
Condition Based Approval Management with Effort
Introduction
- Capital Expenditure Requests: The following flow describes the
capital expenditure request that we are configuring in Effort as part of
this tutorial.

- Farmer Advance Requests (Leaf): The following
flow describes the farmer advance request that we are configuring in
Effort as part of this tutorial.

- Travel Expenses: The following flow describes the travel expense
request that we are configuring in Effort as part of this
tutorial.

This tutorial provides all the activities that need to be performed by different roles involved in the approval workflow using the Effort platform. Here's the list of activities we will be configuring and executing in the Effort as part of this workflow.
- Admin Activities (Configuration of Approval Management Process)
- Create List Masters
- Create Department List
- Create States TE List
- Create Approve | Reject for Approvals List
- Create Leaf Manager Finance Rejection List
- Create Grades List
- Create Mode of Travel Expenses List
- Create Expense Code List
- Create Travel Exp No.of Days List
- Create TE - Image | Doc List
- Create Travel Expenses List
- Create Travel Code List
- Create Travel Code Other List
- Create Travel Expenses Daily Allowances List
- Create Non Marketing Daily Allowance (TE) List
- Creation and Configuration of Forms
- Create Form - WMS Capex - Initiator
- Create Form - Capex - PA
- Create Other Forms for Capex Approval Process
- Create Form - Leaf (Farmer Advance)
- Create Form - Leaf Functional Accountant
- Create Other Forms for Leaf Approval Management
- Create Form - Travel Exp - Initiator
- Create Form - RM Review - TE
- Create Form - L2 Review
- Create Form - Emp GRP 2 - TE
- Create List Masters
- Execute Capital Expenditure Approval Process
- Execute Leaf Approval Process
- Execute Travel Expense Approval Process
Admin Activities (Configuration of Approval Management Process)
In this section, we will walk you through the admin-level activities involved in the configuration of the approval management process. To perform the Admin activities, the users must have access to the App Builder module. Login to Effort as App Builder. Refer to the Sign-in To Effort topic for login.
Employee Configuration
Create Employees
The Employee module enables the creation and management of employees within an organization. Initially, employee data must be created, as the approval management process involves key roles, including the requestor, managers, directors, and so on.
To know more about the employees module, refer to Employees.
In this section, we will create employees who will be involved in the approval management process. To create employees, follow the steps below:
-
Go to .

-
Enter the employee details such as First Name, Last Name, Employee
ID, Email, Mobile Number, and so on.

-
Select the Access Type based on the employee
you want to create.
If you are creating a Field Employee or Field Manager, you can select the Access Types as Mobile App or Employee Web App & Mobile App. For the Admin or Manager employees, you can select the Employee Web App, Configurator & Mobile App option.
-
Click Save.
Note: If you want to create more employees, you can choose the Import feature to create in a single go. To import employees, refer to Import Employees.
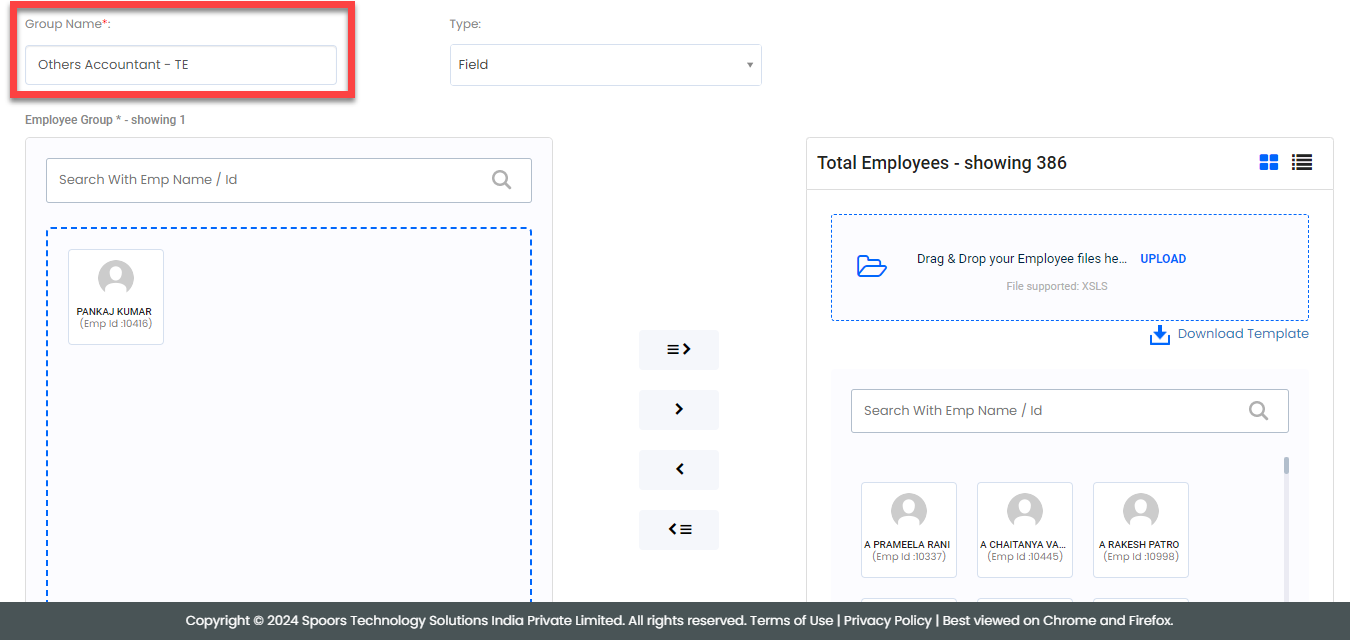
Create Employee Groups
In the approval process, there is often a need to obtain approval from a group of individuals. The Employee Groups feature allows you to categorize employees based on their roles or departments. To configure approval from any member within a designated group, you must first create employee groups. To know more about employee groups, refer to Employee Groups.
In this section, we will create employee groups to streamline the approval process effectively. To create employee groups, follow the steps below:
-
Go to .

-
In the Group Name field, enter the name of
the employee group. Here, we are creating a group for individuals in
the MD role.

-
Under the Total Employees section, you can
find all the employees within your organization. Select the
employees in the MD role and click the left arrow icon to move them
to the selected employees section.

- Click Save.
-
Similarly, create the following employee groups. We'll assign the
approval tasks to these employee groups in the later sections.
- CFO: Create this group for the Chief
Financial Officer (CFO) and include employees who hold the
same role.

- Finance Controller: Create this group
for the finance department and include employees who are
responsible for financial control operations.

- Leaf Accountant: Create this group
for the accounts department and include employees who are
responsible for managing the leaf approval process.

- Production Accountant TE: Create this
group for the accounts department and include employees who
are responsible for managing production operations.

- Others Accountant TE: Create this
group for the accounts department and include employees who
are responsible for managing other operations.
- CFO: Create this group for the Chief
Financial Officer (CFO) and include employees who hold the
same role.
Create List Masters
In this section, we will create the list masters that are used in forms and processes to store the data. The data includes departments, expense codes, states, travel codes, and so on. To know more about Lists, refer to Lists.
Create Department List
In this section, we will create a department list that contains the names of the departments. To create this list, follow the steps below:
-
Go to .

-
In the Title field, enter the title as
Department List.

-
Click Add Field.

-
Under the Identifier column, enable the
checkbox.

-
Under the Field Label column, enter the
label as Department List.

-
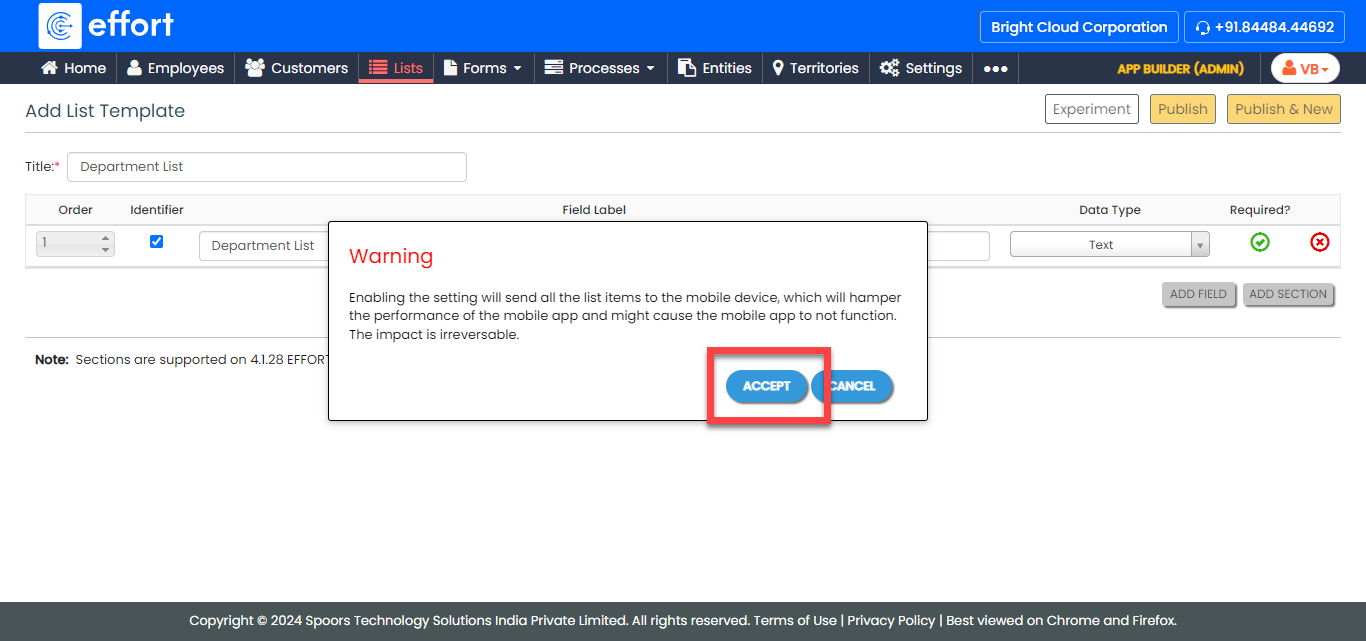
Click Publish and then click
OK in the confirmation pop-up.

-
In the List Scope in Sync pop-up window,
select the Sync all option and click
OK to make all the list items available
to the mobile app users.

-
In the Warning pop-up window, click the
Accept button.
Your Department List is ready. Now you need to add items to it. -
To add department names to the list master, click
Add.

-
In the List No and Department
List fields, enter department names as per your
requirements, such as finance, marketing, etc.

Note: To view the list items that you added, refer to View List Items.Note: To edit the list items that you added, refer to Edit List Item. - Click Save to save your item. Otherwise, click Save & New to save the existing item and add one more new item.
Create States TE List
In this section, we will create a States TE list that contains the names of the states in the country and their GSTIN numbers. To create this list, follow the steps below:
-
Follow the same instructions in the previous section and create the
States TE as shown below.

- Click Publish to save the List master and then select all in the List Scope in Sync pop-up window.
-
The list master creation is completed. Now you need to add items to
this list. As we have 2 fields in this list, it will take more time
if we add items manually. Instead, you can add multiple items to the
list in one go using the Import option. On
the List Actions page, click
Import.

-
Click Download Template. An Excel file is
downloaded.

-
Open the downloaded Excel sheet and fill in the data in the fields.
Once you fill in the data, save the Excel sheet.

-
Go back to the Import List page, click
Choose File, and select the filled Excel
sheet.

-
Click the Import button. Once the import is
completed, refresh the page after a few seconds. You can check the
import status at the bottom of the page.

-
To view the imported list items, go to .
Note: To view the list items that you added, refer to View List Items.Note: To edit the list items that you added, refer to Edit List Item.
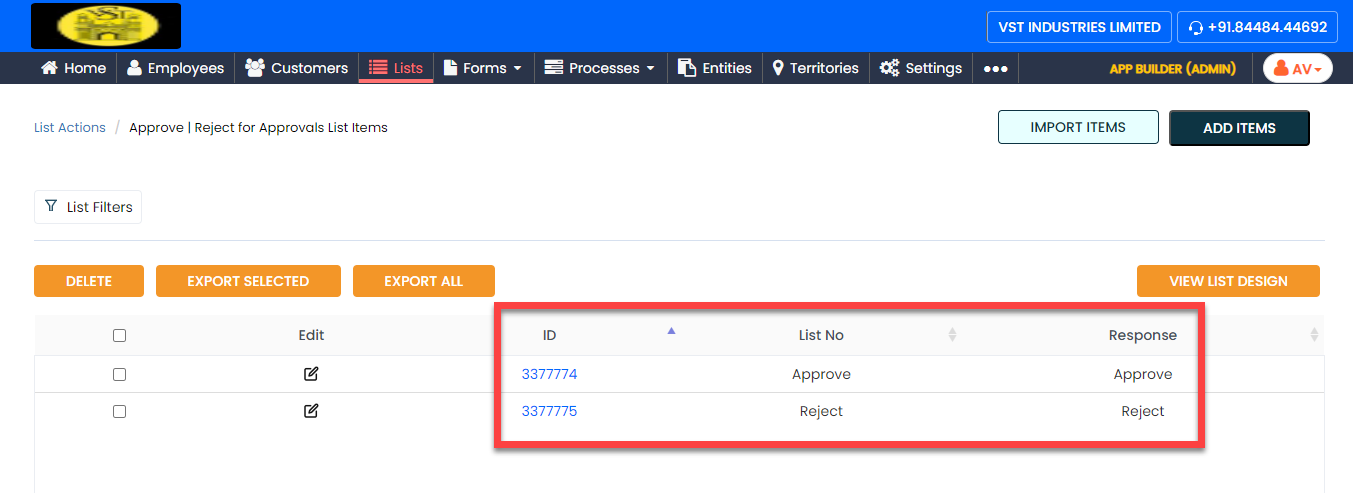
Create Approve | Reject for Approvals List
Till now, we have created Department and States TE list masters and added items to them. Now you are familiar with creating lists and adding items using import and manually.
In this section, we will create a list master that contains the approve or reject options. To create this list, follow the steps below:
-
Create the Approve | Reject for Approvals
list master as shown in the following screenshot.

-
Now add the items to the list. You can either use the
Import option or follow the manual
process to add the items at your convenience.
Note: To add the list items, refer to Add an Item to List.Note: To import the list items, refer to Import List Items.Note: To edit the list items that you added, refer to Edit List Item.
Create Leaf Department List
In this section, we will create a list master for the leaf department. To create this list, follow the steps below:
-
Create the Leaf - Department list master as
shown in the following screenshot.

-
Now add the items to the list as per your requirement. You can
either use the Import option or follow the
manual process to add the items at your convenience.

Note: To add the list items, refer to Add an Item to List.Note: To import the list items, refer to Import List Items.Note: To edit the list items that you added, refer to Edit List Item.
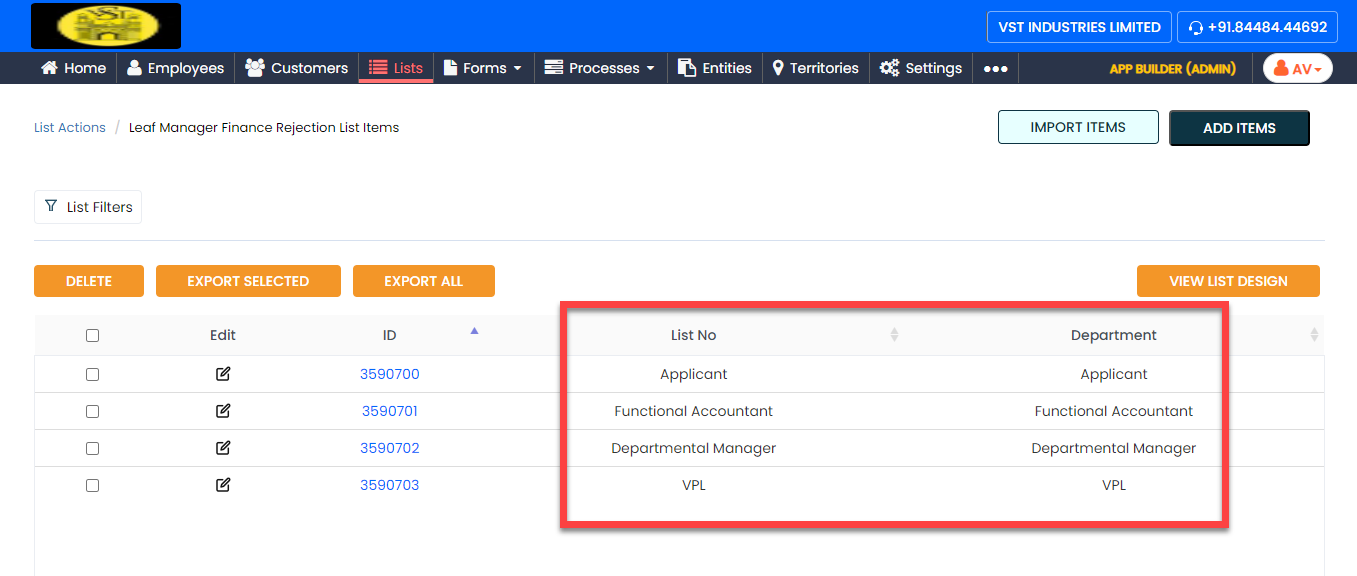
Create Leaf Manager Finance Rejection List
In this section, we will create another list master for the leaf department called Leaf Manager Finance Rejection. To create this list, follow the steps below:
-
Create the Leaf Manager Finance Rejection
list master as shown in the following screenshot.

-
Now add the items to the list as per your requirement. You can
either use the Import option or follow the
manual process to add the items at your convenience.
Note: To add the list items, refer to Add an Item to List.Note: To import the list items, refer to Import List Items.Note: To edit the list items that you added, refer to Edit List Item.
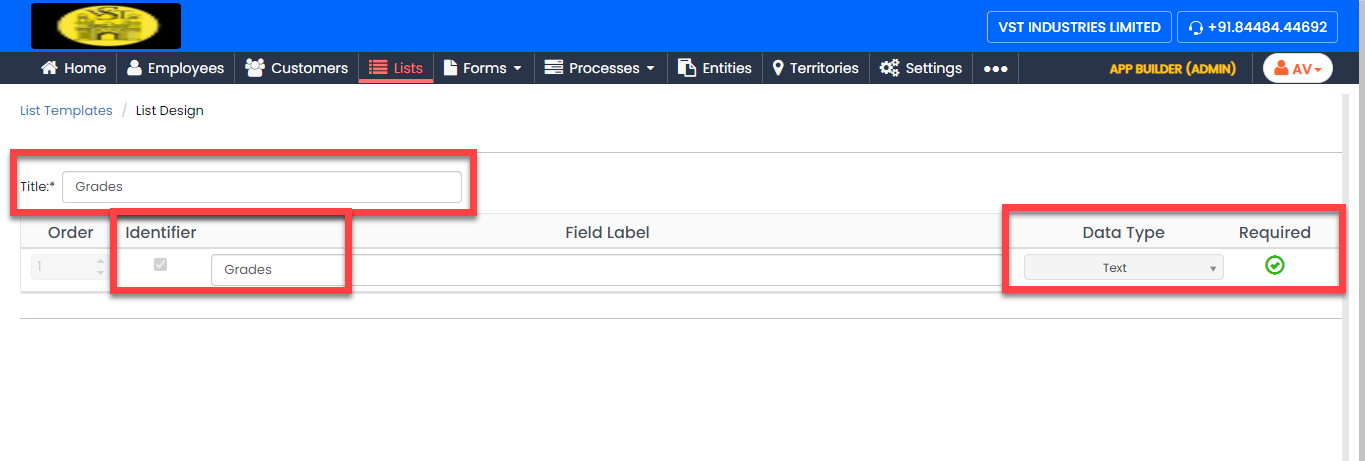
Create Grades List
In this section, we will create a list master called Grades. We'll use this list master in the activity forms. To create this list, follow the steps below:
-
Create the Grades list master as shown in
the following screenshot.
-
Now add the items to the list as per your requirement. You can
either use the Import option or follow the
manual process to add the items at your convenience.

Note: To add the list items, refer to Add an Item to List.Note: To edit the list items that you added, refer to Edit List Item.Note: To import the list items, refer to Import List Items.
Create Mode of Travel Expenses List
In this section, we will create a list master called Mode of Travel Expenses to define the different modes of travel. We'll use this list master in the activity forms. To create this list, follow the steps below:
-
Create the Mode of Travel Expenses list
master as shown in the following screenshot.

-
Now add the items to the list as per your requirement. You can
either use the Import option or follow the
manual process to add the items at your convenience.

Note: To add the list items, refer to Add an Item to List.Note: To edit the list items that you added, refer to Edit List Item.Note: To import the list items, refer to Import List Items.
Create Expense Code List
In this section, we will create a list master called Expense Code to define a unique code for all the different types of expenses. We'll use this list master in the activity forms. To create this list, follow the steps below:
-
Create the Expense Code list master as shown
in the following screenshot.

-
Now add the items to the list as per your requirement. You can
either use the Import option or follow the
manual process to add the items at your convenience.

Note: To add the list items, refer to Add an Item to List.Note: To import the list items, refer to Import List Items.Note: To edit the list items that you added, refer to Edit List Item.
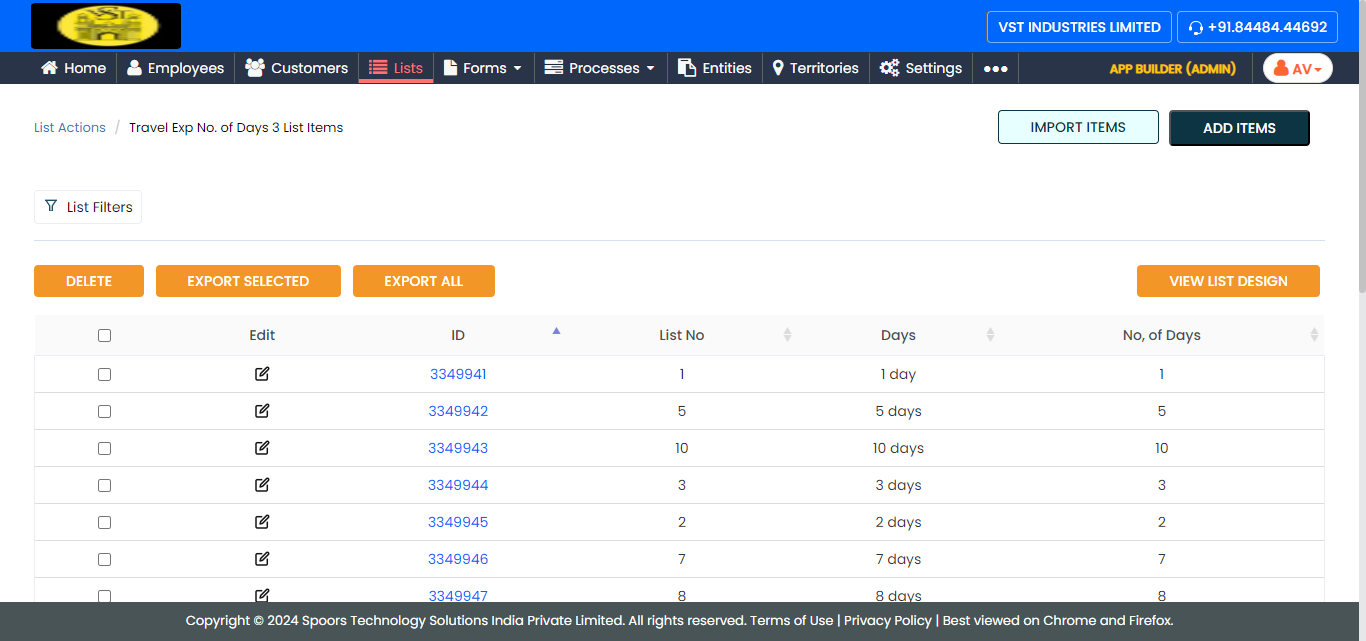
Create Travel Exp No.of Days List
In this section, we will create a list master called Travel Exp No.of Days to define a number of days. We'll use this list master in the activity forms. To create this list, follow the steps below:
-
Create the Travel Exp No.of Days list master
as shown in the following screenshot.

-
Now add the items to the list as per your requirement. You can
either use the Import option or follow the
manual process to add the items at your convenience.
Note: To add the list items, refer to Add an Item to List.Note: To import the list items, refer to Import List Items.Note: To edit the list items that you added, refer to Edit List Item.
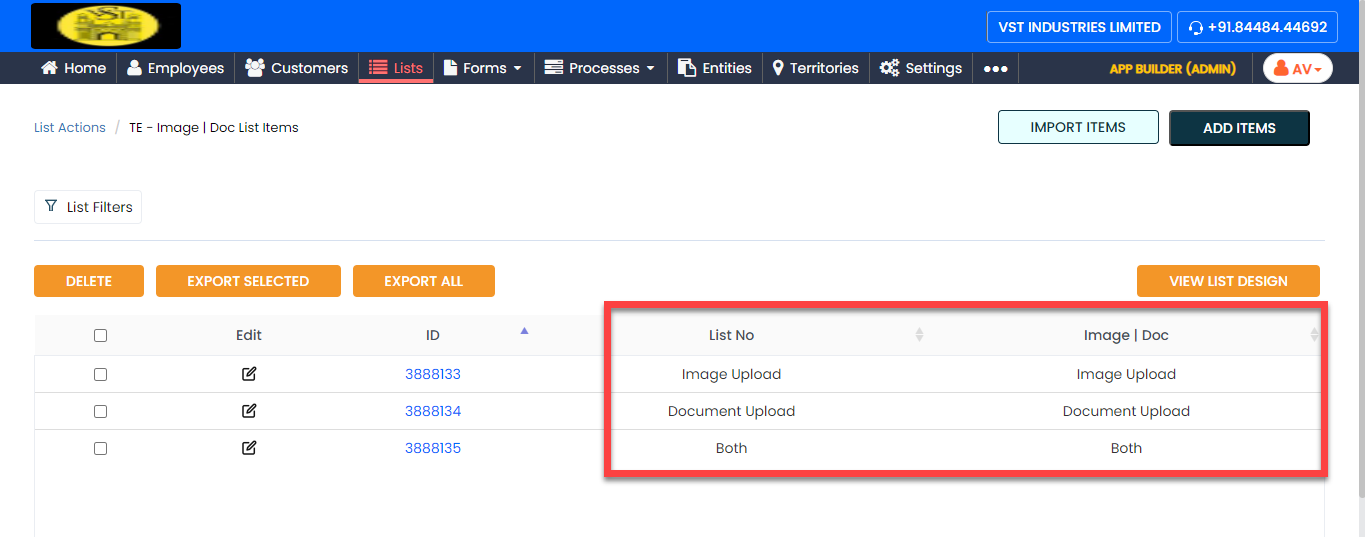
Create TE - Image | Doc List
In this section, we will create a list master called TE - Image | Doc to define the uploaded document type for travel expenses. We'll use this list master in the activity forms. To create this list, follow the steps below:
-
Create the TE - Image | Doc list master as
shown in the following screenshot.

-
Now add the items to the list as per your requirement. You can
either use the Import option or follow the
manual process to add the items at your convenience.
Note: To add the list items, refer to Add an Item to List.Note: To import the list items, refer to Import List Items.Note: To edit the list items that you added, refer to Edit List Item.
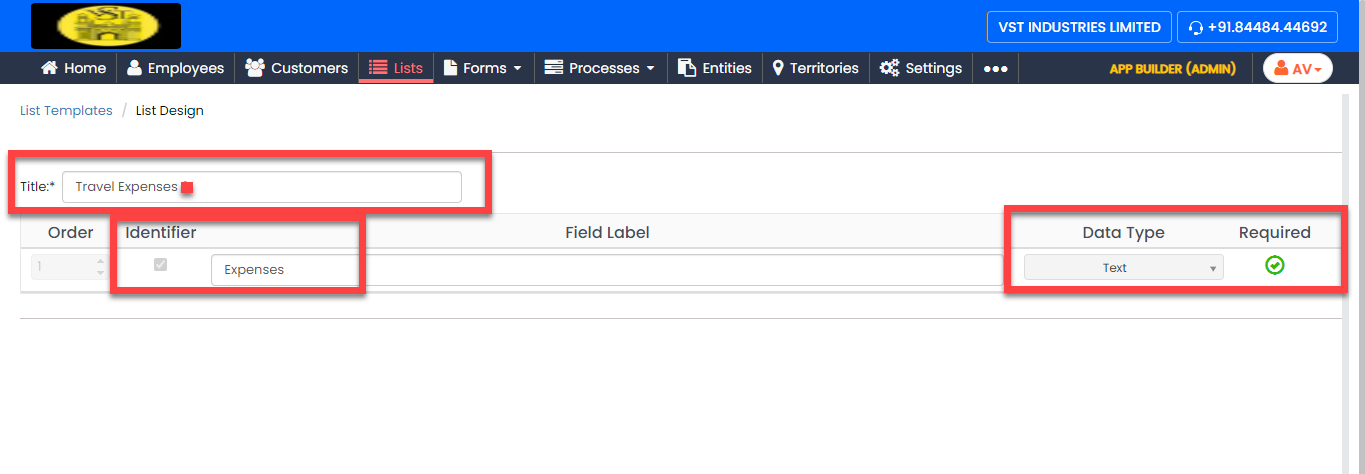
Create Travel Expenses List
In this section, we will create a list master called Travel Expenses to define different expenses for travel. We'll use this list master in the activity forms. To create this list, follow the steps below:
-
Create the Travel Expenses list master as
shown in the following screenshot.
-
Now add the items to the list as per your requirement. You can
either use the Import option or follow the
manual process to add the items at your convenience.

Note: To add the list items, refer to Add an Item to List.Note: To import the list items, refer to Import List Items.Note: To edit the list items that you added, refer to Edit List Item.
Create Travel Code List
In this section, we will create a list master called Travel Code to define different codes for travel. We'll use this list master in the activity forms. To create this list, follow the steps below:
-
Create the Travel Code list master as shown
in the following screenshot.

-
Now add the items to the list as per your requirement. You can
either use the Import option or follow the
manual process to add the items at your convenience.

Note: To add the list items, refer to Add an Item to List.Note: To import the list items, refer to Import List Items.Note: To edit the list items that you added, refer to Edit List Item.
Create Travel Code Other List
In this section, we will create a list master called Travel Code Other to define other codes for travel. We'll use this list master in the activity forms. To create this list, follow the steps below:
-
Create the Travel Code Other list master as
shown in the following screenshot.

-
Now add the items to the list as per your requirement. You can
either use the Import option or follow the
manual process to add the items at your convenience.

Note: To add the list items, refer to Add an Item to List.Note: To import the list items, refer to Import List Items.Note: To edit the list items that you added, refer to Edit List Item.
Create Travel Expenses Daily Allowances List
In this section, we will create a list master called Travel Expenses Daily Allowances to define daily allowances for travel expenses. We'll use this list master in the activity forms. To create this list, follow the steps below:
-
Create the Travel Expenses Daily Allowances
list master as shown in the following screenshot.
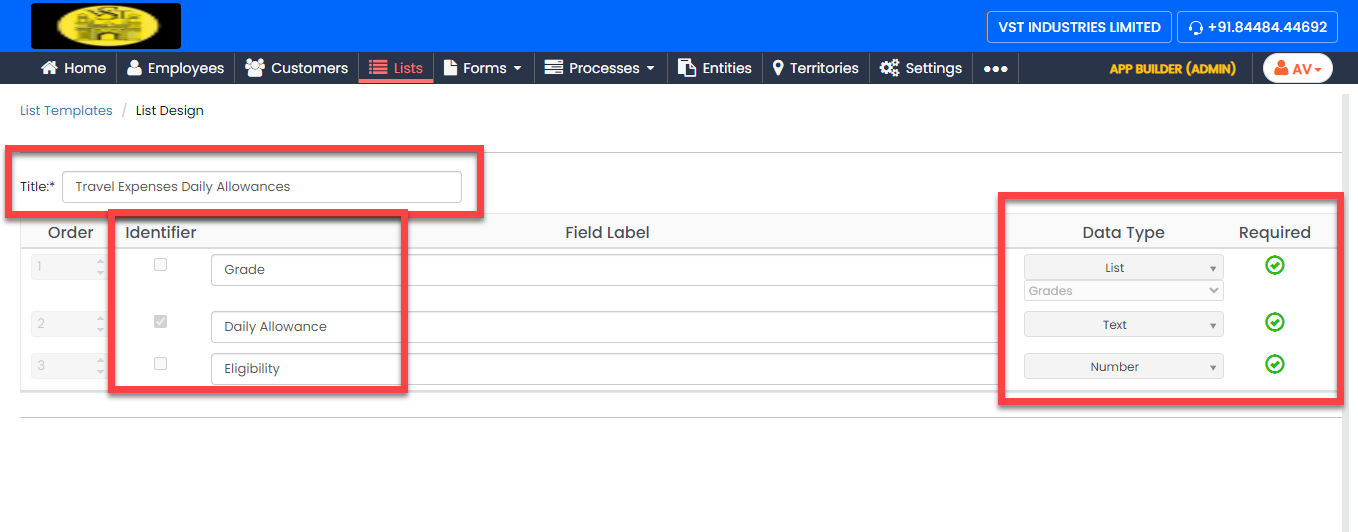
-
Now add the items to the list as per your requirement. You can
either use the Import option or follow the
manual process to add the items at your convenience.

Note: To add the list items, refer to Add an Item to List.Note: To import the list items, refer to Import List Items.Note: To edit the list items that you added, refer to Edit List Item.
Create Non Marketing Daily Allowance (TE) List
In this section, we will create a list master called Non-Marketing Daily Allowance (TE) to define daily allowances for nonmarketing travel expanses. We'll use this list master in the activity forms. To create this list, follow the steps below:
-
Create the Non Marketing Daily Allowance
(TE) list master as shown in the following
screenshot.

-
Now add the items to the list as per your requirement. You can
either use the Import option or follow the
manual process to add the items at your convenience.

Note: To add the list items, refer to Add an Item to List.Note: To import the list items, refer to Import List Items.Note: To edit the list items that you added, refer to Edit List Item.
Creation and Configuration of Forms
In this section, we will create the forms that are required for managing the approvals. The forms include a capital expenditure, a request for travel expanses, an approval form, and more. Here, we will walk you through the form creation steps, required fields, field-level configurations, and form-level configurations for all the forms. To know more about the forms, refer to Forms.
Create Form - WMS Capex - Initiator
The WMS Capex - Initiator form is used for initiating WMS capital expenditure requests. To create this form, follow the steps below:
-
Go to .
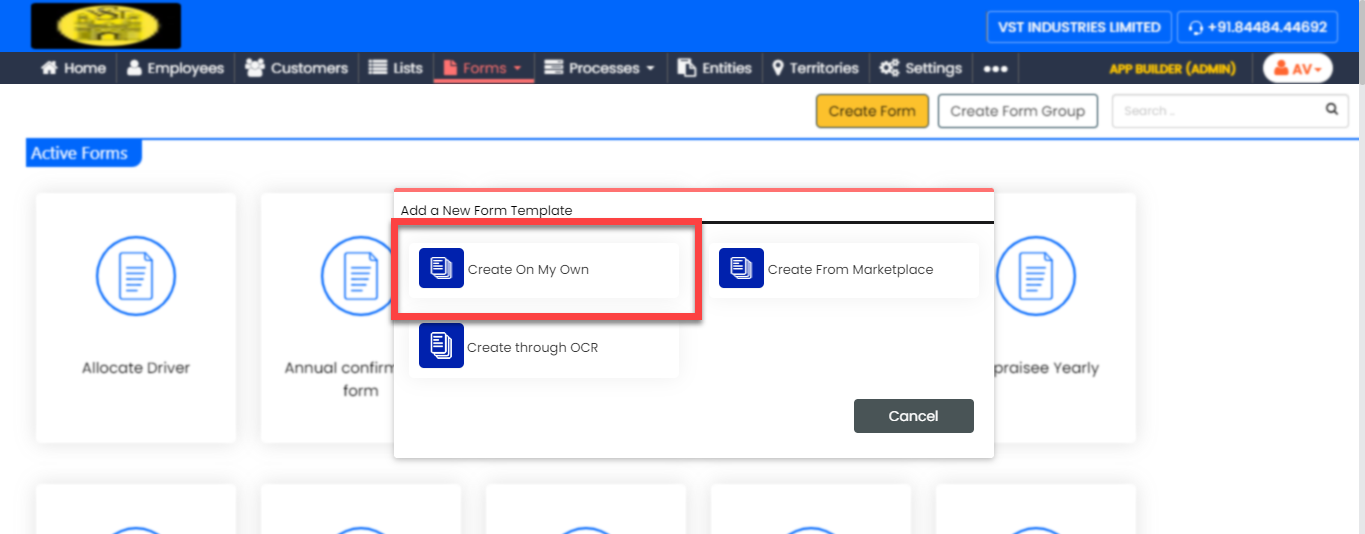
-
In the Title field, enter the title as
WMS Capex - Initiator.

-
Drag and drop the following data types onto the field canvas and
label them as shown below.
Data Type Label Text Requisition No. Date Date Text Capex Description Number Capex Amount (In Lakhs) Text Competitive Quotations (If Any) Text Counter party recommended & Reasons Fields Group Economics of Proposal Fields Group Group Pick List Department Employee Applicant Text Responsibility Text Work Begins Text Work Ends Dropdown Budgetary Sanction details To be confirmed by Finance Fields Group In Case of Replacement Rich Text Format Justification Note Multi Document 1. Comparative Statement Multi Document 2. Quotations Multi Document 3. Workings To know more about all the data types, refer to the following topics. -
Click the Date field and configure it as
default to today's date when clicked.
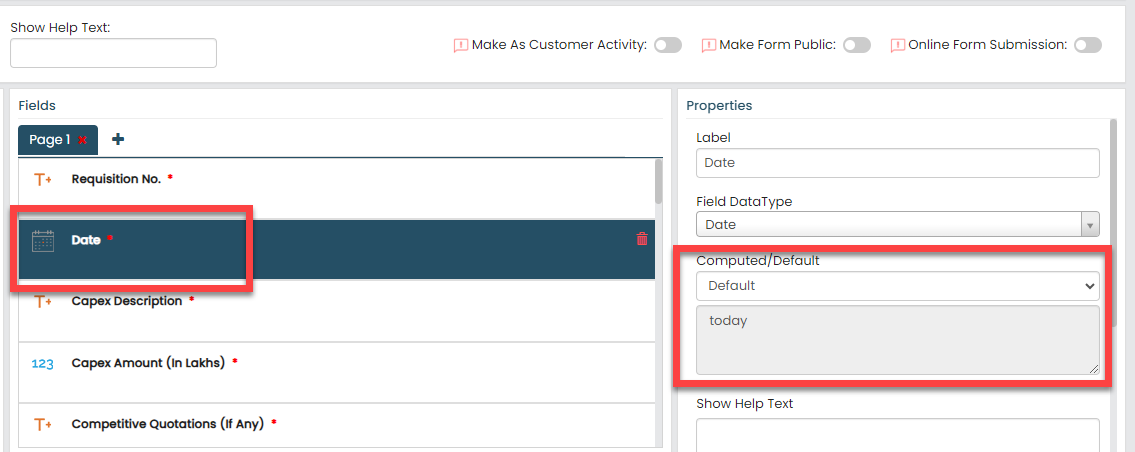
To know more about Computed/Default fields, refer to Field Properties.
-
Click the Fields Group field labeled as
Economics of Proposal, and drag and drop
the following data types onto the field canvas. Then, appropriately
label them as shown below.

Data Type Label Text Terms of Payment Text Escalation Clause Text Present value of Cash Flow Text Performance Guarantees (If any) -
Under the Economics of Proposal fields
group, uncheck the Required Field option for
the following fields in the Properties
section to make them optional fields when submitting the form.

- Escalation Clause
- Present value of Cash Flow
- Performance Guarantees (If any)
-
Click the Fields Group field labeled as
Group, and drag and drop the following
data types onto the field canvas. Then, appropriately label them as
shown below.

Data Type Label Text Net present value Text Internal Rate of Return Text Pay back Period -
Under the Group fields group, uncheck the
Required Field option for the following
fields in the Properties section to make them
optional fields when submitting the form.

- Net present value
- Internal Rate of Return
- Pay back Period
-
Click the Pick List field labeled as
Department and select
Department List from the
List dropdown.

-
Click the Dropdown field labeled as
Budgetary Sanction details To be confirmed by
Finance and add the following options in the
Add Values field. Then, uncheck the
Required Field option to make it optional
when submitting the form.
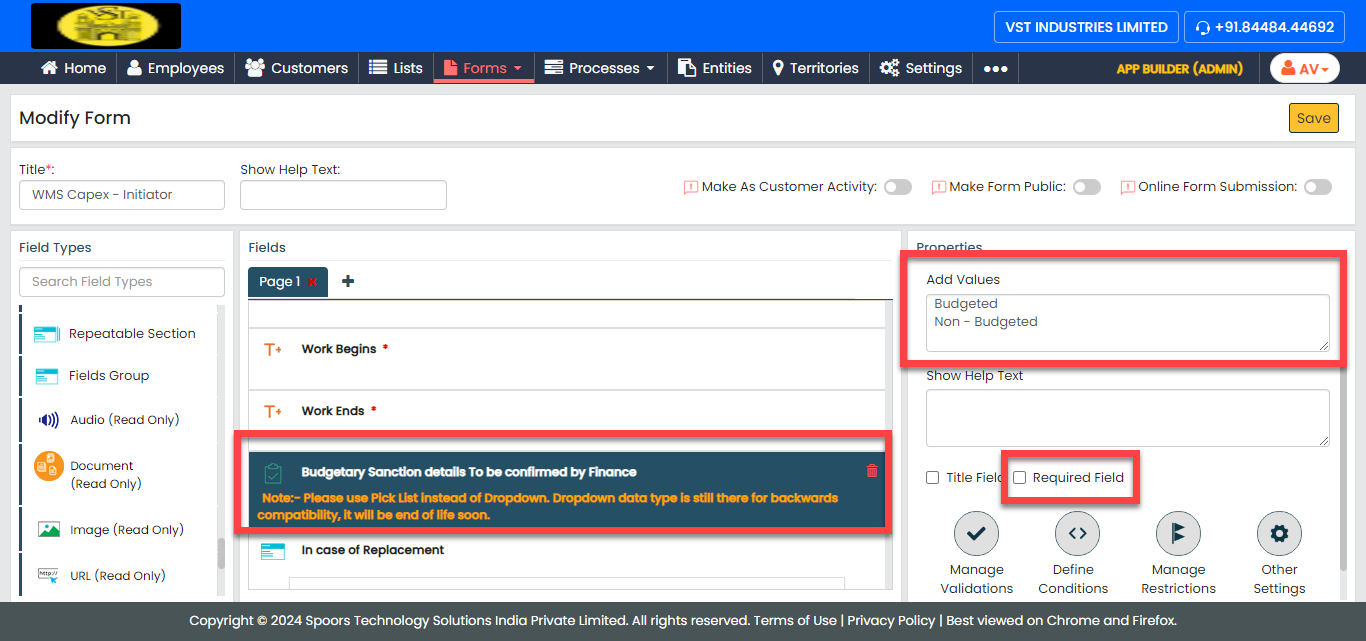
- Budgeted
- Non - Budgeted
-
Click the Fields Group field labeled as
In case of Replacement, and drag and drop
the following data types onto the field canvas. Then, appropriately
label them as shown below.

Data Type Label Text Asset Number Text Market value if any (Quotations to be enclosed) Text Book Value -
Under the In case of Replacement fields
group, uncheck the Required Field option for
the following fields in the Properties
section to make them optional fields when submitting the form.
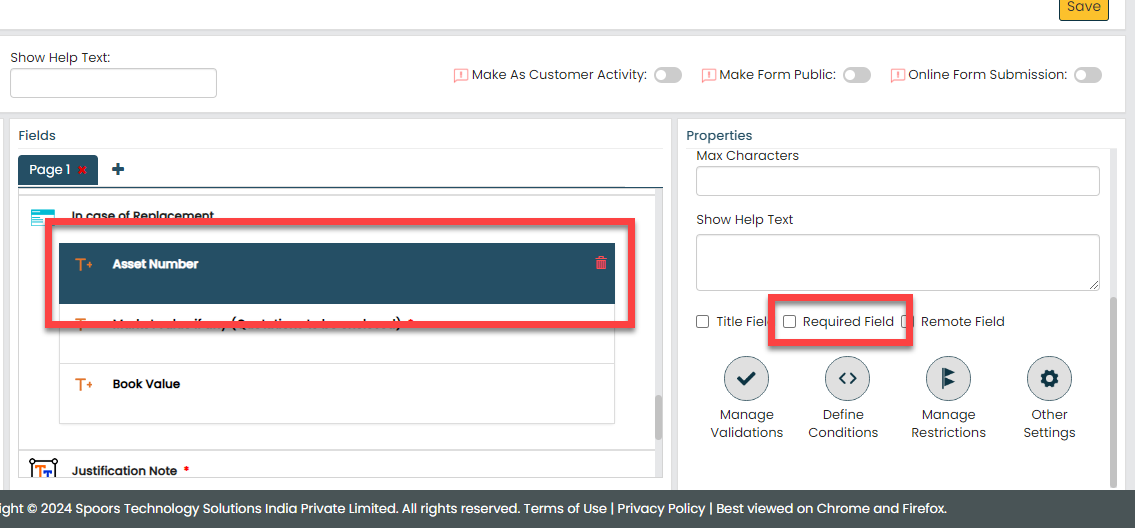
- Asset Number
- Book Value
-
Uncheck the Required Field option in the
Properties section to make them optional
fields for the following fields when submitting the form.

- 1. Comparative Statement
- 2. Quotations
- 3. Workings
-
Now click Publish and then click
OK to make it available to the employees.
You are done with your first form creation.
Note: To know more about all the publishing options, refer to Publishing Options.
Create Form - Capex - PA
The Capex - PA form is used by the immediate managers of the initiator to capture their notes and approve the WMS capital expenditure requests. To create this form, follow the steps below:
-
Go to .
-
In the Title field, enter the title as
Capex - PA.

-
Add the same fields that we added in the WMS Capex -
Initiator form and configure them as mentioned in the previous topic.

-
Additionally, add the following data types and label them as shown
below:

Data Type Label Pick List Approval of PA Text Remarks -
Click the Pick List field labeled as
Approval of PA, and select
Approve | Reject for Approvals from the
List dropdown.

Create Other Forms for Capex Approval Process
- L1: This form is used by the L1 approver
of the capital expenditure request to capture notes and approval
status.

- L2: This form is used by the L2 approver
of the capital expenditure request to capture notes and approval
status.

- L3: This form is used by the L3 approver
of the capital expenditure request to capture notes and approval
status.

- L4: This form is used by the L4 approver
of the capital expenditure request to capture notes and approval
status.

- L5: This form is used by the L5 approver
of the capital expenditure request to capture notes and approval
status.

- Static: This form is used by the static
level 1 approver of the capital expenditure request to capture
notes and approval status.

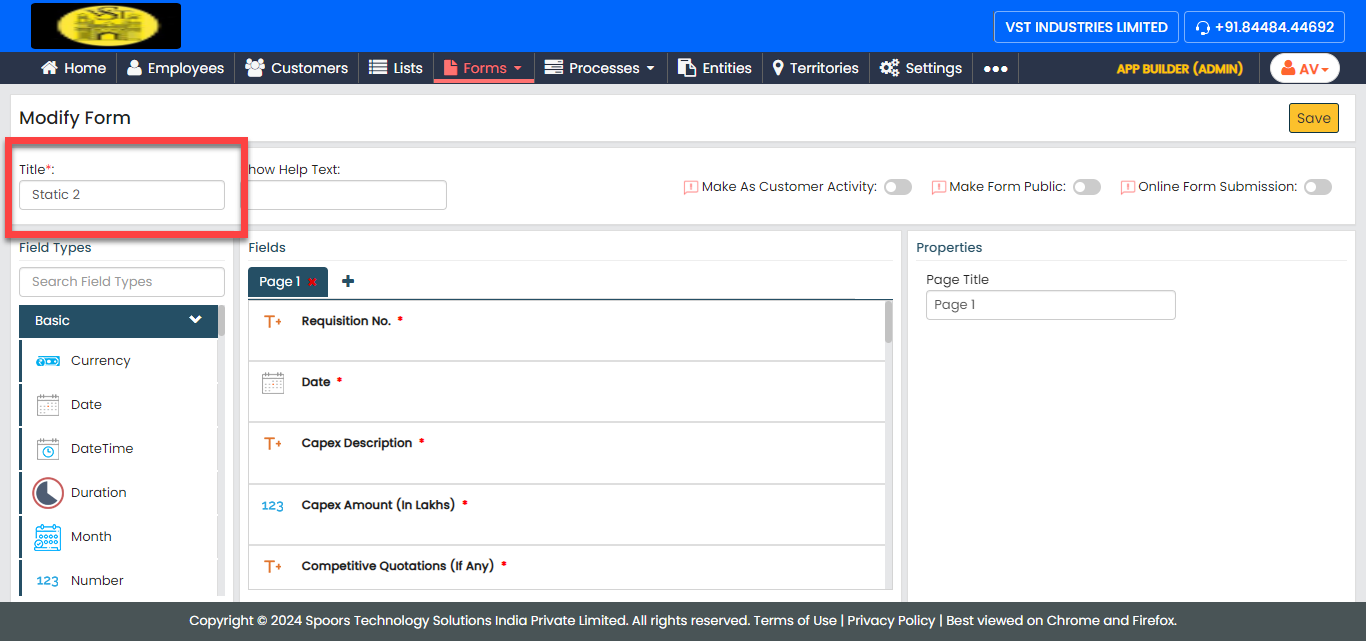
- Static 2: This form is used by the static
level 2 approver of the capital expenditure request to capture
notes and approval status.
- Static 3: This form is used by the static
level 3 approver of the capital expenditure request to capture
notes and approval status.

- Static 4: This form is used by the static
level 4 approver of the capital expenditure request to capture
notes and approval status.

Create Form - Leaf (Farmer Advance)
The Leaf (Farmer Advance) form is used for initiating farmer advance requests. To create this form, follow the steps below:
-
Go to .
-
In the Title field, enter the title as
Leaf (Farmer Advance).

-
Drag and drop the following data types onto the field canvas and
label them as shown below.
Data Type Label Text Requisition No. Date Date Pick List Department Text Nature of Sanction Text Description Date Effective Date Date Previous Increase Dt Number Impact in current year (In Lakhs) Rich Text Format Justification & Content Repeatable Section Attachments Text Remarks To know more about all the data types, refer to the following topics. -
Under the Properties section, uncheck the
Required Field option for the following
fields to make them optional when submitting the form.

- Requisition No.
- Description
- Effective Date
- Previous Increase Dt
- Remarks
-
Click the Pick List field labeled as
Department, and select the
Leaf - Department list from the List
dropdown under the Properties dropdown.

-
Click the Repeatable Section field labeled
as Attachments, and do the following.
-
Click the repeatable section field and define the
Minimum Entries to 0 and
Maximum Entries to
12.

-
Drag and drop the following data types onto the field
canvas. Then, appropriately label them as shown below.

Data Type Label Text Document Name Multi Document Attach Document
-
Click the repeatable section field and define the
Minimum Entries to 0 and
Maximum Entries to
12.
-
Now click Publish and then click
OK to make it available to the
employees.
Note: To know more about all the publishing options, refer to Publishing Options.
Create Form - Leaf Functional Accountant
The Leaf Functional Accountant form is used by the accountant of the leaf department to approve the leaf farmer advance requests. To create this form, follow the steps below:
-
Go to .
-
In the Title field, enter the title as
Leaf Functional Accountant.

-
Add the same fields that we added in the Leaf (Farmer
Advance) form and configure them as mentioned in the previous topic.

-
Additionally, add the Pick List data type,
label it as Approval, and then select
Approve | Reject for Approvals from the
List dropdown.

Create Other Forms for Leaf Approval Management
- Leaf Departmental Manager: This form is
used by the leaf department manager to capture notes and
approval status.

- Leaf VPL: This form is used by the vice
president (VP) of the leaf department to capture notes and
approval status.

- Leaf Manager Finance: This form is used
by the manager of the leaf finance department to capture notes
and approval status.

- Leaf Finance Controller: This form is
used by the controller of the Leaf Finance Department to capture
notes and approval status.

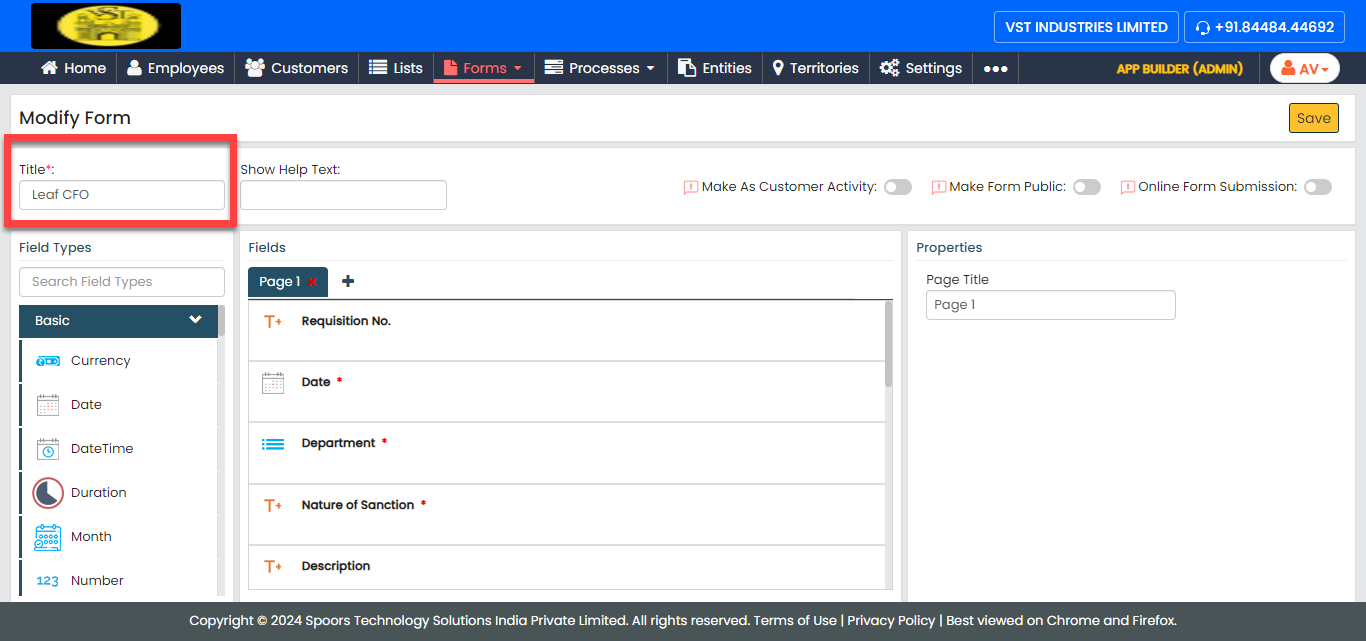
- Leaf CFO: This form is used by the chief
finance officer (CFO) to capture notes and approval
status.
- Leaf MD: This form is used by the chief
finance officer (CFO) to capture notes and approval
status.

Create Form - Travel Exp - Initiator
The Travel Exp - Initiator form is used for initiating travel expenditure requests. To create this form, follow the steps below:
-
Go to .
-
In the Title field, enter the title as
Travel Exp - Initiator.

-
Drag and drop the following data types onto the field canvas and
label them as shown below.
Data Type Label Employee Employee Text P No. Text Head Quarters Text Circle Pick List Grade Number Cost Centre Code Repeatable Section Hotel (or) CTE Number Total of Food & Hotel Expenses (Including Tax) Number Total of Food & Hotel Expenses (Excluding Tax) Repeatable Section Travel Expenses Number Total Amount for (Air (or) Train (or) Bus) Number Total Amount for (Taxi Fare) Number Total Amount for (Auto Fare) Number Total of Travel Expenses Repeatable Section Other Expenses Number Total of Other Expenses Repeatable Section Daily Allowances Number Total of Daily Expenses Repeatable Section Daily Allowances | Mileage Number Total Exp of Mileage Number Total Exp of Daily Expenses Repeatable Section Mileage Number Total of Mileage Number Total of Daily Allowances (M, L & NM) Number Incidentals Eligibility Per Day Number Total Incidentals of the tour Number Expenses Amount Number Expenses of the CTE Number Total Tax Amount Number Exceeded Amount Number Total Expenses of the Tour Number Total Expenses of the Tour by Excluding Tax Number To Word Total (Rupees Only) To know more about all the data types, refer to the following topics. -
Click the P No. field and do the
following.
-
Under the Properties section, make
the field a Computed field.
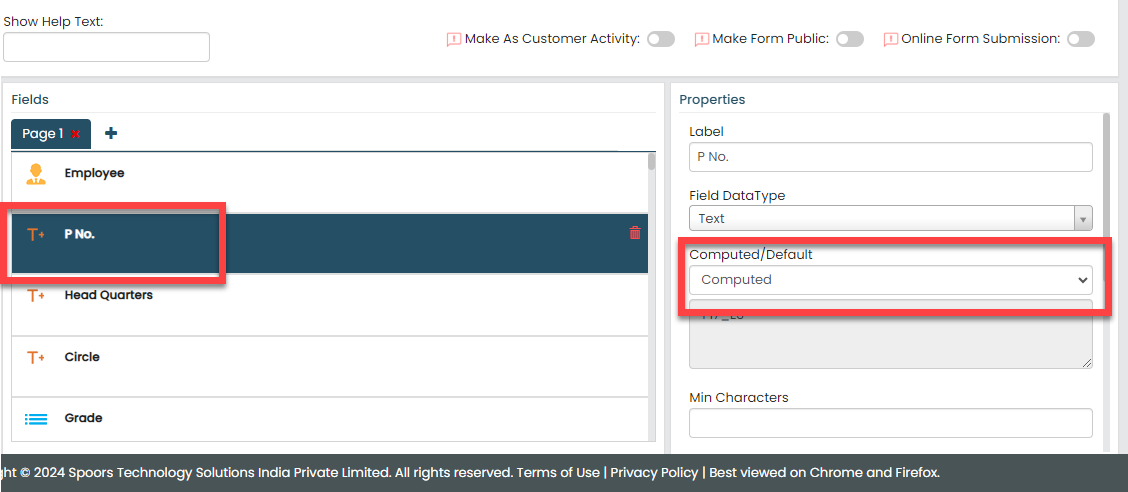
-
Click the grey box under the
Computed field, click the
Employee ID field located on the
left side to populate it on the formula editor, and then
click Done.

According to this configuration, the employee ID will be retrieved from the employee data and automatically populated in the field when you select the employee from the Employee field.
-
Under the Properties section, make
the field a Computed field.
-
Click the Head Quarters field and do the
following.
-
Under the Properties section, make
the field a Computed field.

-
Click the grey box under the
Computed field, click the
Employee_Cost Centre Name field
located on the left side to populate it on the formula
editor, and then click Done.

According to this configuration, the employee cost center (headquarter) will be retrieved from the employee data and automatically populated in the field when you select the employee from the Employee field.
-
Under the Properties section, make
the field a Computed field.
-
Click the Circle field and do the
following.
-
Under the Properties section, make
the field a Computed field.

-
Click the grey box under the
Computed field, click the
Employee_Location field located
on the left side to populate it on the formula editor, and
then click Done.
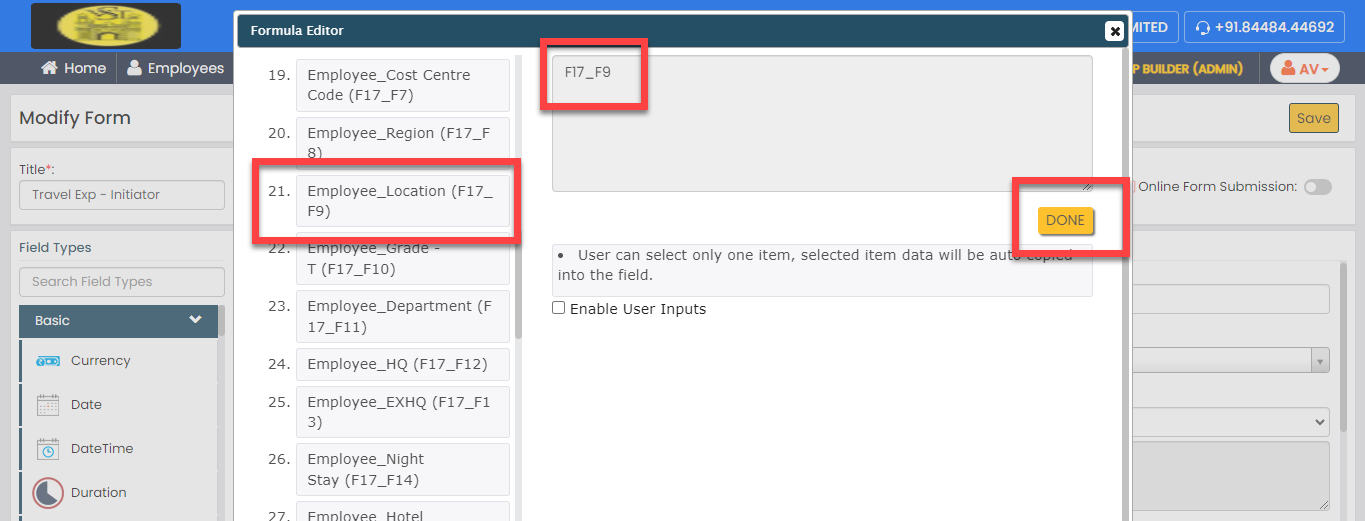
According to this configuration, the employee location will be retrieved from the employee data and automatically populated in the field when you select the employee from the Employee field.
-
Under the Properties section, make
the field a Computed field.
-
Click the Grade field and do the
following.
-
Under the Properties section, select
Grades from the
List dropdown.

-
Make the field a Computed
field.

-
Click the grey box under the
Computed field, click the
Employee_Grades field located on
the left side to populate it on the formula editor, and then
click Done.
According to this configuration, the employee grade will be retrieved from the Grades list and automatically populated in the field.
-
Under the Properties section, select
Grades from the
List dropdown.
-
Click the Cost Centre Code field and do the
following.
-
Under the Properties section, make
the field a Computed field.

-
Click the grey box under the
Computed field, click the
filledBy_Cost Centre Code field
located on the left side to populate it on the formula
editor, and then click Done.

According to this configuration, the employee cost center code will be retrieved from the employee data of the individual initiating this request and automatically populated in the field.
-
Under the Properties section, make
the field a Computed field.
-
Click the Repeatable Section field labeled
as Hotel (or) CTE and do the following.
-
Under the Properties section,
configure the Minimum Entries to
0 and Maximum Entries to
50.

-
Select the following checkboxes to allow instance
collapsing and users to generate instances as per their
requirements.
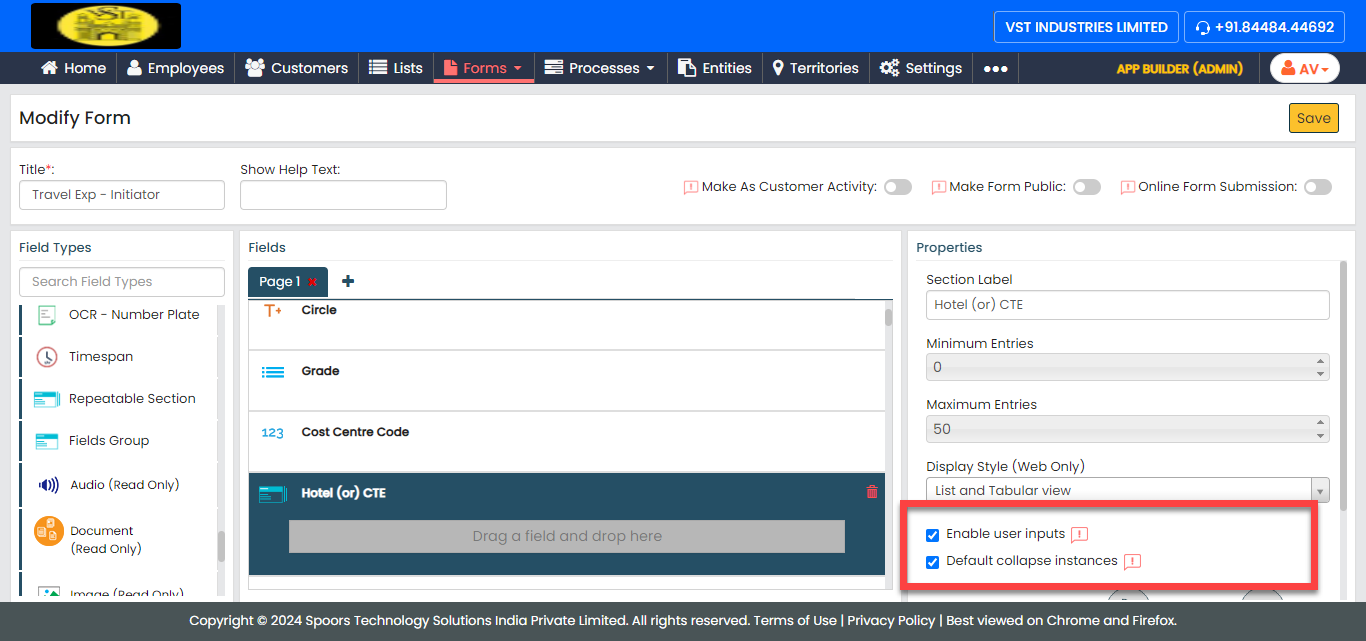
-
For the Nature of Expense field,
select Expense Code from the
List dropdown.

-
For the Metro | Non Metro field, add
the following values in the Add
Values field.

- Metro
- Non Metro
-
For the GL Code field, make it as
computed field and configure as shown below.

-
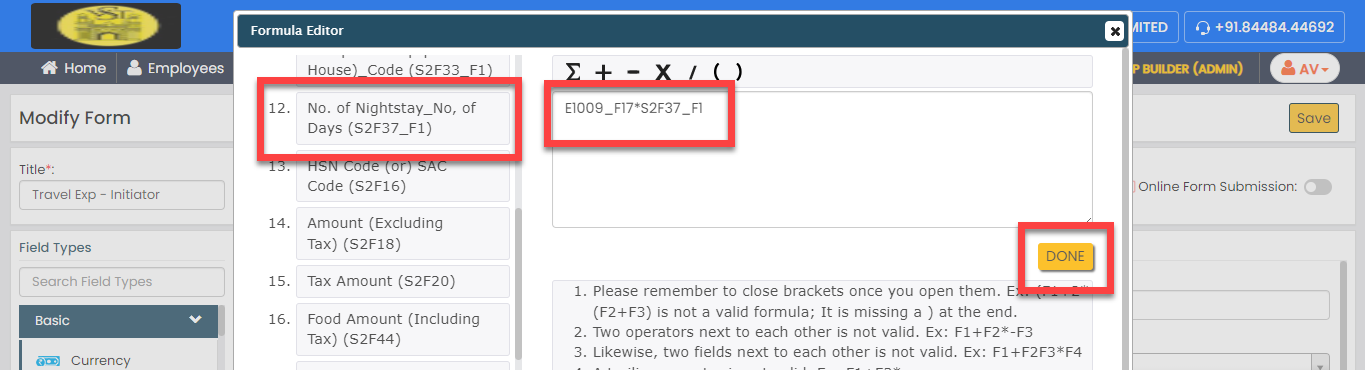
For the No. of Night stay field,
make it as computed field and configure as shown
below.

This formula helps you to calculate the duration between the From Date and To Date. The time span between the two fields will be automatically populated in the field. -
For the No. of Nightstay field,
select Travel Exp No. of Days from
the List dropdown.

-
Click Define Conditions, click
Add Criteria under the
Filter Based on Values in Other
Fields section, define the condition as
shown below, and then click OK.

According to this configuration, the options in the list are filtered, and the number of days is populated automatically.
-
For the State field, select
States TE from the
List dropdown.

-
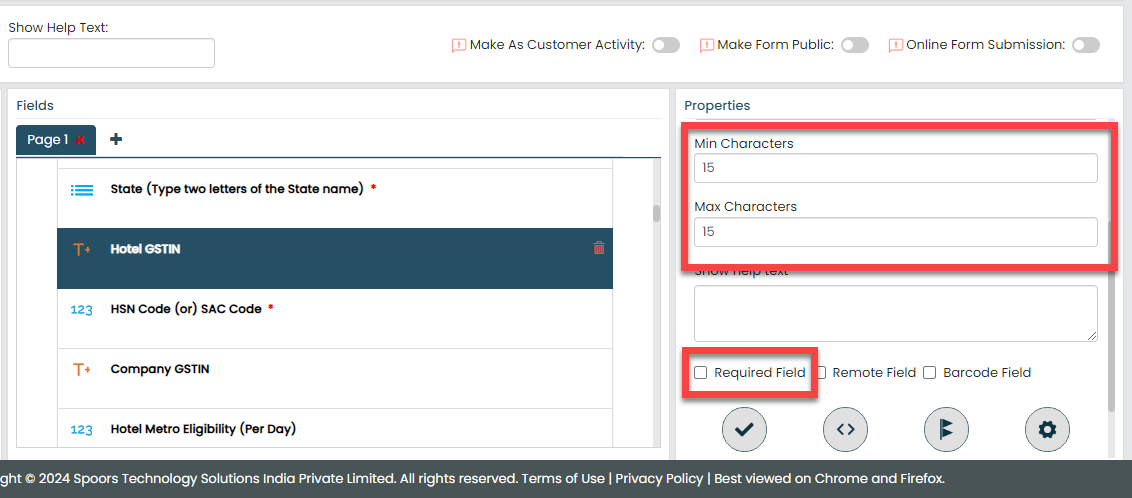
For the Hotel GSTIN field, uncheck
the Required Field option to make it
optional, and set the Min Characters
and Max Characters to
15.
-
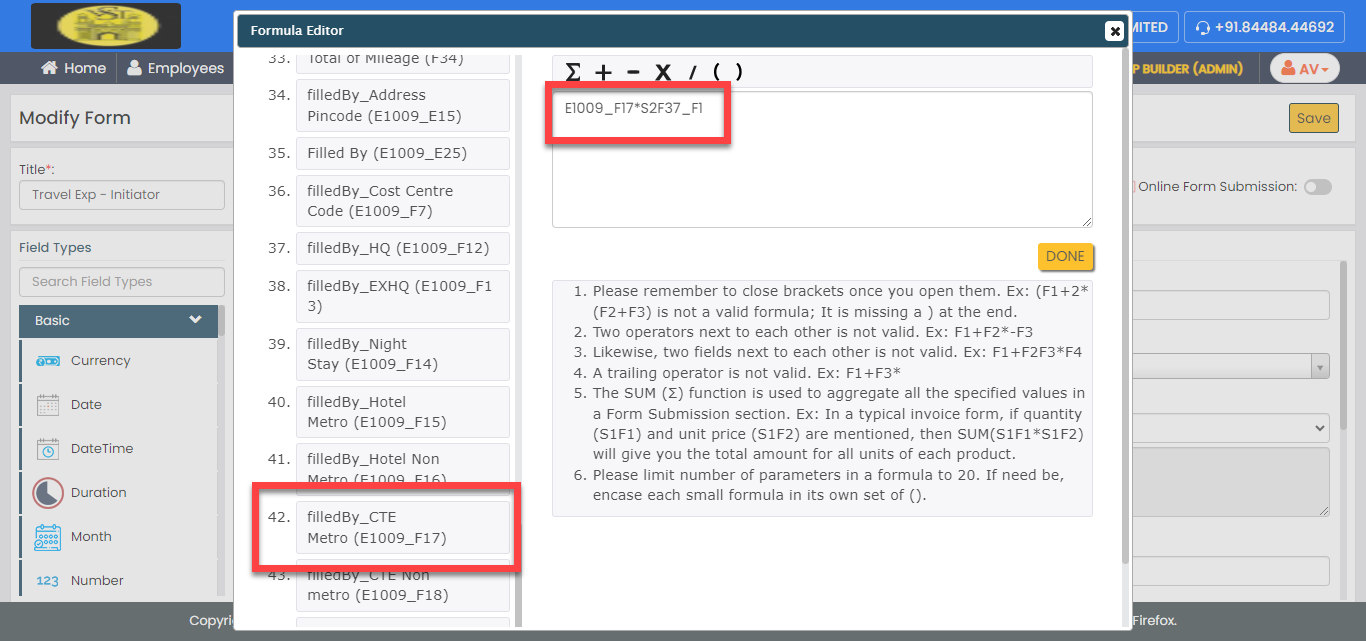
For the Hotel Metro Eligibility (Per
Day) field, make it as computed, define the
formula as shown below, and then click
Done.

-
For the Company GSTIN field, make it
as computed, define the formula as shown below, and then
click Done.

-
For the CTE Metro Eligibility (Per
Day) field, make it as computed, define the
formula as shown below, and then click
Done.

-
For the CTE Non Metro Eligibility (Per
Day) field, make it as computed, define the
formula as shown below, and then click
Done.

-
For the Amount (Including Tax)
field, make it as computed, define the formula as shown
below, and then click Done.

This formula helps you to calculate the values in the fields such as Amount, Tax Amount, and Food Amount. The total value will be automatically populated in the field. -
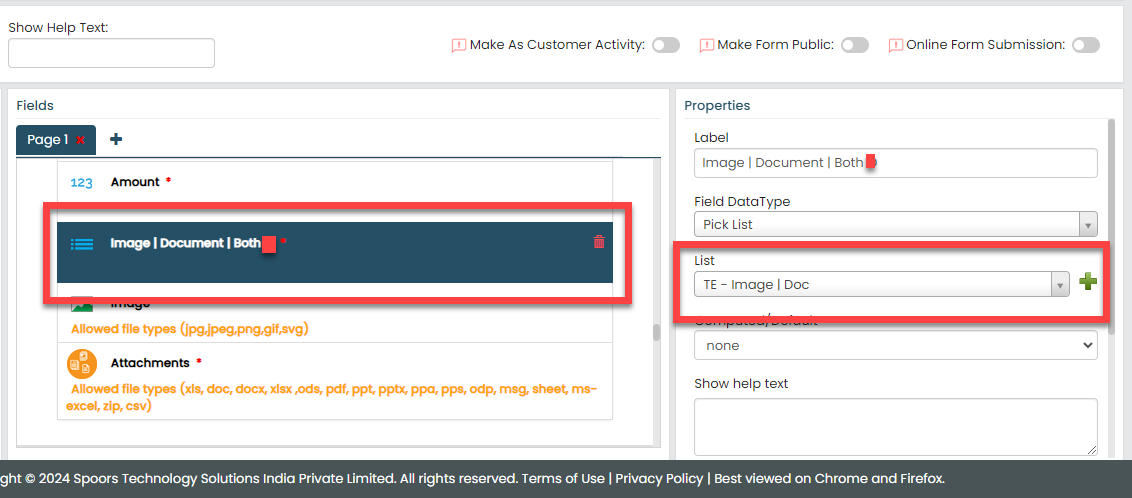
For the Image | Document | Both
field, select TE - Image | Doc from
the List dropdown.

-
For the Overall Eligibility Hotel
Metro field, make it as computed, define the
formula as shown below, and then click
Done.


Here, we are multiplying the value of Hotel Metro by the number of days to obtain the overall eligibility.
-
For the Overall Eligibility Non Hotel
Metro field, make it as computed, define the
formula as shown below, and then click
Done.


Here, we are multiplying the value of Hotel Non Metro by the number of days to obtain the overall eligibility.
-
For the Overall Eligibility CTE
Metro field, make it as computed, define the
formula as shown below, and then click
Done.
Here, we are multiplying the value of CTE Metro by the number of days to obtain the overall eligibility.
-
For the Overall Eligibility CTE Non
Metro field, make it as computed, define the
formula as shown below, and then click
Done.


Here, we are multiplying the value of CTE Non Metro by the number of days to obtain the overall eligibility.
-
Under the Properties section,
configure the Minimum Entries to
0 and Maximum Entries to
50.
-
For the Total of Food & Hotel Expenses (Including
Tax) field, make it as computed, define the formula
as shown below, and then click Done.

Here, we are calculating all the amounts to obtain the total food and hotel expenses including tax.
-
For the Total of Food & Hotel Expenses (Excluding
Tax) field, make it as computed, define the formula
as shown below, and then click Done.

Here, we are calculating all the amounts to obtain the total food and hotel expenses excluding tax.
-
Click the Repeatable Section field labeled
as Travel Expenses and do the
following.
-
Under the Properties section,
configure the Minimum Entries to
0 and Maximum Entries to
50.

-
Select the following checkboxes to allow instance
collapsing and users to generate instances as per their
requirements.

-
For the Travel Expenses field,
select Travel Code from the
List dropdown.

-
For the GL Code field, make it as
computed, define the formula as shown below, and then click
Done.

-
For the Mode of Travel field, add
the following values in the Add
Values field.
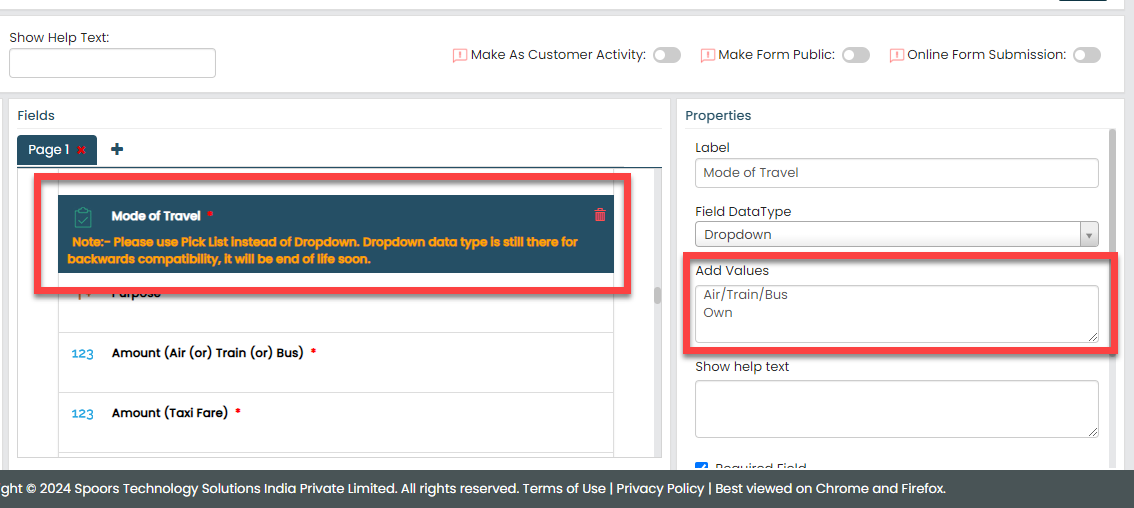
- Air/Train/Bus
- Own
-
For the Image | Document | Both
field, select TE - Image | Doc from
the List dropdown.

-
Under the Properties section,
configure the Minimum Entries to
0 and Maximum Entries to
50.
-
For the Total Amount for (Air (or) Train (or)
Bus) field, make it as computed, define the formula
as shown below, and then click Done.

This formula calculates the amounts of all instances and automatically populates the total amount.
-
For the Total Amount for (Taxi Fare) field,
make it as computed, define the formula as shown below, and then
click Done.

This formula calculates the taxi fares of all instances and automatically populates the total amount.
-
For the Total Amount for (Auto Fare) field,
make it as computed, define the formula as shown below, and then
click Done.

This formula calculates the auto fares of all instances and automatically populates the total amount.
-
For the Total of Travel Expenses field, make
it as computed, define the formula as shown below, and then click
Done.

This formula calculates all the total amounts (travel, auto, taxi) and automatically populates the total amount.
-
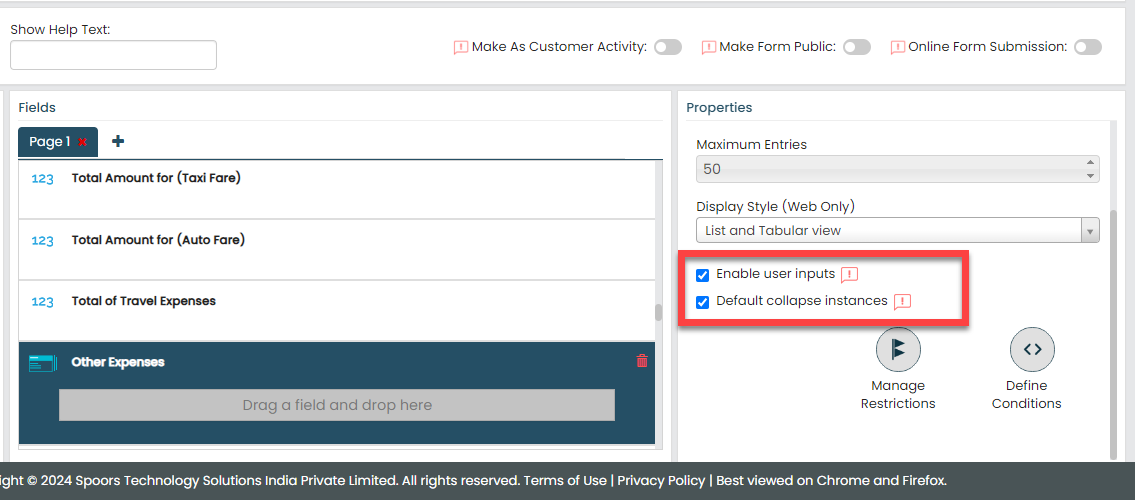
Click the Repeatable Section field labeled
as Other Expenses and do the following.
-
Under the Properties section,
configure the Minimum Entries to
0 and Maximum Entries to
50.

-
Select the following checkboxes to allow instance
collapsing and users to generate instances as per their
requirements.
-
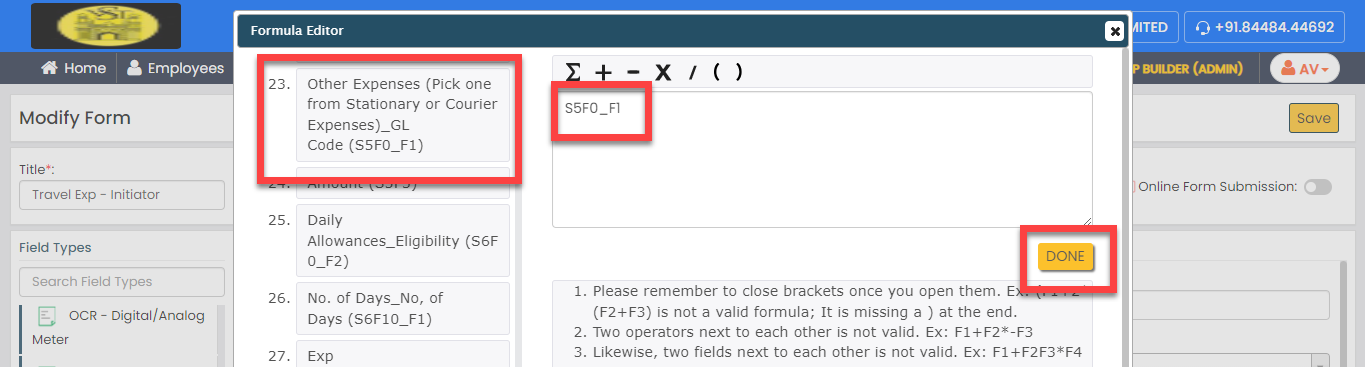
For the Other Expenses field, select
Travel Code from the
List dropdown.

-
For the GL Code field, make it as
computed, define the formula as shown below, and then click
Done.
-
For the Image | Document | Both
field, select TE - Image | Doc from
the List dropdown.
-
Under the Properties section,
configure the Minimum Entries to
0 and Maximum Entries to
50.
-
For the Total of Other Expenses field, make
it as computed, define the formula as shown below, and then click
Done.

This formula calculates the other amounts of all instances and automatically populates the total amount.
-
Click the Repeatable Section field labeled
as Daily Allowances and do the
following.
-
Under the Properties section,
configure the Minimum Entries to
0 and Maximum Entries to
100.

-
Select the following checkboxes to allow instance
collapsing and users to generate instances as per their
requirements.

-
For the Nature of Expense field,
select Travel Expanses Daily
Allowances from the
List dropdown.

-
For the Nature of Expense field,
click Define Conditions, click
Add Criteria under the
Filter Based on Values in Other
Fields section, define the condition as
shown below, and then click OK.

According to this configuration, the options in the list are filtered, and the expense nature is populated automatically.
-
For the No. of Days field, make it
as computed field and configure as shown below.

This formula helps you to calculate the duration between the From Date and To Date. The timespan between the two fields will be automatically populated in the field. -
For the No. of Days field, select
Travel Exp No. of Days from the
List dropdown.

-
For the No. of Days field, click
Define Conditions, click
Add Criteria under the
Filter Based on Values in Other
Fields section, define the condition as
shown below, and then click OK.

According to this configuration, the options in the list are filtered, and the number of days is populated automatically.
-
For the Amount field, make it as
computed, define the formula as shown below, and then click
Done.

Here, we are multiplying the value of daily allowance by the number of days to obtain the total amount.
-
Under the Properties section,
configure the Minimum Entries to
0 and Maximum Entries to
100.
-
For the Total of Daily Expenses field, make
it as computed, define the formula as shown below, and then click
Done.

This formula calculates the daily allowances of all instances and automatically populates the total amount.
-
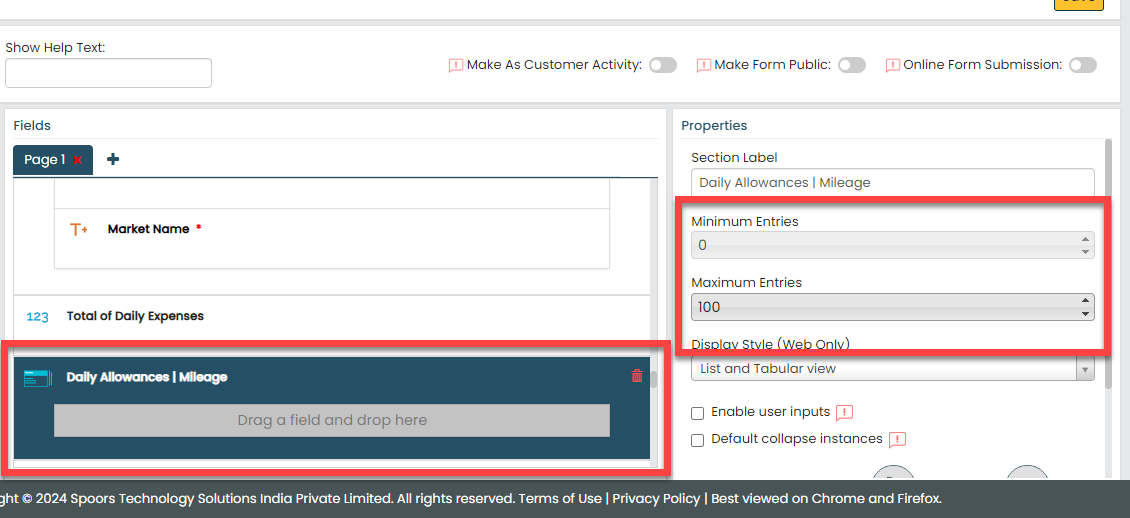
Click the Repeatable Section field labeled
as Daily Allowances | Mileage and do the
following.
-
Under the Properties section,
configure the Minimum Entries to
0 and Maximum Entries to
100.
-
Select the following checkboxes to allow instance
collapsing and users to generate instances as per their
requirements.

-
For the Exp Description field,
select Travel Expanses Daily Allowances
Leaf from the List
dropdown.

-
For the Exp Description field, click
Define Conditions, click
Add Criteria under the
Filter Based on Values in Other
Fields section, define the condition as
shown below, and then click OK.

-
For the No. of Days field, make it
as computed field and configure as shown below.
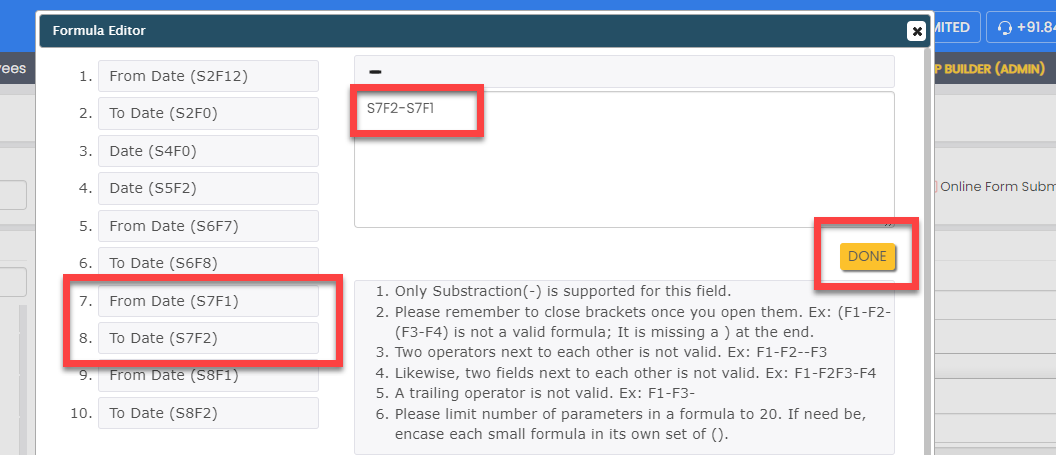
This formula helps you to calculate the duration between the From Date and To Date. The timespan between the two fields will be automatically populated in the field. -
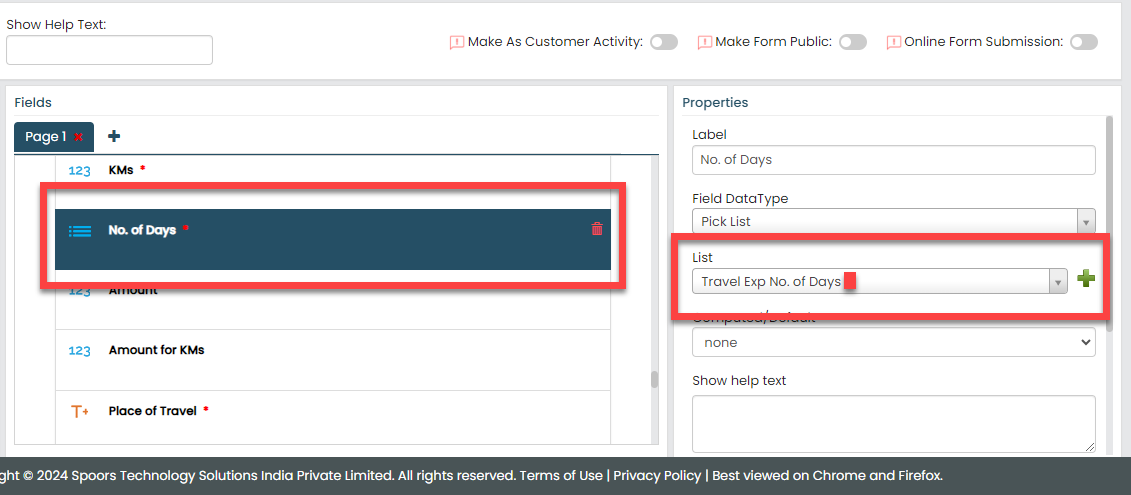
For the No. of Days field, select
Travel Exp No. of Days from the
List dropdown.
-
For the No. of Days field, click
Define Conditions, click
Add Criteria under the
Filter Based on Values in Other
Fields section, define the condition as
shown below, and then click OK.

According to this configuration, the options in the list are filtered, and the number of days is populated automatically.
-
For the Amount field, make it as
computed, define the formula as shown below, and then click
Done.

Here, we are multiplying the value of eligibility by the number of days to obtain the total amount.
-
For the Amount for KMs field, make
it as computed, define the formula as shown below, and then
click Done.

Here, we are multiplying the value of eligibility by the kms to obtain the total amount.
-
Under the Properties section,
configure the Minimum Entries to
0 and Maximum Entries to
100.
-
For the Total Exp of Mileage field, make it
as computed, define the formula as the sum of all the amounts, and
then click Done.

This formula calculates the amounts of all instances and automatically populates the total amount.
-
For the Total Exp of Daily Expenses field,
make it as computed, define the formula as the sum of all the
amounts for kms, and then click Done.

This formula calculates the amounts of all instances and automatically populates the total amount.
-
Click the Repeatable Section field labeled
as Mileage and do the following.
-
Under the Properties section,
configure the Minimum Entries to
0 and Maximum Entries to
100.

-
Select the following checkboxes to allow instance
collapsing and users to generate instances as per their
requirements.

-
For the Mileage field, select
Non Marketing Daily Allowance
(TE) from the List
dropdown.

-
For the Mileage field, click
Define Conditions, click
Add Criteria under the
Filter Based on Values in Other
Fields section, define the condition as
shown below, and then click OK.

-
For the No. of Days field, make it
as computed field, and configure as shown below.

This formula helps you to calculate the duration between the From Date and To Date. The timespan between the two fields will be automatically populated in the field. -
For the No. of Days field, select
Travel Exp No. of Days from the
List dropdown.

-
For the No. of Days field, click
Define Conditions, click
Add Criteria under the
Filter Based on Values in Other
Fields section, define the condition as
shown below, and then click OK.

According to this configuration, the options in the list are filtered, and the number of days is populated automatically.
-
Under the Properties section,
configure the Minimum Entries to
0 and Maximum Entries to
100.
-
For the Total of Mileage field, make it as
computed, define the formula as shown below, and then click
Done.

-
For the Total of Daily Allowances (M, L &
NM) field, make it as computed, define the formula
as shown below, and then click Done.

Here, we are calculating all the allowances.
-
For the Incidentals Eligibility Per Day
field, make it as computed, define the formula as shown below, and
then click Done.

-
For the Total Incidentals of the tour field,
make it as computed, define the formula as shown below, and then
click Done.

Here, we are multiplying no. of days with Incidentals Eligibility Per Day.
-
For the Expenses Amount field, make it as
computed, define the formula as shown below, and then click
Done.

Here, we are calculating all the allowances.
-
For the Expenses of the CTE field, make it
as computed, define the formula as shown below, and then click
Done.

Here, we are calculating the Total Incidentals of the tour with Expenses Amount.
-
For the Total Tax Amount field, make it as
computed, define the formula as shown below, and then click
Done.

Here, we are calculating all the taxes.
-
For the Exceeded Amount field, make it as
computed, define the formula as shown below, and then click
Done.

Here, we have defined the formula to calculate the excess amount.
-
For the Total Expenses of the Tour field,
make it as computed, define the formula to calculate the total
expense, and then click Done.

-
For the Total Expenses of the Tour by Excluding
Tax field, make it as computed, define the formula
to calculate total expense excluding tax, and then click
Done.

-
For the Total (Rupees Only) field, define
the formula as shown below, and then click
Done.

F39 represents the value in the Total Expenses of the Tour by Excluding Tax field. -
Now click Publish and then click
OK to make it available to the
employees.
Note: To know more about all the publishing options, refer to Publishing Options.
Create Form - RM Review - TE
The RM Review form is used by the regional managers of the initiator to capture their notes and approve the travel expense requests. To create this form, follow the steps below:
-
Go to .
-
In the Title field, enter the title as
RM Review - TE.

-
Drag and drop the following data types onto the field canvas and
label them as shown below.
Data Type Label Employee Employee Text P No. Text Head Quarters Text Circle Pick List Grade Date From Date Date To Date Number Cost Centre Code Number Total of Food & Hotel Expenses (Including Tax) Number Total of Food & Hotel Expenses (Excluding Tax) Number Total of Travel Expenses Number Total of Other Expenses Number Total Daily Expenses Number Total Exp of Mileage Number Total Exp of Daily Expenses Number Total of Mileage Number Incidentals Eligibility Per Day Number Total Incidentals of the tour Number Total Expenses of the Tour Number Exceeded Amount Pick List Approval Text Remarks (If Any) -
Under the Properties section, uncheck the
Required Field option for the following
fields to make them optional when submitting the form.

- Total of Food & Hotel Expenses (Including Tax)
- Total of Travel Expenses
- Total of Other Expenses
- Total Daily Expenses
- Total Exp of Mileage
- Total Exp of Daily Expenses
- Total of Mileage
- Incidentals Eligibility Per Day
- Total Incidentals of the tour
- Remarks (If Any)
-
Click the Pick List field labeled as
Grade, and select the
Grades list from the
List dropdown under the
Properties dropdown.

-
Click the Pick List field labeled as
Approval, and select the
Approve | Reject for Approvals list from
the List dropdown under the
Properties dropdown.

-
Now click Publish and then click
OK to make it available to the
employees.
Note: To know more about all the publishing options, refer to Publishing Options.
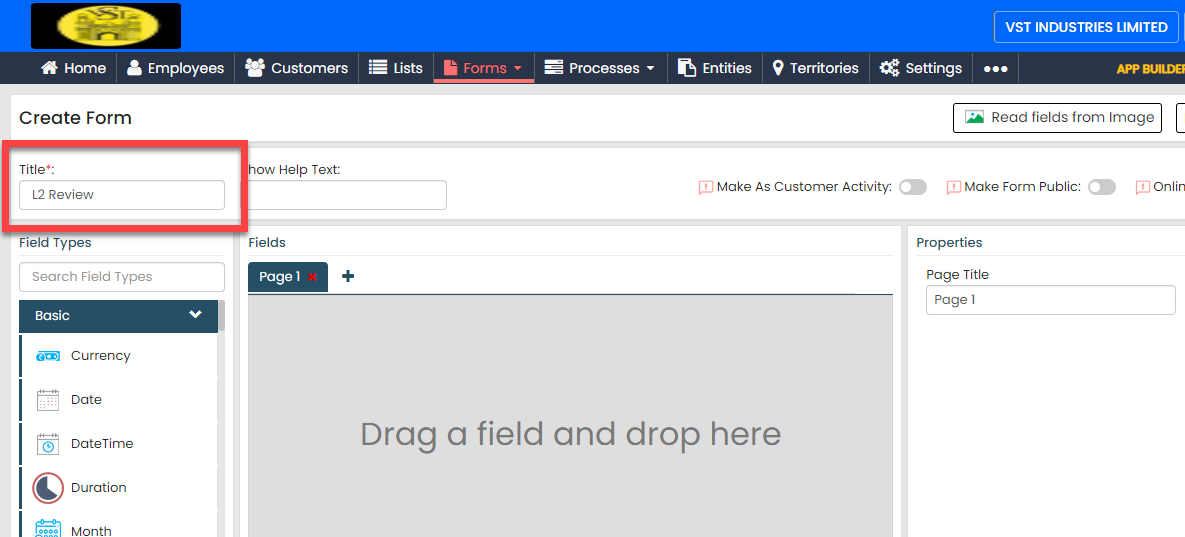
Create Form - L2 Review
The L2 Review form is used by the second level reviewers of the travel expense request to capture their notes and approve the travel expense requests. To create this form, follow the steps below:
-
Go to .
-
In the Title field, enter the title as
L2 Review.
-
Drag and drop the following data types onto the field canvas and
label them as shown below.
Data Type Label Employee Employee Text P No. Text Head Quarters Text Circle Pick List Grade Date From Date Date To Date Number Cost Centre Code Number Total of Food & Hotel Expenses (Including Tax) Number Total of Travel Expenses Number Total Incidentals of the tour Number Total Expenses of the Tour Number Excess Amount Pick List Approval Text Remarks (If Any) -
Click the Pick List field labeled as
Grade, and select the
Grades list from the
List dropdown under the
Properties dropdown.
-
Click the Pick List field labeled as
Approval, and select the
Approve | Reject for Approvals list from
the List dropdown under the
Properties dropdown.

-
Now click Publish and then click
OK to make it available to the
employees.
Note: To know more about all the publishing options, refer to Publishing Options.
Create Form - Emp GRP 2 - TE
The Emp GRP 2 - TE form is used to capture their notes and approve the travel expense requests. To create this form, follow the steps below:
-
Go to .
-
In the Title field, enter the title as
Emp GRP 2 - TE.
-
Drag and drop the following data types onto the field canvas and
label them as shown below.
Data Type Label Employee Employee Text P No. Text Head Quarters Text Circle Pick List Grade Number Cost Centre Code Repeatable Section Hotel (or) CTE Number Total of Food & Hotel Expenses (Including Tax) Number Total of Food & Hotel Expenses (Excluding Tax) Repeatable Section Travel Expenses Number Total Amount for (Air (or) Train (or) Bus) Number Total Amount for (Taxi Fare) Number Total Amount for (Auto Fare) Number Total of Travel Expenses Repeatable Section Other Expenses Number Total of Other Expenses Repeatable Section Daily Allowances Number Total of Daily Expenses Repeatable Section Daily Allowances | Mileage Number Total Exp of Mileage Number Total Exp of Daily Expenses Repeatable Section Mileage Number Total of Mileage Number Total of Daily Allowances (M, L & NM) Number Incidentals Eligibility Per Day Number Total Incidentals of the tour Number Expenses Amount Number Expenses of the CTE Number Total Tax Amount Number Exceeded Amount Number Total Expenses of the Tour Number Total Expenses of the Tour by Excluding Tax Yes/No Original Documents Received Yes/No Document Posted Remarks (If Any) Remarks (If Any) -
Under the Properties section, uncheck the
Required Field option for the following
fields to make them optional when submitting the form.
- Total of Daily Expenses
- Total Exp of Mileage
- Total of Mileage
- Remarks (If Any)
-
For the Grade field, select
Grades from the
List dropdown under the
Properties section.
-
Click the Repeatable Section field labeled
as Hotel (or) CTE and do the following.
-
Under the Properties section,
configure the Minimum Entries to
0 and Maximum Entries to
50.
-
For the Nature of Expense field,
select Expense Code from the
List dropdown.
-
For the Metro | Non Metro field, add
the following values in the Add
Values field.
- Metro
- Non Metro
-
For the No. of Days field, make it
as computed field and configure as shown below.

This formula helps you to calculate the duration between the From Date and To Date. The timespan between the two fields will be automatically populated in the field. -
For the No. of Days 1 field, select
Travel Exp No. of Days from the
List dropdown.

-
For the State field, select
States TE from the
List dropdown.
-
Click Define Conditions, click
Add Criteria under the
Field Dependency Based on Values in Other
Fields section, define the condition as
shown below, and then click OK.

According to this configuration, the options in the list are filtered, and the number of days is populated automatically.
-
For the Image | Document | Both
field, select TE - Image | Doc from
the List dropdown.
-
Under the Properties section,
configure the Minimum Entries to
0 and Maximum Entries to
50.
-
Click the Repeatable Section field labeled
as Travel Expenses and do the
following.
-
Under the Properties section,
configure the Minimum Entries to
0 and Maximum Entries to
50.
-
For the Travel Expenses field,
select Travel Code from the
List dropdown.
-
For the Mode of Travel field, add
the following values in the Add
Values field.
- Air/Train/Bus
- Own
-
For the Image | Document | Both
field, select TE - Image | Doc from
the List dropdown.
-
Under the Properties section,
configure the Minimum Entries to
0 and Maximum Entries to
50.
-
Click the Repeatable Section field labeled
as Other Expenses and do the following.
-
Under the Properties section,
configure the Minimum Entries to
0 and Maximum Entries to
50.
-
For the Other Expenses field, select
Travel Code from the
List dropdown.
-
For the Image | Document | Both
field, select TE - Image | Doc from
the List dropdown.
-
Under the Properties section,
configure the Minimum Entries to
0 and Maximum Entries to
50.
-
Click the Repeatable Section field labeled
as Daily Allowances and do the
following.
-
Under the Properties section,
configure the Minimum Entries to
0 and Maximum Entries to
100.
-
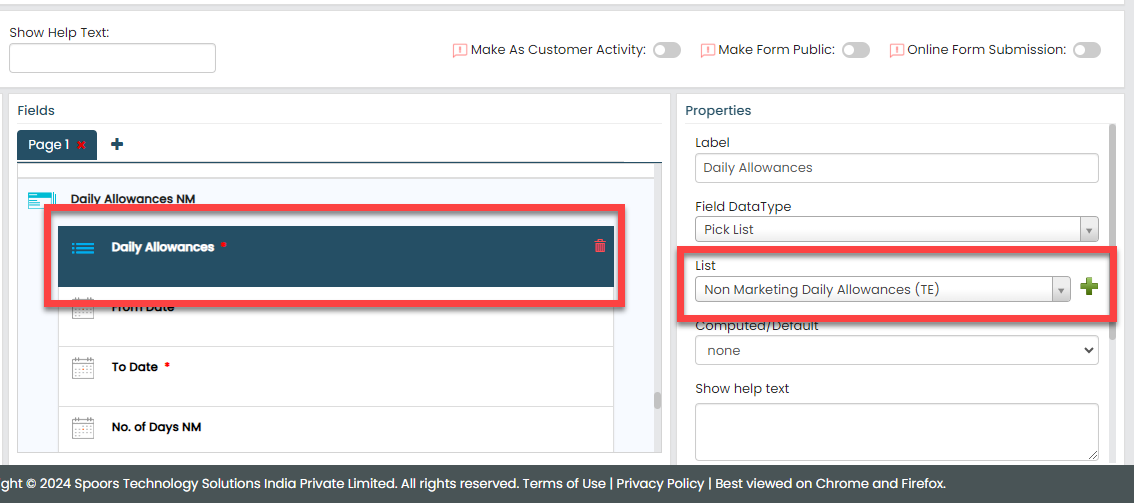
For the Nature of Expense field,
select Travel Expanses Daily
Allowances from the
List dropdown.
-
For the No. of Days field, make it
as computed field and configure as shown below.
This formula helps you to calculate the duration between the From Date and To Date. The timespan between the two fields will be automatically populated in the field. -
For the No. of Days field, select
Travel Exp No. of Days from the
List dropdown.
-
Under the Properties section,
configure the Minimum Entries to
0 and Maximum Entries to
100.
-
Click the Repeatable Section field labeled
as Daily Allowances | Mileage and do the
following.
-
Under the Properties section,
configure the Minimum Entries to
0 and Maximum Entries to
100.
-
For the Exp Description field,
select Travel Expanses Daily Allowances
Leaf from the List
dropdown.
-
For the No. of Days L field, make it
as computed field and configure as shown below.
This formula helps you to calculate the duration between the From Date and To Date. The timespan between the two fields will be automatically populated in the field. -
For the No. of Days L field, select
Travel Exp No. of Days from the
List dropdown.
-
Under the Properties section,
configure the Minimum Entries to
0 and Maximum Entries to
100.
-
Click the Repeatable Section field labeled
as Daily Allowances NM and do the
following.
-
Under the Properties section,
configure the Minimum Entries to
0 and Maximum Entries to
50.

-
For the Daily Allowances field,
select Non Marketing Daily Allowance
(TE) from the List
dropdown.
-
For the No. of Days field, make it
as computed field, and configure as shown below.
This formula helps you to calculate the duration between the From Date and To Date. The timespan between the two fields will be automatically populated in the field. -
For the No. of Days NM field, select
Travel Exp No. of Days from the
List dropdown.

-
Under the Properties section,
configure the Minimum Entries to
0 and Maximum Entries to
50.
-
Now click Publish and then click
OK to make it available to the
employees.
Note: To know more about all the publishing options, refer to Publishing Options.
Creation and Configuration of Processes
Creation and Configuration of Capital Expenditure Approvals
The Capex Approvals workflow requires configuration to effectively manage the activities associated with the process. These activities include initiating the capital expenditure request, approval by the immediate manager, approval by the L1 manager, L2 manager, and so on.
In this section, we will configure the process activities, outline the sequence of execution, specify the necessary information for creating work items, and other aspects. To know more about work processes, refer to Work Processes.
Create Capex Approvals Process
In this section, we will create the activities associated with the capital expenditure approval process.
-
Go to .

-
On the Create Activity Process screen, do the
following:
-
In the Work Process Name field,
enter the title as Capex Approvals.

- Click Next.
-
In the Work Process Name field,
enter the title as Capex Approvals.
-
After entering the process name and clicking Next, you
will proceed to the next tab, where you are required to
configure the work fields. On this tab, click Next and
then click OK. We will configure this
section later.

-
On the Manage Forms tab, click
Next.

-
Manage Activities: On this tab, we will
define the activities that need to be executed for a request. To
know more about activities, refer to Activities. To
define the activities, follow these steps:
-
Click Add Activity.

-
Under the Activity Title column,
enter the title as
Initiator.

-
For the Initiator activity,
configure the WMS Capex-
Initiator form under the Form
Template column.

-
Similarly, click the Add
Activity button again and create the
following activities, and then configure the forms given
against the activities.

Activity Name Form Template Immediate Manager Capex - PA L1 L1 L2 L2 L3 L3 L4 L4 L5 L5 Finance Controller Static Static 2 Static 2 Static 3 Static 3 Static 4 Static 4
-
Click Add Activity.
- On the Clone Fields Data tab, click Next.
- On the Manage Flow tab, you can see the default flow created automatically. Click Next to move to the next screen. We will configure this later.
- On the Define Auto Allocation tab, click Skip. We will configure this later.
- On the Manage Restrictions tab, click Next.
-
On the Other Settings tab, click
Complete. We will configure this
later.

- As you can see, we've ignored some configurations as those are complex and time-consuming. Refer to the next sections for detailed steps to configure the flow, fields, work settings, and so on.
Configure Work Fields
In this section, we will configure the work fields that are required for capturing the information necessary to execute the process. You will find some default fields that are pre-configured. However, these defaults are insufficient for capturing the necessary information. To address this, we must add and configure custom fields. To know more about work fields, refer to Work Fields.
Follow the steps below to create work fields.
-
On the process page, click Manage
Fields. Alternatively, go to .

-
To begin, deactivate all default fields by clicking on the
green checkboxes, as demonstrated below.


-
Click Add Field and then do the
following:

-
Under the Field Label column,
enter Requisition No..

-
Change Data Type to
AutoGenerate.

-
Under the Field Label column,
enter Requisition No..
-
Similarly, click the Add Field button
and configure the fields as described in the following
table.
Field Configuration Date Make this field as Default. The field configuration is shown below:
Work Start Configure the field as shown below:
Work Ends Configure the field as shown below:
Approval Level Change the Data Type to Dropdown and add the following values:- Single Applicant
- Two Applicants
- Three Applicants
- Four Applicants
- Five Applicants
- Six Applicants
 Configure the field as shown below:
- Two Applicants
- Three Applicants
- Four Applicants
- Five Applicants
- Six Applicants
Configure the field as shown below: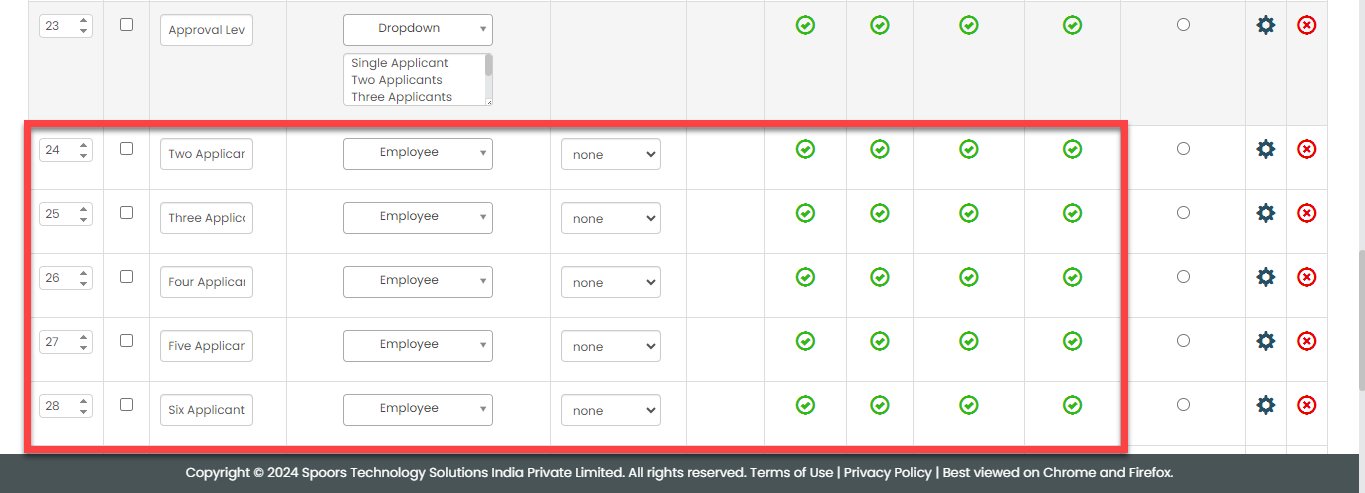
Applicant Configure the field as shown below: Click on the grey box, click Filled By and then click Done.
Description Configure the field as shown below: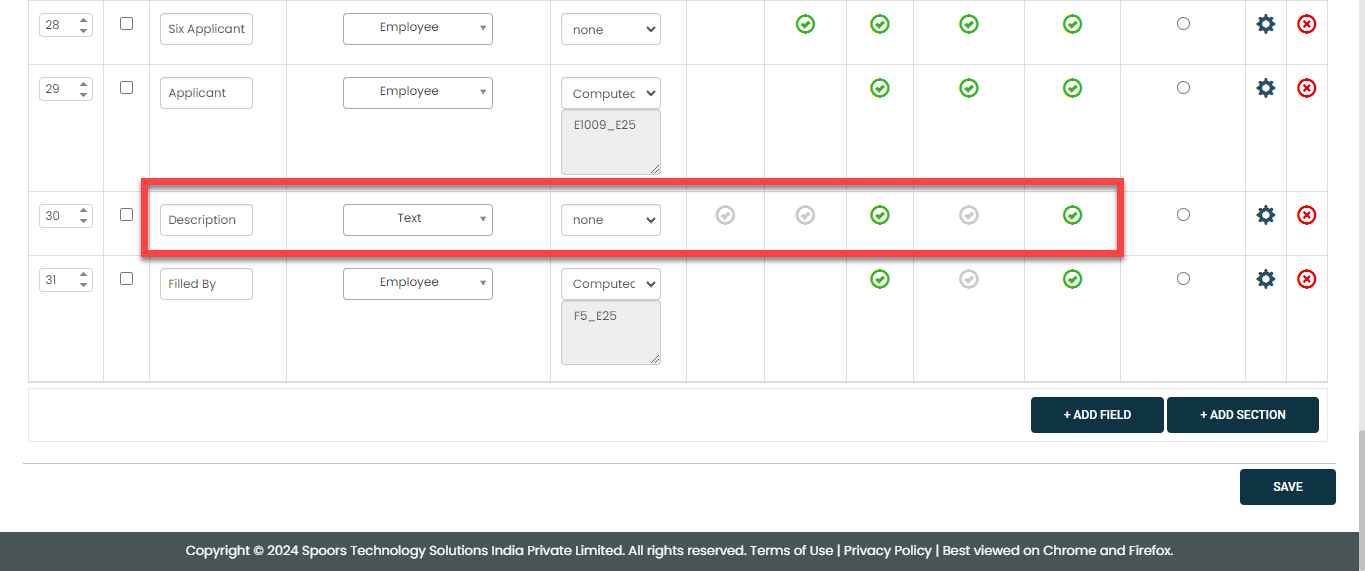
Filled By Configure the field as shown below: Click on the grey box, click Three Applicants_Filled By and then click Done.
- Once you configure all the fields, click Save.
Configure Work Flow
In this section, we will define the workflow, which outlines the sequence of activities defined earlier. This process includes specifying the start activity, end activity, subsequent activities, and more. To know more about the Flow, refer to the Manage Flow documentation.
Follow the instructions below to configure the flow:
- On the process page, click Manage Flow. Alternatively, go to .
-
For the Initiator activity, do the
following:
-
Make sure that the Initiator
activity as Start Activity as
shown below.
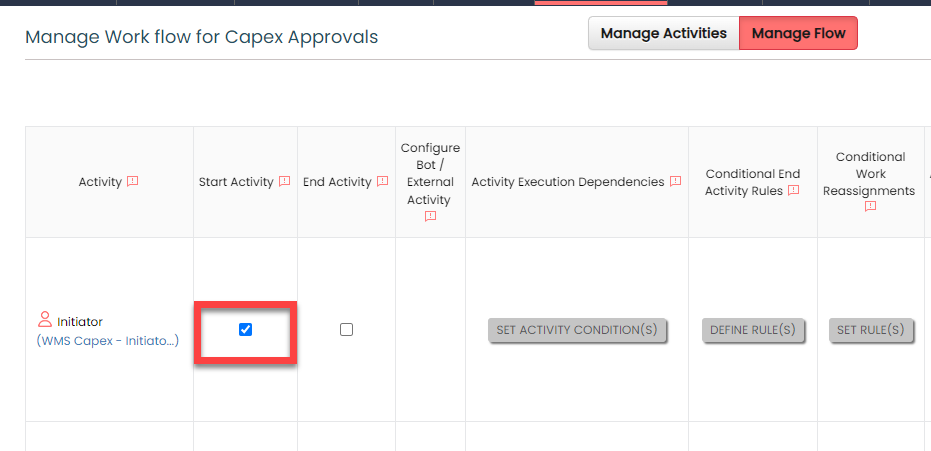
When you make an activity as the start activity, it means that the initiator has to do this activity first.
-
Select the following activities and click the right
arrow icon to move them to the
Selected section.
- Immediate Manager
- L1

According to this configuration, the capital expenditure request will be assigned to the immediate managers or Level 1 approver once the request has been initiated.
-
Make sure that the Initiator
activity as Start Activity as
shown below.
-
For the Immediate Manager activity, do
the following:
-
Under the Allocation Rules
column, click the bulb icon, and then configure as shown
below in the pop-up window.
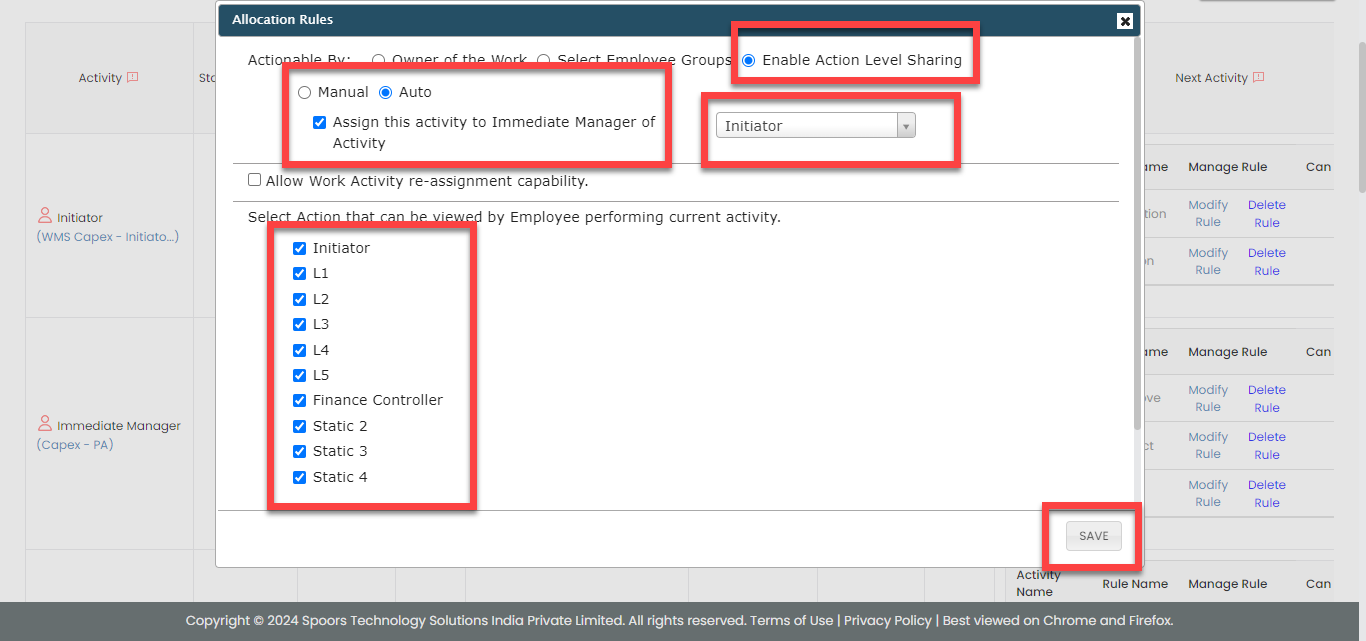
According to this configuration, this action will be automatically assigned to the immediate manager of the travel expense request initiator, and it also enables the sharing of activity details. The data in the current activity can be viewed by the initiator and other approvers.
-
Select the following activities and click the right
arrow icon to move them to the
Selected section.
- Initiator
- L1
- Finance Controller

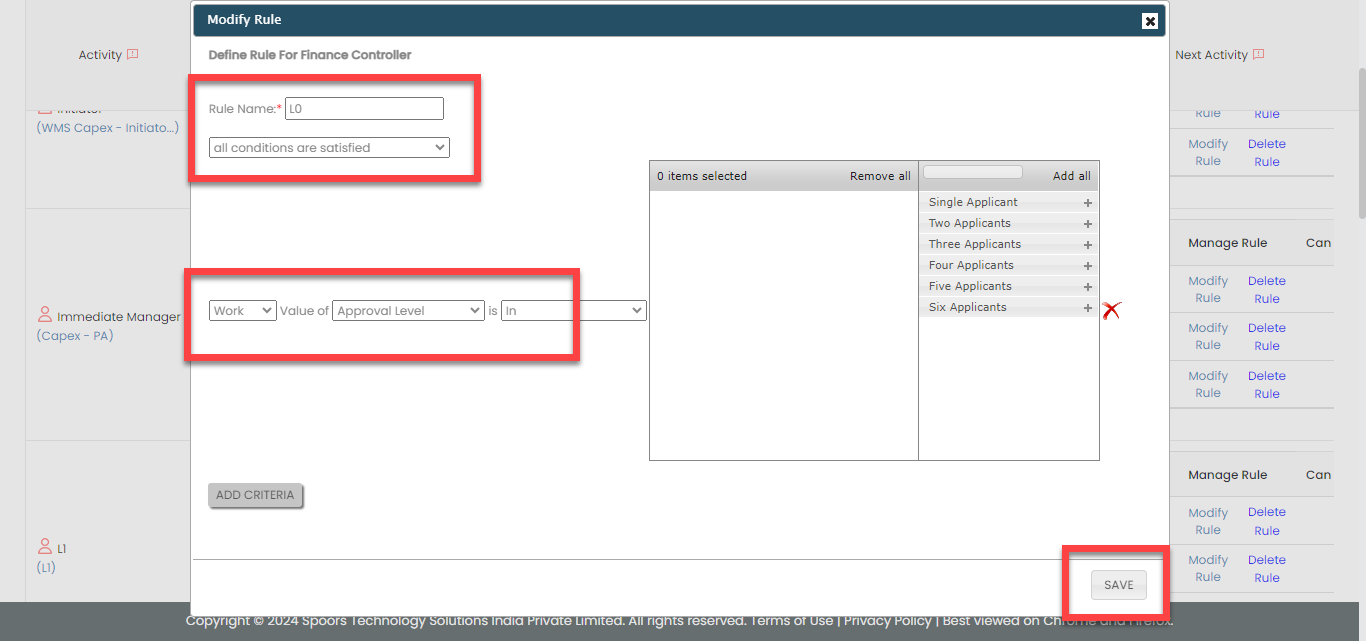
-
Enter the Rule Name as
Approve, click Add
Criteria, define the configuration as
shown below, and then click
Save.

According to this configuration, the request will be assigned to the L2 approver if the expense request is approved by the immediate manager of the initiator.
-
Similarly, click Create Rule
against the Initiator activity to
define the configuration as shown below.

According to this configuration, the request will be assigned to the initiator again if the expense request is rejected by the immediate manager of the initiator.
-
Similarly, click Create Rule
against the Finance Controller
activity to define the configuration as shown
below.
-
Under the Allocation Rules
column, click the bulb icon, and then configure as shown
below in the pop-up window.
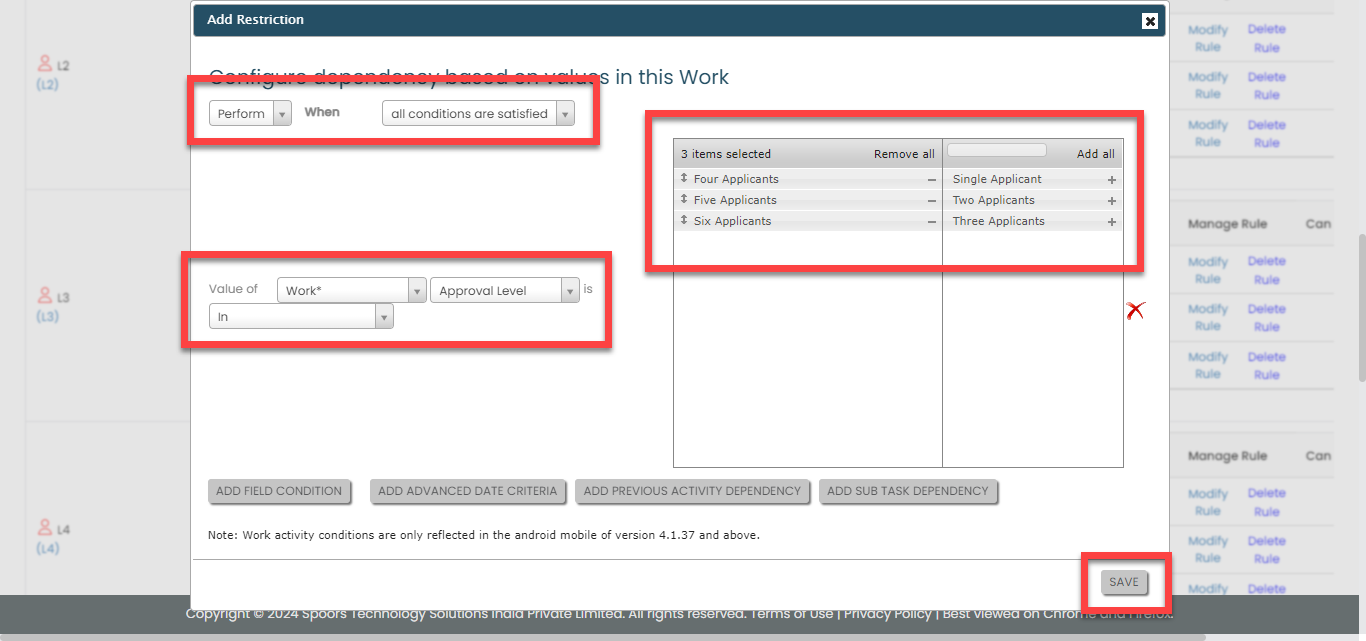
-
For the L1 activity, do the
following:
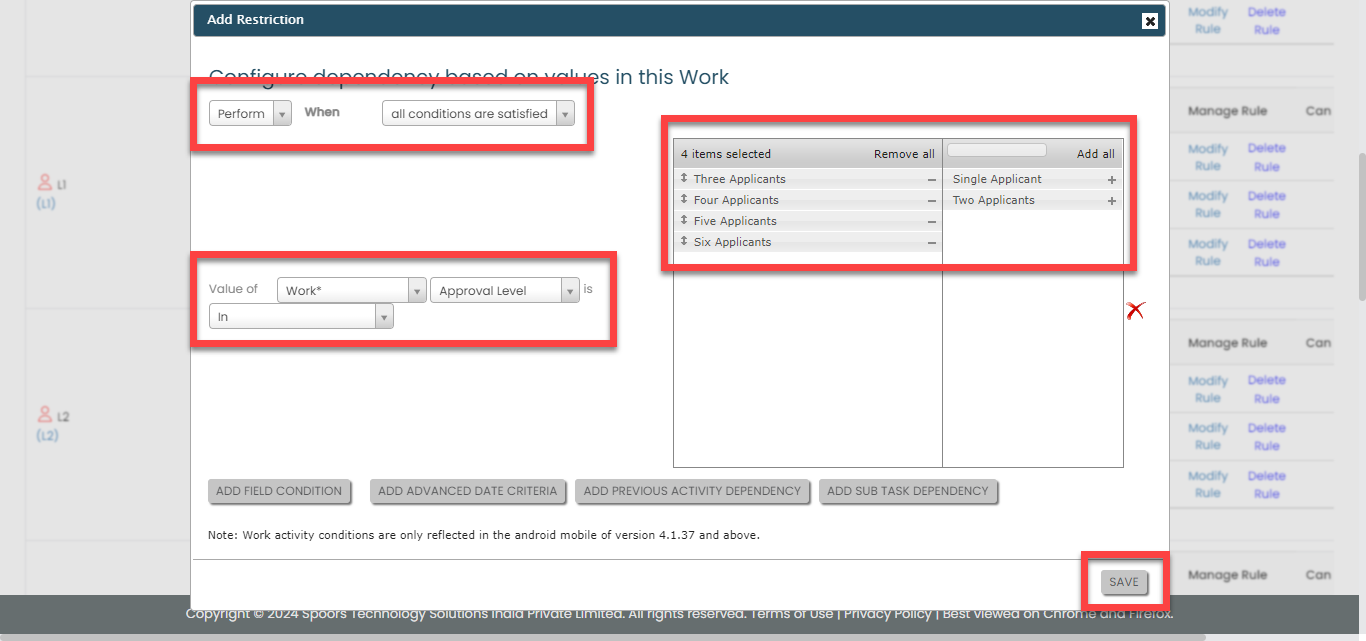
-
Under the Activity Execution
Dependencies column, click
Set Activity Condition(s),
and then configure as shown below in the pop-up
window.

According to this configuration, this action will only be executed if the request has two or more applicants.
-
Under the Allocation Rules
column, click the bulb icon, and then configure as shown
below in the pop-up window.

According to this configuration, this action will be automatically assigned to the two employees.
-
Select the following activities and click the right
arrow icon to move them to the
Selected section.
- Initiator
- L2
- Finance Controller

-
Click Create Rule against the
L2 activity to define the
configuration as shown below.

-
Now click Create Rule against
the Finance Controller activity
to define the configuration as shown below.

-
Now click Create Rule against
the Initiator activity to define
the configuration as shown below.

-
Under the Activity Execution
Dependencies column, click
Set Activity Condition(s),
and then configure as shown below in the pop-up
window.
-
For the L2 activity, do the
following:
-
Under the Activity Execution
Dependencies column, click
Set Activity Condition(s),
and then configure as shown below in the pop-up
window.
According to this configuration, this action will only be executed if the request has three or more applicants.
-
Under the Allocation Rules
column, click the bulb icon, and then configure as shown
below in the pop-up window.

-
Select the following activities and click the right
arrow icon to move them to the
Selected section.
- Initiator
- L3
- Finance Controller

-
Click Create Rule against the
L3 activity to define the
configuration as shown below.

-
Now click Create Rule against
the Finance Controller activity
to define the configuration as shown below.
-
Now click Create Rule against
the Initiator activity to define
the configuration as shown below.
-
Under the Activity Execution
Dependencies column, click
Set Activity Condition(s),
and then configure as shown below in the pop-up
window.
-
For the L3 activity, do the
following:
-
Under the Activity Execution
Dependencies column, click
Set Activity Condition(s),
and then configure as shown below in the pop-up
window.
According to this configuration, this action will only be executed if the request has three or more applicants.
-
Under the Allocation Rules
column, click the bulb icon, and then configure as shown
below in the pop-up window.

-
Select the following activities and click the right
arrow icon to move them to the
Selected section.
- Initiator
- L4
- Finance Controller

-
Click Create Rule against the
L4 activity and define the
configuration as shown below.

-
Now click Create Rule against
the Finance Controller activity
to define the configuration as shown below.
-
Now click Create Rule against
the Initiator activity to define
the configuration as shown below.
-
Under the Activity Execution
Dependencies column, click
Set Activity Condition(s),
and then configure as shown below in the pop-up
window.
-
For the L4 activity, do the
following:
-
Under the Activity Execution
Dependencies column, click
Set Activity Condition(s),
and then configure as shown below in the pop-up
window.

According to this configuration, this action will only be executed if the request has four or more applicants.
-
Under the Allocation Rules
column, click the bulb icon, and then configure as shown
below in the pop-up window.

-
Select the following activities and click the right
arrow icon to move them to the
Selected section.
- Initiator
- L5
- Finance Controller

-
Click Create Rule against the
L5 activity and define the
configuration as shown below.
-
Now click Create Rule against
the Finance Controller activity
to define the configuration as shown below.
-
Now click Create Rule against
the Initiator activity to define
the configuration as shown below.
-
Under the Activity Execution
Dependencies column, click
Set Activity Condition(s),
and then configure as shown below in the pop-up
window.
-
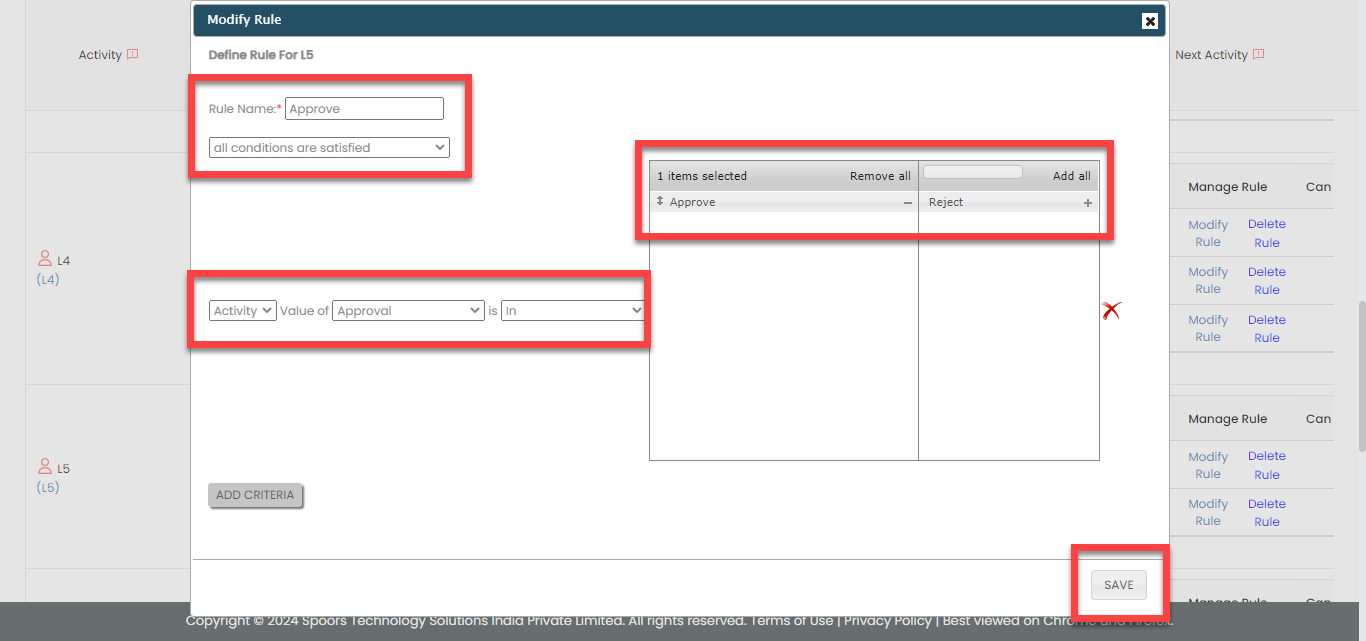
For the L5 activity, do the
following:
-
Under the Activity Execution
Dependencies column, click
Set Activity Condition(s),
and then configure as shown below in the pop-up
window.

-
Under the Allocation Rules
column, click the bulb icon, and then configure as shown
below in the pop-up window.

-
Select the following activities and click the right
arrow icon to move them to the
Selected section.
- Initiator
- Finance Controller

-
Now click Create Rule against
the Finance Controller activity
to define the configuration as shown below.

-
Now click Create Rule against
the Initiator activity to define
the configuration as shown below.
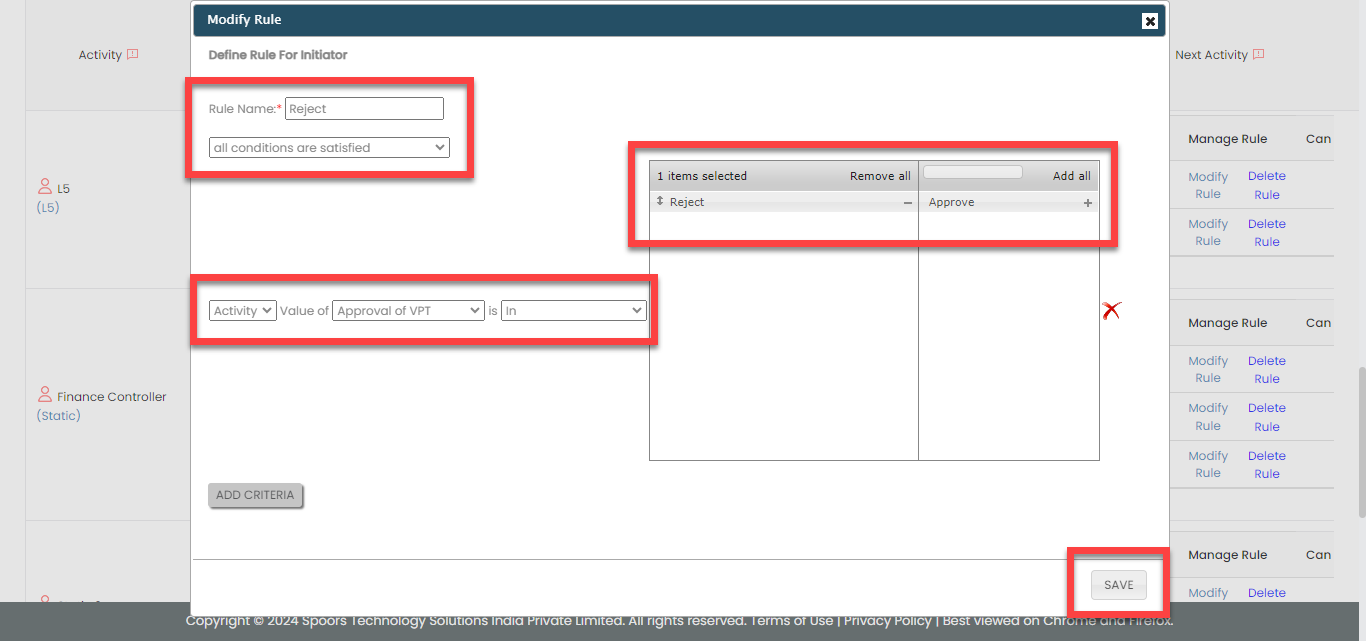
-
Under the Activity Execution
Dependencies column, click
Set Activity Condition(s),
and then configure as shown below in the pop-up
window.
-
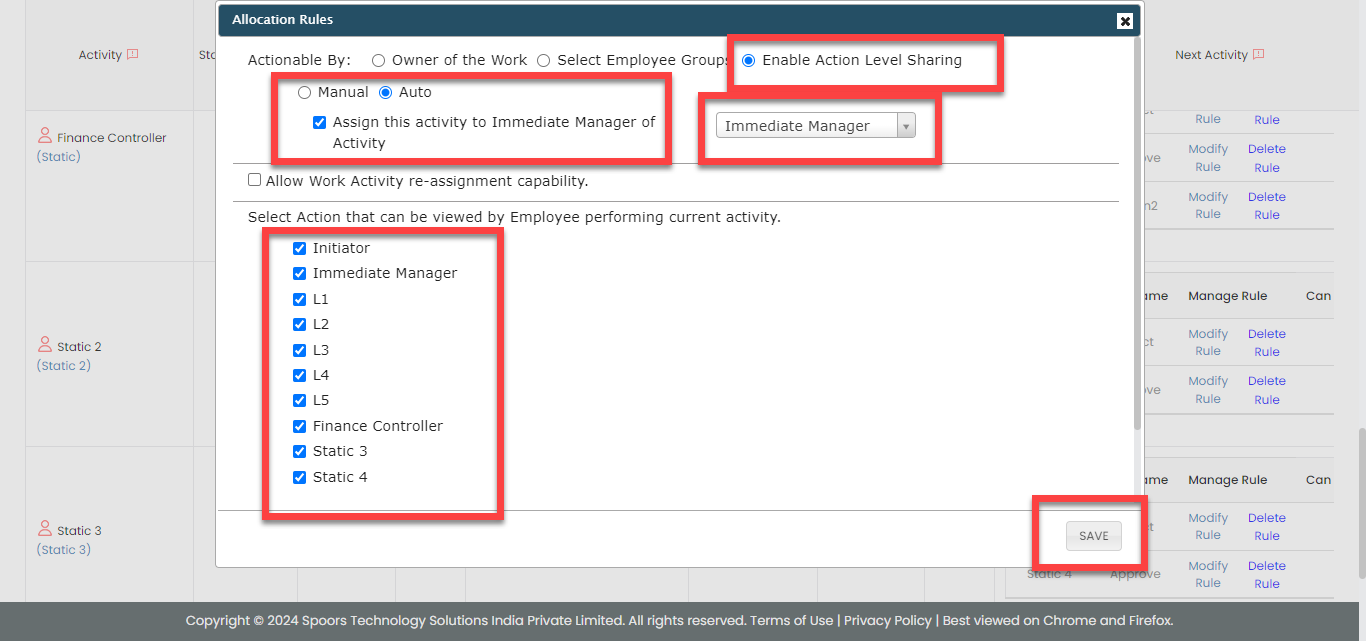
For the Finance Controller activity, do
the following:
-
Under the Activity Execution
Dependencies column, click
Set Activity Condition(s),
and then configure as shown below in the pop-up
window.

-
Under the Allocation Rules
column, click the bulb icon, and then configure as shown
below in the pop-up window.


According to this configuration, this activity will be automatically assigned to the employees in the Finance Controller employee group.
-
Select the following activities and click the right
arrow icon to move them to the
Selected section.
- Initiator
- Static 2
- Static 3

-
Now click Create Rule against
the Initiator activity to define
the configuration as shown below.

-
Now click Create Rule against
the Static 2 activity to define
the configuration as shown below.

-
Now click Create Rule against
the Static 3 activity to define
the configuration as shown below.

-
Under the Activity Execution
Dependencies column, click
Set Activity Condition(s),
and then configure as shown below in the pop-up
window.
-
For the Static 2 activity, do the
following:
-
Under the Allocation Rules
column, click the bulb icon, and then configure as shown
below in the pop-up window.
According to this configuration, this activity will be automatically assigned to the manager of the initiator's immediate manager.
-
Select the following activities and click the right
arrow icon to move them to the
Selected section.
- Initiator
- Static 3

-
Now click Create Rule against
the Initiator activity to define
the configuration as shown below.

-
Now click Create Rule against
the Static 3 activity to define
the configuration as shown below.

-
Under the Allocation Rules
column, click the bulb icon, and then configure as shown
below in the pop-up window.
-
For the Static 3 activity, do the
following:
-
Under the Allocation Rules
column, click the bulb icon, and then configure as shown
below in the pop-up window.

-
Select the following activities and click the right
arrow icon to move them to the
Selected section.
- Initiator
- Static 4

-
Now click Create Rule against
the Initiator activity to define
the configuration as shown below.

-
Now click Create Rule against
the Static 4 activity to define
the configuration as shown below.

-
Under the Allocation Rules
column, click the bulb icon, and then configure as shown
below in the pop-up window.
-
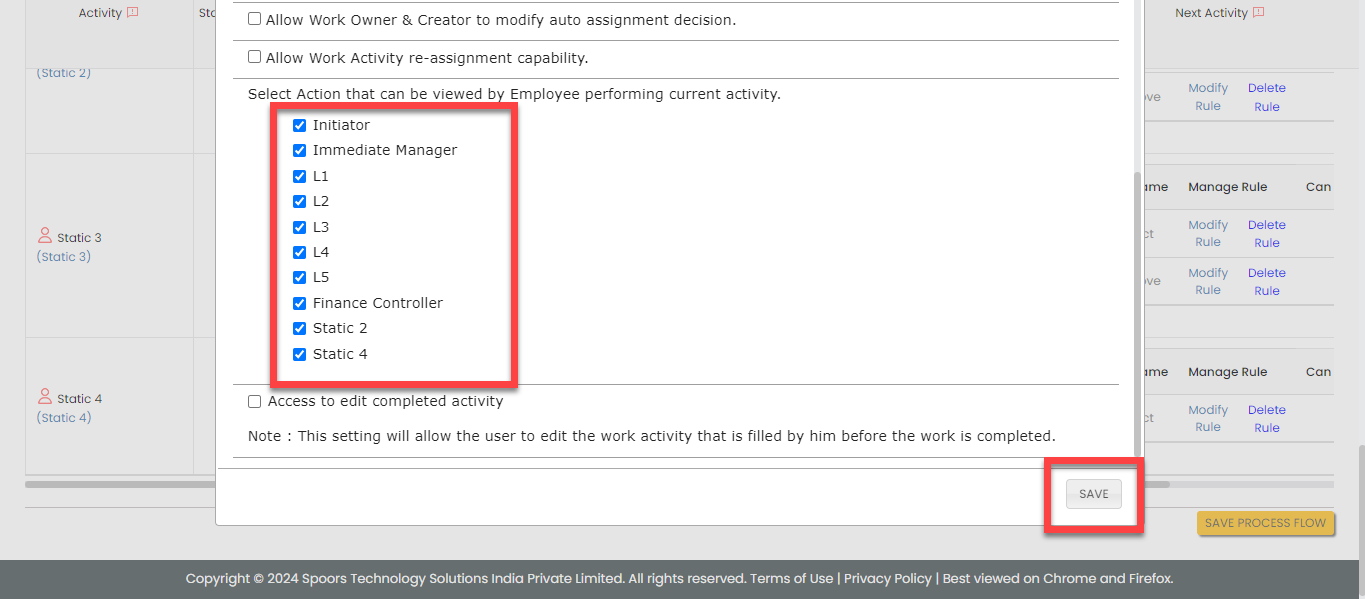
For the Static 4 activity, do the
following:
-
Under the Conditional End Activity
Rules column, click Define
Rule(s), and then configure as shown
below in the pop-up window.
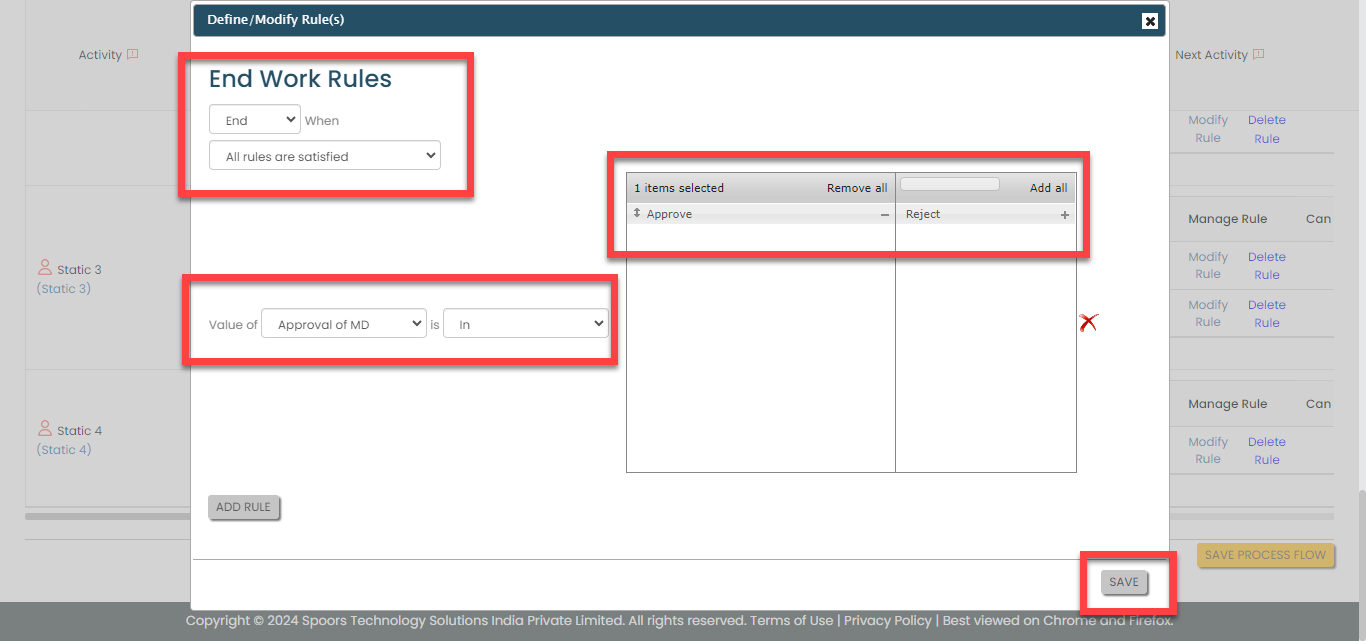
According to this configuration, the capital expenditure request approval process will be completed once the request has received approval from the managing director (MD).
-
Under the Allocation Rules
column, click the bulb icon, and then configure as shown
below in the pop-up window.

-
Select the following activities and click the right
arrow icon to move them to the
Selected section.
- Initiator

-
Now click Create Rule against
the Initiator activity to define
the configuration as shown below.

-
Under the Conditional End Activity
Rules column, click Define
Rule(s), and then configure as shown
below in the pop-up window.
- Click Save Process Flow.
Configure Auto Fill
In this section, we will define the auto fill configuration that allows data copy from one activity to another activity. To know more about auto fill, refer to Auto Fill.
Follow the steps below to configure auto fill.
-
On the process page, click Manage
Fields. Alternatively, go to .

-
Under the Activities Autofill from Normal
Fields column, click the auto form fill icon
against the Initiator activity, and do
the following.

-
On the pop-up window, select the Enable Form
Submission Auto fill from Work/Form
Submission checkbox to enable data
sharing from work/form fields to form fields.
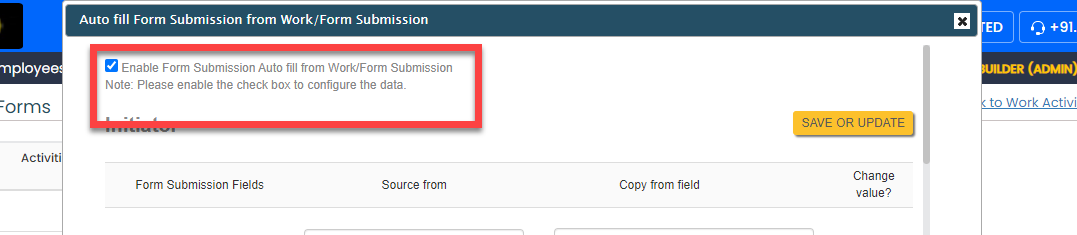
-
On the pop-up window, select the Enable Form
Submission Auto fill from Work/Form
Submission checkbox to enable data
sharing from work/form fields to form fields.
-
Under the Activities Autofill from Normal
Fields column, click the auto form fill icon
against the Immediate Manager, L1, Finance
Controller, Static 2, Static 3, and Static 4
activities, and do the following.
-
Under the Activities Autofill from Normal
Fields column, click the auto form fill icon
against the L2, L3, L4, and L5
activities, and do the following.
Creation and Configuration of Leaf Approvals
The Leaf workflow requires configuration to effectively manage the activities associated with the process. These activities include initiating farmer advance requests, approval by the leaf accountant, approval by GM, VP, and so on.
In this section, we will configure the process activities, outline the sequence of execution, specify the necessary information for creating work items, and other aspects. To know more about work processes, refer to Work Processes.
Create Leaf Process
In this section, we will create the activities associated with the leaf approval process.
-
Go to .
-
On the Create Activity Process screen, do the
following:
-
In the Work Process Name field,
enter the title as Leaf.

- Click Next.
-
In the Work Process Name field,
enter the title as Leaf.
-
After entering the process name and clicking Next, you
will proceed to the next tab, where you are required to
configure the work fields. On this tab, click Next and
then click OK. We will configure this
section later.

-
On the Manage Forms tab, click
Next.
-
Manage Activities: On this tab, we will
define the activities that need to be executed for a request. To
know more about activities, refer to Activities. To
define the activities, follow these steps:
-
Click Add Activity.
-
Under the Activity Title column,
enter the title as
Initiator.
-
For the Initiator activity,
configure the Leaf (Farmer
Advance) form under the Form
Template column.

-
Similarly, click the Add
Activity button again and create the
following activities, and then configure the forms given
against the activities.

Activity Name Form Template Leaf - Accountant Leaf Functional Accountant GM - Leaf Leaf Department Manager VP - Leaf Leaf VPL Manager Finance Leaf Manager Finance Finance Controller Leaf Finance Controller CFO Leaf CFO MD Leaf MD
-
Click Add Activity.
- On the Clone Fields Data tab, click Next.
- On the Manage Flow tab, you can see the default flow created automatically. Click Next to move to the next screen. We will configure this later.
- On the Define Auto Allocation tab, click Skip. We will configure this later.
- On the Manage Restrictions tab, click Next.
-
On the Other Settings tab, click
Complete. We will configure this
later.
- As you can see, we've ignored some configurations as those are complex and time consuming. Refer to the next sections for detailed steps to configure the flow, fields, work settings, and so on.
Configure Work Fields
In this section, we will configure the work fields that are required for capturing the information necessary to execute the process. You will find some default fields that are pre-configured. However, these defaults are insufficient for capturing the necessary information. To address this, we must add and configure custom fields. To know more about work fields, refer to Work Fields.
Follow the steps below to create work fields.
-
On the process page, click Manage
Fields. Alternatively, go to .

-
To begin, deactivate all default fields by clicking on the
green checkboxes, as demonstrated below.
-
Click Add Field and then do the
following:
-
Under the Field Label column,
enter Requisition No..
-
Change Data Type to
AutoGenerate.
-
Under the Field Label column,
enter Requisition No..
-
Similarly, click the Add Field button
and configure the fields as described in the following
table.
Field Configuration Date Make this field as Default. The field configuration is shown below:Department Configure the field as shown below: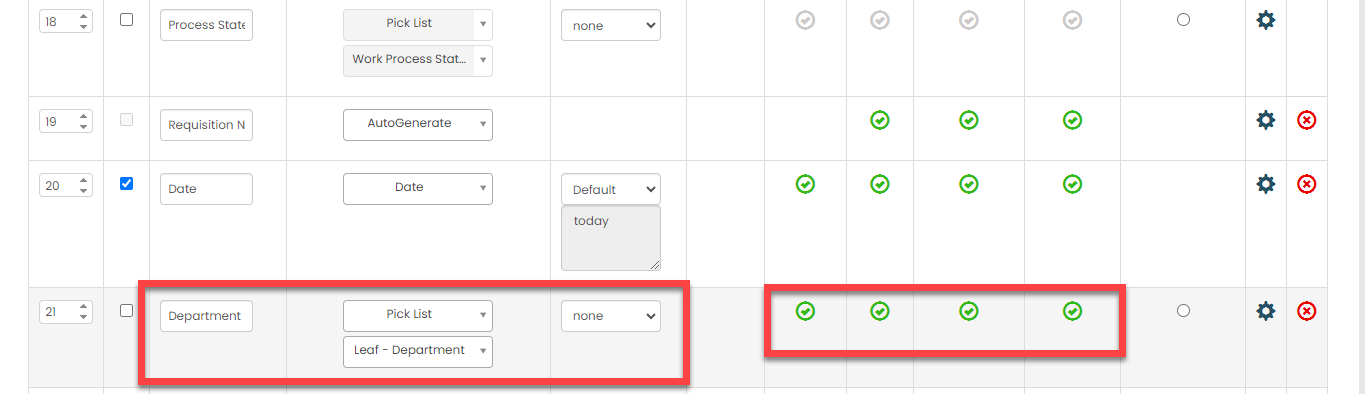
Description Configure the field as shown below:
- Once you configure all the fields, click Save.
Configure Work Flow
In this section, we will define the workflow, which outlines the sequence of activities defined earlier. This process includes specifying the start activity, end activity, subsequent activities, and more. To know more about the Flow, refer to the Manage Flow documentation.
Follow the instructions below to configure the flow:
- On the process page, click Manage Flow. Alternatively, go to .
-
For the Initiator activity, do the
following:
-
Make sure that the Initiator
activity as Start Activity as
shown below.

When you make an activity as the start activity, it means that the initiator has to do this activity first.
-
Select the Leaf - Accountant
activity and click the right arrow icon to move it to
the Selected section.

According to this configuration, the request will be assigned to the accountant of the leaf department once the request has been initiated.
-
Make sure that the Initiator
activity as Start Activity as
shown below.
-
For the Leaf - Accountant activity, do
the following:
-
Under the Allocation Rules
column, click the bulb icon, and then configure as shown
below in the pop-up window.


According to this configuration, this action will be automatically assigned to the employees in the Leaf Accountant employee group, and it also enables sharing of activity details. The data in the current activity can be viewed by the initiator and other approvers.
-
Select the following activities and click the right
arrow icon to move them to the
Selected section.
- GM - Leaf
- Initiator

-
Click Create Rule against the
GM - Leaf activity and define
the conditions to execute this activity once the request
has been approved by the leaf accountant.
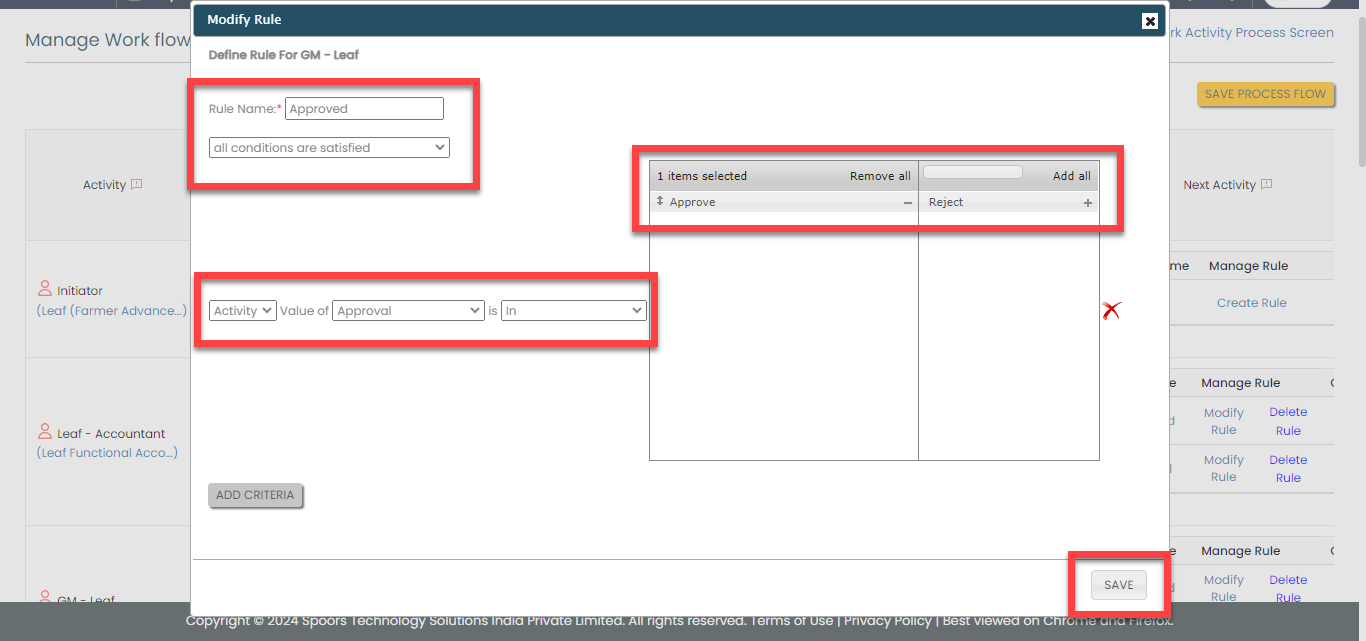
-
Similarly, click Create Rule
against the Initiator activity
and define the configuration as shown below.

According to this configuration, the request will be assigned to the initiator again if the expense request is rejected by the leaf accountant.
-
Under the Allocation Rules
column, click the bulb icon, and then configure as shown
below in the pop-up window.
-
For the GM - Leaf activity, do the
following:
-
Under the Allocation Rules
column, click the bulb icon, and then configure as shown
below in the pop-up window.
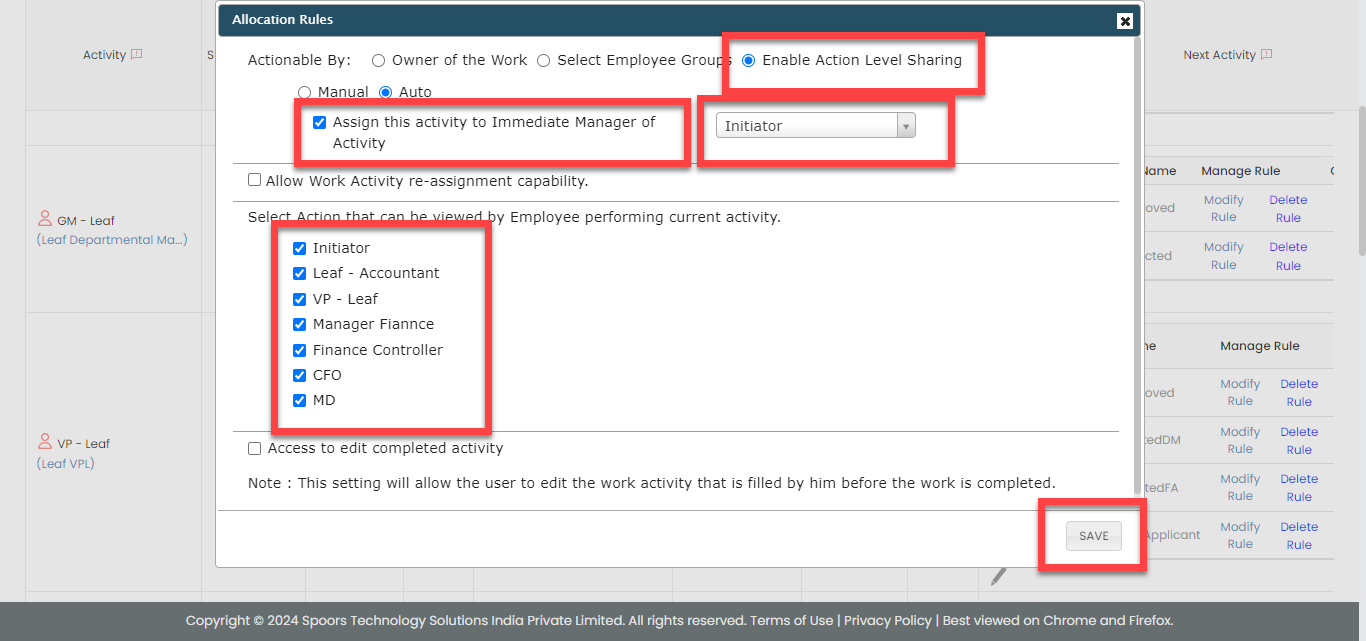
-
Select the following activities and click the right
arrow icon to move them to the
Selected section.
- VP - Leaf
- Initiator

-
Click Create Rule against the
VP - Leaf activity and define
the conditions to execute this activity once the request
has been approved by the GM -
Leaf.
-
Similarly, click Create Rule
against the Initiator activity
and define the configuration as shown below.
According to this configuration, the request will be assigned to the initiator again if the expense request is rejected by the Leaf - GM.
-
Under the Allocation Rules
column, click the bulb icon, and then configure as shown
below in the pop-up window.
-
For the VP - Leaf activity, do the
following:
-
Under the Allocation Rules
column, click the bulb icon, and then configure as shown
below in the pop-up window.

-
Select the following activities and click the right
arrow icon to move them to the
Selected section.
- Manager Finance
- GM - Leaf
- Leaf - Accountant
- Initiator

-
Click Create Rule against the
Manager Finance activity and
define the configuration as shown below.

-
Click Create Rule against the
GM - Leaf activity and define
the configuration as shown below.

-
Click Create Rule against the
Leaf - Accountant activity
and define the configuration as shown below.

-
Similarly, click Create Rule
against the Initiator activity
and define the configuration as shown below.

-
Under the Allocation Rules
column, click the bulb icon, and then configure as shown
below in the pop-up window.
-
For the Manager Finance activity, do the
following:
-
Under the Allocation Rules
column, click the bulb icon, and then configure as shown
below in the pop-up window.
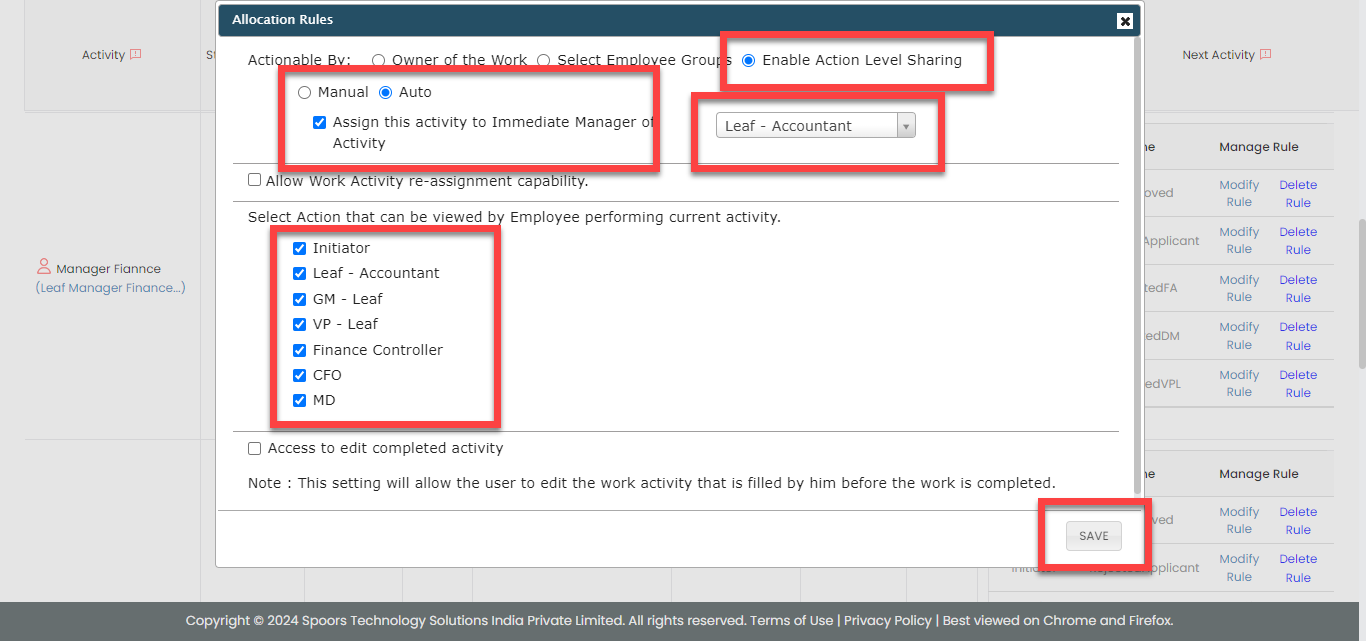
-
Select the following activities and click the right
arrow icon to move them to the
Selected section.
- Finance Controller
- Leaf - Accountant
- GM - Leaf
- VP - Leaf
- Initiator

-
Click Create Rule against the
Finance Controller activity
and define the configuration as shown below.

-
Click Create Rule against the
GM - Leaf activity and define
the configuration as shown below.
-
Click Create Rule against the
VP - Leaf activity and define
the configuration as shown below.

-
Click Create Rule against the
Leaf - Accountant activity
and define the configuration as shown below.
-
Similarly, click Create Rule
against the Initiator activity
and define the configuration as shown below.
-
Under the Allocation Rules
column, click the bulb icon, and then configure as shown
below in the pop-up window.
-
For the Finance Controller activity, do
the following:
-
Under the Allocation Rules
column, click the bulb icon, and then configure as shown
below in the pop-up window.

-
Select the following activities and click the right
arrow icon to move them to the
Selected section.
- CFO
- Leaf - Accountant
- Manager Finance
- GM - Leaf
- VP - Leaf
- Initiator

-
Click Create Rule against the
CFO activity and define the
configuration as shown below.

-
Click Create Rule against the
GM - Leaf activity and define
the configuration as shown below.
-
Click Create Rule against the
VP - Leaf activity and define
the configuration as shown below.
-
Click Create Rule against the
Leaf - Accountant activity
and define the configuration as shown below.
-
Click Create Rule against the
Manager Finance activity and
define the configuration as shown below.

-
Similarly, click Create Rule
against the Initiator activity
and define the configuration as shown below.
-
Under the Allocation Rules
column, click the bulb icon, and then configure as shown
below in the pop-up window.
-
For the CFO activity, do the
following:
-
Under the Allocation Rules
column, click the bulb icon, and then configure as shown
below in the pop-up window.

-
Select the following activities and click the right
arrow icon to move them to the
Selected section.
- MD
- Leaf - Accountant
- Manager Finance
- Finance Controller
- GM - Leaf
- VP - Leaf
- Initiator

-
Click Create Rule against the
MD activity and define the
configuration as shown below.

-
Click Create Rule against the
Finance Controller activity
and define the configuration as shown below.

-
Click Create Rule against the
GM - Leaf activity and define
the configuration as shown below.
-
Click Create Rule against the
VP - Leaf activity and define
the configuration as shown below.
-
Click Create Rule against the
Leaf - Accountant activity
and define the configuration as shown below.
-
Click Create Rule against the
Manager Finance activity and
define the configuration as shown below.
-
Similarly, click Create Rule
against the Initiator activity
and define the configuration as shown below.
-
Under the Allocation Rules
column, click the bulb icon, and then configure as shown
below in the pop-up window.
-
For the MD activity, do the
following:
-
Under the Conditional End Activity
Rules column, click Define
Rule(s), and then configure as shown
below in the pop-up window.

According to this configuration, the leaf approval process will be completed once the request has been approved by the managing director (MD).
-
Under the Allocation Rules
column, click the bulb icon, and then configure as shown
below in the pop-up window.

-
Select the following activities and click the right
arrow icon to move them to the
Selected section.
- CFO
- Leaf - Accountant
- Manager Finance
- Finance Controller
- GM - Leaf
- VP - Leaf
- Initiator

-
Click Create Rule against the
CFO activity and define the
configuration as shown below.

-
Click Create Rule against the
Finance Controller activity
and define the configuration as shown below.
-
Click Create Rule against the
GM - Leaf activity and define
the configuration as shown below.
-
Click Create Rule against the
VP - Leaf activity and define
the configuration as shown below.
-
Click Create Rule against the
Leaf - Accountant activity
and define the configuration as shown below.
-
Click Create Rule against the
Manager Finance activity and
define the configuration as shown below.
-
Similarly, click Create Rule
against the Initiator activity
and define the configuration as shown below.
-
Under the Conditional End Activity
Rules column, click Define
Rule(s), and then configure as shown
below in the pop-up window.
- Click Save Process Flow.
Configure Auto Fill
In this section, we will define the auto fill configuration that allows data copy from one activity to another activity. To know more about auto fill, refer to Auto Fill.
Follow the steps below to configure auto fill.
-
On the process page, click Manage
Fields. Alternatively, go to .
-
For the Initiator activity, do the
following:
-
Under the Activities Autofill from Normal
Fields column, click the auto form fill
icon.

-
On the pop-up window, select the Enable Form
Submission Auto fill from Work/Form
Submission checkbox to enable data
sharing from work/form fields to form fields.
-
Configure the fields as mentioned in the following
table.
Form Submission Fields
Source from
Copy from field
Change value?
Requisition No.
Leaf Requisition No.
No Date
Leaf Date
Yes Department
Leaf Department
Yes Nature of Sanction
Leaf - Accountant Nature of Sanction
Yes Description
Leaf Description
Yes Effective Date
Leaf - Accountant Effective Date
Yes Previous Increase Dt
Leaf - Accountant Previous Increase Dt
Yes Impact in current year (In Lakhs)
Leaf - Accountant Impact in current year (In Lakhs)
Yes Justification & Content
Leaf - Accountant Justification & Content
Yes 
-
Under the Activities Autofill from Section
Fields column, click the auto form fill
icon.

-
On the pop-up window, select the Enable
Section to Section Auto Fill. checkbox
to enable data sharing from work/form section fields to
form section fields, and then click Add
Configuration.

-
Configure the fields as shown below.

-
Under the Activities Autofill from Normal
Fields column, click the auto form fill
icon.
-
For the Leaf - Accountant activity, do
the following:
-
On the pop-up window, select the Enable Form
Submission Auto fill from Work/Form
Submission checkbox to enable data
sharing from work/form fields to form fields.
-
Configure the fields as mentioned in the following
table.
Form Submission Fields
Source from
Copy from field
Change value?
Requisition No.
Leaf Requisition No.
No Date
Leaf Date
No Department
Leaf Department
No Nature of Sanction
Initiator Nature of Sanction
No Description
Leaf Description
No Effective Date
Initiator Effective Date
No Previous Increase Dt
Initiator Previous Increase Dt
No Impact in current year (In Lakhs)
Initiator Impact in current year (In Lakhs)
No Justification & Content
Initiator Justification & Content
No 
-
On the pop-up window, select the Enable
Section to Section Auto Fill. checkbox
to enable data sharing from work/form section fields to
form section fields, and then click Add
Configuration.
-
Configure the fields as shown below.

-
On the pop-up window, select the Enable Form
Submission Auto fill from Work/Form
Submission checkbox to enable data
sharing from work/form fields to form fields.
-
For the GM - Leaf, VP - Leaf, Manager Finance,
Finance Controller, CFO, and MD activities, do
the following:

-
On the pop-up window, select the Enable Form
Submission Auto fill from Work/Form
Submission checkbox to enable data
sharing from work/form fields to form fields.
-
On the pop-up window, select the Enable
Section to Section Auto Fill. checkbox
to enable data sharing from work/form section fields to
form section fields, and then click Add
Configuration.
-
Configure the fields as shown below.
-
On the pop-up window, select the Enable Form
Submission Auto fill from Work/Form
Submission checkbox to enable data
sharing from work/form fields to form fields.
Creation and Configuration of Travel Expense Approvals
The Travel Expense workflow requires configuration to effectively manage the activities associated with the process. These activities include initiating travel expense requests, approval by the reporting manager, L2 review, and so on.
In this section, we will configure the process activities, outline the sequence of execution, specify the necessary information for creating work items, and other aspects. To know more about work processes, refer to Work Processes.
Create Travel Expenses Process
In this section, we will create the activities associated with the travel expense approval process.
-
Go to .
-
On the Create Activity Process screen, do the
following:
-
In the Work Process Name field,
enter the title as Travel Expenses.

- Click Next.
-
In the Work Process Name field,
enter the title as Travel Expenses.
- After entering the process name and clicking Next, you will proceed to the next tab, where you are required to configure the work fields. On this tab, click Next and then click OK. We will configure this section later.
-
On the Manage Forms tab, click
Next.
-
Manage Activities: On this tab, we will
define the activities that need to be executed for a request. To
know more about activities, refer to Activities. To
define the activities, follow these steps:
-
Click Add Activity.
-
Under the Activity Title column,
enter the title as
Initiator.
-
For the Initiator activity,
configure the Travel Exp -
Initiator form under the Form
Template column.

-
Similarly, click the Add
Activity button again and create the
following activities, and then configure the forms given
against the activities.
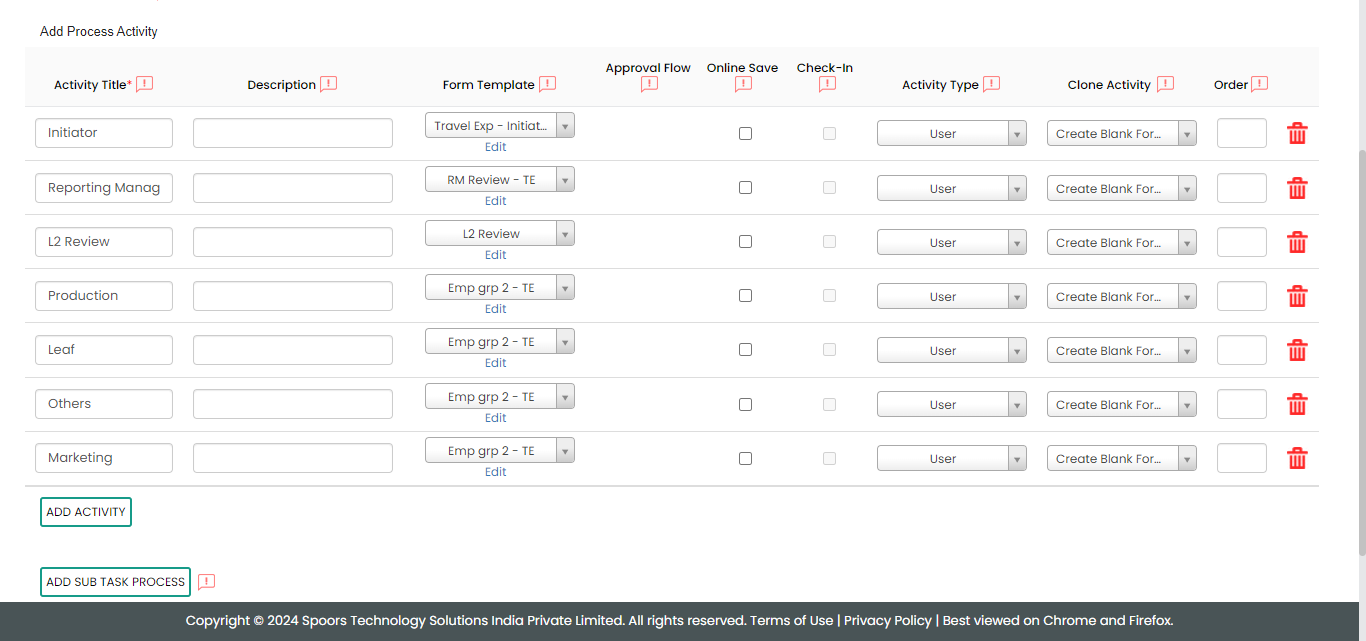
Activity Name Form Template Reporting Manager Review RM Review - TE L2 Review L2 Review Production Emp grp 2 - TE Leaf Emp grp 2 - TE Others Emp grp 2 - TE Marketing Emp grp 2 - TE
-
Click Add Activity.
- On the Clone Fields Data tab, click Next.
- On the Manage Flow tab, you can see the default flow created automatically. Click Next to move to the next screen. We will configure this later.
- On the Define Auto Allocation tab, click Skip. We will configure this later.
- On the Manage Restrictions tab, click Next.
-
On the Other Settings tab, click
Complete. We will configure this
later.
- As you can see, we've ignored some configurations as those are complex and time consuming. Refer to the next sections for detailed steps to configure the flow, fields, work settings, and so on.
Configure Work Fields
In this section, we will configure the work fields that are required for capturing the information necessary to execute the process. You will find some default fields that are pre-configured. However, these defaults are insufficient for capturing the necessary information. To address this, we must add and configure custom fields. To know more about work fields, refer to Work Fields.
Follow the steps below to create work fields.
-
On the process page, click Manage
Fields. Alternatively, go to .
-
To begin, deactivate all default fields by clicking on the
green checkboxes, as demonstrated below.
-
Click Add Field and then do the
following:
-
Under the Field Label column,
enter Start Date.

-
Change Data Type to
Date.

-
Under the Field Label column,
enter Start Date.
-
Similarly, click the Add Field button
and configure the fields as described in the following
table.
Field Configuration End Date Configure the field as shown below:
Travel Days Make this field as Computed and then configure the field as shown below: Click the grey box below the computed field and then define the formula as shown below.
Brief about the Travel Configure the field as shown below:
Claim requested by Make this field as Computed and then configure the field as shown below: Click the grey box below the computed field and then define the formula as shown below.
Department Make this field as Computed and then configure the field as shown below: Click the grey box below the computed field and then define the formula as shown below.
- Once you configure all the fields, click Save.
Configure Work Flow
In this section, we will define the workflow, which outlines the sequence of activities defined earlier. This process includes specifying the start activity, end activity, subsequent activities, and more. To know more about the Flow, refer to the Manage Flow documentation.
Follow the instructions below to configure the flow:
- On the process page, click Manage Flow. Alternatively, go to .
-
For the Initiator activity, do the
following:
-
Make sure that the Initiator
activity as Start Activity as
shown below.
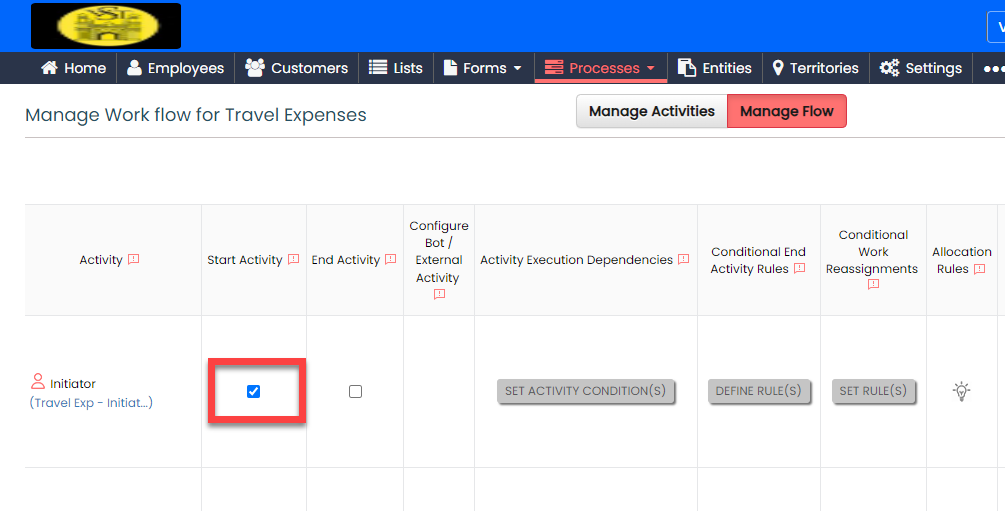
When you make an activity as the start activity, it means that the initiator has to do this activity first.
-
Select the Reporting Manager
Review activity and click the right
arrow icon to move it to the
Selected section.
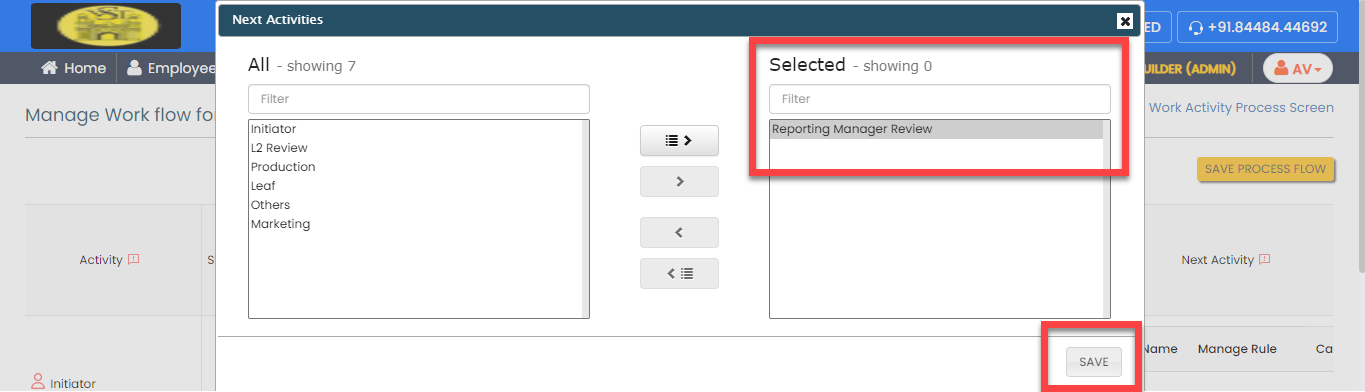
According to this configuration, the request will be assigned to the reporting manager of the initiator once the request has been initiated.
-
Make sure that the Initiator
activity as Start Activity as
shown below.
-
For the Reporting Manager Review
activity, do the following:
-
Under the Allocation Rules
column, click the bulb icon, and then configure as shown
below in the pop-up window.

According to this configuration, this action will be automatically assigned to the initiator's reporting manager.
-
Select the following activities and click the right
arrow icon to move them to the
Selected section.
- L2 Review
- Production
- Leaf
- Others
- Marketing
- Initiator

-
Click Create Rule against the
L2 Review activity and define
the conditions to execute this activity.

According to this condition, the request will be sent to the L2 approver if the exceeded amount is greater than 0. -
Click Create Rule against the
Production activity and
define the conditions to execute this activity.

-
Click Create Rule against the
Leaf activity and define the
conditions to execute this activity.

-
Click Create Rule against the
Others activity and define
the conditions to execute this activity.
-
Click Create Rule against the
Marketing activity and define
the conditions to execute this activity.

-
Click Create Rule against the
Initiator activity and define
the conditions to execute this activity.

-
Under the Allocation Rules
column, click the bulb icon, and then configure as shown
below in the pop-up window.
-
For the L2 Review activity, do the
following:
-
Under the Activity Execution
Dependencies column, click
Set Activity Condition(s),
click Add Field Condition, and
then configure as shown below.

According to this configuration, this action will be executed only if the exceeded amount is greater than 0.
-
Under the Allocation Rules
column, click the bulb icon, and then configure as shown
below in the pop-up window.

-
Select the following activities and click the right
arrow icon to move them to the
Selected section.
- Production
- Leaf
- Others
- Marketing
- Initiator

-
Click Create Rule against the
Production activity and
define the conditions to execute this activity.

-
Click Create Rule against the
Leaf activity and define the
conditions to execute this activity.
-
Click Create Rule against the
Others activity and define
the conditions to execute this activity.
-
Click Create Rule against the
Marketing activity and define
the conditions to execute this activity.
-
Click Create Rule against the
Initiator activity and define
the conditions to execute this activity.
-
Under the Activity Execution
Dependencies column, click
Set Activity Condition(s),
click Add Field Condition, and
then configure as shown below.
-
For the Production activity, do the
following:
-
Under the End Activity column,
enable the checkbox to make it as end activity.
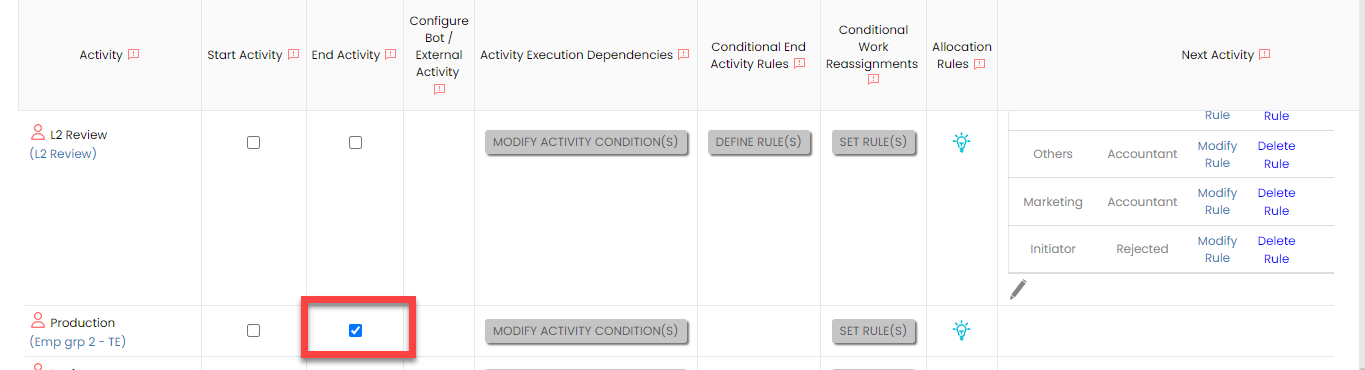
-
Under the Activity Execution
Dependencies column, click
Set Activity Condition(s),
click Add Field Condition, and
then configure as shown below.

According to this configuration, this action will be executed only if the request belongs to a particular department.
-
Under the Allocation Rules
column, click the bulb icon, and then configure as shown
below in the pop-up window.
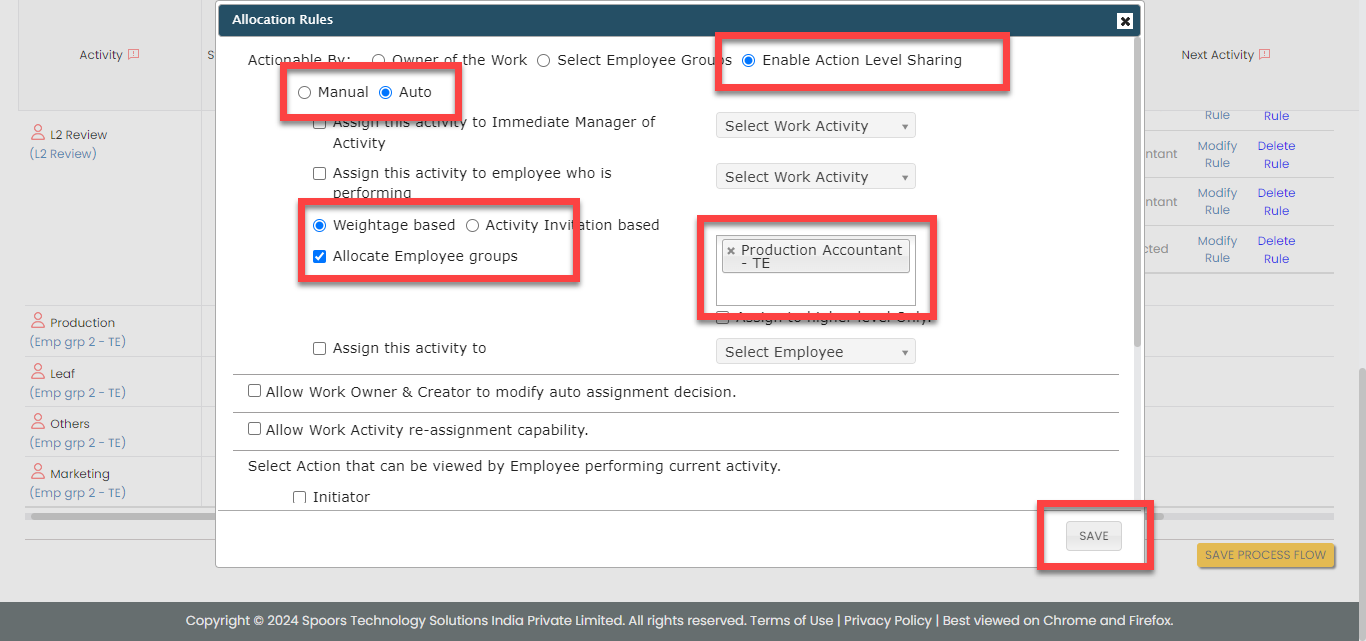
-
Under the End Activity column,
enable the checkbox to make it as end activity.
-
For the Leaf activity, do the
following:
-
Under the Activity Execution
Dependencies column, click
Set Activity Condition(s),
click Add Field Condition, and
then configure as shown below.

According to this configuration, this action will be executed only if the request belongs to a particular department.
-
Under the Allocation Rules
column, click the bulb icon, and then configure as shown
below in the pop-up window.

-
Under the Activity Execution
Dependencies column, click
Set Activity Condition(s),
click Add Field Condition, and
then configure as shown below.
-
For the Others activity, do the
following:
-
Under the Activity Execution
Dependencies column, click
Set Activity Condition(s),
click Add Field Condition, and
then configure as shown below.

According to this configuration, this action will be executed only if the request belongs to a particular department.
-
Under the Allocation Rules
column, click the bulb icon, and then configure as shown
below in the pop-up window.

-
Under the Activity Execution
Dependencies column, click
Set Activity Condition(s),
click Add Field Condition, and
then configure as shown below.
-
For the Marketing activity, do the
following:
-
Under the Activity Execution
Dependencies column, click
Set Activity Condition(s),
click Add Field Condition, and
then configure as shown below.
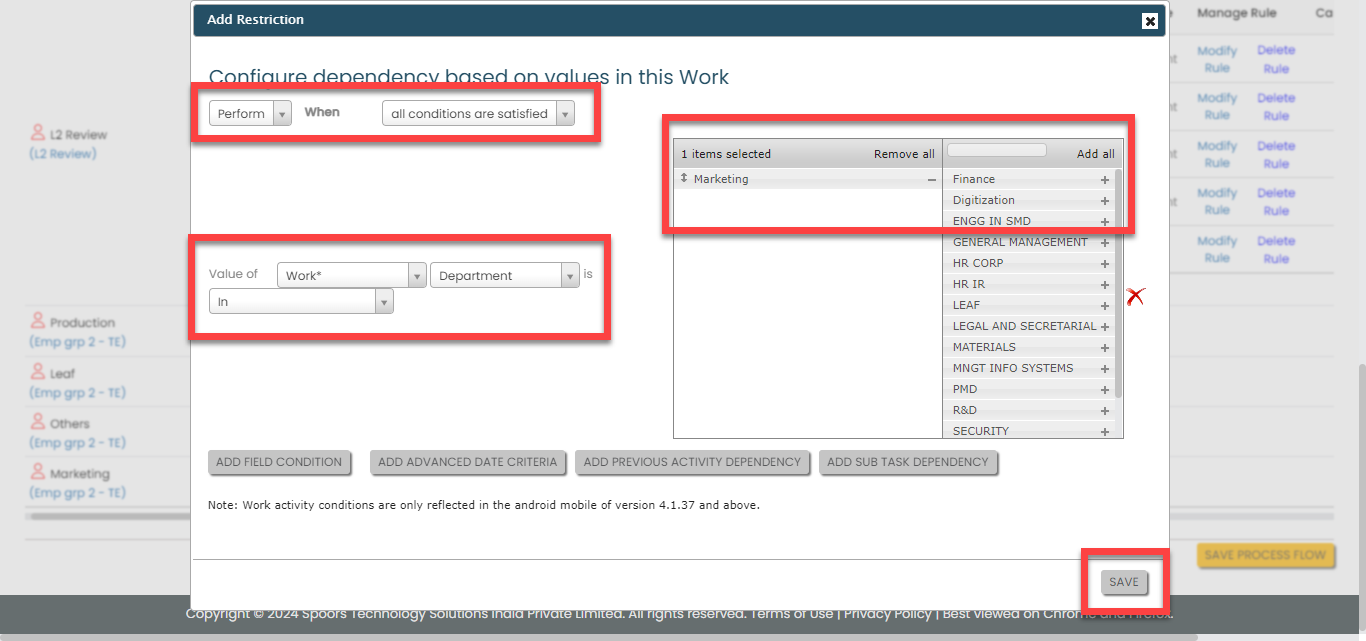
According to this configuration, this action will be executed only if the request belongs to a particular department.
-
Under the Allocation Rules
column, click the bulb icon, and then configure as shown
below in the pop-up window.
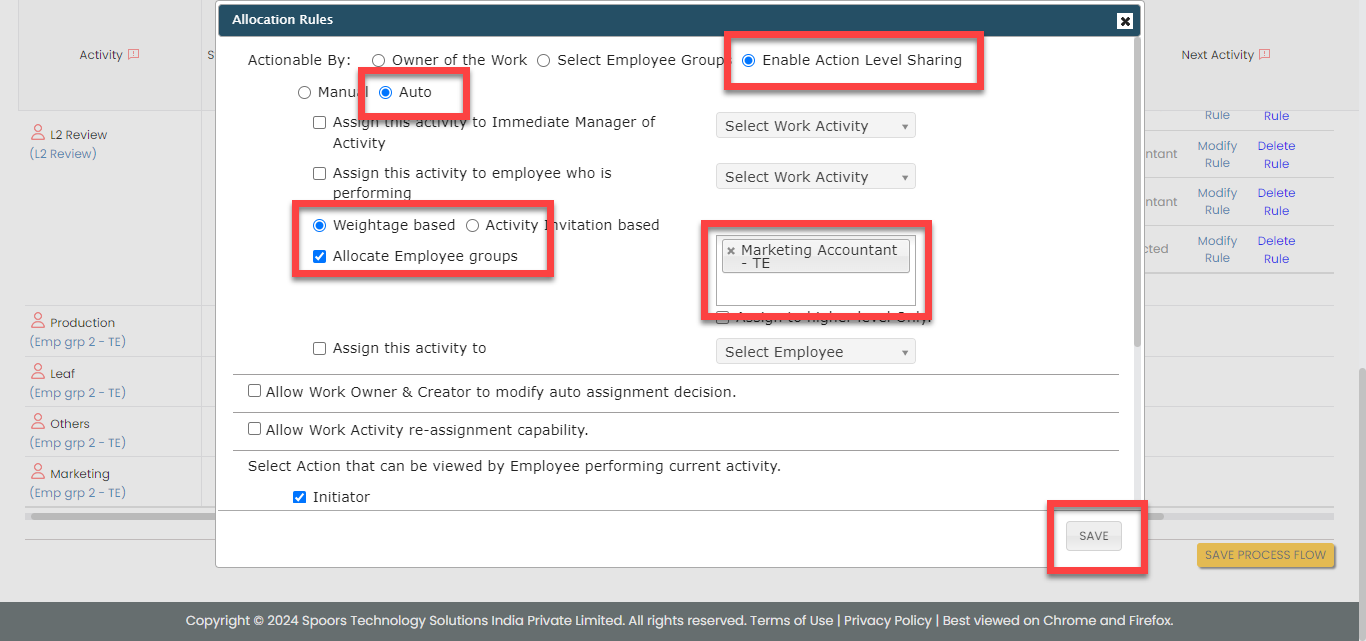
-
Under the Activity Execution
Dependencies column, click
Set Activity Condition(s),
click Add Field Condition, and
then configure as shown below.
- Click Save Process Flow.
Configure Auto Fill
In this section, we will define the auto fill configuration that allows data copy from one activity to another activity. To know more about auto fill, refer to Auto Fill.
Follow the steps below to configure auto fill.
-
On the process page, click Manage
Fields. Alternatively, go to .
-
For the Initiator activity, do the
following:
-
Under the Activities Autofill from Normal
Fields column, click the auto form fill
icon.

-
On the pop-up window, select the Enable Form
Submission Auto fill from Work/Form
Submission checkbox to enable data
sharing from work/form fields to form fields and
configure as shown below.

- Click Save or Update.
-
Under the Activities Autofill from Normal
Fields column, click the auto form fill
icon.
-
For the Reporting Manager Review
activity, do the following:
-
On the pop-up window, select the Enable Form
Submission Auto fill from Work/Form
Submission checkbox to enable data
sharing from work/form fields to form fields and
configure as shown below.
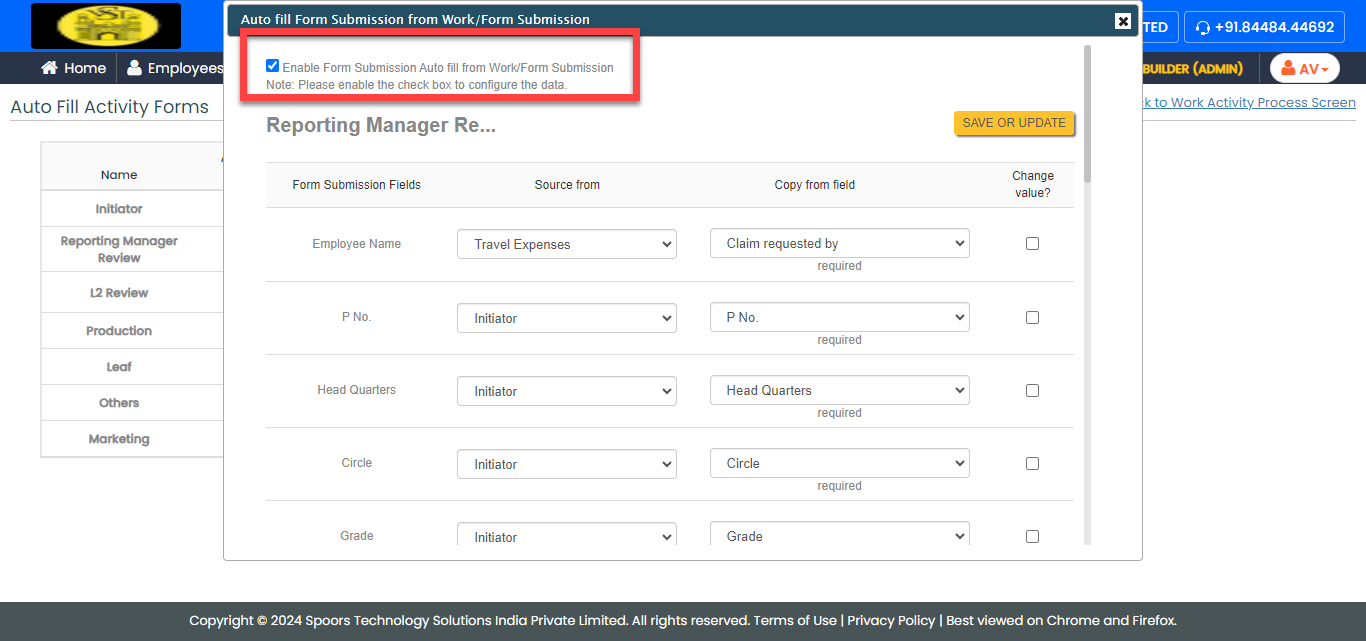
Form Submission Fields
Source from
Copy from field
Change value?
Employee Name
Travel Expenses Claim Requested By
No P No.
Initiator P No.
No Head Quarters
Initiator Head Quarters
No Circle
Initiator Circle
No Grade
Initiator Grade
No From Date
Travel Expenses Start Date
No To Date
Travel Expenses End Date
No Cost Centre Code
Initiator Cost Centre Code
No Total of Food & Hotel Expenses (Including Tax)
Initiator Total of Food & Hotel Expenses (Including Tax)
No Total of Food & Hotel Expenses (Excluding Tax)
Initiator Total of Food & Hotel Expenses (Excluding Tax)
No Total of Travel Expenses
Initiator Total of Travel Expenses
No Total of Other Expenses
Initiator Total of Other Expenses
No Total Daily Expenses
Initiator Total Daily Expenses
No Total Exp of Mileage
Initiator Total Exp of Mileage
No Total Exp of Daily Expenses
Initiator Total Exp of Daily Expenses
No Total of Mileage
Initiator Total of Mileage
No Incidentals Eligibility Per Day
Initiator Incidentals Eligibility Per Day
No Total Incidentals of the tour
Initiator Total Incidentals of the tour
No Total Expenses of the Tour
Initiator Total Expenses of the Tour
No Exceeded Amount
Initiator Exceeded Amount
No
-
On the pop-up window, select the Enable Form
Submission Auto fill from Work/Form
Submission checkbox to enable data
sharing from work/form fields to form fields and
configure as shown below.
-
For the L2 Review activity, do the
following:
-
On the pop-up window, select the Enable Form
Submission Auto fill from Work/Form
Submission checkbox to enable data
sharing from work/form fields to form fields and
configure as shown below.

Form Submission Fields
Source from
Copy from field
Change value?
Employee
Travel Expenses Claim Requested By
No P No.
Initiator P No.
No Head Quarters
Initiator Head Quarters
No Circle
Initiator Circle
No Grade
Initiator Grade
No From Date
Travel Expenses Start Date
No To Date
Travel Expenses End Date
No Cost Centre Code
Initiator Cost Centre Code
No Total of Food & Hotel Expenses (Including Tax)
Initiator Total of Food & Hotel Expenses (Including Tax)
No Total of Food & Hotel Expenses (Excluding Tax)
Initiator Total of Food & Hotel Expenses (Excluding Tax)
No Total of Travel Expenses
Initiator Total of Travel Expenses
No Total Incidentals of the tour
Initiator Total Incidentals of the tour
No Total Expenses of the Tour
Initiator Total Expenses of the Tour
No Excess Amount
Reporting Manager Review Exceeded Amount
No
-
On the pop-up window, select the Enable Form
Submission Auto fill from Work/Form
Submission checkbox to enable data
sharing from work/form fields to form fields and
configure as shown below.
-
For the Production, Leaf, Other, and
Marketing activities, do the following:
-
On the pop-up window, select the Enable Form
Submission Auto fill from Work/Form
Submission checkbox to enable data
sharing from work/form fields to form fields and
configure as shown below.

Form Submission Fields
Source from
Copy from field
Change value?
Employee
Travel Expenses Claim Requested By
No P No.
Initiator P No.
No Head Quarters
Initiator Head Quarters
No Circle
Initiator Circle
No Grade
Initiator Grade
No Cost Centre Code
Initiator Cost Centre Code
No Total of Food & Hotel Expenses (Including Tax)
Initiator Total of Food & Hotel Expenses (Including Tax)
No Total of Food & Hotel Expenses (Excluding Tax)
Initiator Total of Food & Hotel Expenses (Excluding Tax)
No Total Amount for (Air (or) Train (or) Bus)
Initiator Total Amount for (Air (or) Train (or) Bus)
No Total Amount for (Taxi Fare)
Initiator Total Amount for (Taxi Fare)
No Total Amount for (Auto Fare)
Initiator Total Amount for (Auto Fare)
No Total of Travel Expenses
Initiator Total of Travel Expenses
No -
Under the Activities Autofill from Section
Fields column, click the auto form fill
icon.
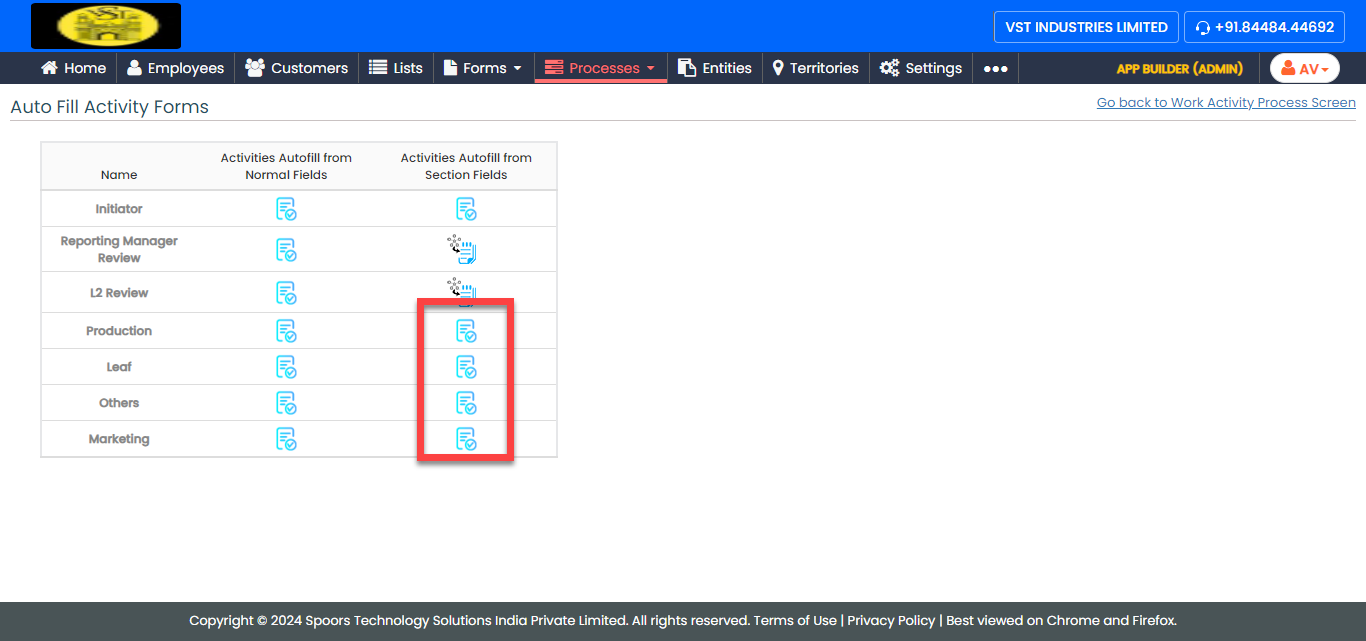
-
On the pop-up window, select the Enable
Section to Section Auto Fill. checkbox
to enable data sharing from work/form section fields to
form section fields.
-
Click Add Configuration and
define the configuration and fields as shown below to
enable auto copy from the Hotel (or)
CTE section.

Form Submission Fields
Copy from field
Change value?
Nature of Expense (Please select Hotel & Food Exp | CTE | Food Exp | Guest House)
Nature of Expense (Please select Hotel & Food Exp | CTE | Food Exp | Guest House)
No Metro | Non Metro
Metro | Non Metro
No From Date
From Date
No To Date
To Date
No GL Code
GL Code
No No. of Days
No. of Night Stay
No No. of Days 1
No. of Night Stay
No Hotel Name
Hotel Name
No Town (or) City
Town (or) City
No Bill No.
Bill No.
No State
State (Type two letters of the state name)
No Hotel GSTIN
Hotel GSTIN
No HSN Code (or) SAC Code
HSN Code (or) SAC Code
No Company GSTIN
Company GSTIN
No Hotel Metro Eligibility (Per Day)
Hotel Metro Eligibility (Per Day)
No Hotel Non Metro Eligibility (Per Day)
Hotel Non Metro Eligibility (Per Day)
No CTE Metro Eligibility (Per Day)
CTE Metro Eligibility (Per Day)
No CTE Non Metro Eligibility (Per Day)
CTE Non Metro Eligibility (Per Day)
No Amount (Excluding Tax)
Amount (Excluding Tax)
No Tax Amount
Tax Amount
No Food Amount (Including Tax)
Food Amount (Including Tax)
No Amount (Including Tax)
Amount (Including Tax)
No Total (Including Tax)
Total Exp (Including Tax)
No Remarks
Remarks
No Image | Doc | Both
Image | Document | Both
No Bill Image
Image Yes Attachments
Attach Bills Yes Overall Eligibility Hotel Metro
Overall Eligibility Hotel Metro
No Overall Eligibility Non Hotel Metro
Overall Eligibility Non Hotel Metro
No Overall Eligibility CTE Metro
Overall Eligibility CTE Metro
No Overall Eligibility CTE Non Metro
Overall Eligibility CTE Non Metro
No -
Similarly, click the Add
Configuration again and define the
configurations as shown below to enable auto copy from
Total Expenses section.

Form Submission Fields
Copy from field
Change value?
Date
Date
No Travel Expenses (Please select any one them Air, Bus, Train or Taxi or Auto)
Travel Expenses (Please select any one them Air, Bus, Train or Taxi or Auto)
No GL Code
GL Code
No Travel To
Travel To
No Mode of Travel
Mode of Travel
No Purpose
Purpose
No Amount (Air (or) Train (or) Bus)
Amount (Air (or) Train (or) Bus)
No Amount (Taxi Fare)
Amount (Taxi Fare)
No Amount (Auto Fare)
Amount (Auto Fare)
No Kilometers
Kilometers
No Image | Doc | Both
Image | Document | Both TE
No Image
Image
Yes Attachments
Attachments
Yes -
Similarly, click the Add
Configuration again and define the
configurations as shown below to enable auto copy from
the Other Expenses section.

Form Submission Fields
Copy from field
Change value?
Date
Date
No Other Expenses (Pick one from Stationary or Courier Expenses)
Other Expenses (Pick one from Stationary or Courier Expenses)
No GL Code
GL Code
No Description
Description
No Amount
Amount
No Image | Doc | Both
Image | Document | Both TE
No Image
Image
Yes Attachments
Attachments
Yes -
Similarly, click the Add
Configuration again and define the
configurations as shown below to enable auto copy from
the Daily Allowances
section.

Form Submission Fields
Copy from field
Change value?
From Date
From Date
No To Date
To Date
No Daily Allowances
Daily Allowances
No No. of Days
No. of Days
No No. of Days
No. of Days
No Amount
Amount
No Market Name
Market Name
No -
Similarly, click the Add
Configuration again and define the
configurations as shown below to enable auto copy from
the Daily Allowances | Mileage
section.

Form Submission Fields
Copy from field
Change value?
From Date
From Date
No To Date
To Date
No Exp Description
Exp Description
No No. of Days L
No. of Days
No No. of Days L
No. of Days
No KMs
KMs
No Amount
Amount
No Amount of KMs
Amount of KMs
No Place of Travel
Place of Travel
No -
Similarly, click the Add
Configuration again and define the
configurations as shown below to enable auto copy from
the Mileage section.
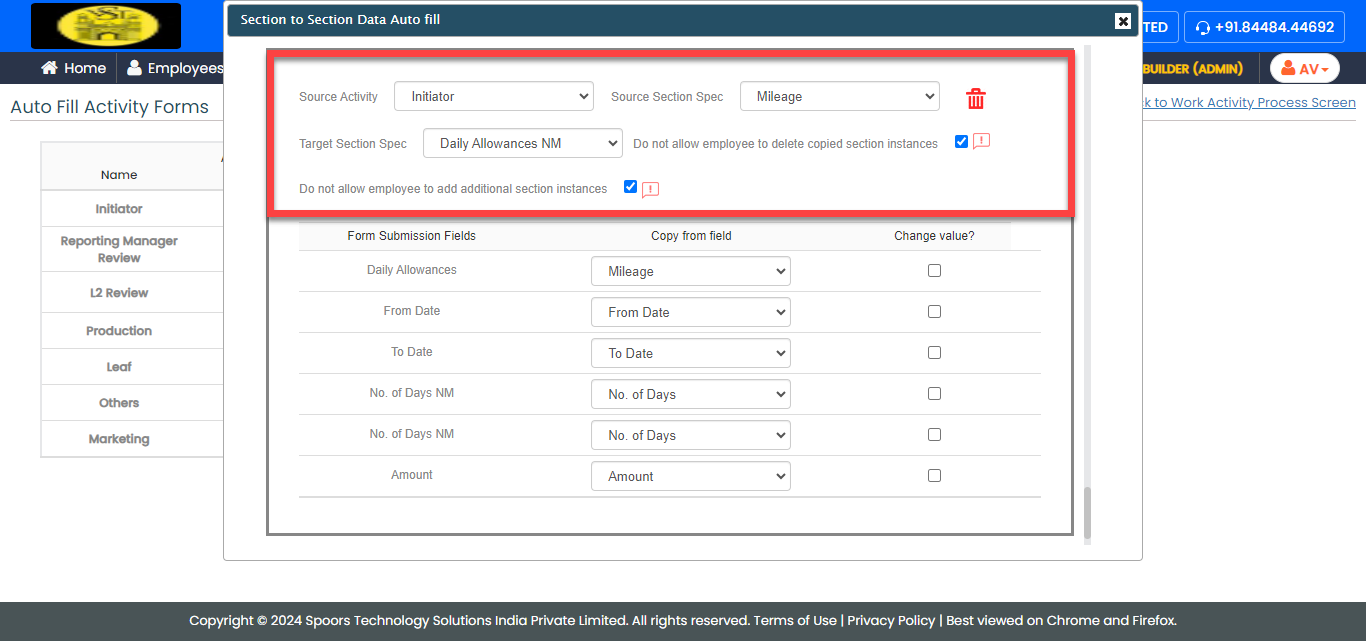
Form Submission Fields
Copy from field
Change value?
Daily Allowances
Mileage No From Date
From Date
No To Date
To Date
No No. of Days NM
No. of Days No No. of Days NM
No. of Days
No Amount
Amount
No
-
On the pop-up window, select the Enable Form
Submission Auto fill from Work/Form
Submission checkbox to enable data
sharing from work/form fields to form fields and
configure as shown below.
Execute Capital Expenditure Approval Process
In this section, we will show you how to execute the Capital Expenditure Approval Process in the Effort Platform. It provides the activities performed by the initiators and approvers, such as initiating approval requests, approving the request, and so on. Let's get started.
Initiate Capital Expenditure Request
The initiators can use either the Web App or Web Lite app to initiate approval requests. Follow the instructions below to create and initiate the capital expenditure approval flow in the Web App.
-
Go to .

-
Under the Basic Details section, fill in the
required fields such as customer, date, work start, work ends, and so
on.

-
Select the approval flow as per your requirement.

- Optional:
If you select two or more applicants from the Approval
Level dropdown, select the other applicants from other
fields.

- Click Save.
-
After you click Save, you will see the process
screen. Scroll down to the bottom of the page and click the eye icon
against the newly created process.

-
On the process details page, click Perform
Initiator.

-
Fill in the details and click Save.

Approve Capital Expenditure Request
Once the initiator's request is raised, it will be assigned to the approver. To complete the approval, the approver must follow the steps below:
- The approver can navigate from either the home page dashboard or the respective Capex process screen. To approve from the respective process page, go to .
-
Under the Actions column, click the eye icon
against the required process.

-
On the process details page, click Perform
L1.

-
As configured, the details will be populated automatically on the
fields.

-
The approver verifies the details and approves the request by selecting
the Approved option from the
Approval dropdown.

- Click Save.
-
Similarly, other approvers such as L2, L3, L4, L5, the Finance
Controller, and other static approvers must follow the same process to
approve the capital expenditure request. If the request is rejected by
any approver, it will be returned to the initiator. The initiator must
update the request according to the comments and then resubmit it for
approval. The approval flow will then be initiated again. Once the
request is approved by all approvers, the process will be marked as
Completed.

Execute Leaf Approval Process
In this section, we will show you how to execute the Leaf Approval Process in the Effort Platform. It provides the activities performed by the initiators and approvers, such as initiating approval requests, approving the request, and so on. Let's get started.
Initiate Leaf Approval Process
The initiators can use either the Web App or Web Lite app to initiate approval requests. Follow the instructions below to create and initiate the leaf approval flow in the Web App.
-
Go to .

-
Under the Basic Details section, fill in the
required fields such as date and department.

- Click Save.
-
After you click Save, you will see the process
screen. Scroll down to the bottom of the page and click the eye icon
against the newly created process.

-
On the process details page, click Perform
Initiator.

-
Fill in the details and click Save.

Approve Leaf Request
Once the initiator's request is raised, it will be assigned to the approver. To complete the approval, the approver must follow the steps below:
- The approver can navigate from either the home page dashboard or the respective Leaf process screen. To approve from the respective process page, go to .
-
Under the Next Activity column, click on the
next activity name against the required process.

-
As configured, the details will be populated automatically on the
fields.

-
The approver verifies the details and approves the request by selecting
the Yes option from the Approval of
PA dropdown.

- Click Save.
-
Similarly, other approvers, such as the HOD, VP, Manager of Finance,
Finance Controller, CFO, and MD, must follow the same process to approve
the leaf request. If the request is rejected by any approver, it will be
returned to the initiator. The initiator must update the request
according to the comments and then resubmit it for approval. The
approval flow will then be initiated again. Once the request is approved
by all approvers, the process will be marked as completed.
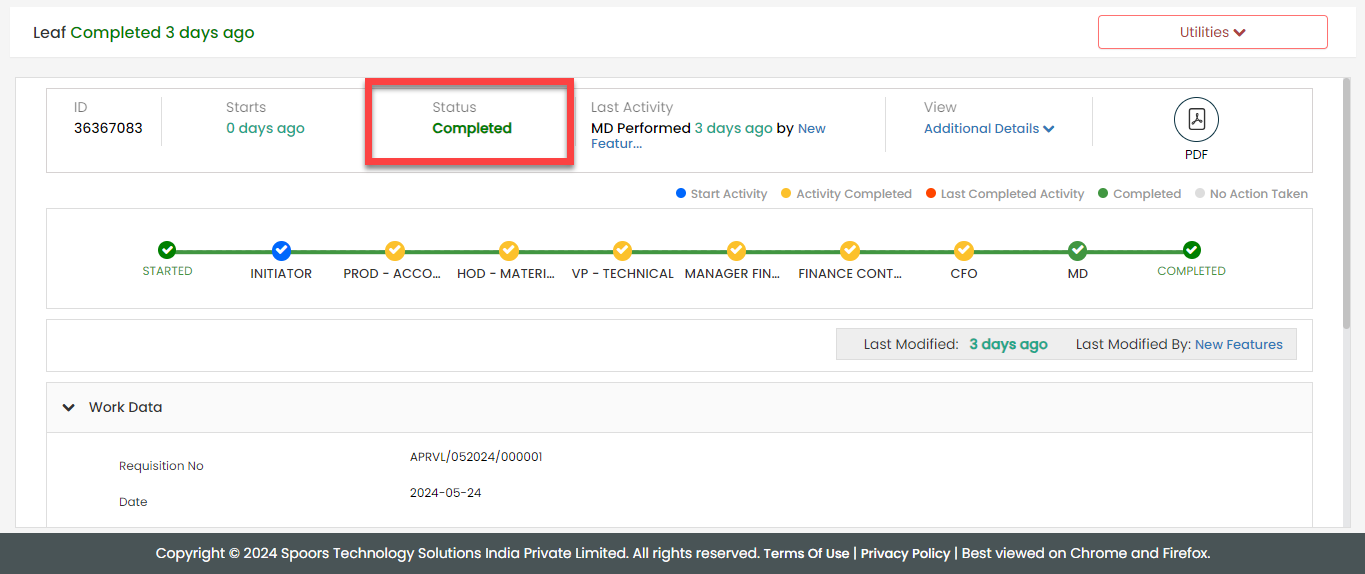
Execute Travel Expense Approval Process
In this section, we will show you how to execute the Travel Expense Approval Process in the Effort Platform. It provides the activities performed by the initiators and approvers, such as initiating approval requests, approving the request, and so on. Let's get started.
Initiate Travel Expense Approval Process
The initiators can use either the Web App or Web Lite app to initiate approval requests. Follow the instructions below to create and initiate the travel expense approval flow in the Web App.
-
Go to .

-
Under the Basic Details section, fill in the
required fields such as travel start date, end date, department, and so
on.

- Click Save.
-
After you click Save, you will see the process
screen. Scroll down to the bottom of the page and click the eye icon
against the newly created process.

-
On the process details page, click Perform
Initiator.
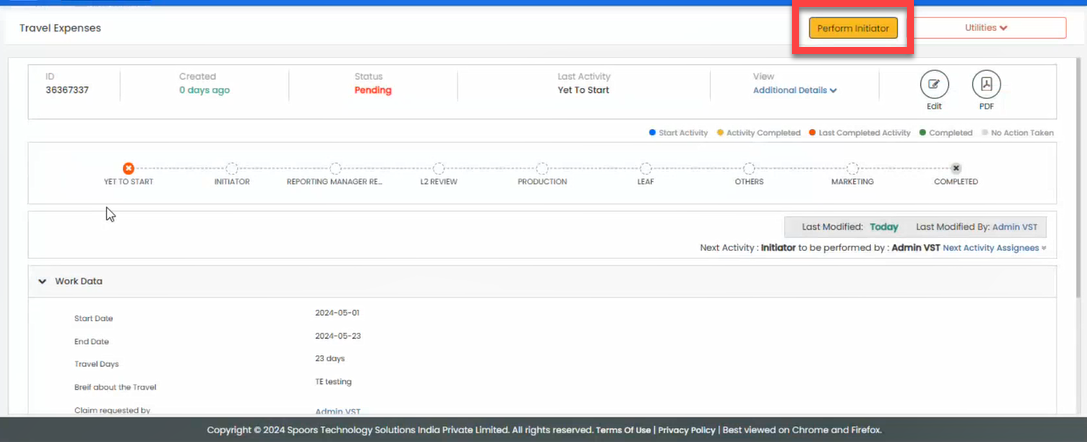
-
Fill in the details and click Save.

Approve Travel Expense Request
Once the initiator's request is raised, it will be assigned to the approver. To complete the approval, the approver must follow the steps below:
- The approver can navigate from either the home page dashboard or the respective Leaf process screen. To approve from the respective process page, go to .
-
Under the Next Activity column, click on the
next activity name against the required process.

-
As configured, the details will be populated automatically on the
fields.

-
The approver verifies the details and approves the request by selecting
the Approved option from the
Approval dropdown.

- Click Save.
-
Similarly, other approvers, such as the L2, production, leaf,
marketing, and so on, must follow the same process to approve the travel
expense request. If the request is rejected by any approver, it will be
returned to the initiator. The initiator must update the request
according to the comments and then resubmit it for approval. The
approval flow will then be initiated again. Once the request is approved
by all approvers, the process will be marked as
Completed.
