Configure Turbine Installation (Sub Tasks) with Effort
Introduction
The installation of turbines is a highly complex procedure involving numerous tasks like equipment shipping, foundation work, wiring, and more. If we create separate tasks for each of these activities, it becomes challenging to monitor the status of individual tasks, including those that are incomplete, completed, on hold, and so forth. This complicates the assessment of whether the turbine installation has been successfully completed or not.
Effort, a No Code Platform, offers a comprehensive solution to sidestep all these challenges by fully digitizing installation activities. It facilitates the creation of subtasks within a parent task, assigning them to different technicians. The parent process is considered complete only when all the associated subtasks are finished. Furthermore, Effort enables the creation of a subtask list for the main process, making it easy to monitor progress. The platform streamlines operations with features such as automatic data copying from the parent process to the sub-process, condition-based activity execution, condition-based process completion, and more.
In this tutorial, we will walk you through the process of configuring and operating a sample turbine installation process from scratch using the Effort platform. By following the step-by-step instructions below, you will be able to set up a successful turbine installation process with the Effort platform.
This tutorial provides all the activities that need to be performed by different roles involved in the operation using the Effort platform. The roles include Admin, Manager, and Employee (Technicians). Here's the list of activities we will be configuring and executing in the Effort as part of the Installation.
Admin Activities (Configuration of Installation Service)
In this section, we will walk you through the admin-level activities involved in the configuration of the Turbine Installations. To perform the Admin activities, the users must have access to the App Builder module. Only the users that have App Builder access can define all the configurations. Login to Effort as App Builder. Refer to the Sign-in To Effort topic for login.
Creation of Employees
In this section, we will guide you through the process of creating employees in the Web App. These employees are responsible for managing backend activities, handling assigned installation tasks, and executing the tasks assigned to them. To create employees, follow the steps below:
-
Go to .

-
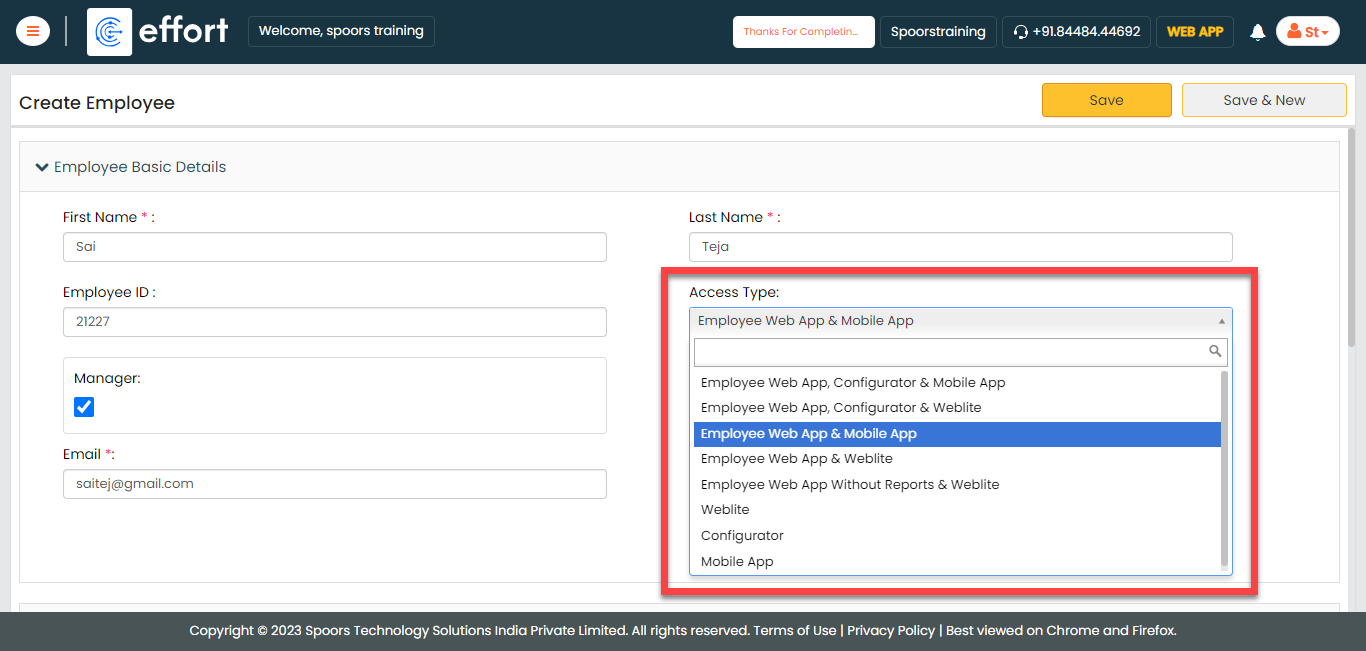
Enter the employee details such as First Name, Last Name, Employee ID,
Email, Mobile Number, and so on.

-
Select the Access Type based on the employee you
want to create.
-
Click Save.
Note: If you want to create more employees, you can choose the Import feature to create in a single go. To import employees, refer to Import Employees.
Creation and Configuration of Activity Form
In this section, we will create a sample form required to manage the turbine installation process. This form needs to be filled out by technicians to capture all the details related to installation. To know more about the forms, refer to Forms.
-
Go to .

-
In the Title field, enter the title as
Activity Details.

-
Drag and drop the data types onto the field canvas and label them as
per your business requirement. Here, we are adding the following data
types for this tutorial.
Data Type Label Text Activity Name Yes/No Is Your Activity Completed? To know more about all the data types, refer to the following topics.
-
Now click Publish and then click
OK to make it available to the technicians.
You are done with your first form creation.
Note: To know more about all the publishing options, refer to Publishing Options.
Creation and Configuration of Turbine Installation Process
For this tutorial, we will create a sample turbine installation process where the process gets completed once the technicians execute individual sub-tasks. It is a workflow that requires configuration to effectively manage the activities associated with it. These activities include generating an installation request, visiting the site, executing the sub-task, and more.
In this section, we will configure the Installation Service process activities, outline the sequence of execution, specify the necessary information for creating work items, and other aspects. To know more about work processes, refer Work Processes.
Creation and Configuration of Sub Process
Creation of Activity Process
In this section, we will create and configure a sample sub-task that must be executed as part of the main turbine installation process. To configure this, follow the steps below:
-
Go to .

-
On the Create Activity Process screen, do the
following:
-
In the Work Process Name field,
enter the title as Activities.

- Click Next.
-
In the Work Process Name field,
enter the title as Activities.
-
After clicking the Next button, you will proceed to the
next tab, where you are required to configure the work fields.
On this tab, click Next and then click
OK. We will configure this section
later.

-
On the Manage Forms tab, click
Next.

-
Manage Activities: On this tab, we will
define the activities that need to be executed for this process.
To know more about activities, refer Activities. To
define the activities, follow these steps:
-
Click Add Activity.

-
Under the Activity Title column,
enter the title as Enter Activity
Details.

-
Under the Form Template column,
select the Activity form that we
created earlier.

- Once you define the activity, click Next.
-
Click Add Activity.
-
On the Clone Fields Data tab, click
Next.

-
On the Manage Flow tab, you can see the default flow
created automatically. Click Next to move
to the next screen. We will configure this later.

-
On the Define Auto Allocation tab, click
Skip.

-
On the Manage Restrictions tab, click
Next.

-
On the Other Settings tab, click
Complete. We will configure this
later.

- As you can see, we've ignored some configurations as those are complex and time-consuming. Refer to the next sections for detailed steps to configure the flow, fields, work settings, and so on.
Configure Work Fields
In this section, we will configure the work fields that are required for capturing the information necessary to execute the activity process. You will find some default fields that are pre-configured. We'll customize the default fields for a better understanding. To know more about work fields, refer Work Fields.
Follow the steps below to create work fields.
-
On the process page, click Manage
Fields. Alternatively, go to .

-
Change the Work Name label to
Turbine ID.

-
Change the Employee label to
Technician.

- Click Save.
Configure Work Flow
In this section, we will define the configuration of workflow. To know more about the Flow, refer to the Manage Flow documentation.
Follow the instructions below to configure the flow:
-
On the process page, click Manage Flow.
Alternatively, go to .

-
Under the End Activity column, uncheck
the checkbox.

-
Under the Next Activity column, click
the pencil icon.

-
Click on the Enter Activity Details activity, click the
right arrow icon to select it, and click Save.

-
Under the Next Activity column, click
Create Rule to define the
configuration to execute this activity.

-
Enter the Rule Name as
No and click Add
Criteria.

-
Define the configuration as shown below and click
Save.

According to this configuration, the technician must repeat this activity if it is not completed. This process will continue until the technician successfully completes the activity.
-
Under the Conditional End Activity Rules
column, click Define Rule(s).

-
Click Add Rule, define the configuration
as shown below, and click Save.

According to this configuration, the process will be completed when the technician completes the activity.
-
Under the Allocation Rules column, click
the bulb icon.

-
Define the configuration as shown below and click
Save.

According to this configuration, the activity will be again assigned to the same technician if it is not completed. - Click Save Process Flow.
Creation and Configuration of Parent Process
Creation of Turbine Installation Process
In this section, we will create and configure a sample parent task called the turbine installation process. This is the actual process wherein the entire process will be considered complete once all the subprocesses are finished. To configure this, follow the steps below:
-
Go to .
-
On the Create Activity Process screen, do the
following:
-
In the Work Process Name field,
enter the title as Turbine Installations.
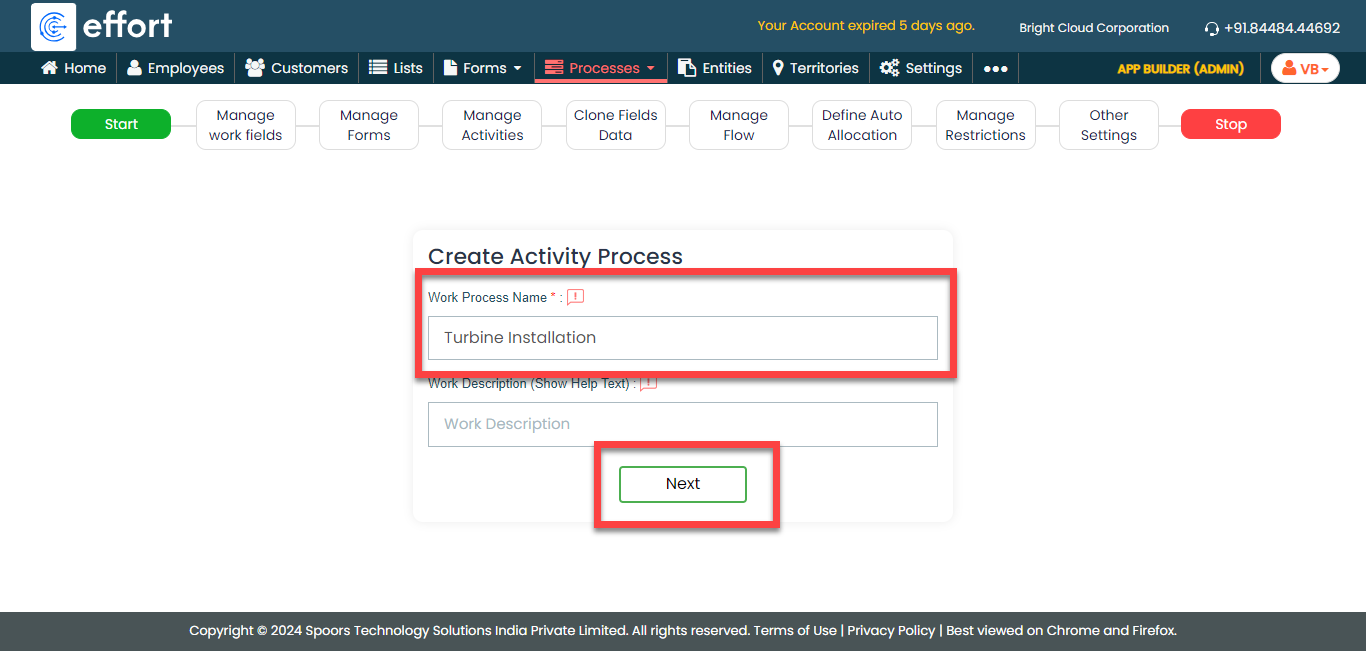
- Click Next.
-
In the Work Process Name field,
enter the title as Turbine Installations.
-
After clicking the Next button, you will proceed to the
next tab, where you are required to configure the work fields.
On this tab, click Next and then click
OK. We will configure this section
later.
-
On the Manage Forms tab, click
Next.
-
Manage Activities: On this tab, we will
define the activities that need to be executed for this process.
To know more about activities, refer Activities. To
define the activities, follow these steps:
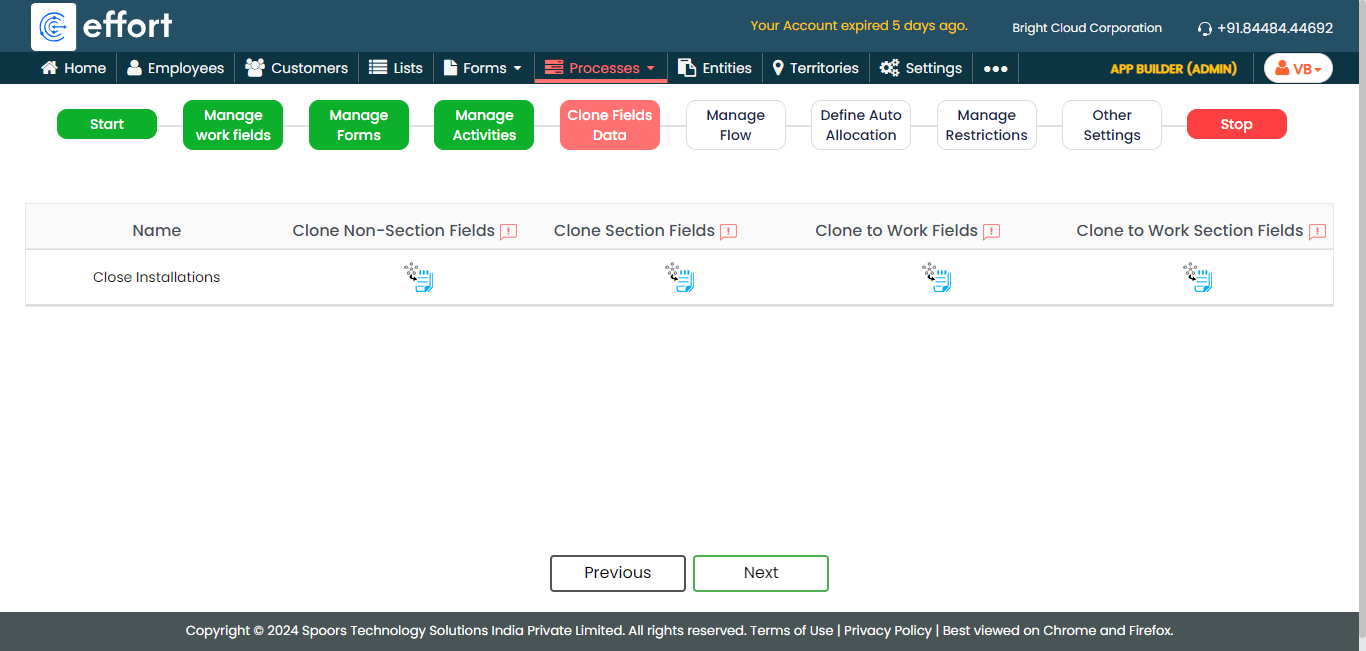
-
Click Add Activity.
-
Under the Activity Title column,
enter the title as Close
Installations.

-
Click Add Sub Task
Process.

-
Under the Sub Task Title column,
enter the title as
Activities.

-
Under the Work Process Template
column, select the Activities
process that we created earlier.
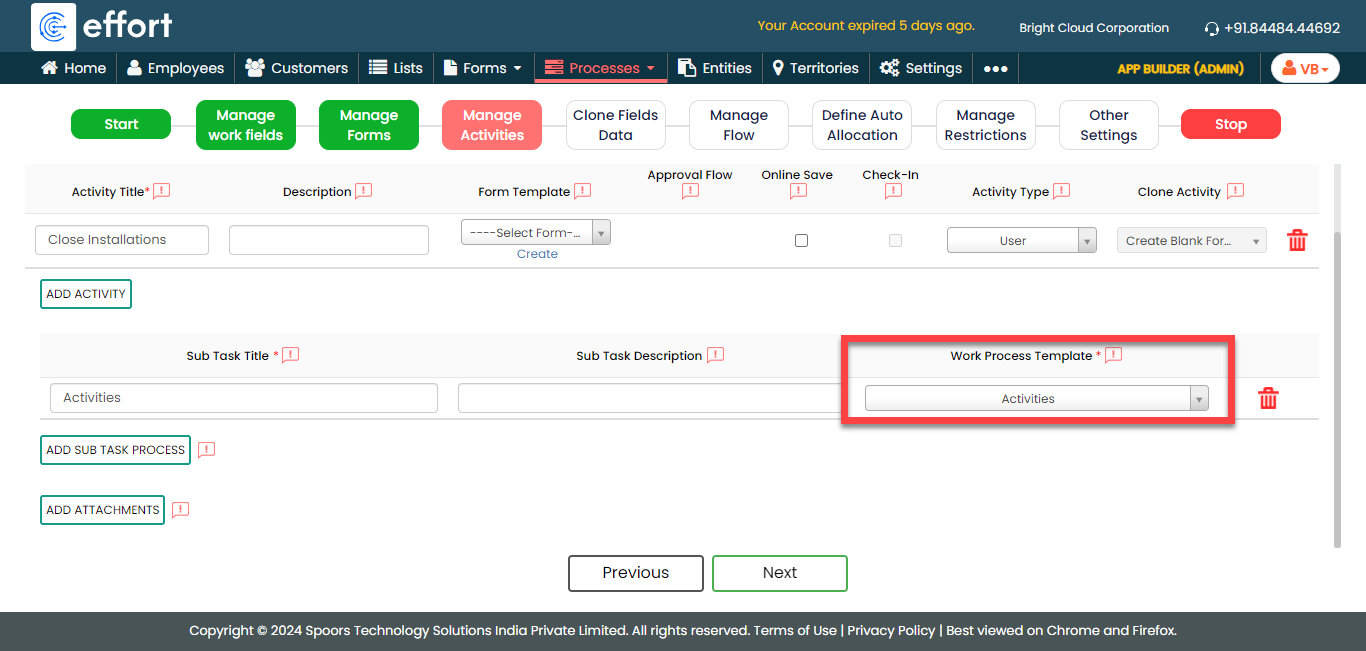
According to this configuration, the Activities process that we previously created will be a subprocess under Turbine Installations. The Turbine Installations process is considered complete once the Activities processes are finished.
-
Click Add Activity.
-
On the Clone Fields Data tab, click
Next.
-
On the Manage Flow tab, you can see the default flow
created automatically. Click Next to move
to the next screen. We will configure this later.

-
On the Define Auto Allocation tab, click
Skip.
-
On the Manage Restrictions tab, click
Next.
-
On the Other Settings tab, click
Complete. We will configure this
later.
- As you can see, we've ignored some configurations as those are complex and time-consuming. Refer to the next sections for detailed steps to configure the flow, fields, work settings, and so on.
Configure Work Fields
In this section, we will configure the work fields that are required for capturing the information necessary to execute the turbine installation process. You will find some default fields that are pre-configured. We'll customize the default fields for a better understanding. To know more about work fields, refer Work Fields.
Follow the steps below to create work fields.
-
On the process page, click Manage
Fields. Alternatively, go to .

-
Change the Work Name label to
Turbine Name.

-
Change the Employee label to
Created By and make it as
Default.

-
Click the grey box below the Default
field, click Filled By to populate it on the formula
field, and then click Done.

-
Scroll down a bit, change the Location label to
Site Location, and enable the
checkboxes as shown below.

- Click Save.
Configure Work Flow
In this section, we will define the configuration of workflow. To know more about the Flow, refer to the Manage Flow documentation.
Follow the instructions below to configure the flow:
-
On the process page, click Manage Flow.
Alternatively, go to .

-
Under the Activity Execution
Dependencies column, click Set
Activity Condition(s).

-
Click Add Sub Task Dependency, define
the configuration as shown below, and click
Save.

According to this configuration, the process will be completed when all the sub-tasks are completed.
- Click Save Process Flow.
Configure Sub Task Settings
In this section, we will configure the subtask settings. Follow the instructions below to configure:
-
On the process page, click Manage Flow.
Alternatively, go to .

-
Under the Activities column, click the
first gear icon, define the configuration as shown below, and
click Save.

According to this configuration, the employee who creates the parent process can get access to create/add/modify/view the sub-tasks. If the Send Parent Work along with Sub Work option is checked, the technicians can see both parent and sub-tasks.
-
Under the Activities column, click the
second gear icon, define the configuration as shown below, and
click Save.

According to this configuration, sub task creation is not allowed once the parent task is completed.
Configure Auto Copy
Till now, we created both parent process and subprocess. We have some common fields in both processes. In this section, we will define the auto copy configuration where the data in parent process fields will be automatically populated on to the sub-task process fields. Follow the instructions below to configure:
-
On the process page, click Manage Flow.
Alternatively, go to .

-
Under the Activities column, click the
auto-fill icon, define the configuration as shown below, and
click Save.

According to this configuration, when you are creating a sub-task, the values for the configured fields will be automatically populated. The technicians can know the end time of the turbine installation.
Execute Turbine Installation Process
Till now, we configured the Turbine Installation process in the app builder. In this section, we will show you how to execute the Turbine Installation Process in both Web and Mobile Apps. It provides the activities performed by the admins and technicians, such as creating works, logging into the effort, executing installation activity in the mobile app, and so on. Let's get started.
Create a Turbine Installation Process
To initiate a turbine installation process, follow the steps below.
-
Go to .

-
Under the Basic Details section, fill in the
mandatory fields.

- Click Save.
Add Sub Tasks
To add a sub-task, follow the steps below.
-
Once you save the process, it will be visible in the process list
screen. On the process page, scroll down a bit and click the view icon
under the Actions column.

-
Click the Utilities dropdown and then click
Add Activities For (User Name).

-
You can see the values are auto-populated on the fields as we
configured.

-
Under the Assign A Work section, assign it to a
technician.

- Click Save.
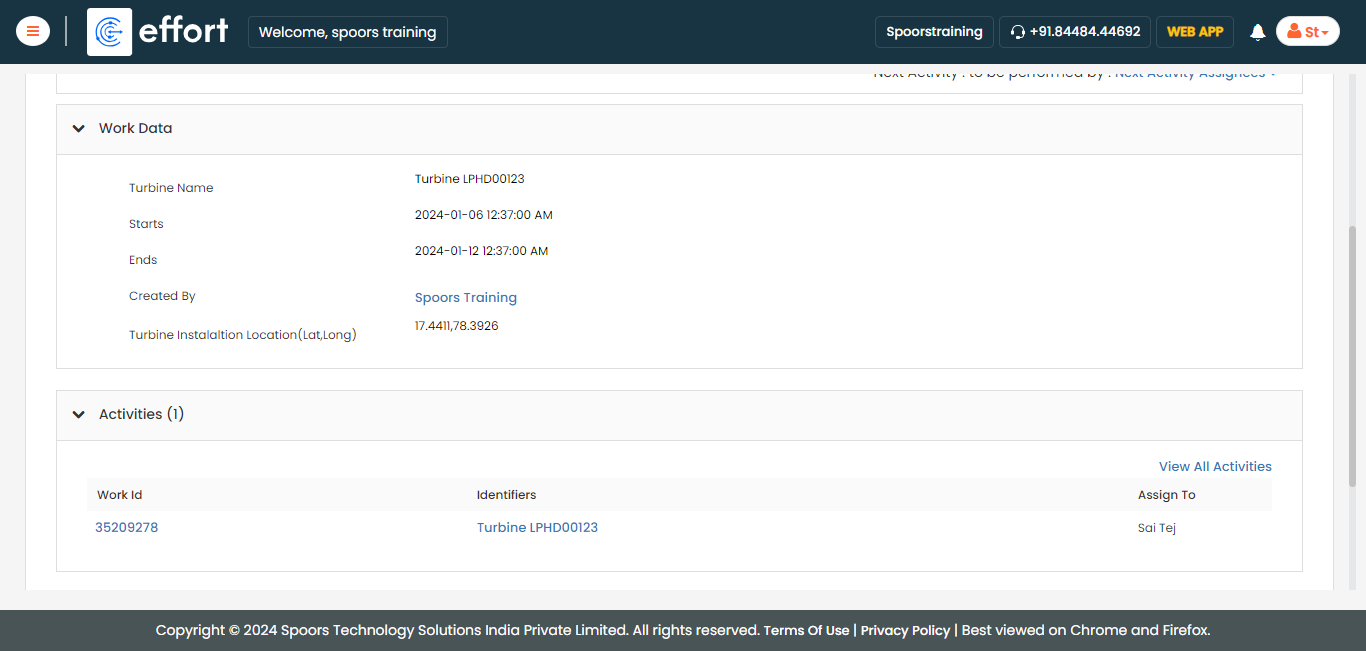
-
Once you save it, you can see the work details page where you can check
the details of both the parent task and sub-task.
- Similarly, you can create multiple sub-tasks and assign them to multiple technicians. The parent task can be closed only when all the sub-tasks are completed. If any sub-task is in progress, you are not allowed to close this process.
Login to Effort NXT Mobile App
To begin with the Turbine installations process, we require an application through which we can log in, check the works assigned, and perform tasks. This section provides instructions to get started with the Effort NXT mobile app.
-
On your mobile phone, open either the Play Store or App Store and
install the Effort NXT app.
Note: To know more about how to install the app, refer to Install EFFORT NXT App. -
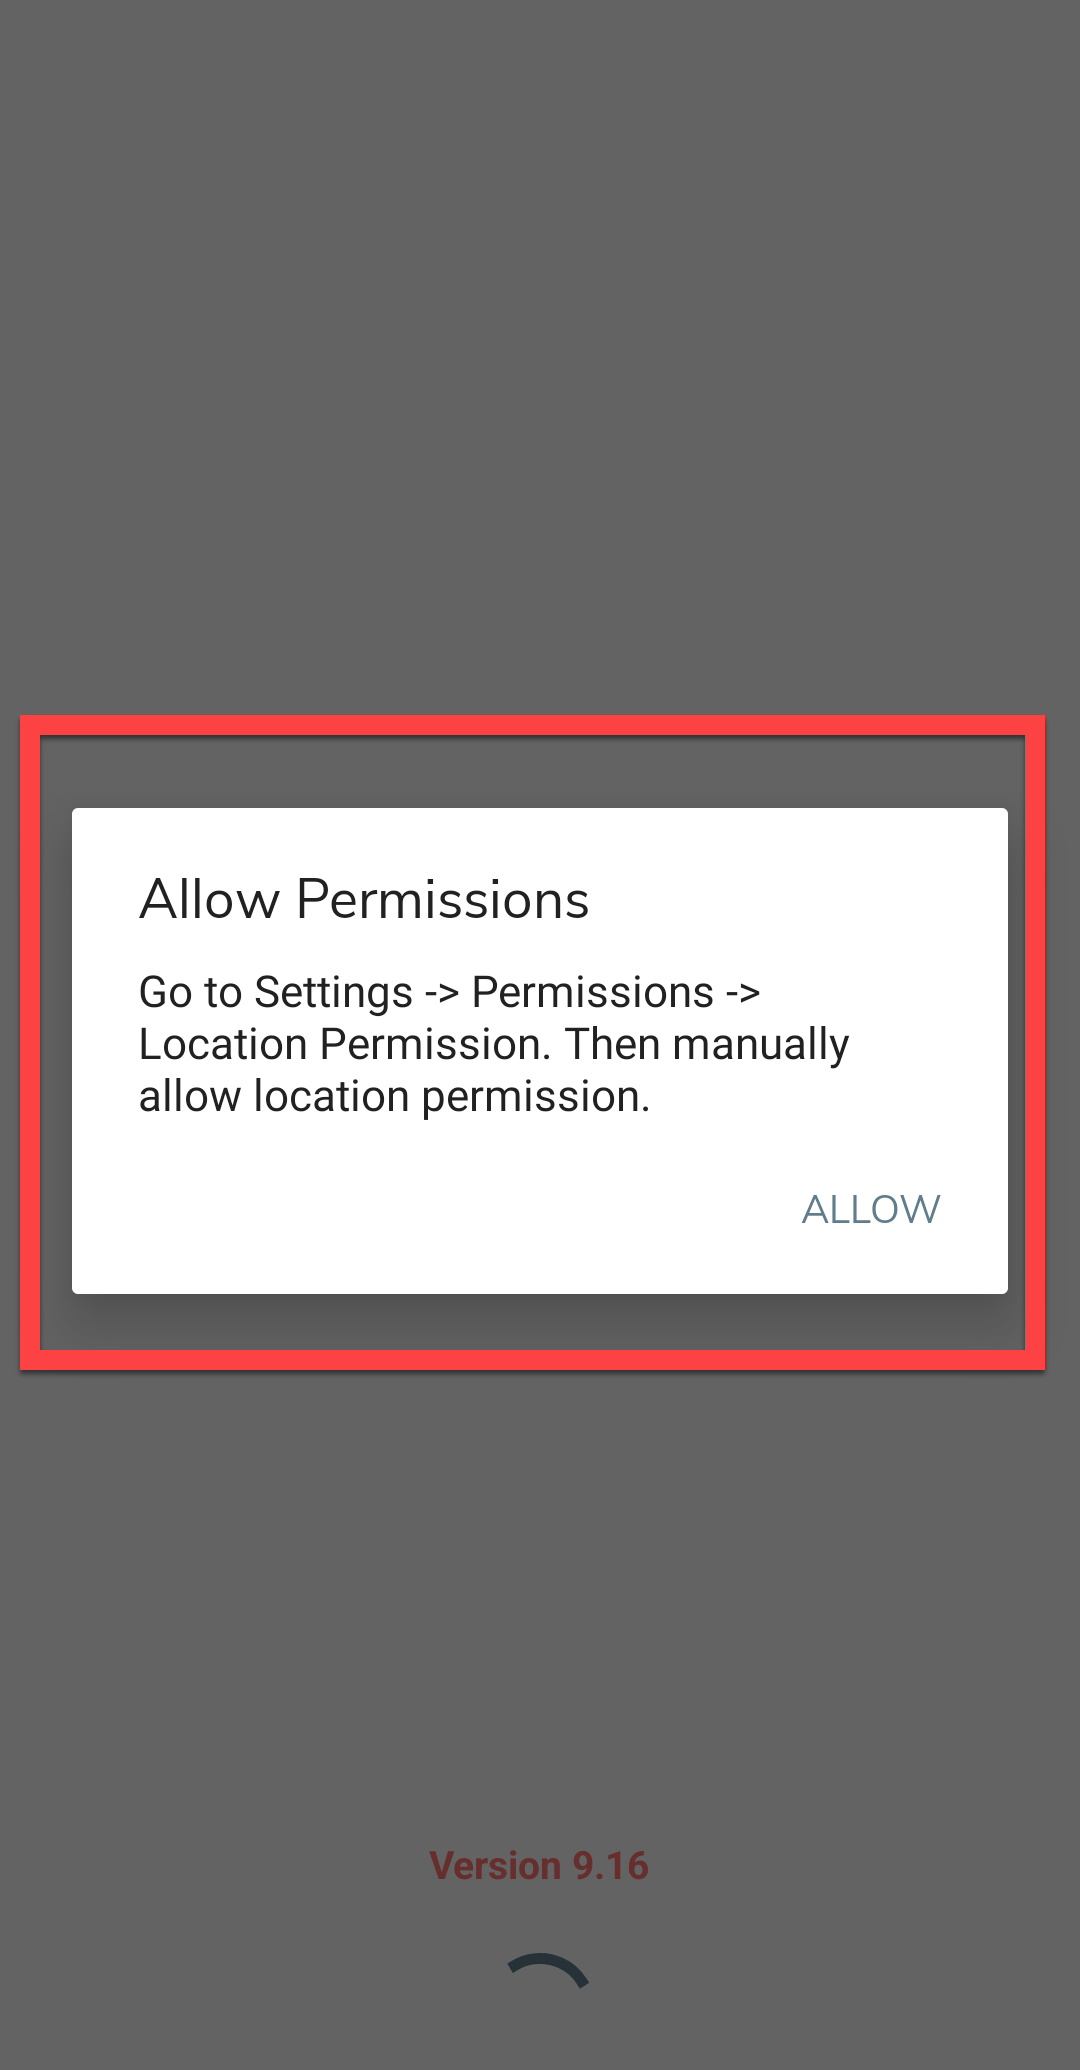
Once the download is completed, open the app and grant all the required
permissions.
-
Login to the Effort app using your registered mobile number.

Note: To register using your registered mobile number, refer to Log in to Mobile App Using Phone.Note: To register using your email and password, refer to Log in to Mobile App Using Email -
After you log in to the mobile app, tap Sign in
to mark that you have started working.
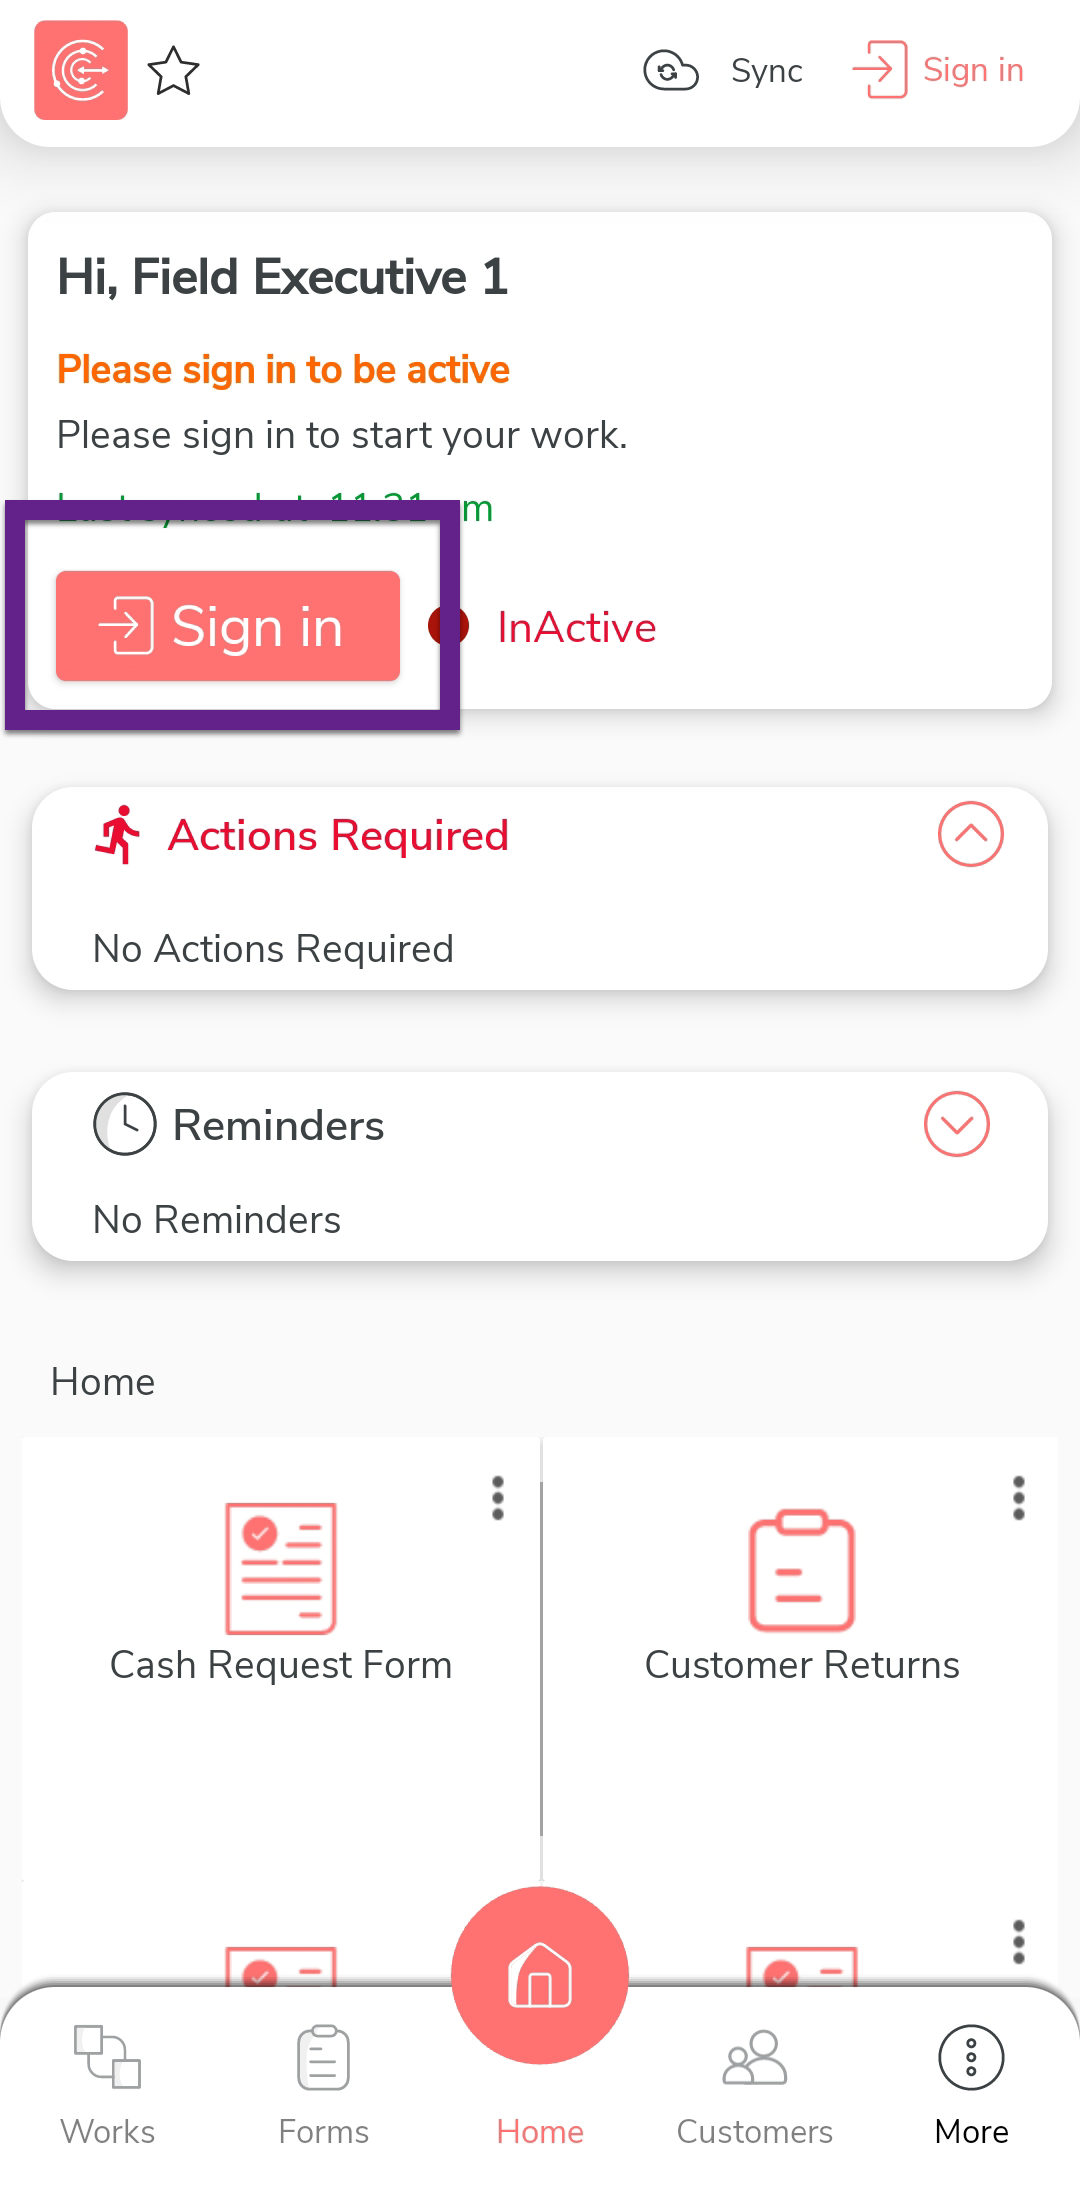
-
The mobile captures your face and your current location. On this
screen, ensure your face and location are captured correctly, and then
tap Sign In.

-
Once you complete Sign In, tap
Sync to sync the data with the server.

Note: Make sure to Sync the mobile app every time you perform an activity to ensure that your data is updated on the server. If you fail to sync, your changes or work will not be captured in the server.
Complete Sub Task in the Mobile App
In this section, we will explore how a technician completes a sub-task using the Effort mobile app.
-
On the effort mobile app home screen, tap on the action item under the
Actions Required section. Alternatively, you
can tap the Activities card.

-
Tap on the view map icon to view the customer's location.

-
Use the navigation buttons to reach the customer.

-
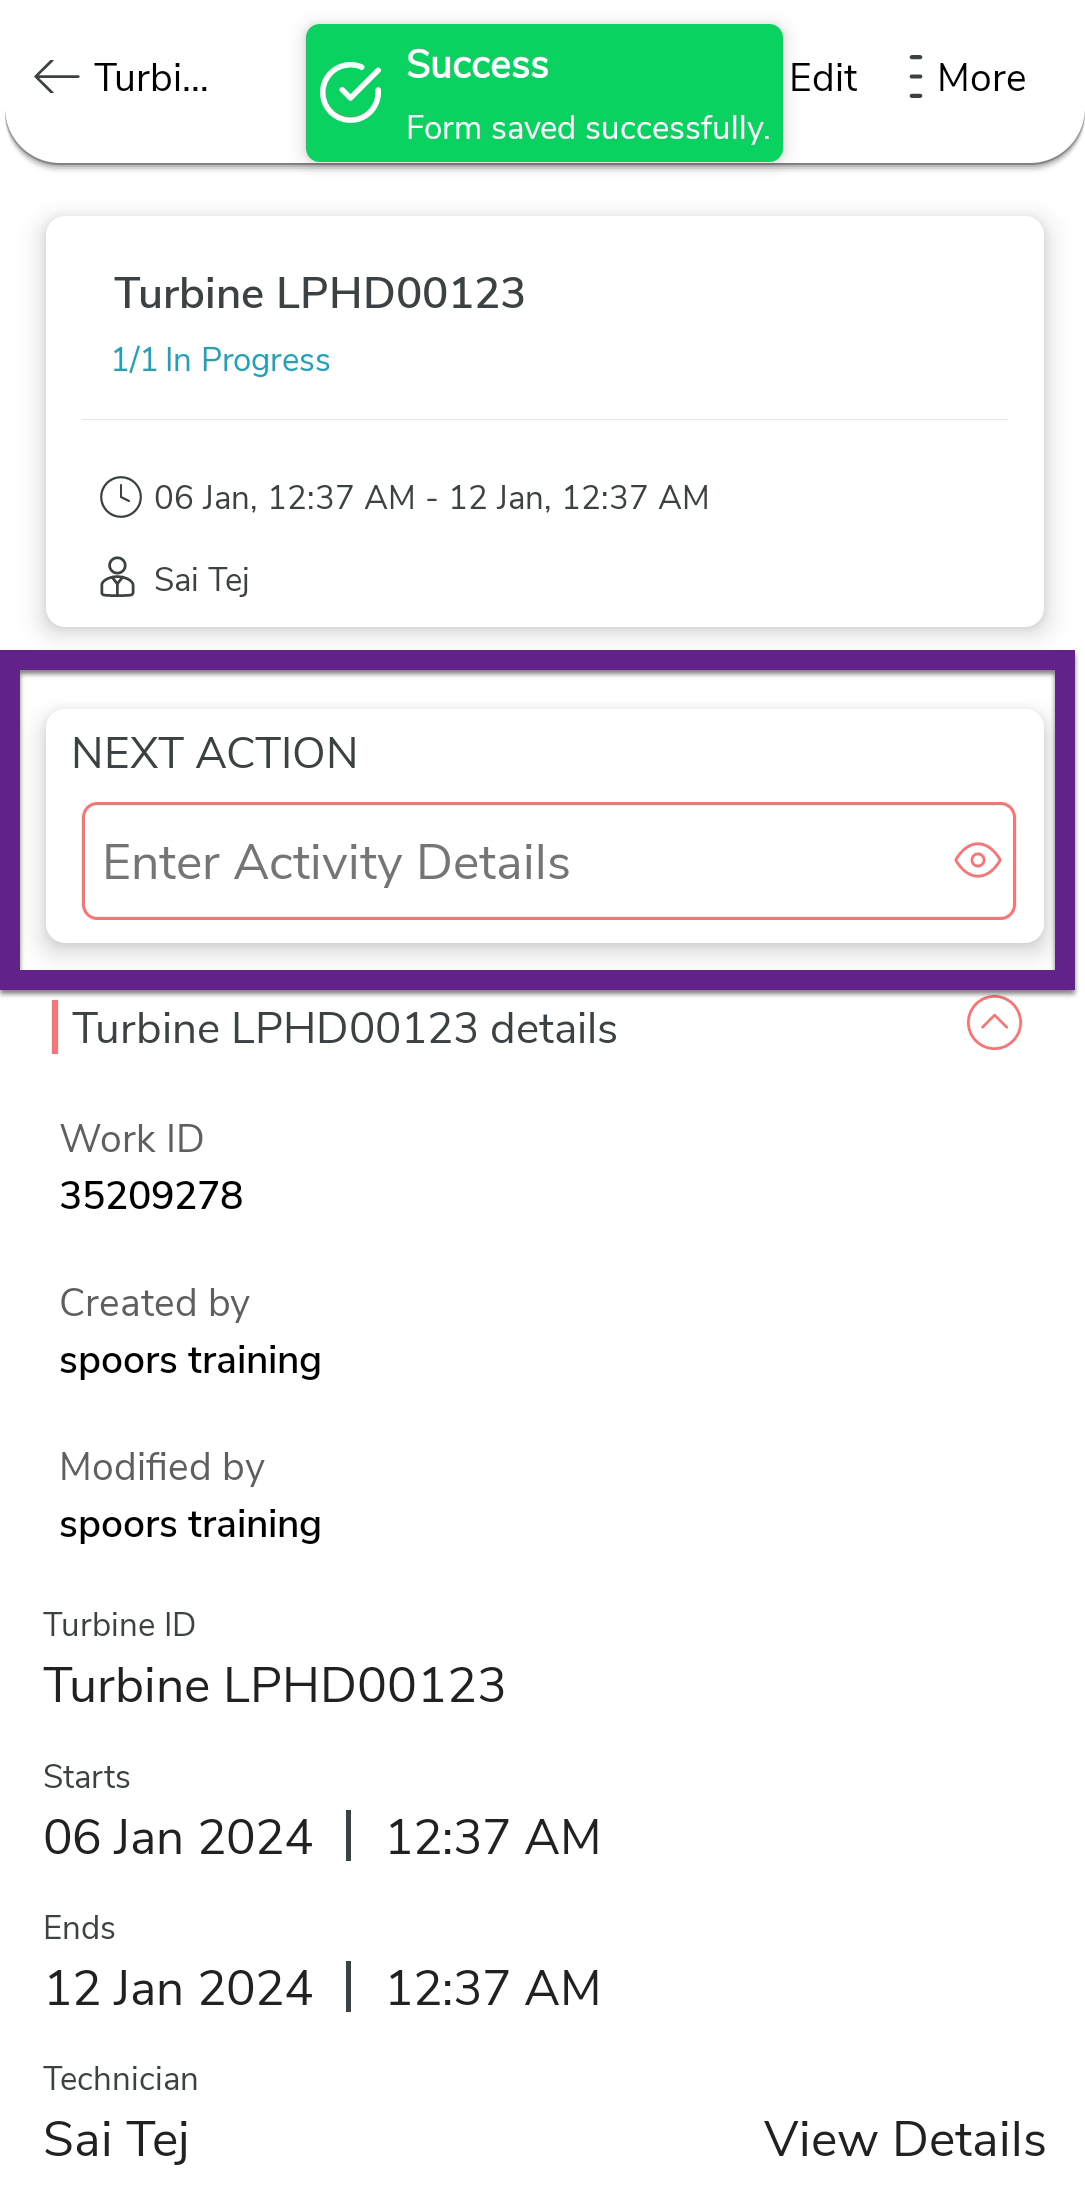
Once you reach the customer, tap the sub-task card.

-
Under the Next Action section, tap
Enter Activity Details.

-
Fill in the fields.

As you can see, we have selected No for the second field as the task is still in progress. -
Once you fill in the data, tap Save and then tap
Save in the confirmation pop-up.

-
Once you complete the activity, you can see the same activity again.
Tap on it to execute it.
-
Fill in the data in the fields.

Here, you can see we are marking the Activity Completed as Yes. It means the sub-task is completed successfully.
-
Once you fill in the data, tap Save and then tap
Save in the confirmation pop-up.

-
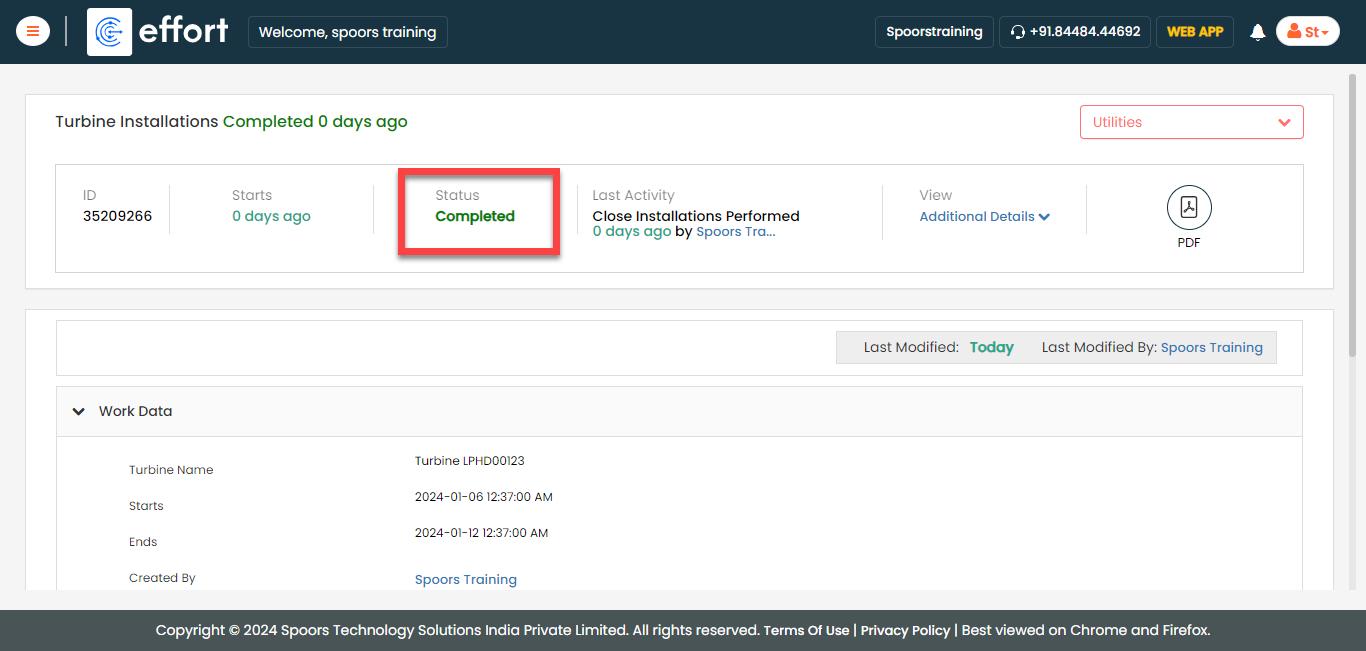
Once you complete the activity, you can see the work status as
Completed. It means that the activity is
completed successfully.

Complete Turbine Installation Process (Parent)
Once all the sub task are completed, you can complete the parent task. To do that, follow the steps below.
- Go to .
-
Scroll down a bit and click the eye icon of the required process.

-
Scroll down a bit and expand the Activities
section to see the activities performed.

-
Once all the sub activities are completed, then you can perform the
close parent turbine installation process. Click Perform
Close Installation to complete the activity.

-
Once we perform the close installation process, the process status will
be changed to Completed.