Configure Installation Service with Effort
Introduction
Providing installation services manually will be complex, as it involves challenges in data capturing, task assignment, collaboration among the technicians (especially when multiple technicians are required for a single task), feedback collection, and more. Furthermore, when multiple technicians are needed for a single installation task, the necessity to generate individual tasks for each technician adds to the time-consuming nature of the process.
Effort, a No Code Platform, offers a comprehensive solution to sidestep all these challenges by fully digitizing installation activities. With essential features like location-based check-ins, collaborative work allocation allowing a single service ticket to be assigned to multiple resources, rule-based activity executions, data validations, and more, it ensures a streamlined process.
In this tutorial, we will walk you through the process of configuring and operating Installation Service from scratch using the Effort platform. By following the step-by-step instructions below, you will be able to set up a successful Installation Service operation with the Effort platform.
This tutorial provides all the activities that need to be performed by different roles involved in the Installation Service operation using the Effort platform. The roles include Admin, Manager, and Employee (Technicians). Here's the list of activities we will be configuring and executing in the Effort as part of Installation Service.
Admin Activities (Configuration of Installation Service)
In this section, we will walk you through the admin-level activities involved in the configuration of the Installation Service. To perform the Admin activities, the users must have access to the App Builder module. Only the users that have App Builder access can define all the configurations. Login to Effort as App Builder. Refer to the Sign-in To Effort topic for login.
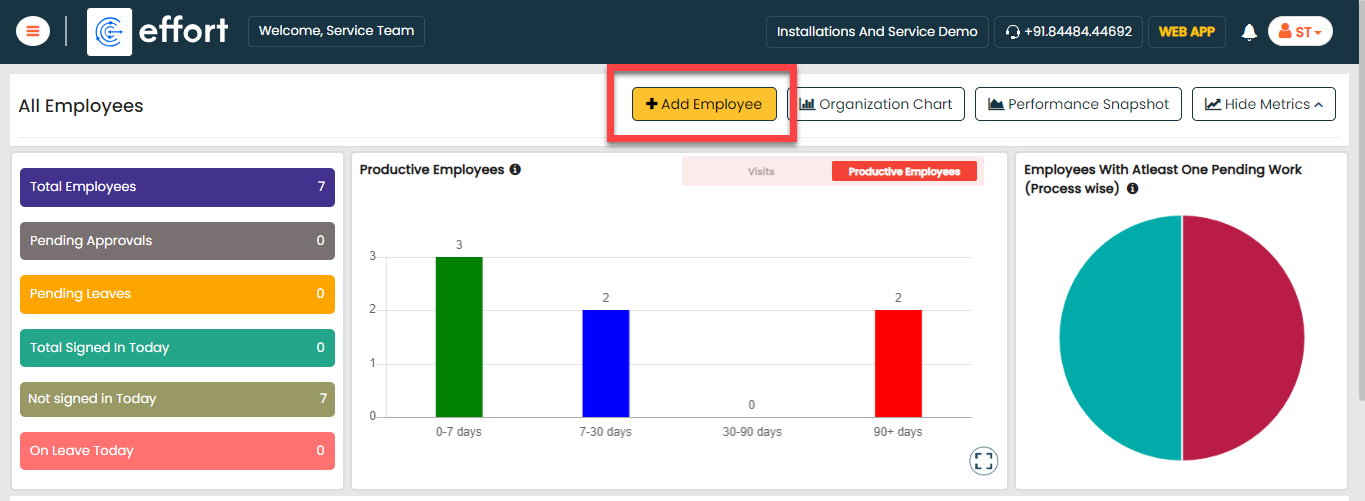
Creation of Employees
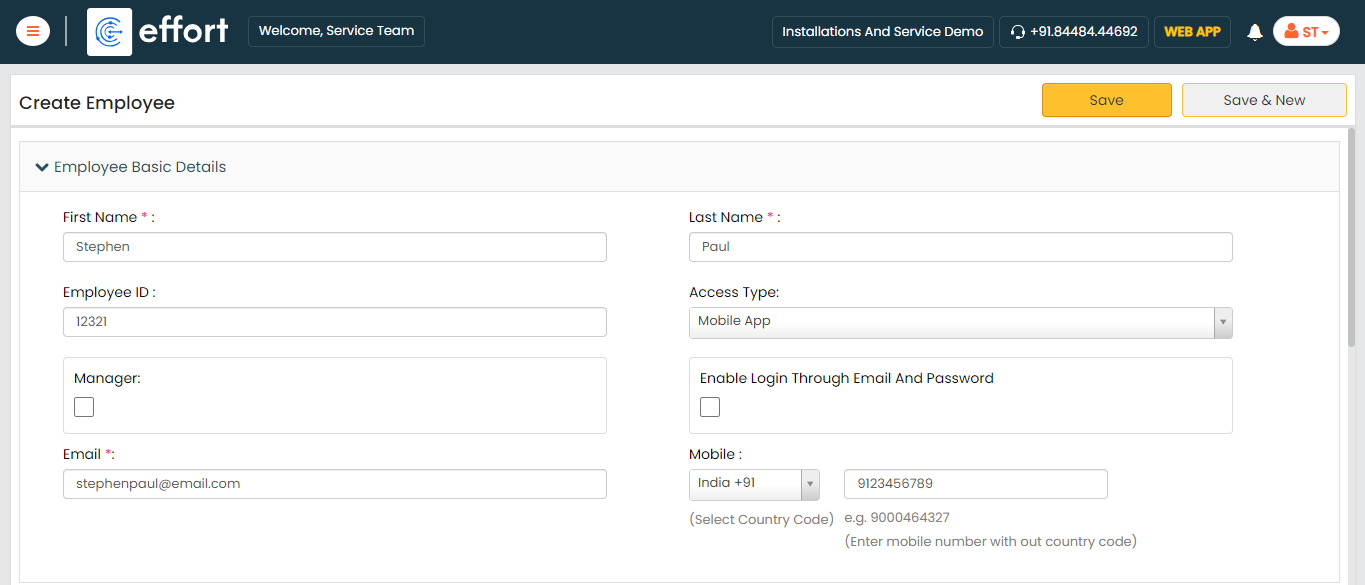
In this section, we will guide you through the process of creating employees in the Web App. These employees are responsible for managing backend activities, handling assigned installation service requests, and executing the tasks assigned to them. To create employees, follow the steps below:
-
Go to .
-
Enter the employee details such as First Name, Last Name, Employee ID,
Email, Mobile Number, and so on.
-
Select the Access Type based on the employee you
want to create.

-
Click Save.
Note: If you want to create more employees, you can choose the Import feature to create in a single go. To import employees, refer to Import Employees.
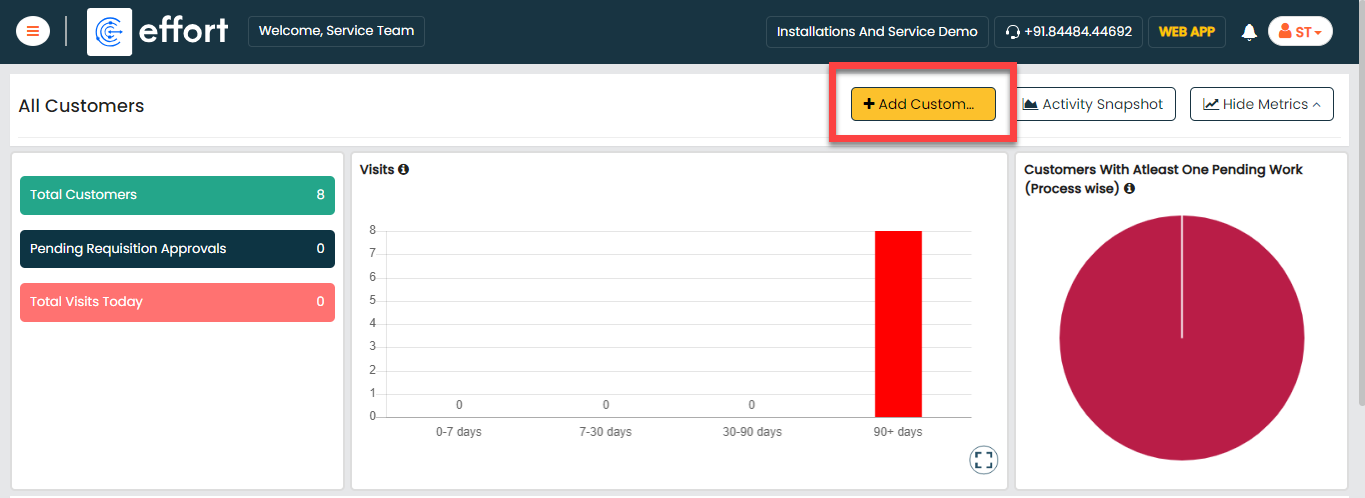
Creation of Customers
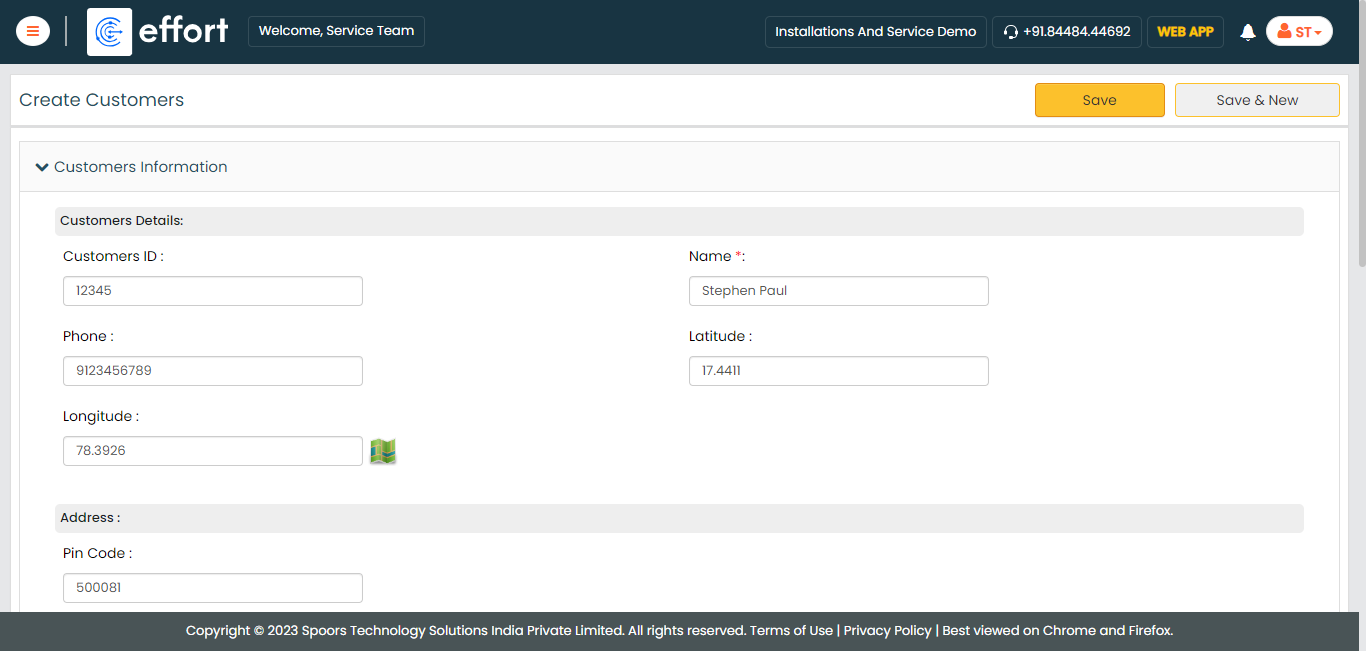
Customers are essential stakeholders where the installation or service activities will take place. In this section, we will walk you through the creation of the customers from the Web App. To create customers, follow the steps below:
-
Go to .
-
Enter the customer details and click Save.
- You can also use the Import option to create more customers in a single go. For the instructions to import the customers, refer to the Import Customers topic.
- Once you import the customers, you can check the import status at the bottom of the page. Alternatively, you can check the Customers module in the Web App.
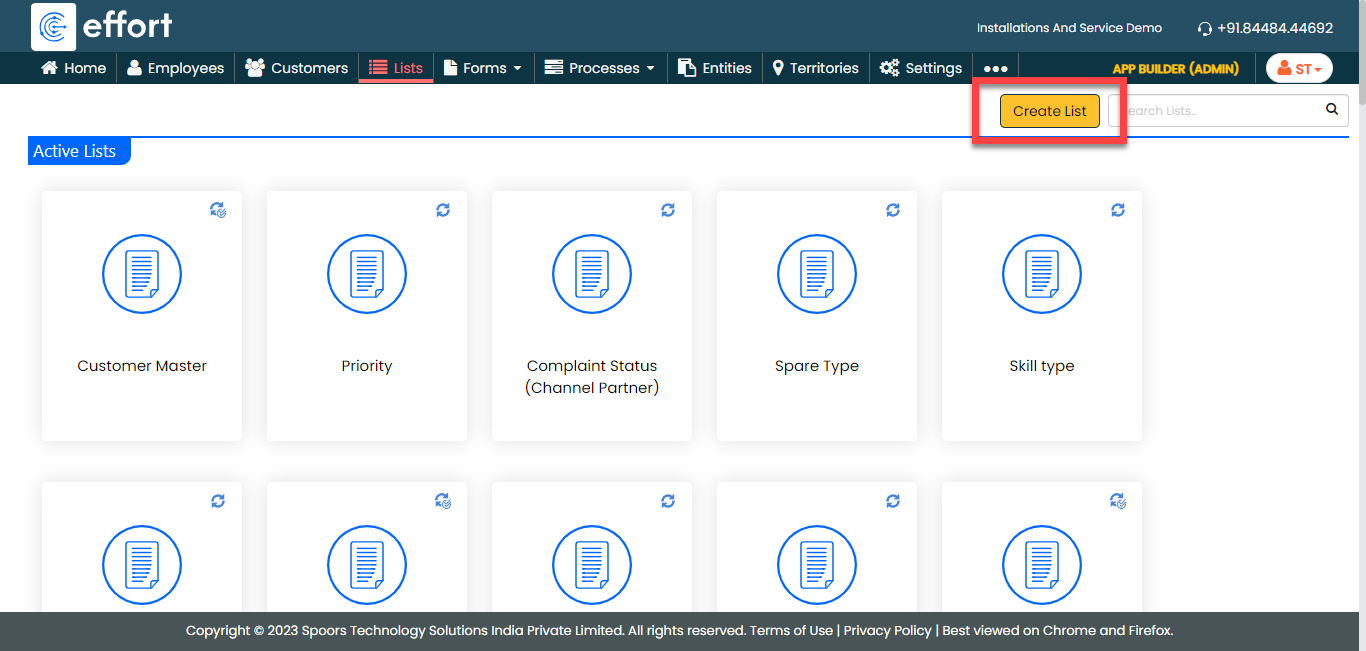
Creation of List Masters
In this part, we'll be creating the list masters. A list master is a comprehensive collection of data. It includes information about products, finished goods, and dispatch data. We'll use these list masters in forms and processes to manage the data. To know more about Lists, refer to Lists.
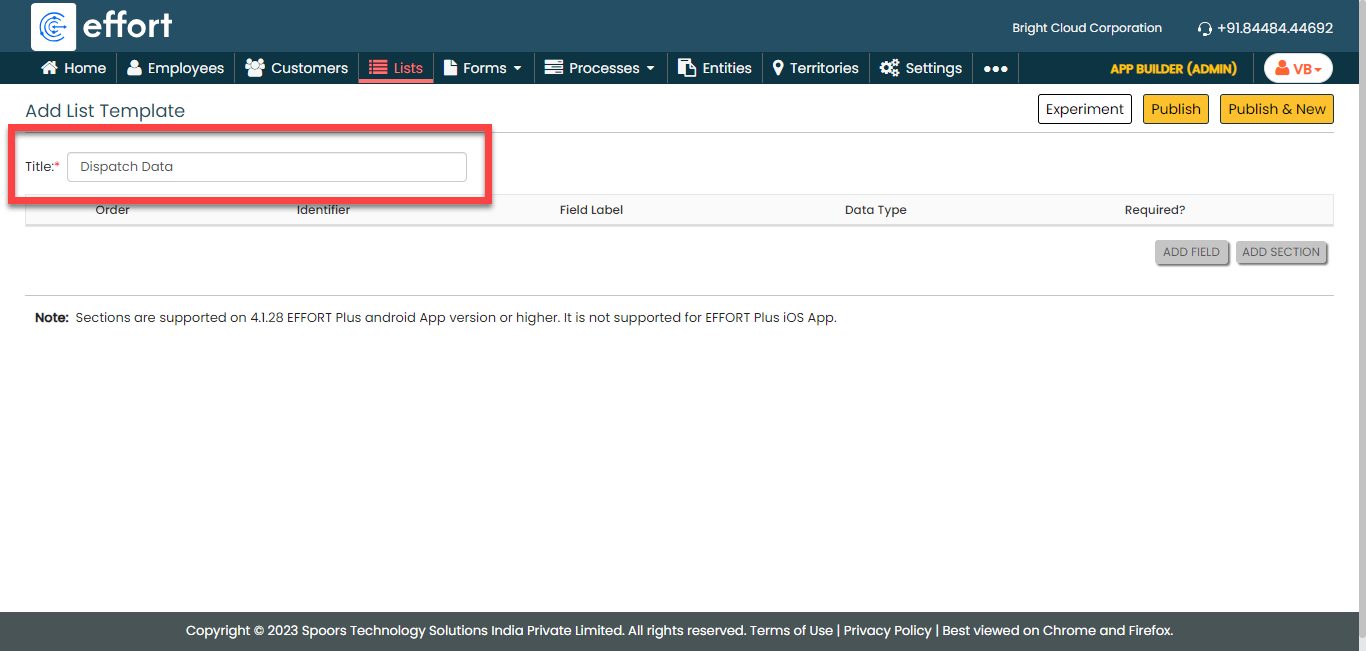
Creation of Dispatch Data List
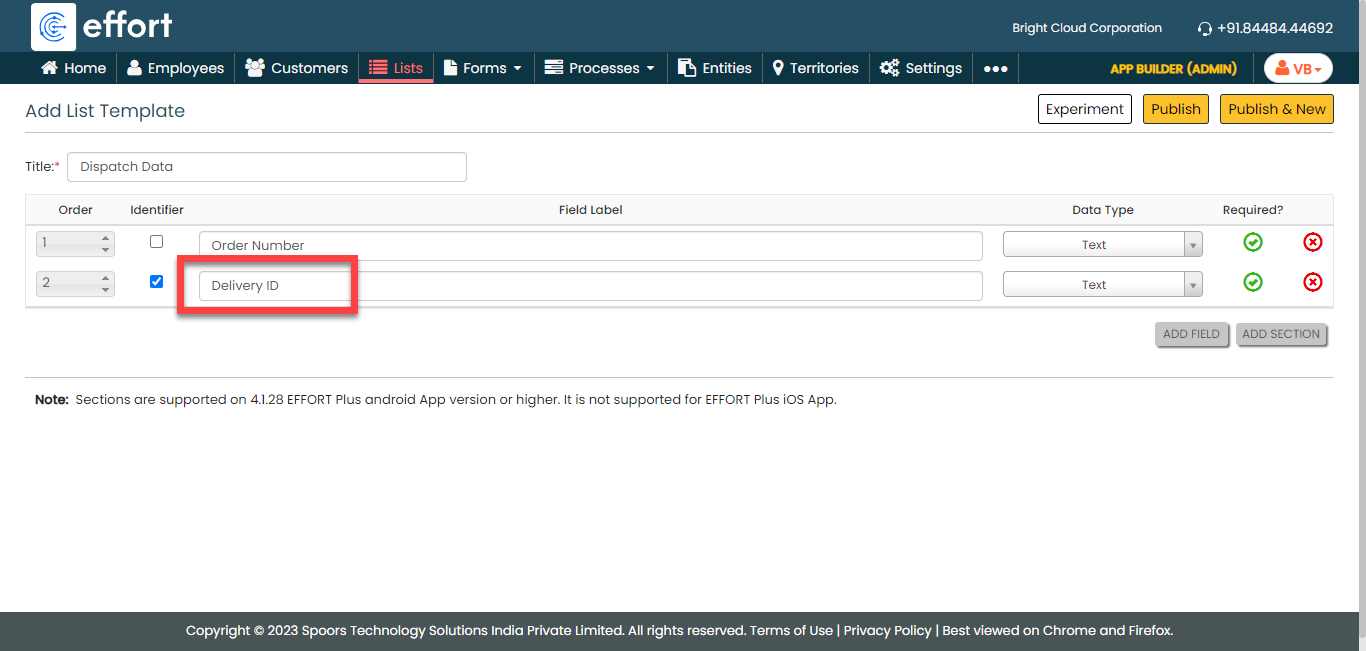
In this section, we will be creating a list called "Dispatch Data". This list contains the dispatch details such as Order ID, Delivery Date, Invoice Number, Customer Name, Address, and so on. This will be used in the installation form to specify the work order number. To create this list, follow the steps below:
-
Go to .
-
In the Title field, enter the title as
Dispatch Data.
-
Click the Add Field button.

-
Under the Field Label column, enter the
label as Order Number.

-
Click the Add Field button again to add more
fields.

-
Under the Identifier column, enable the
checkbox.
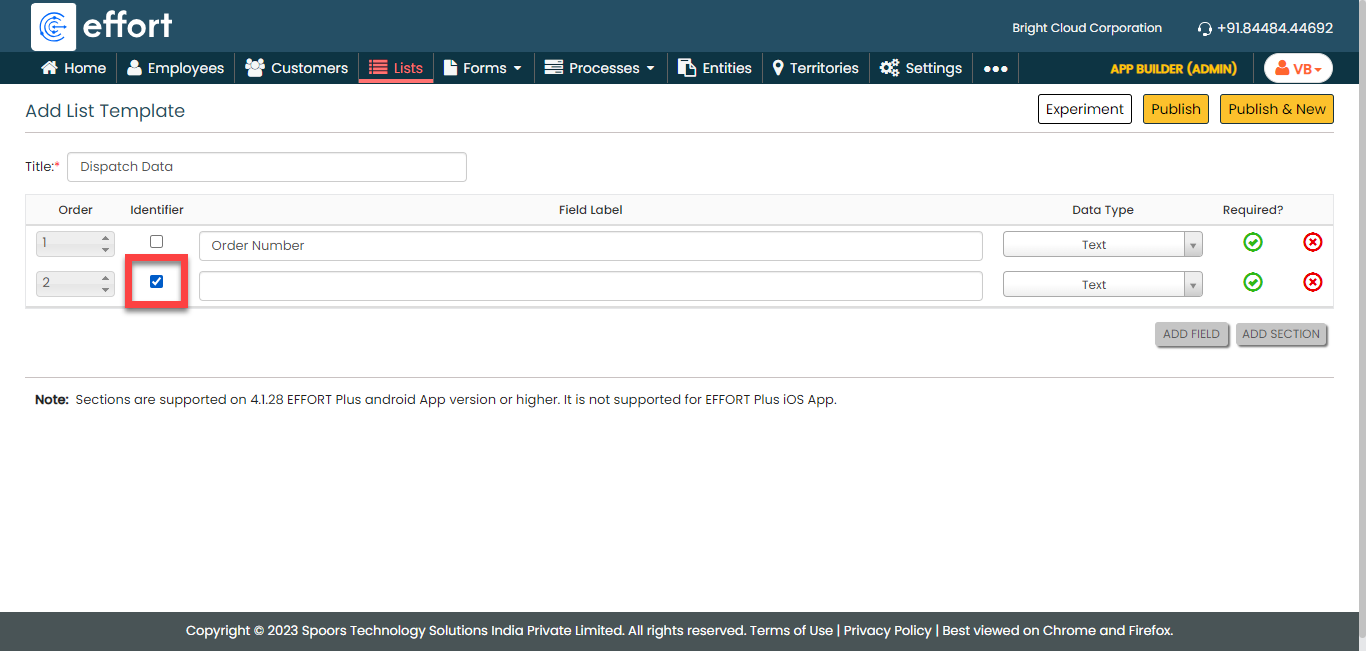
-
Under the Field Label column, enter the
label as Delivery ID.
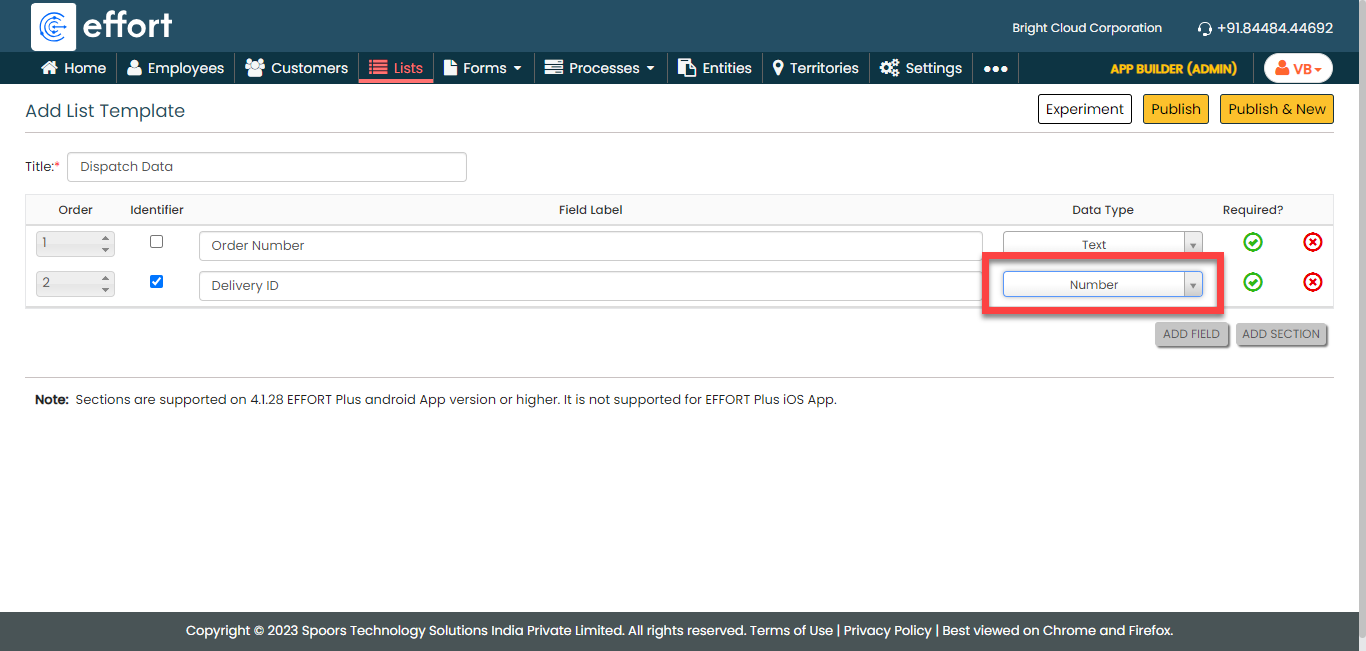
-
Under the Data Type column, click the
dropdown and change the data type to the
Number.
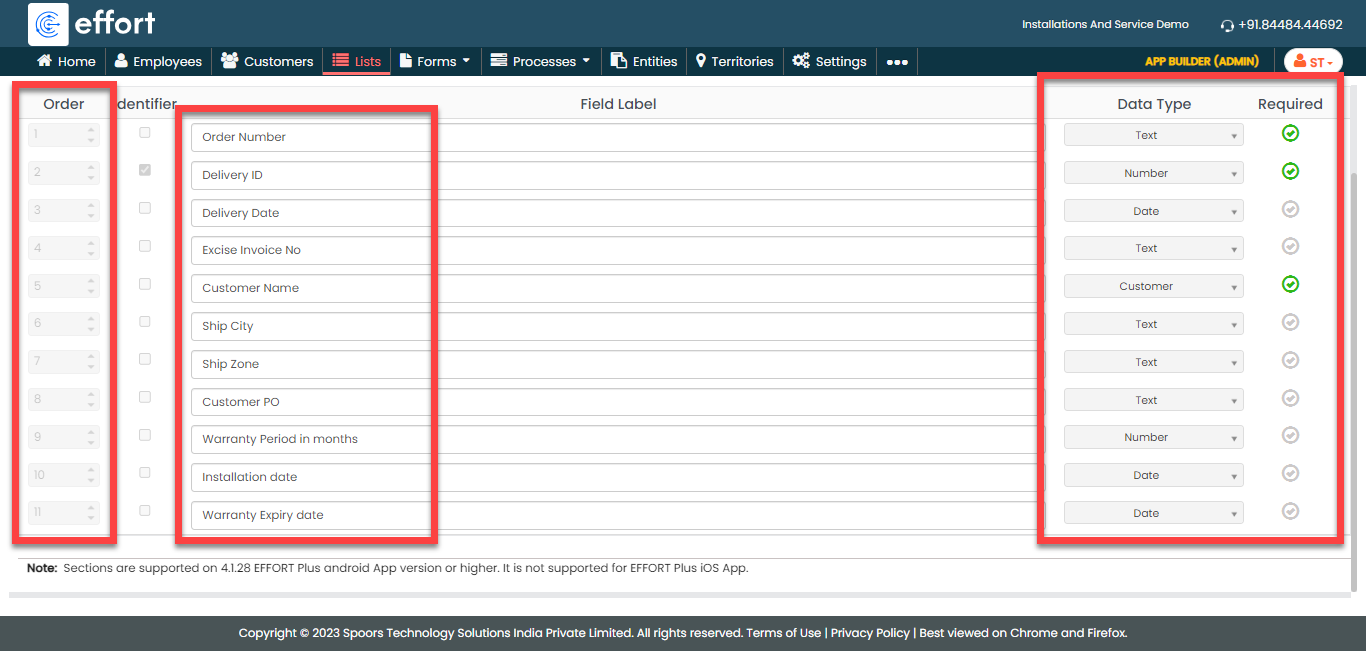
-
Click the Add Field button again to define
the fields and configure them as shown below.
-
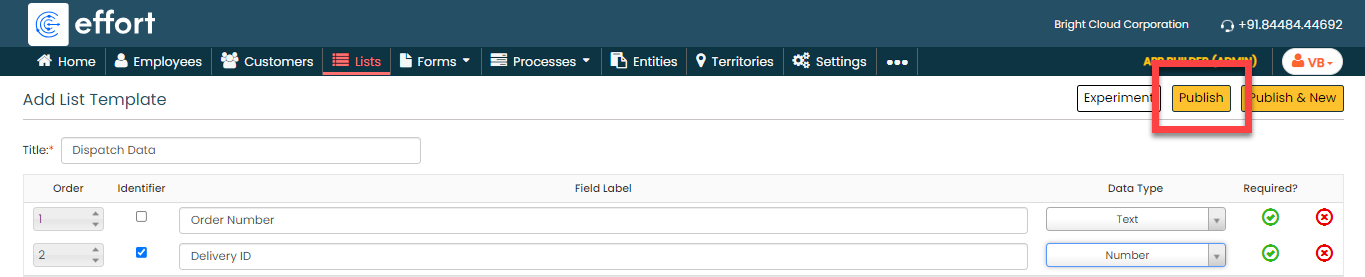
Click Publish and then click
OK in the confirmation pop-up.
-
In the List Scope in Sync pop-up window,
select the Sync all option and click
OK to make all the list items available
to the technicians.
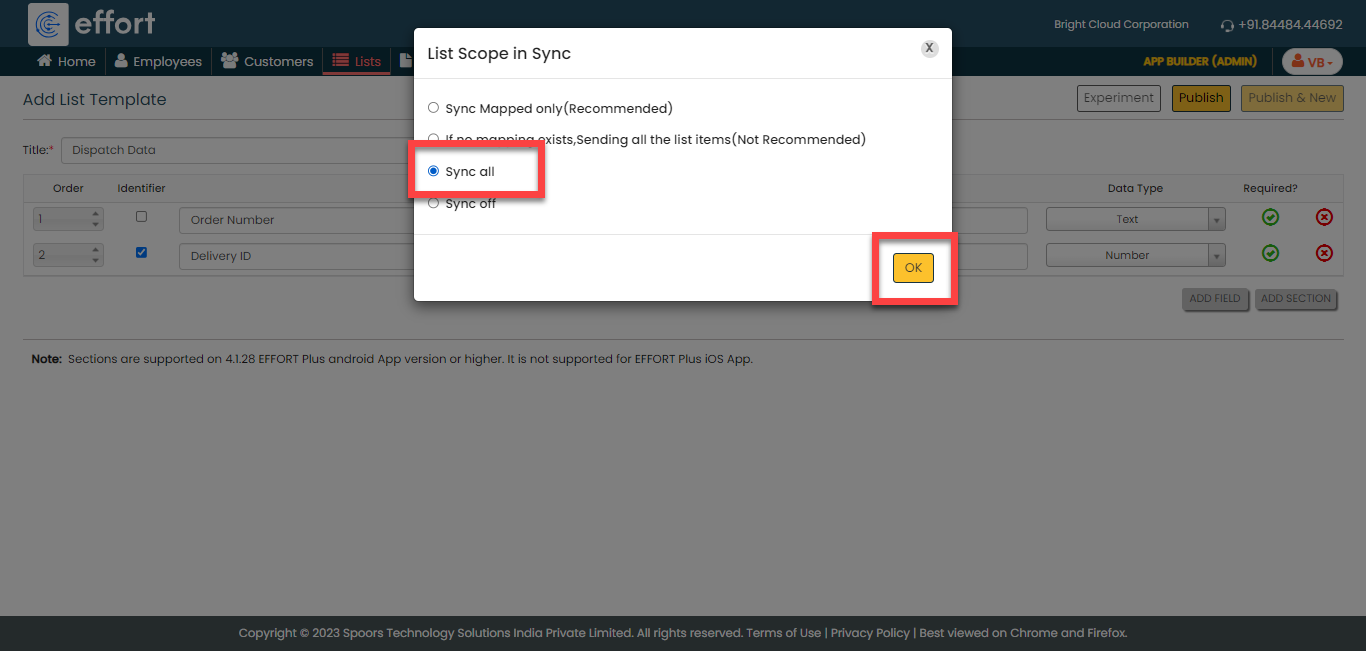
-
In the Warning pop-up window, click the
Accept button.

Your Dispatch Data list is ready. Now you need to add items to it. -
To add dispatch data to the list master, click
Add.
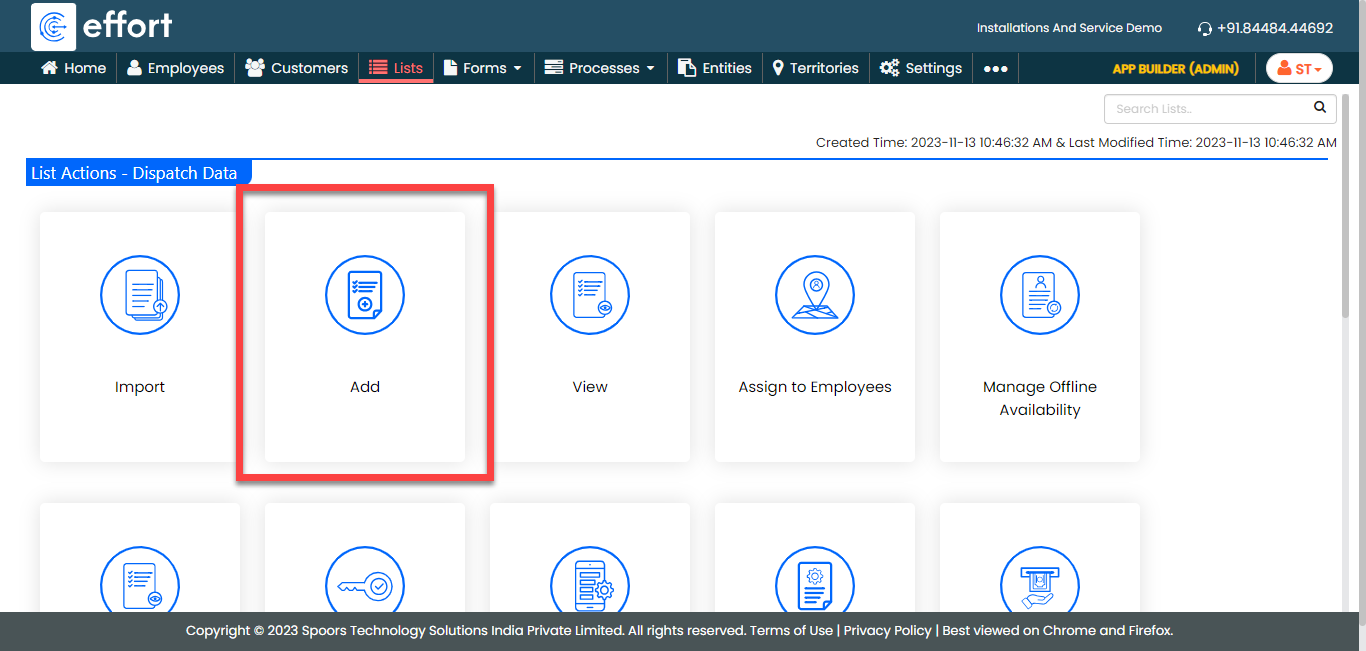
-
Enter the details in the fields and click
Save.
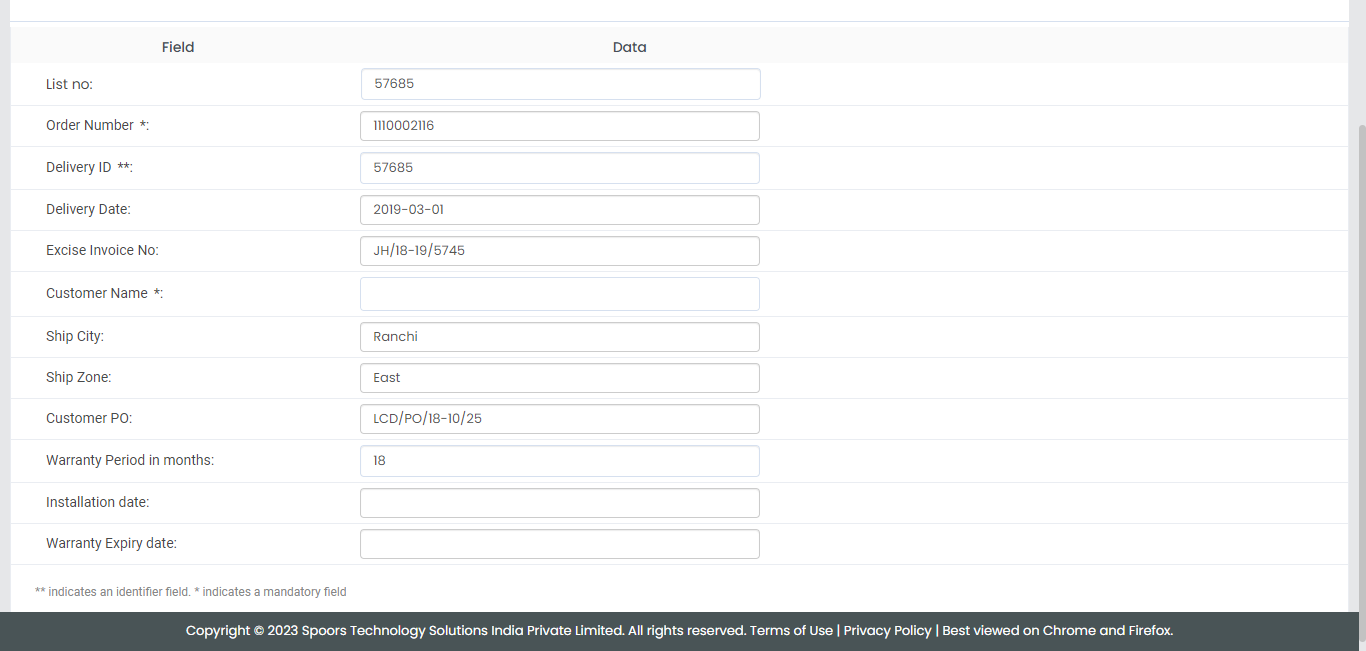
Note: To view the list items that you added, refer to View List Items.Note: To edit the list items that you added, refer to Edit List Item. - Otherwise, click Save & New to save the existing item and add one more new item.
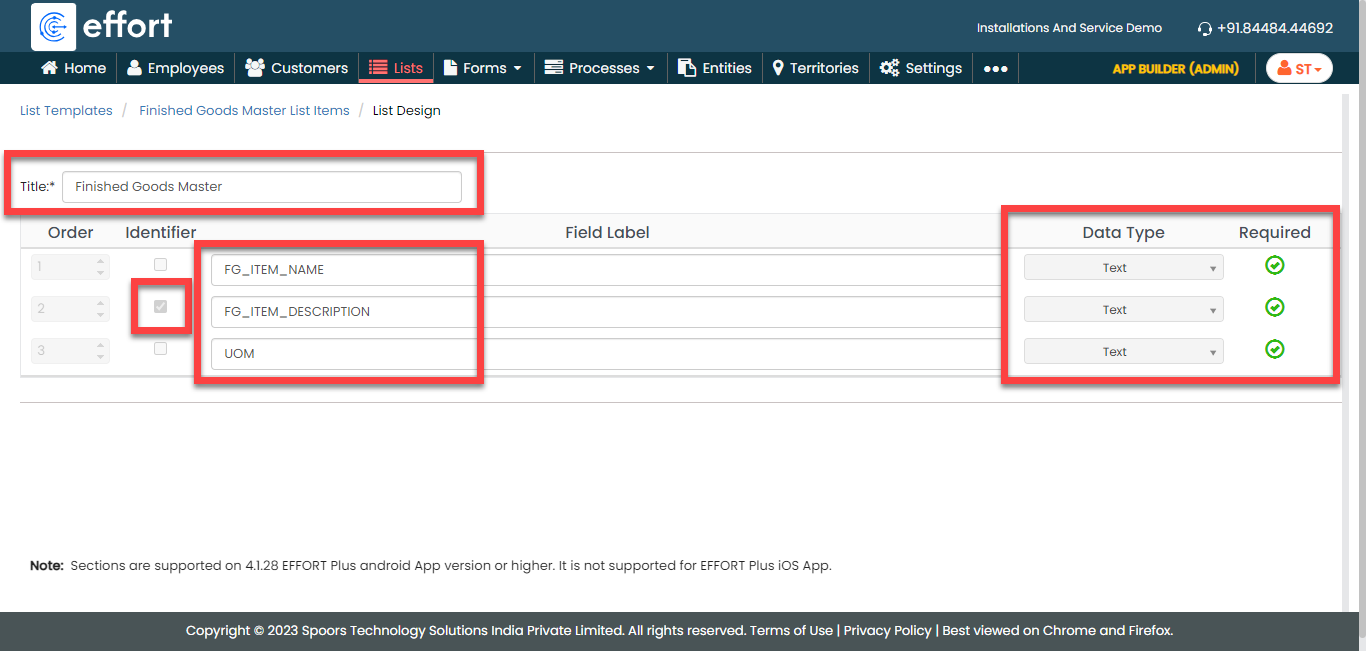
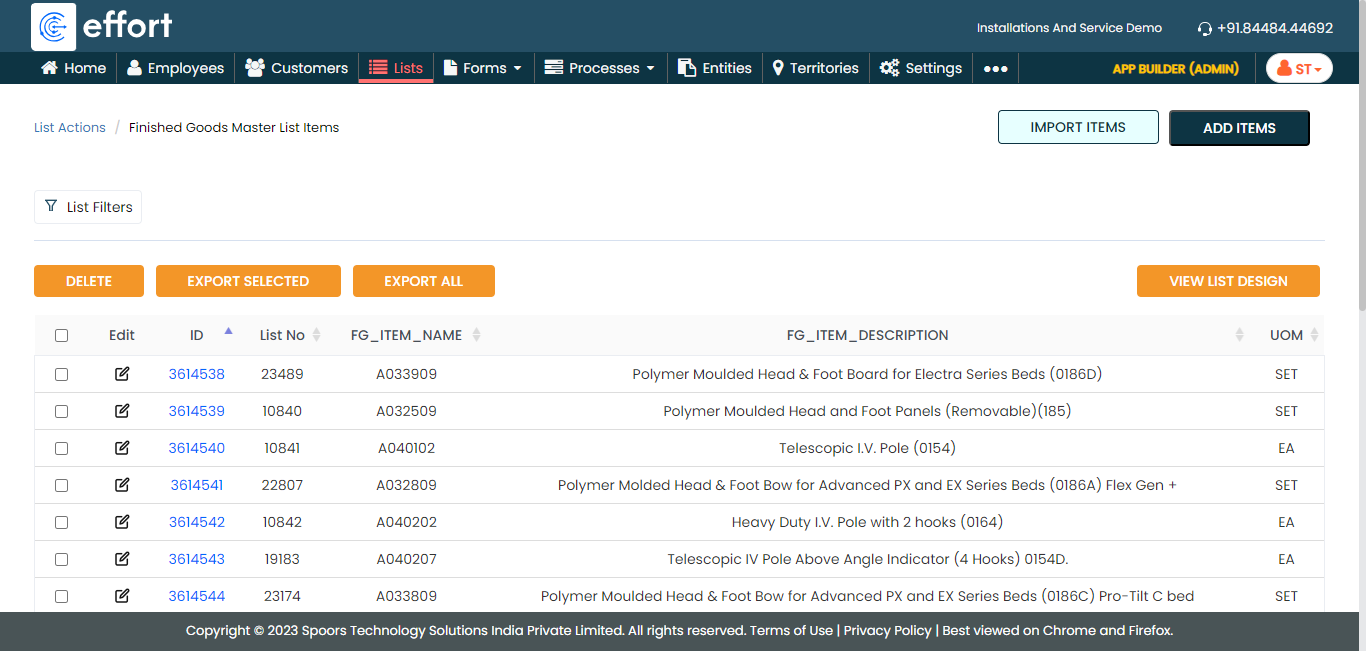
Create Finished Goods Master List
In this section, we will create a list master for finished goods that the company installs at customers.
-
Create the Finished Goods Master list as shown in the following
screenshot.
- Click Publish to save the List master and then select all in the List Scope in Sync pop-up window.
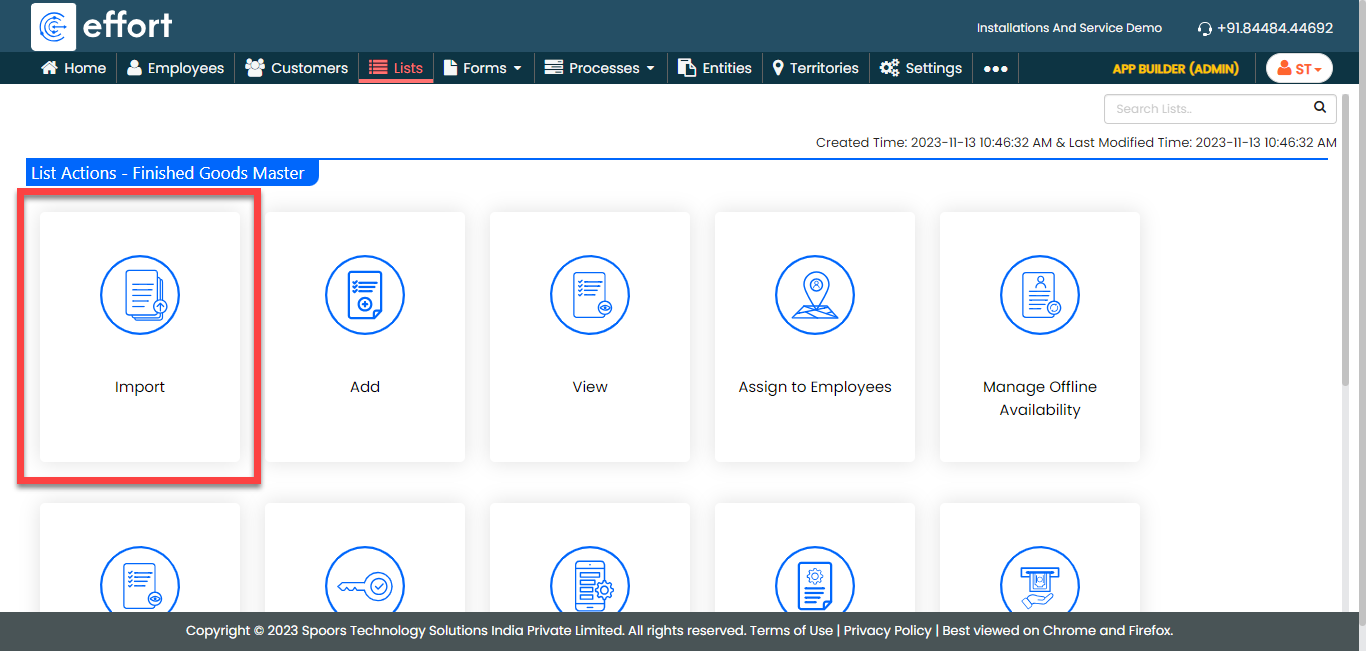
-
The list master creation is completed. Now you need to add items to
this list. It will take more time if we add items manually. Instead,
you can add multiple items to the list in one go using the
Import option. On the List
Actions page, click
Import.
-
Click Download Template. An Excel file is
downloaded.
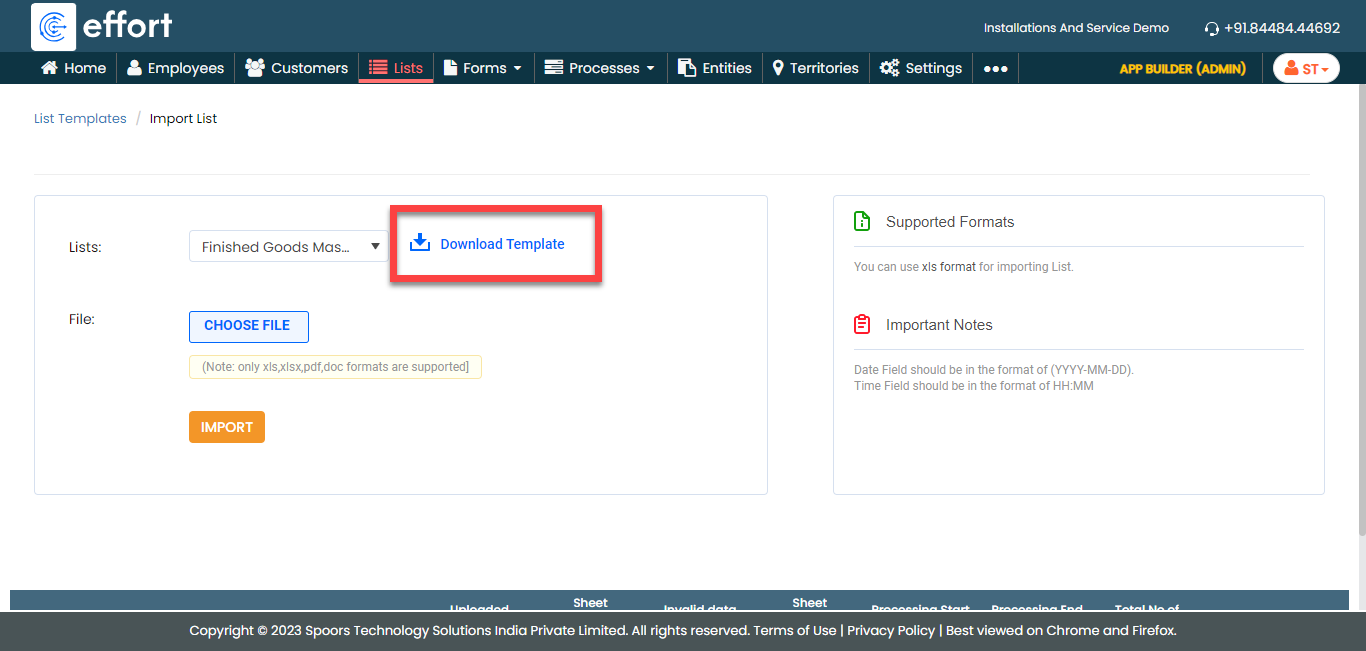
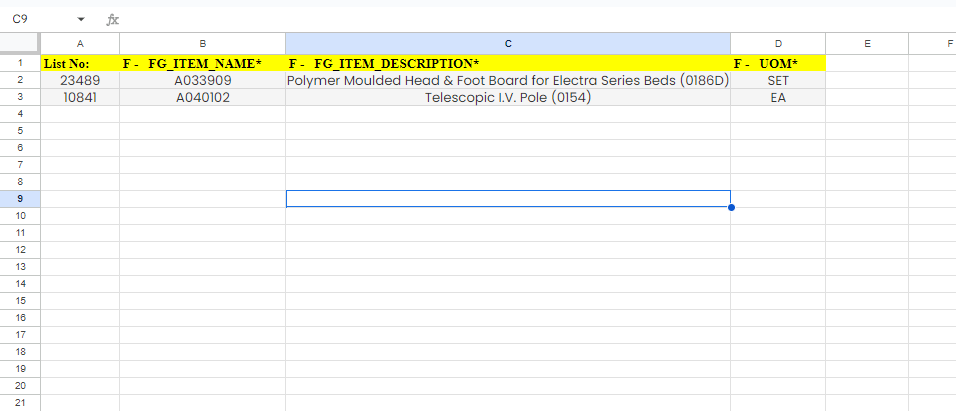
-
Open the downloaded Excel sheet and fill in the data in the fields.
Once you fill in the data, save the Excel sheet.
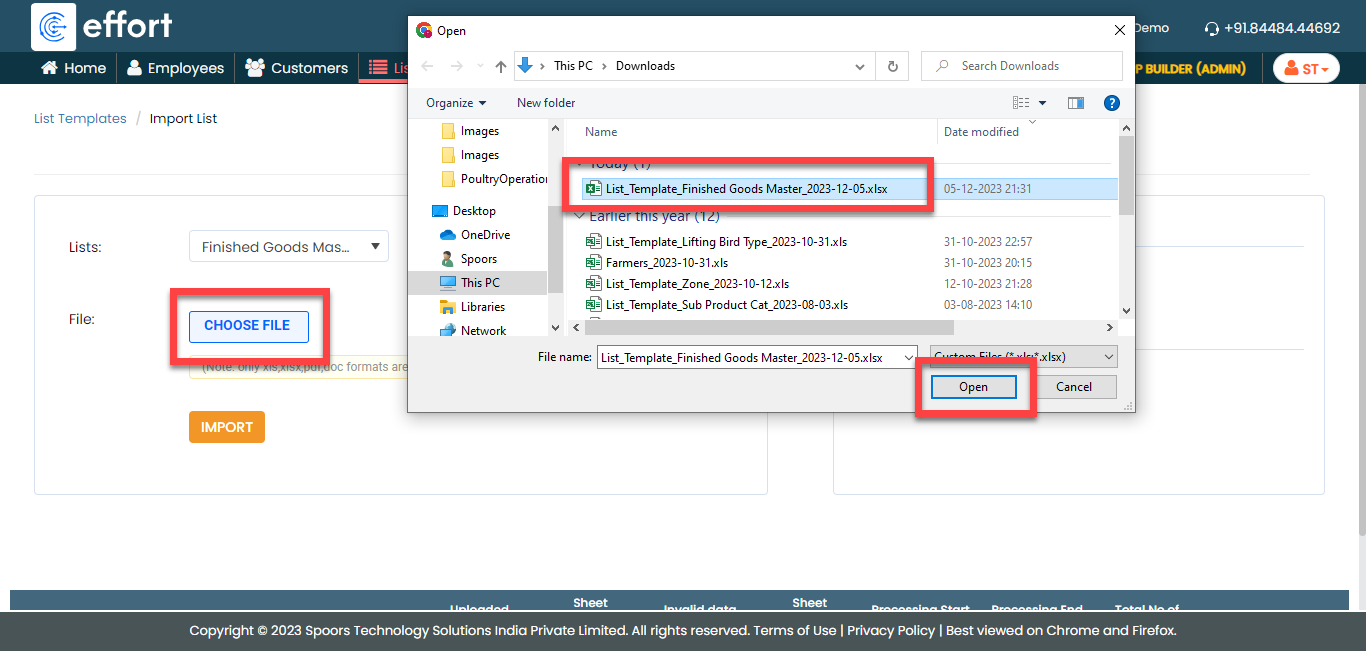
-
Go back to the Import List page, click
Choose File, and select the filled Excel
sheet.
-
Click the Import button. Once the import is
completed, refresh the page after a few seconds. You can check the
import status at the bottom of the page.
-
To view the imported list items, go to .
Note: To view the list items that you added, refer to View List Items.Note: To edit the list items that you added, refer to Edit List Item.
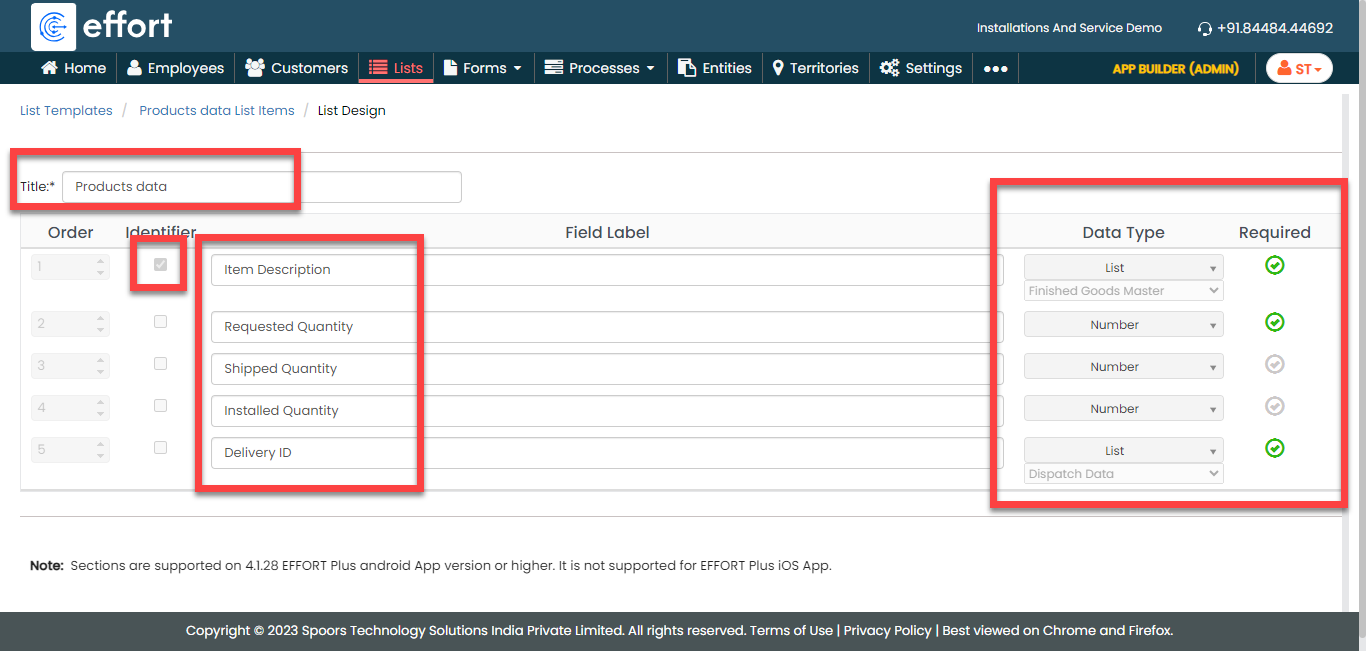
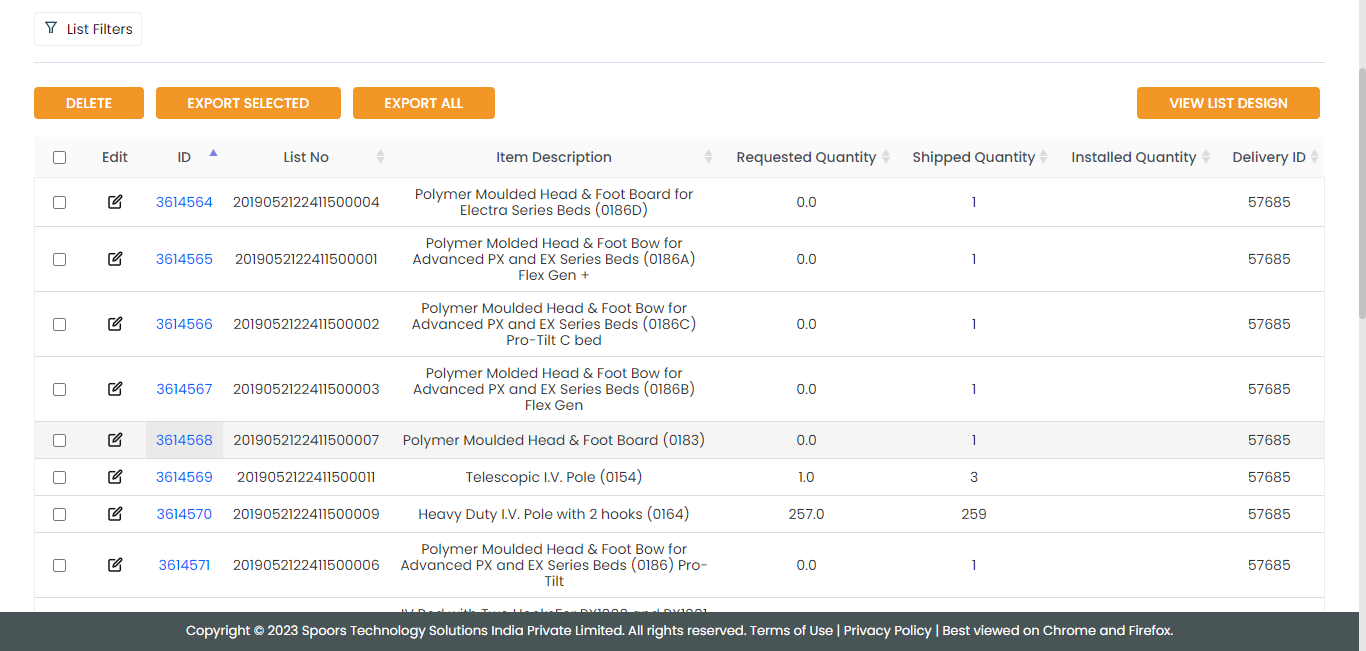
Create Products Data List
Now, we will create a list master that contains the data of all the products such as item, requested quantity, shipped quantity, installed quantity, and so on. To create the Products Data list, follow the steps below:
-
Create the Products Data list master as shown in the following
screenshot.
-
Now add the items to the list. You can either use the
Import option or follow the manual
process to add the items at your convenience.
Note: To add the list items, refer to Add an Item to List.Note: To import the list items, refer to Import List Items.Note: To edit the list items that you added, refer to Edit List Item.
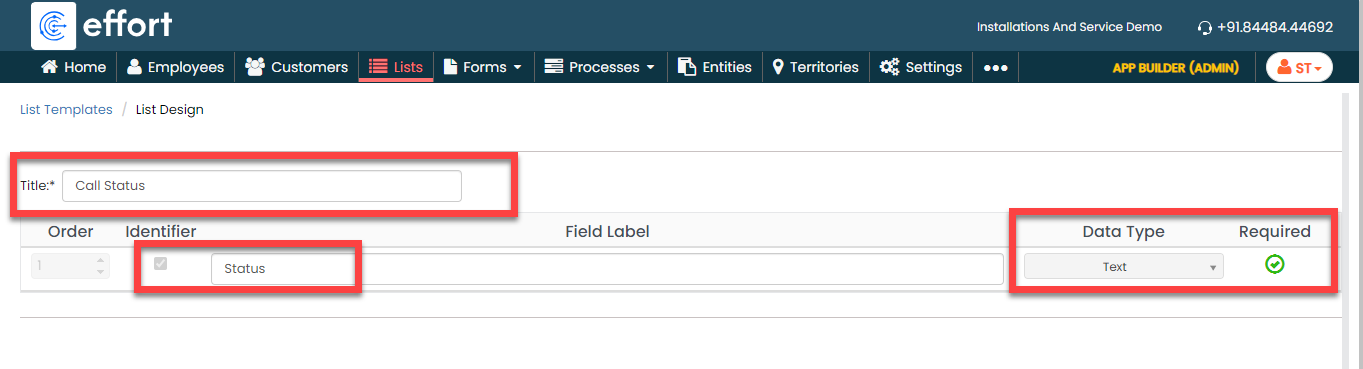
Create Call Status List
Now, we will create a list master that contains call status options such as Active and Inactive. To create, follow the steps below:
-
Create the Call Status list master as shown in the following
screenshot.
-
Now add the items to the list. You can either use the
Import option or follow the manual
process to add the items at your convenience.
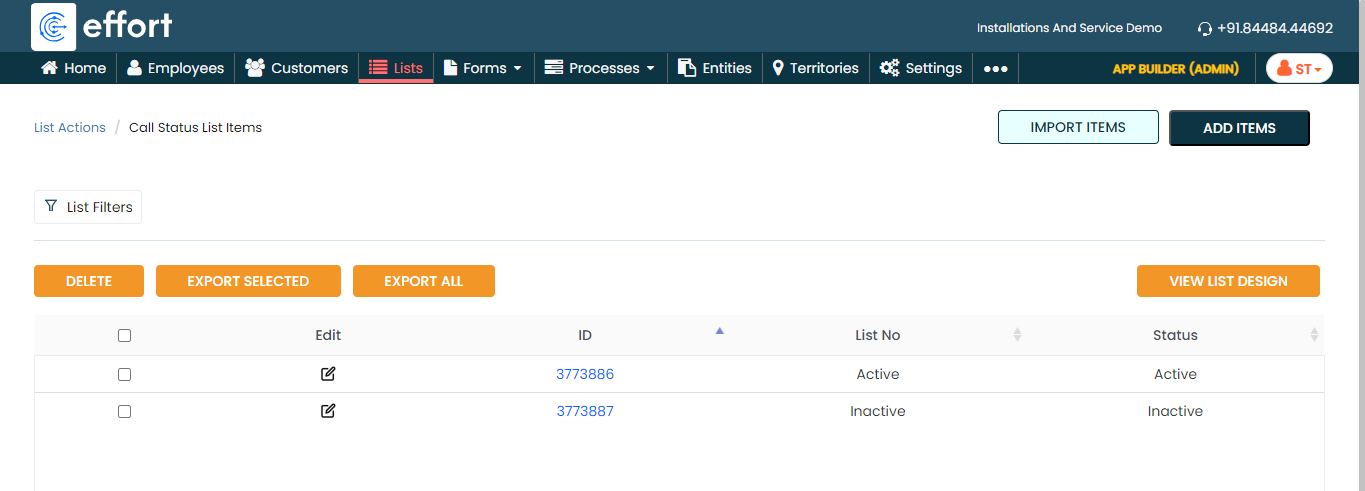
Note: To add the list items, refer to Add an Item to List.Note: To import the list items, refer to Import List Items.Note: To edit the list items that you added, refer to Edit List Item.
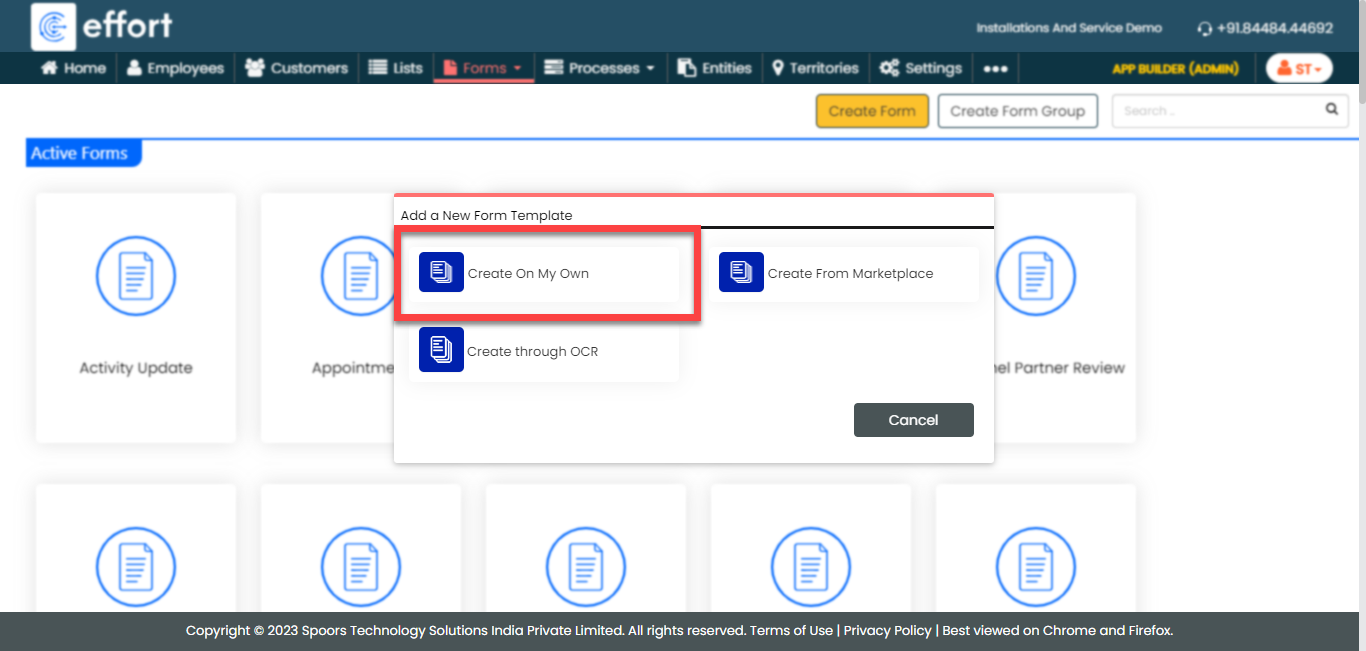
Creation and Configuration of Forms
In this section, we will create the forms required to manage the installation service. These forms need to be filled out by technicians to capture all the details related to installation/service. We will discuss them in detail as we set them up separately. Here, we will guide you through the steps of creating the forms, necessary fields, field-level configurations, and form-level configurations for all the forms. To know more about the forms, refer to Forms.
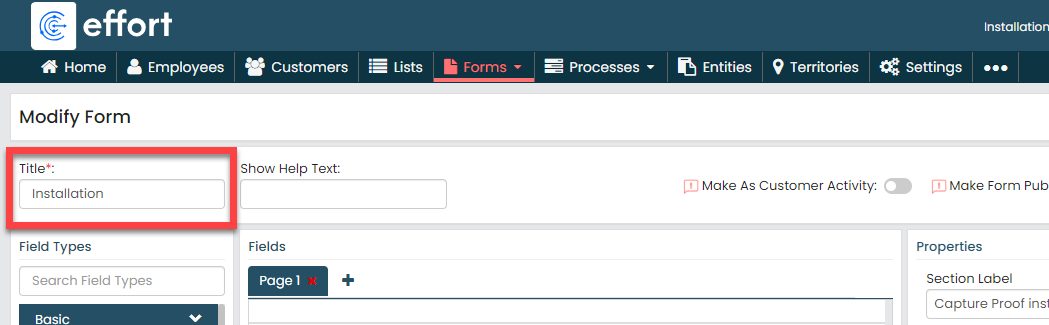
Installation Form
Technicians fill out the Installation form whenever they perform an installation activity to record the product and other work order details such as work order number, product data, and other installation details. The form serves as a comprehensive record, facilitating accurate tracking and efficient management of installation tasks. This streamlined process enhances organizational efficiency and ensures a systematic approach to recording and retrieving vital installation-related data through the mobile application.
To create this form, follow the steps below:
-
Go to .
-
In the Title field, enter the title as
Installation.
-
Drag and drop the following data types onto the field canvas and
label them as shown below.
Data Type Label Pick List Work Order No Repeatable Section Product Details Repeatable Section Barcode Details Pick List Call Status Repeatable Section Capture Proof Installation To know more about all the data types, refer to the following topics. -
Click the Work Order No field and select
Dispatch Data from the
List dropdown under the
Properties section.

-
Click the Product Details field and drag and
drop the following data types onto the field canvas and then label
them as shown below.
Data Type Label Pick List Product Number Dispatched Quantity Number Installed Quantity -
Under the Properties section, define
the Minimum Entries and
Maximum Entries as per your
requirement.
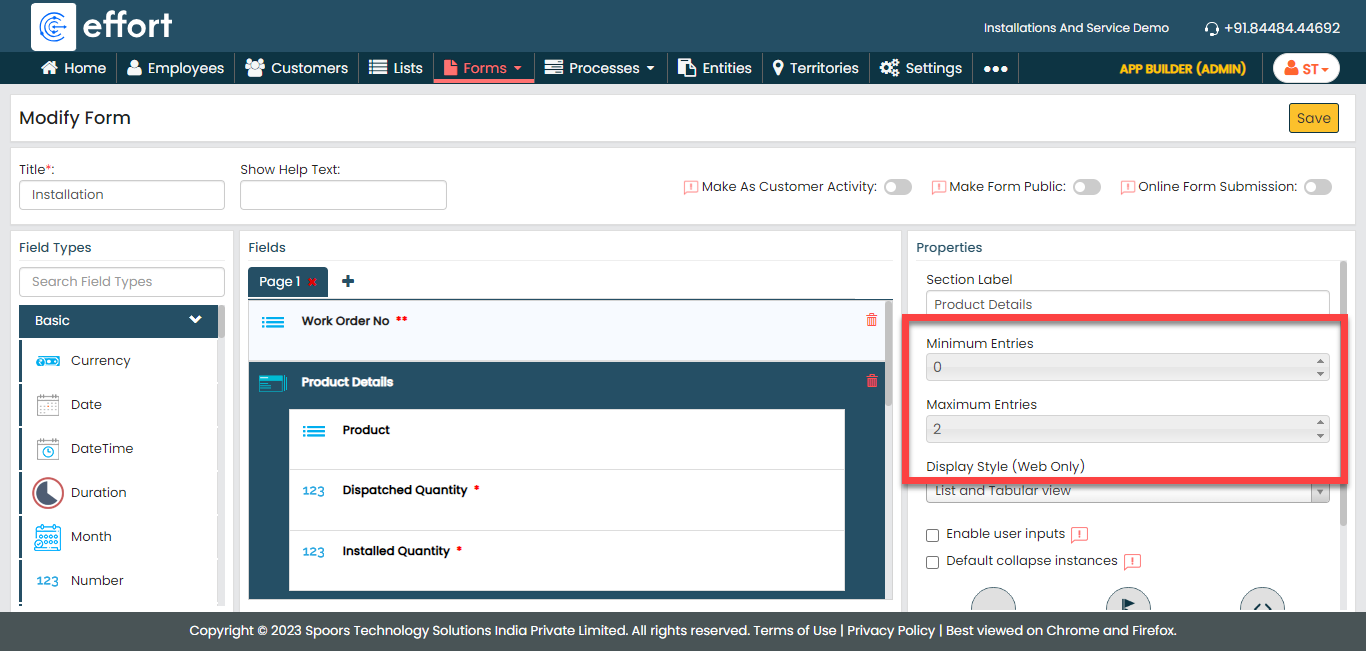
As per the above configuration, the user can create a maximum of 2 instances for capturing the product details. -
Click the Product field inside the
section, select the Products Data
list from the List dropdown under the
Properties section.

-
Click the Dispatched Quantity field
and make it as Computed under the
Properties section.

-
Click the grey box under the
Computed field.
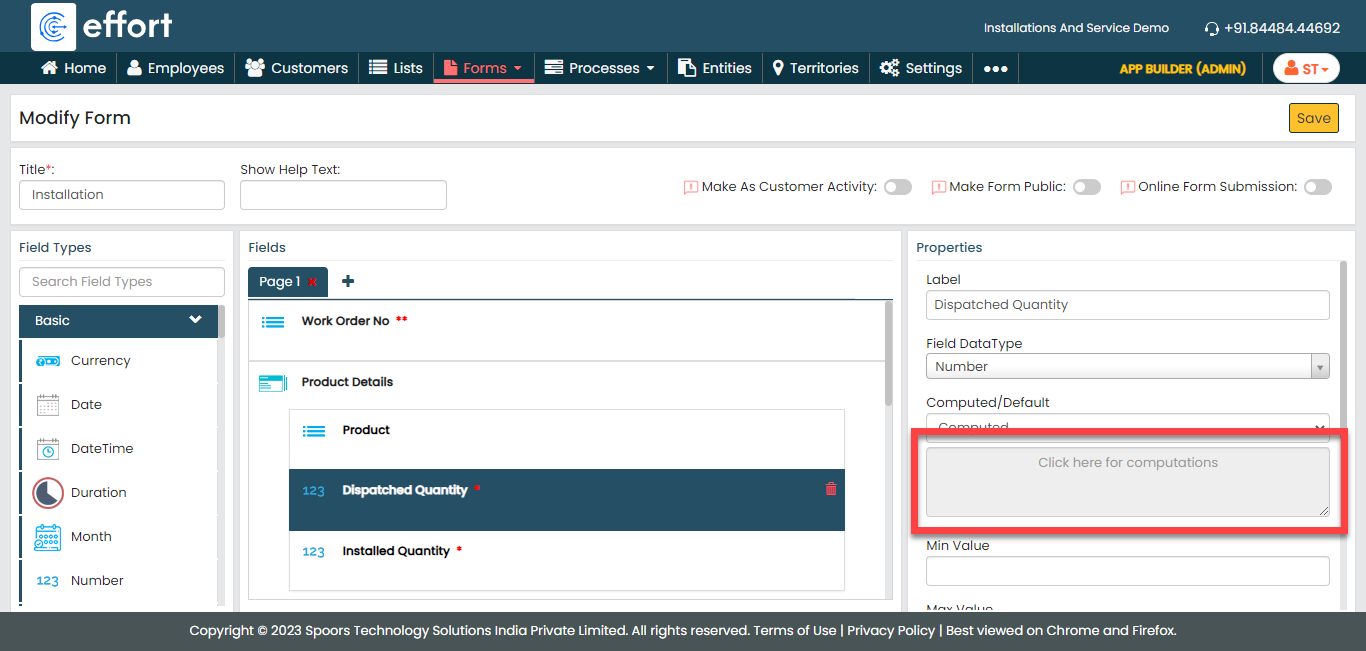
To know more about Computed and Default options, refer to Field Properties.
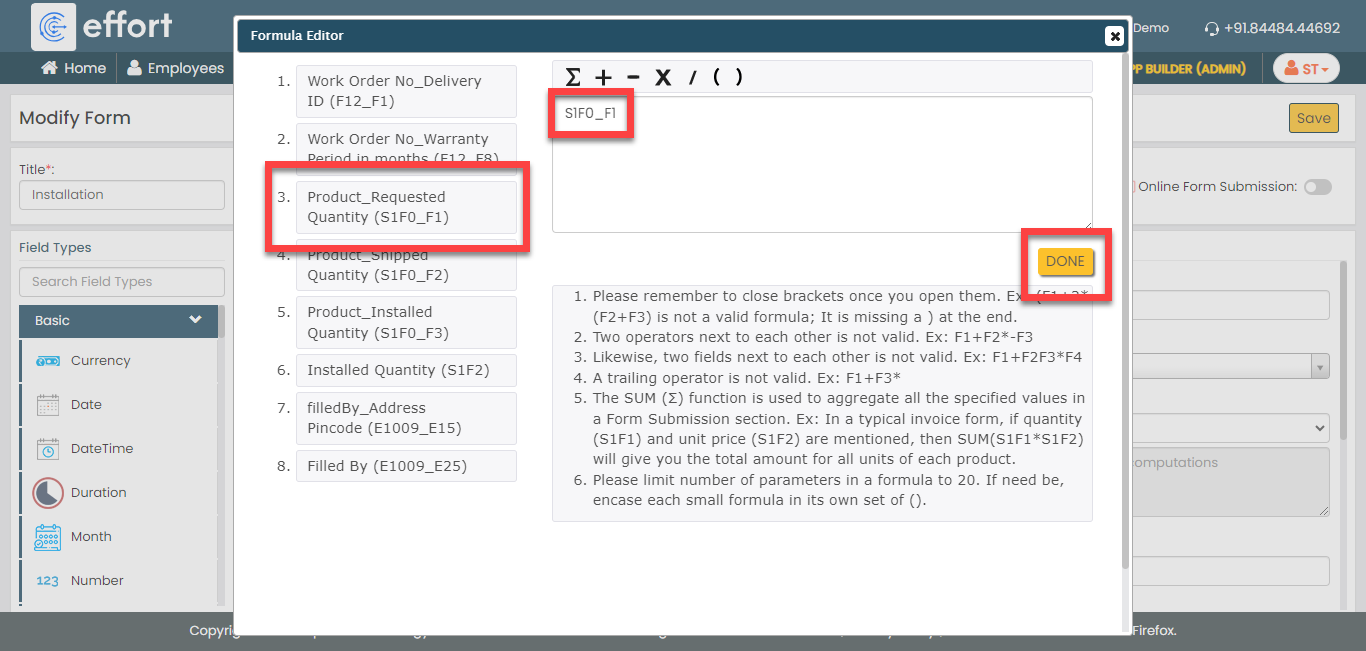
-
You can see the Formula Editor
pop-up window where the formulas can be defined. On the
pop-up window, click the Product_Requested
Quantity (S1F0_F1) field and then click
Done.
-
Click the Installed Quantity field
and click Manage Validations button
under the Properties icon.

-
Click the Add Criteria button under
the Validate Based on Values in Other
Fields and define the configuration as shown
below and click OK.

We defined this configuration to validate the value entered in this field. If the installed quantity is more than the dispatched quantity, then the system displays the configured error message and it will not allow you to save the form.
-
Under the Properties section, define
the Minimum Entries and
Maximum Entries as per your
requirement.
-
Click the Barcode Details field and drag and
drop the following data types onto the field canvas and then label
them as shown below.
Data Type Label Text Barcode Or QR Code Date Date Text Asset No -
Under the Properties section, define
the Minimum Entries and
Maximum Entries as per your
requirement.
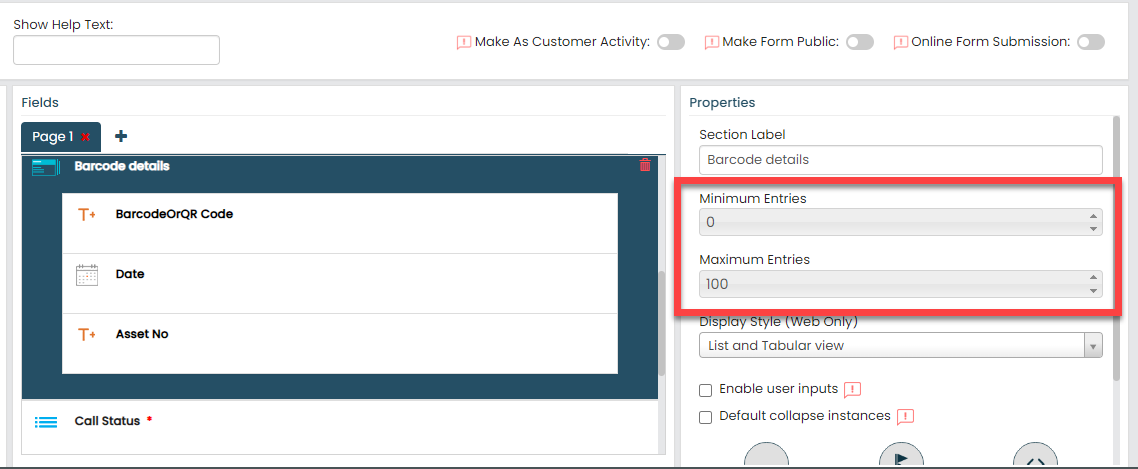
As per the above configuration, the user can create a maximum of 100 instances for capturing the product barcode details. -
Click the Barcode Or QR Code field
inside the section, disable the Required
Field checkbox and enable the
Barcode field.

We made this field a barcode field and it is optional while filling the form. When we made enable the Barcode Field checkbox, the technicians can see a scanner icon beside the field. They can tap on it and scan any QR or Barcode. -
For the Date and Asset
No fields, disable the Required
Field checkbox to make them optional while
submitting the form.

-
Under the Properties section, define
the Minimum Entries and
Maximum Entries as per your
requirement.
- Click the Call Status picklist field and select the Call Status list that we created earlier from the List dropdown.
-
Click the Capture Proof Installation field
and drag and drop the following data types onto the field canvas and
then label them as shown below.
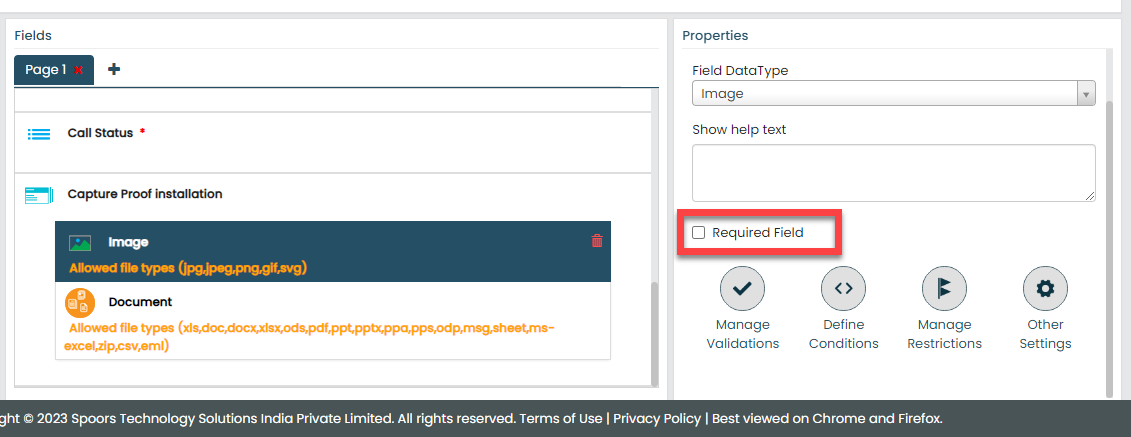
Data Type Label Image Image Document Document -
Under the Properties section, define
the Minimum Entries and
Maximum Entries as per your
requirement.

As per the above configuration, the user can create a maximum of 5 instances for capturing the product barcode details. -
For the Image and
Document fields, disable the
Required Field checkbox to make
them optional while submitting the form.
-
Under the Properties section, define
the Minimum Entries and
Maximum Entries as per your
requirement.
-
Now click Publish and then click
OK to make it available to the
technicians. You are done with your first form creation.
Note: To know more about all the publishing options, refer to Publishing Options.
Feedback
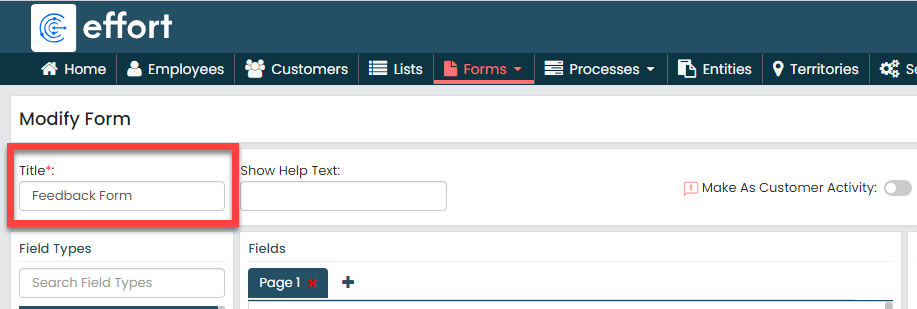
Upon completion of an installation task, technician are required to complete a feedback form. We will incorporate specific parameters to gather valuable feedback from our customers. To create this form, follow the steps below.
- Go to .
-
In the Title field, enter the title as
Feedback Form.
-
Drag and drop the following data types onto the field canvas and
label them as shown below.
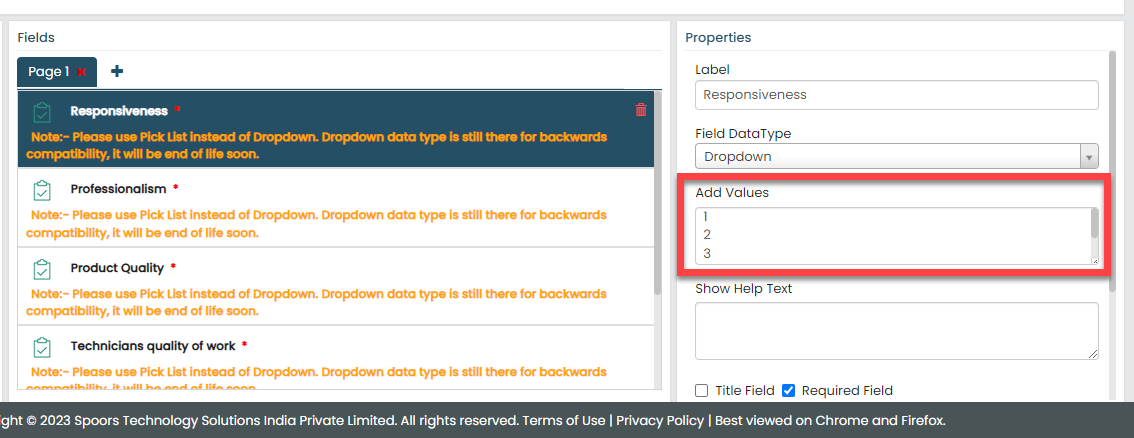
Data Type Label Dropdown Responsiveness Dropdown Professionalism Dropdown Product Quality Dropdown Technicians quality of work Text Feedback Signature Customer Signature To know more about all the data types, refer to the following topics. -
Click the Responsiveness,
Professionalism, Product
Quality, and Technicians Quality of
Work fields, and add values 1 to 5 in the
Add Values field.
-
Now click Publish and then click
OK to make it available to the
technicians.
Note: To know more about all the publishing options, refer to Publishing Options.
Creation and Configuration of Installation Service Process
The Installation Service is a workflow that requires configuration to effectively manage the activities associated with the installation process. These activities include generating an installation request, visiting the customer's location, executing the installation, and more.
In this section, we will configure the Installation Service process activities, outline the sequence of execution, specify the necessary information for creating work items, and among other aspects. To know more about work processes, refer Work Processes.
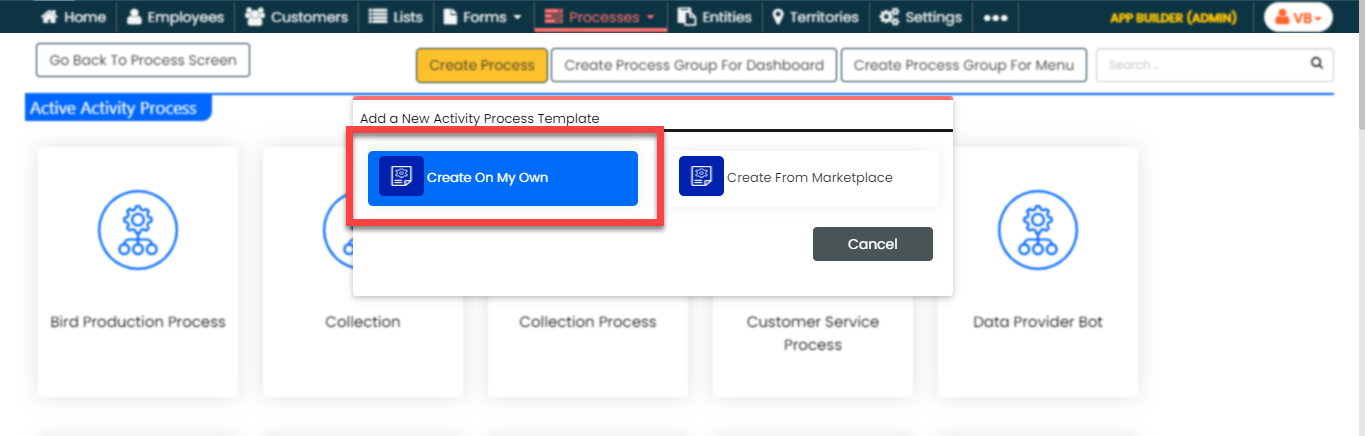
Create Installation Service Process
In this section, we will create the Installation Service Process.
-
Go to .
-
On the Create Activity Process screen, do the
following:
-
In the Work Process Name field,
enter the title as Installation Service
Request.
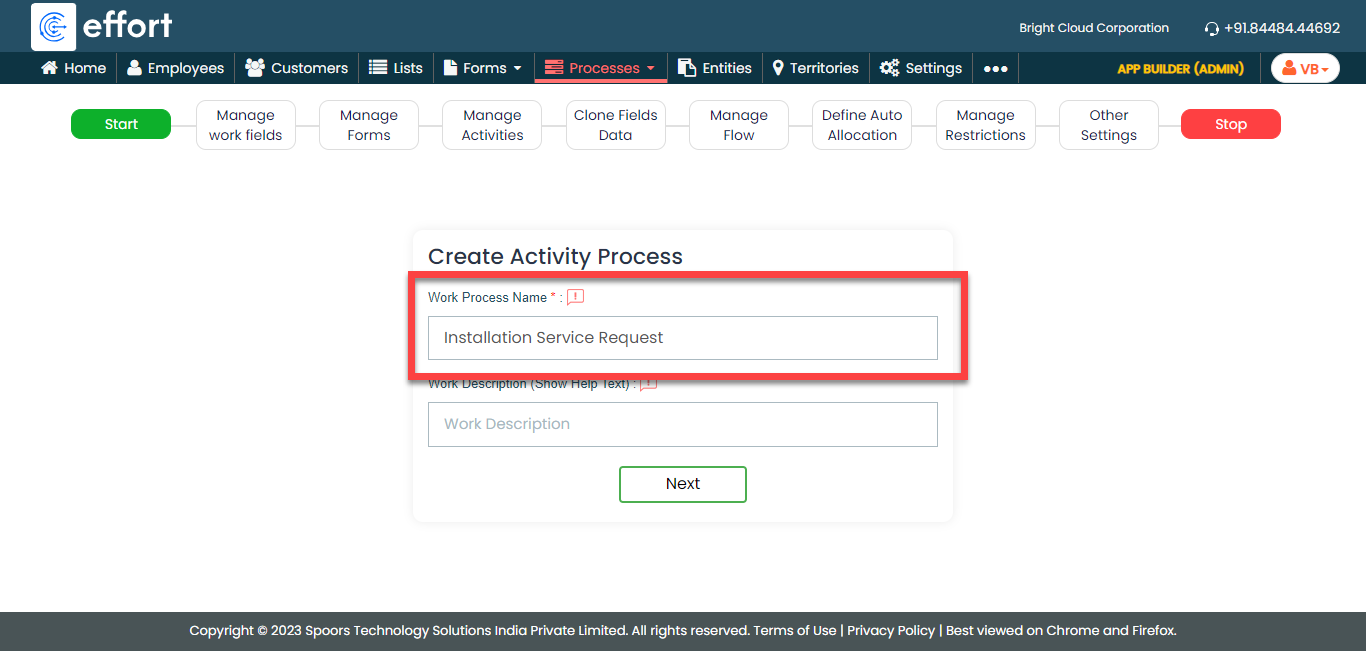
- Click Next.
-
In the Work Process Name field,
enter the title as Installation Service
Request.
-
After entering the process name and clicking Next, you will
proceed to the next tab, where you are required to configure the
work fields. On this tab, click Next and then click
OK. We will configure this section
later.

-
On the Manage Forms tab, click
Next.

-
Manage Activities: On this tab, we will
define the activities that need to be executed for installation
service request. To know more about activities, refer Activities. To
define the activities, follow these steps:
-
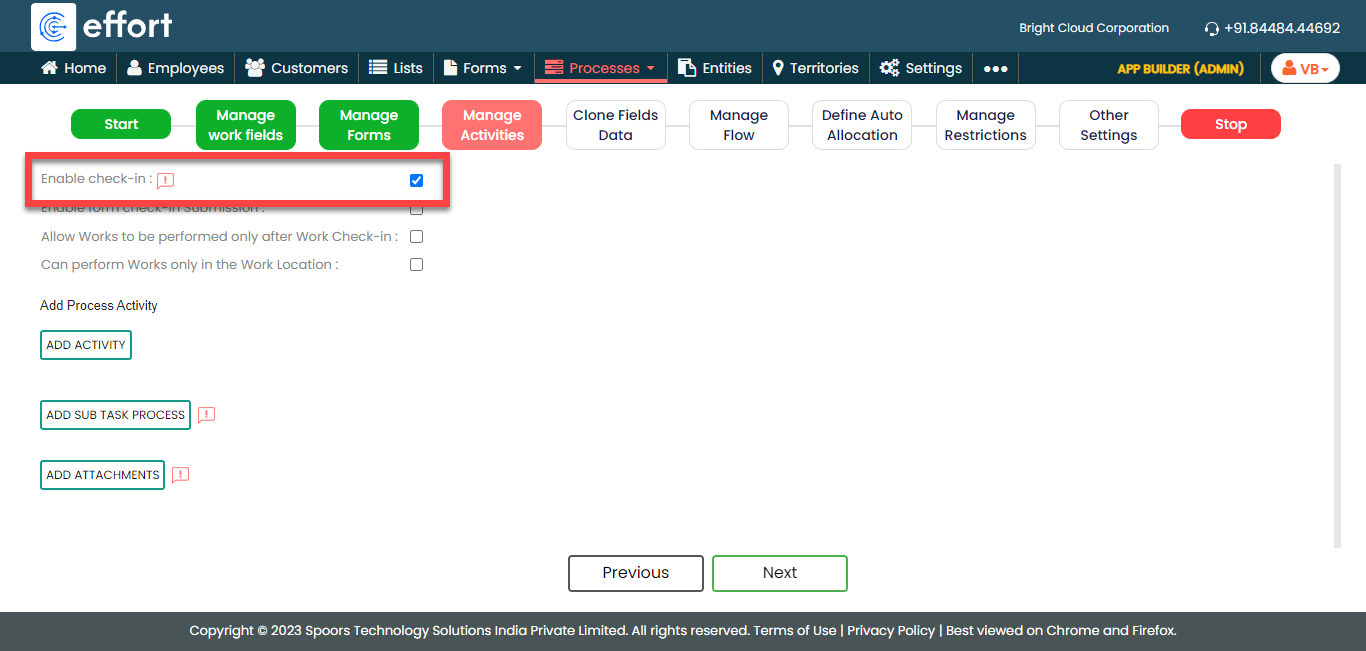
Check the Enable check-in checkbox
to activate work check-in feature for this process. Based on
the configuration, the system will not allow the technicians
to execute the process without doing the check-in.
-
Click Add Activity.

-
Under the Activity Title column,
enter the title as
Installation.

-
For the Installation activity,
configure the Installation form under
the Form Template column.

-
Similarly, click Add Activity button
again to create another activity as
Feedback and configure the same
Feedback form.

- Once you define the activities, click Next.
-
Check the Enable check-in checkbox
to activate work check-in feature for this process. Based on
the configuration, the system will not allow the technicians
to execute the process without doing the check-in.
-
On the Clone Fields Data tab, click
Next.

-
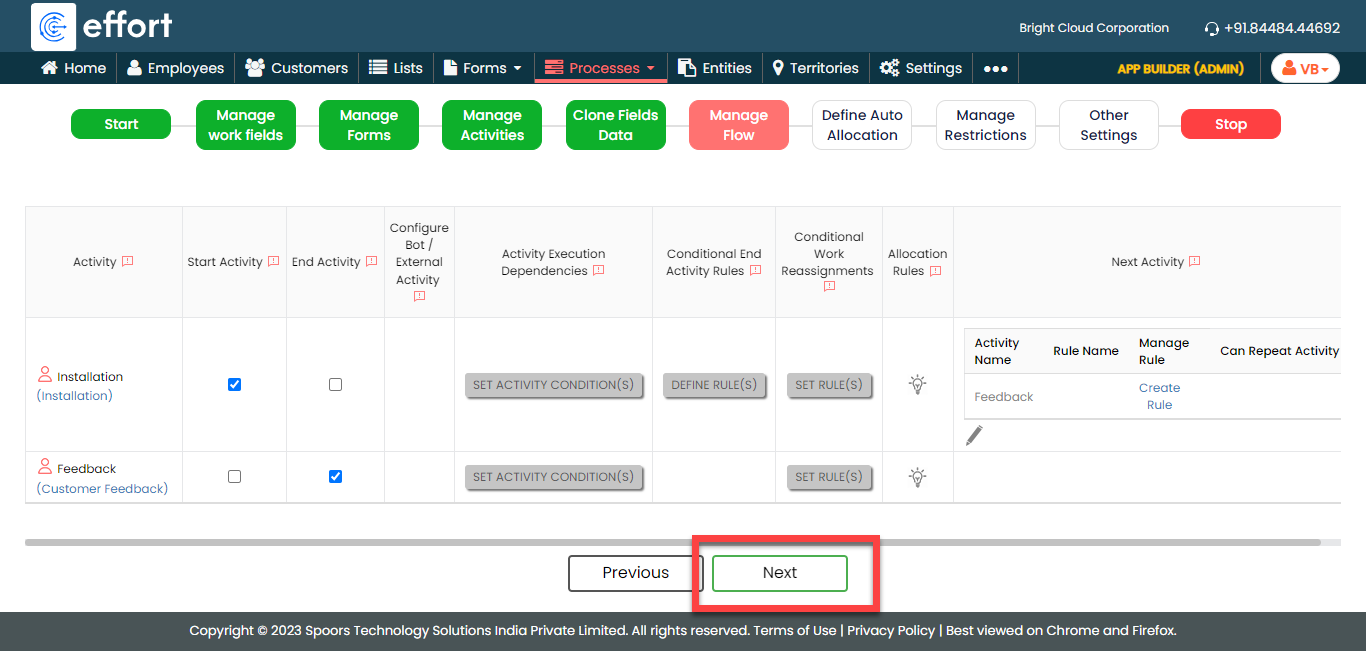
On the Manage Flow tab, you can see the default flow created
automatically. Click Next to move to the next
screen. We will configure this later.
-
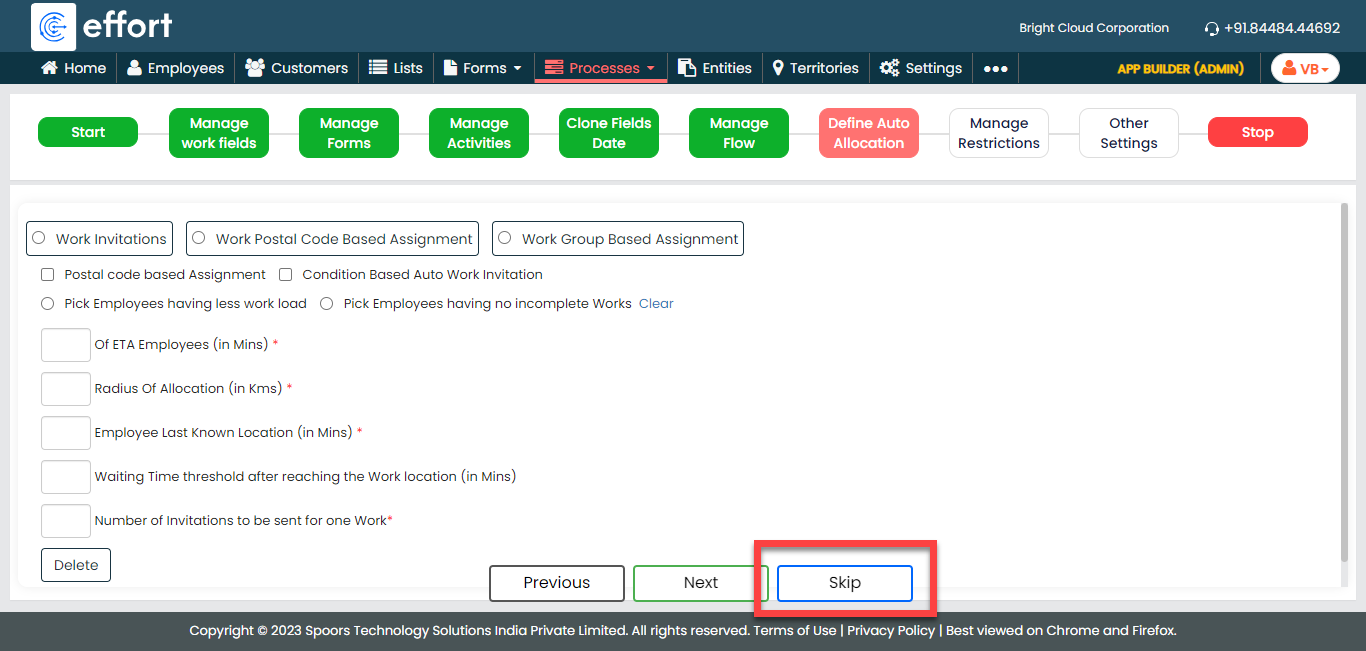
On the Define Auto Allocation tab, click
Skip. We will configure this later.
-
On the Manage Restrictions tab, select the Enable
work sharing option and click
Next.

This feature helps us assign the same work process to multiple employees. Whenever there is a need for multiple employees to complete a single task, this feature proves to be very helpful. Instead of creating individual work items for each employee, we can assign the same task to multiple employees simultaneously. This not only reduces time but also enhances visibility.
-
On the Other Settings tab, click
Complete. We will configure this
later.

- As you can see, we've ignored some configurations as those are complex and time consuming. Refer to the next sections for detailed steps to configure the flow, fields, work settings, and so on.
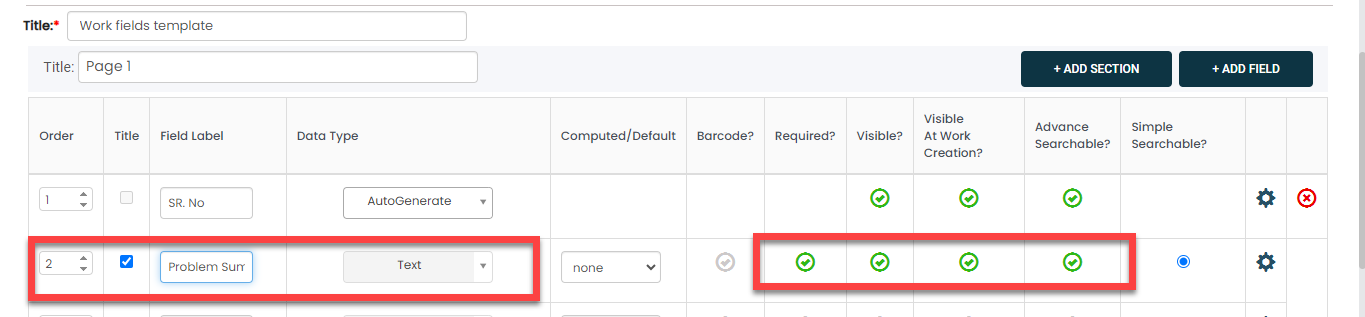
Configure Work Fields
In this section, we will configure the work fields which are required for capturing the information necessary to execute installation work. You will find some default fields that are pre-configured. However, these defaults are insufficient for capturing the necessary information. To address this, we must add and configure custom fields. To know more about work fields, refer Work Fields.
Follow the steps below to create work fields.
-
On the process page, click Manage Fields.
Alternatively, go to .
-
Click Add Field and define the configuration
as shown below.

-
Change the Work Name label to
Problem Summary.
-
Similarly, click the Add Field button and
configure the fields as described in the following table.
Field Configuration Delivery Challan No Set the data type to Pick List and select the Dispatch Data from the dropdown.Configure the field configuration as shown below: 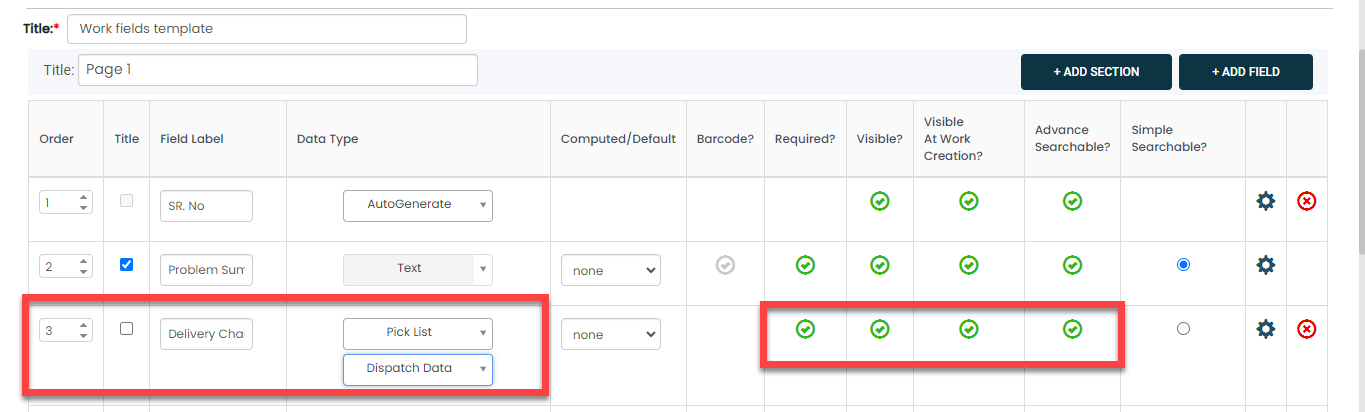
Work Order no Make this field as Computed. The field configuration is shown below: 
Click on the grey box and configure as shown below to fetch the Work Order Number automatically: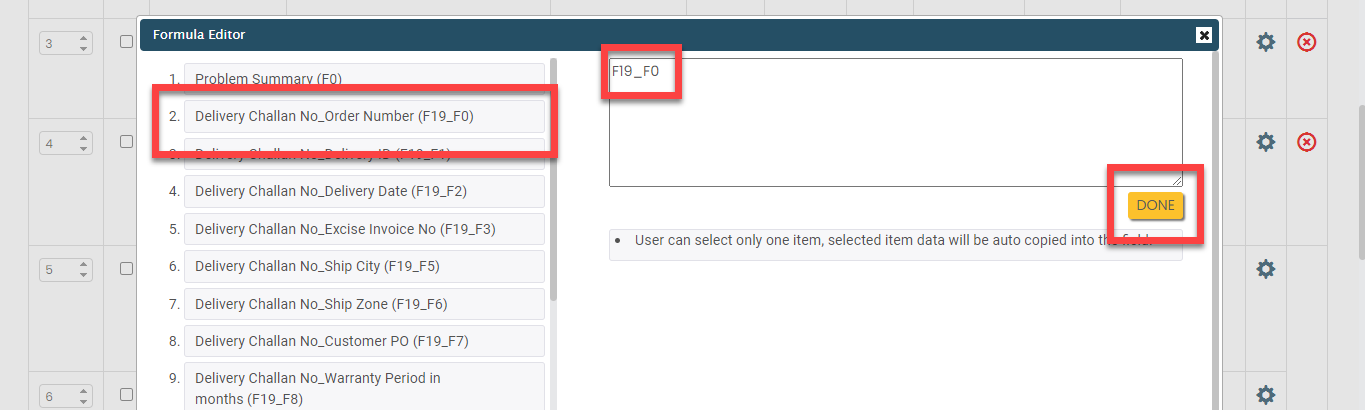
Starts This is a default field. Do not change the default configuration. 
Ends This is a default field. Do not change the default configuration. 
Customer This is a default field. Make this field as Default. The field configuration is shown below: 
Click on the grey box and configure as shown below to fetch the Customer Name from the Dispatch Data list master automatically: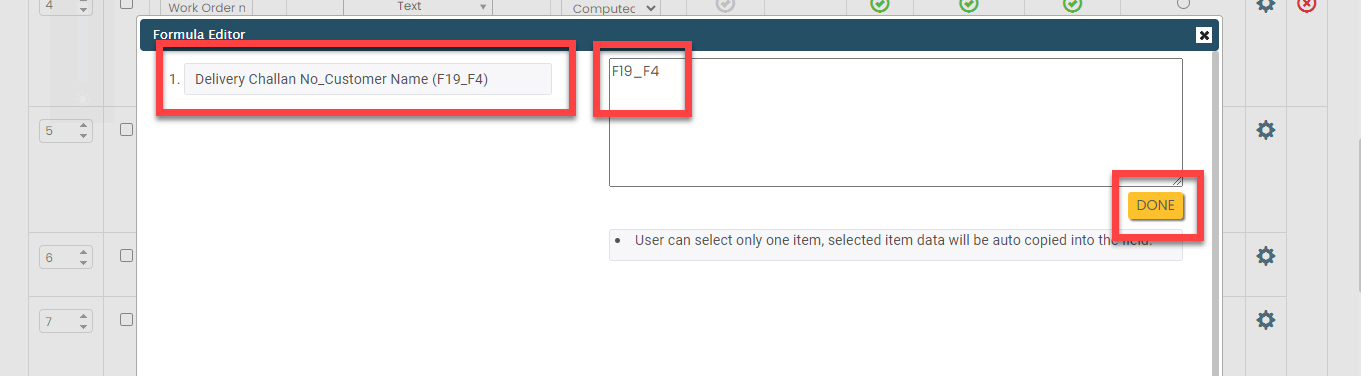
Employee This is a default field. Do not change the default configuration. 
Priority This is a default field. Configure the field as shown below: 
Address same as customer? This is a default field. Configure the field as shown below: 
Installed customer Name Configure the field as shown below: 
Phone Number, Street, Area, City, Landmark, Country, State, Pincode, Location These are default fields. Configure the field as shown below: 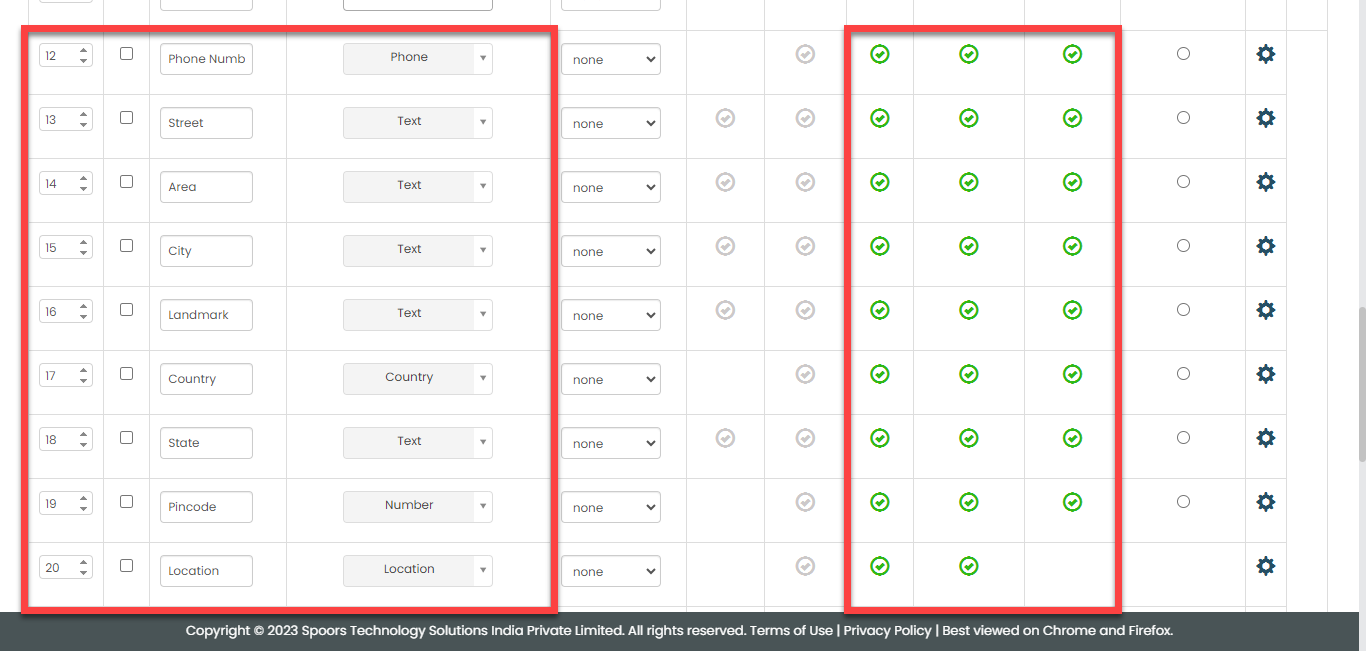
Visit at - area name Configure the field as shown below: 
Region Set the data type to Dropdown and configure as shown below:  Add the values to the dropdown as per your requirement in the blank field.
Here are some sample values.-
Mumbai
-
Chennai
-
Delhi
-
Kolkatta
-
Rest of South
-
Rest of North
-
Rest of West
-
Rest of East
Call status Set the data type to Pick List and select the Call Status from the dropdown. Configure the field as shown below: 
Received Date Configure the field as shown below: 
Barcode Make this field as and configure the field as shown below: 
-
- Once you configure all the fields, click Save.
Configure Work Flow
In this section, we will define the workflow, which outlines the sequence of activities defined earlier. This process includes specifying the start activity, end activity, subsequent activities, and more. To know more about the Flow, refer to the Manage Flow documentation.
Follow the instructions below to configure flow:
-
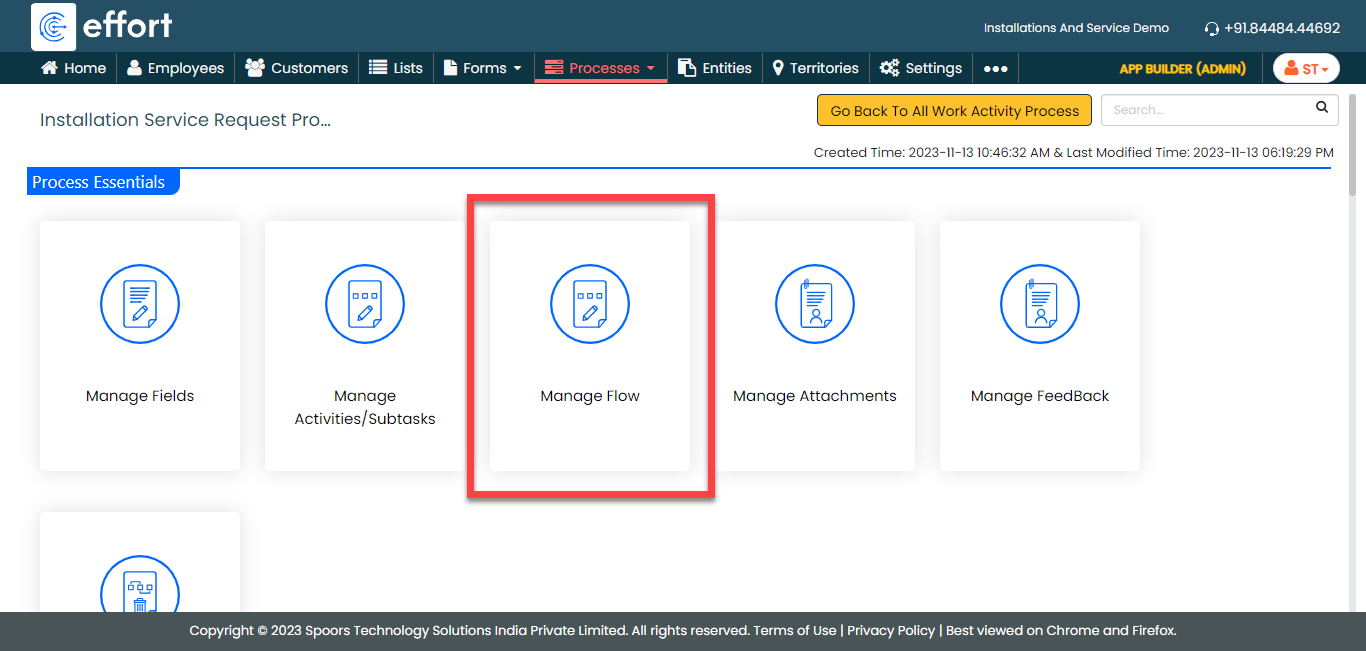
On the process page, click Manage Flow.
Alternatively, go to .
-
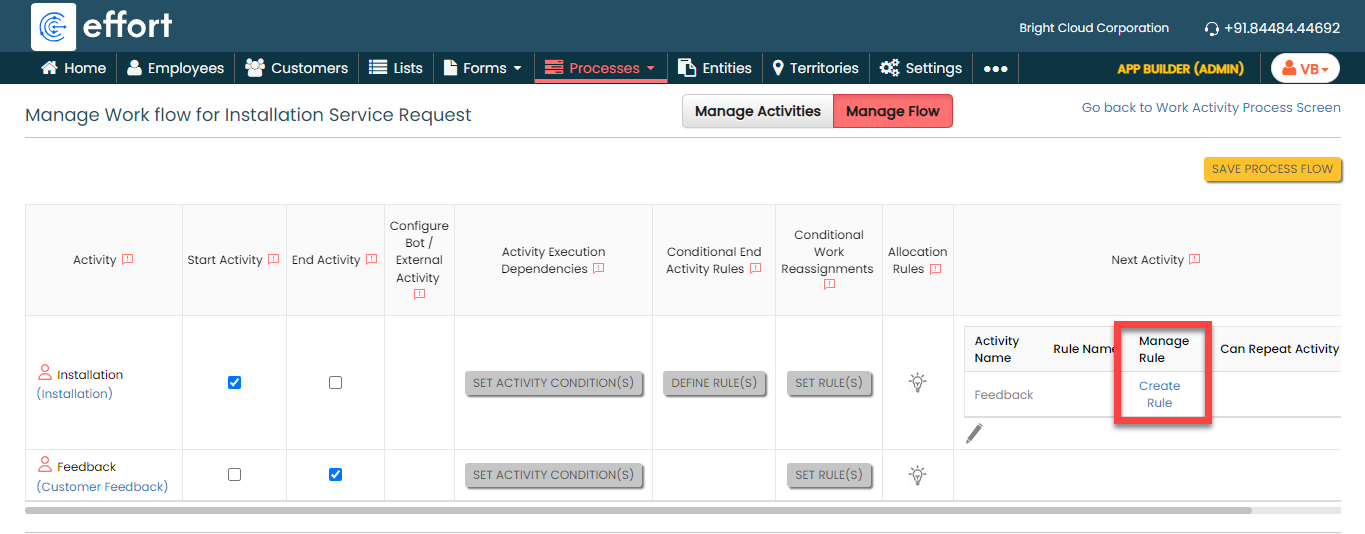
For the Installation activity, do the
following:
-
Make sure that the Installation
activity as Start Activity as shown
below.

When you make an activity as the start activity, it means that technicians have to do this activity first.
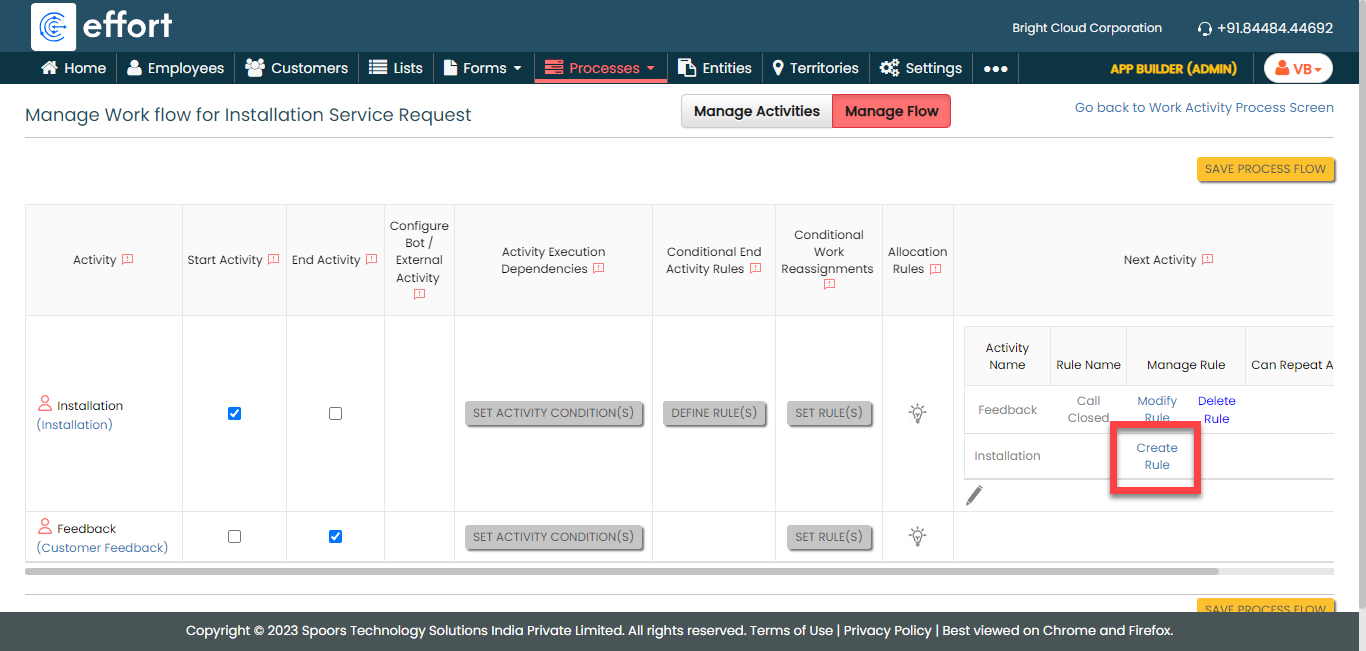
-
Under the Next Activity column,
click Create Rule.
-
On the Create Rule pop-up window,
enter the Rule Name as Call
Closed and click Add Criteria
to define the configuration.
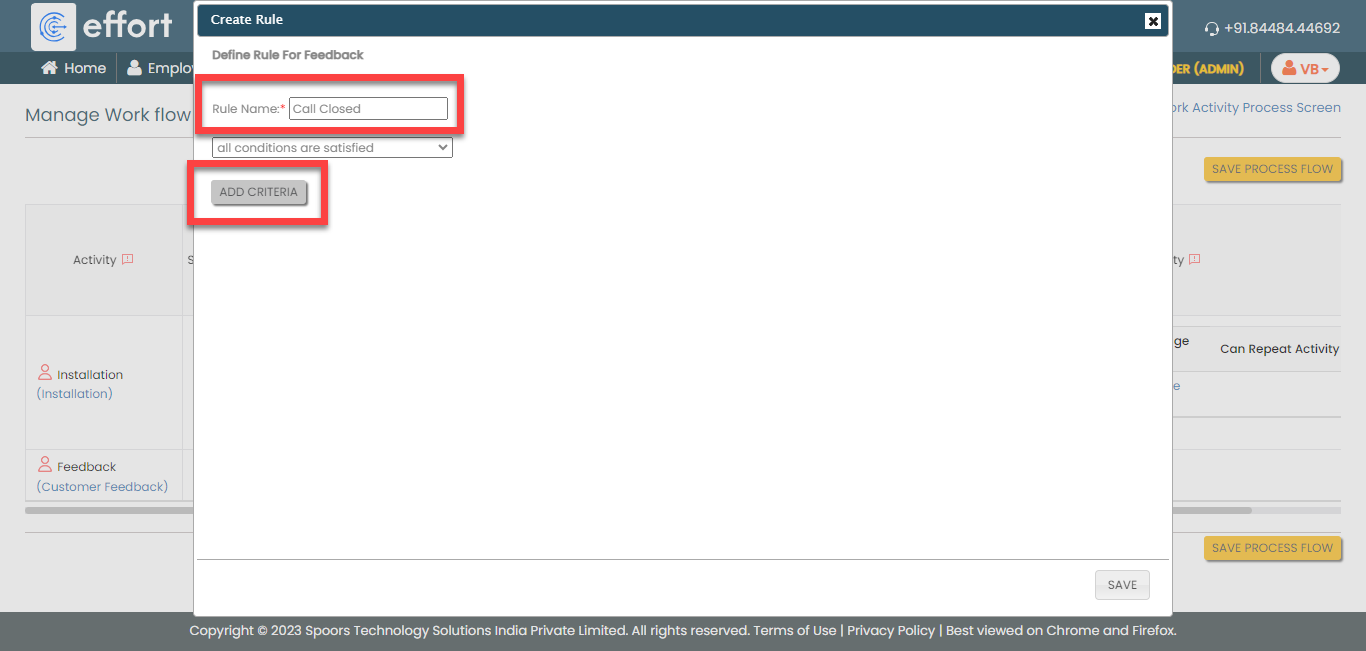
-
Define the configuration as shown below and click
Save.

According to this configuration, the feedback activity will be executed after the installation activity only when the call status is in the Inactive state. If the call status is in the Active state, the technicians must perform the Installation task again. To set up this configuration, follow the steps outlined below.
-
Under the Next Activity column,
click the pencil icon.
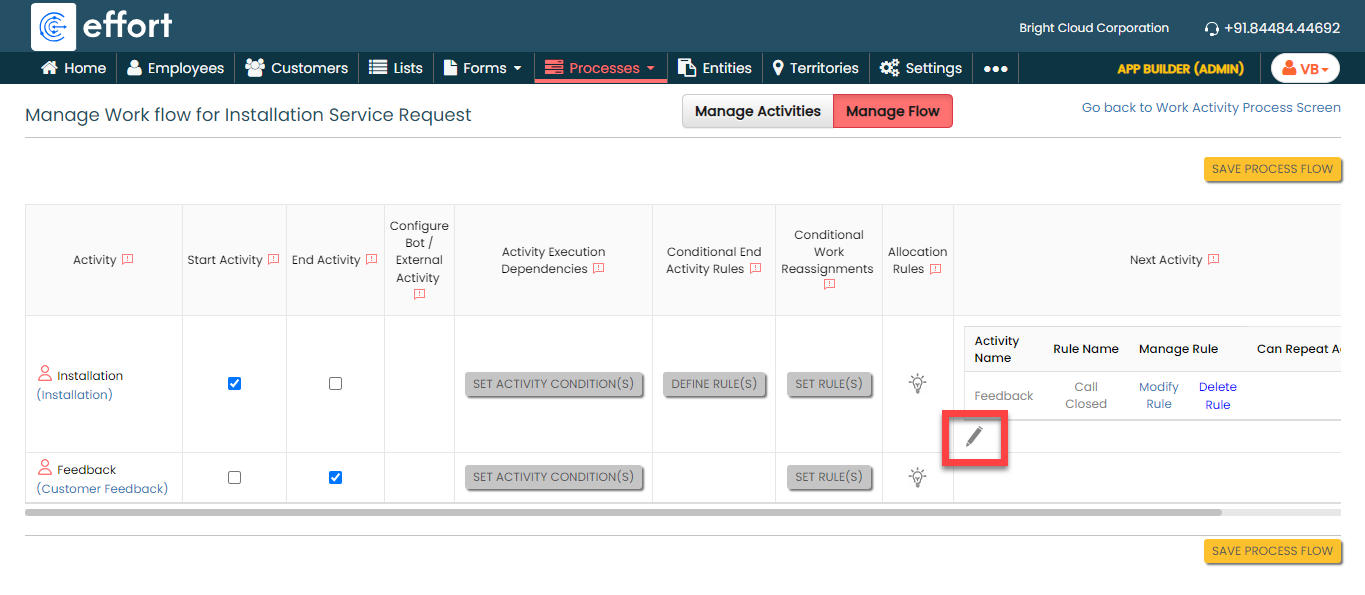
-
Click on the Installation activity and click right
arrow icon to select it.

-
Now click Create Rule again the
Installation activity under the Next
Activity column.
-
Define the configuration as shown below and click
Save.

-
Make sure that the Installation
activity as Start Activity as shown
below.
- Click Save Process Flow.
Execute Installation Service Request Process
In this section, we will show you how to execute the Installation Service Request Process in the Effort Platform. It provides the activities performed by the admins and technicians, such as creating works, logging into the effort, executing installation activity in the mobile app, and so on. Let's get started.
Create a Installation Service Request Process
When an installation service request is received, the work is initiated. Follow the steps outlined below to create a work order in the effort platform.
-
Go to .
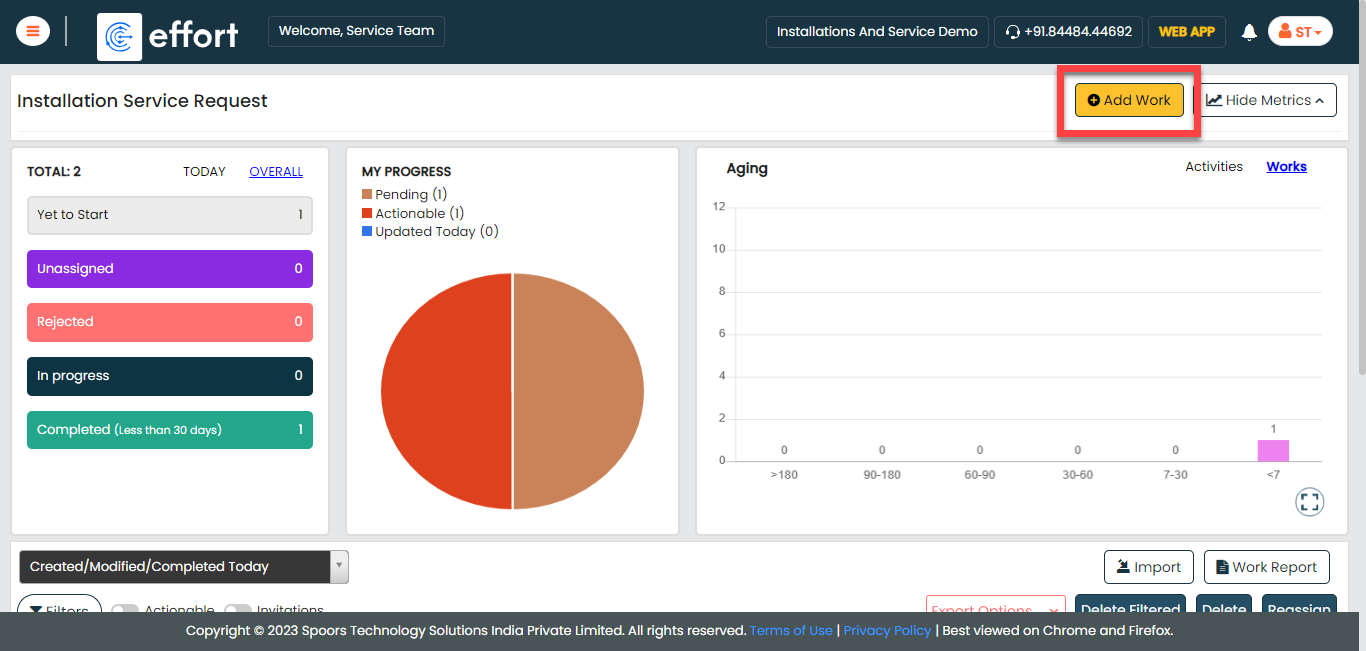
-
Under the Basic Details section, fill in the
mandatory fields.

-
Under the Assign A Work section, assign it to a
supervisor.
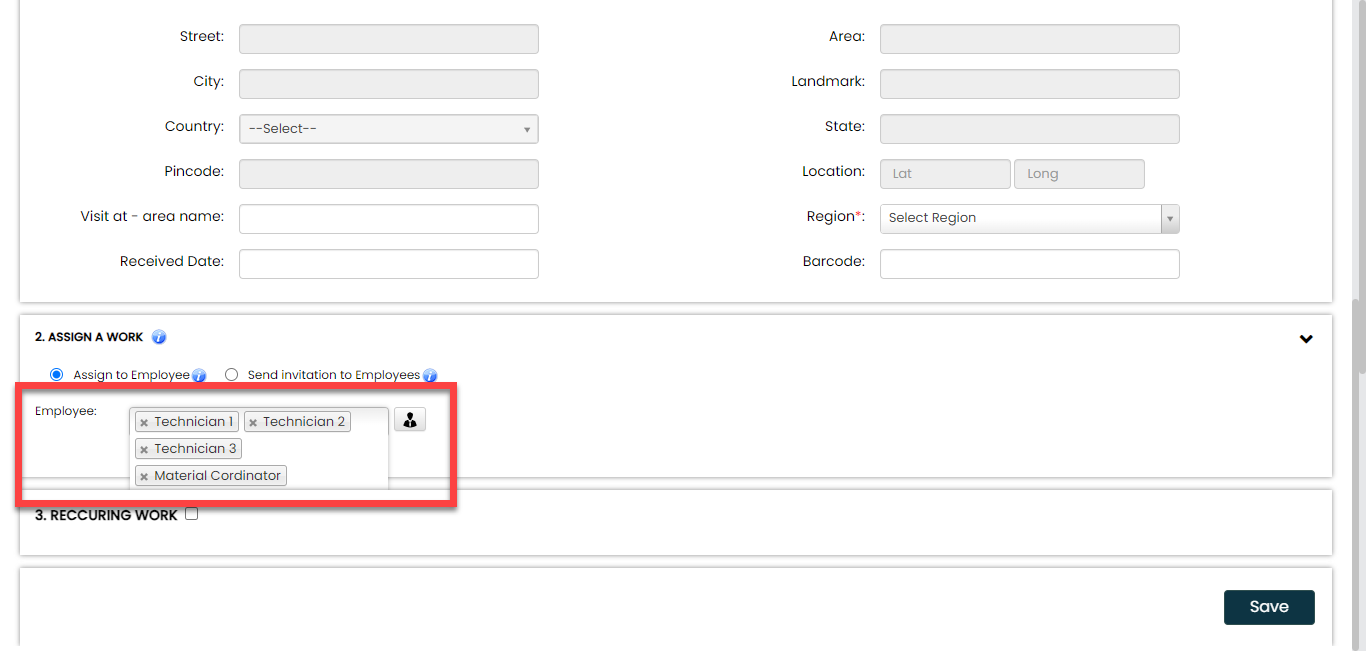
As you can see, we assigned this process to multiple employees. We achieved this by enabling the work sharing feature in the work settings. - Click Save.
Login to Effort NXT Mobile App
To begin with Installation Service Request Process, we require an application through which we can log in, check the works assigned, and perform tasks. This section provides instructions to get started with the Effort NXT mobile app.
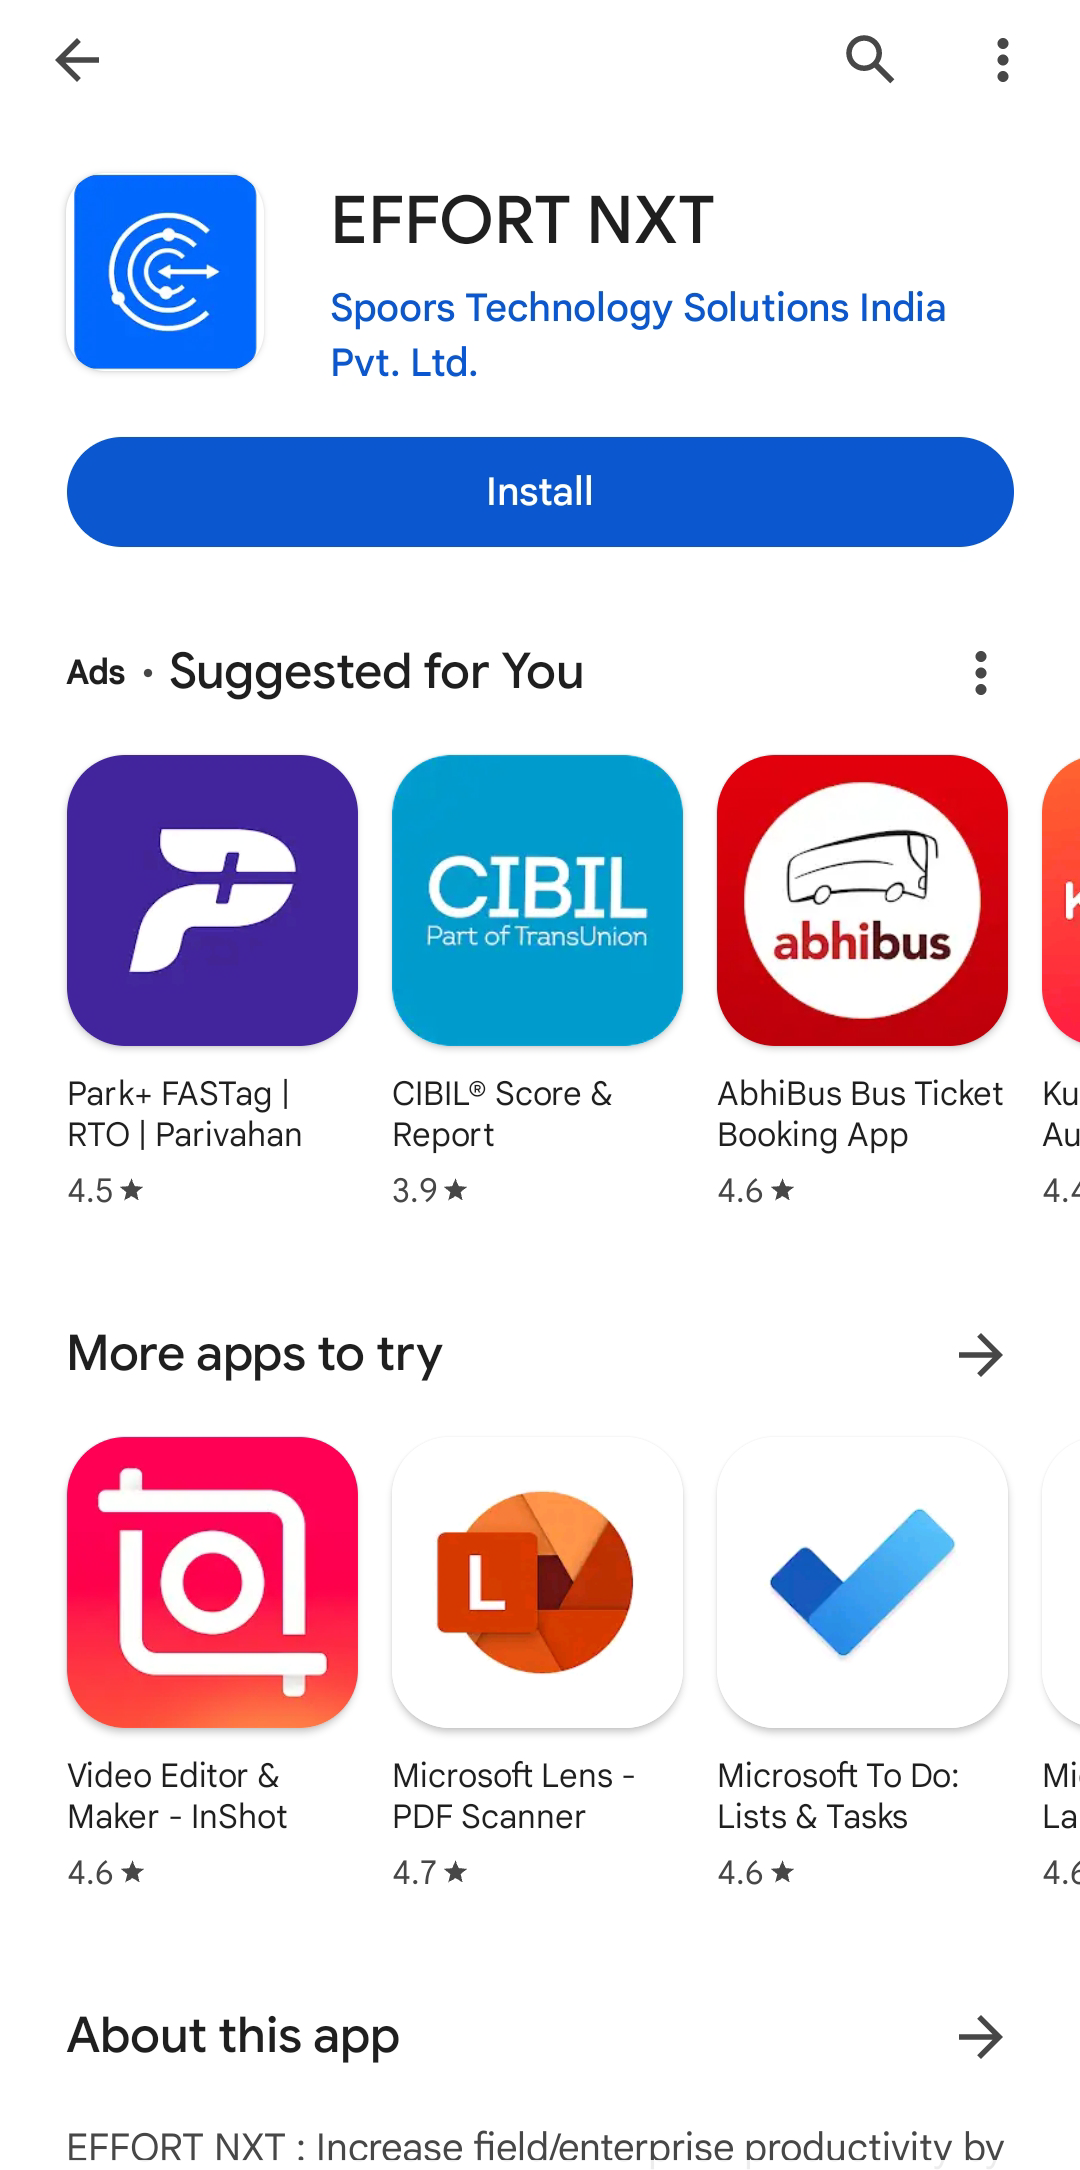
-
On your mobile phone, open either the Play Store or App Store and
install the Effort NXT app.
Note: To know more about how to install the app, refer to Install EFFORT NXT App. -
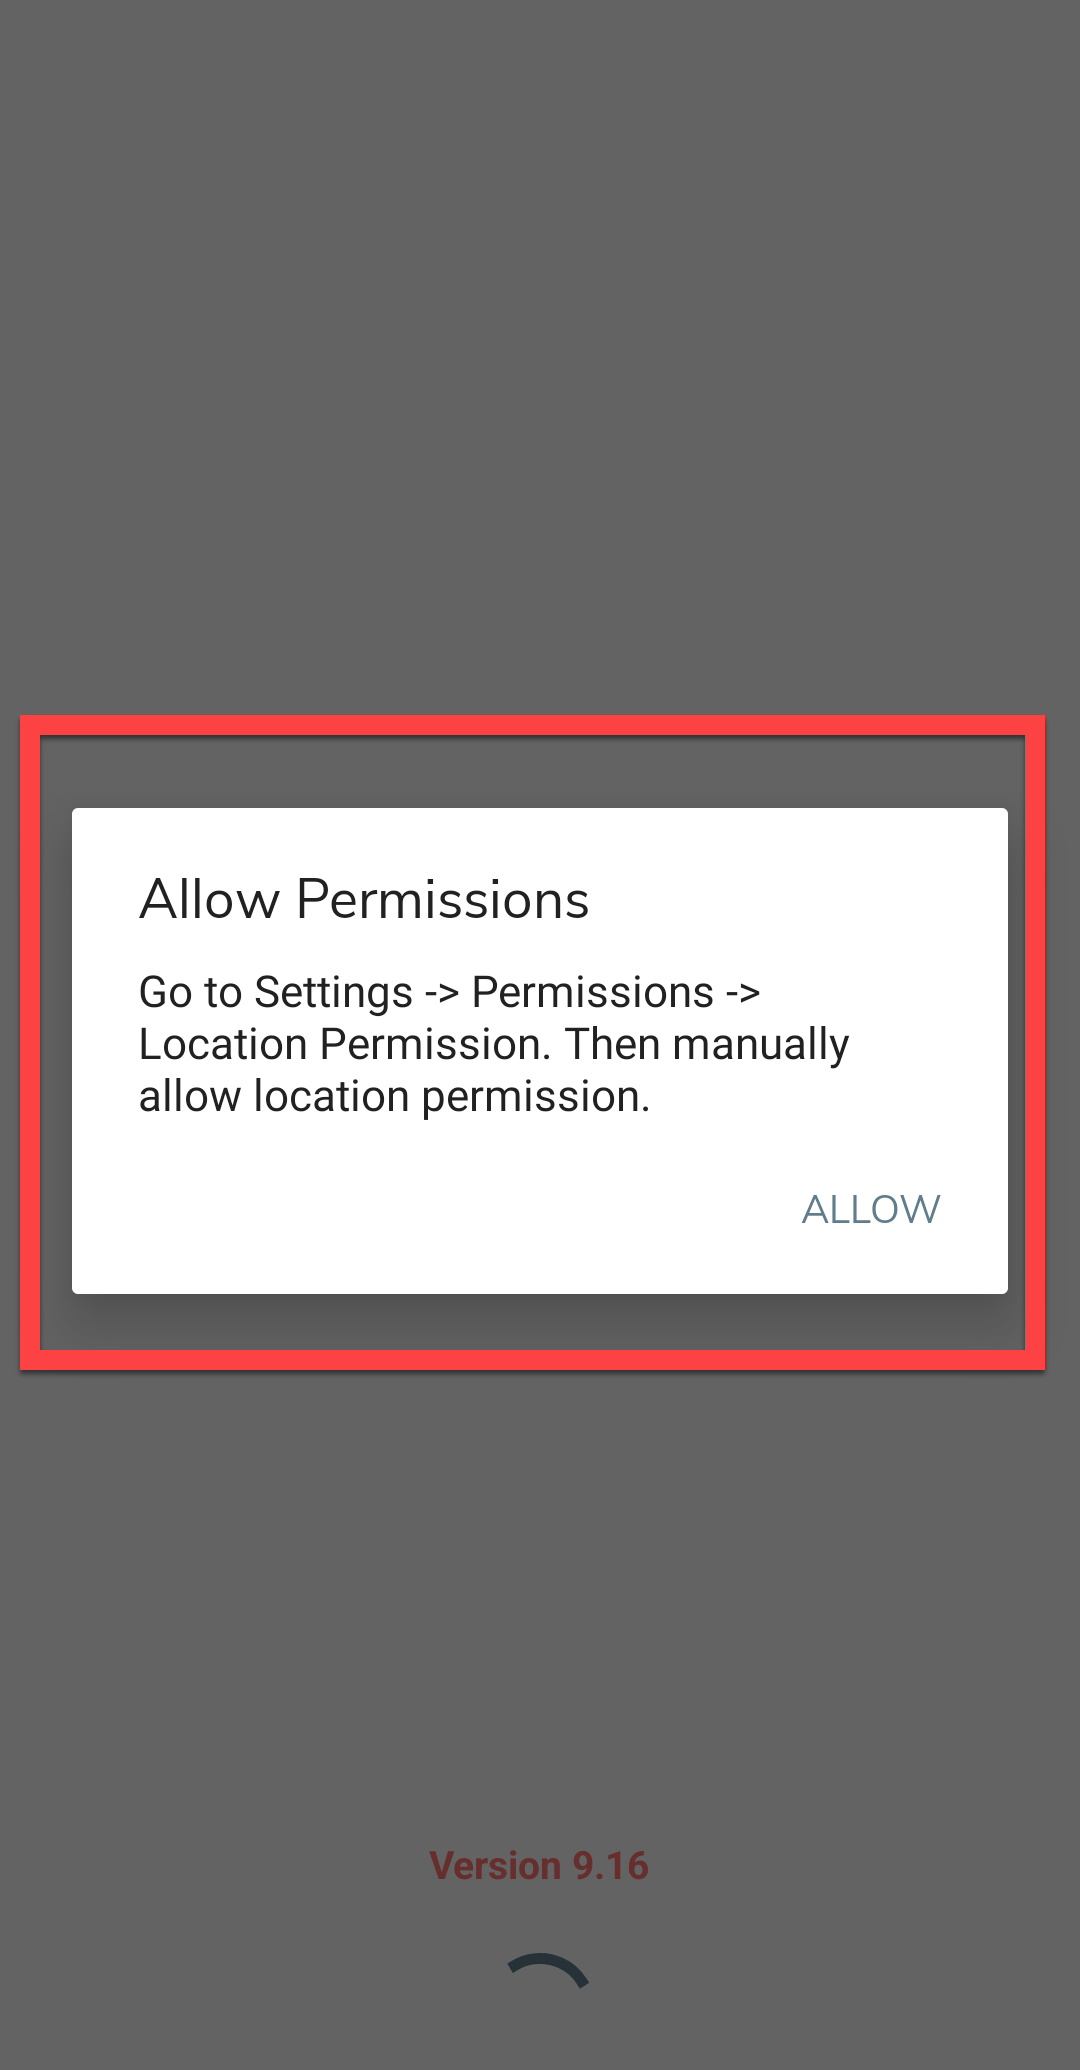
Once the download is completed, open the app and grant all the required
permissions.
-
Login to the Effort app using your registered mobile number.

Note: To register using your registered mobile number, refer to Log in to Mobile App Using Phone.Note: To register using your email and password, refer to Log in to Mobile App Using Email -
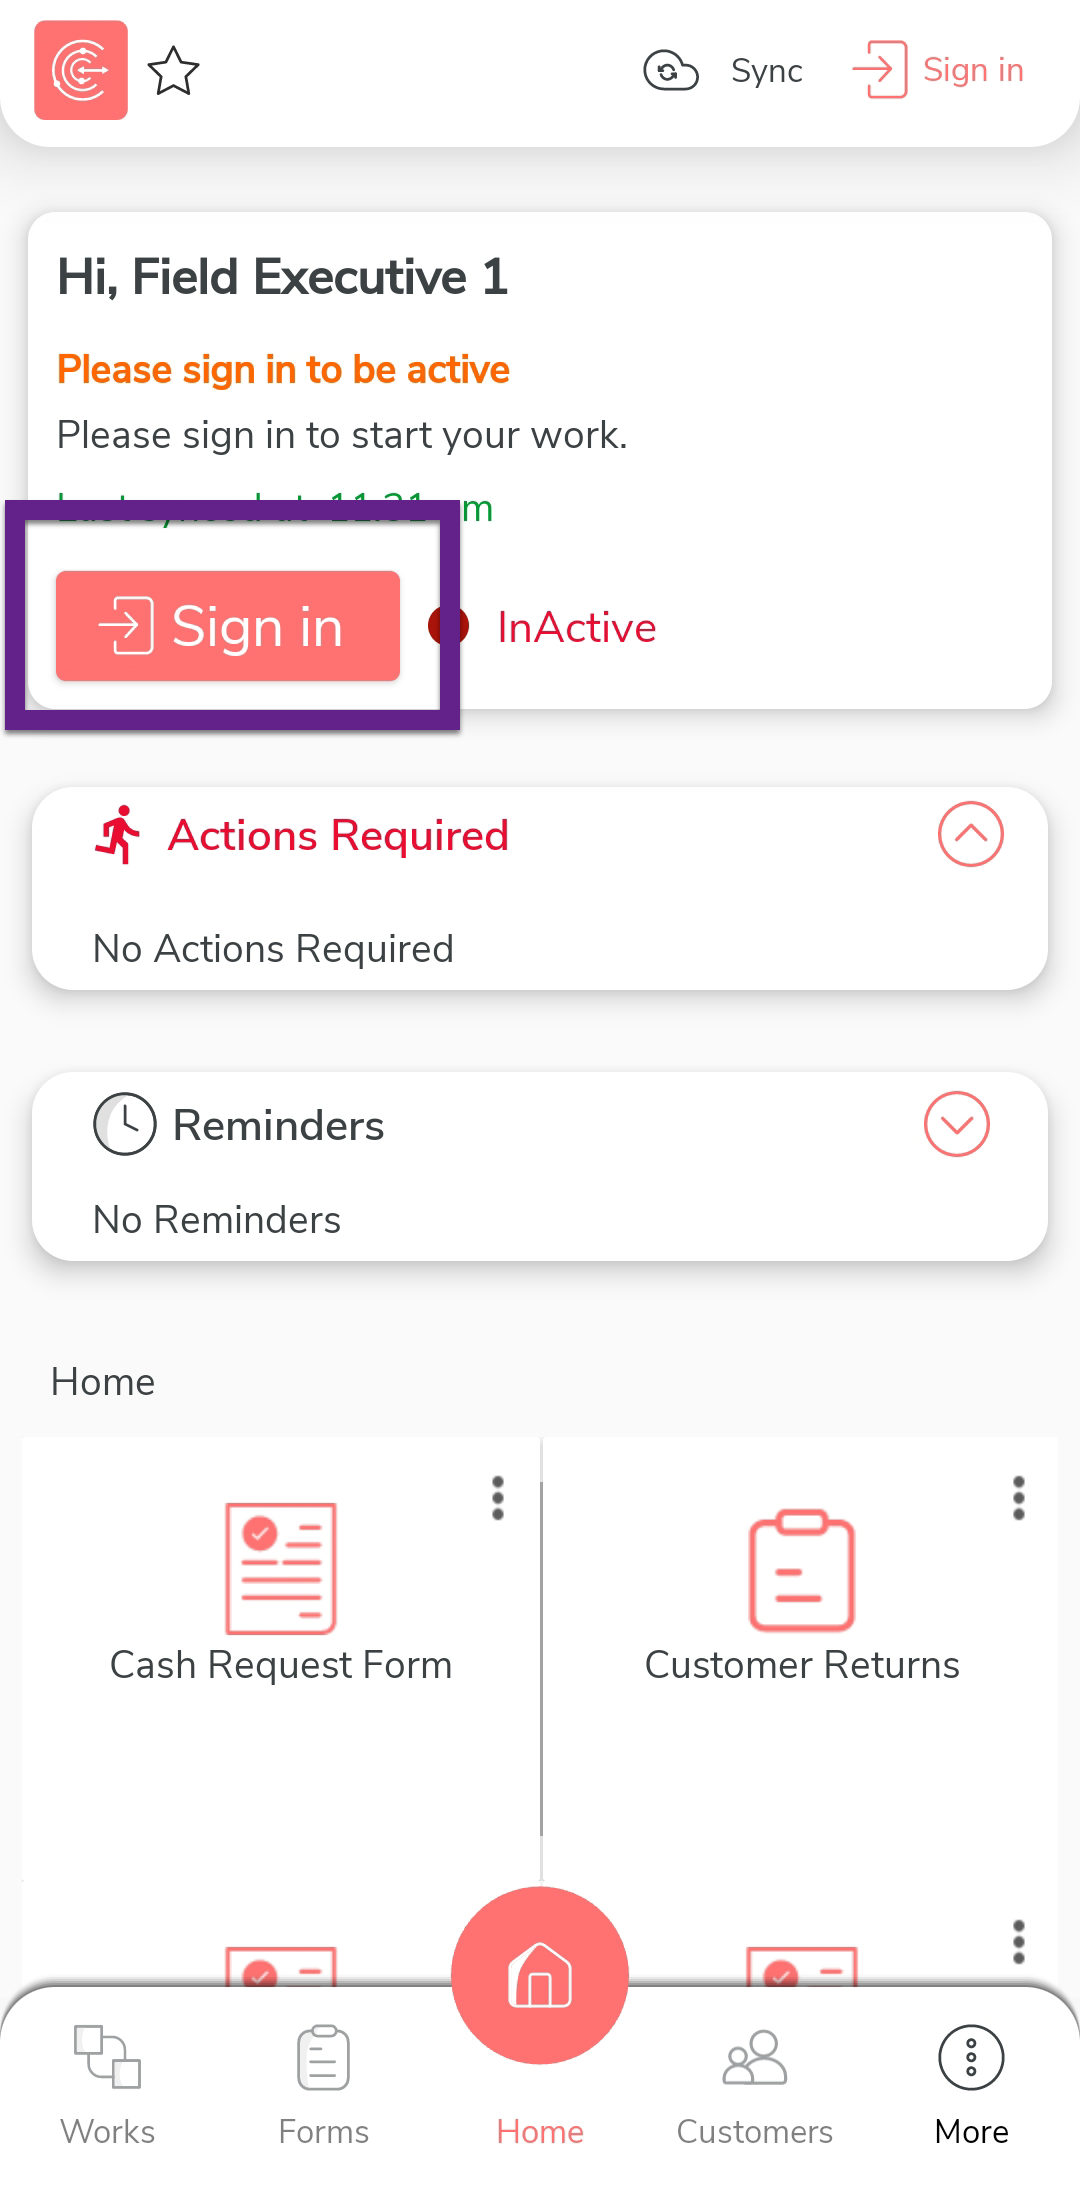
After you log in to the mobile app, tap Sign in
to mark that you have started working.
-
The mobile captures your face and your current location. On this
screen, ensure your face and location are captured correctly, and then
tap Sign In.

-
Once you complete Sign In, tap
Sync to sync the data with the server.

Note: Make sure to Sync the mobile app every time you perform an activity to ensure that your data is updated on the server. If you fail to sync, your changes or work will not be captured in the server.
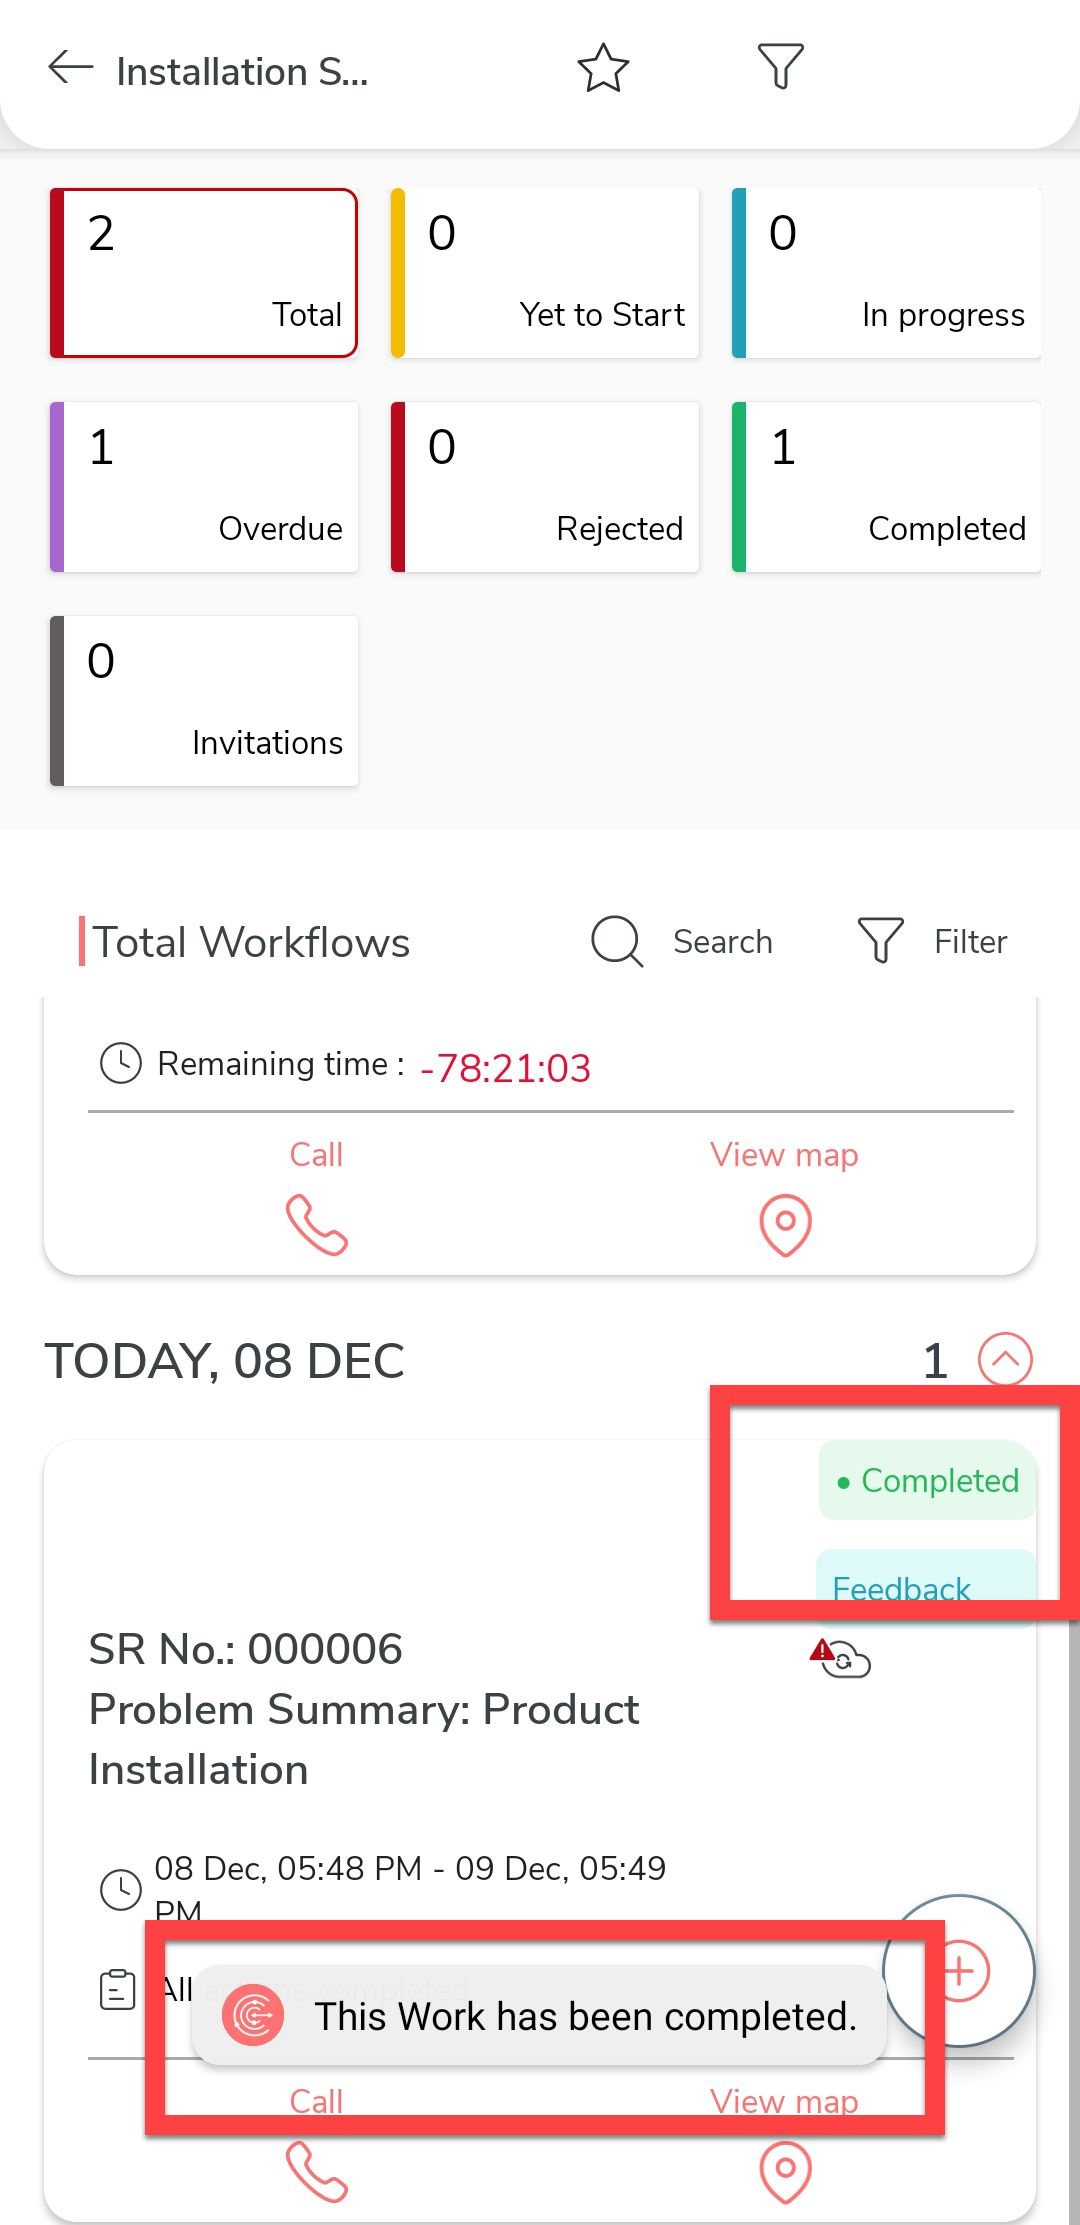
Complete Installation Service Request Work in the Mobile App
In this section, we will explore how a technician completes an installation task using the Effort mobile app.
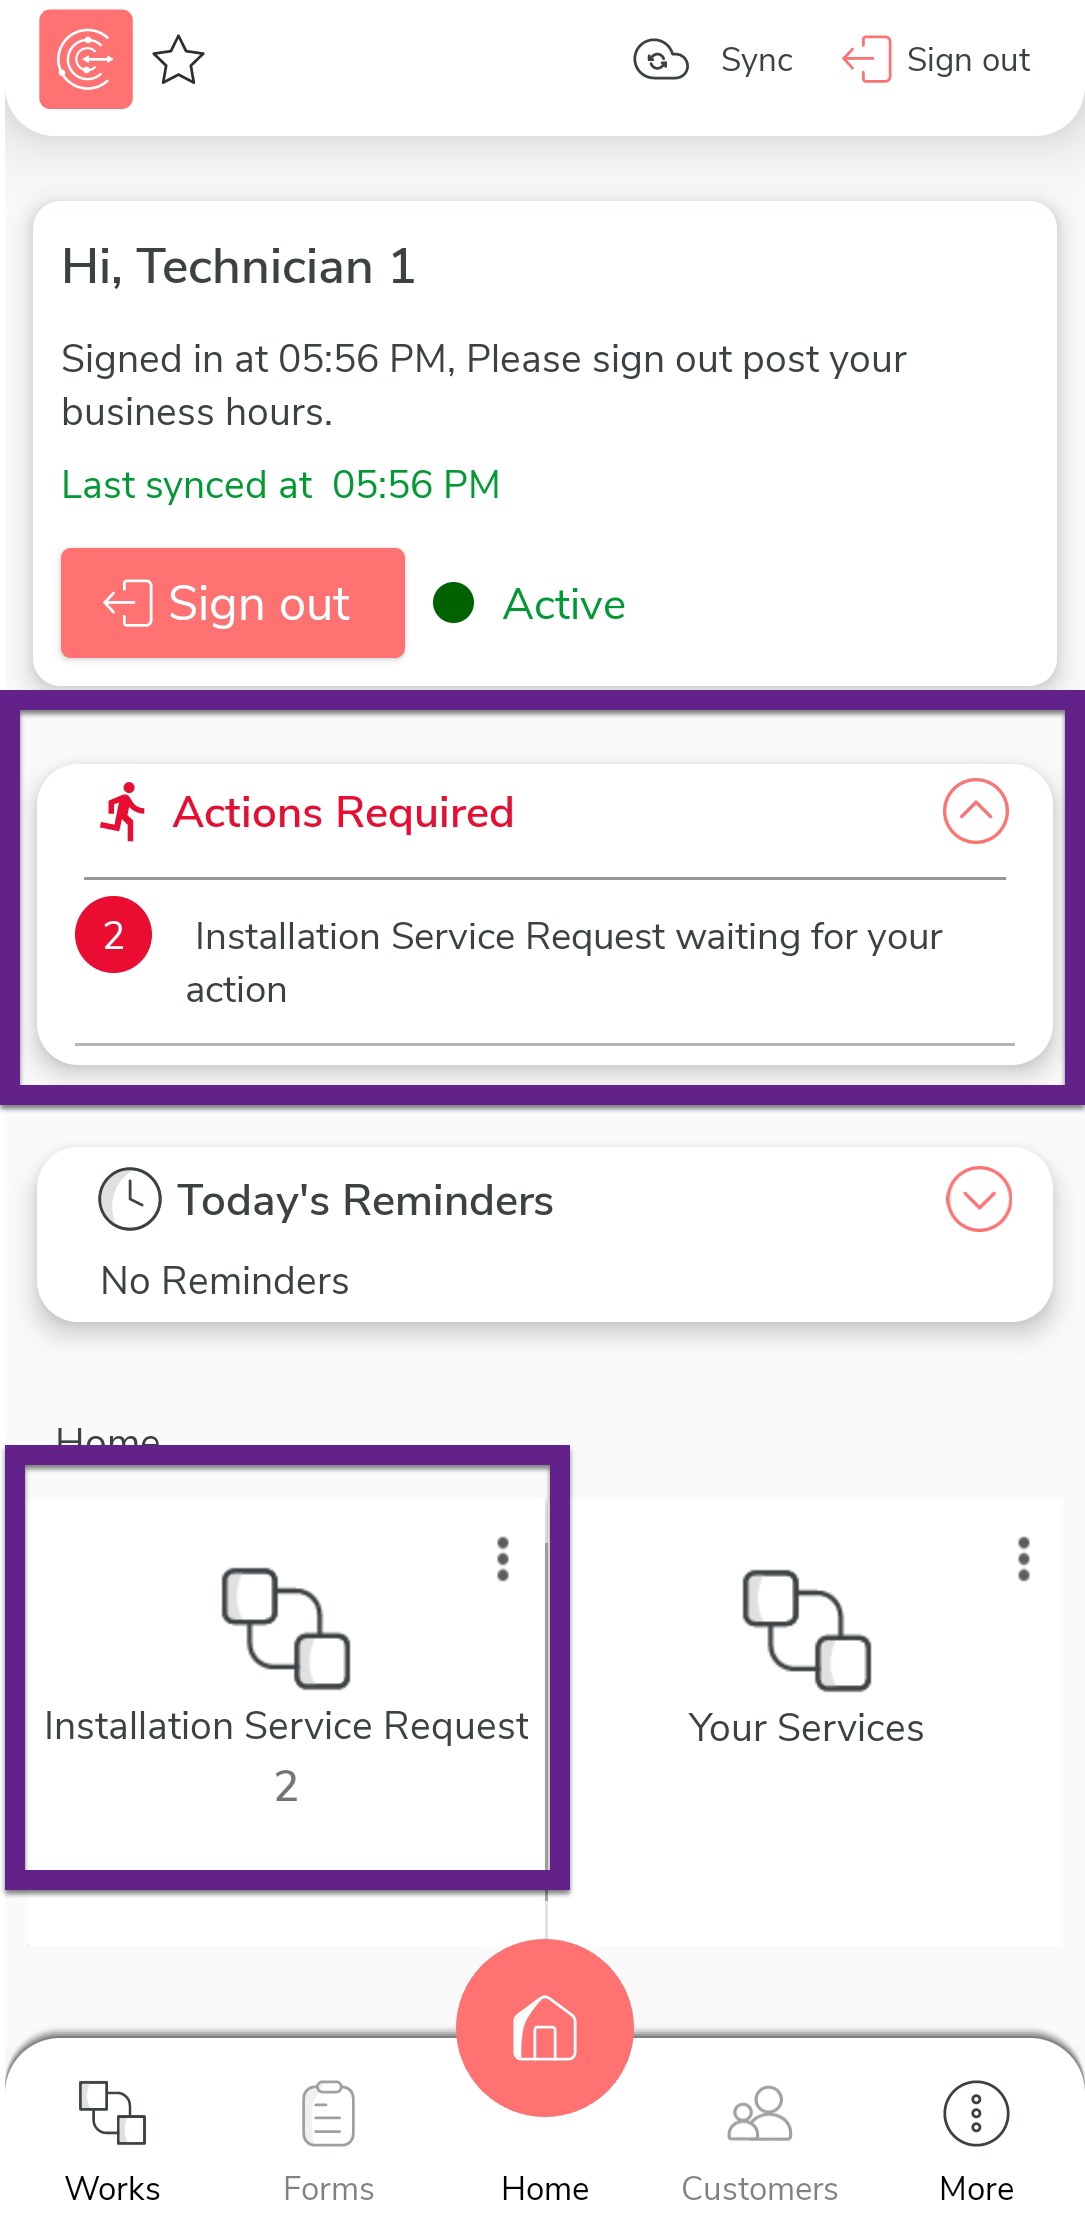
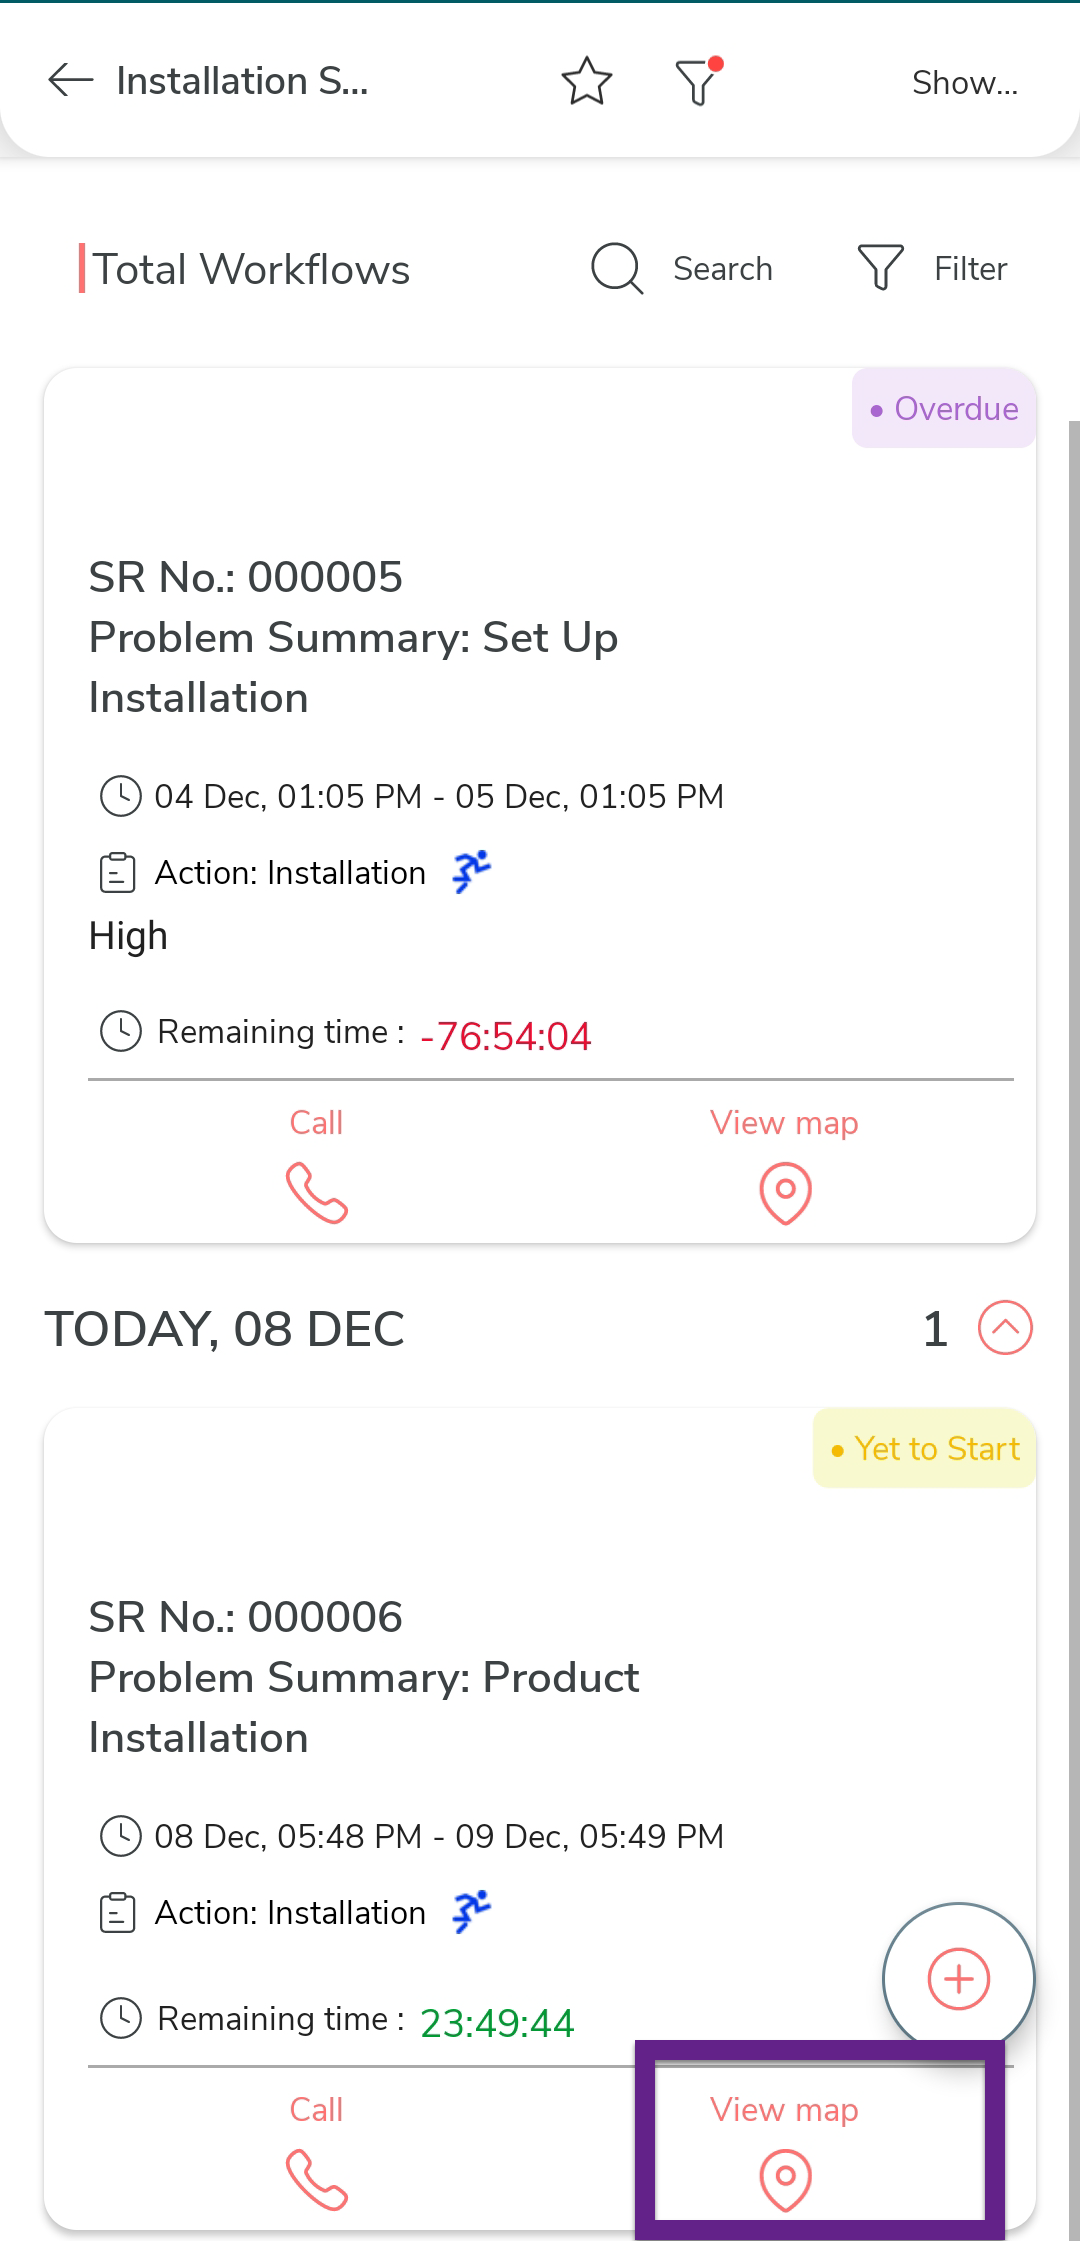
-
On the effort mobile app home screen, tap on the action item under the
Actions Required section. Alternatively, you
can tap the Installation Service Request
card.
-
Tap on the view map icon to view the customer's location.
-
Use the navigation buttons to reach the customer.

-
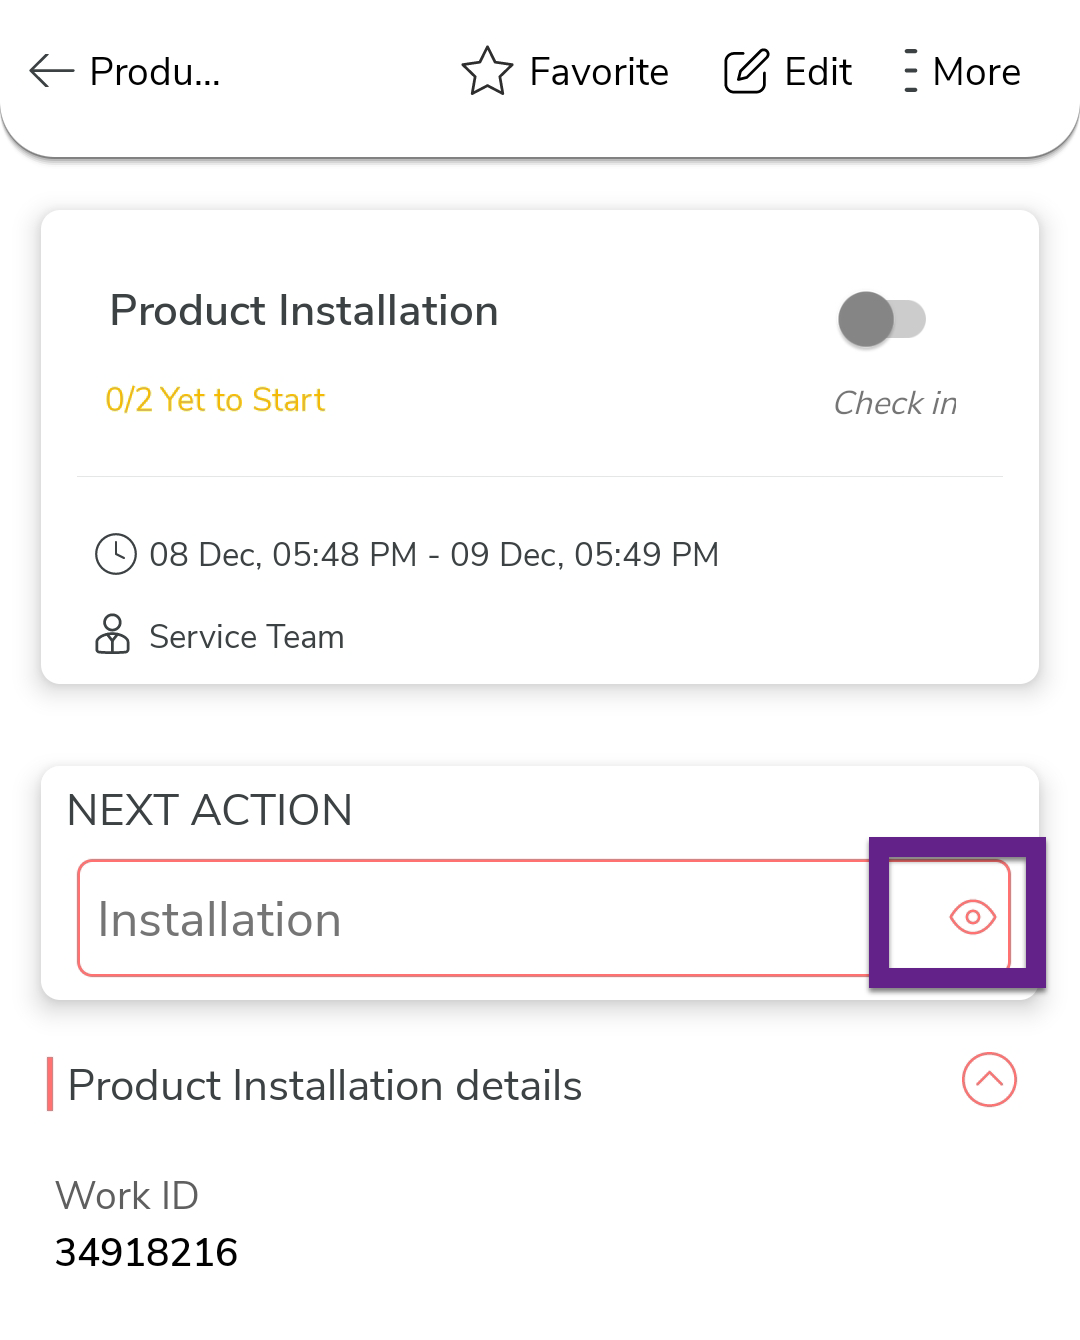
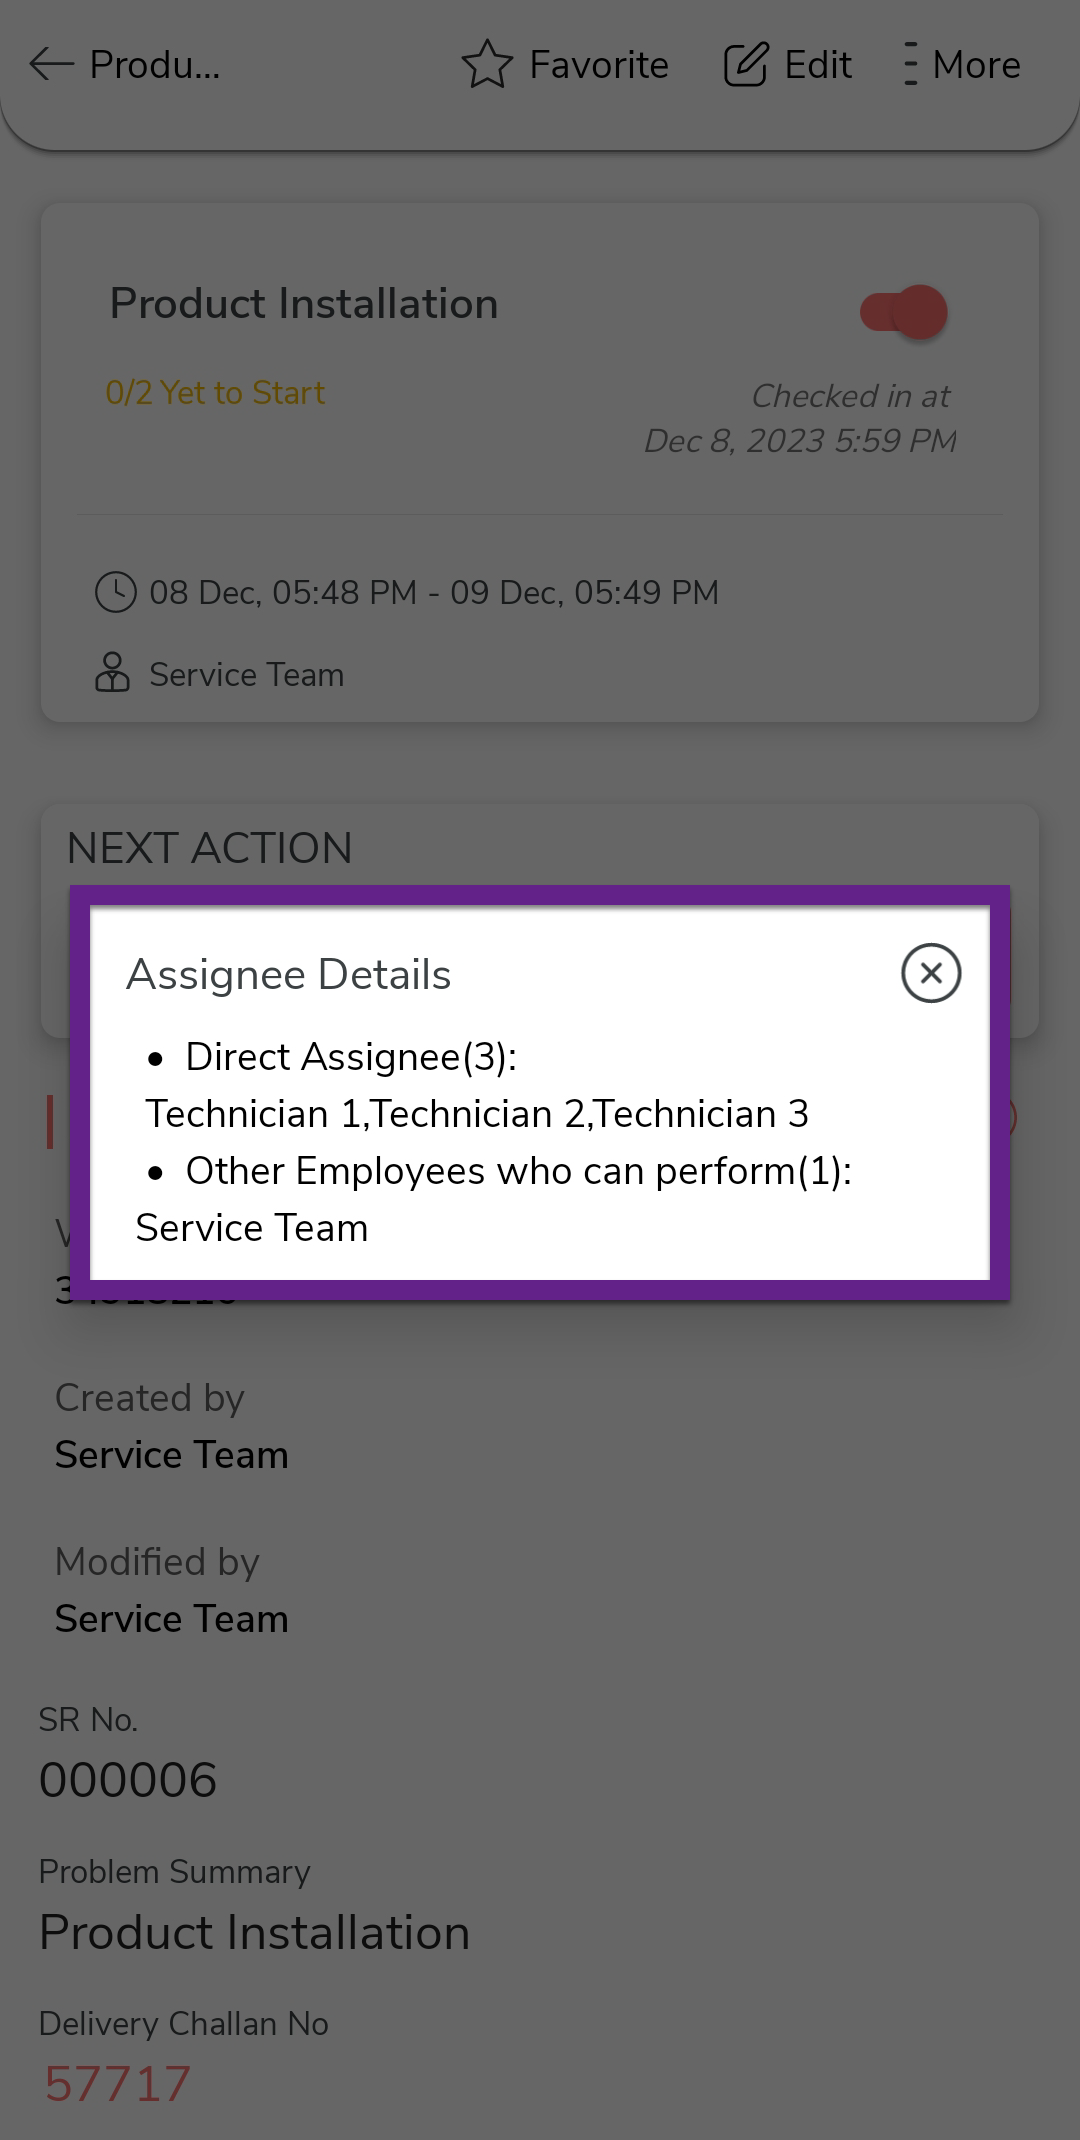
Tap the eye icon on the Installation button to view the assignee
details.
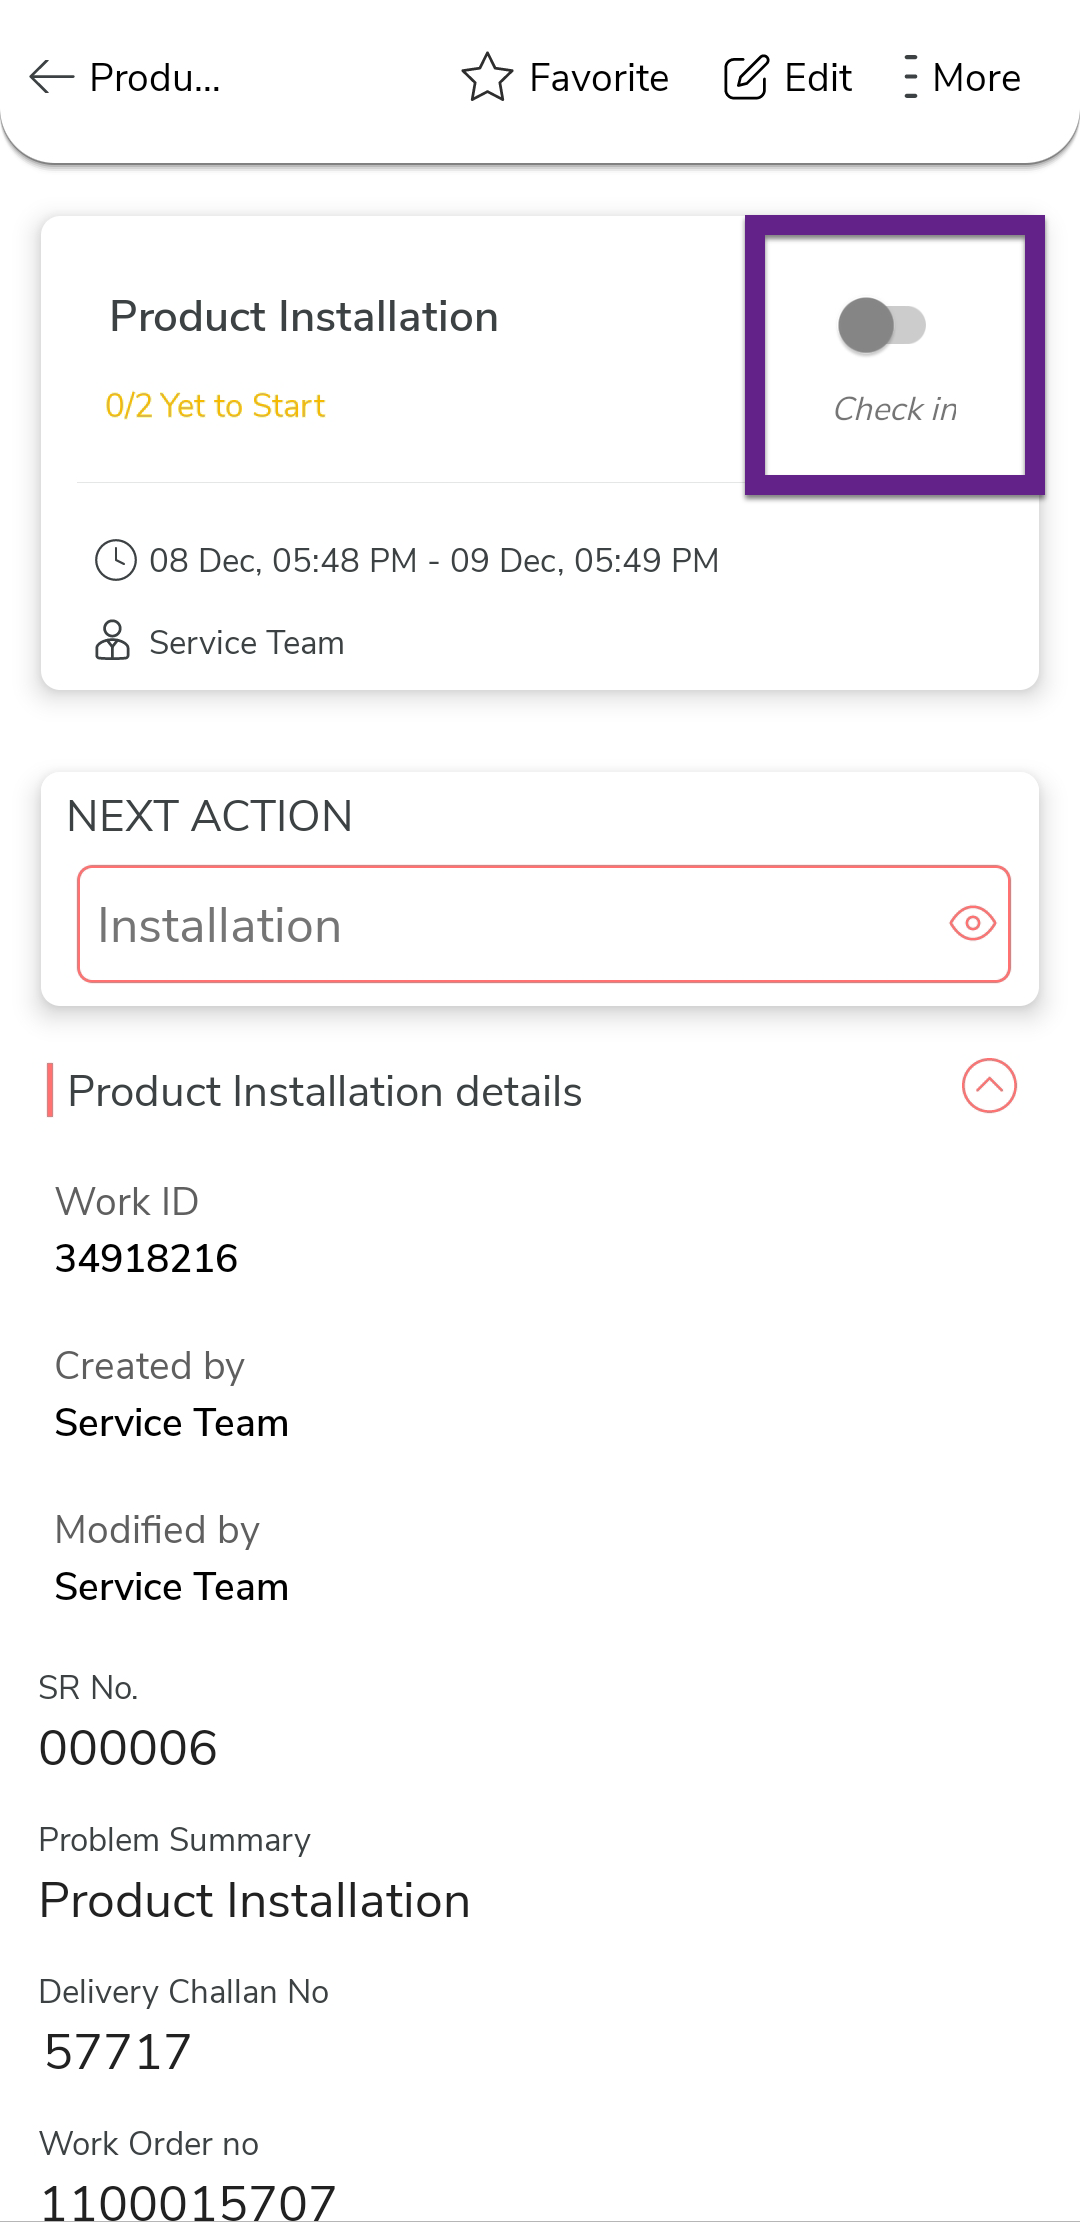
-
Once you reach the customer, tap Check in and
Check In on the confirmation pop-up.
-
Under the Next Action section, tap
Installation.
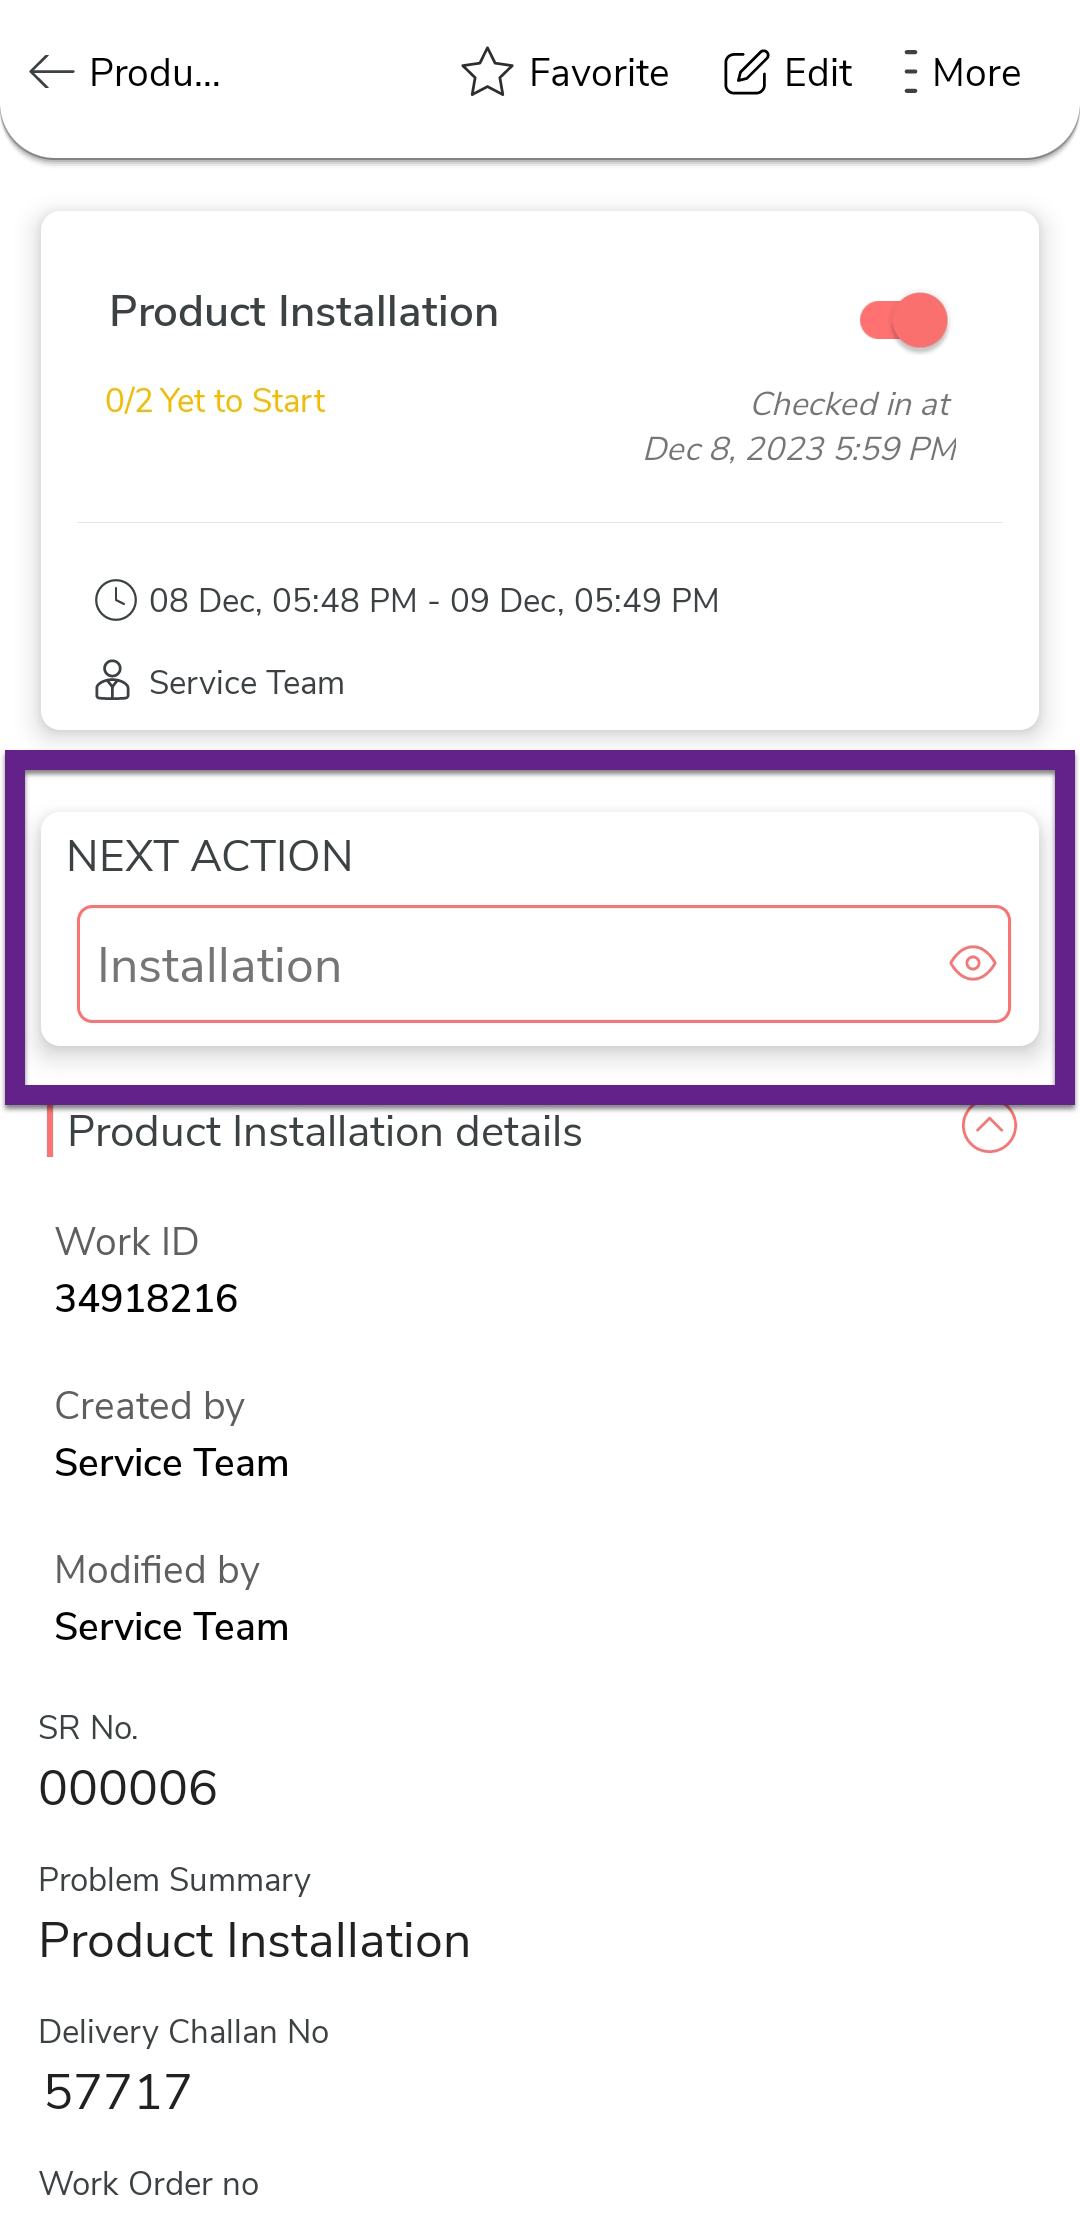
-
Fill in the Installation form. As configured, you can see the error
message if we enter the installed quantity more than the dispatched
quantity.

-
Enter the product barcode details such as barcode, date, and asset
number.

-
Upload the installation proofs.
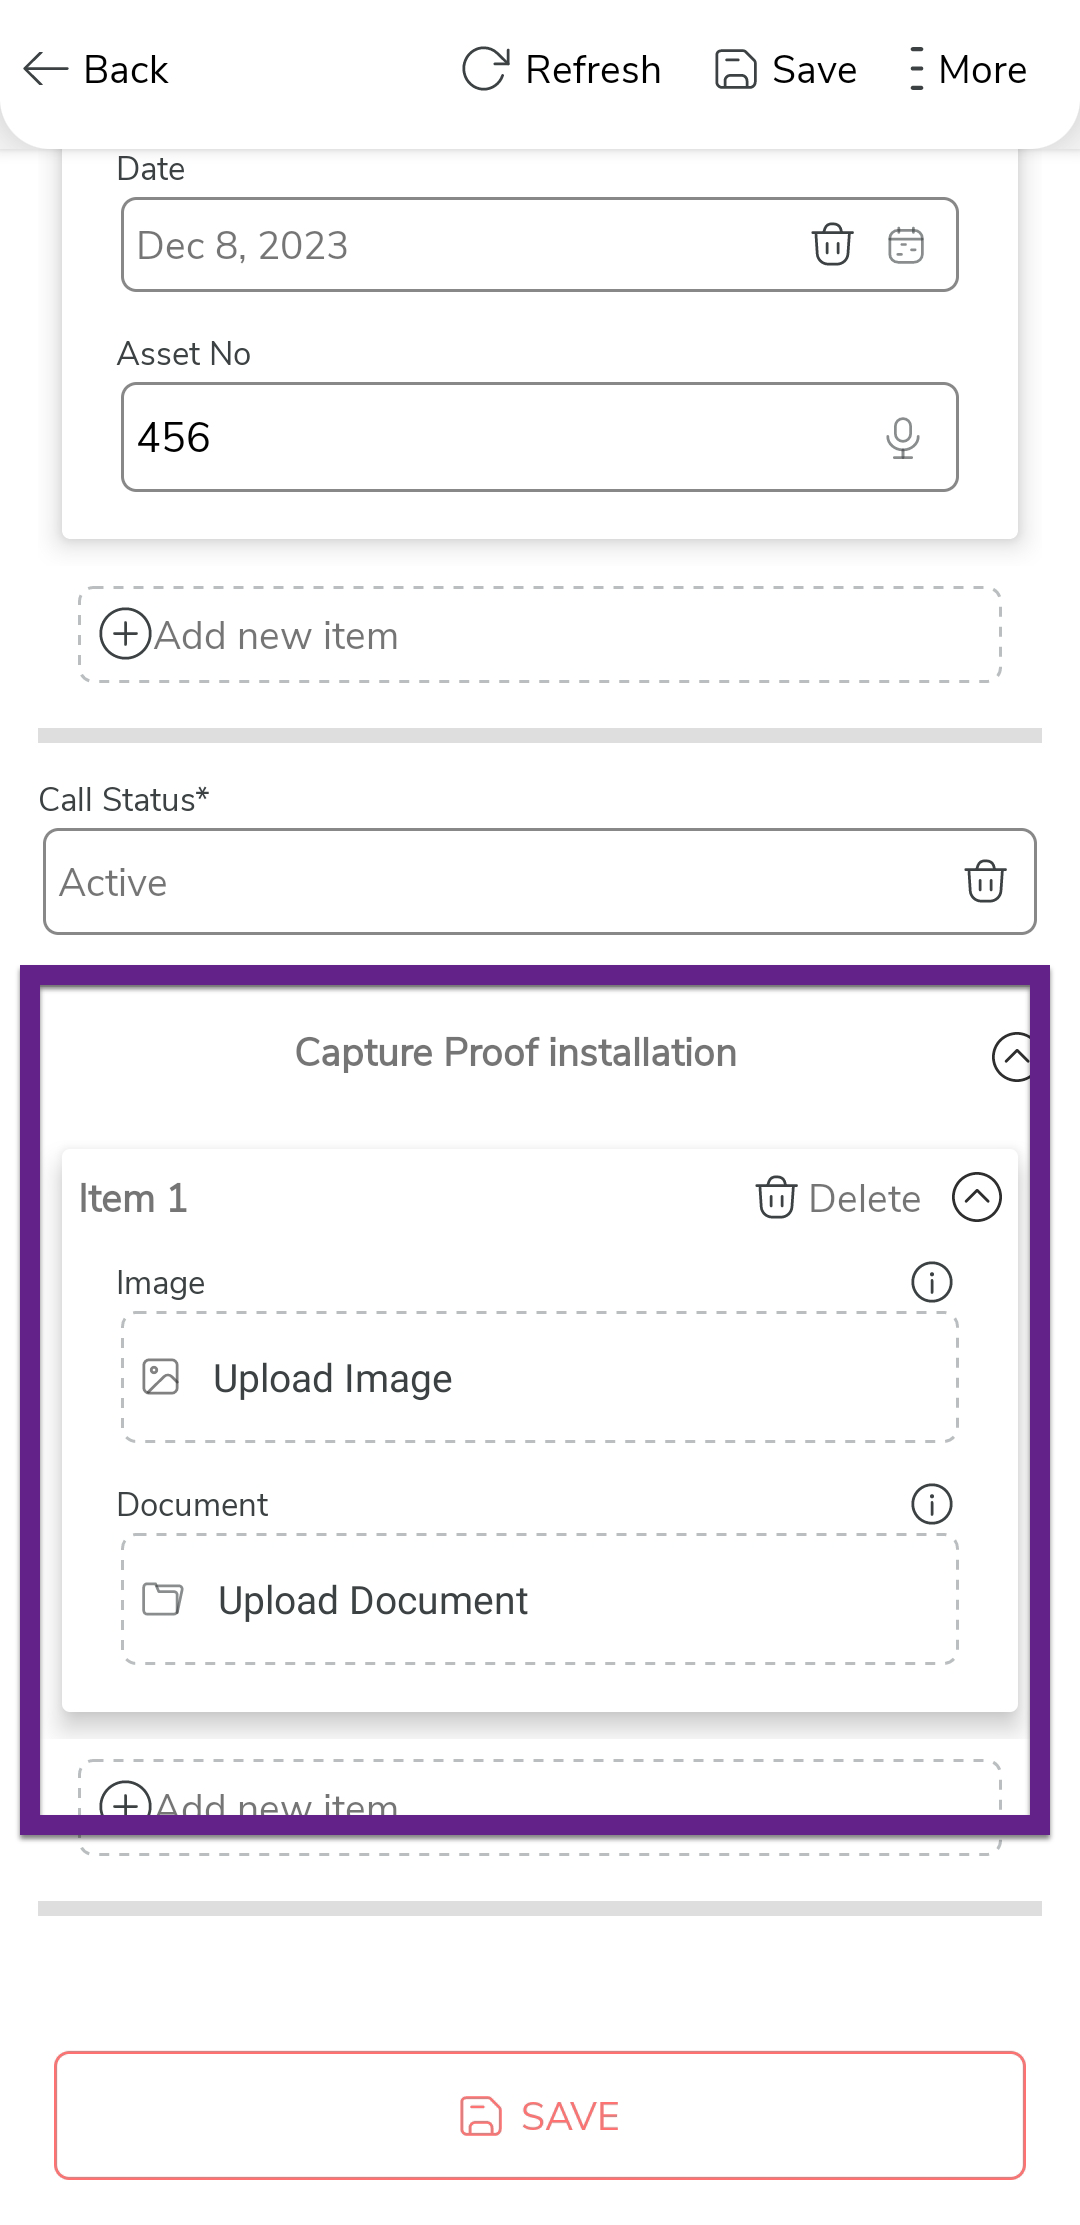
-
Once you fill in the data, tap Save and then tap
Save in the confirmation pop-up.

-
Once you complete the Installation activity, you
can see the Feedback activity. Tap on it to
execute it.
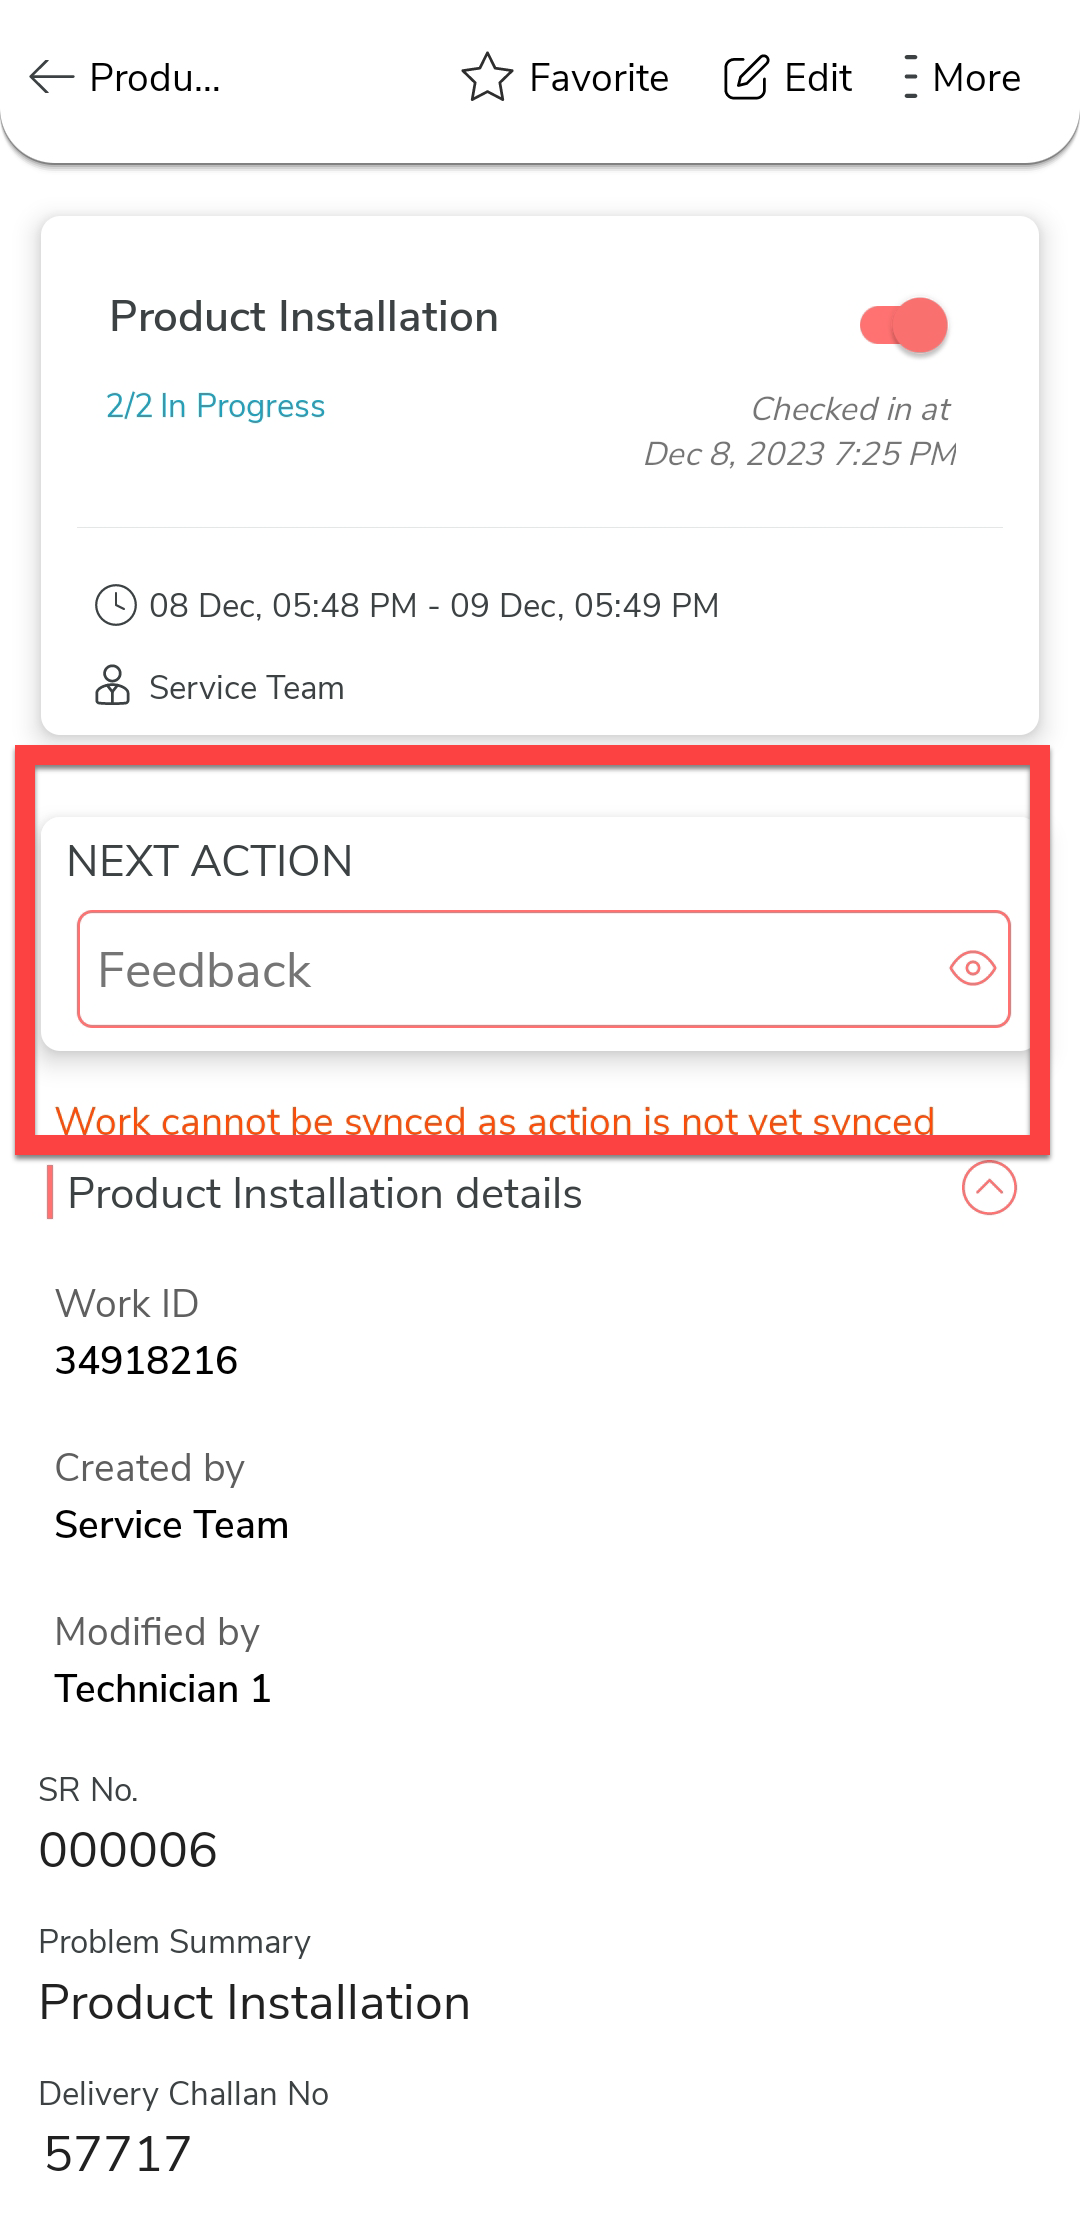
-
Capture the customer feedback and signature.
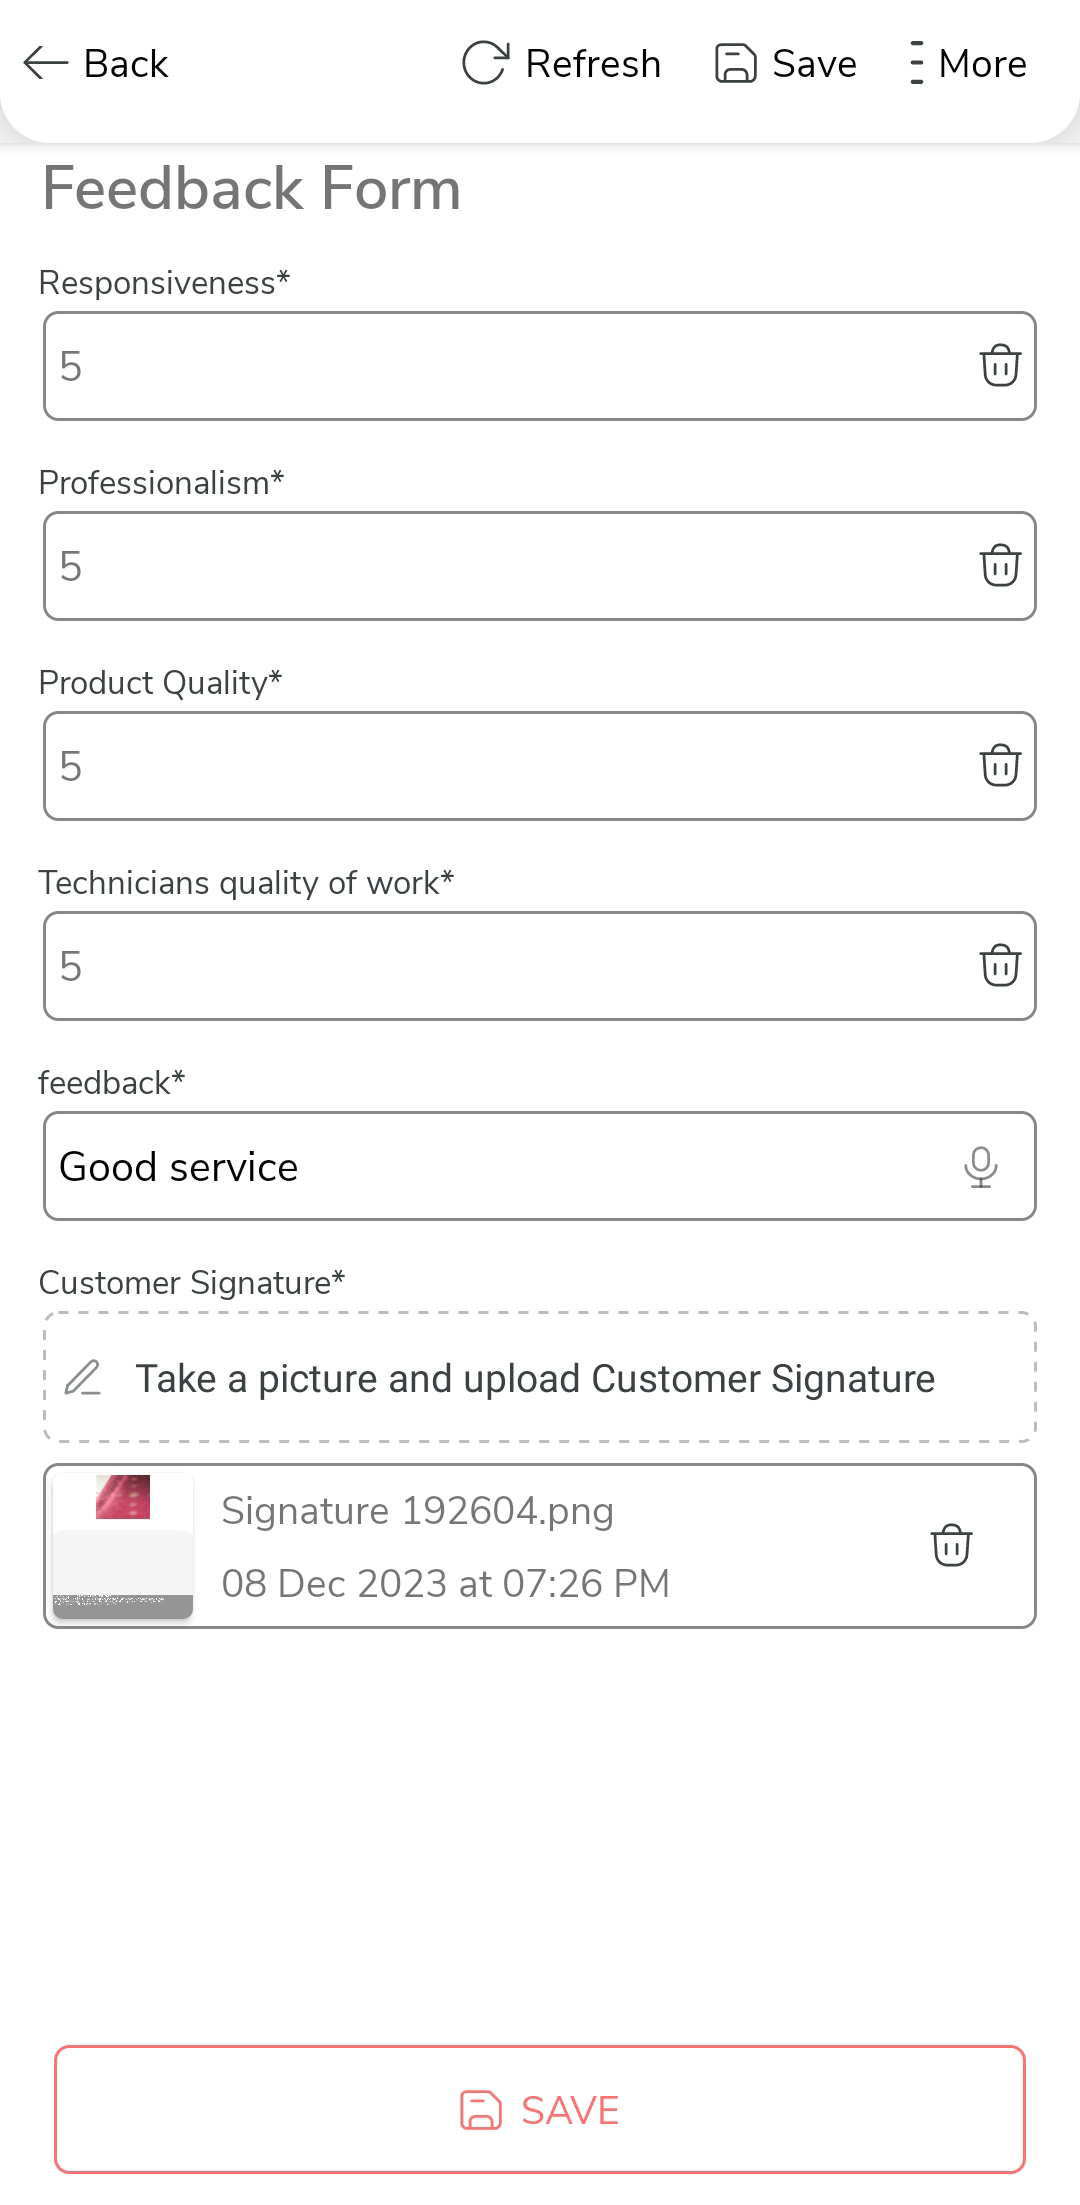
-
Once you fill in the data, tap Save and then tap
Save in the confirmation pop-up.

-
Once you complete the feedback activity, you can see the work status as
Completed. It means that the installation
activity is completed successfully.