Poultry Production Management with EFFORT
Introduction
The poultry industry is a vital sector of agriculture focused on the breeding, rearing, and processing of domesticated birds, primarily chickens, ducks, turkeys, and geese, for meat and egg production.
Effectively managing daily poultry production have significant challenges. Keeping track of various data points such as feed consumption, health concerns, medication, waste management, mortality rates, bird lifting, and weight management is highly complex. Manual record-keeping is prone to errors, and analyzing trends and generating reports demands substantial time and effort. Precision in record-keeping is vital for well-informed decision-making. Delays resulting from manual management can facilitate the spread of diseases, making efficient management imperative.
Effort platform revolutionizes poultry distribution by digitizing poultry management processes, ensuring seamless operations. It enables the complete digitization of the poultry cycle, automating data collection, offering real-time insights, and optimizing various operations. This streamlining enhances the efficiency and manageability of poultry production significantly.
In this tutorial, we will configure the Poultry Production Management workflow with Effort. We'll explore the all essential modules and key features that helps you to effectively manage the poultry productions. Also, this tutorial provides all the activities that need to be performed by different roles involved in this operation using the Effort platform. The roles include Admin, Farmers, and Supervisors. Here's the list of activities we will be configuring and executing in the Effort as part of Poultry Production.
Admin Activities (Configuration of Poultry Production Management)
In this section, we will walk you through the admin-level activities involved in the configuration of the Poultry Production Management. To perform the Admin activities, the users must have access to the App Builder module. Only the users that have App Builder access can define all the configurations. Login to Effort as App Builder. Refer to the Sign-in To Effort topic for login.
Change Module Titles
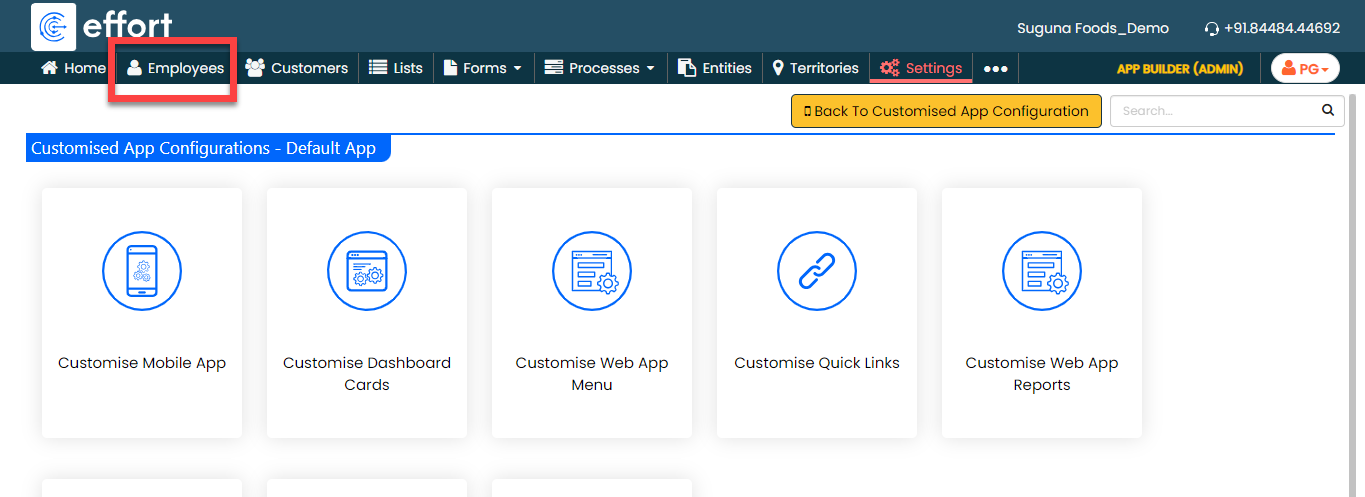
For a better understanding, you can rename this module name to Supervisors.
- Go to .
-
Scroll down a bit and change the Employees
module name to Supervisors.

- Click Save.
- Similarly, change the Customers module title to Farmers. Farmers are shouldering the responsibility of caring for the birds from the moment they hatch until they are ready for processing.
Creation of Supervisors
In this section, we will walk you through the creation of the supervisors in the Web App. To create supervisors, follow the steps below:
-
Go to .

-
Enter the supervisor details such as First Name, Last Name, Employee
ID, Email, Mobile Number, and so on.

- Select the Access Type based on the supervisor you want to create.
-
Click Save.
Note: If you want to create more employees, you can choose the Import feature to create in a single go. To import employees, refer to Import Employees.
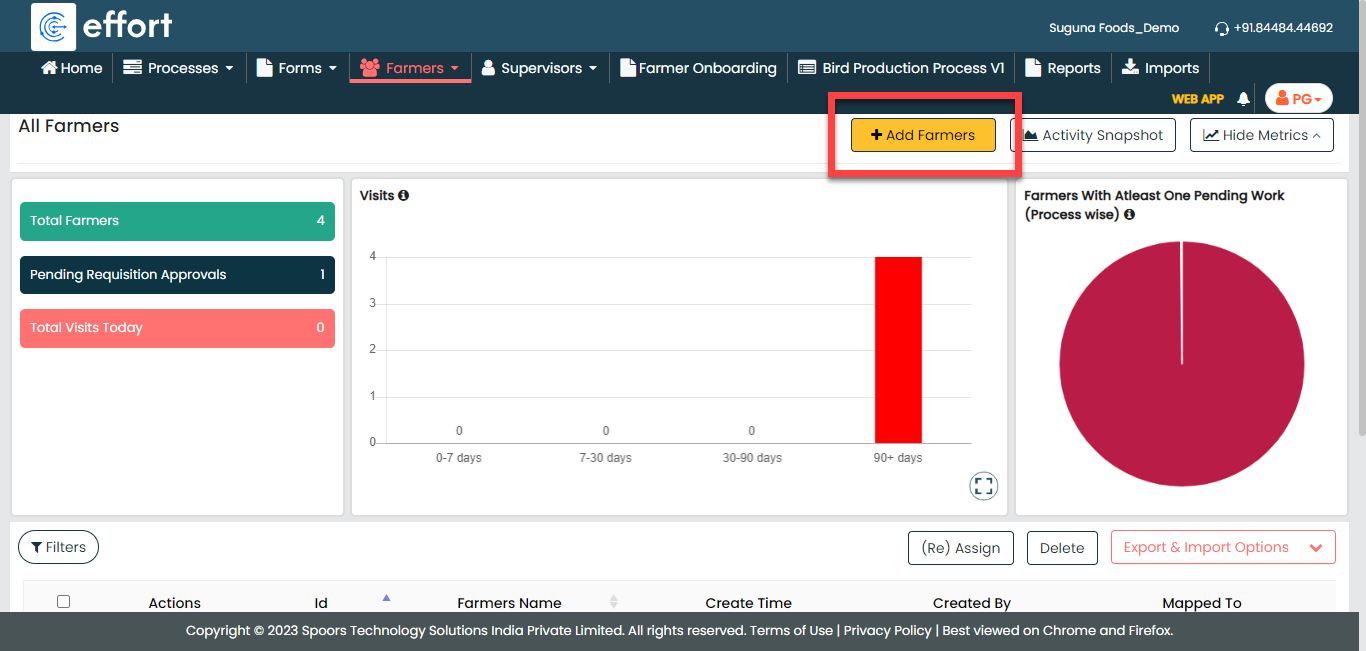
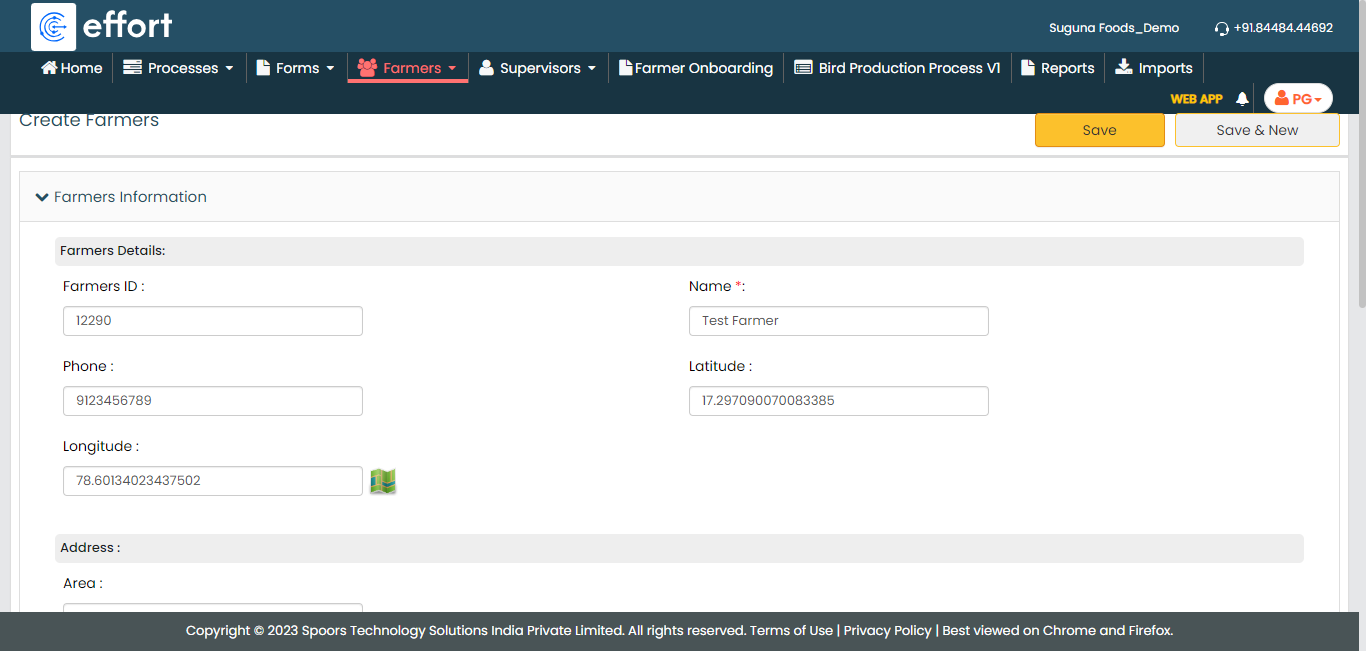
Creation of Farmers
In this section, we will walk you through the creation of the farmers from the Web App. To create farmers, follow the steps below:
-
Go to .
-
Enter the farmer details and click Save.
-
You can also use the Import option to create
more farmers in a single go. For the instructions to import the farmers,
refer to the Import Customers
topic.

- Once you import the farmers, you can check the import status at the bottom of the page. Alternatively, you can check the Farmers module in the Web App.
Creation of List Masters
In this part, we'll be creating the list masters. A list master is a comprehensive collection of data. It includes information about reasons for mortality and bird lifting type. To know more about Lists, refer to Lists.
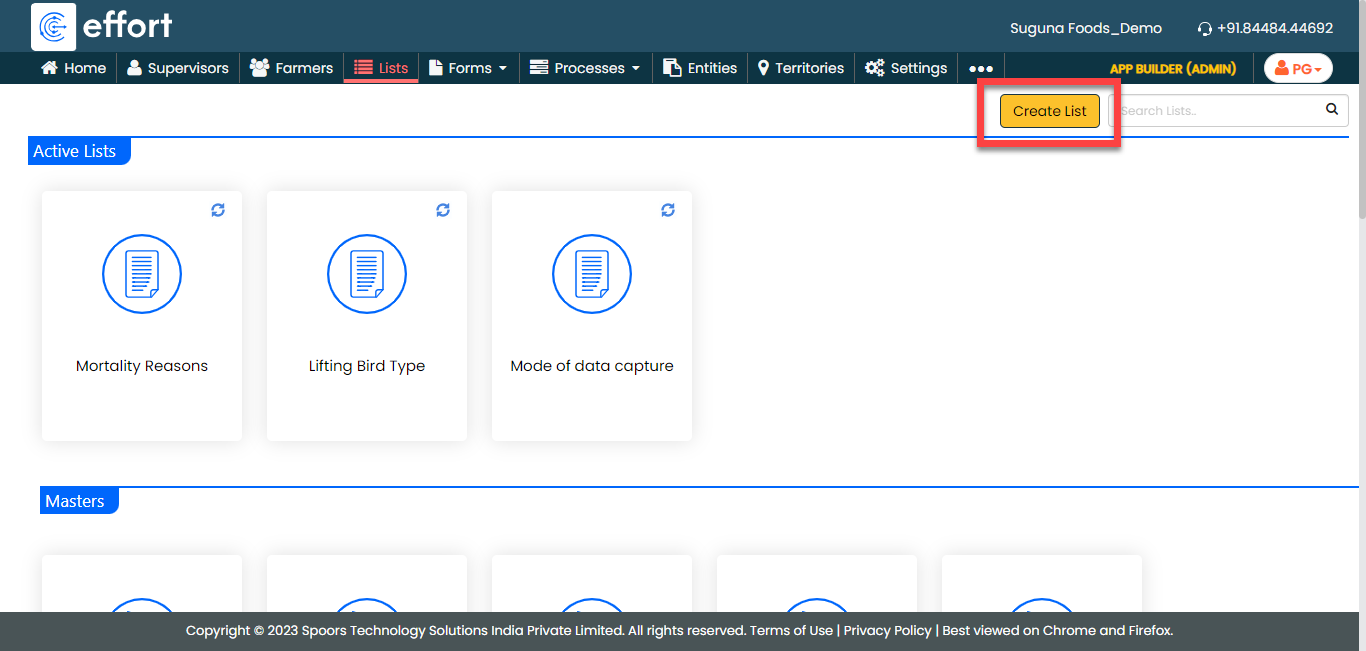
Creation of Mortality Reasons List
In this section, we will be creating a list called "Mortality Reasons." This list contains various causes that lead to the death of birds, such as pneumonia, heat stroke, infection, animal attack, and so on. This will be used in the farm management form to specify the reason for bird death. To create this list, follow the steps below:
-
Go to .
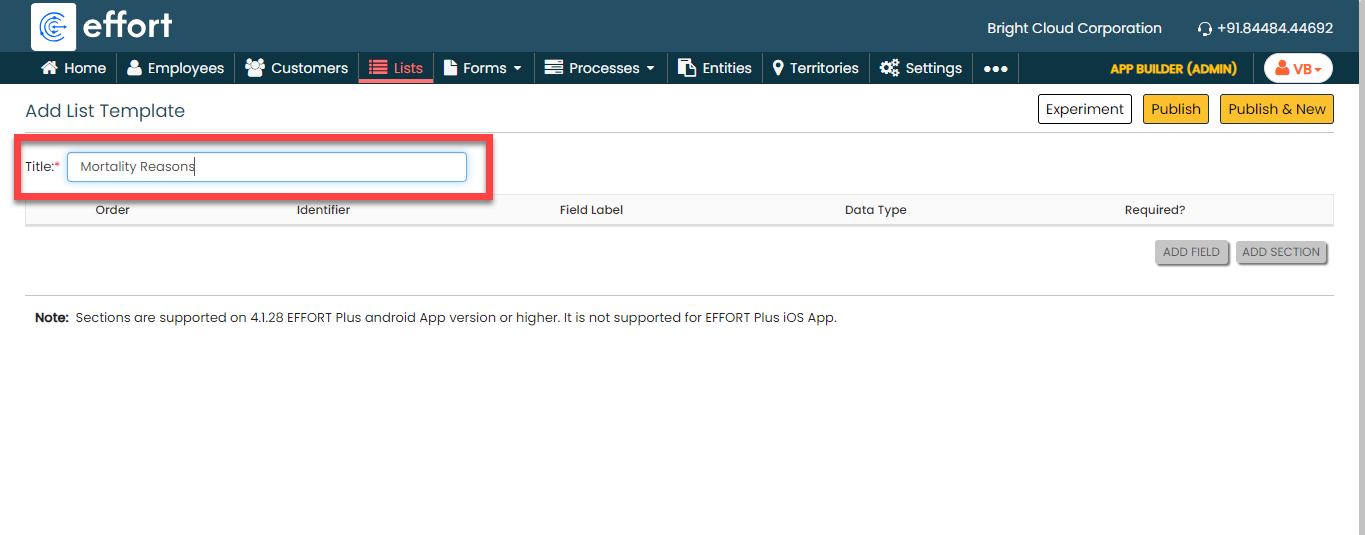
-
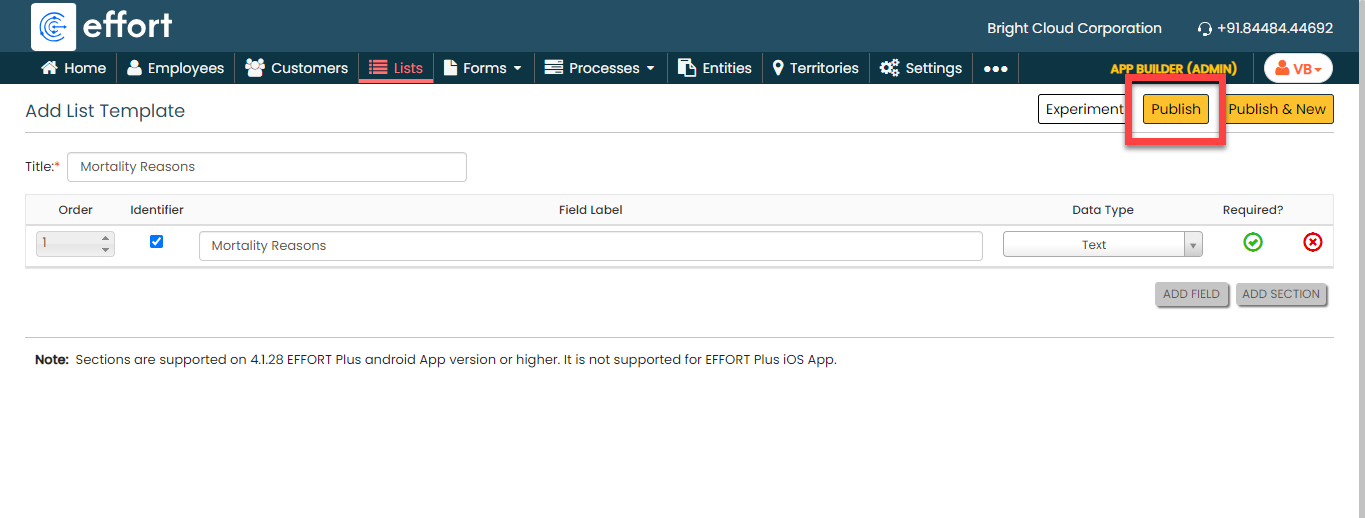
In the Title field, enter the title as
Mortality Reasons.
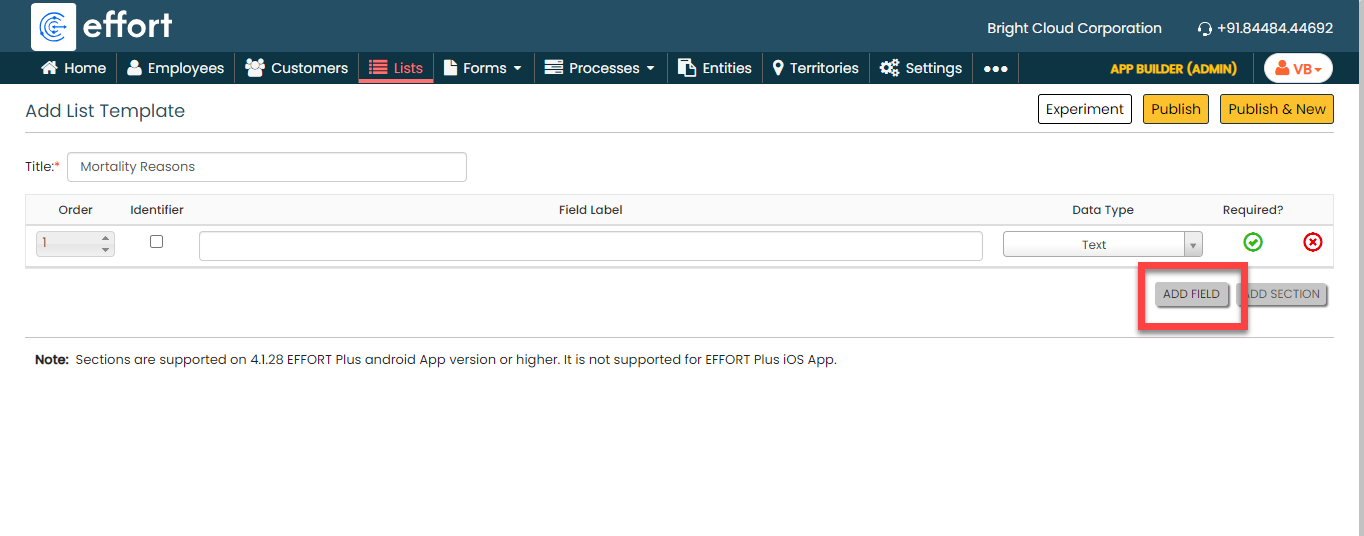
-
Click the Add Field button.
-
Under the Identifier column, enable the
checkbox.
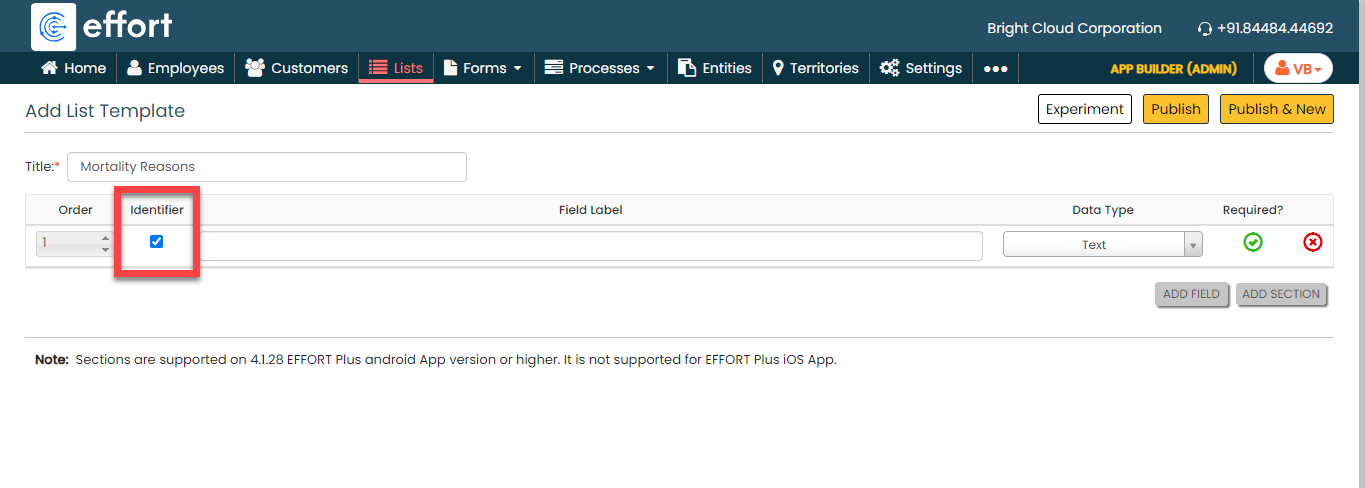
-
Under the Field Label column, enter the
label as Mortality Reasons.

-
Click Publish and then click
OK in the confirmation pop-up.
-
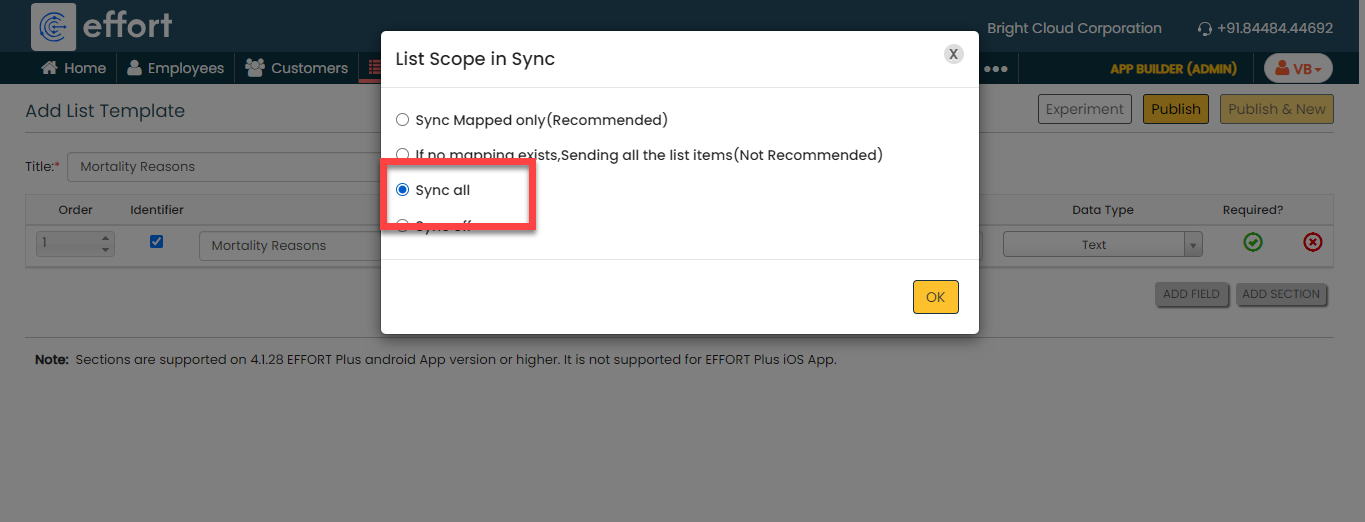
In the List Scope in Sync pop-up window,
select the Sync all option and click
OK to make all the list items available
to the mobile app users.
-
In the Warning pop-up window, click the
Accept button.

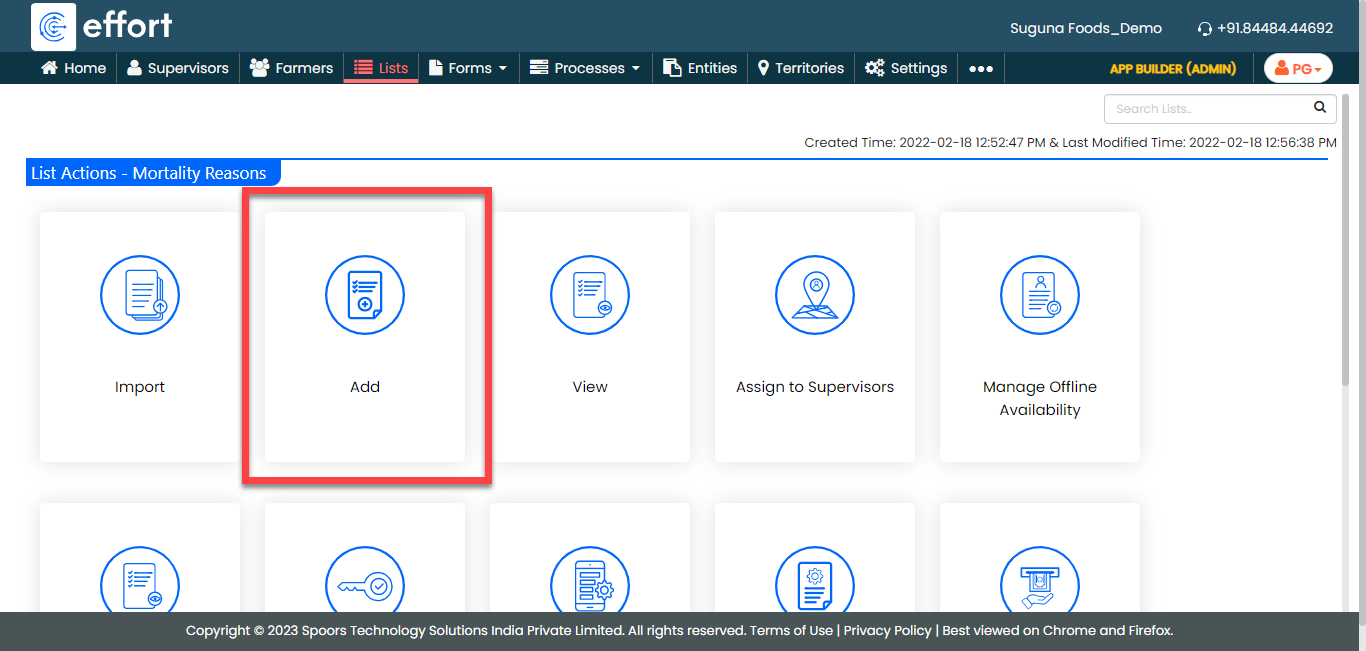
Your Mortality Reasons list is ready. Now you need to add items to it. -
To add mortality reasons to the list master, click
Add.
-
In the List No and Mortality
Reasons fields, enter the mortality reasons as per
your requirement, such as Pneumonia, Heat Stroke, and so on.
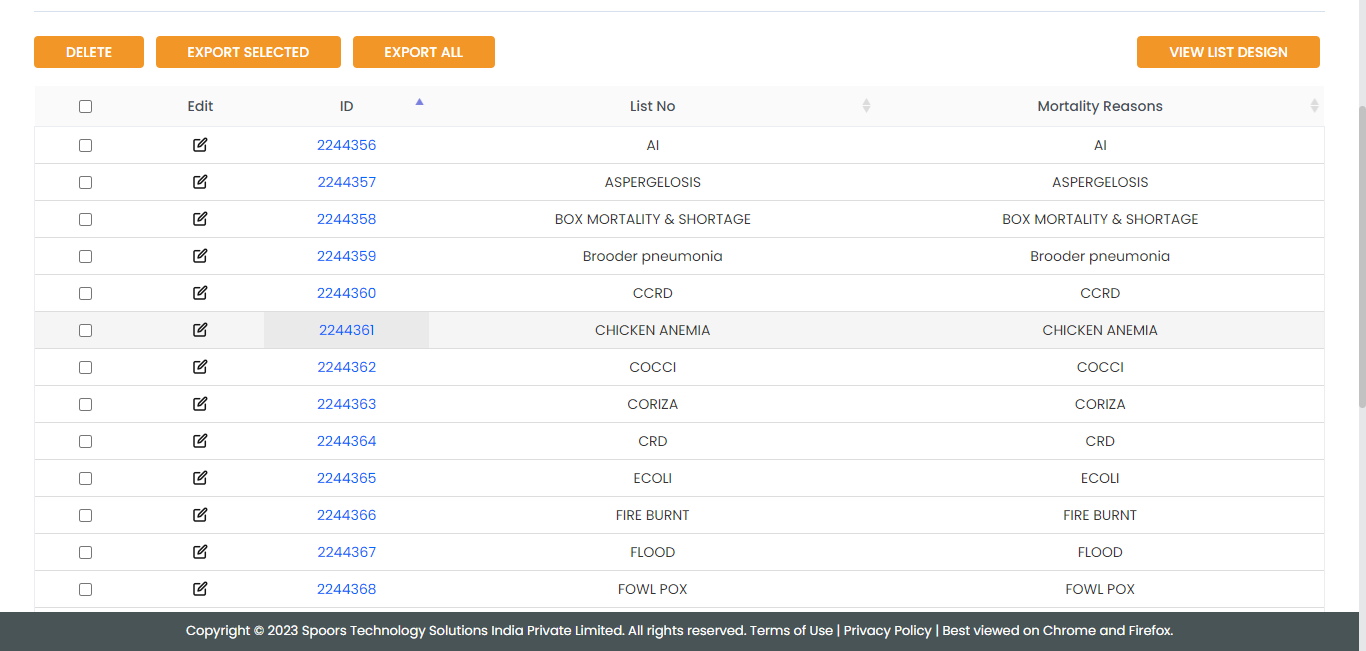
Note: To view the list items that you added, refer to View List Items.Note: To edit the list items that you added, refer to Edit List Item. - Click Save to save your item. Otherwise, click Save & New to save the existing item and add one more new item.
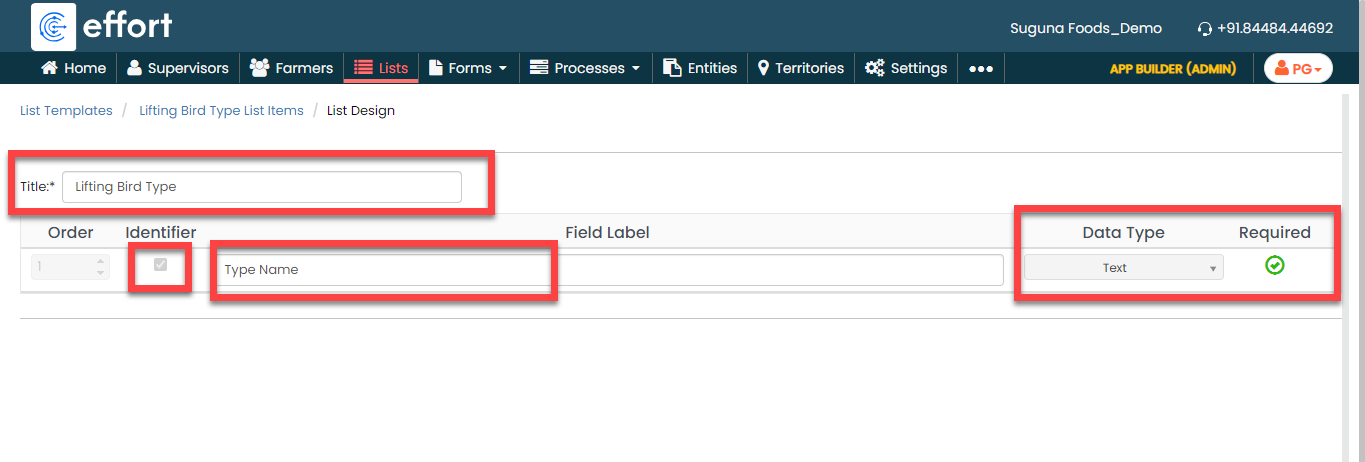
Create Lifting Bird Type List
In this section, we will create a list master for Lifting Bird Type. This list contains items to specifiy the lifting bird types such as normal birds, deceased birds, under weight birds, and so on.
-
Create the Lifting Bird Type list master as shown in the following
screenshot.
- Click Publish to save the List master and then select all in the List Scope in Sync pop-up window.
-
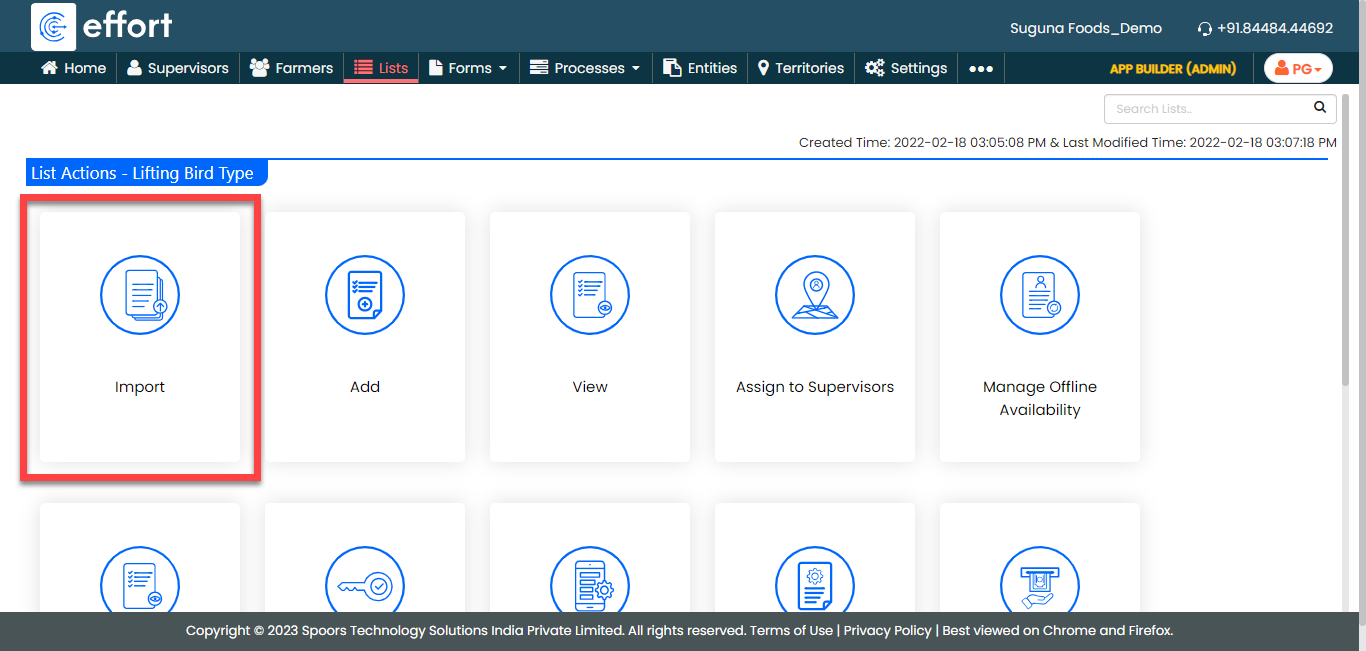
The list master creation is completed. Now you need to add items to
this list. It will take more time if we add items manually. Instead,
you can add multiple items to the list in one go using the
Import option. On the List
Actions page, click
Import.
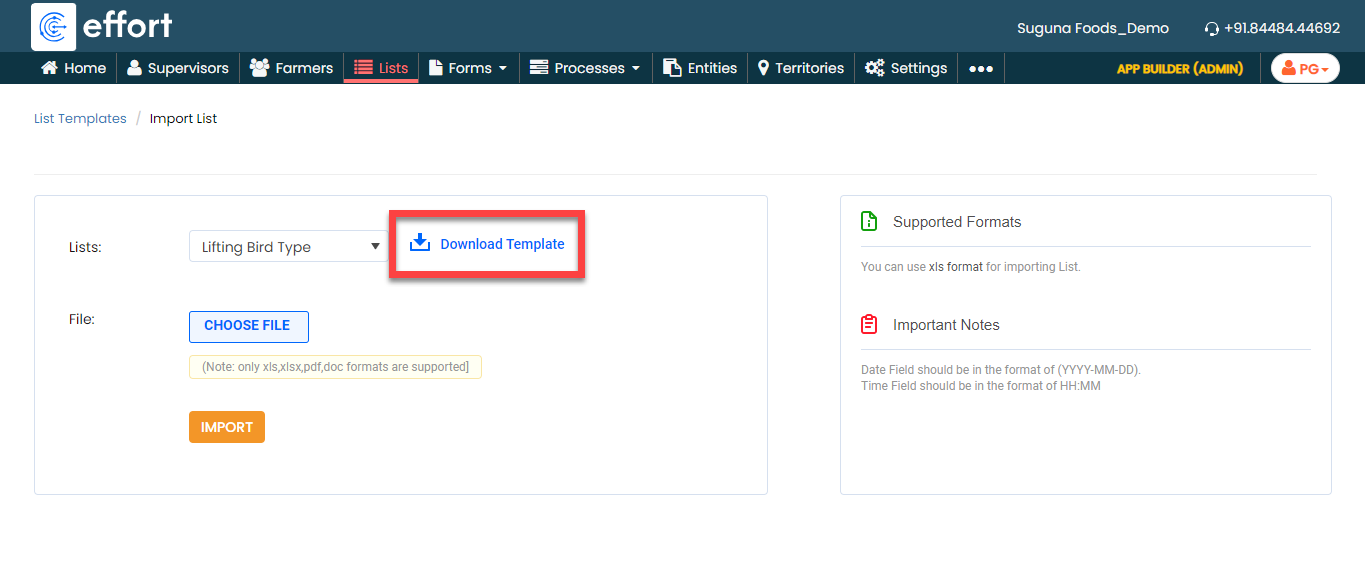
-
Click Download Template. An Excel file is
downloaded.
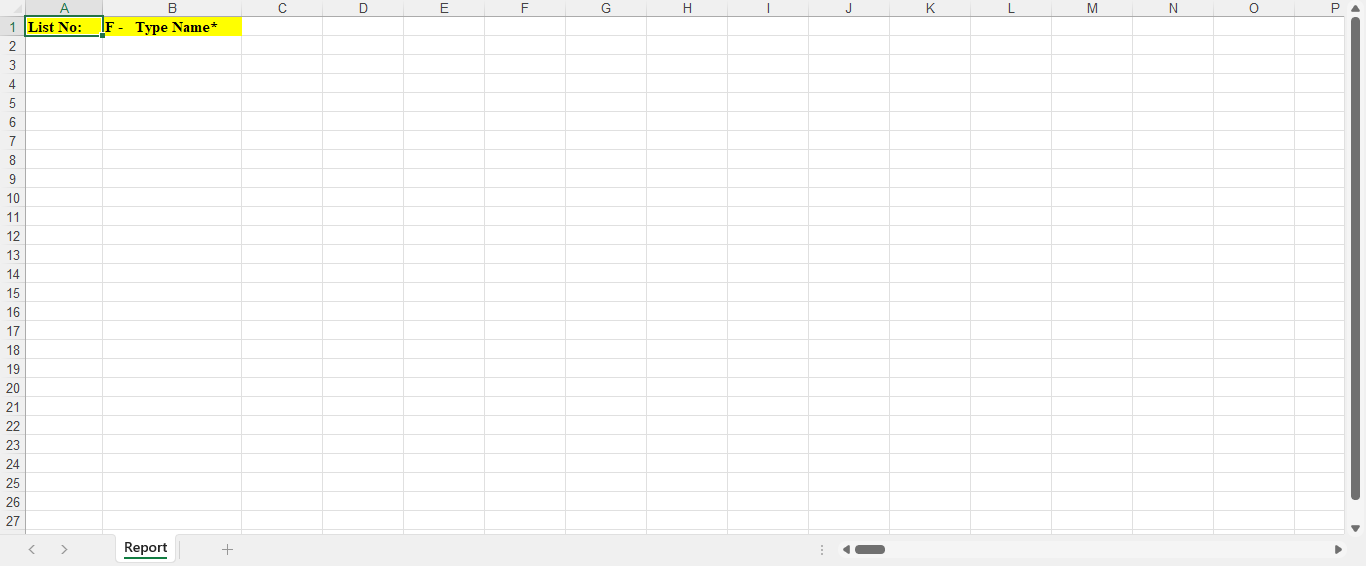
-
Open the downloaded Excel sheet and fill in the data in the fields.
Once you fill in the data, save the Excel sheet.
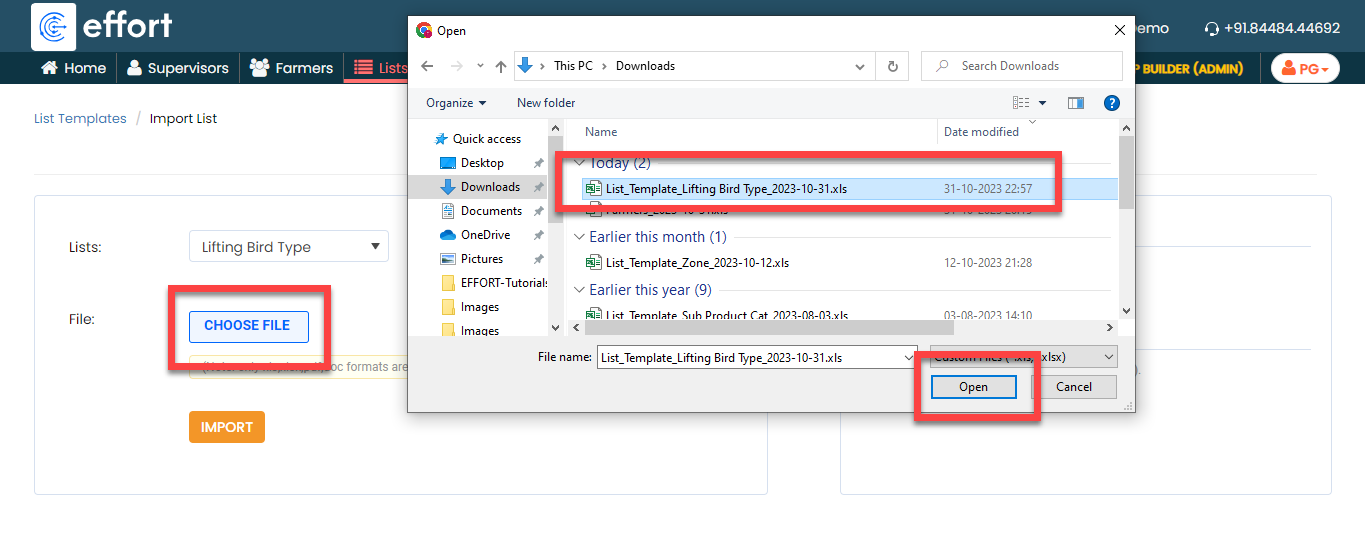
-
Go back to the Import List page, click
Choose File, and select the filled Excel
sheet.
- Click the Import button. Once the import is completed, refresh the page after a few seconds. You can check the import status at the bottom of the page.
-
To view the imported list items, go to .
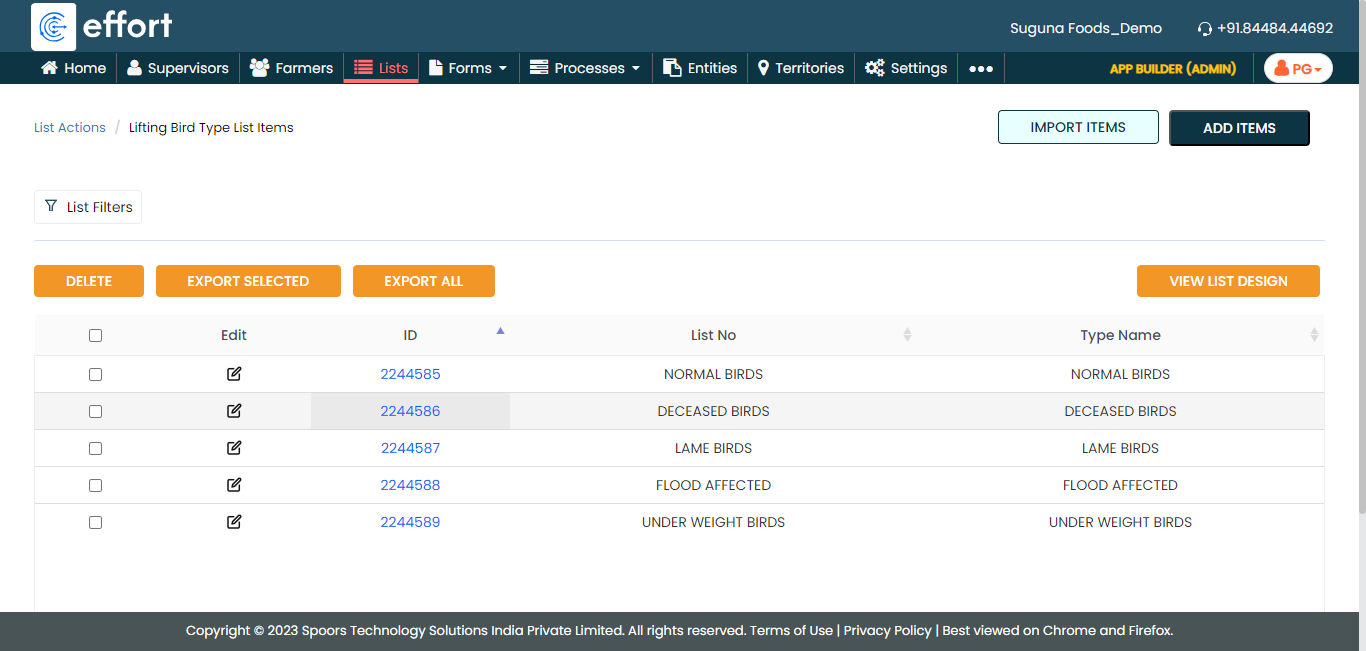
Note: To view the list items that you added, refer to View List Items.Note: To edit the list items that you added, refer to Edit List Item.
Creation and Configuration of Forms
In this section, we will create the forms required to manage the Poultry Operations. These forms need to be filled out by supervisors to capture all the details related to farm. We will discuss them in detail as we set them up separately. Here, we will guide you through the steps of creating the forms, necessary fields, field-level configurations, and form-level configurations for all the forms. To know more about the forms, refer to Forms.
New Daily Farm Monitoring Form
Supervisors fill out the New Daily Farm Monitoring form on a daily basis to record activities such as farmer details, mortality rates, feed consumption, signs of illness, growth rates, and production numbers. This practice is crucial for effective poultry farm management. These records offer valuable data for analysis, issue identification, and informed decision-making. Maintaining accurate records through forms like the Daily Poultry Farm Monitoring form ensures compliance with regulations, serving as proof that the farm adheres to required standards and protocols. Sharing detailed information about the farm's daily activities and observations ensures that all involved parties are well-informed about the poultry's health and well-being.
To create this form, follow the steps below:
- Go to .
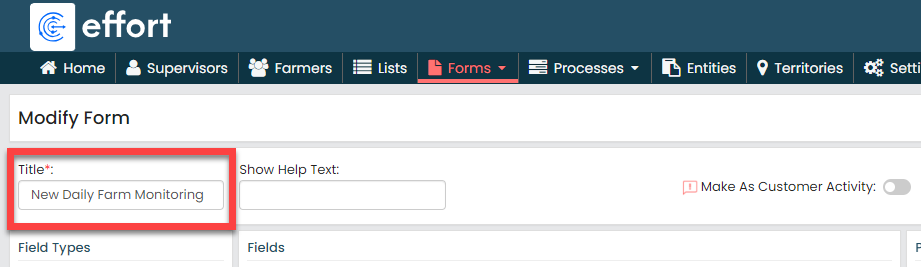
-
In the Title field, enter the title as
New Daily Farm Monitoring.
-
Drag and drop the following data types onto the field canvas and
label them as shown below.
Data Type Label Customer Farmer Text Farmer ID Date Chicks Placed Date Date Visit Date Yes/No Mortality Yes/No Critically Deceased Farm Pick List Mortality Reason Number Today Mortality Number Last Cumulative Mortality Number Today Cumulative Mortality Image Image Text Medicines Text Preventives Number Chicks Placed Quantity Number Lifted Birds Number Last Balanced Birds Number Today Balanced Birds Number B1 Feed Consumption (In KG) Number B2 Feed Consumption (In KG) Number B3 Feed Consumption (In KG) Number Total Feed Consumption (In KG) Yes/No Enter Feed Stock Number B1 Feed Physical (In KG) Number B2 Feed Physical (In KG) Number B3 Feed Physical (In KG) Number Feed Physical (In KG) Number Avg Body Weight (In KG) Image Body Weight Weighing Scale Image Dropdown Body Weight Taken By Text Remark To know more about all the data types, refer to the following topics. -
Click the Farmer ID field, and do the
following:
-
Under the Properties section, select
the Computed option from the
Computed/Default dropdown.

To know more about Computed and Default options, refer to Field Properties.
-
Click the grey box under the
Computed/Default dropdown, and
select the first field labeled as Farmer_ID, and
click Done.

This configuration allows us to retrieve the farmer ID from the customer master and automatically populate on this field when the supervisor selects the farmer in the first field.
-
Under the Properties section, select
the Computed option from the
Computed/Default dropdown.
-
Click on the Chicks Placed Date, Visit Date, Mortality,
and Critically Deceased Farm fields and uncheck the
Required Field option to make the fields
optional when submitting.

-
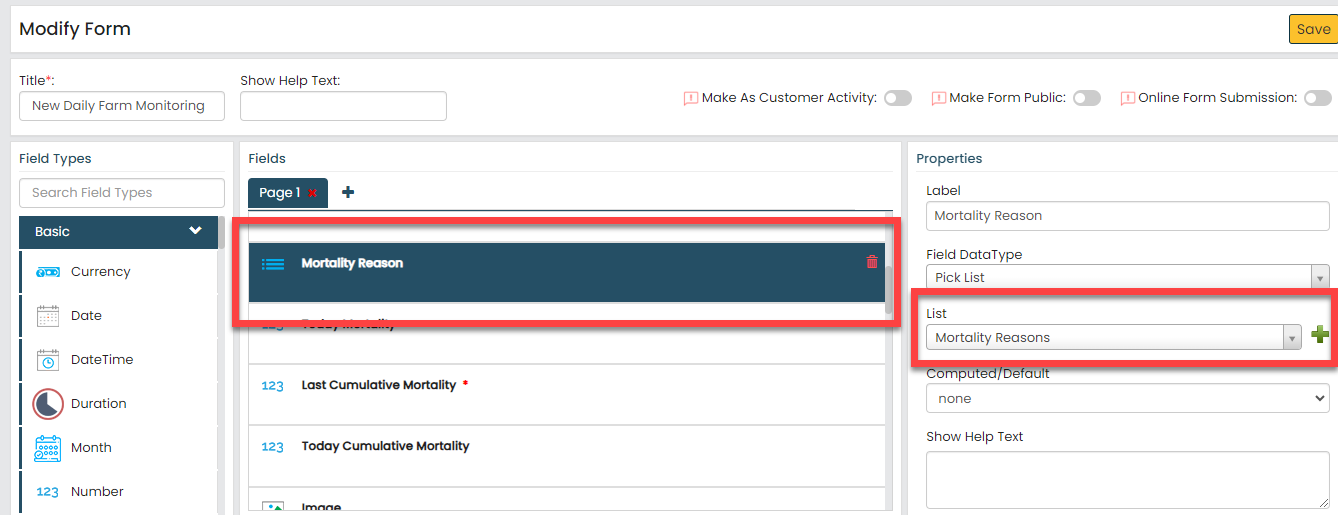
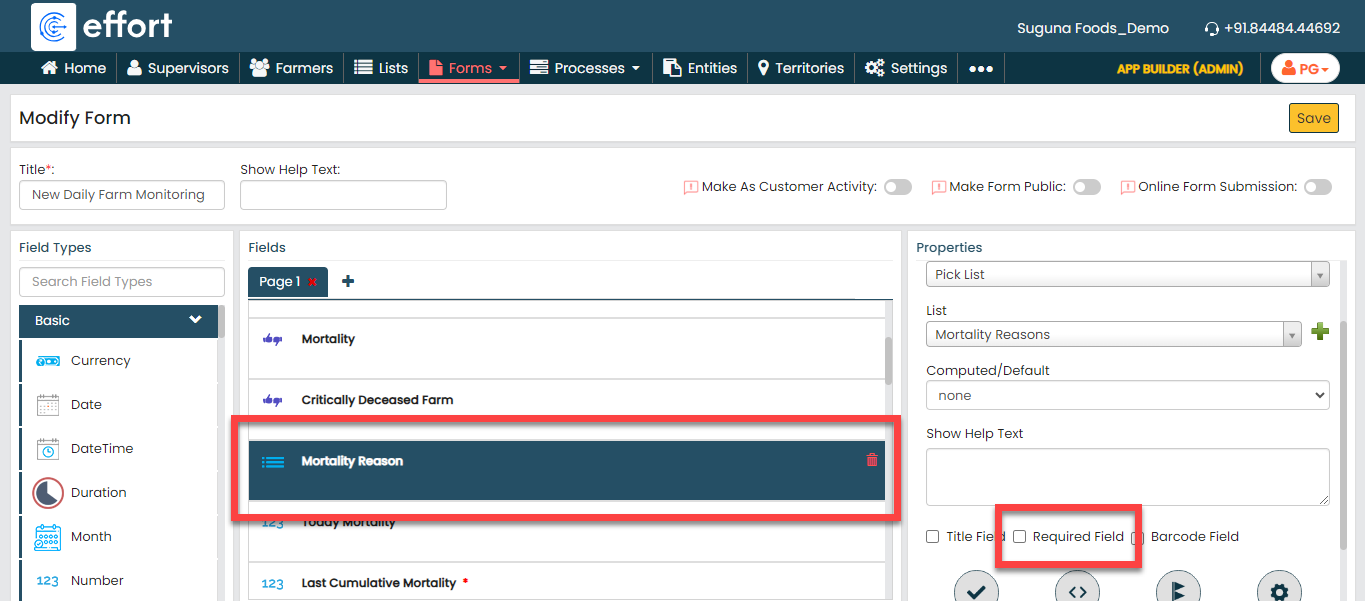
Click the Mortality Reason picklist field,
do the following.
-
Under the Properties section, select
the Mortality Reasons list that we
created earlier from the List
dropdown.
-
Uncheck the Required Field option to
make it optional when submitting.
-
Under the Properties section, select
the Mortality Reasons list that we
created earlier from the List
dropdown.
-
Click the Today Mortality field and do the
following.
-
Uncheck the Required Field option to
make it optional when submitting.

-
Click the Manage Validations icon
and define the configuration as shown below.

This configuration helps us validate the mortality against the quantity of chicks placed to avoid incorrect data entry. Let's assume the quantity of chicks placed is 2000. If, by mistake, the supervisor enters the mortality as 2100, the configured error message will be automatically displayed. The app will not allow the supervisor to submit the form without correcting the data.
To know more about all the validations you can define to avoid incorrect data entry, refer to the Manage Validations topic.
-
Click the Define Conditions icon and
define the configuration as shown below.
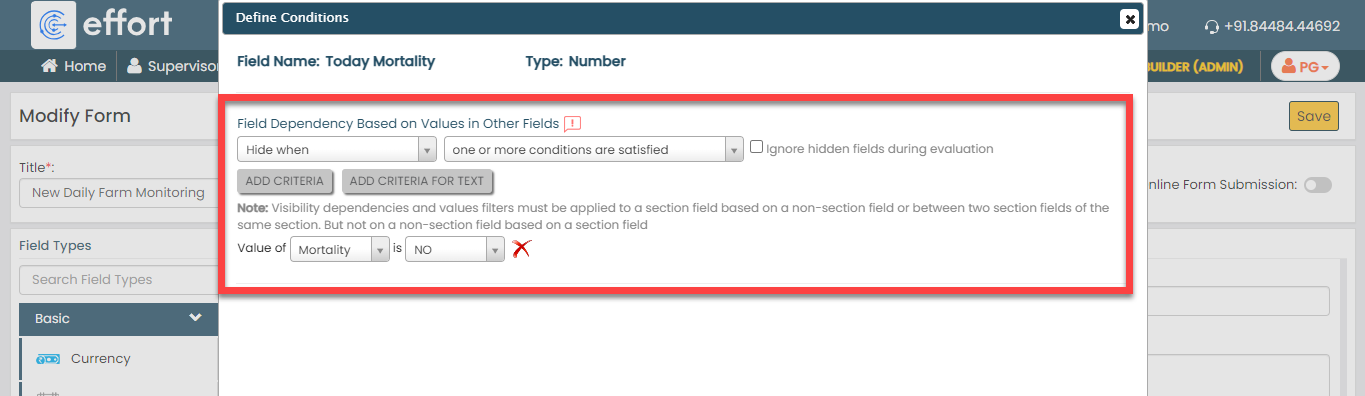
This configuration automatically hides the Today Mortality field when the supervisor selects No for the Mortality field. If there is no mortality, then the quantity is not required.To know more about all the conditions, refer to the Define Conditions topic.
-
Uncheck the Required Field option to
make it optional when submitting.
-
Click the Last Cumulative Mortality field
and do the following:
-
Under the Properties section, select
the Default option from the
Computed/Default dropdown.
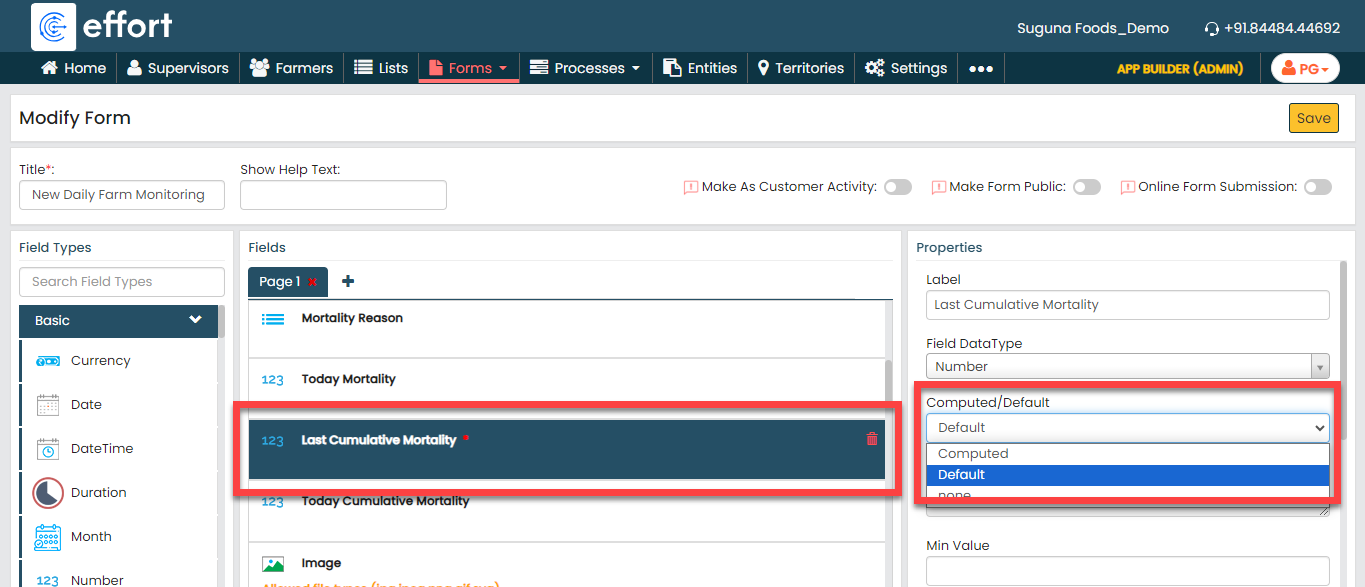
To know more about Computed and Default options, refer to Field Properties.
-
Click the grey box under the
Computed/Default dropdown, enter
0, and then click
Done.
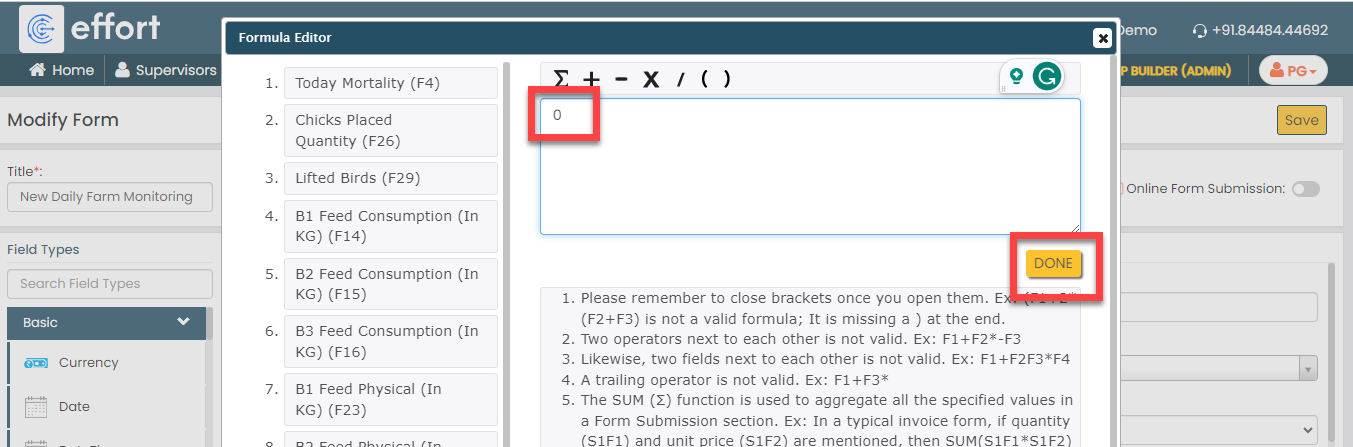
By default, 0 will be displayed. If required, the supervisor can edit the value.
-
Under the Properties section, select
the Default option from the
Computed/Default dropdown.
-
Click the Today Cumulative Mortality field
and do the following:
-
Under the Properties section, select
the Computed option from the
Computed/Default dropdown.
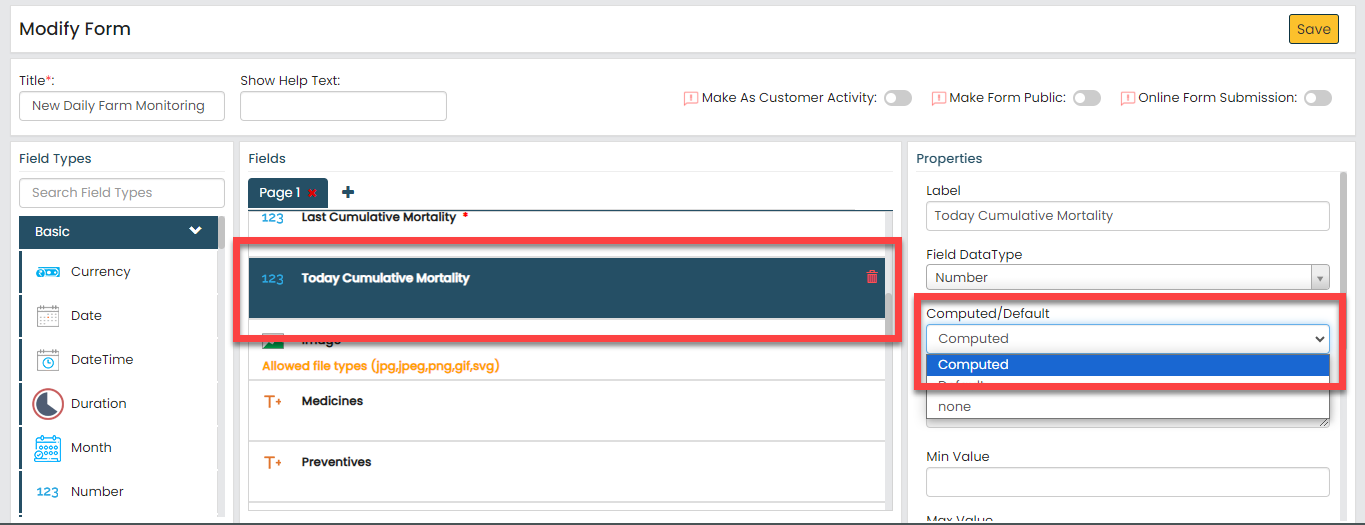
To know more about Computed and Default options, refer to Field Properties.
-
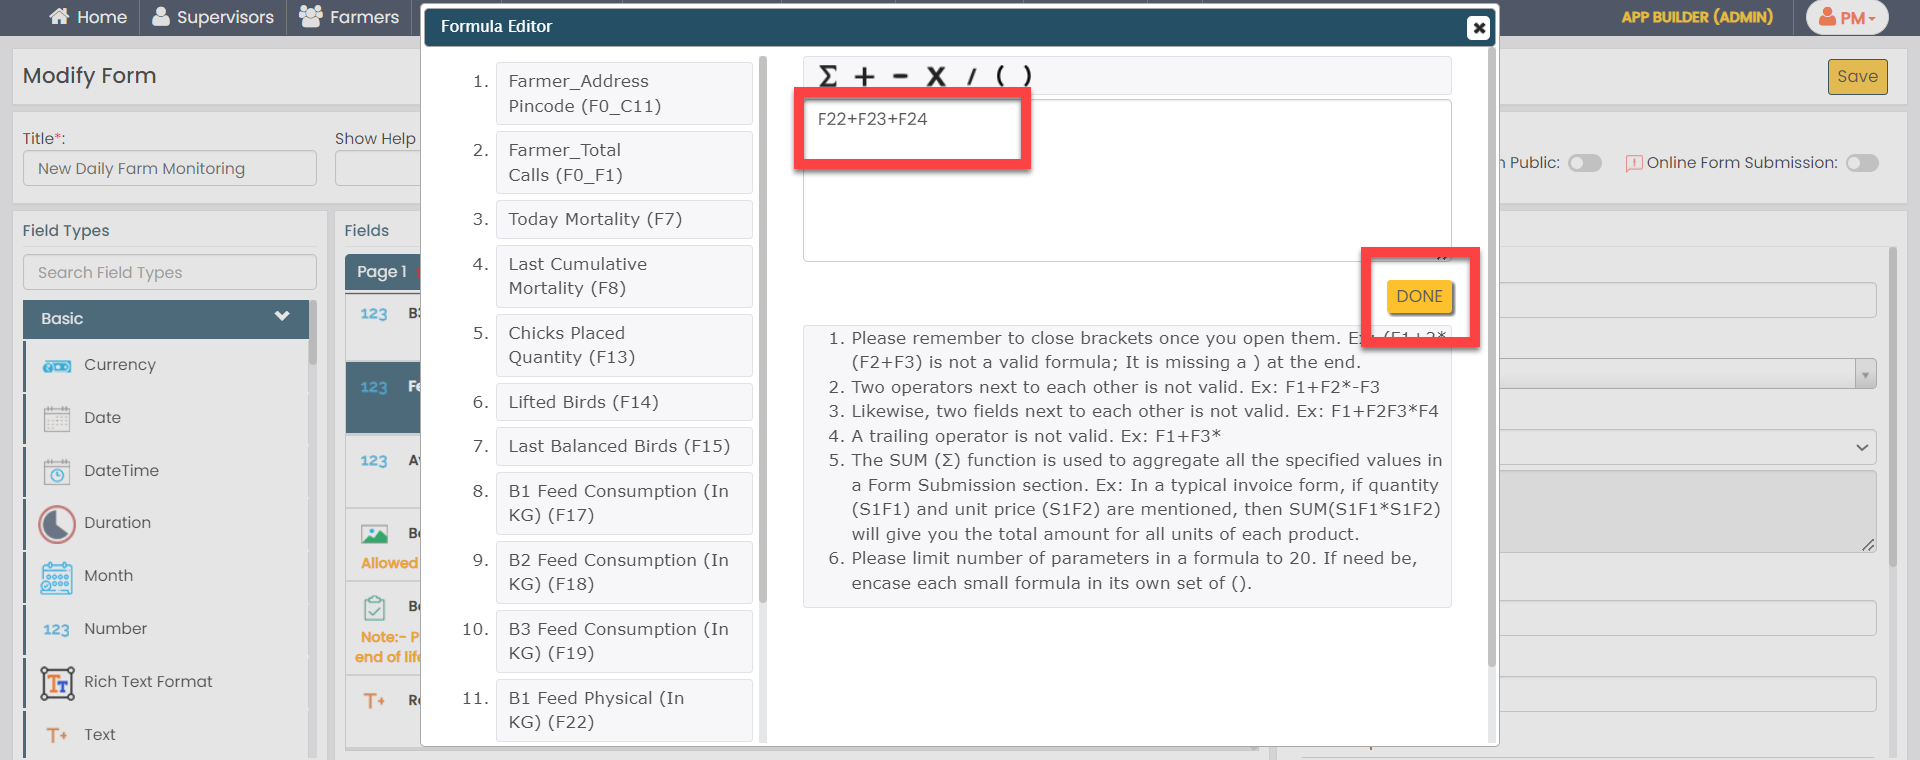
Click the grey box under the
Computed/Default dropdown, define
the formula as shown below, and then click
Done. You can click on the fields
provided in the right section to populate them on the
formula editor.

According to this formula, today's cumulative mortality will be calculated automatically by adding the current day's mortality to the last cumulative mortality.
-
Under the Properties section, select
the Computed option from the
Computed/Default dropdown.
-
Click on the Image, Medicines, Preventives, and Chicks
Placed Quantity fields and uncheck the
Required Field option to make the fields
optional when submitting.

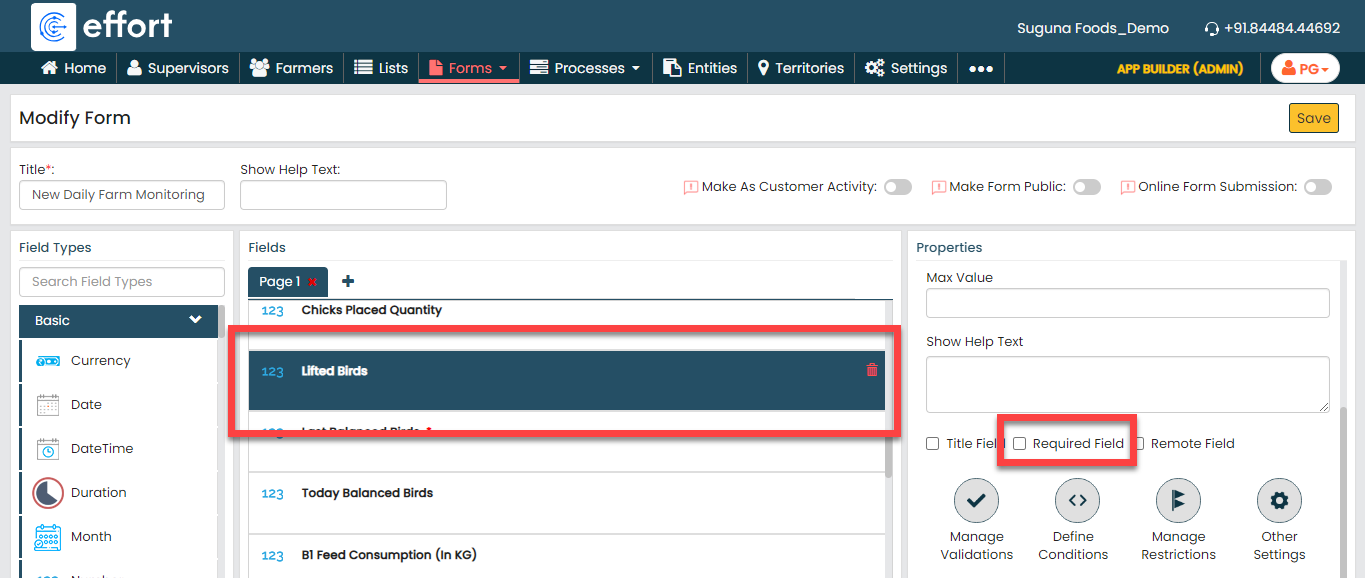
-
Click the Lifted Birds field and do the
following.
-
Uncheck the Required Field option to
make it optional when submitting.
-
Click the Manage Validations icon
and define the configuration as shown below.
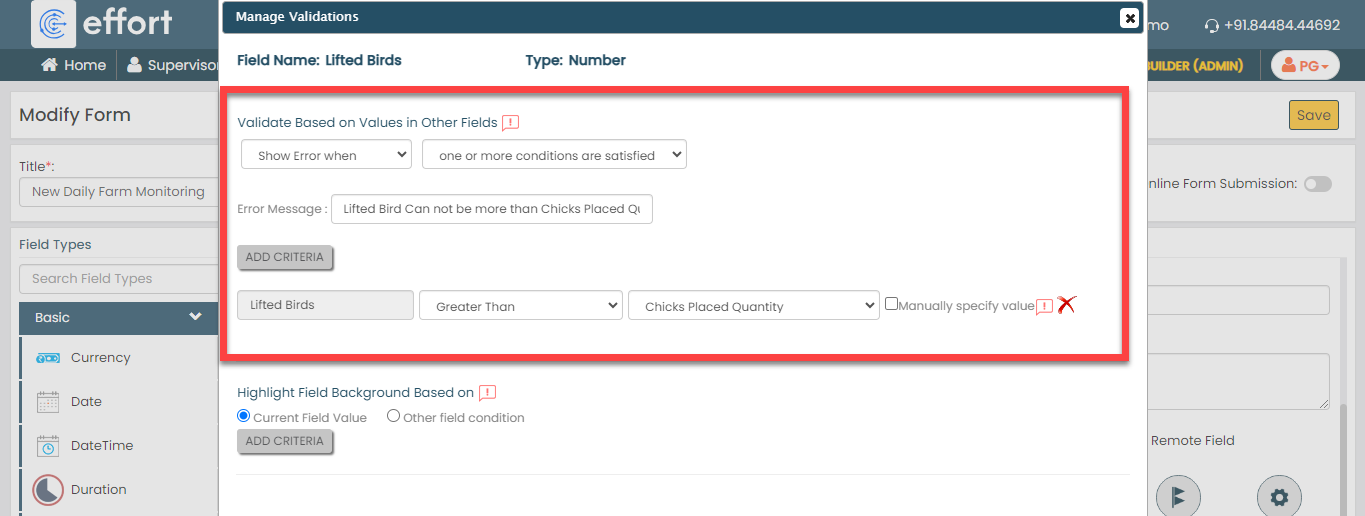
This configuration helps us validate the lifted birds against the quantity of chicks placed to avoid incorrect data entry. Let's assume the quantity of chicks placed is 2000. If, by mistake, the supervisor enters the lifted birds as 2100, the configured error message will be automatically displayed. The app will not allow the supervisor to submit the form without correcting the data.
To know more about all the validations you can define to avoid incorrect data entry, refer to the Manage Validations topic.
-
Uncheck the Required Field option to
make it optional when submitting.
-
Click the Last Balanced Birds field and do
the following:
-
Under the Properties section, select
the Default option from the
Computed/Default dropdown.
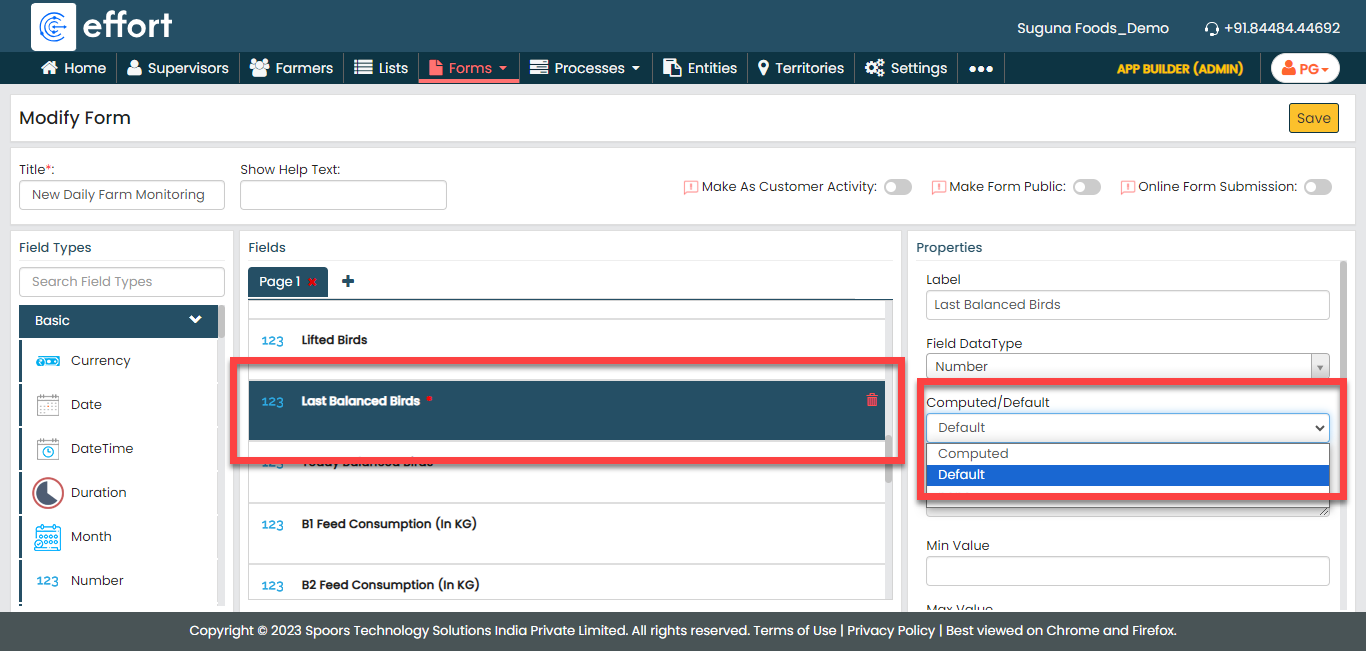
To know more about Computed and Default options, refer to Field Properties.
-
Click the grey box under the
Computed/Default dropdown, enter
0, and then click
Done.

By default, 0 will be displayed. If required, the supervisor can edit the value.
-
Under the Properties section, select
the Default option from the
Computed/Default dropdown.
-
Click the Today Balanced Birds field and do
the following:
-
Under the Properties section, select
the Computed option from the
Computed/Default dropdown.
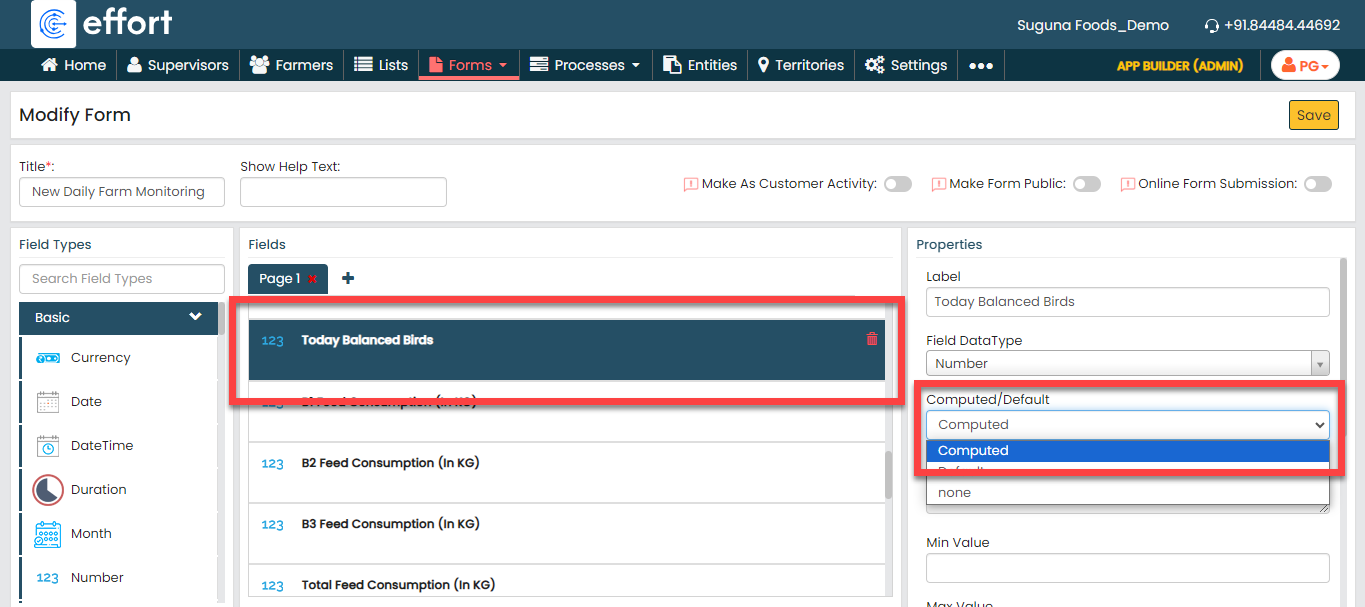
To know more about Computed and Default options, refer to Field Properties.
-
Click the grey box under the
Computed/Default dropdown, define
the formula as shown below, and then click
Done. You can click on the fields
provided in the right section to populate them on the
formula editor.

According to this formula, Today's balanced birds will be calculated automatically by removing lifted birds and the current day's mortality from the last balanced mortality.
-
Under the Properties section, select
the Computed option from the
Computed/Default dropdown.
-
Click on the B1 Feed Consumption (In KG), B2 Feed
Consumption (In KG), and B3 Feed Consumption (In KG)
fields and uncheck the Required Field option
to make the fields optional when submitting.

-
Click the Total Feed Consumption (In KG)
field and do the following:
-
Under the Properties section, select
the Computed option from the
Computed/Default dropdown.
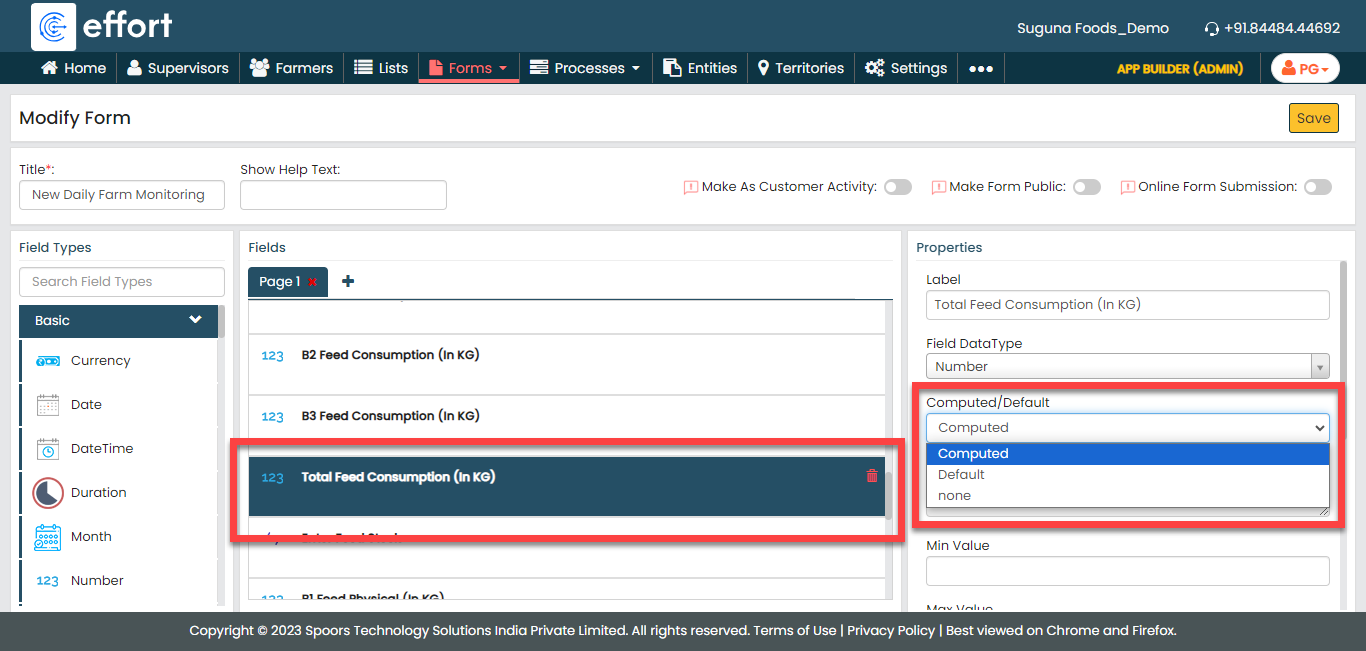
To know more about Computed and Default options, refer to Field Properties.
-
Click the grey box under the
Computed/Default dropdown, define
the formula as shown below, and then click
Done. You can click on the fields
provided in the right section to populate them on the
formula editor.
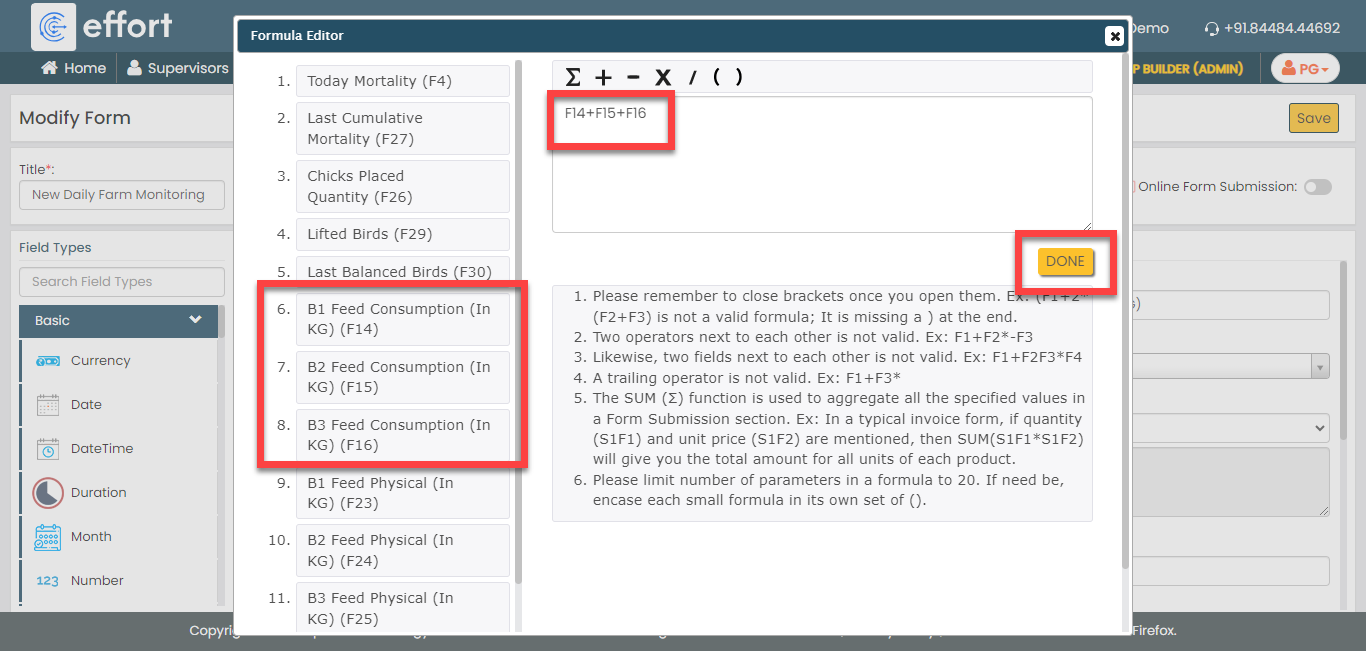
According to this formula, Total feed consumption will be calculated automatically by adding all types of feed consumptions.
-
Under the Properties section, select
the Computed option from the
Computed/Default dropdown.
-
Click on the Enter Feed Stock, B1 Feed Physical (In KG),
B2 Feed Physical (In KG), and B3 Feed Physical (In
KG) fields and uncheck the Required
Field option to make the fields optional when
submitting.

-
Click the Feed Physical (In KG) field and do
the following:
-
Under the Properties section, select
the Computed option from the
Computed/Default dropdown.
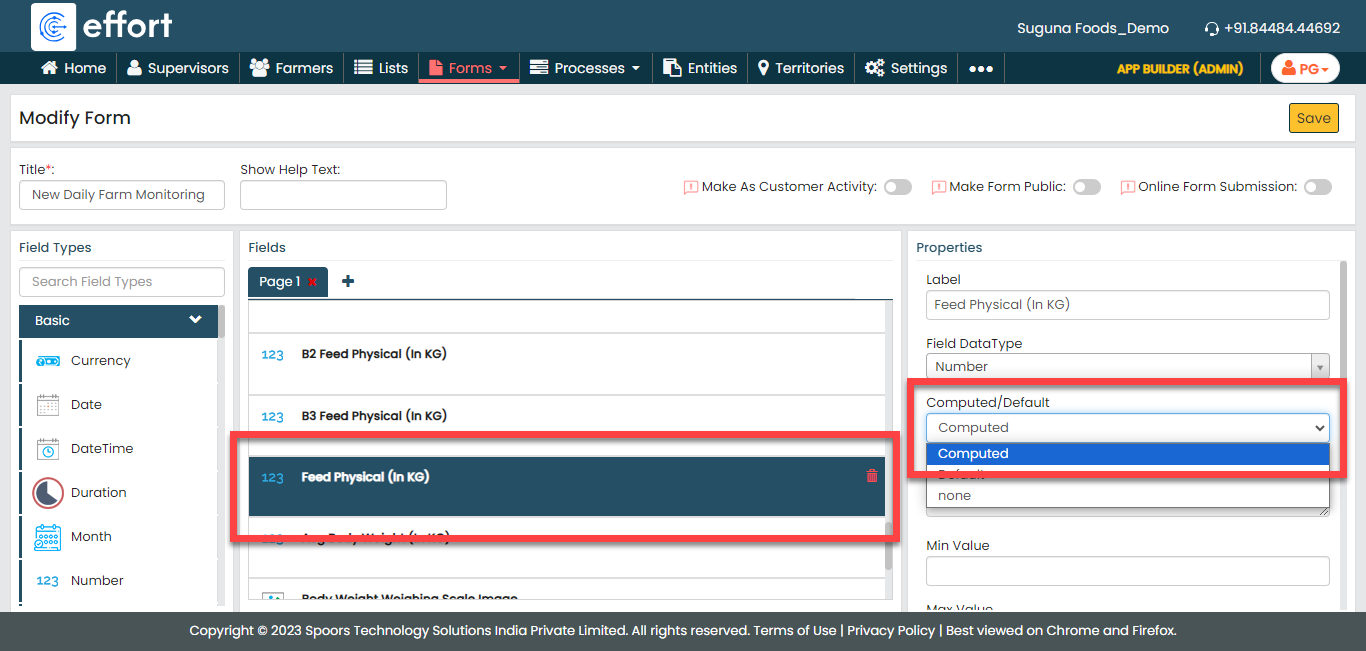
To know more about Computed and Default options, refer to Field Properties.
-
Click the grey box under the
Computed/Default dropdown, define
the formula as shown below, and then click
Done. You can click on the fields
provided in the right section to populate them on the
formula editor.

According to this formula, Total physical feed will be calculated automatically by adding all types of physical feeds.
-
Under the Properties section, select
the Computed option from the
Computed/Default dropdown.
-
Click on the Avg Body Weight (In KG), Body Weight
Weighing Scale Image, Body Weight Taken By, and
Remark fields and uncheck the Required
Field option to make the fields optional when
submitting.

-
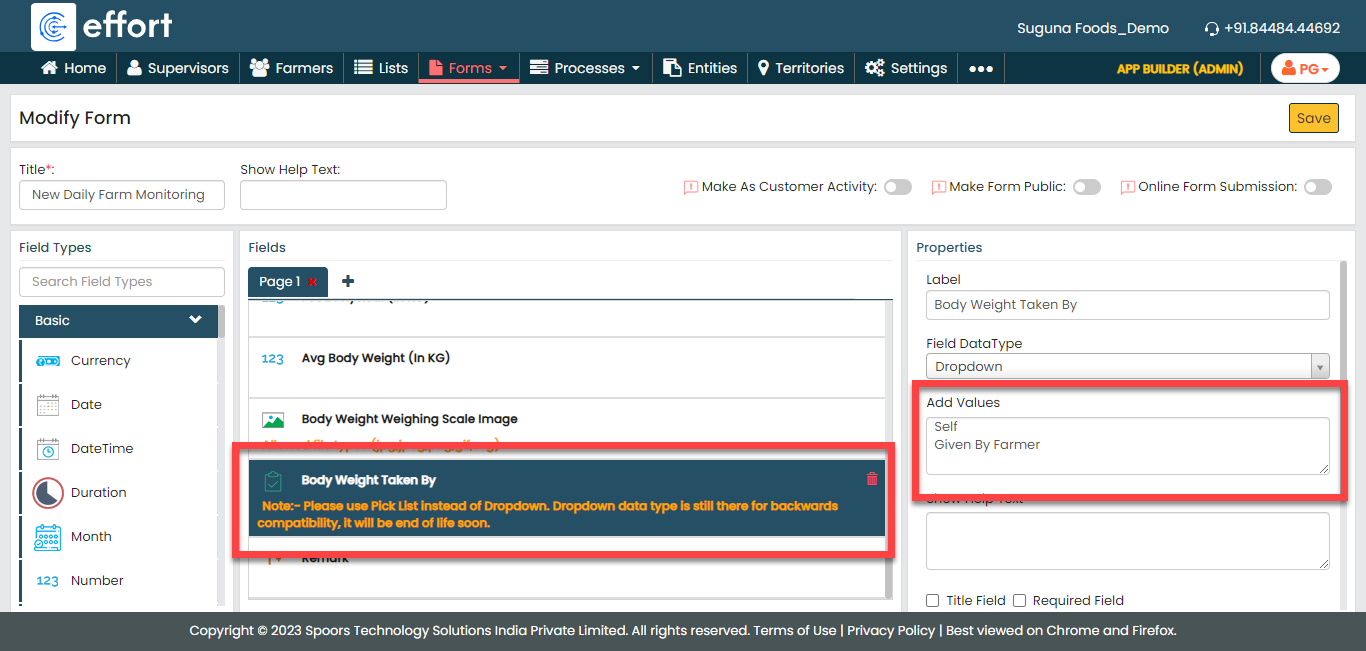
Click the Body Weight Taken By field and do
the following:
-
Under the Properties section, add
the following dropdown options in the Add
Values.
-
Self
-
Given By Farmer
-
-
Under the Properties section, add
the following dropdown options in the Add
Values.
-
Now click Publish and then click
OK to make it available to the
technicians. You are done with your first form creation.
Note: To know more about all the publishing options, refer to Publishing Options.
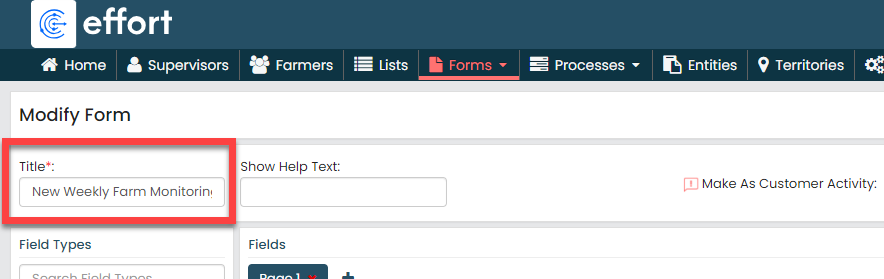
New Weekly Farm Monitoring
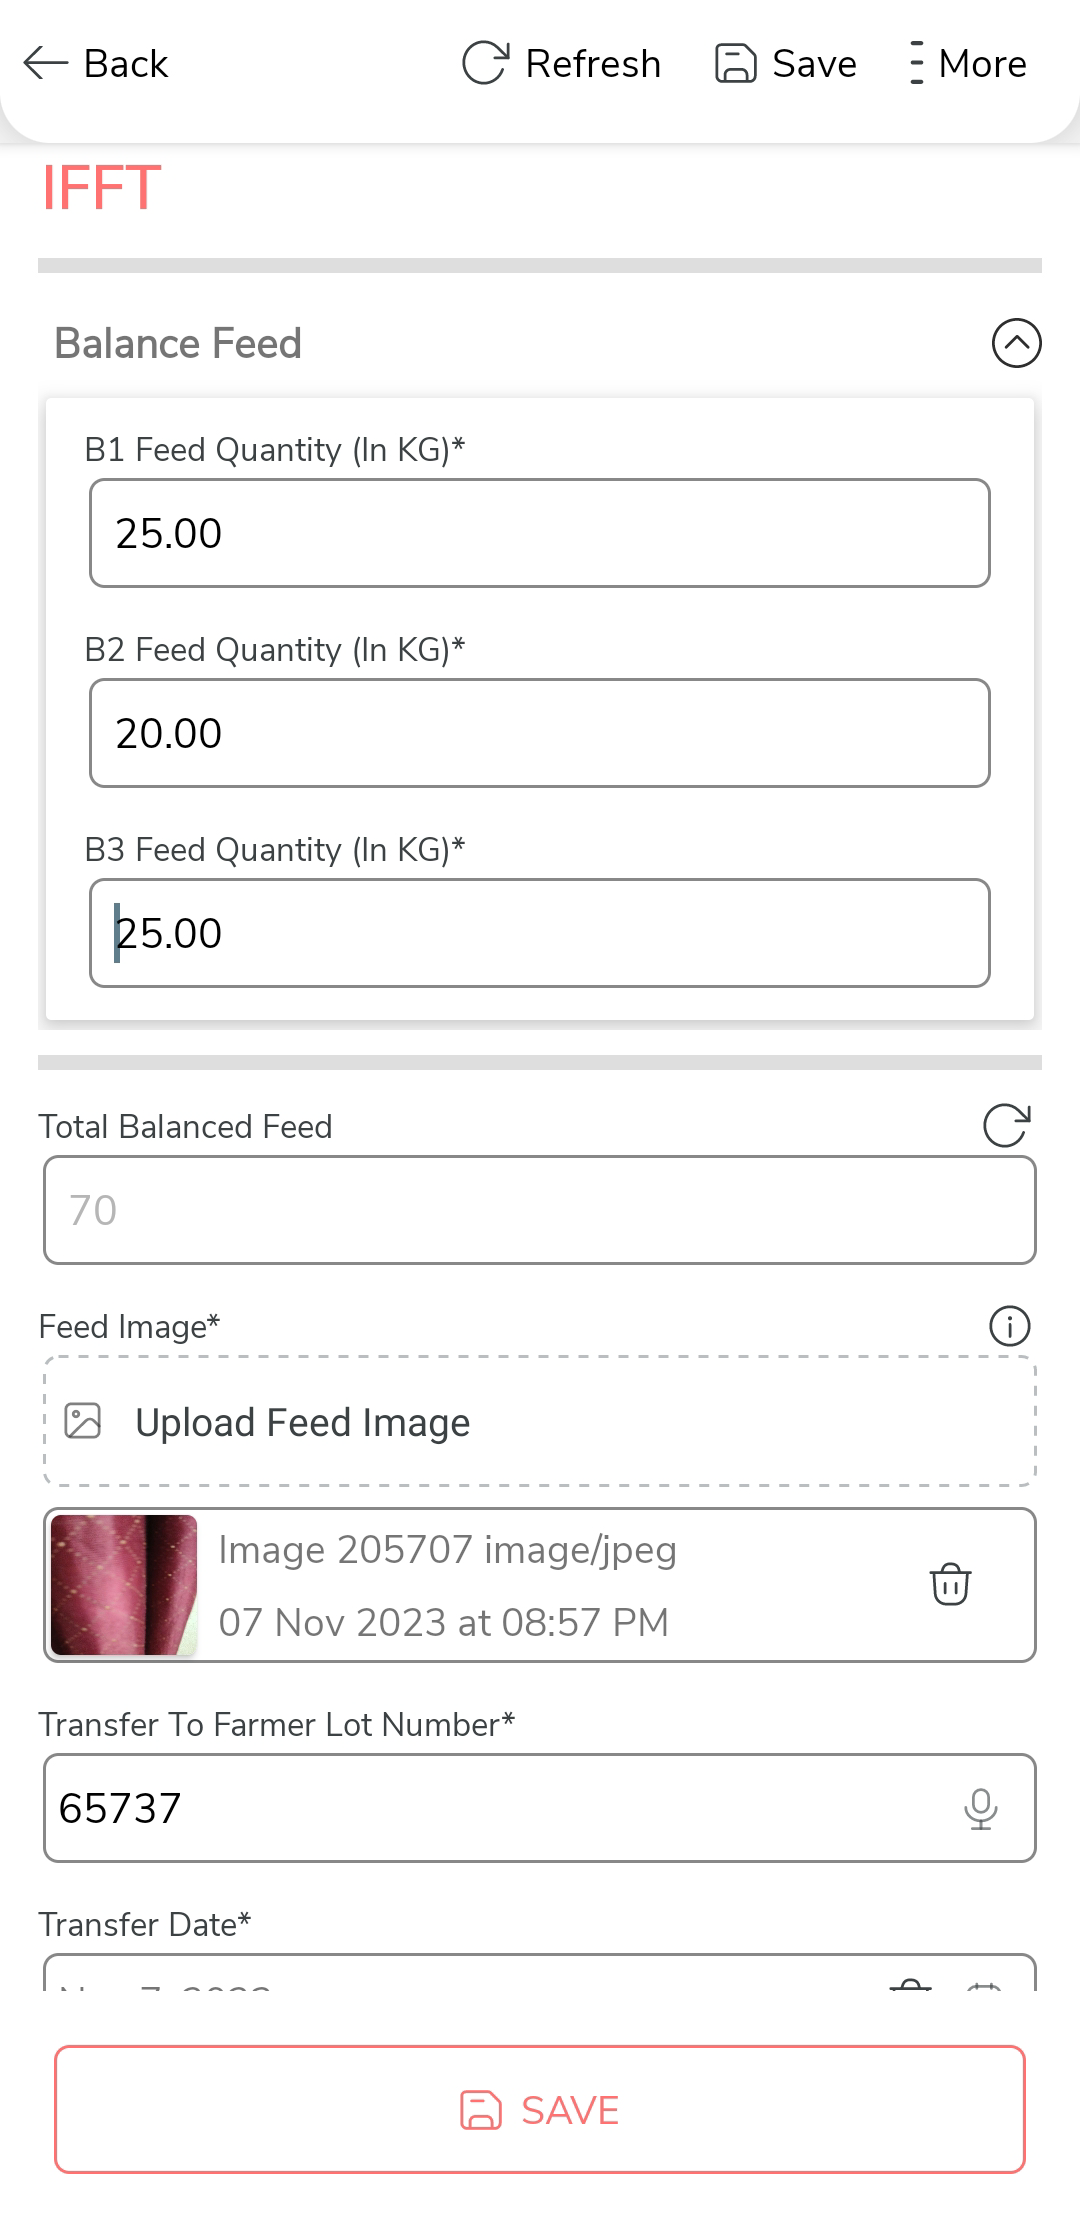
IFFT Form
Supervisors fill out the IFFT form to capture the balance feed details when the birds are ready to lift for selling purposes. The balanced feed is the one which will supply different nutrients in right proportions according to the requirements for maintenance and various productive functions. To create this form, follow the steps below:
- Go to .
-
In the Title field, enter the title as
IFFT.

-
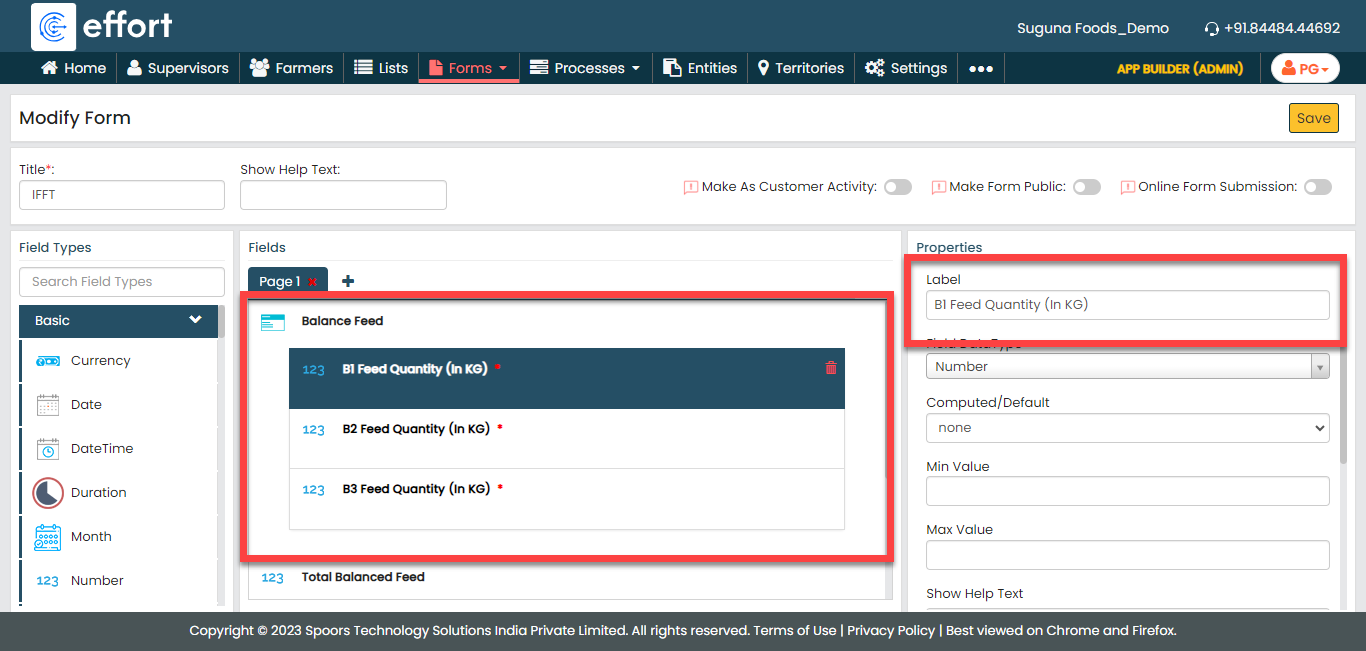
Drag and drop the following data types onto the field canvas and
label them as shown below.
Data Type Label Fields Group Balance Feed Number Total Balanced Feed Image Feed Image Text Transfer To Farmer Lot Number Date Transfer Date To know more about all the data types, refer to the following topics. -
Drag and drop three Number data types onto the
Balance Feed field and label them as
B1 Feed Quantity (In KG), B2
Feed Quantity (In KG), and B3 Feed
Quantity (In KG).
-
Click the Total Balanced Feed field and do
the following:
-
Under the Properties section, select
the Computed option from the
Computed/Default dropdown.
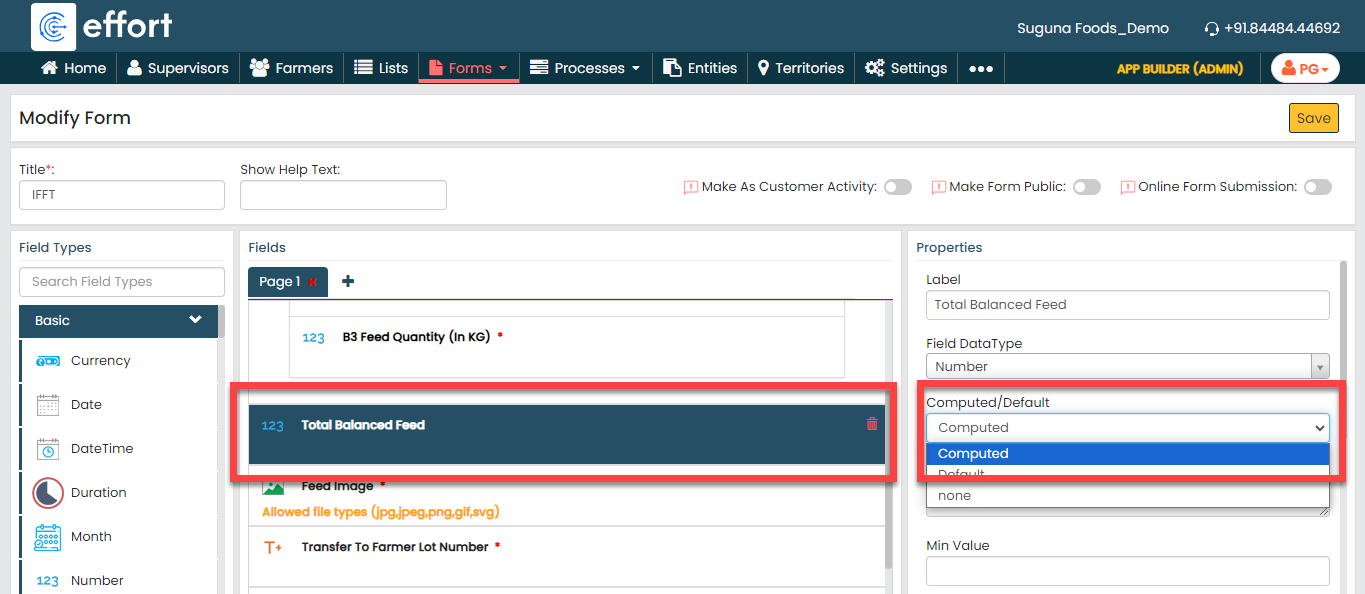
To know more about Computed and Default options, refer to Field Properties.
-
Click the grey box under the
Computed/Default dropdown, and
define the formula as shown below, and click
Done.

According to this formula, Total feed consumption will be calculated automatically by adding all types of feed consumptions.
-
Under the Properties section, select
the Computed option from the
Computed/Default dropdown.
-
Now click Publish and then click
OK to make it available to the
supervisors.
Note: To know more about all the publishing options, refer to Publishing Options.
Creation and Configuration of Bird Production Process
The Bird Production Process is a workflow that we must configure to monitor all bird-related data, starting from birth and continuing until they are ready for processing. In this section, we will configure the Bird Production process activities, outline the sequence of execution, specify the necessary information for creating work items, and among other aspects. To know more about work processes, refer Work Processes.
Create Bird Production Process
In this section, we will create the Bird Production Process.
- Go to .
-
On the Create Activity Process screen, do the
following:
-
In the Work Process Name field,
enter the title as Bird Production Process.

- Click Next.
-
In the Work Process Name field,
enter the title as Bird Production Process.
-
After entering the process name and clicking Next, you will
proceed to the next tab, where you are required to configure the
work fields. On this tab, click Next and then click
OK. We will configure this section
later.
-
On the Manage Forms tab, click
Next.

-
Manage Activities: On this tab, you will
define the activities that need to be executed for bird production
process. To know more about activities, refer Activities. To
define the activities, follow these steps:
-
Click Add Activity.

-
Under the Activity Title column,
enter the title as Day 1.

-
For the Day 1 activity, configure
the New Daily Farm Monitoring form
under the Form Template column.

-
Similarly, click Add Activity button
again to create another activity as Day
2 and configure the same New
Daily Farm Monitoring form.

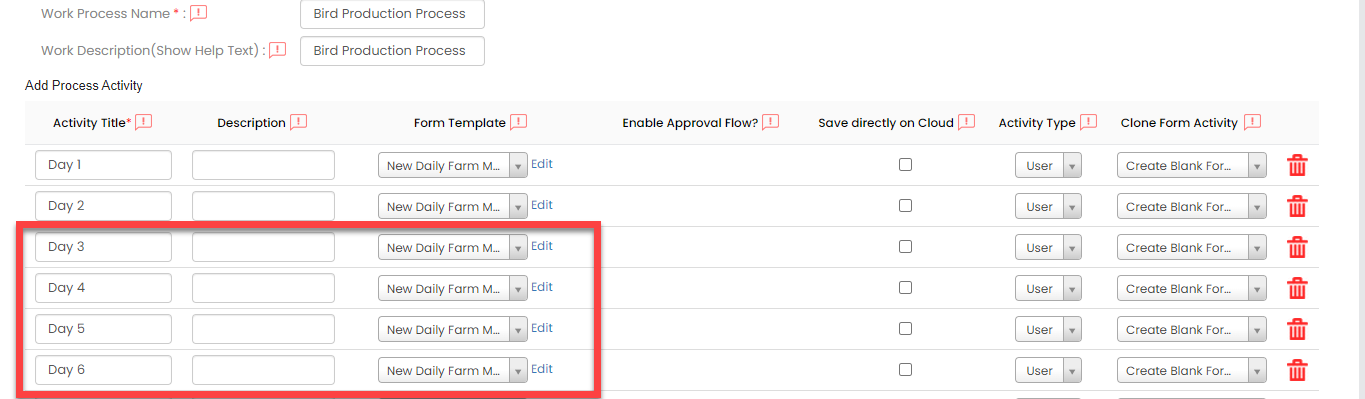
-
In the same way, create Day 3,
Day 4, Day
5, Day 6 activities
and configure the same New Daily Farm
Monitoring form.
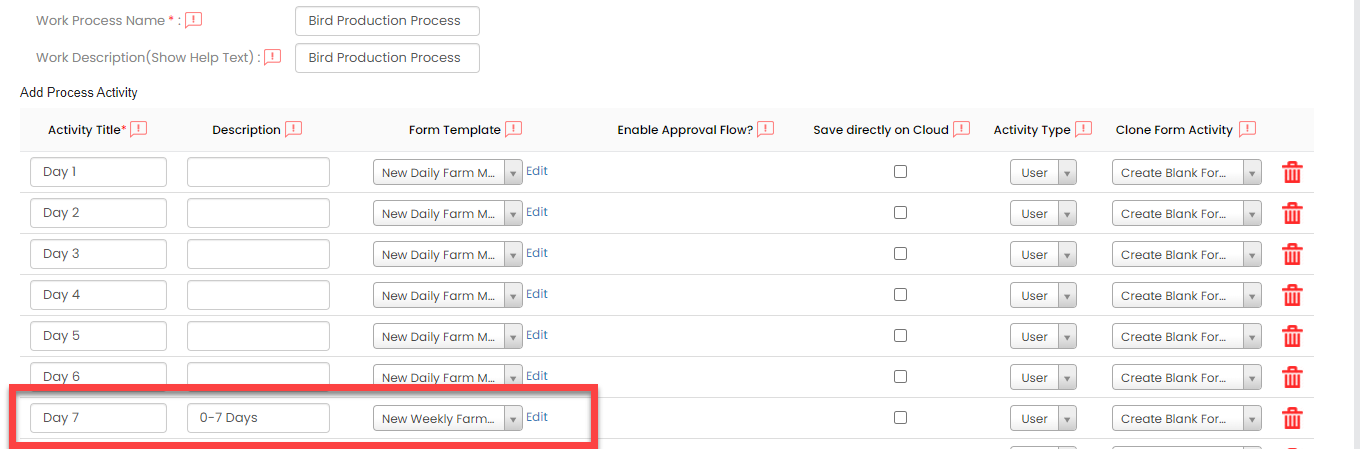
-
Now create Day 7 activity and
configure the New Weekly Farm
Monitoring form.
-
If you require more activities to be performed for bird
production, you can click the Add
Activity button again.

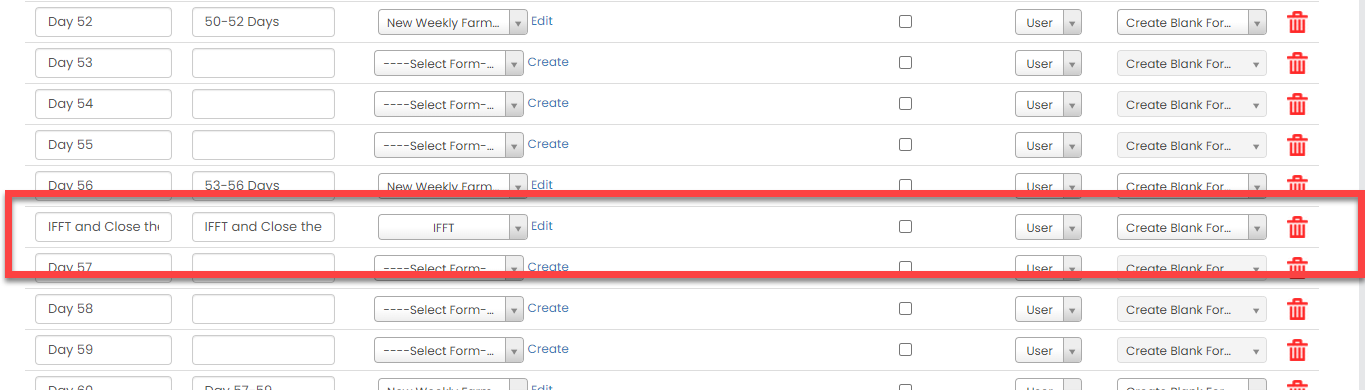
-
Create an activity with the tilte as IFFT and
Close the Lot and configure the
IFFT form to it.
- Once you define the activities, click Next.
-
Click Add Activity.
-
On the Clone Fields Data tab, click
Next.

-
On the Manage Flow tab, you can see the default flow created
automatically. Click Next to move to the next
screen. We will configure this later.
-
On the Define Auto Allocation tab, click
Skip. We will configure this later.

-
On the Manage Restrictions tab, click
Next. We will configure this later.
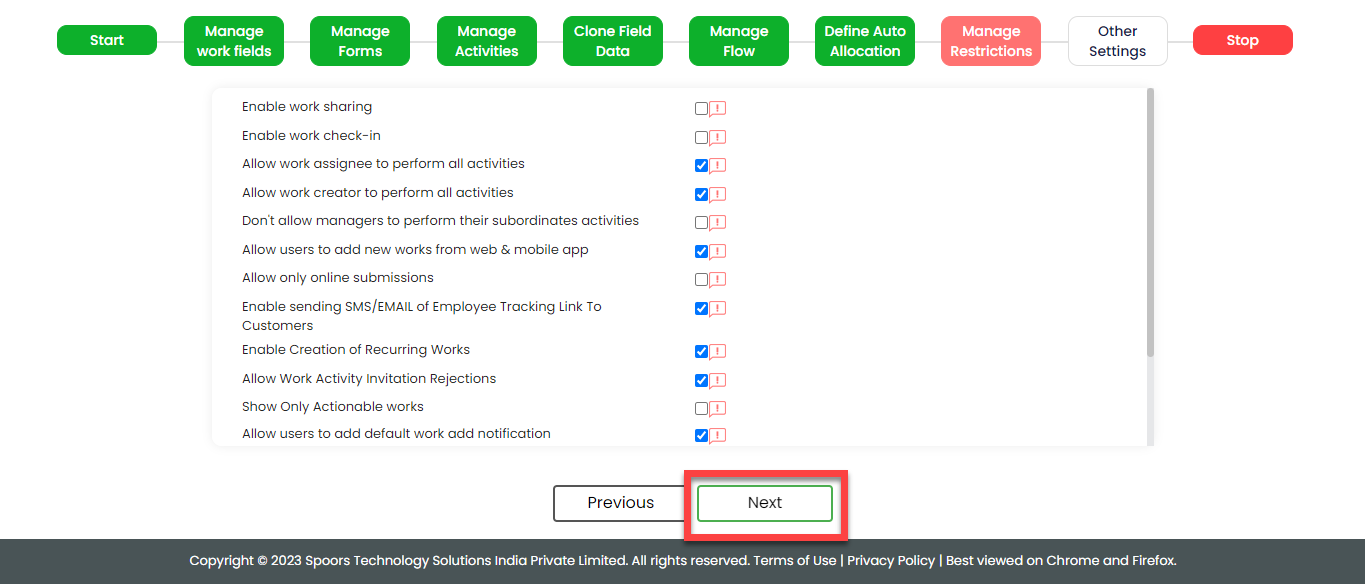
-
On the Other Settings tab, click
Complete. We will configure this
later.

- As you can see, we've ignored some configurations as those are complex and time consuming. Refer to the next sections for detailed steps to configure the flow, fields, work settings, and so on.
Configure Work Fields
In this section, we will configure the work fields which are required for capturing the information necessary to create an Bird Production work. You will find some default fields that are pre-configured. However, these defaults are insufficient for capturing the necessary information. To address this, we must add and configure custom fields. To know more about work fields, refer Work Fields.
Follow the steps below to create work fields.
- On the process page, click Manage Fields. Alternatively, go to .
-
To begin, deactivate all default fields by clicking on the green
checkboxes, as demonstrated below.


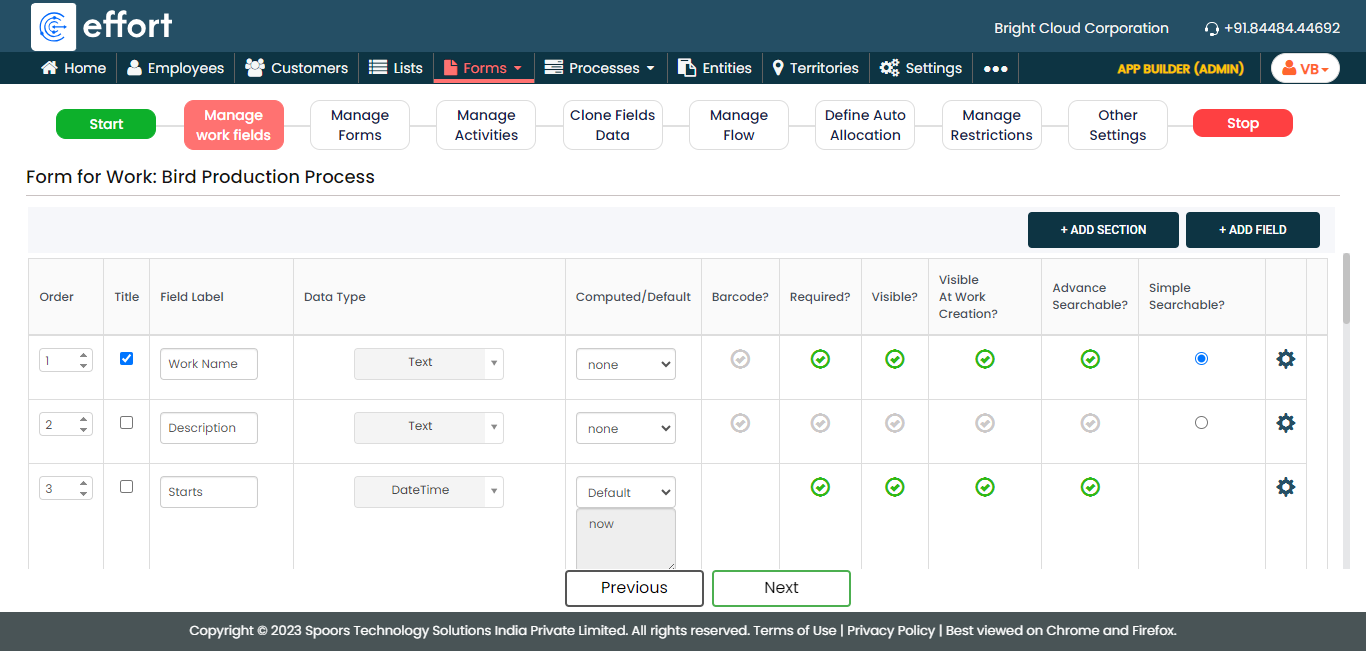
-
After disabling all the default fields, change the Work
Name to Lot Number and then
enable the Required,
Visible, Visible at Work
Creation, and Advance
Searchable.

-
Similarly, click the Add Field button again
and configure the following fields as described in the following
table.
Field Configuration Starts Date and Time Change the label of the Starts to Start Date and Time and enable the checkboxes as shown below. 
Farmer Change the label of the Customer to Farmer and enable the checkboxes as shown below. 
Farmer Number Make this field as Computed. The field configuration is shown below: 
Click on the grey box and configure as shown below to fetch the farmer number automatically: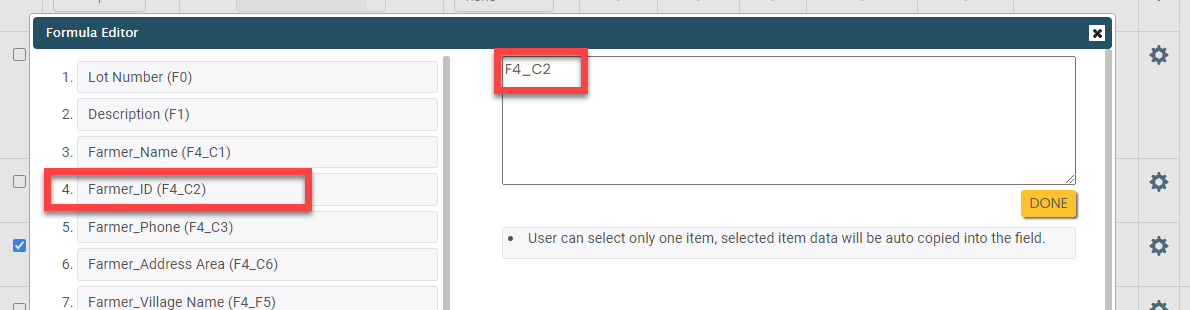
Supervisor Change the label of the Employee to Supervisor and enable the checkboxes as shown below. 
Farm Location Change the label of the Location to Farm Location and enable the checkboxes as shown below. 
Chicks Placed Date Configure the field as shown below: 
Chicks Placed Quantity Configure the field as shown below: 
Branch Code Configure the field as shown below: 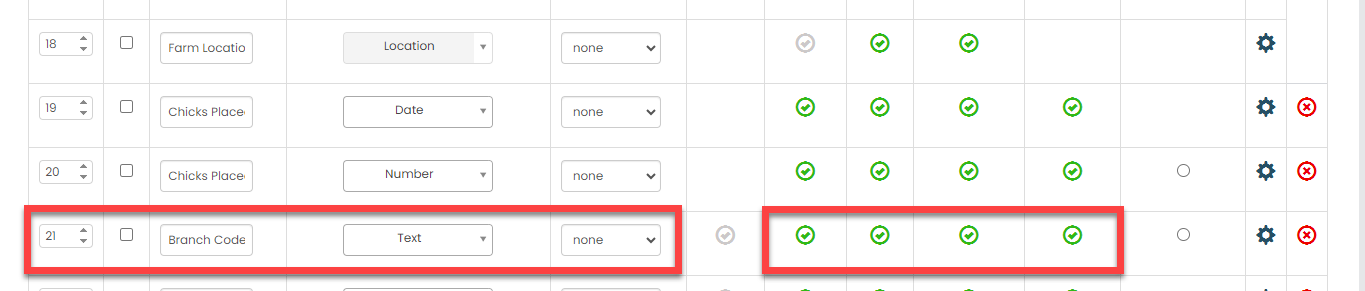
Branch Name Configure the field as shown below: 
Line Process type Configure the field as shown below: 
Chicks Capacity Configure the field as shown below: 
Branch Office Configure the field as shown below: 
Today Mortality Configure the field as shown below: 
Last Cumulative Mortality Configure the field as shown below: 
Today Cumulative Mortality Make this field as Computed. The field configuration is shown below: 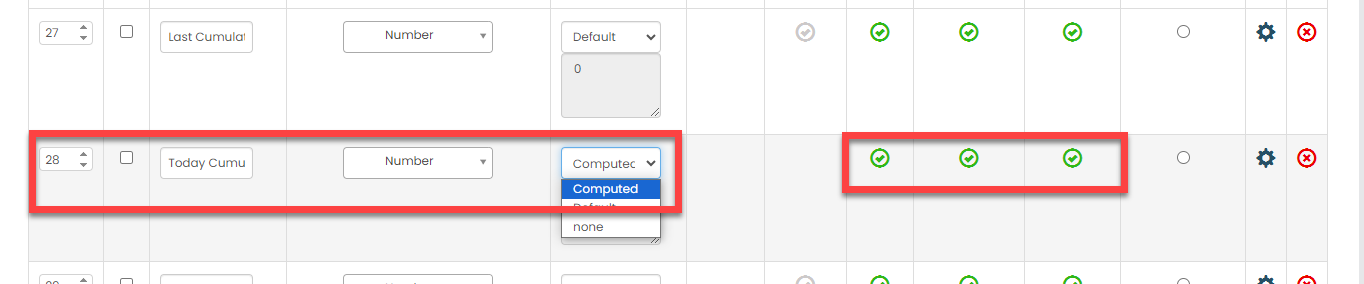
Click on the grey box and configure as shown below to calculate the total cumulative mortality automatically:
Last Balanced Birds Configure the field as shown below: 
Today Balanced Birds Make this field as Computed. The field configuration is shown below: 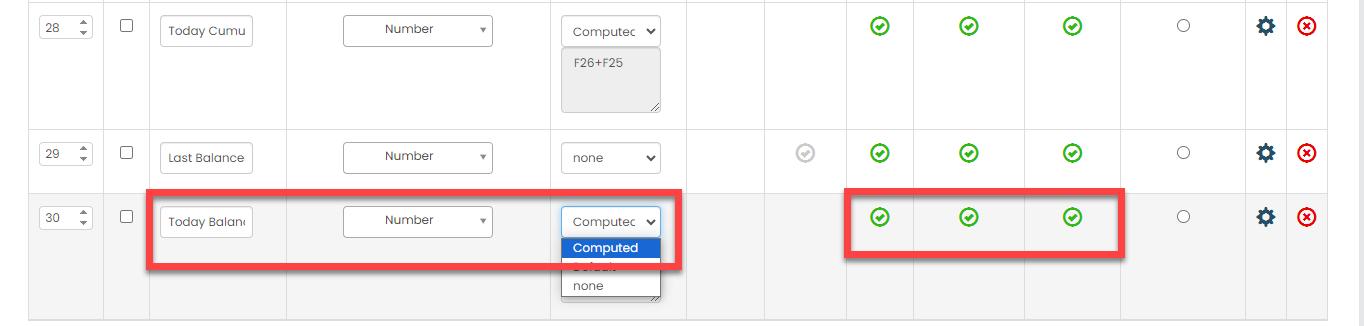
Click on the grey box and configure as shown below to calculate the total today balanced birds automatically:
- Once you configure all the fields, click Save.
Configure Work Flow
In this section, we will define the workflow, which outlines the sequence of activities defined earlier. This process includes specifying the start activity, end activity, subsequent activities, and more. To know more about the Flow, refer to the Manage Flow documentation.
Follow the instructions below to configure flow:
- On the process page, click Manage Flow. Alternatively, go to .
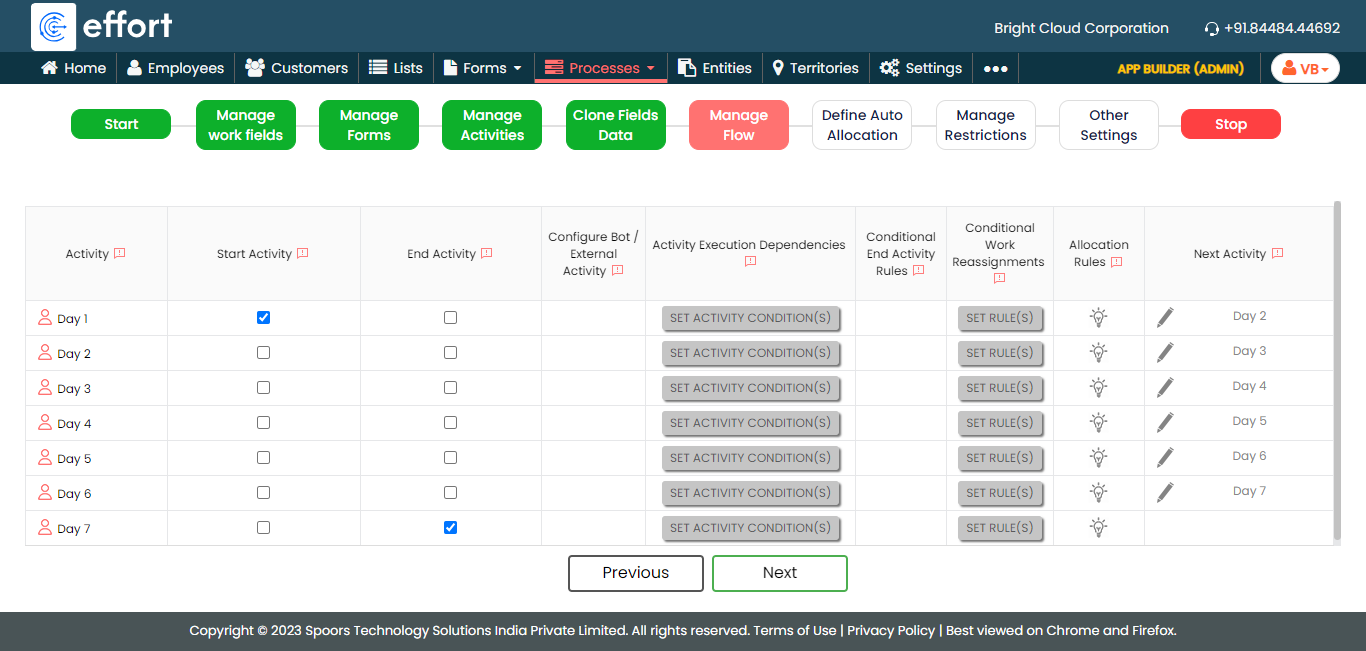
-
For the Day 1 activity, do the
following:
-
Make sure that the Day 1 activity as
Start Activity as shown
below.
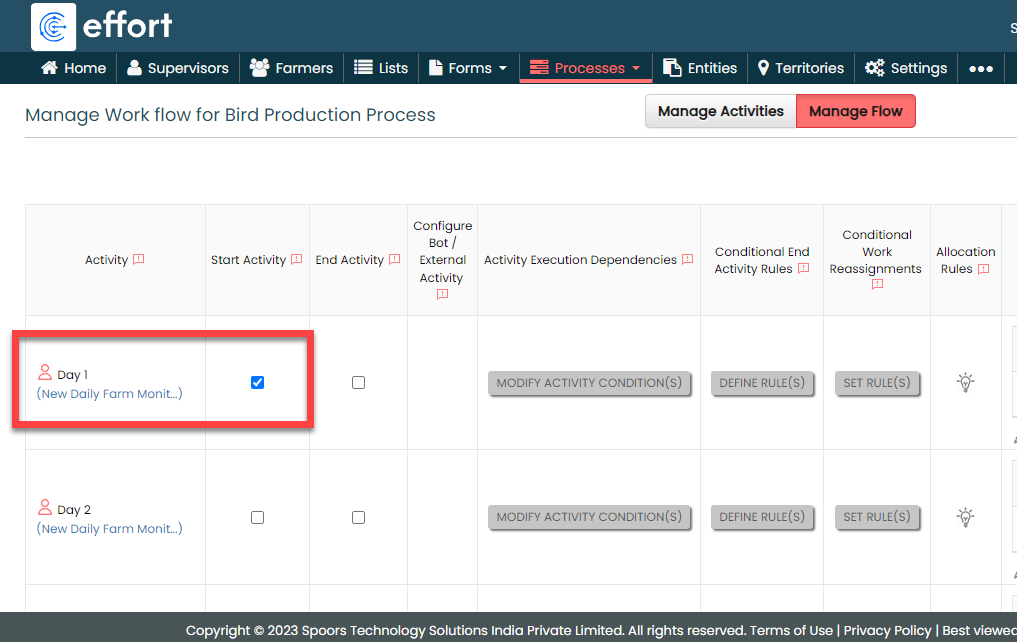
When you make an activity as the start activity, it means that supervisors have to do this activity first.
-
Under the Next Activity column, make
sure that the Day 2 is configured as
next activity.
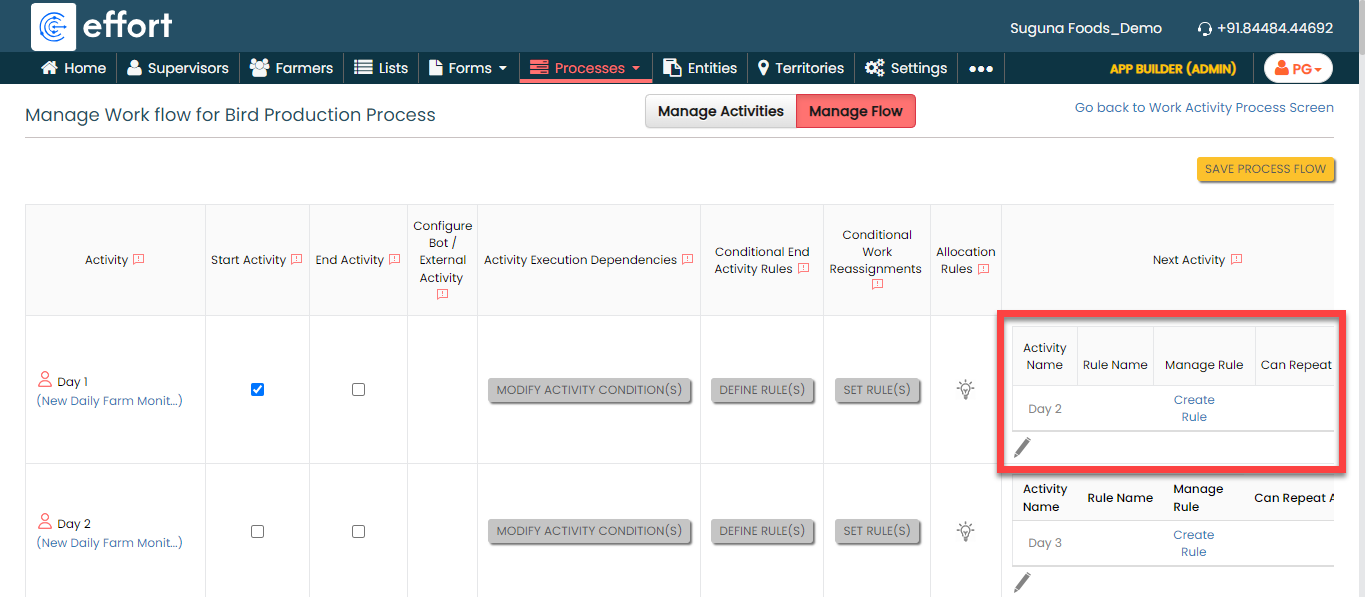
-
If Day 2 is not configured as next
activity, click the pencil icon, select Day
2, click the right arrow, and then click
Save.

-
Under the Activity Execution
Dependencies column, click Set
Activity Conditions.

-
On the Add Restriction pop-up
window, click the Add Advanced Date
Criteria button and define the configuration
as shown below.
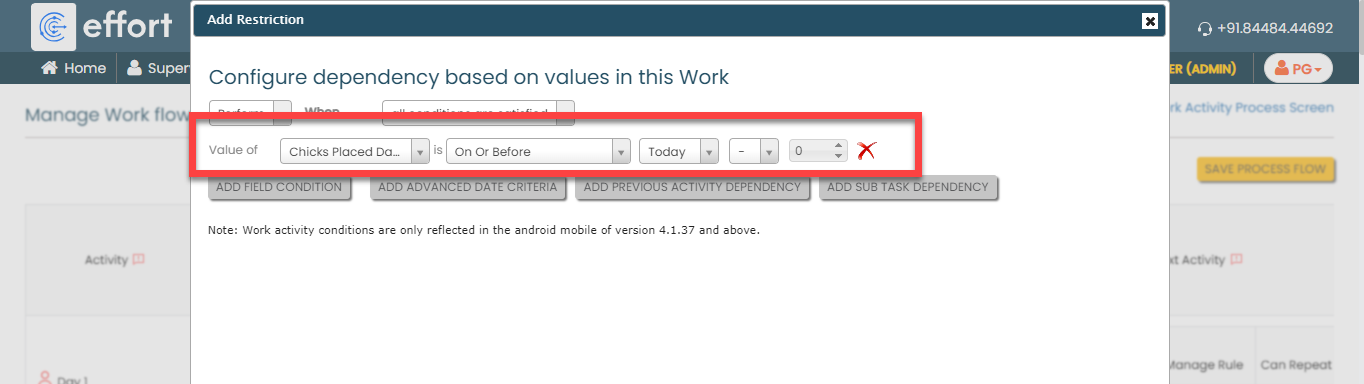
In the above condition, we have defined the initial value as "0". For the subsequent consecutive days, such as Day 2, Day 3, Day 4, and so forth, the value increments by 1 each day, so it becomes 1, 2, 3, and so on. When you configure the next activities, ensure to define the correct value.
According to this configuration, the supervisors can perform the Day 1 activity if the date of chick placement falls on the current day.
-
Make sure that the Day 1 activity as
Start Activity as shown
below.
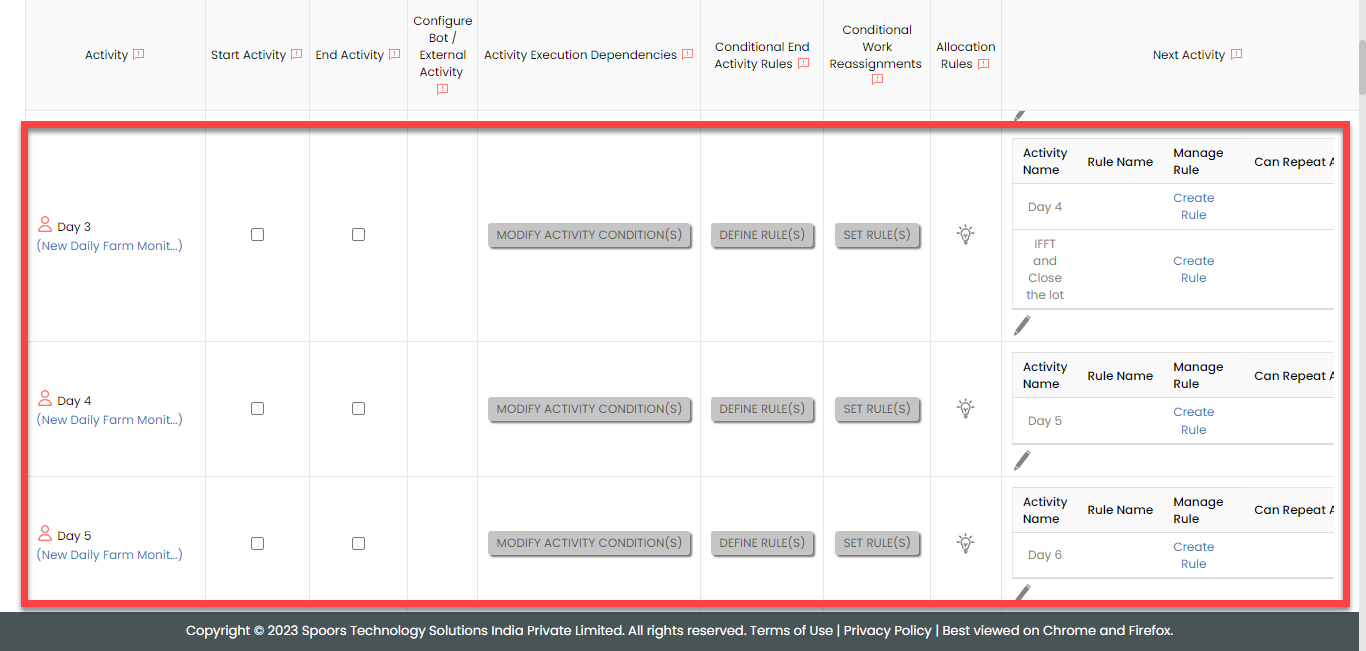
-
For the Day 2 activity, follow the same
steps that we followed for Day 1 to configure
Day 3 as next activity and define the
same condition for Activity Execution
Dependencies.

-
Similarly, configure the next activities for all the activities as
the next consecutive days and define the same condition for
Activity Execution Dependencies.
-
Make the IFFT and Close the Lot as end
activity.
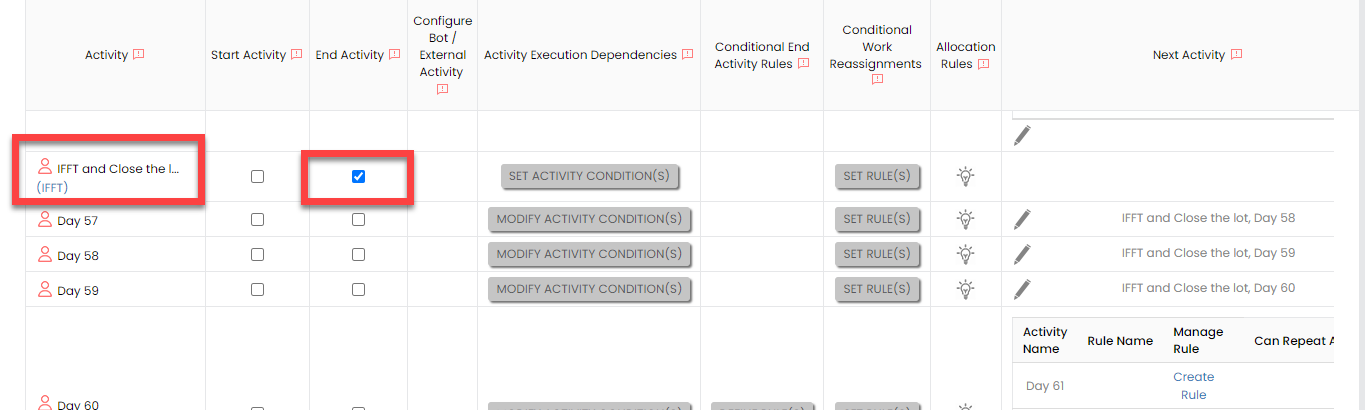
-
Configure the IFFT and Close the Lot
activity as the next activity wherever required. The supervisors
executes this activity when the birds are ready to lift from the
farm and sell out. The process will be completed as we configured
this as end activity.

Configure Auto Fill
In this section, we will define the auto fill configuration that enables us to auto copy data from work fields to activity form fields. It reduces the errors and effort required to fill out the form. To know more about Auto Fill, refer to Auto Fill.
Follow the steps below to define the configuration.
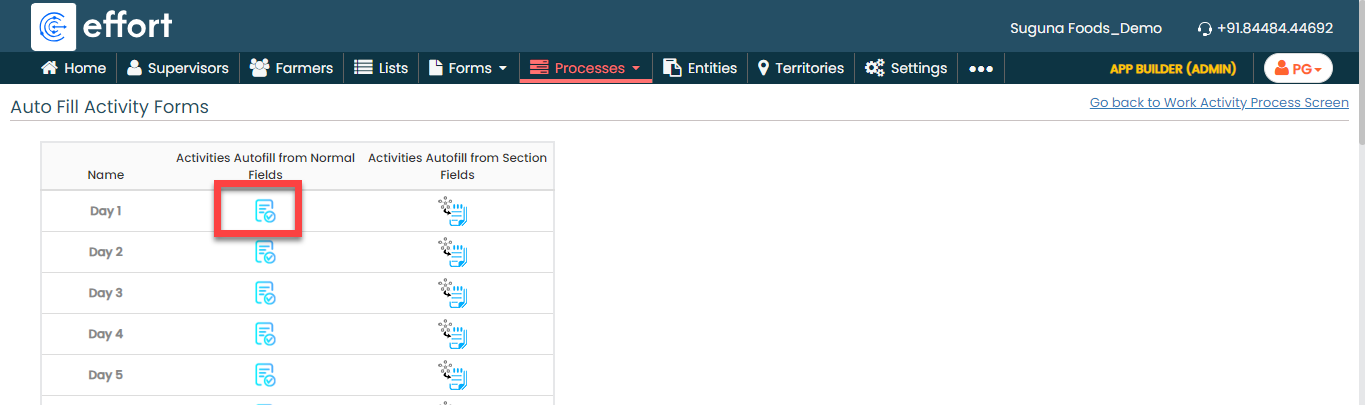
-
On the process page, click Auto Fill Activity
Forms. Alternatively, go to .

-
For the Day 1 activity, click the auto fill
icon under the Activities Autofill from Normal
Fields column.
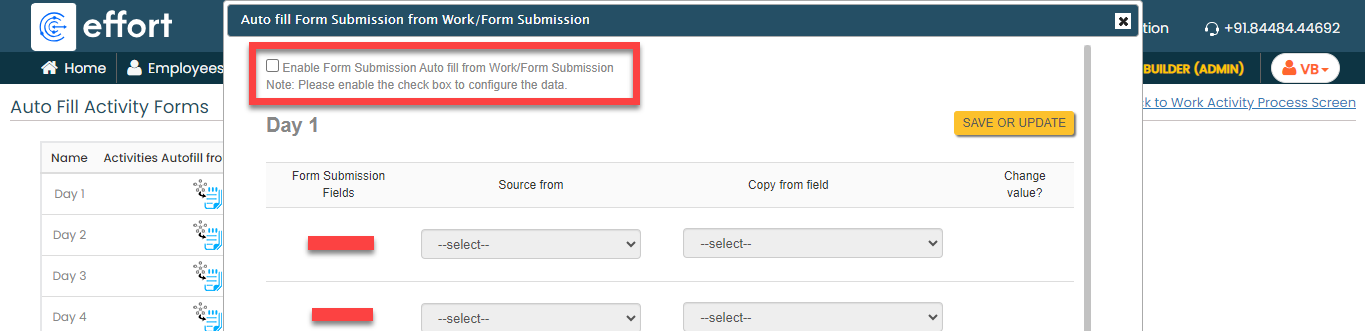
-
Check the Enable Form Submission Auto Fill from
Work/Form Submission checkbox.
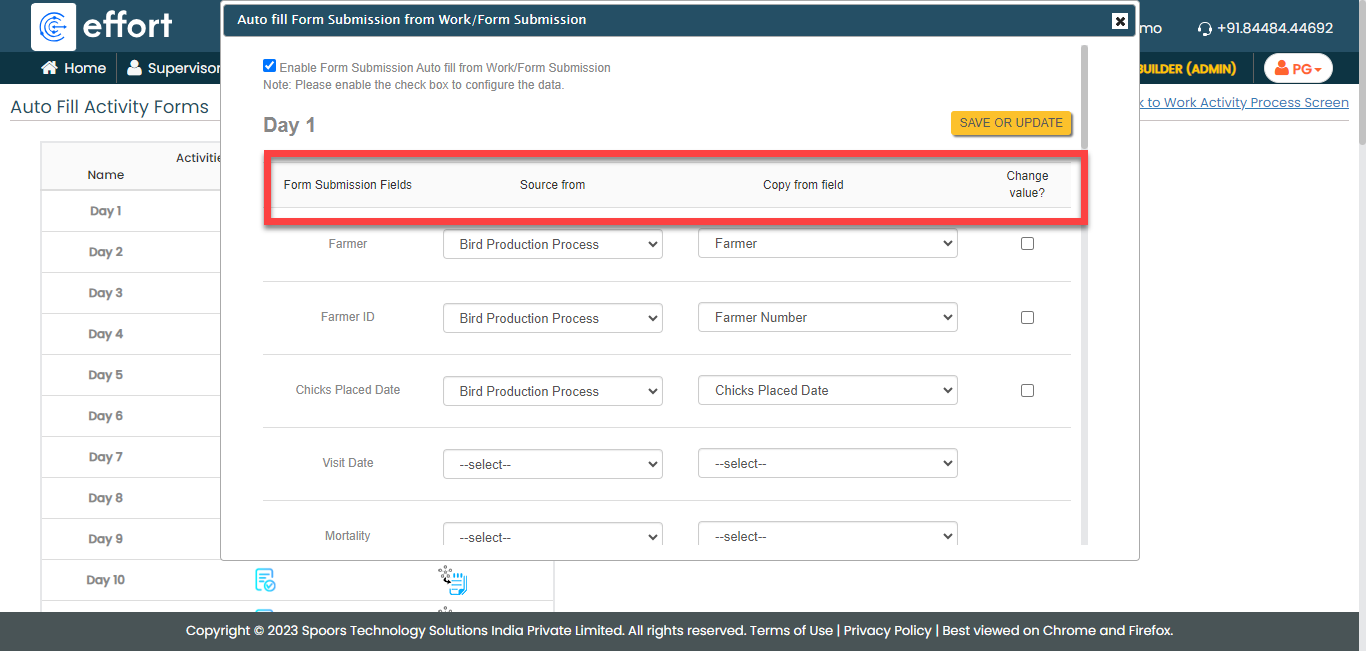
-
The fields under the Form Submission Fields are fields of the
New Daily Farm Monitoring form that we
configured for the Day 1 activity. Under the
Source From column, you can find the
process and its activities. If you select the process from the
dropdown, you can see the work fields under the Copy from
field column. If you select an activity from the
dropdown, you can see the form fields under the Copy from
field column.
-
Under the Source from and Copy
from field columns, configure the fields as shown
below.
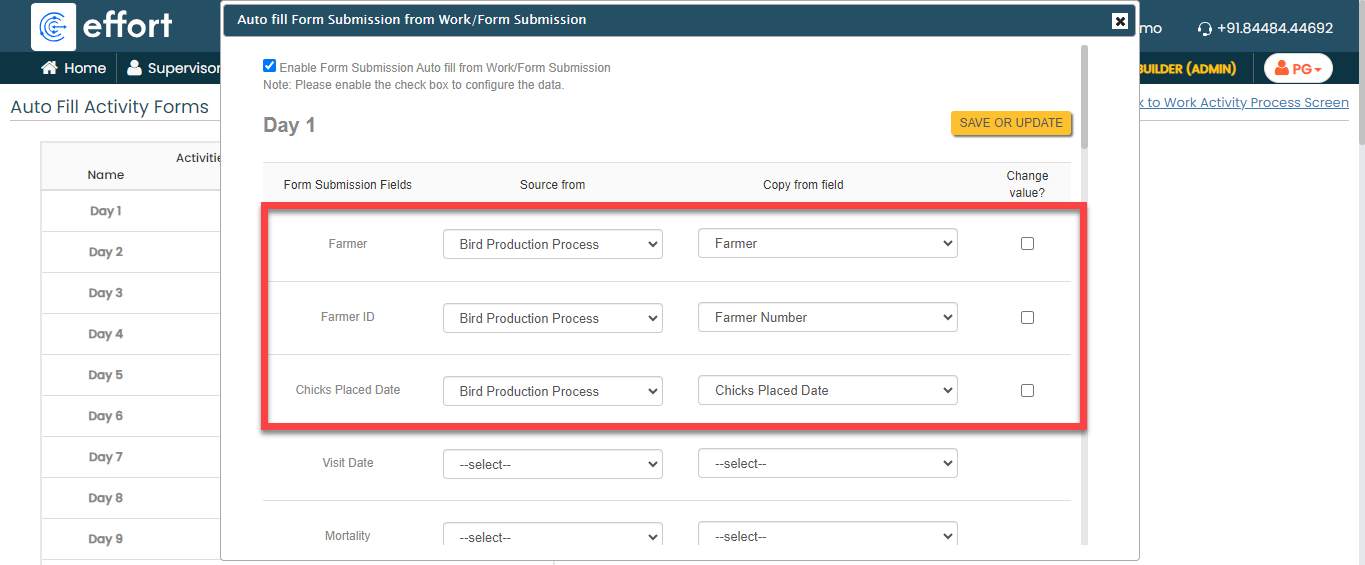

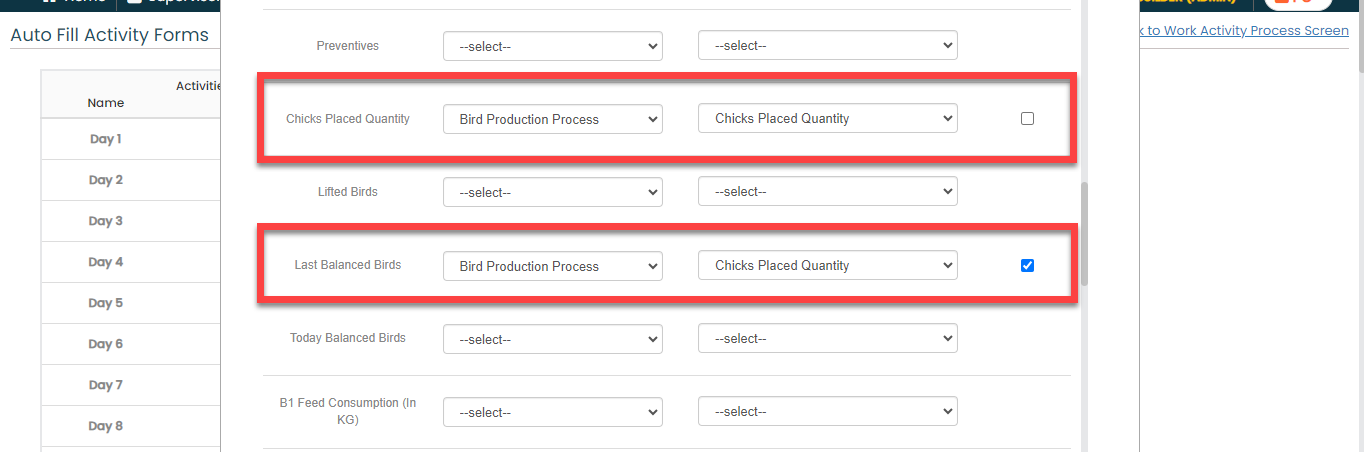
As per this configuration, the value entered in the Farmer work field will be auto-populated in the Farmer farm field of the Day-1 form. As you can see, we've enabled the Change value? checkbox for the Last Balanced Birds fields. This configuration enables us to modify the value that was auto populated from the work fields.
- Click Save or Update.
-
Similarly, configure the auto fill for the Day
2 activity. Copy the Last Cumulative
Mortality and Last Balanced
Birds for Day 2 activity from
the Day 1 as shown below.


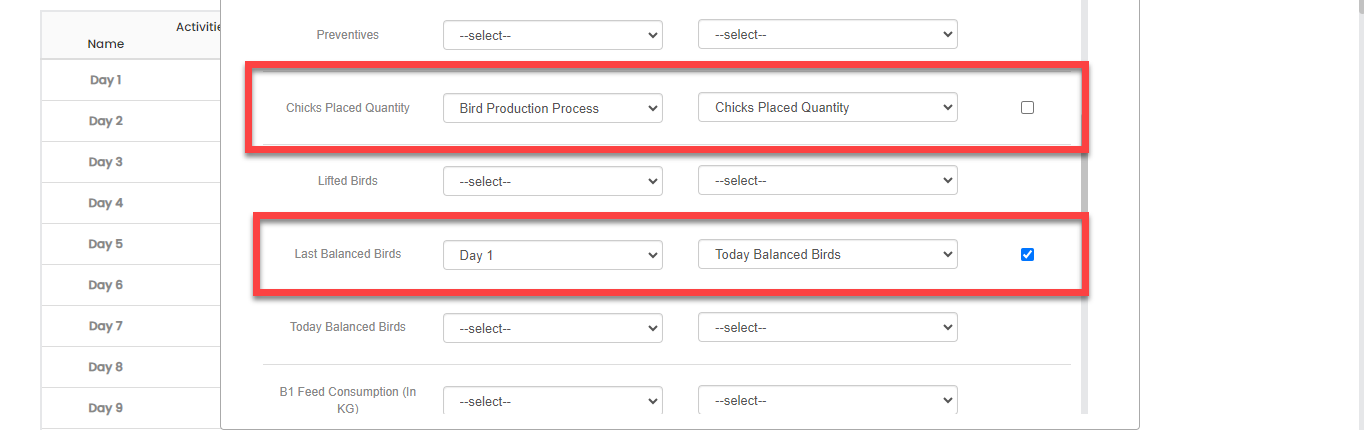
- Similarly, configure the auto fill for all the activities. Copy the Last Cumulative Mortality and Last Balanced Birds from the previous day as we did for Day 2.
Execute Bird Production Process
In this section, we will show you how to execute the Bird Production Process in the Effort Platform. It provides the activities performed by the admins and supervisors, such as creating Bird Production Process works, logging into the effort, executing Bird Production Process in the mobile app, and so on. Let's get started.
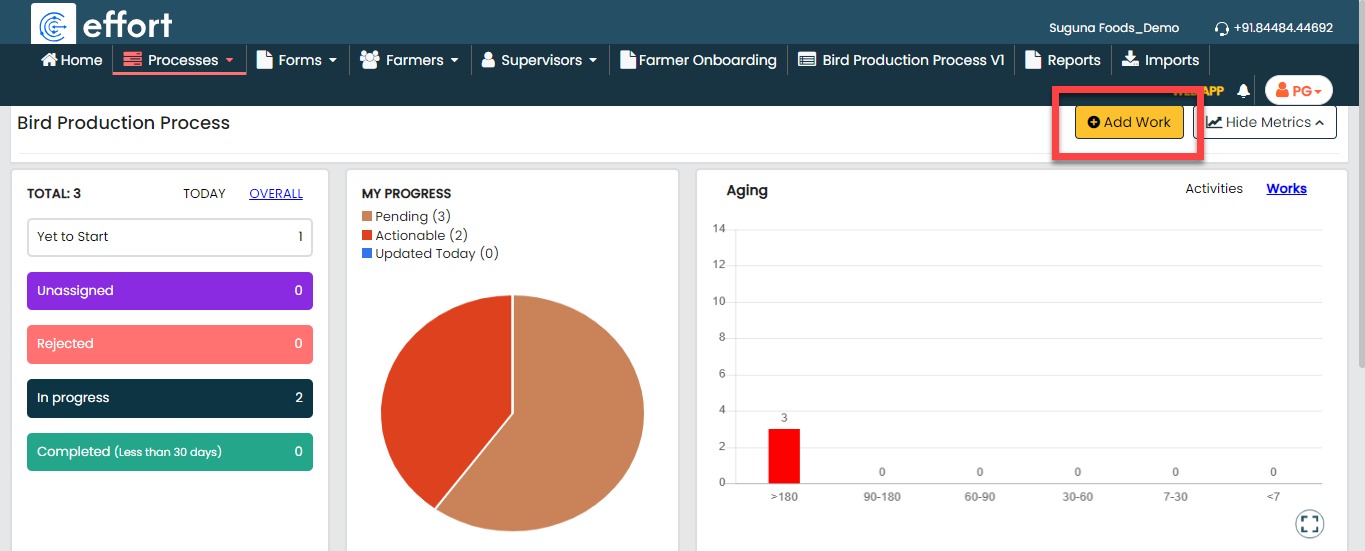
Create a Bird Production Process
When a farmer receives a new batch of birds, the bird production process work is initiated. Follow the steps outlined below to create a work order in the effort platform.
-
Go to .
-
Under the Basic Details section, fill in the
mandatory fields.

-
Under the Assign A Work section, assign it to a
supervisor.

- Click Save.
Login to Effort NXT Mobile App
To begin with Bird Production Process, we require an application through which we can log in, check the works assigned, and perform tasks. This section provides instructions to get started with the Effort NXT mobile app.
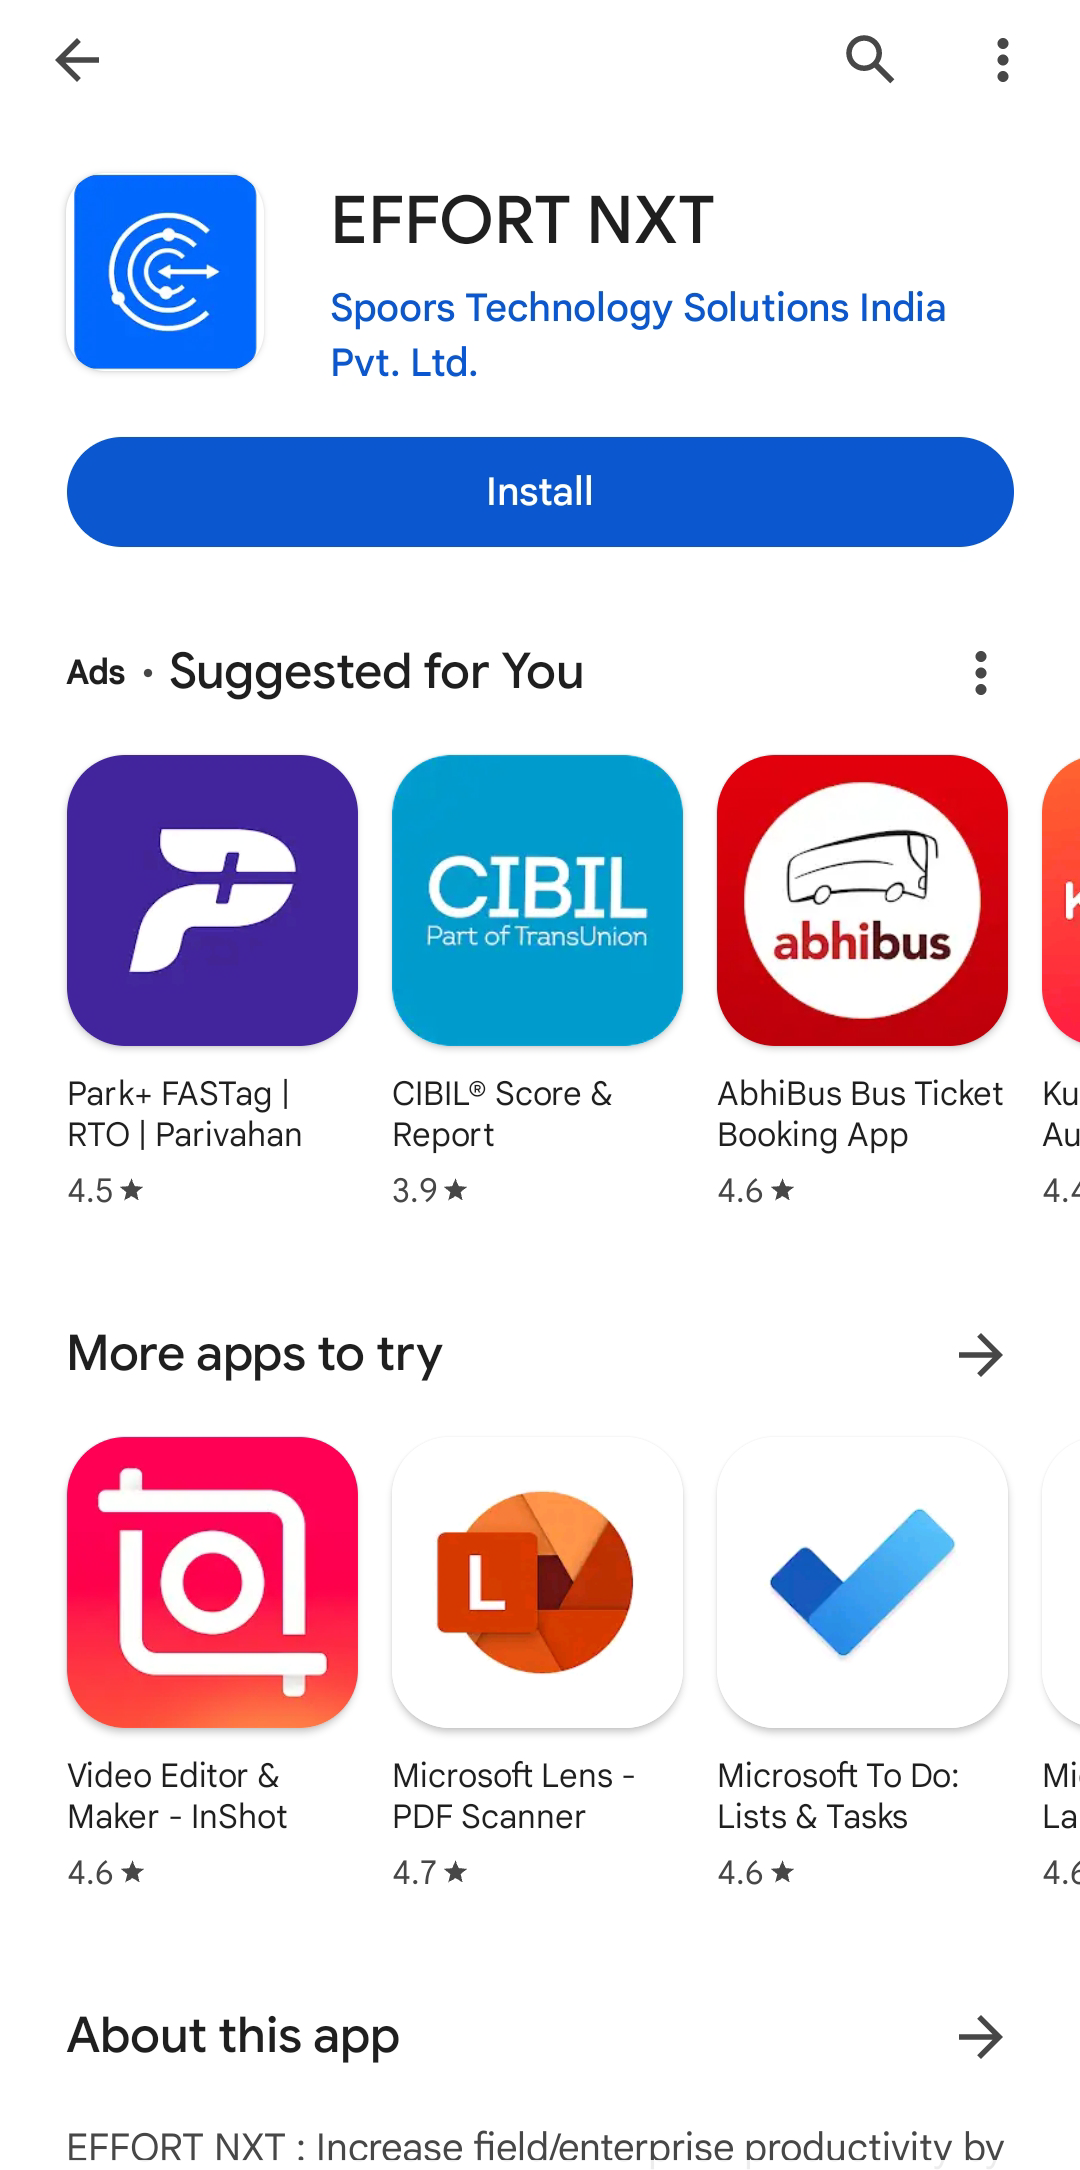
-
On your mobile phone, open either the Play Store or App Store and
install the Effort NXT app.
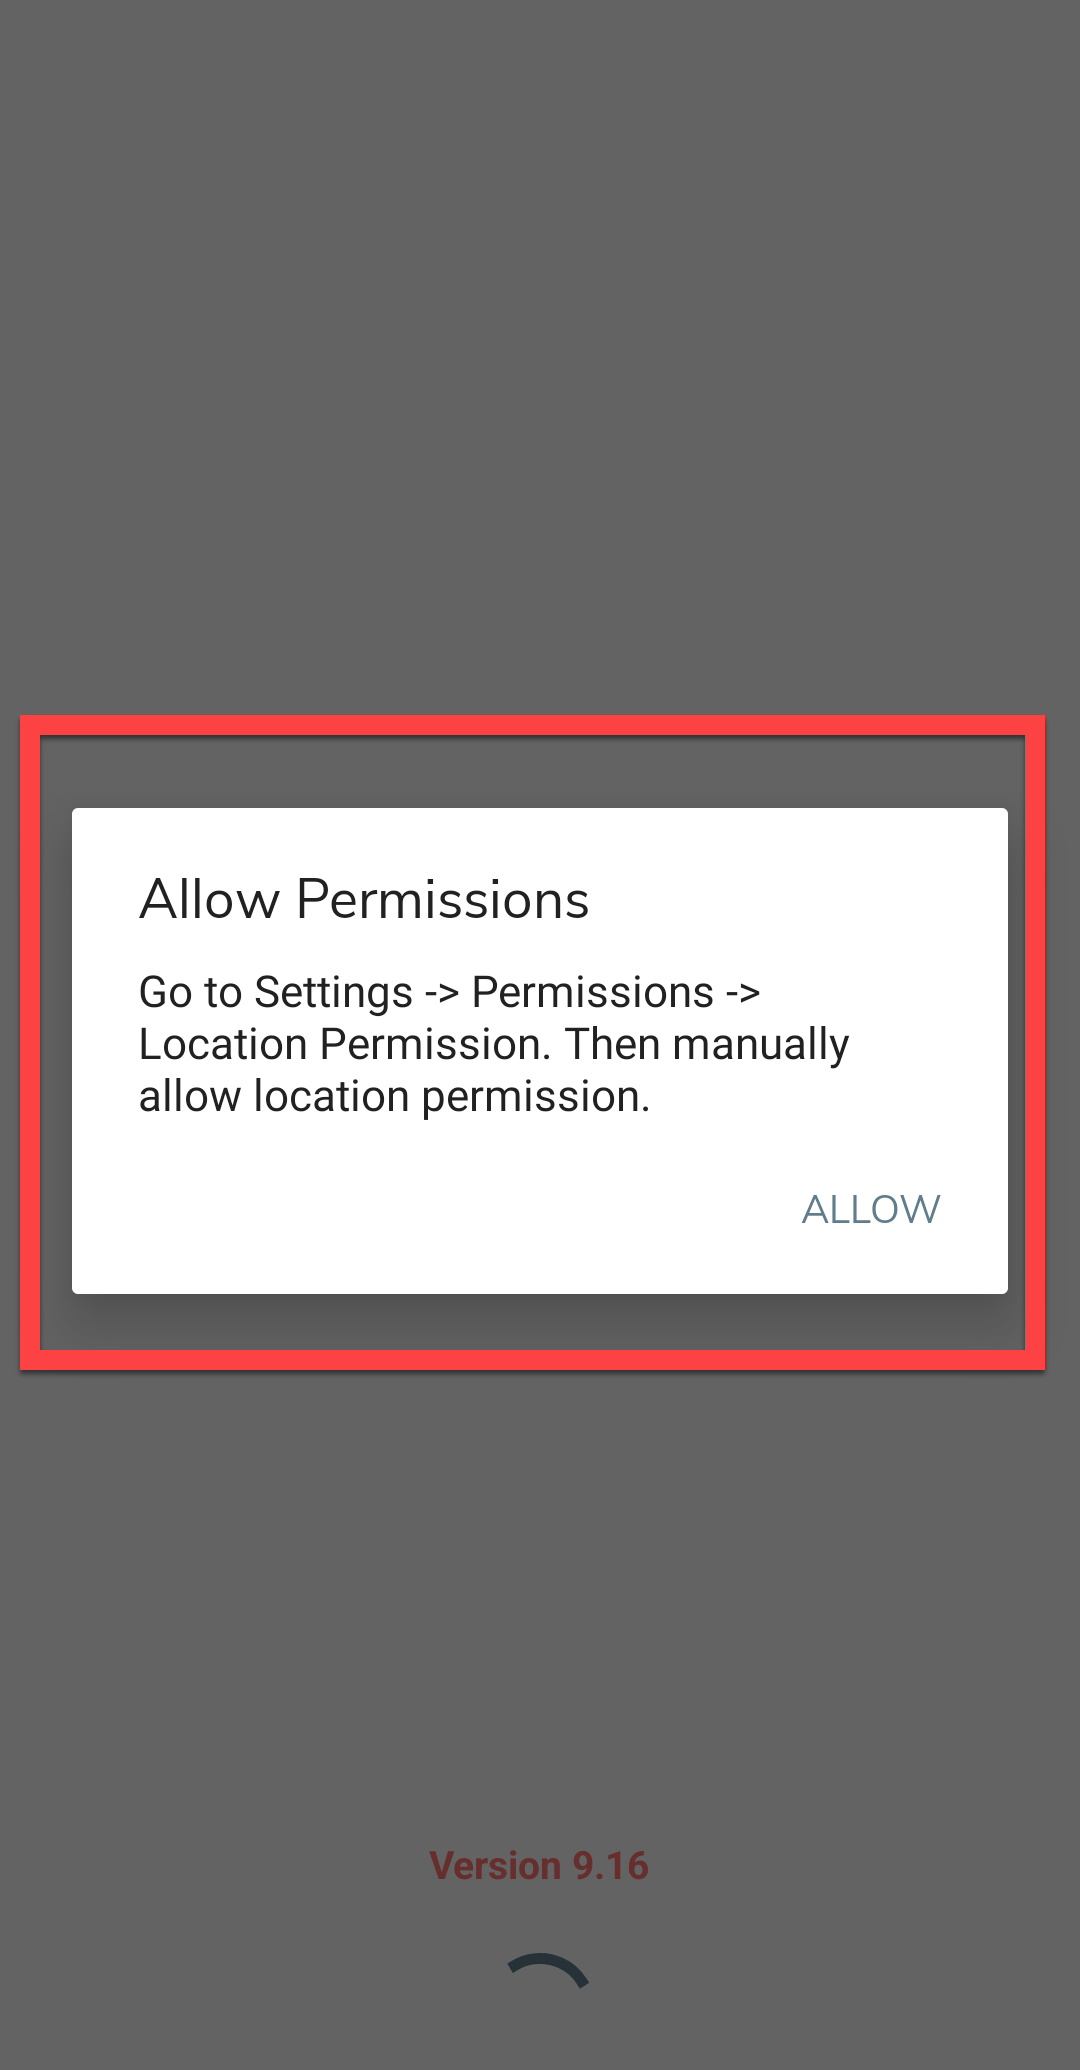
Note: To know more about how to install the app, refer to Install EFFORT NXT App. -
Once the download is completed, open the app and grant all the required
permissions.
-
Login to the Effort app using your registered mobile number.

Note: To register using your registered mobile number, refer to Log in to Mobile App Using Phone.Note: To register using your email and password, refer to Log in to Mobile App Using Email -
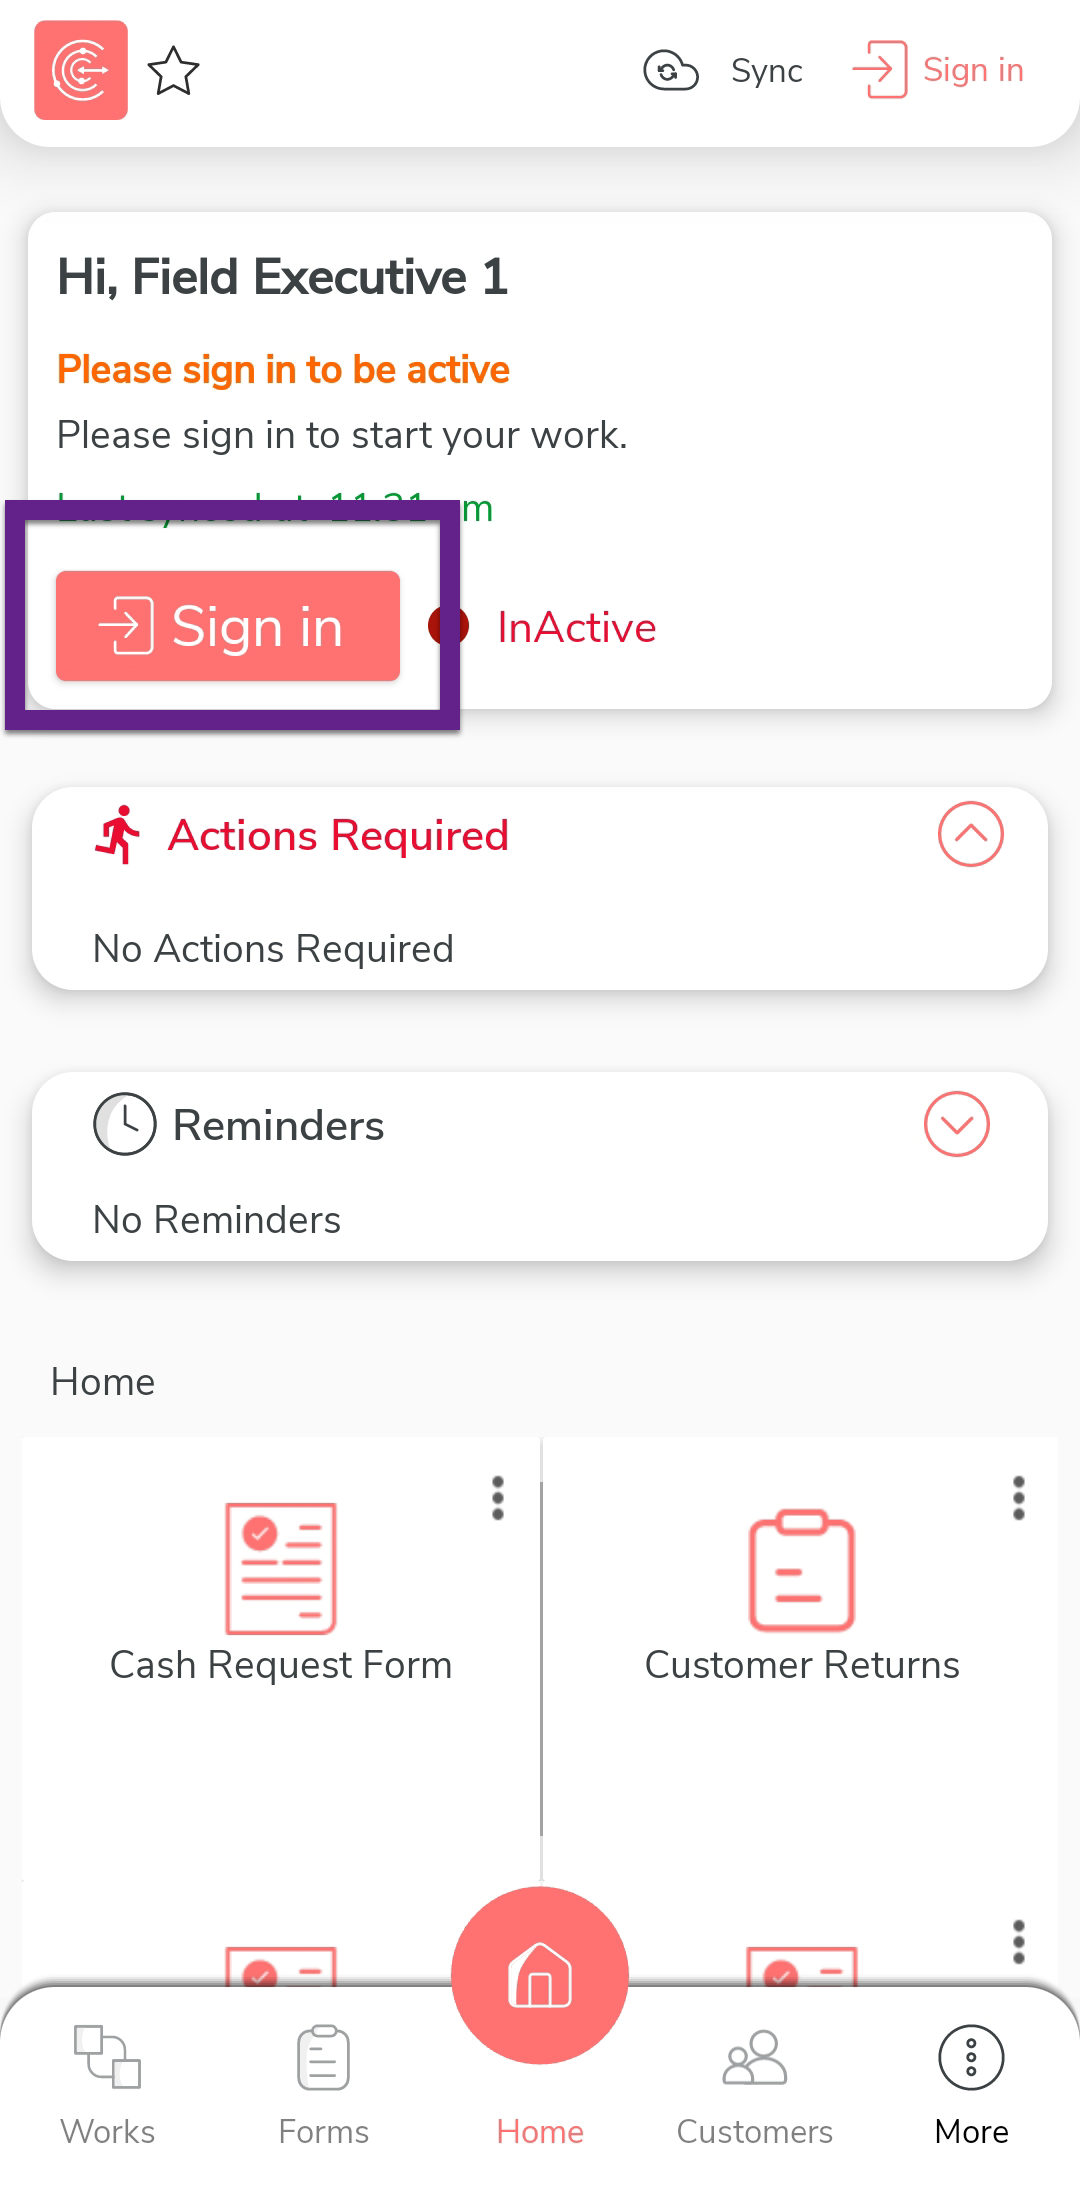
After you log in to the mobile app, tap Sign in
to mark that you have started working.
-
The mobile captures your face and your current location. On this
screen, ensure your face and location are captured correctly, and then
tap Sign In.

-
Once you complete Sign In, tap
Sync to sync the data with the server.

Note: Make sure to Sync the mobile app every time you perform an activity to ensure that your data is updated on the server. If you fail to sync, your changes or work will not be captured in the server.
Complete Bird Production Work in the Mobile App
In this section, we will explore how a supervisors completes a work using the Effort mobile app.
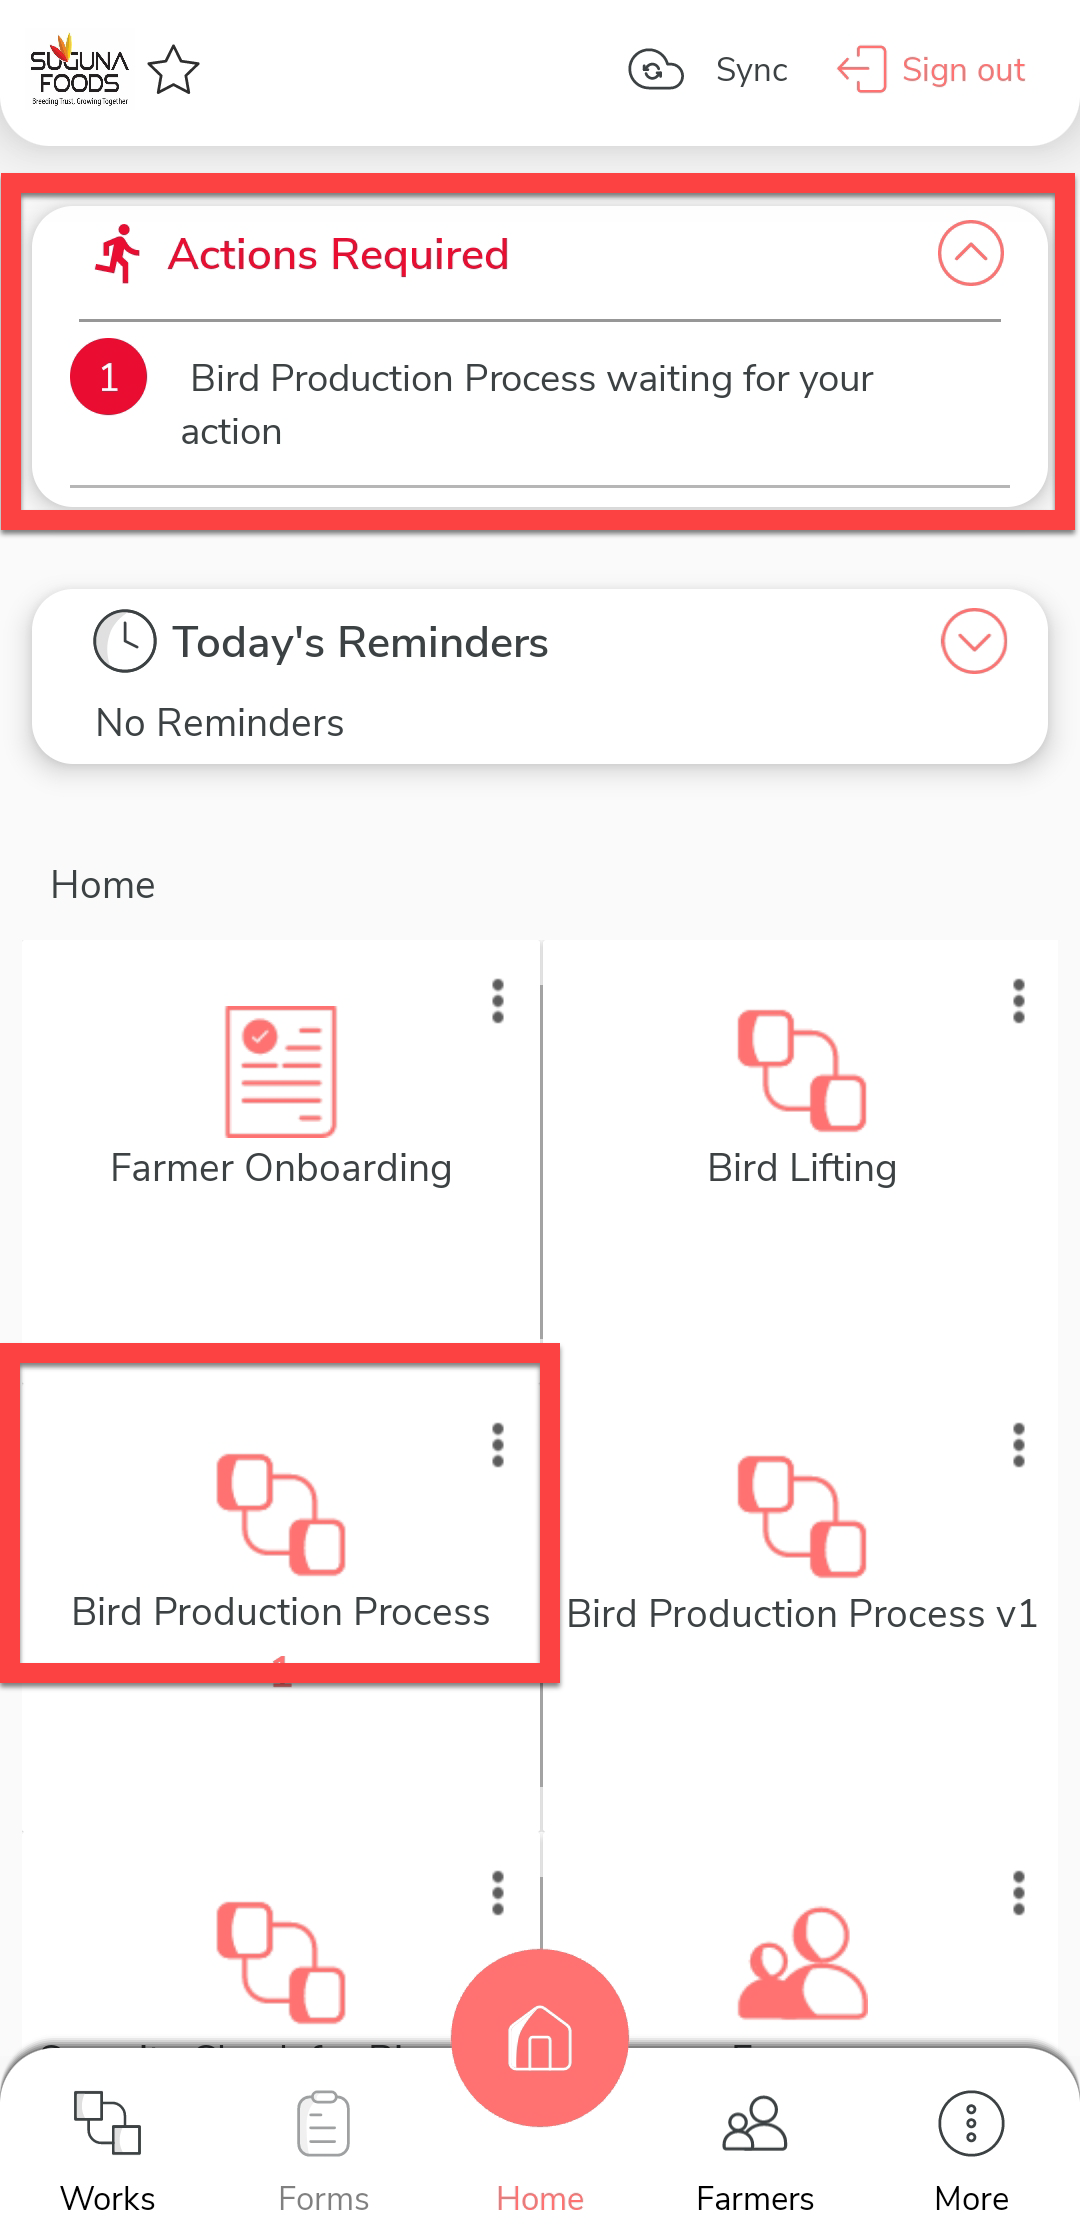
-
On the effort mobile app home screen, tap on the action item under the
Actions Required section. Alternatively, you
can tap the Bird Production Process card.
-
Tap on the view map icon to view the farm location.

-
Use the navigation buttons to reach the farm.

-
Once you reach the farm, tap Check in and
Check In on the confirmation pop-up.

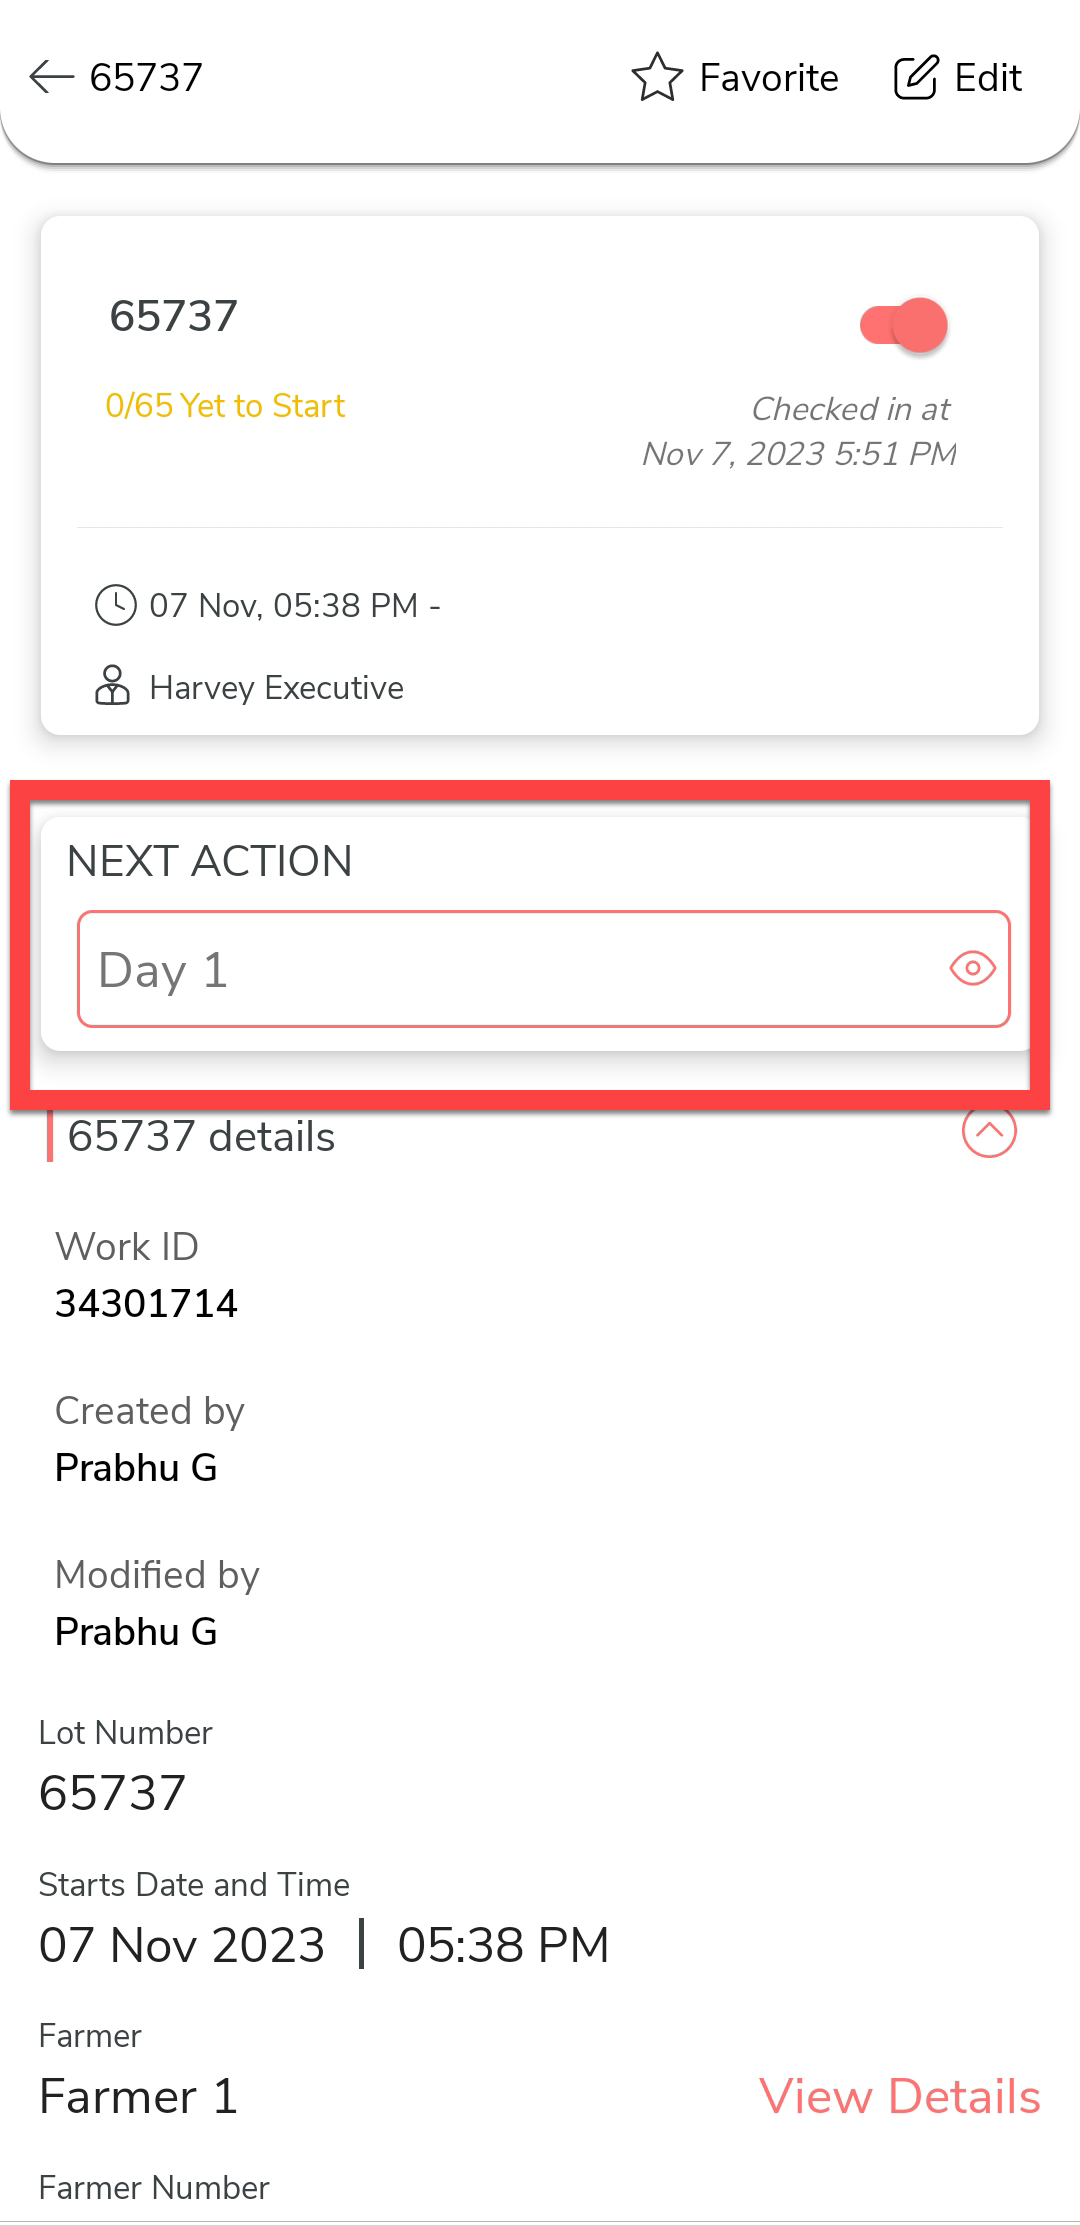
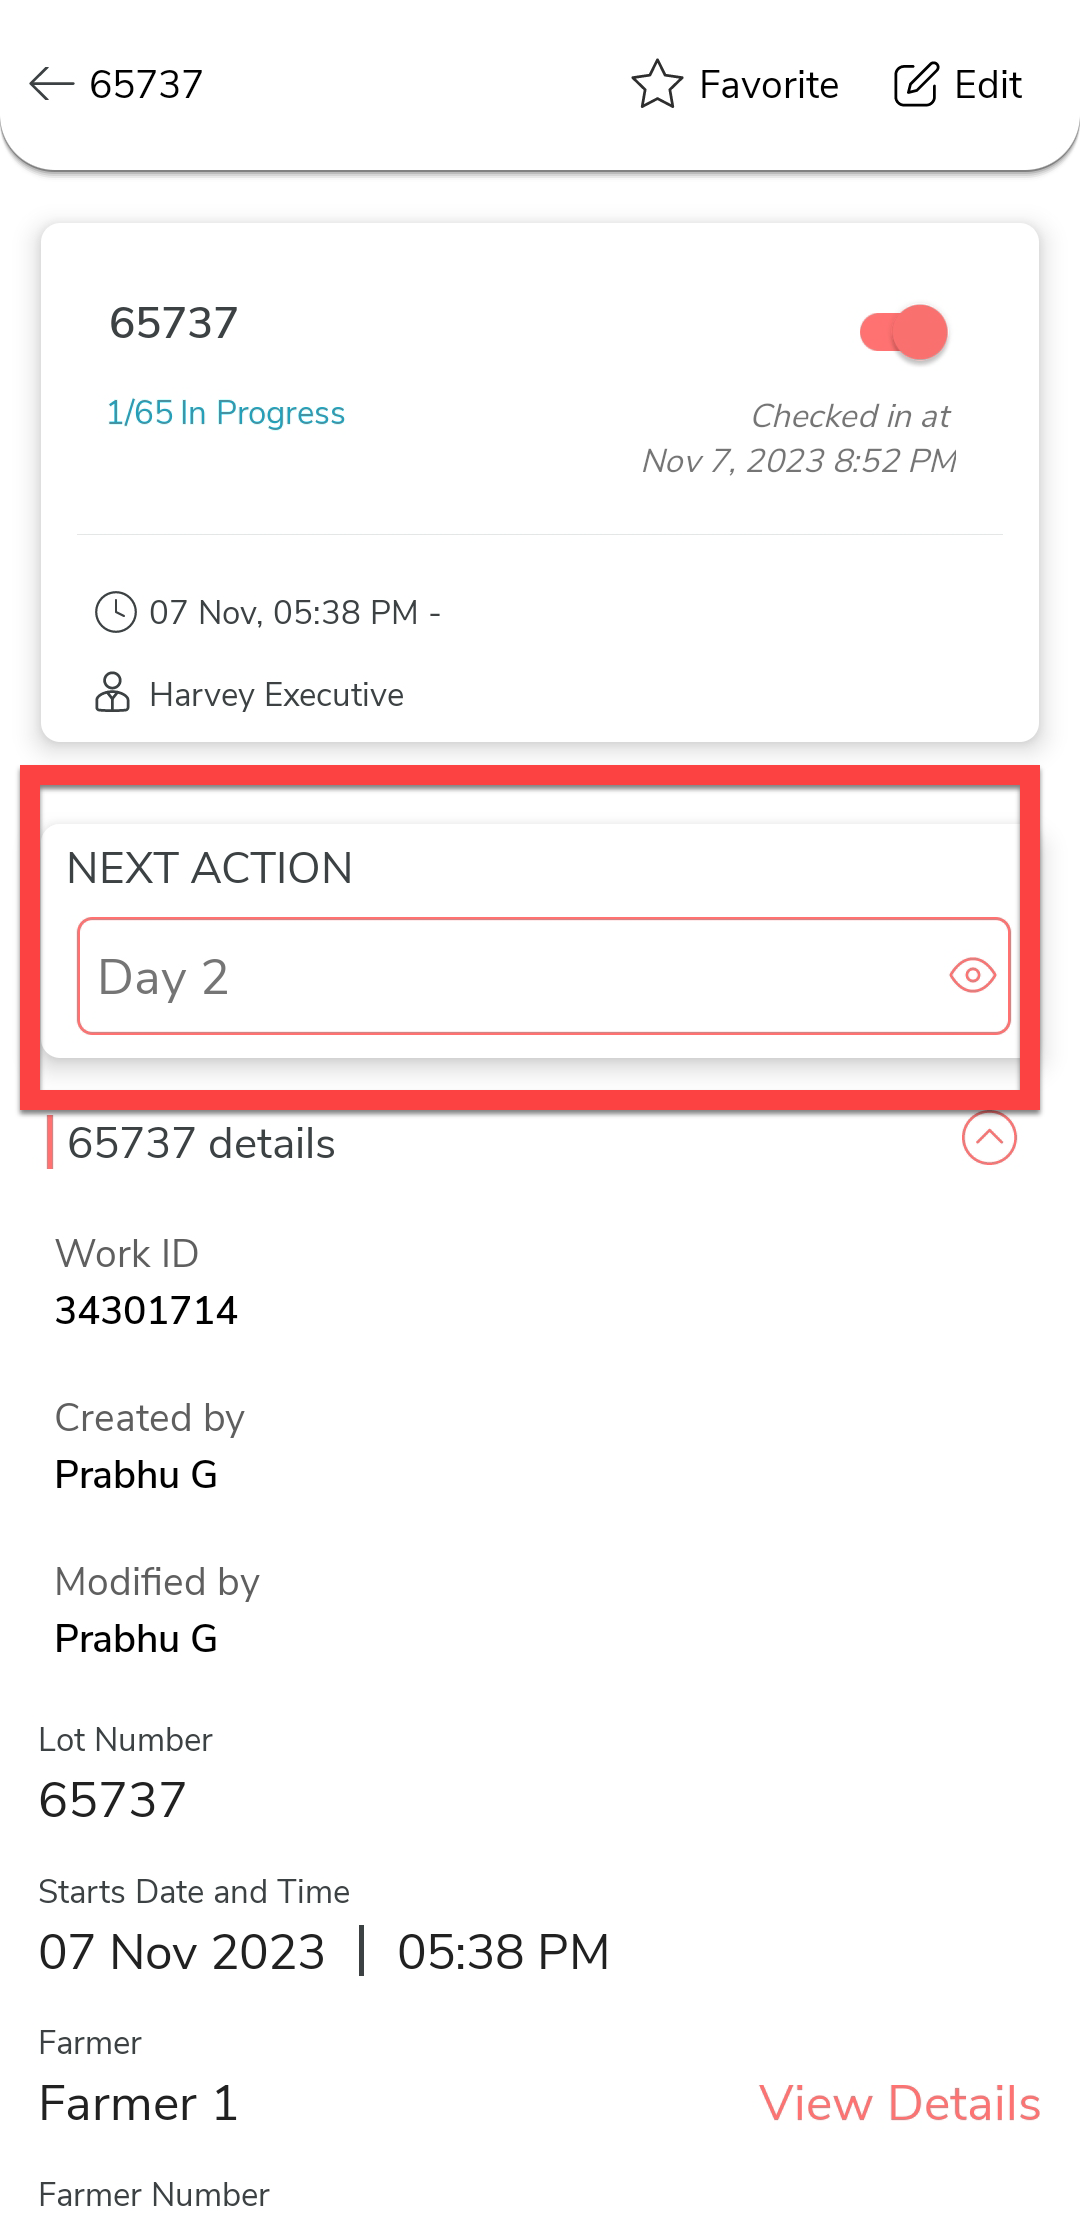
-
Under the Next Action section, tap
Day 1.
-
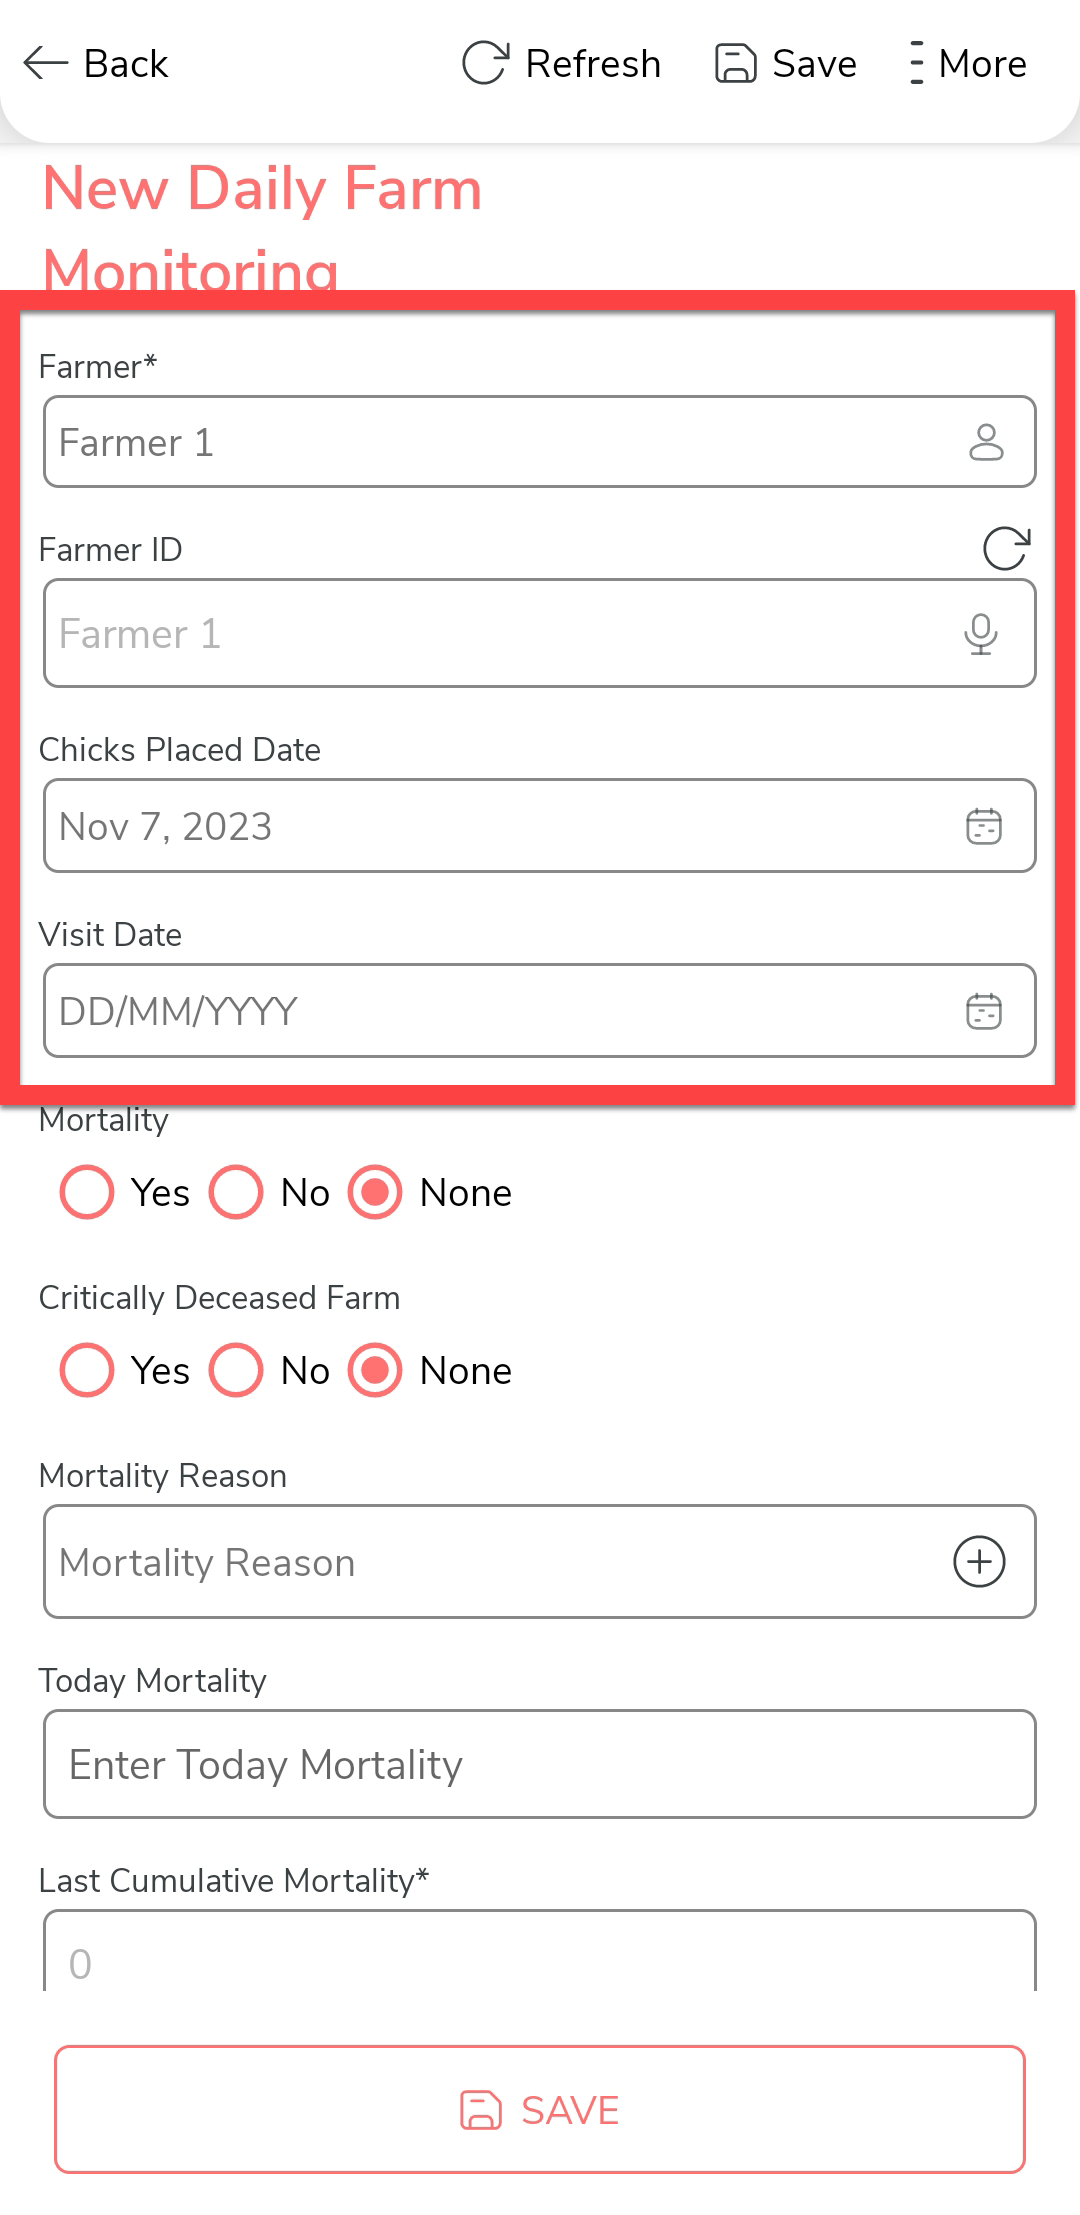
Fill in the New Farm Monitoring form. As configured, Farmer and Farmer
ID are auto copied from the work fields. Enter the visit date and
mortality.

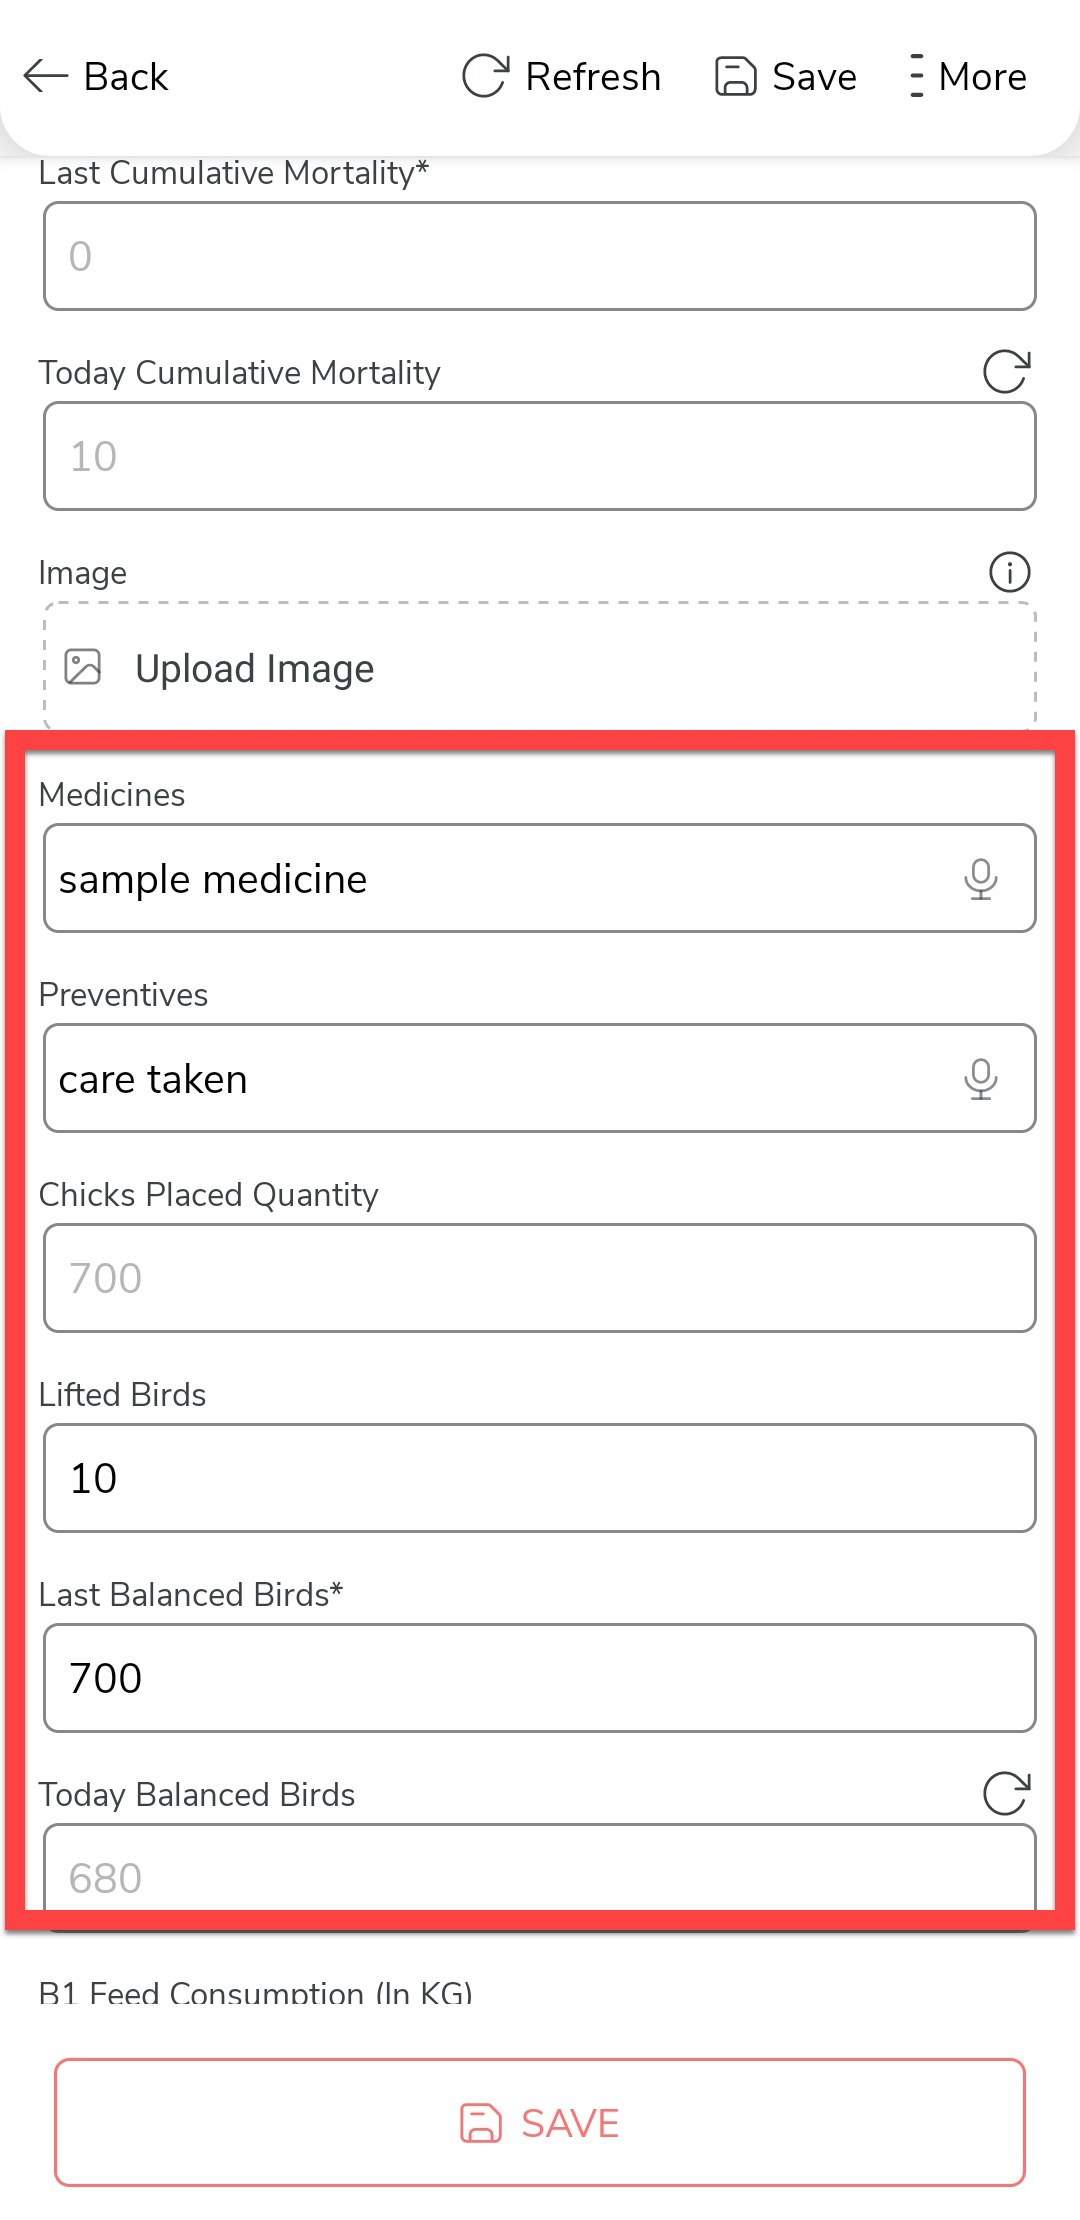
-
Enter the details such as medicines given to birds, preventives taken,
quantity of the lifted birds, and so on.
-
Enter the feed consumption details.

As configured, the total feed is calculated automatically.
-
Enter the feedstock and other details.

-
Once you fill in the data, tap Save and then tap
Save in the confirmation pop-up.

-
Once you complete the Day-1 activity, you'll see
No Next Actions under the Next
Activity section. We configured the activities in such a
way that the supervisor cannot perform the Day-2
activity on Day-1.

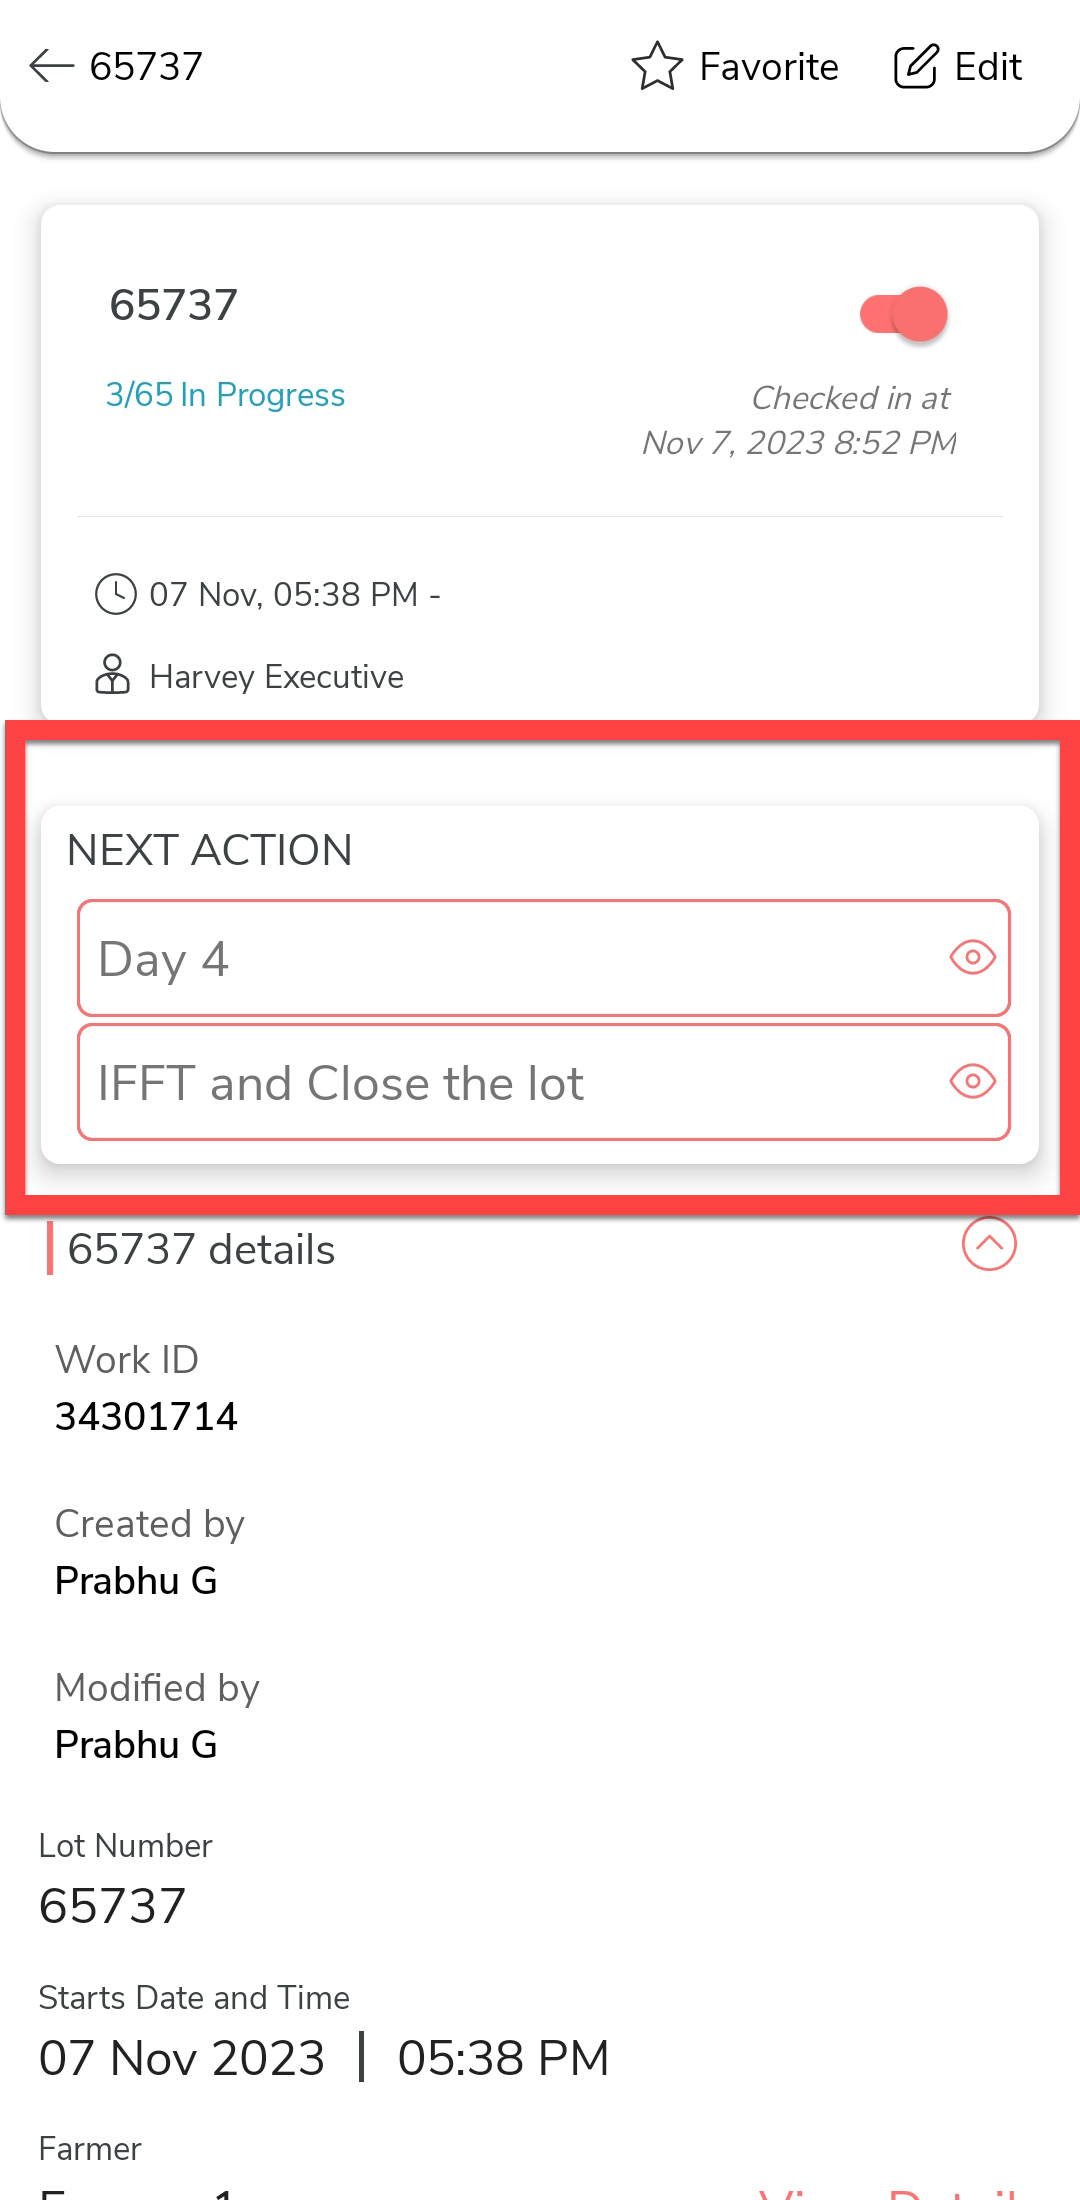
-
On Day-2, the supervisors can see the
Day-2 activity. Tap on it and fill in the new
daily farm monitoring form and save it to complete the day-2
activity.
-
On Day-3, the supervisors can see the
Day-3 activity. Tap on it and fill in the new
daily farm monitoring form and save it to complete the day-3
activity.

- Likewise, the activities will be available to execute on the same day. The supervisors cannot complete the next day's activity on the same day.
-
Once the birds are ready for lifting, you can execute the
IFFT and Close the Lot to complete the
process.
-
Fill in the IFFT form and save it to close the process.
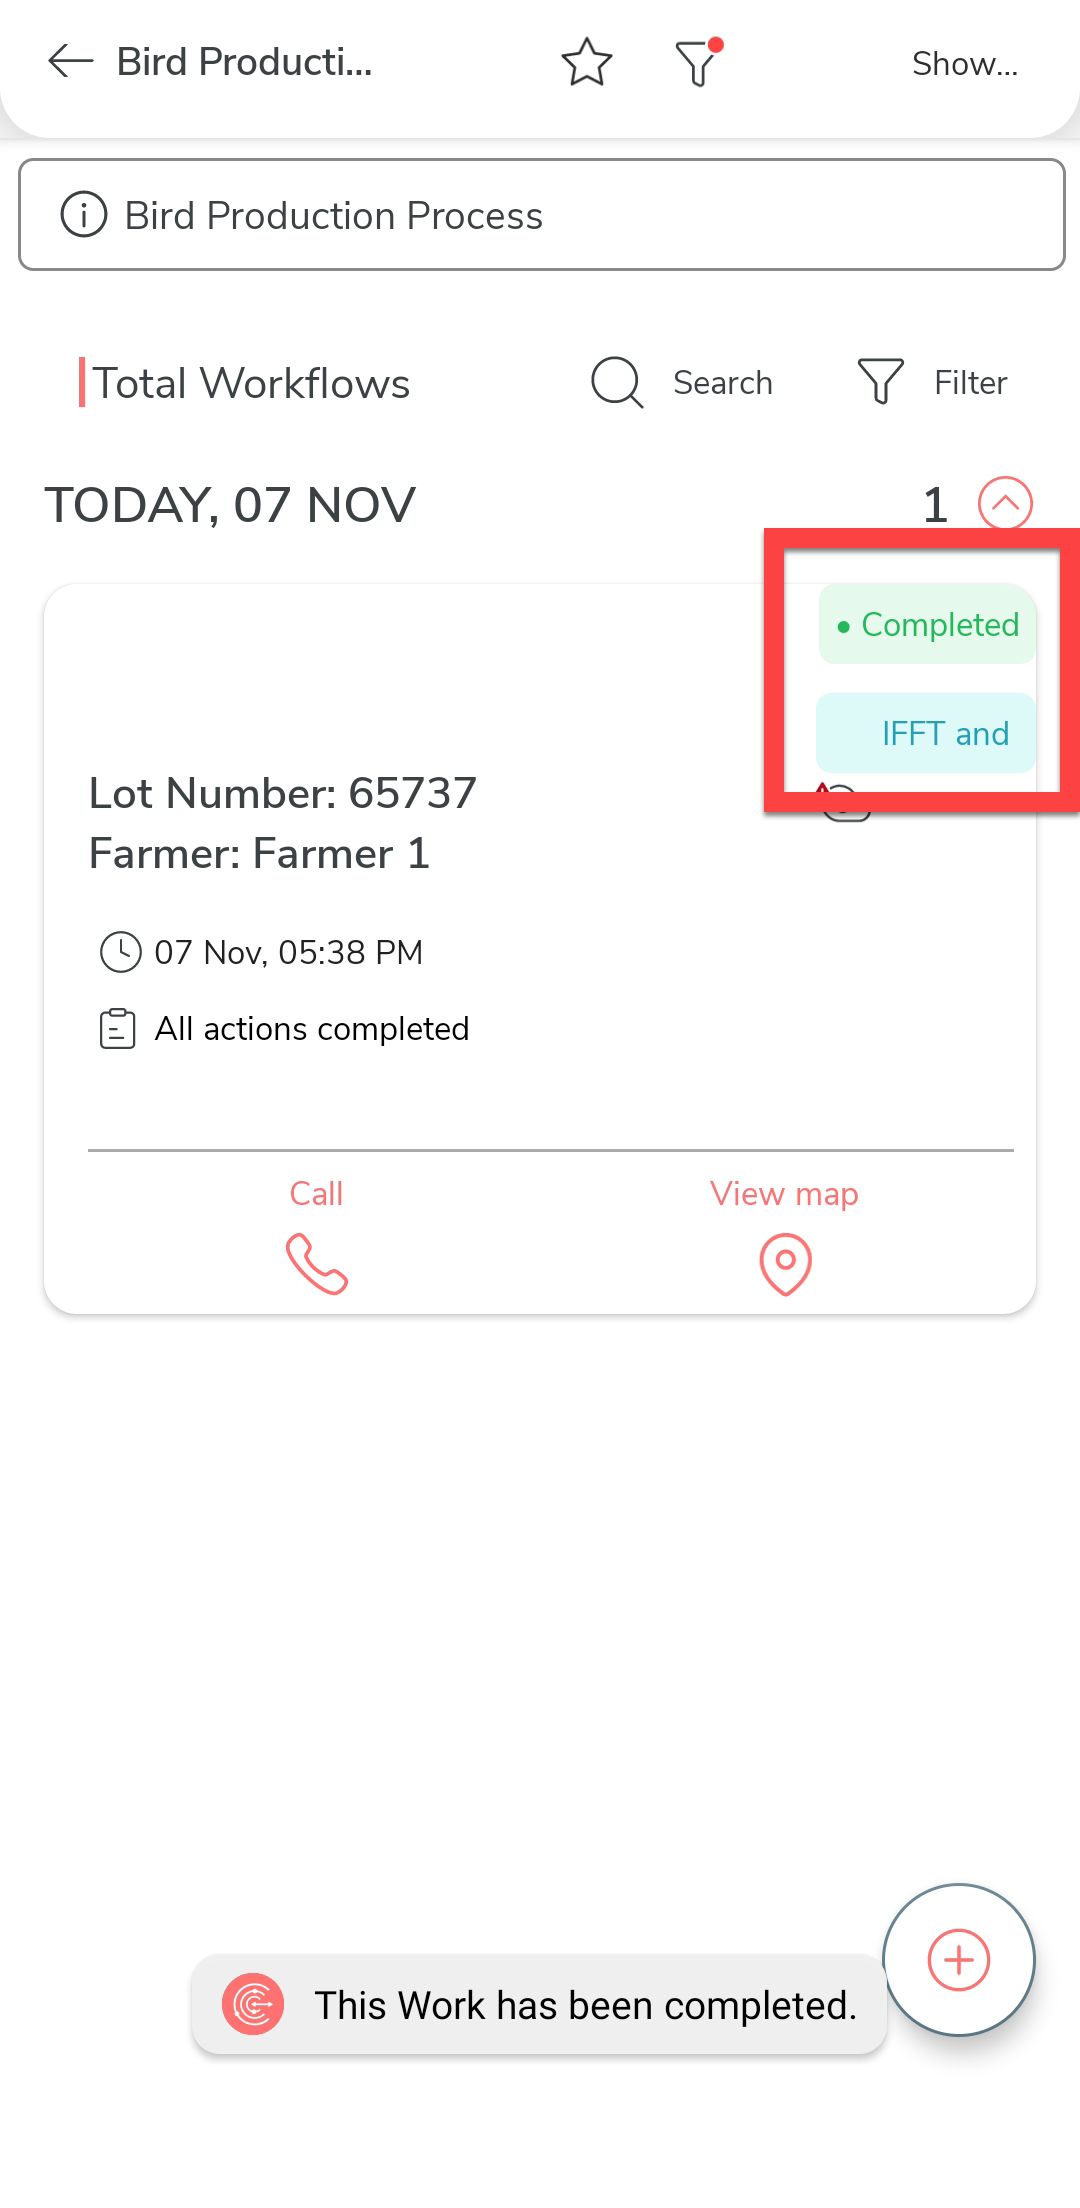
-
Once the IFFT activity is completed, the process
will be marked as Completed.