
Roadside Assistance with Effort
Introduction
Roadside assistance (RSA) is a service offered by automobile and insurance companies and service providers, designed to offer assistance and support to motorists who encounter unexpected vehicle-related issues or breakdowns while on the road. This service is particularly invaluable during emergency situations, providing drivers with peace of mind, knowing that help is just a phone call away, whether they experience a breakdown in the middle of nowhere or a simple flat tire in a suburban neighborhood. For automobile companies, Roadside Assistance is considered one of the most significant differentiating factors when customers are deciding to buy vehicles.
Handling RSA (Roadside Assistance) is quite complex because there are many problems associated with it. Some of these problems include figuring out where the customer is, checking if a nearby technician is available, and more. One of the main issues is making sure we respond quickly. When people are stuck on the road and need help, they want it fast. If we take too long to help them, they won't be happy.
This tutorial helps you to easily configure this complex RSA workflow with Effort. We'll explore the all essential modules and key features that are required to configure RSA. Also, this tutorial provides all the activities that need to be performed by different roles involved in the RSA operation using the Effort platform. The roles include Admin, Manager, and Employee (Field Technician). Here's the list of activities we will be configuring and executing in the Effort as part of RSA.
- Admin Activities (Configuration of RSA)
- Creation of Employees
- Creation of Customers
- Creation of List Masters
- Creation of Regions List
- Create Zones List
- Create Problem Master List
- Create Family Involvement List
- Create Vehicle Registration Master List
- Create Request Generated From List
- Create Work Process State Types List
- Create Vehicle Type List
- Create Cancel Reasons List
- Create Technician Cancel List
- Create City List Master
- Creation and Configuration of Forms
- Creation and Configuration of RSA Workflow
- Customize Web App Modules
- Execute RSA
Admin Activities (Configuration of RSA)
In this section, we will walk you through the admin-level activities involved in the configuration of the RSA. To perform the Admin activities, the users must have access to the App Builder module. Only the users that have App Builder access can create the list masters. Login to Effort as App Builder. Refer to the Sign-in To Effort topic for login.
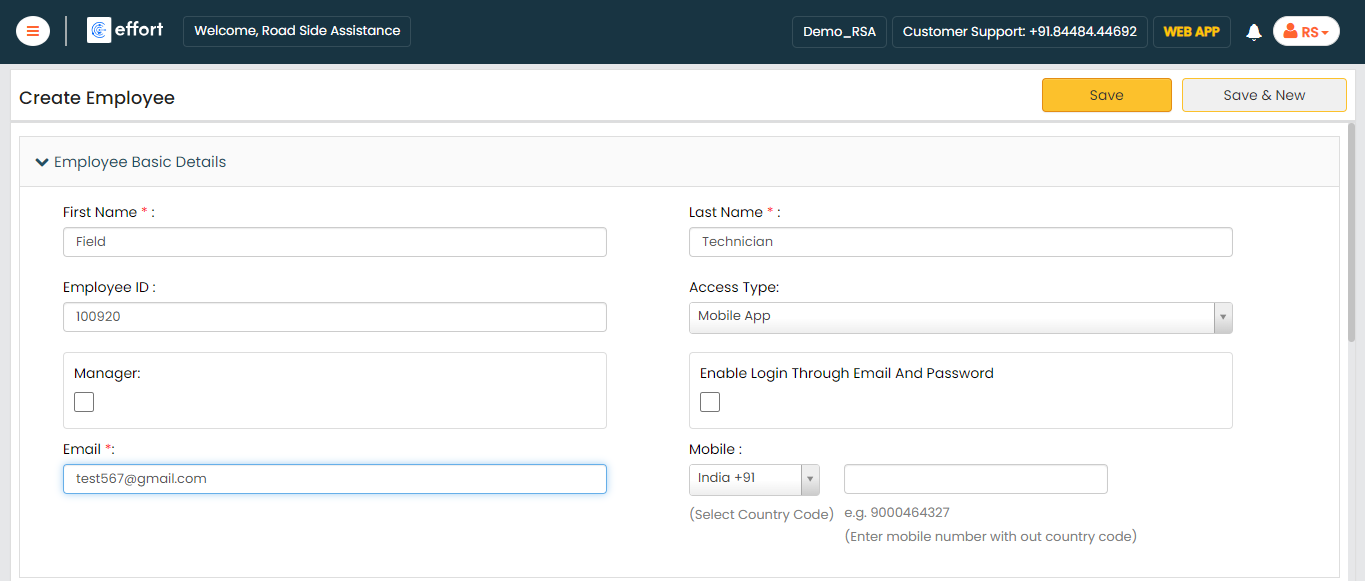
Creation of Employees
- Field Employees (Technicians)
- Back Office Employees (Customer Support Executive)
To know more about the employees module, refer to Employees.
In this section, we will create employees who will be involved in the RSA activities. To create employees, follow the steps below:
-
Go to .

-
Enter the employee details such as First Name, Last Name, Employee ID,
Email, Mobile Number, and so on.
-
Select the Access Type based on the employee you
want to create.
If you are creating a Field Technician, you can select the Access Types as Mobile App or Employee Web App & Mobile App. For the Admin or Manager employees, you can select the Employee Web App, Configurator & Mobile App option.
-
Click Save.
Note: If you want to create more employees, you can choose the Import feature to create in a single go. To import employees, refer to Import Employees.
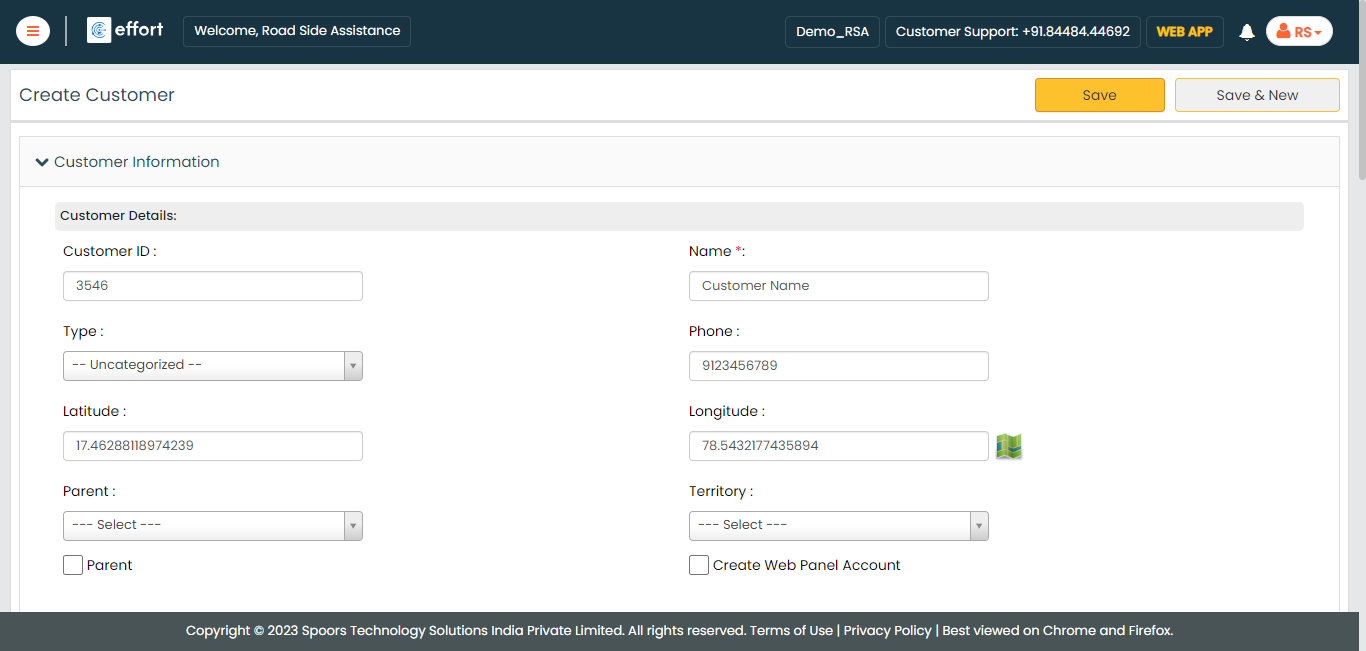
Creation of Customers
Maintaining customer data is crucial for providing Roadside Assistance (RSA) as they are the ones in need of help. Customer data helps in verifying the identity of the person seeking assistance. In this section, we will create customers from the Web App.
-
Go to .
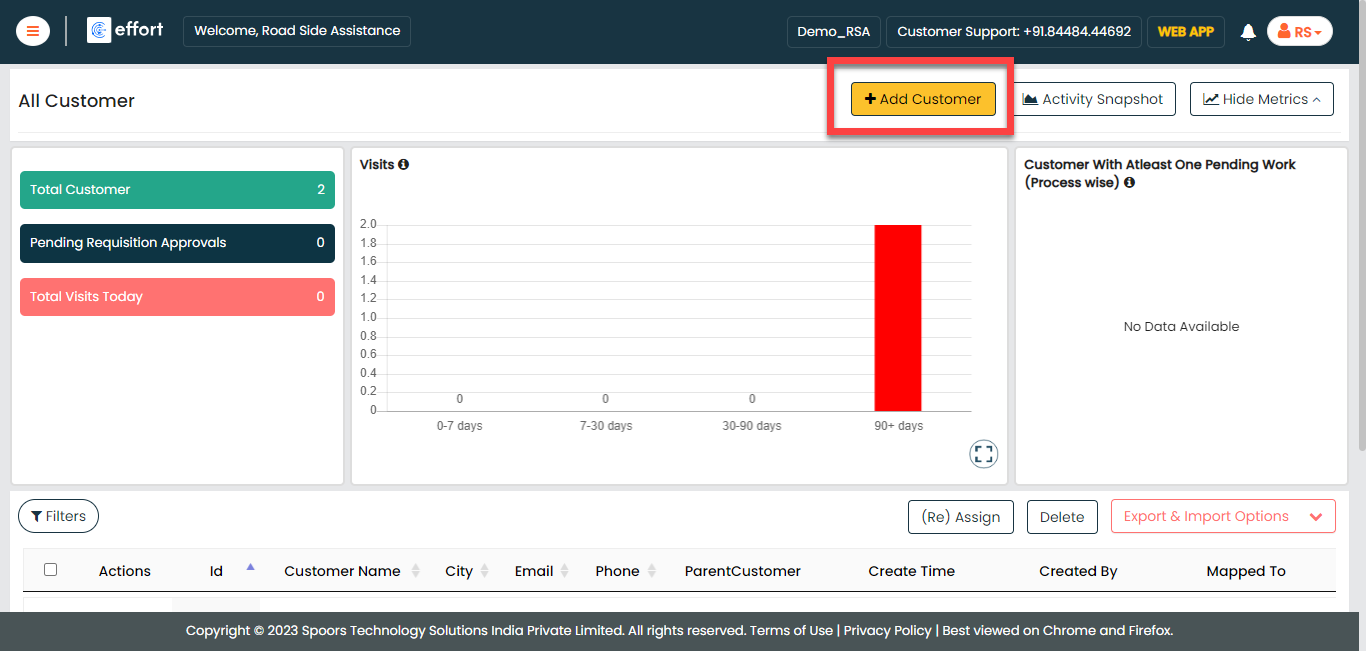
-
Enter the customer details and click Save.
-
You can also use the Import option to create
more customers in a single go. For the instructions to import the
customers, refer to the Import Customers
topic.
Note: In the Map to Employee column, enter the employee ID instead of the employee name.

- Once you import the customers, you can check the import status at the bottom of the page. Alternatively, you can check the Customers module in the Web App.
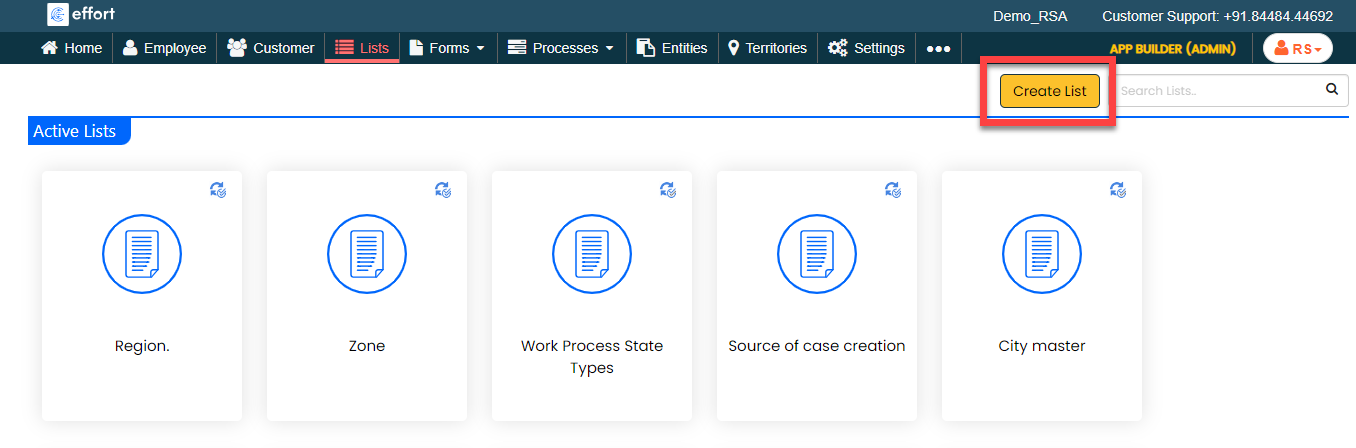
Creation of List Masters
In this part, we'll be creating the list masters. A list master is a comprehensive collection of data. It includes information about cities where RSA is provided, vehicle details of those opting for RSA service, warranty specifics, various towing choices, problem descriptions, and more. To know more about Lists, refer to Lists.
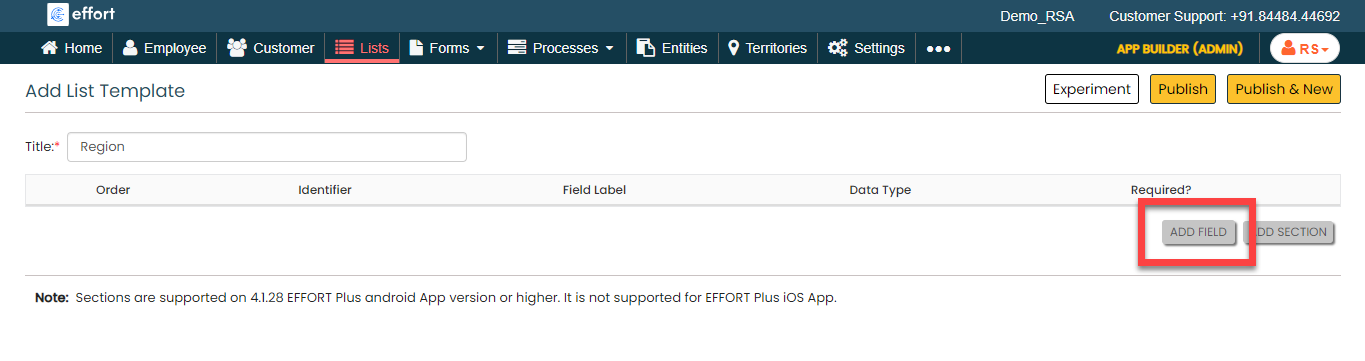
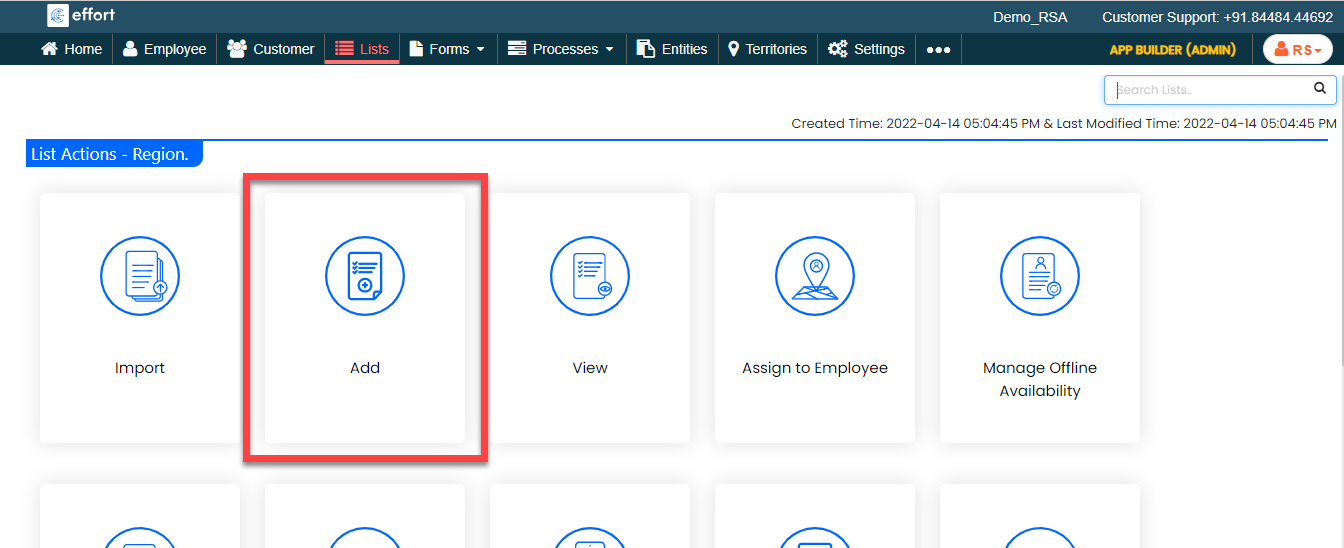
Creation of Regions List
In this section, we will be creating a list called "Regions." This list is created to categorize technicians into different regions across the country, such as East Zone, North Zone, etc. This will be used in the RSA process to make sure only the respective region tickets are visible to those users only. To create this list, follow the steps below:
-
Go to .
-
In the Title field, enter the title as
Region.

-
Click the Add Field button.
-
Under the Identifier column, enable the
checkbox.
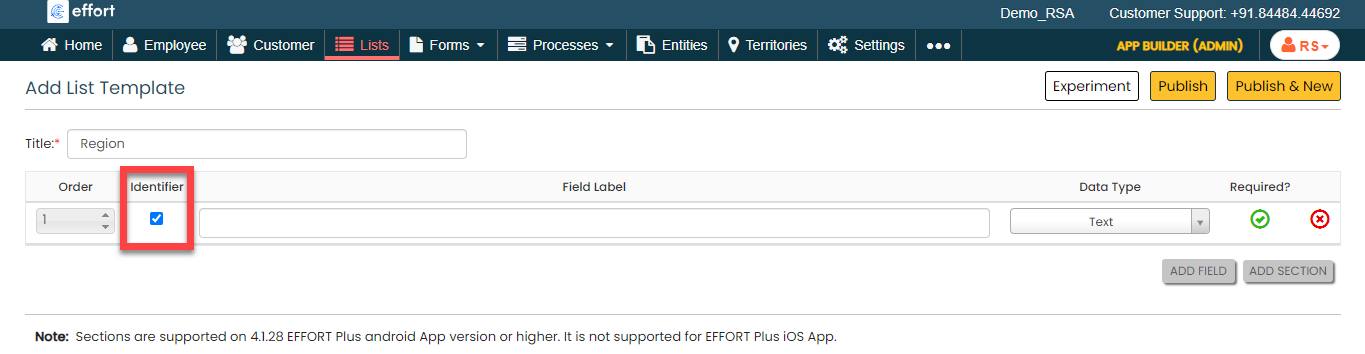
-
Under the Field Label column, enter the
label as Region.

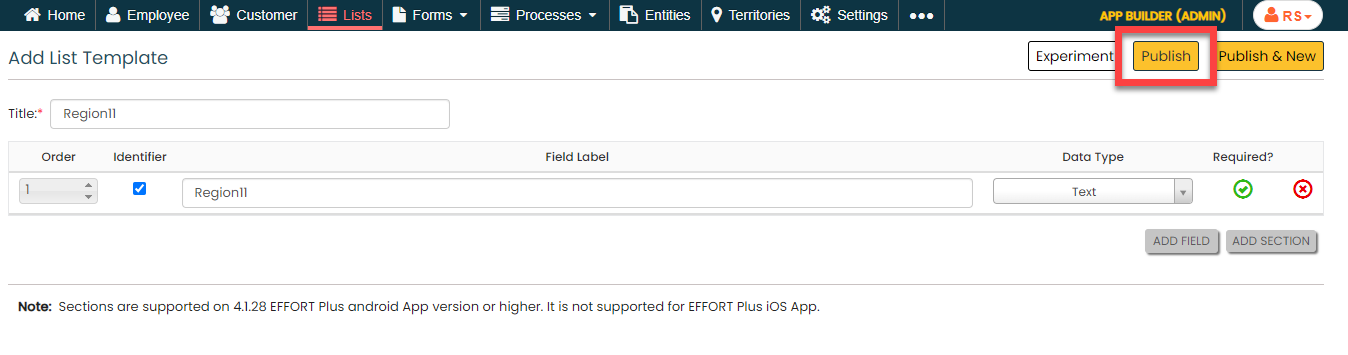
-
Click Publish and then click
OK in the confirmation pop-up.
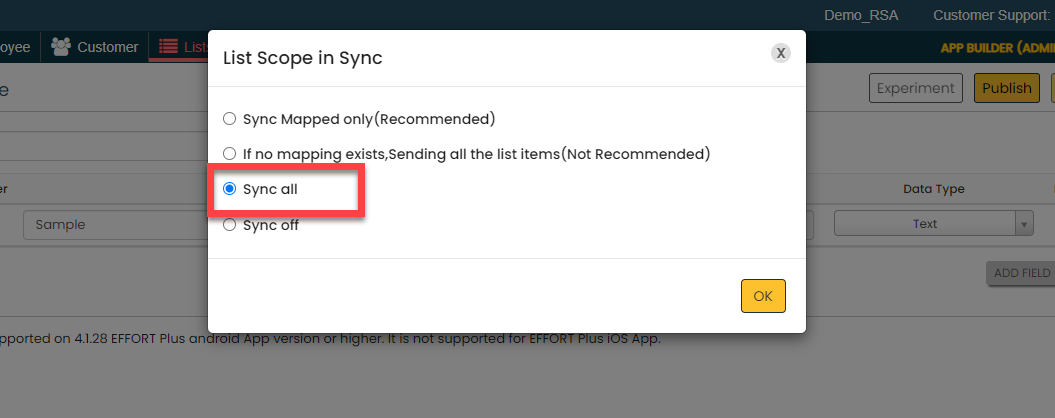
-
In the List Scope in Sync pop-up window,
select the Sync all option and click
OK to make all the list items available
to the mobile app users.
-
In the Warning pop-up window, click the
Accept button.

Your Regions List is ready. Now you need to add items to it. -
To add regions to the list master, click
Add.
-
In the List No and
Region fields, enter the region as per
your requirement, such as South, East, etc.

Note: To view the list items that you added, refer to View List Items.Note: To edit the list items that you added, refer to Edit List Item. - Click Save to save your item. Otherwise, click Save & New to save the existing item and add one more new item.
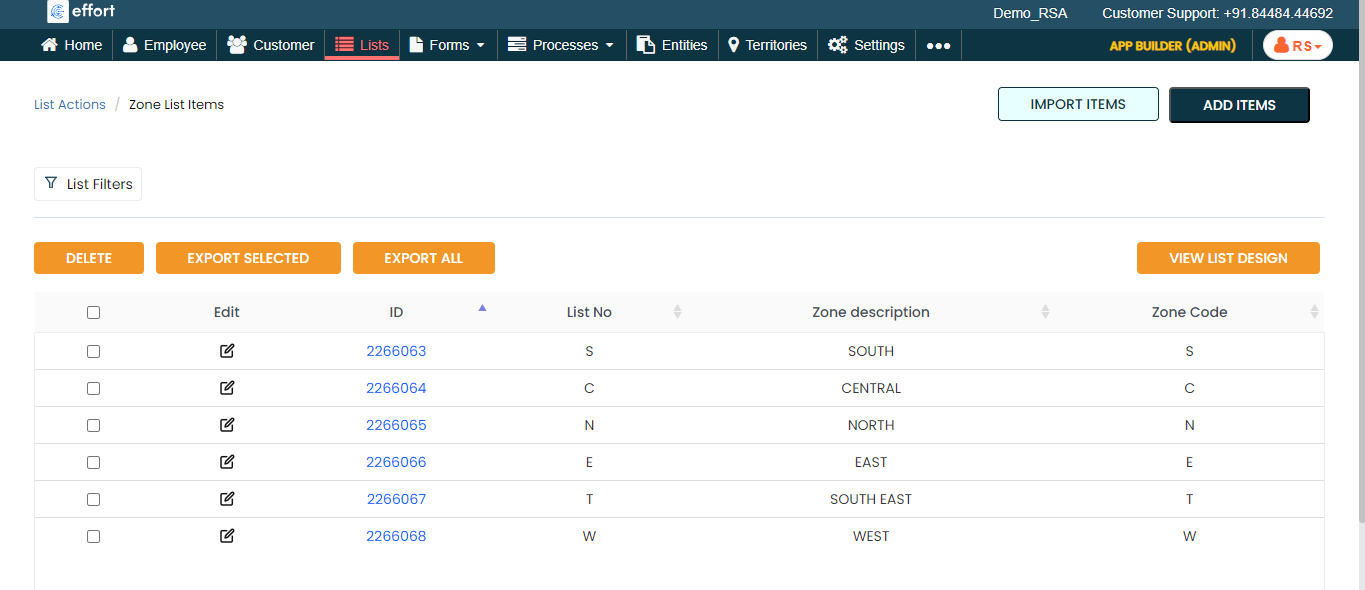
Create Zones List
In this section, we will create a Zone list. We will use this list for creating City list master.
-
Create the Zones list master as shown in the following
screenshot.
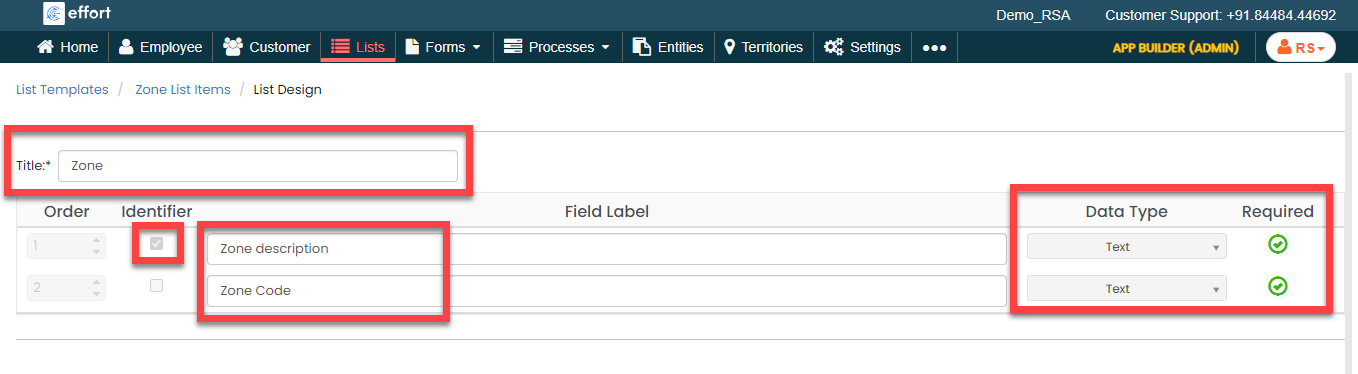
-
As you can see, we have 2 fields in the list. To add more fields,
you need to click the Add Fields button
again.
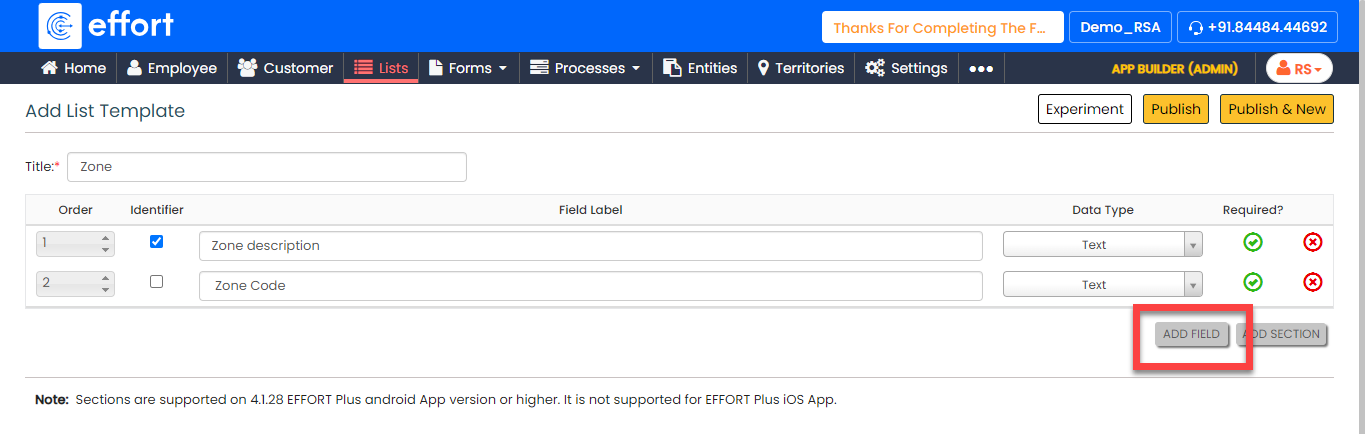
- Click Publish to save the List master and then select all in the List Scope in Sync pop-up window.
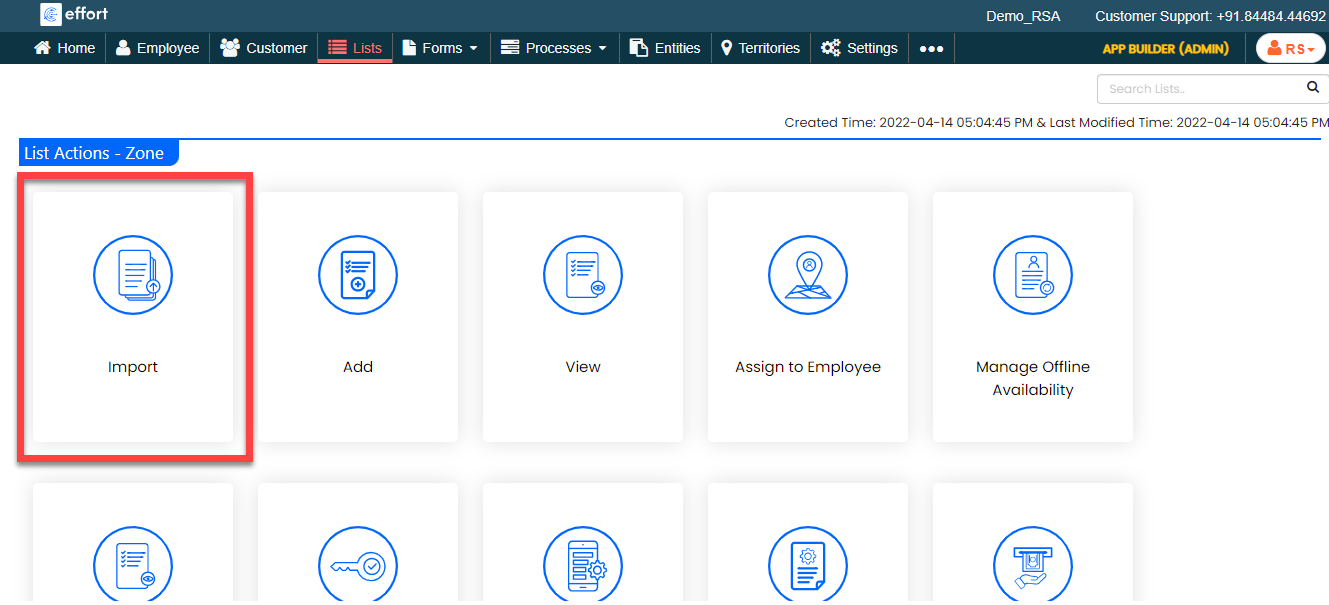
-
The list master creation is completed. Now you need to add items to
this list. As we have 2 fields in this list, it will take more time
if we add items manually. Instead, you can add multiple items to the
list in one go using the Import option. On
the List Actions page, click
Import.
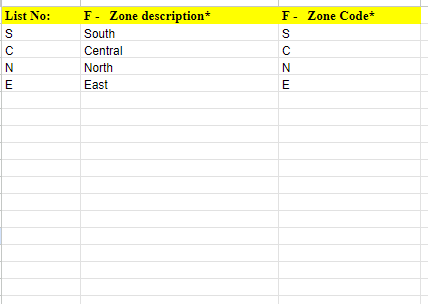
-
Click Download Template. An Excel file is
downloaded.
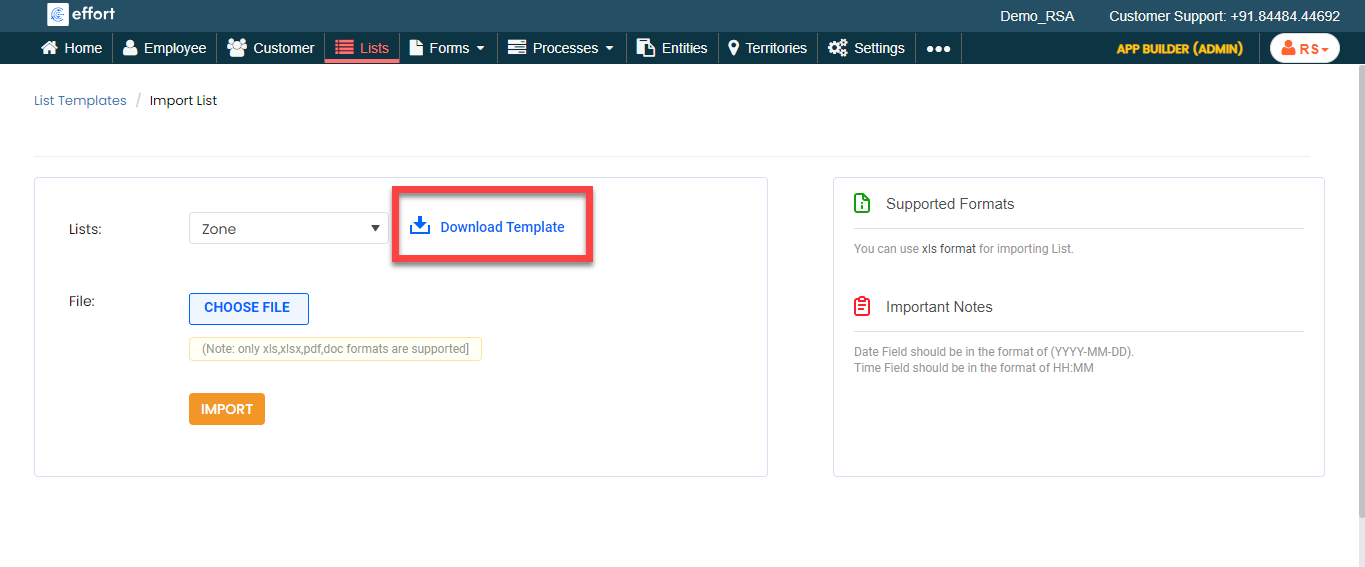
-
Open the downloaded Excel sheet and fill in the data in the fields.
Once you fill in the data, save the Excel sheet.
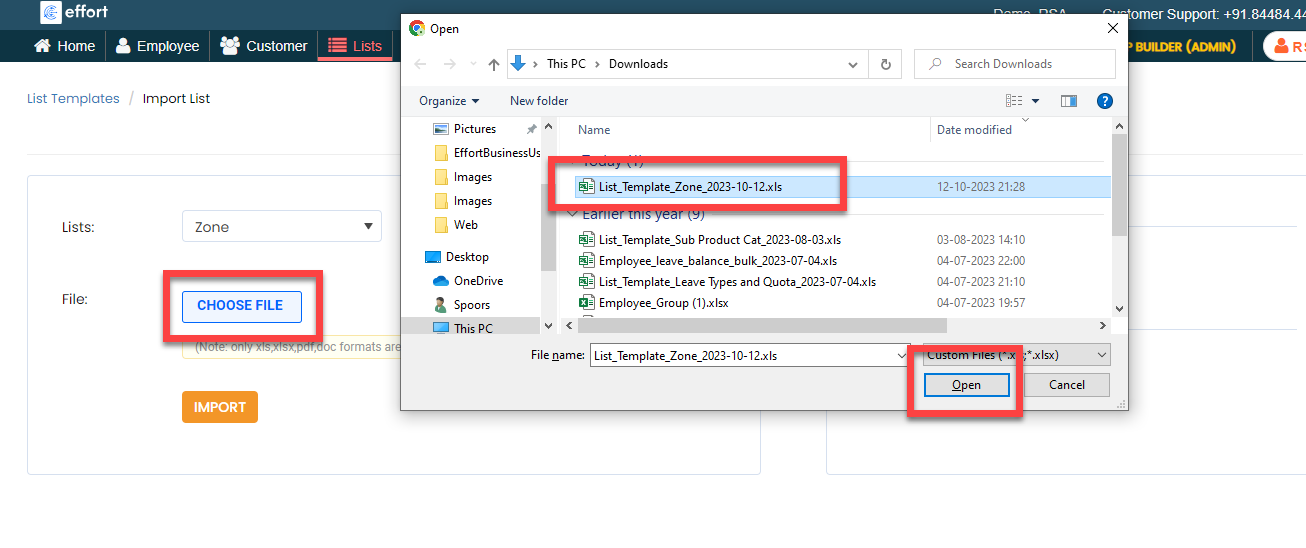
-
Go back to the Import List page, click
Choose File, and select the filled Excel
sheet.
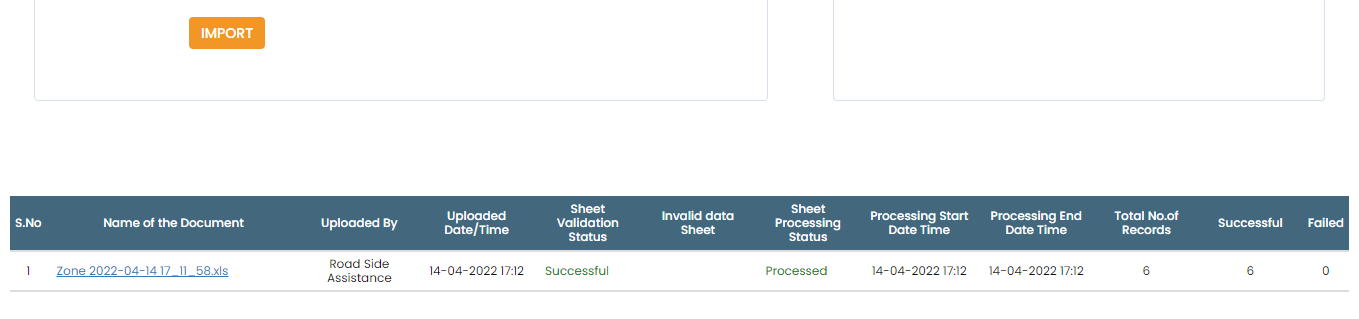
-
Click the Import button. Once the import is
completed, refresh the page after a few seconds. You can check the
import status at the bottom of the page.
-
To view the imported list items, go to .
Note: To view the list items that you added, refer to View List Items.Note: To edit the list items that you added, refer to Edit List Item.
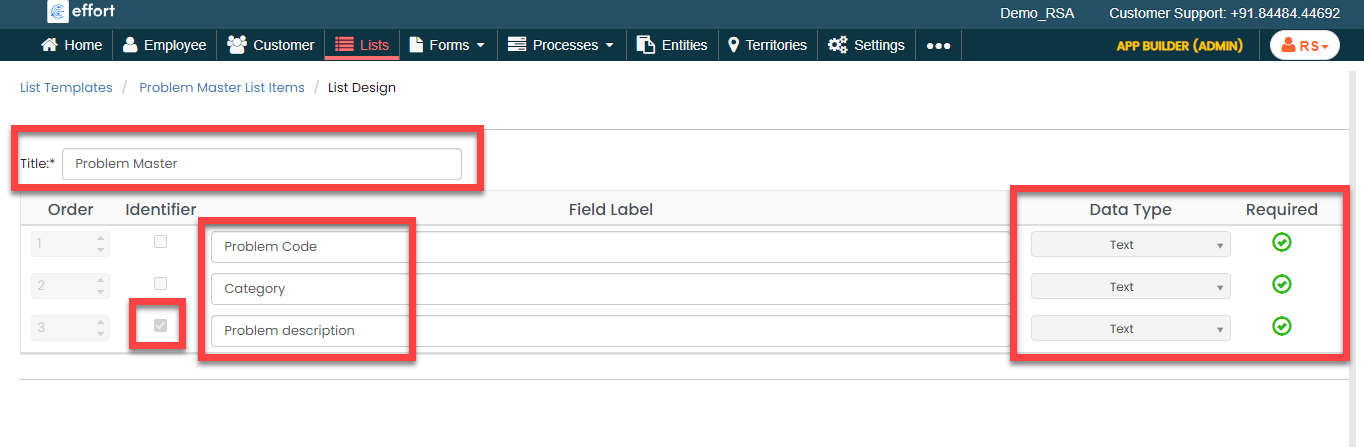
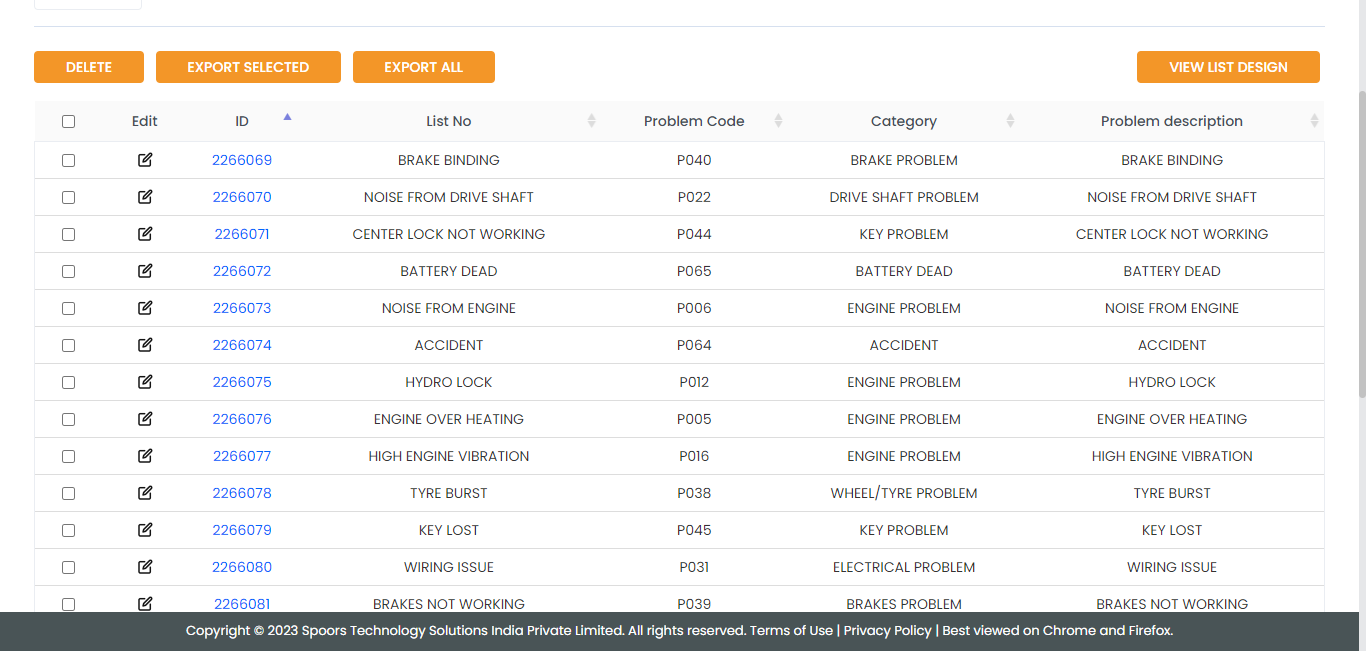
Create Problem Master List
In this section, we will create a Problem Master list. The Problem Master contains the list of potential issues that may arise for vehicles. This master is used to select the type of issue in the vehicle during the generation of the ticket and while the technician closes the ticket.
-
Create the Problem Master list as shown in the following
screenshot.
-
Now add the items to the list. You can either use the
Import option or follow the manual
process to add the items at your convenience.
Note: To add the list items, refer to Add an Item to List.Note: To import the list items, refer to Import List Items.Note: To edit the list items that you added, refer to Edit List Item.
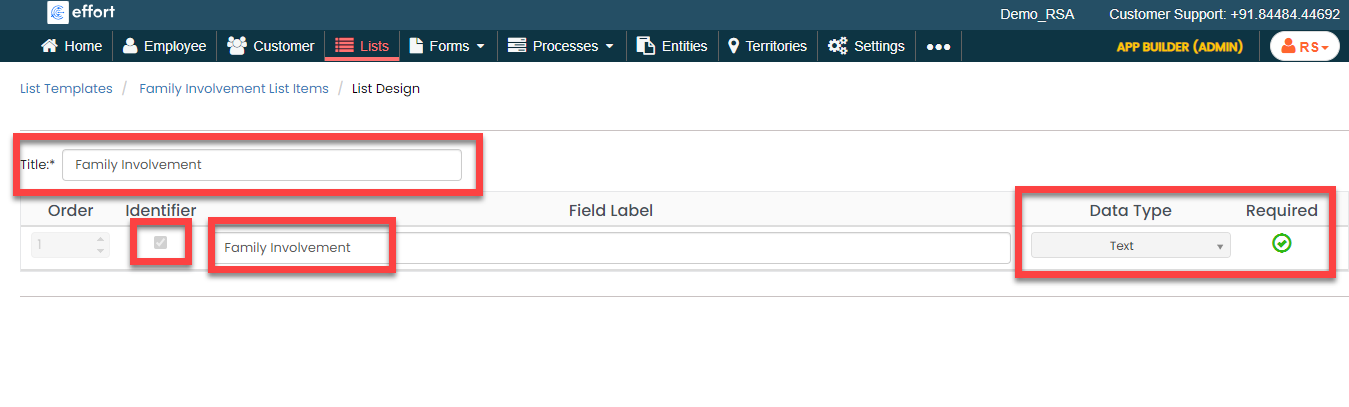
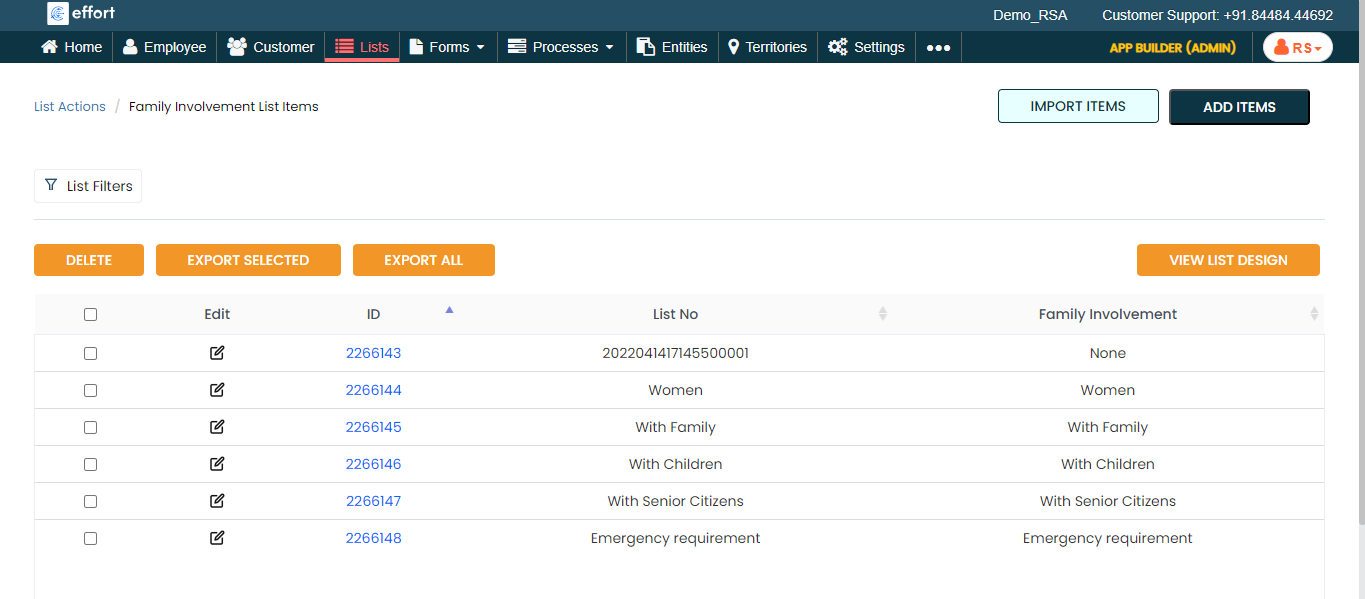
Create Family Involvement List
In this section, we will create a Family Involvement list. This will help the technician understand the criticality of the ticket.
-
Create the Family Involvement list as shown in the following
screenshot.
-
Now add the items to the list. You can either use the
Import option or follow the manual
process to add the items at your convenience.
Note: To add the list items, refer to Add an Item to List.Note: To import the list items, refer to Import List Items.Note: To edit the list items that you added, refer to Edit List Item.
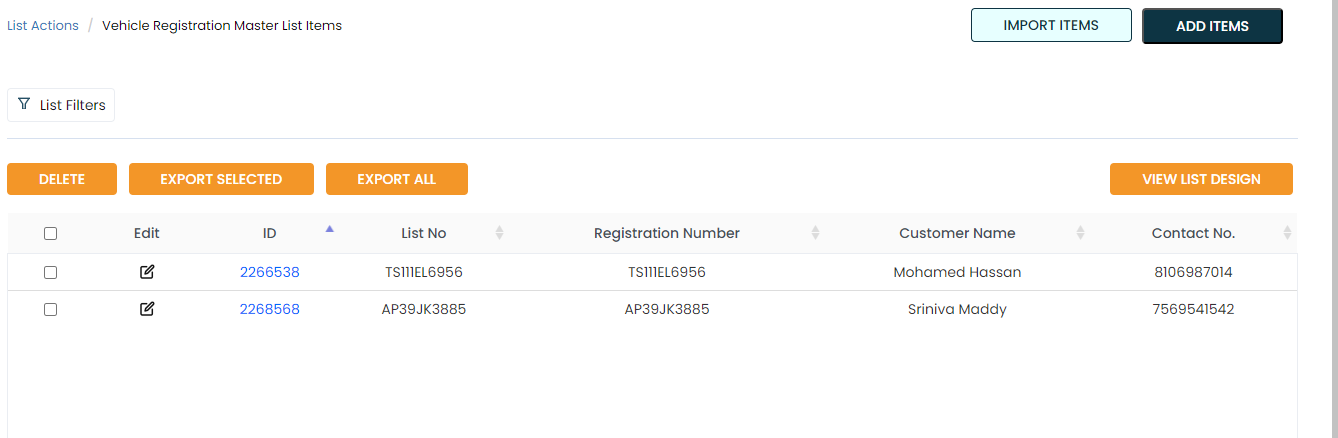
Create Vehicle Registration Master List
In this section, we will create a Vehicle Registration Master list. This list contains all the vehicle registration numbers. It serves the purpose of retrieving customer details by simply entering the registration number.
-
Create the Vehicle Registration Master list as shown in the
following screenshot.
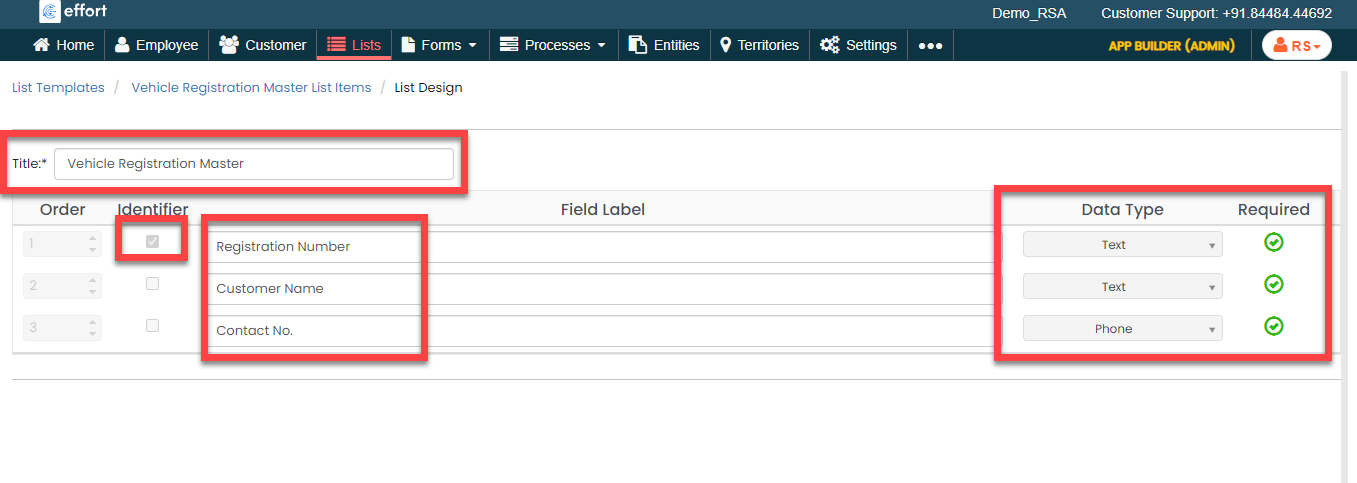
-
For the third field labeled as Customer No,
you need to change the data type to Phone. To
change the data type, select the Phone option
from the dropdown under the Data Type
column.

-
Now add the items to the list. You can either use the
Import option or follow the manual
process to add the items at your convenience.
Note: To add the list items, refer to Add an Item to List.Note: To import the list items, refer to Import List Items.Note: To edit the list items that you added, refer to Edit List Item.
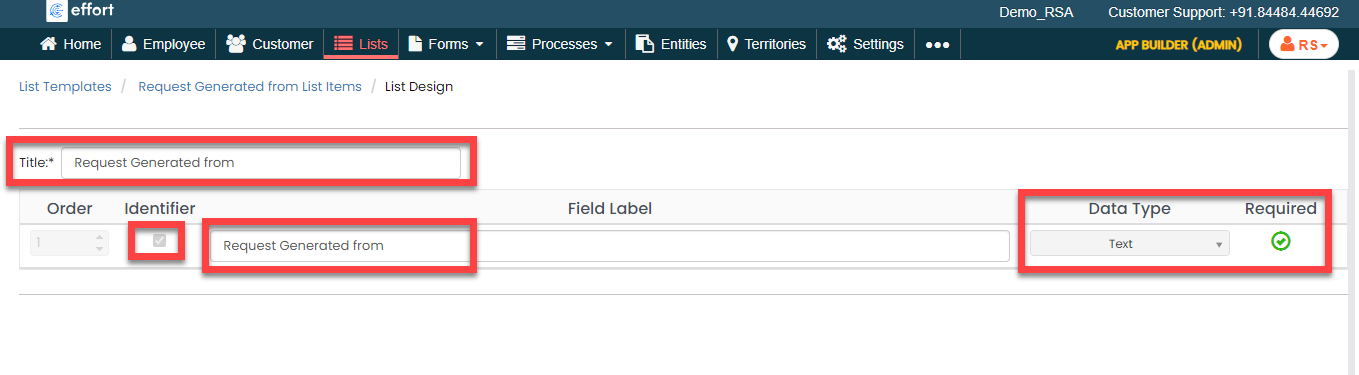
Create Request Generated From List
In this section, we will create a Request Generated From list. Tickets can originate from various sources, such as the call center, the vehicle's IoT device, or a third-party system. The source of the request is determined based on where it comes from. If the call center initiates the request, they select it manually. If the request comes through an API, the source sends the data automatically.
-
Create the Request Generated From list as shown in the following
screenshot.
-
Now add the items to the list. You can either use the
Import option or follow the manual
process to add the items at your convenience.

Note: To add the list items, refer to Add an Item to List.Note: To import the list items, refer to Import List Items.Note: To edit the list items that you added, refer to Edit List Item.
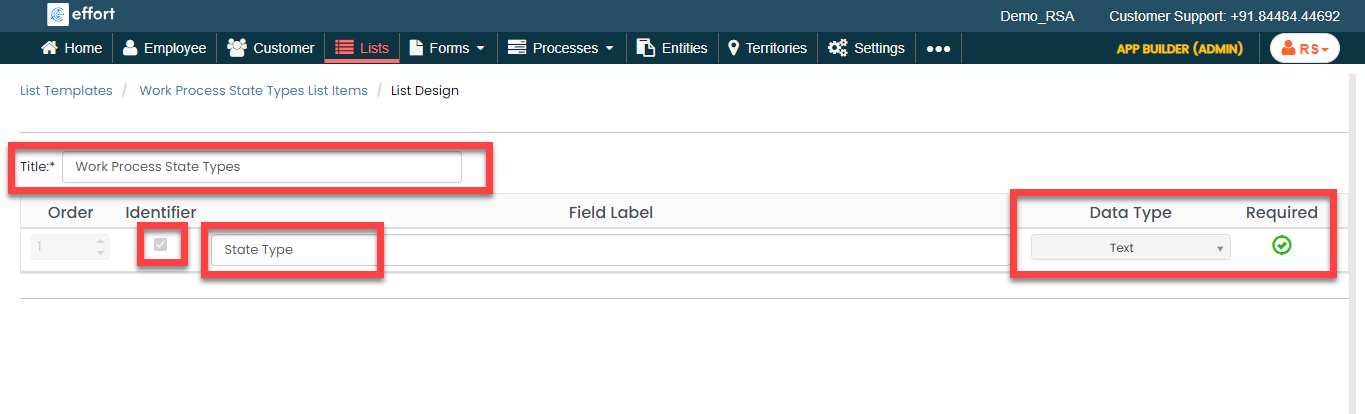
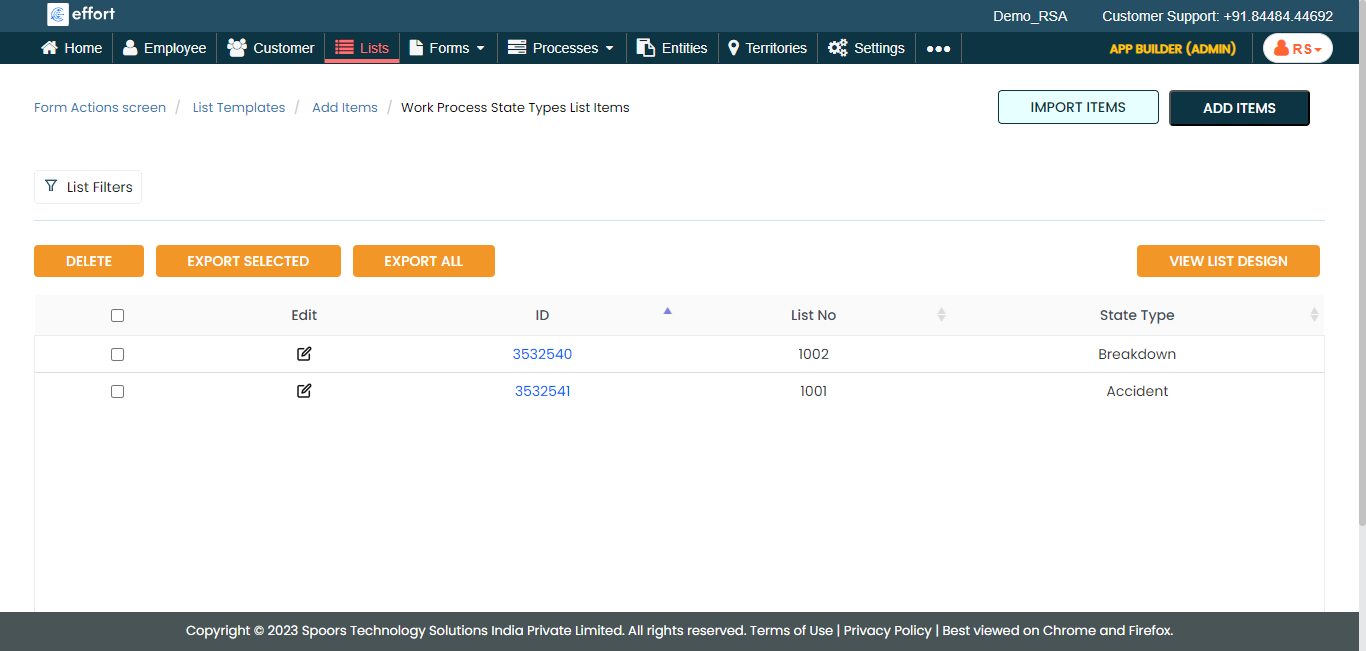
Create Work Process State Types List
In this section, we will create a Work Process State Types list. We're creating this list to categorize the tickets like breakdowns or accidents. Users can click on these categories to filter and view specific tickets.
-
Create the Work Process State Types list as shown in the following
screenshot.
-
Now add the items to the list. You can either use the
Import option or follow the manual
process to add the items at your convenience.
Note: To add the list items, refer to Add an Item to List.Note: To import the list items, refer to Import List Items.Note: To edit the list items that you added, refer to Edit List Item.
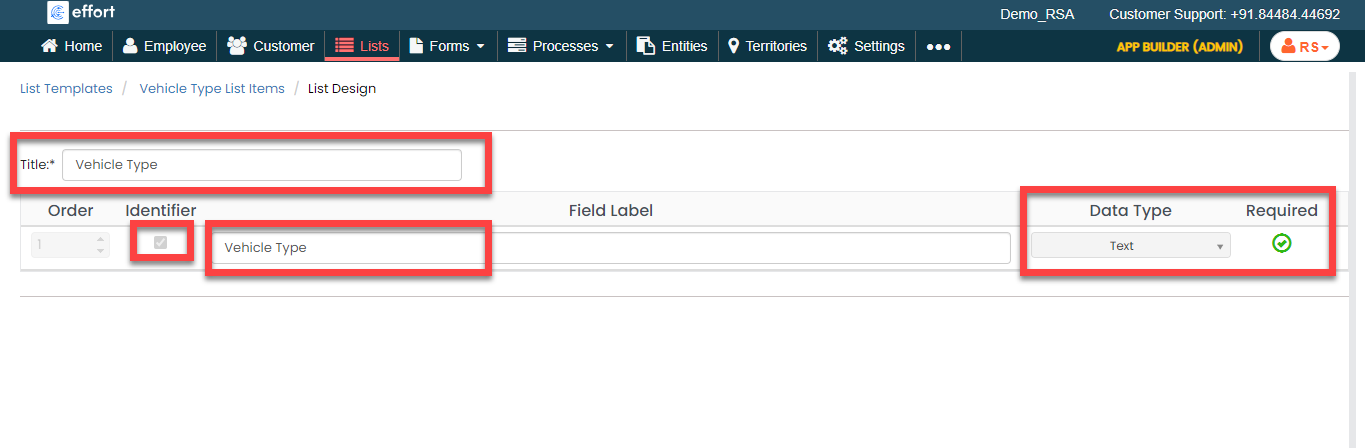
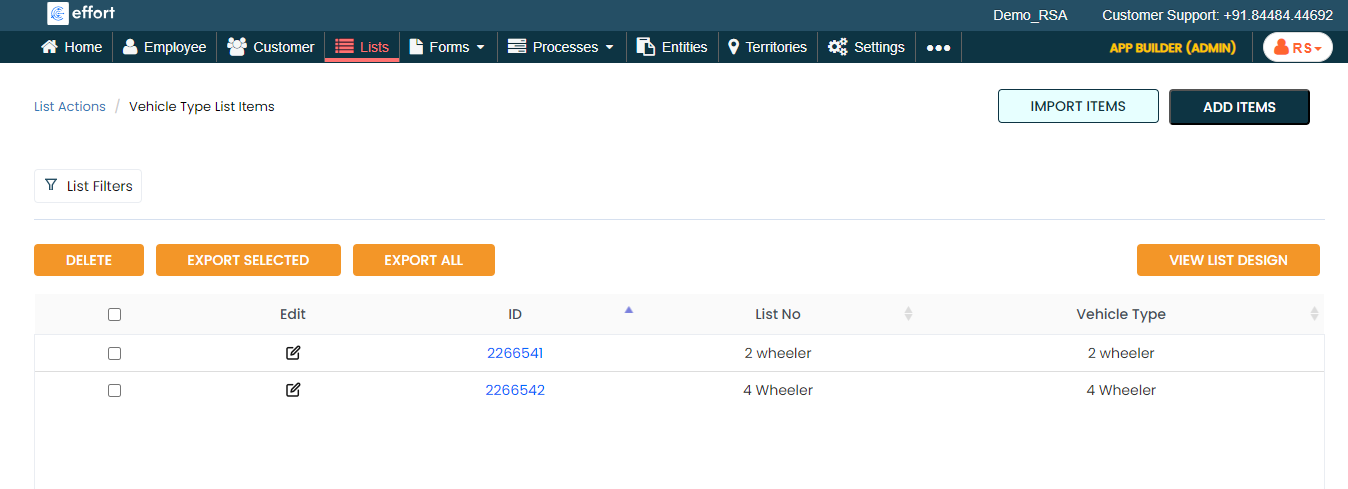
Create Vehicle Type List
In this section, we will create a Vehicle Type list. This helps the technician choose how they traveled to the customer's location.
-
Create the Vehicle Type list as shown in the following
screenshot.
-
Now add the items to the list. You can either use the
Import option or follow the manual
process to add the items at your convenience.
Note: To add the list items, refer to Add an Item to List.Note: To import the list items, refer to Import List Items.Note: To edit the list items that you added, refer to Edit List Item.
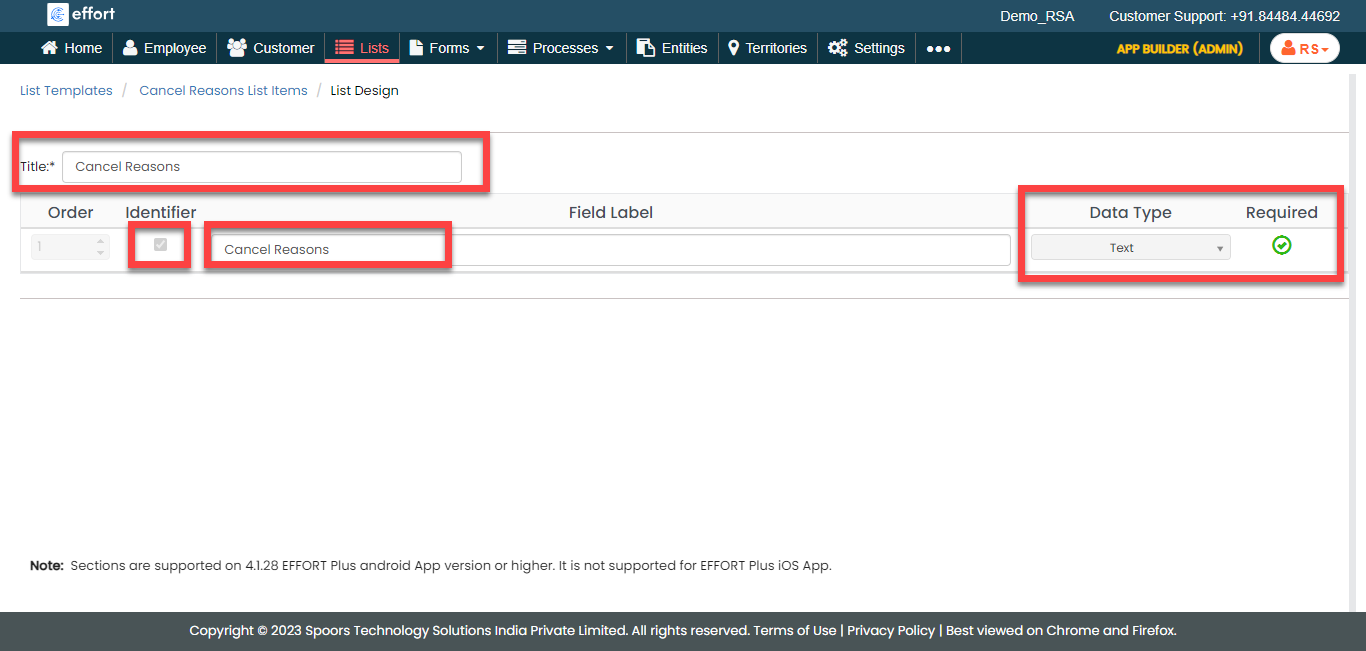
Create Cancel Reasons List
In this section, we will create a Cancel Reasons list. If the customer decides to cancel the ticket, the technician can choose that option.
-
Create the Cancel Reasons list as shown in the following
screenshot.
-
Now add the items to the list. You can either use the
Import option or follow the manual
process to add the items at your convenience.

Note: To add the list items, refer to Add an Item to List.Note: To import the list items, refer to Import List Items.Note: To edit the list items that you added, refer to Edit List Item.
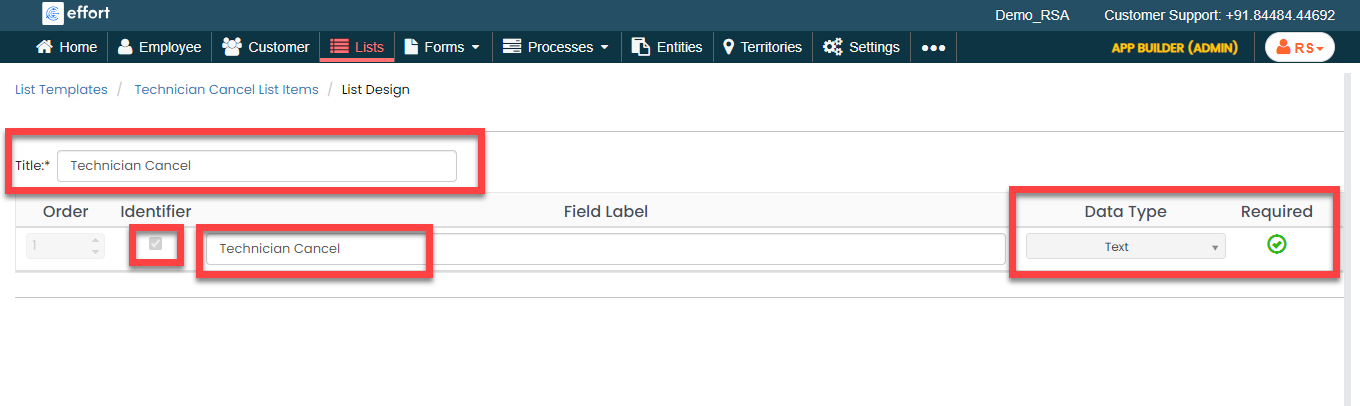
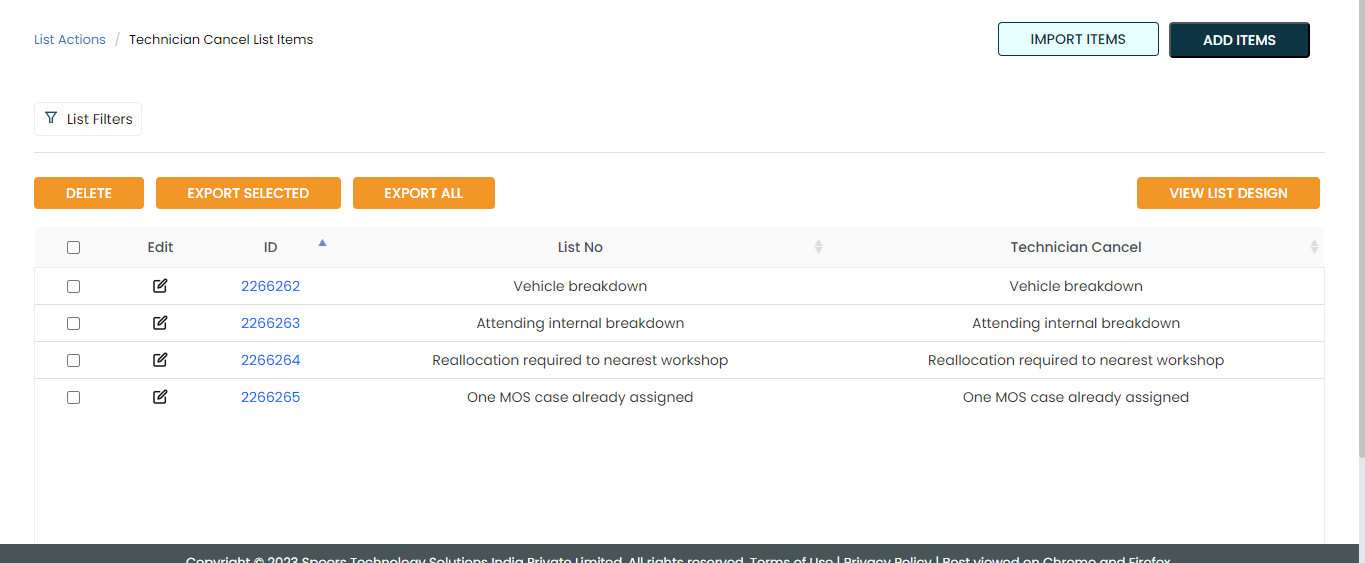
Create Technician Cancel List
In this section, we will create a Technician Cancel list. If the technician cancels the ticket, there are options available in this list to select the reason for cancellation.
-
Create the Technician Cancel list as shown in the following
screenshot.
-
Now add the items to the list. You can either use the
Import option or follow the manual
process to add the items at your convenience.
Note: To add the list items, refer to Add an Item to List.Note: To import the list items, refer to Import List Items.Note: To edit the list items that you added, refer to Edit List Item.
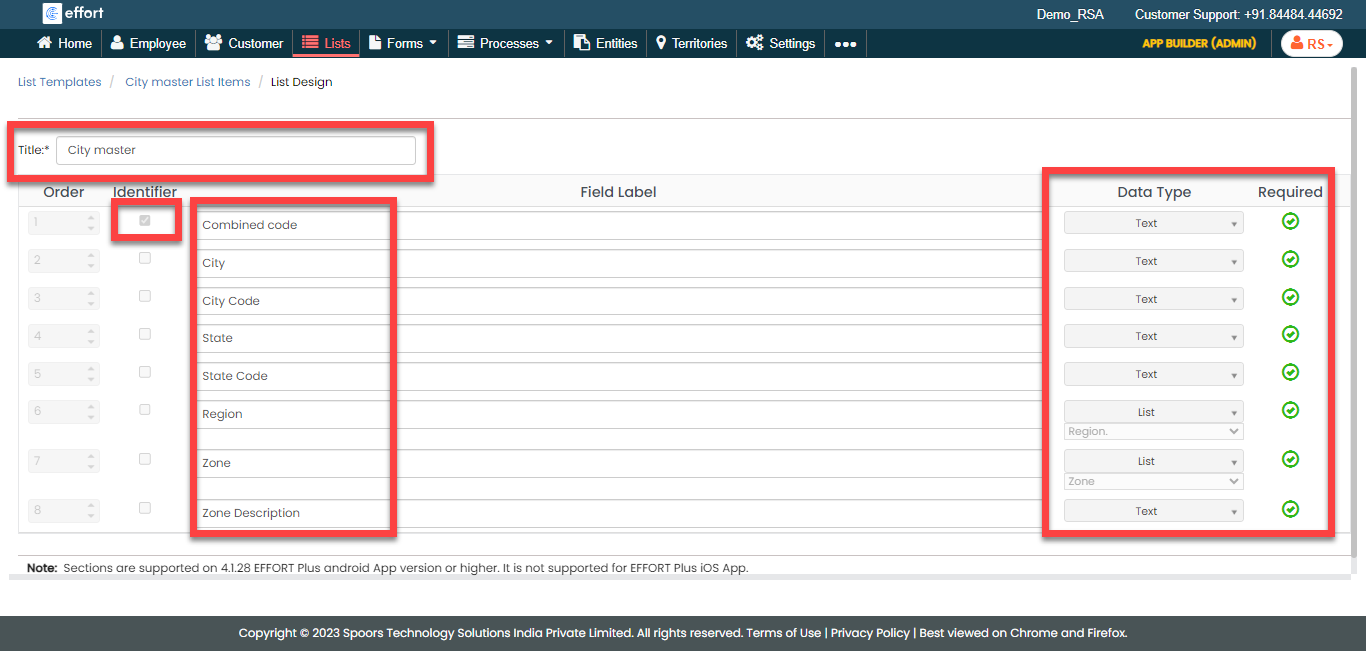
Create City List Master
In this section, we will create a City List Master. It helps the call center team know which city the customer is calling from.
-
Create the City List Master as shown in the following
screenshot.
-
For the sixth field labeled as Region, you
need to change the data type to List. To
change the data type, select the List option
from the dropdown under the Data Type
column.
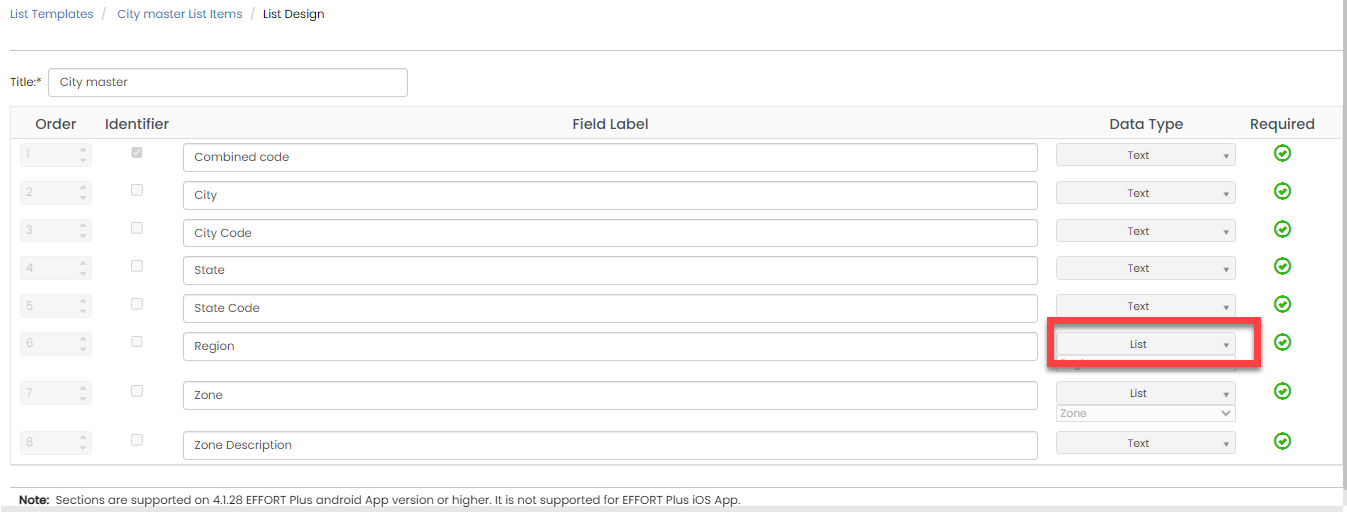
-
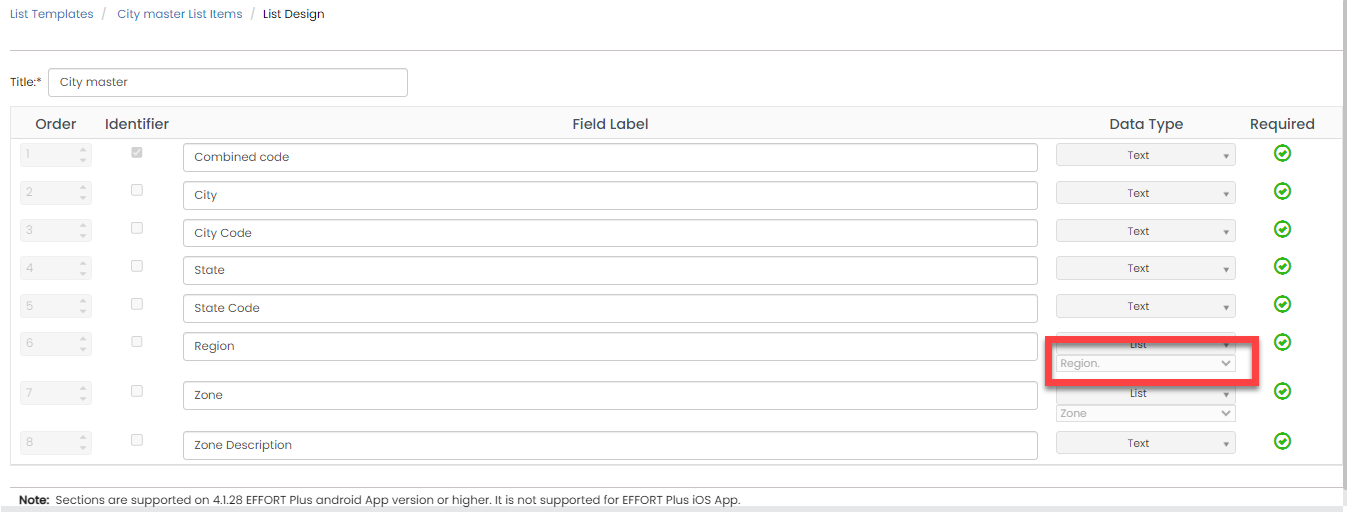
You will see the second dropdown when you set the data type to
List. Click the second dropdown and
select the Region list that you created in
the previous section. Here, we are mapping the city to the
region.
-
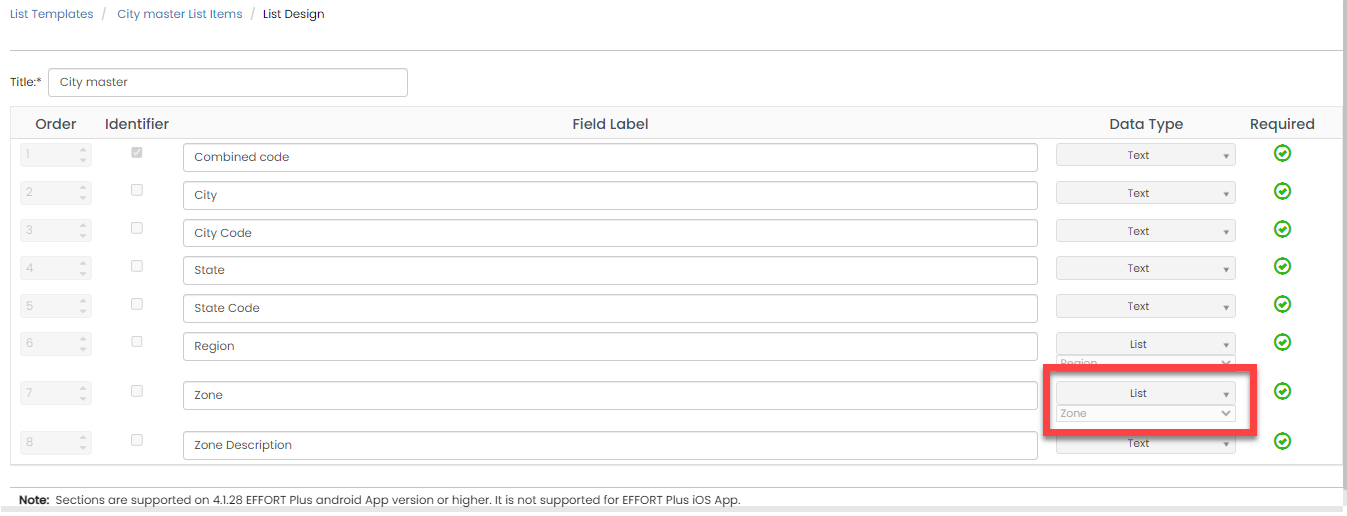
Similarly, configure the seventh field labeled as
Zone.
-
Now add the items to the list. You can either use the
Import option or follow the manual
process to add the items at your convenience.
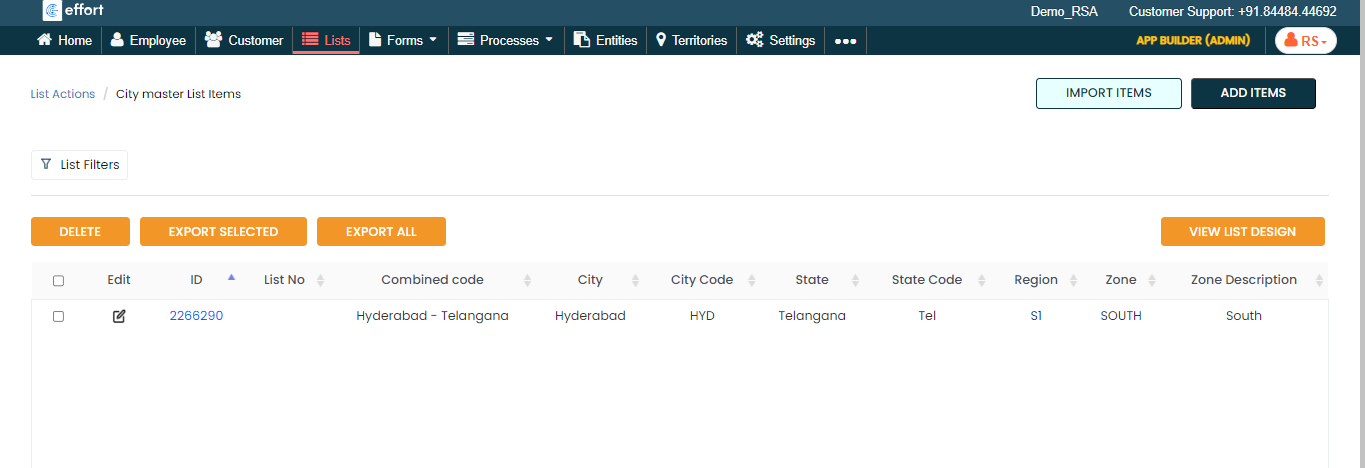
Note: To add the list items, refer to Add an Item to List.Note: To import the list items, refer to Import List Items.Note: To edit the list items that you added, refer to Edit List Item.
Creation and Configuration of Forms
In this section, we will create the forms required for Roadside Assistance operations. These forms need to be filled out by technicians for various purposes during RSA tasks. We will discuss them in detail as we set them up separately. Here, we will guide you through the steps of creating the forms, necessary fields, field-level configurations, and form-level configurations for all the forms. To know more about the forms, refer to Forms.
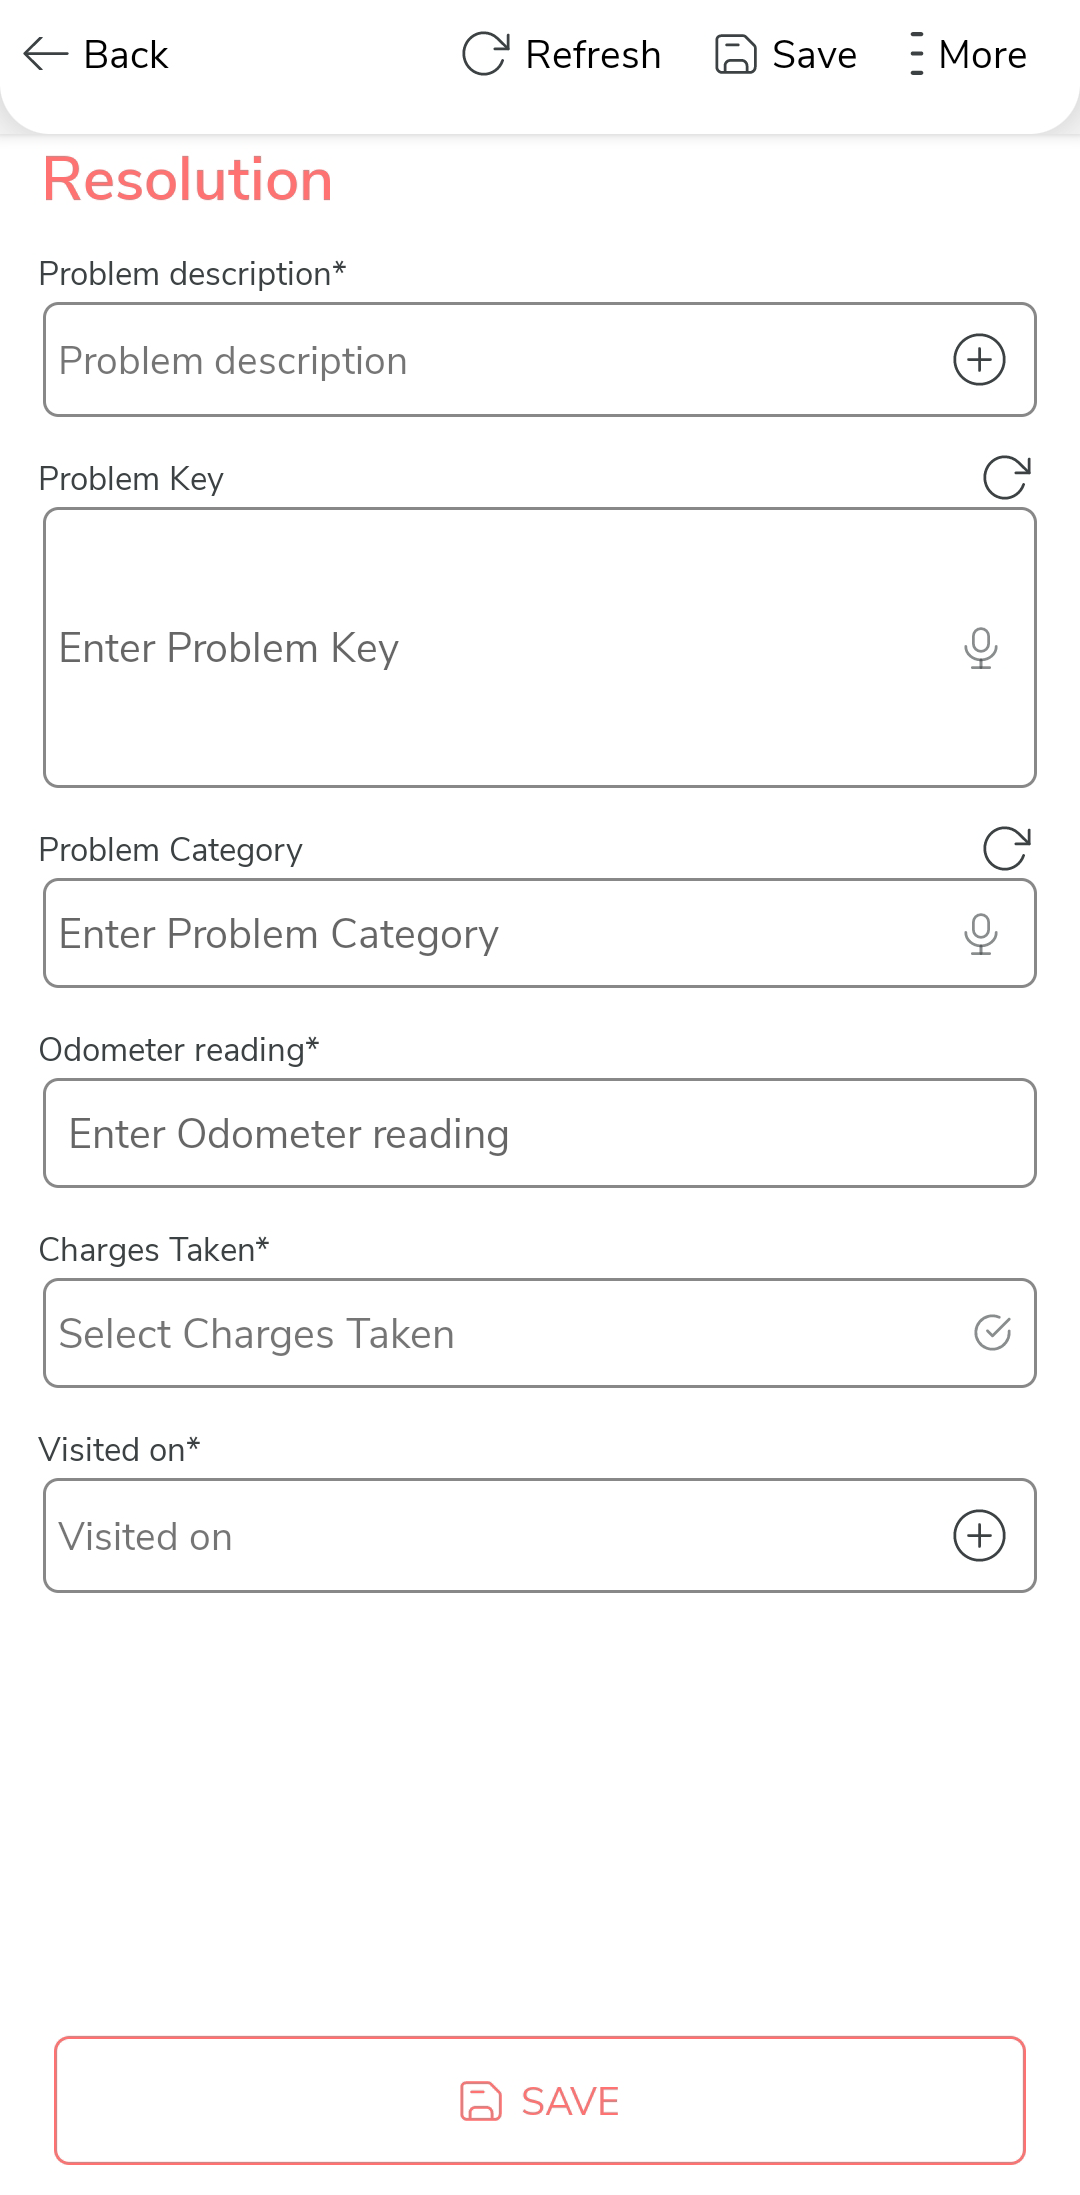
Resolution Form
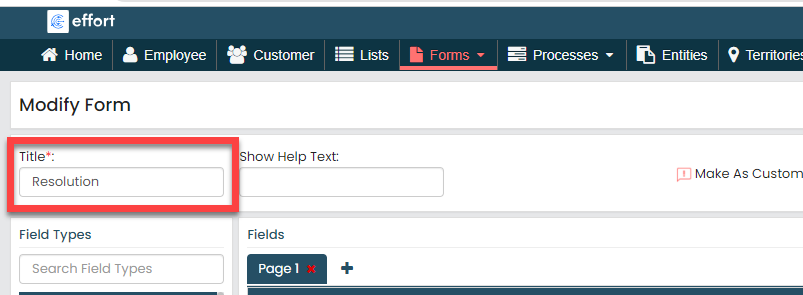
Technicians fill out the Resolution form after successfully completing an RSA task. This form records the details of the issue that occurred in the vehicle. To create this form, follow the steps below:
- Go to .
-
In the Title field, enter the title as
Resolution.
-
Drag and drop the following data types onto the field canvas and
label them as shown below.

Data Type Label Pick List Problem description Text Problem Key Text Problem Category Number Odometer reading Yes/No Charges Taken Pick List Visited on To know more about all the data types, refer to the following topics. -
Click the Problem description picklist
field, select the Problem Master list that we
created earlier from the List dropdown under
the Properties section.

-
Click the Problem Key field, and do the
following:
-
Under the Properties section, select
the Computed option from the
Computed/Default dropdown.
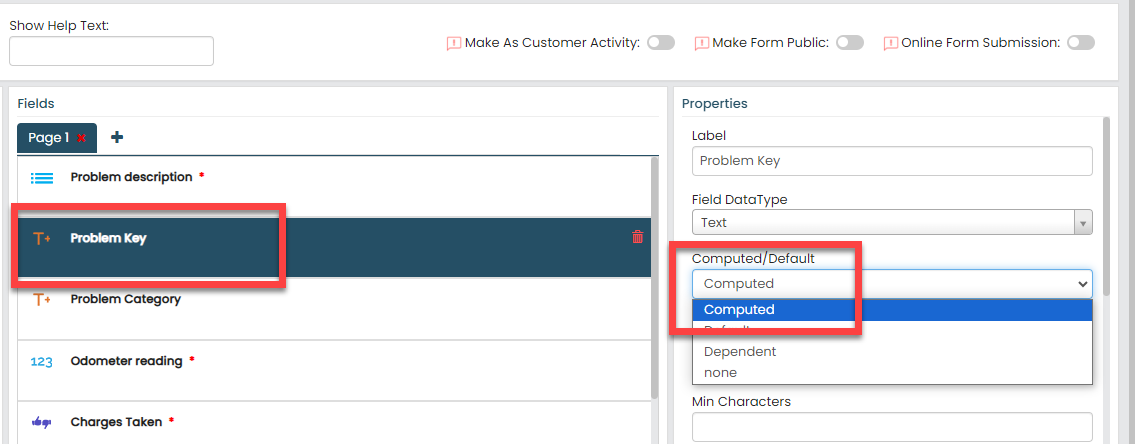
To know more about Computed and Default options, refer to Field Properties.
-
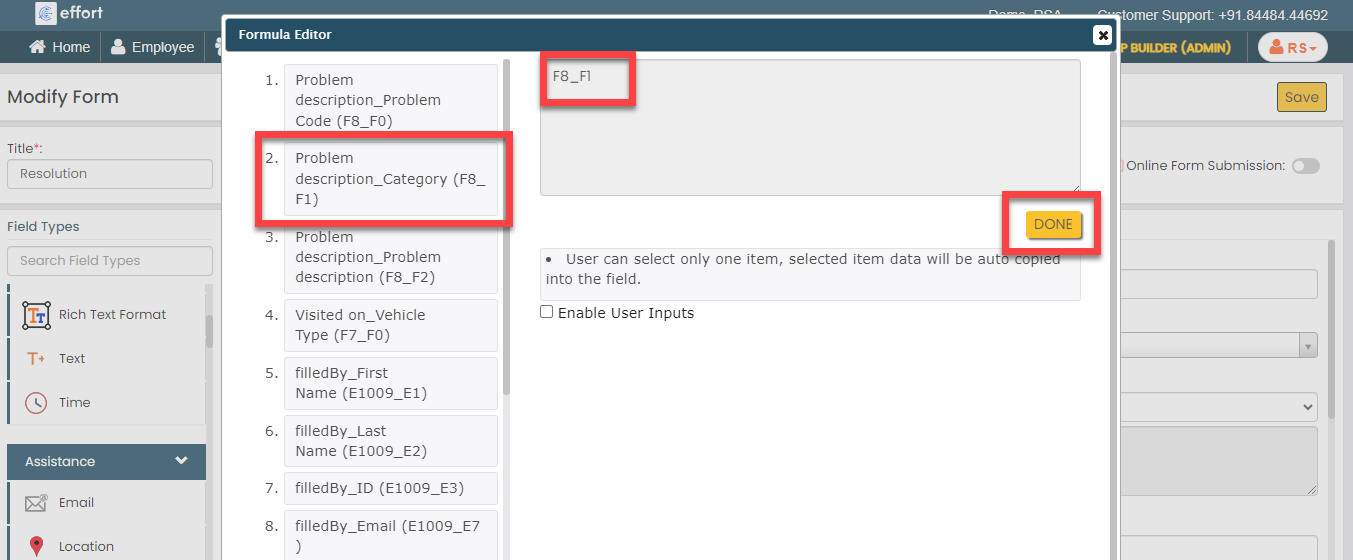
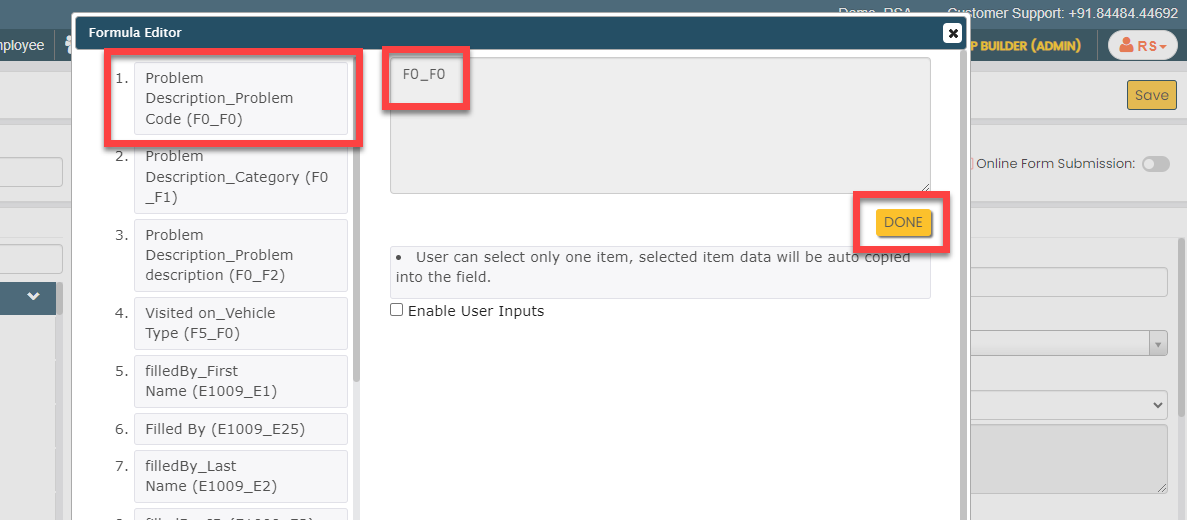
Click the grey box under the
Computed/Default dropdown, and
select the first field labeled as Problem
description_Problem Code, and click
Done.
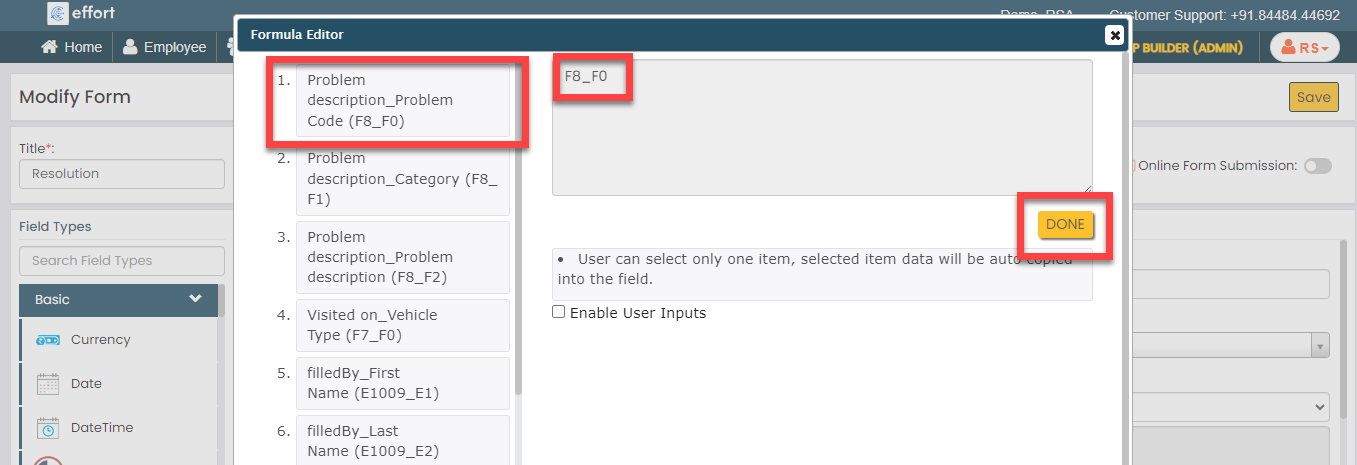
This configuration allows us to retrieve the problem code from the problem master and automatically populate on this field when the technician selects the problem in the first field.
-
Under the Properties section, select
the Computed option from the
Computed/Default dropdown.
-
Click the Problem Category field, and do the
following:
-
Under the Properties section, select
the Computed option from the
Computed/Default dropdown.
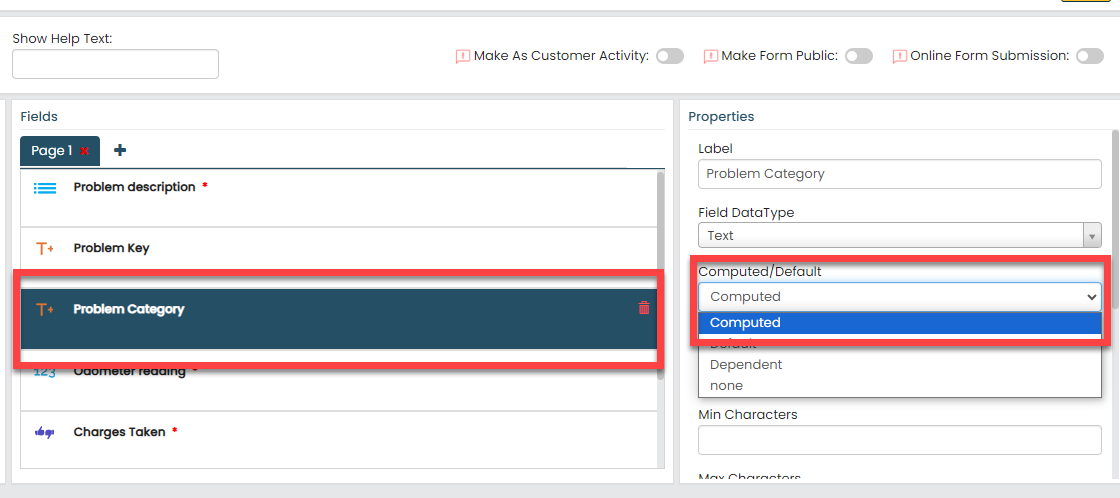
To know more about Computed and Default options, refer to Field Properties.
-
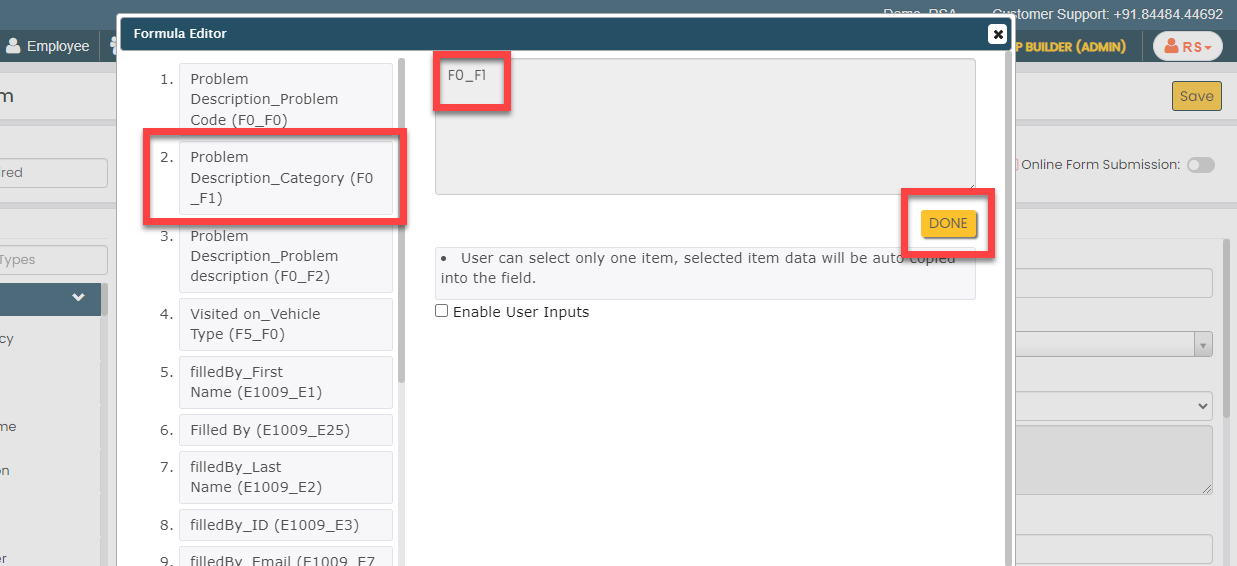
Click the grey box under the
Computed/Default dropdown, and
select the first field labeled as Problem
description_Category, and click
Done.
This configuration allows us to retrieve the problem description from the problem master and automatically populate on this field when the technician selects the problem in the first field.
-
Under the Properties section, select
the Computed option from the
Computed/Default dropdown.
-
Click the Visited on picklist field, select
the Vehicle Type list that we created earlier
from the List dropdown under the
Properties section.

-
Now click Publish and then click
OK to make it available to the
technicians. You are done with your first form creation.
Note: To know more about all the publishing options, refer to Publishing Options.
Cancelation Reasons Form
Technicians fill out the Cancelation Reasons form whenever they reject an RSA task. This form records reasons for canceling the RSA task. To create this form, follow the steps below:
- Go to .
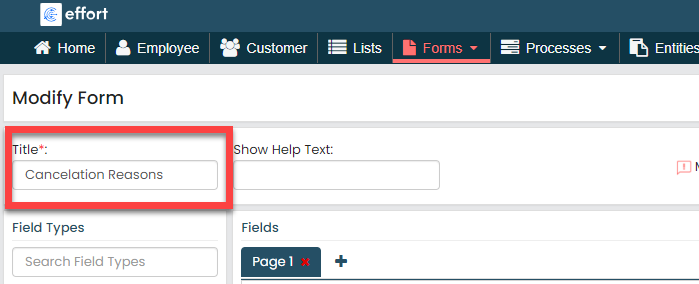
-
In the Title field, enter the title as
Cancelation Reasons.
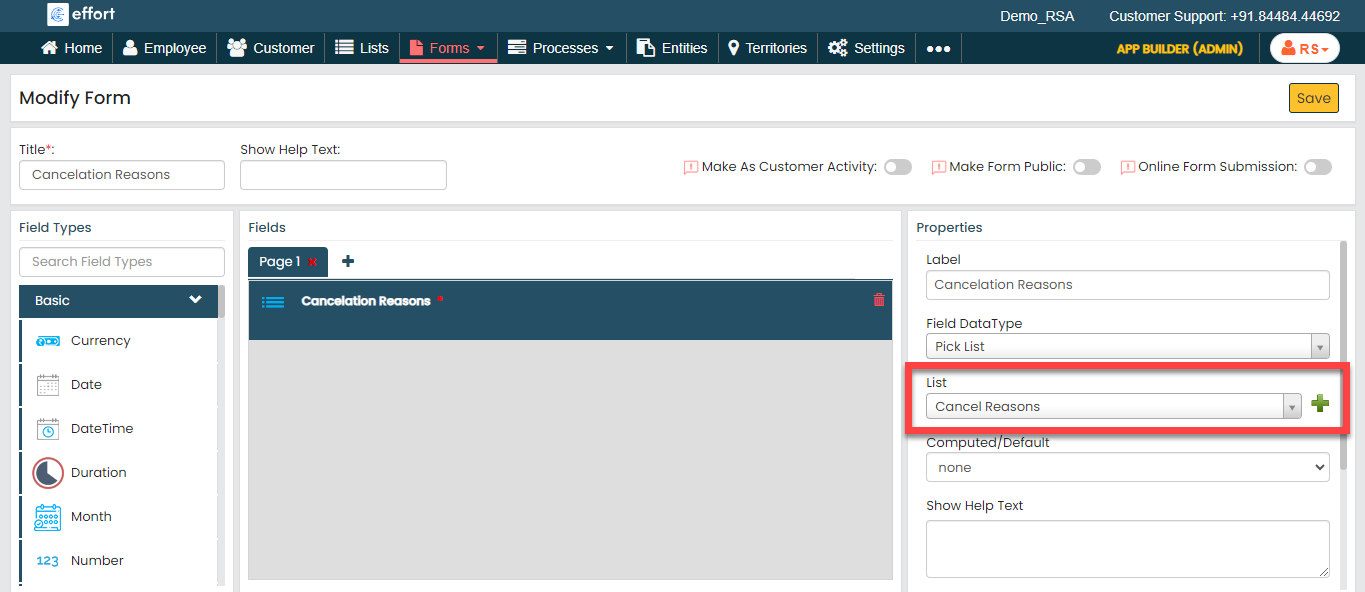
-
Drag and drop the Pick List data type onto the field canvas
and label it as Cancelation Reasons.
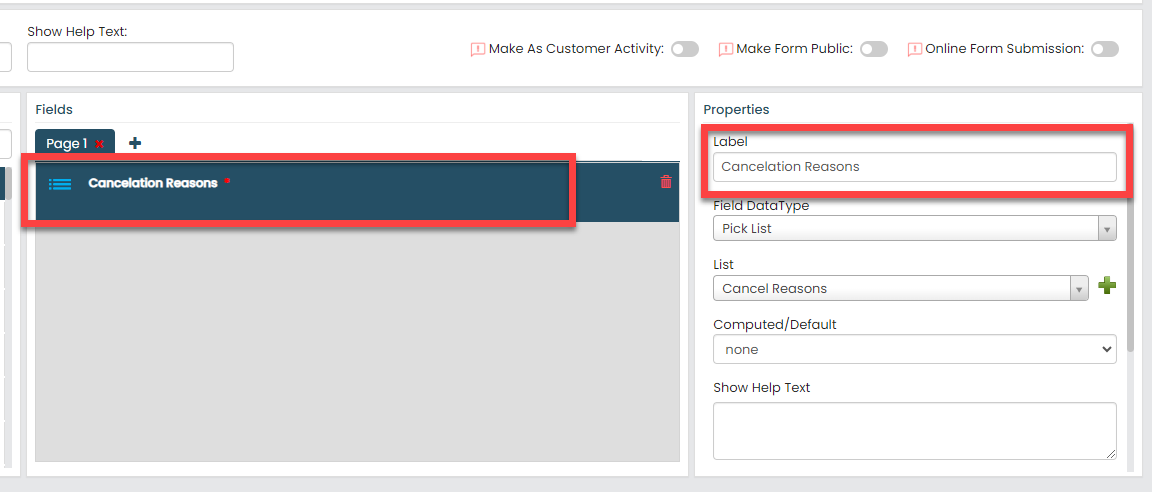
To know more about all the data types, refer to the following topics. -
From the List dropdown under the
Properties section, select the
Cancel Reasons list that we created
earlier
-
Now click Publish and then click
OK to make it available to the
technicians.
Note: To know more about all the publishing options, refer to Publishing Options.
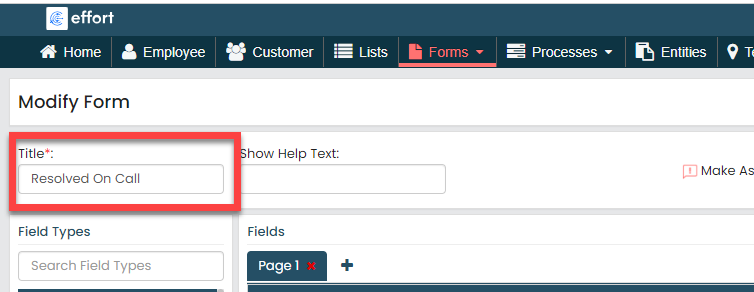
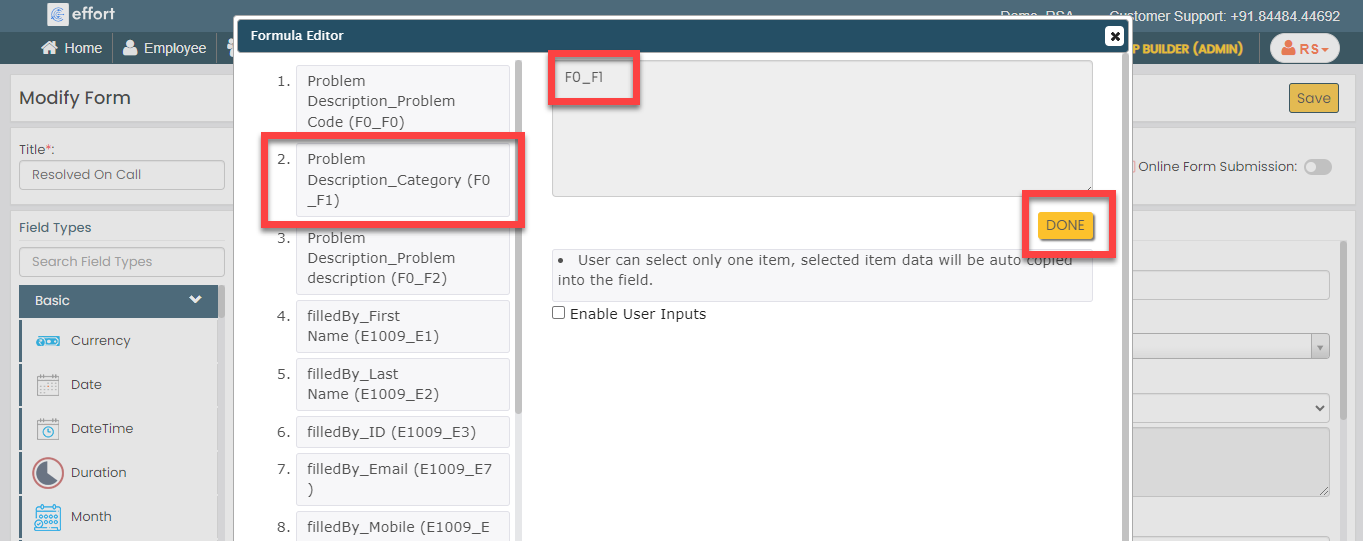
Resolved On Call Form
Technicians fill out the "Resolved On Call" form if they successfully complete an RSA task over the phone. This form records the details of the issue that occurred in the vehicle. To create this form, follow the steps below:
- Go to .
-
In the Title field, enter the title as
Resolved On Call.
-
Drag and drop the following data types onto the field canvas and
label them as shown below.

Data Type Label Pick List Problem Description Text Problem Key Text Problem Category To know more about all the data types, refer to the following topics. -
Click the Problem Description picklist
field, select the Problem Master list that we
created earlier from the List dropdown under
the Properties section.

-
Click the Problem Key field, and do the
following:
-
Under the Properties section, select
the Computed option from the
Computed/Default dropdown.
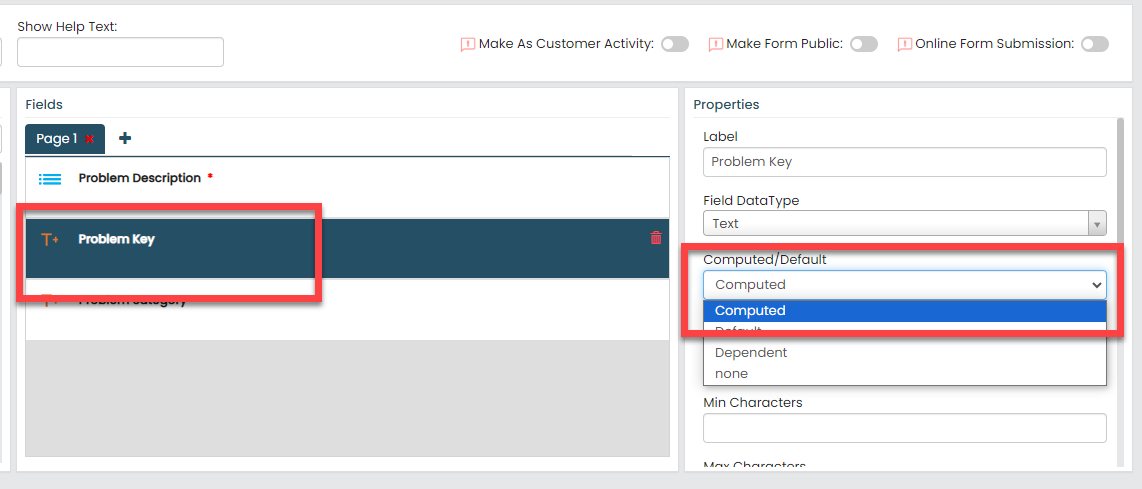
To know more about Computed and Default options, refer to Field Properties.
-
Click the grey box under the
Computed/Default dropdown, and
select the first field labeled as Problem
description_Problem Code, and click
Done.
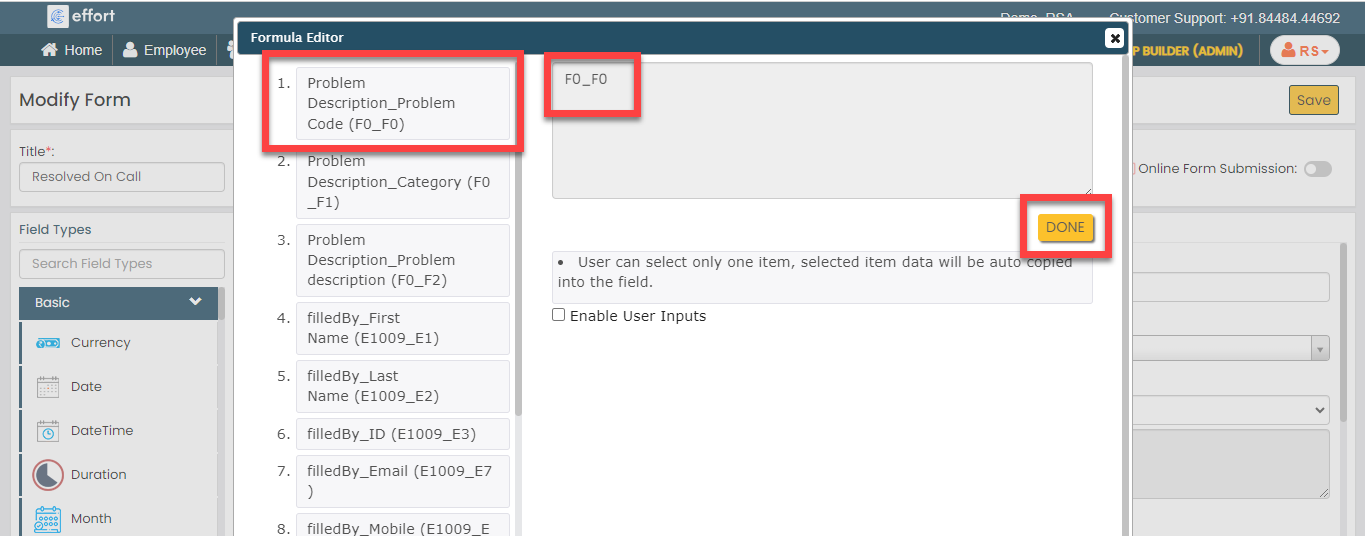
This configuration allows us to retrieve the problem code from the problem master and automatically populate on this field when the technician selects the problem in the first field.
-
Under the Properties section, select
the Computed option from the
Computed/Default dropdown.
-
Click the Problem Category field, and do the
following:
-
Under the Properties section, select
the Computed option from the
Computed/Default dropdown.
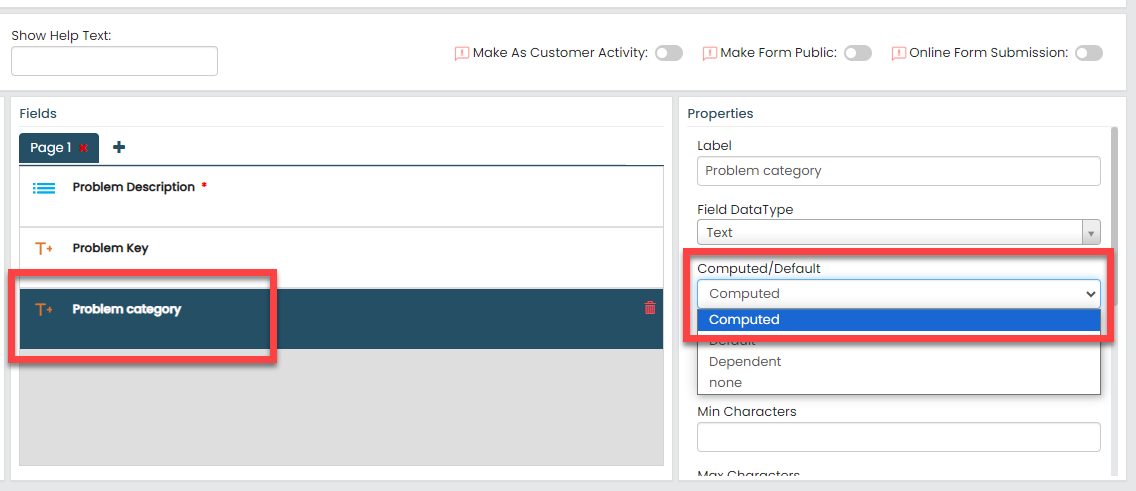
To know more about Computed and Default options, refer to Field Properties.
-
Click the grey box under the
Computed/Default dropdown, and
select the first field labeled as Problem
description_Category, and click
Done.
This configuration allows us to retrieve the problem description from the problem master and automatically populate on this field when the technician selects the problem in the first field.
-
Under the Properties section, select
the Computed option from the
Computed/Default dropdown.
-
Now click Publish and then click
OK to make it available to the
technicians.
Note: To know more about all the publishing options, refer to Publishing Options.
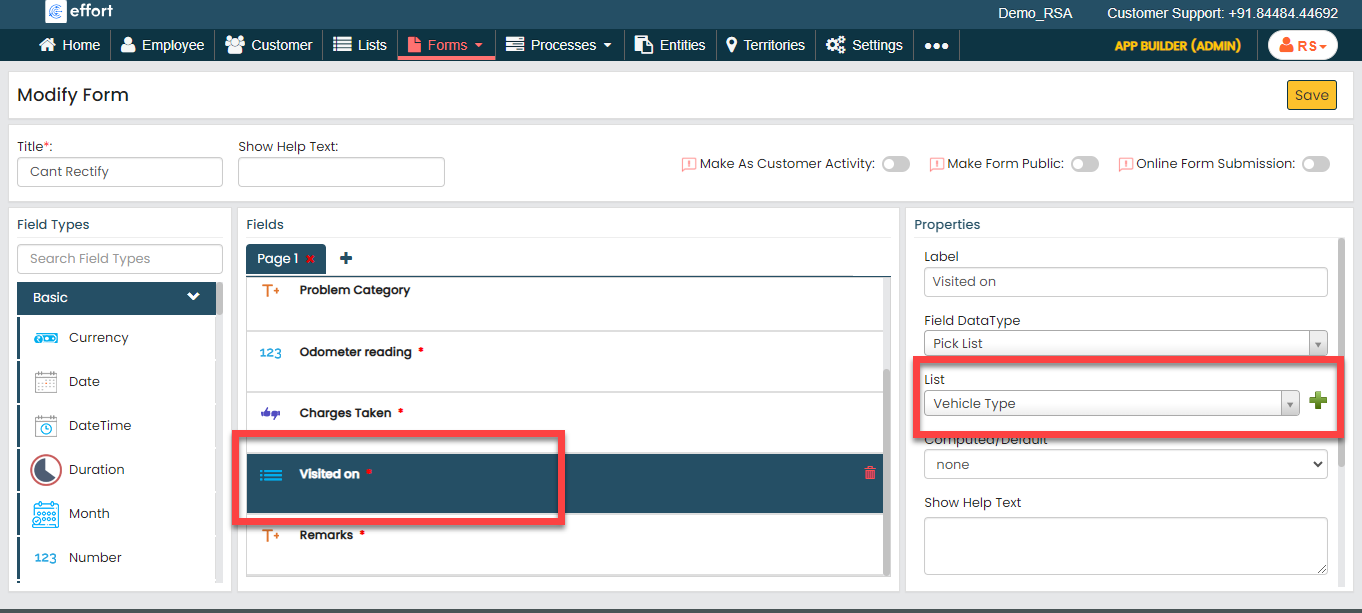
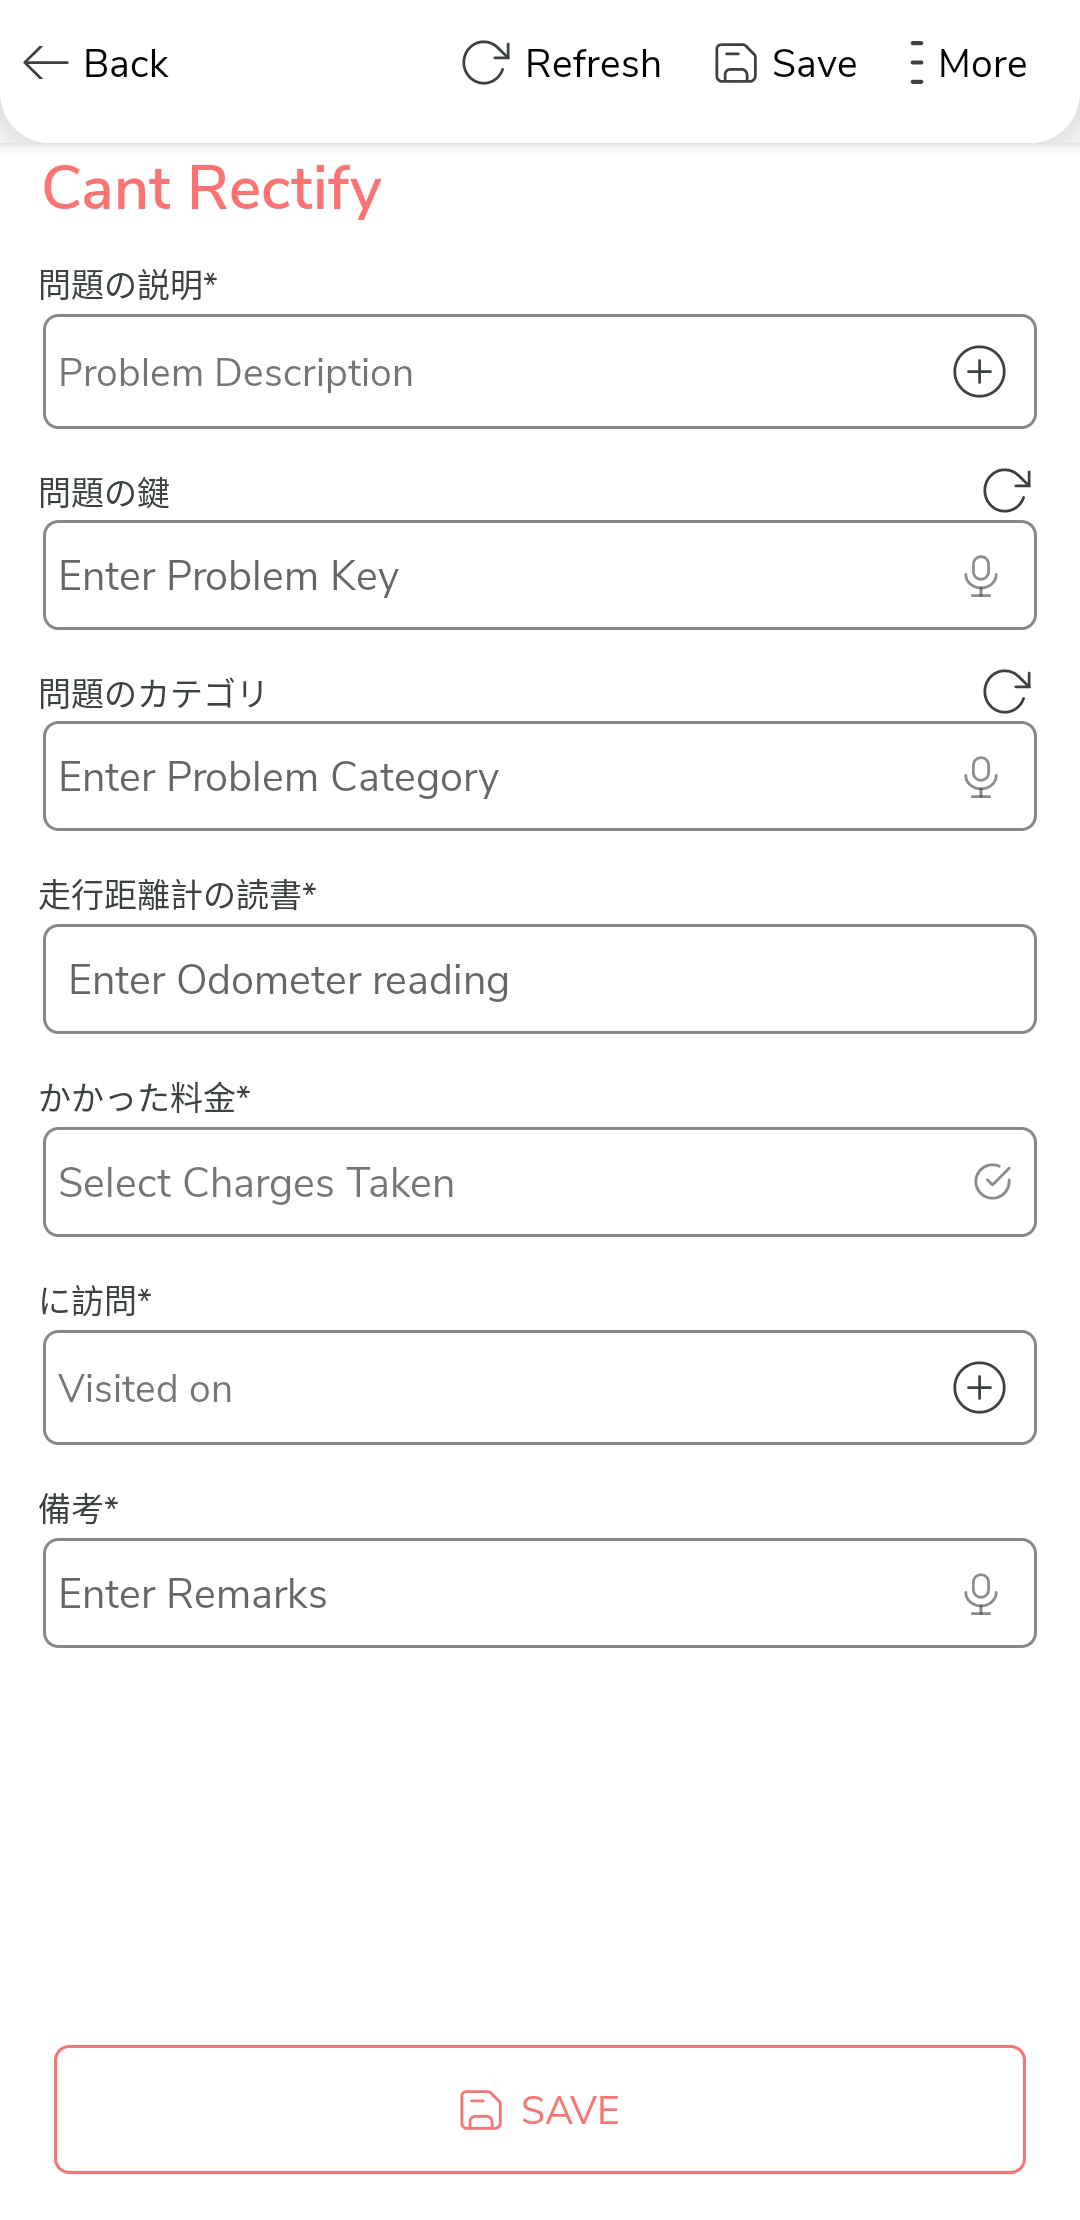
Cant Rectify Form
Technicians fill out the "Cant Rectify" form when they failed to execute an RSA task. This form records the details of the issue that occurred in the vehicle and remarks. To create this form, follow the steps below:
- Go to .
-
In the Title field, enter the title as
Cant Rectify.

-
Drag and drop the following data types onto the field canvas and
label them as shown below.
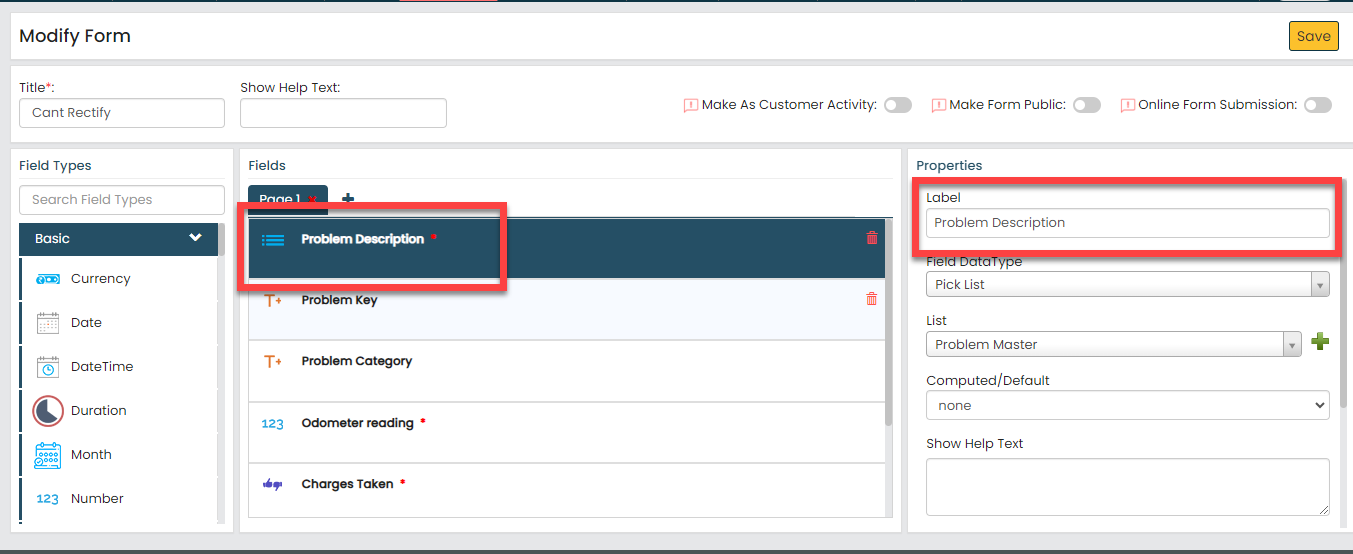
Data Type Label Pick List Problem description Text Problem Key Text Problem Category Number Odometer reading Yes/No Charges Taken Pick List Visited on Text Remarks To know more about all the data types, refer to the following topics. -
Click the Problem description picklist
field, select the Problem Master list that we
created earlier from the List dropdown under
the Properties section.
-
Click the Problem Key field, and do the
following:
-
Under the Properties section, select
the Computed option from the
Computed/Default dropdown.
To know more about Computed and Default options, refer to Field Properties.
-
Click the grey box under the
Computed/Default dropdown, and
select the first field labeled as Problem
description_Problem Code, and click
Done.
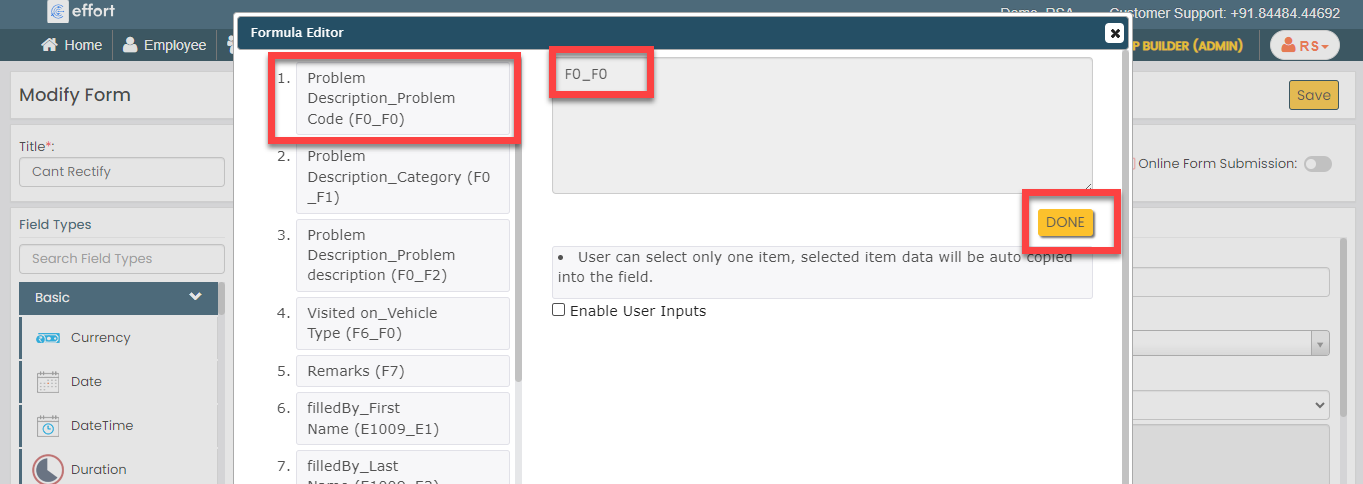
This configuration allows us to retrieve the problem code from the problem master and automatically populate on this field when the technician selects the problem in the first field.
-
Under the Properties section, select
the Computed option from the
Computed/Default dropdown.
-
Click the Problem Category field, and do the
following:
-
Under the Properties section, select
the Computed option from the
Computed/Default dropdown.
To know more about Computed and Default options, refer to Field Properties.
-
Click the grey box under the
Computed/Default dropdown, and
select the first field labeled as Problem
description_Category, and click
Done.
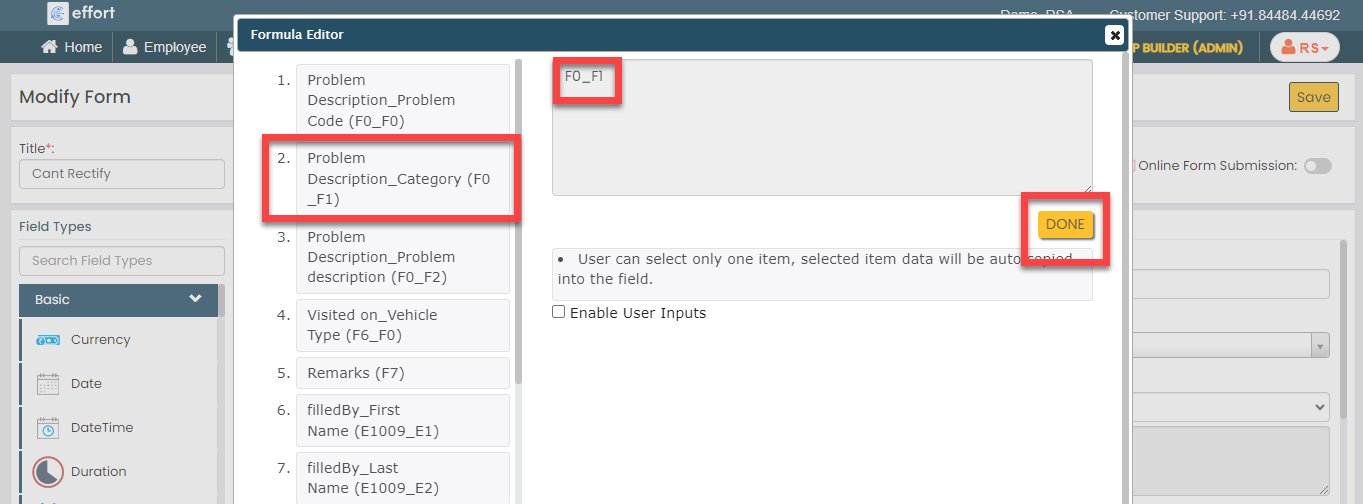
This configuration allows us to retrieve the problem description from the problem master and automatically populate on this field when the technician selects the problem in the first field.
-
Under the Properties section, select
the Computed option from the
Computed/Default dropdown.
-
Click the Visited on picklist field, select
the Vehicle Type list that we created earlier
from the List dropdown under the
Properties section.
-
Now click Publish and then click
OK to make it available to the
technicians.
Note: To know more about all the publishing options, refer to Publishing Options.
Technician Cancel Form
Technicians fill out the "Technician Cancel" form whenever they reject an RSA task due to some reasons. This form records reasons for canceling the RSA task. To create this form, follow the steps below:
- Go to .
-
In the Title field, enter the title as
Technician Cancel.
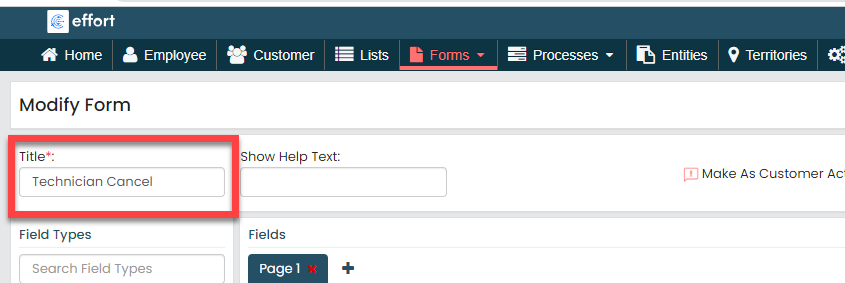
-
Drag and drop the Pick List data type onto the field canvas
and label it as Technician Cancel.

To know more about all the data types, refer to the following topics. -
From the List dropdown under the
Properties section, select the
Technician Cancel list that we created
earlier
-
Now click Publish and then click
OK to make it available to the
technicians.
Note: To know more about all the publishing options, refer to Publishing Options.
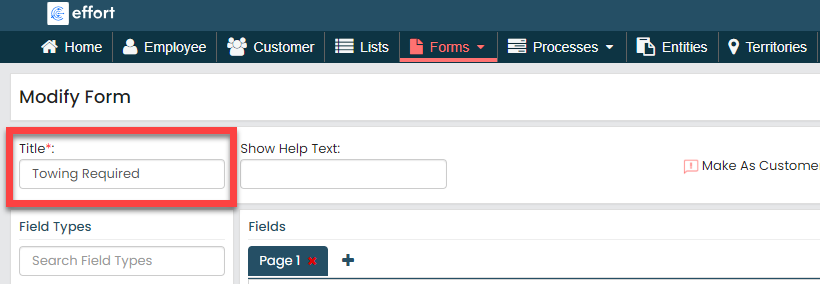
Towing Required Form
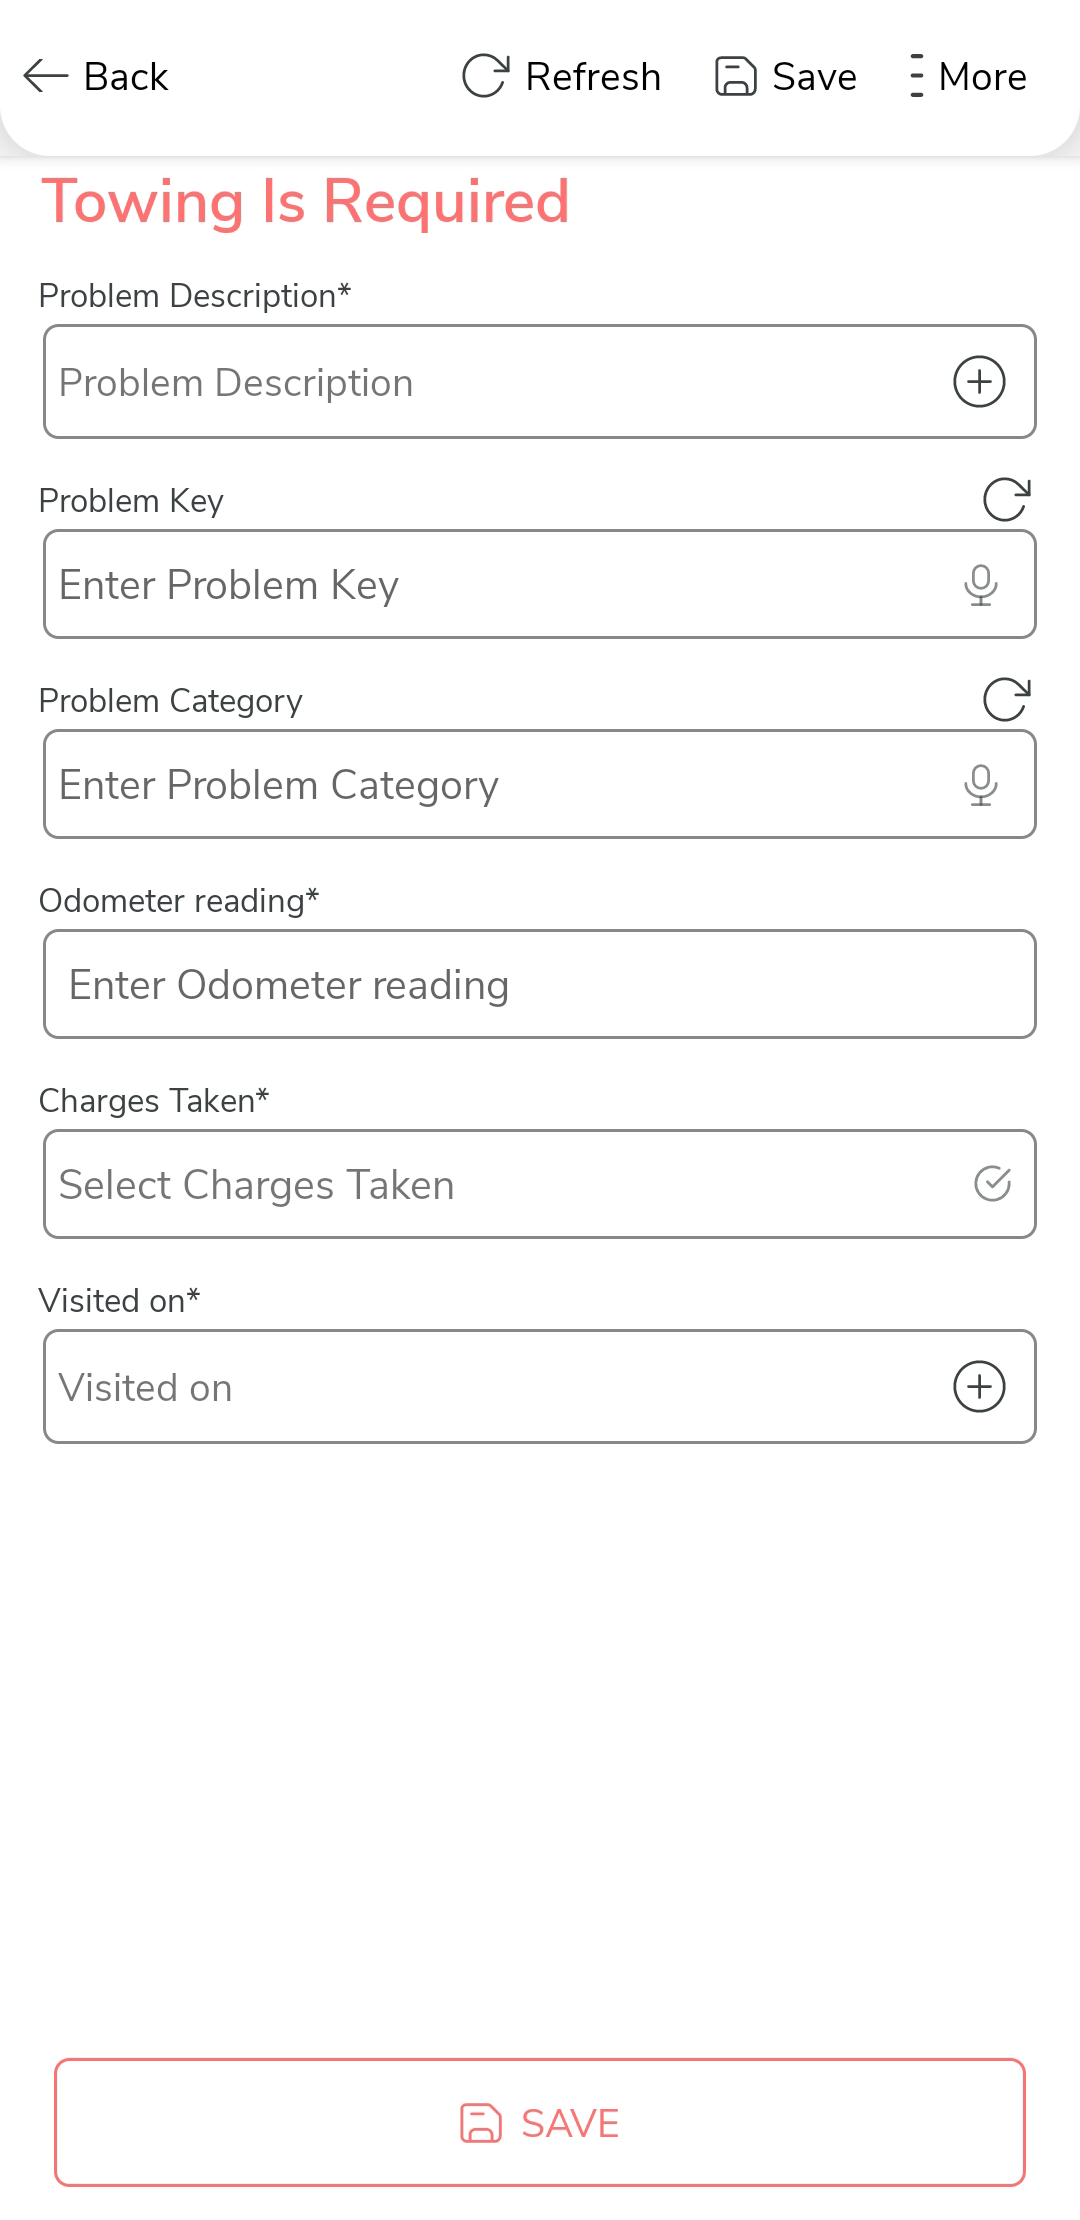
When a vehicle needs to be towed, technicians fill out the Towing Required form, documenting the specific issue encountered. This form is crucial for keeping a record of the problem and the towing process. To create this form, follow the steps below:
- Go to .
-
In the Title field, enter the title as
Towing Required.
-
Drag and drop the following data types onto the field canvas and
label them as shown below.

Data Type Label Pick List Problem description Text Problem Key Text Problem Category Number Odometer reading Yes/No Charges Taken Pick List Visited on To know more about all the data types, refer to the following topics. -
Click the Problem description picklist
field, select the Problem Master list that we
created earlier from the List dropdown under
the Properties section.
-
Click the Problem Key field, and do the
following:
-
Under the Properties section, select
the Computed option from the
Computed/Default dropdown.
To know more about Computed and Default options, refer to Field Properties.
-
Click the grey box under the
Computed/Default dropdown, and
select the first field labeled as Problem
description_Problem Code, and click
Done.
This configuration allows us to retrieve the problem code from the problem master and automatically populate on this field when the technician selects the problem in the first field.
-
Under the Properties section, select
the Computed option from the
Computed/Default dropdown.
-
Click the Problem Category field, and do the
following:
-
Under the Properties section, select
the Computed option from the
Computed/Default dropdown.
To know more about Computed and Default options, refer to Field Properties.
-
Click the grey box under the
Computed/Default dropdown, and
select the first field labeled as Problem
description_Category, and click
Done.
This configuration allows us to retrieve the problem description from the problem master and automatically populate on this field when the technician selects the problem in the first field.
-
Under the Properties section, select
the Computed option from the
Computed/Default dropdown.
-
Click the Visited on picklist field, select
the Vehicle Type list that we created earlier
from the List dropdown under the
Properties section.
-
Now click Publish and then click
OK to make it available to the
technicians.
Note: To know more about all the publishing options, refer to Publishing Options.
Location Capture Form
The Location Capture form will be filled by end customers. When a new RSA task is received, the technician checks the customer's location. If the location isn't captured, the technician sends the customer a link via SMS to their registered mobile number. The customer can click the link and choose their current location on the map. To create this form, follow the steps below:
- Go to .
-
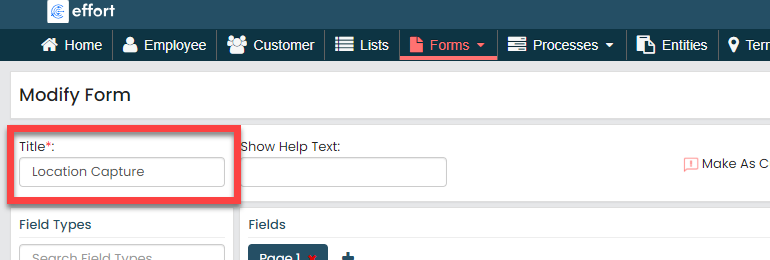
In the Title field, enter the title as
Location Capture.
-
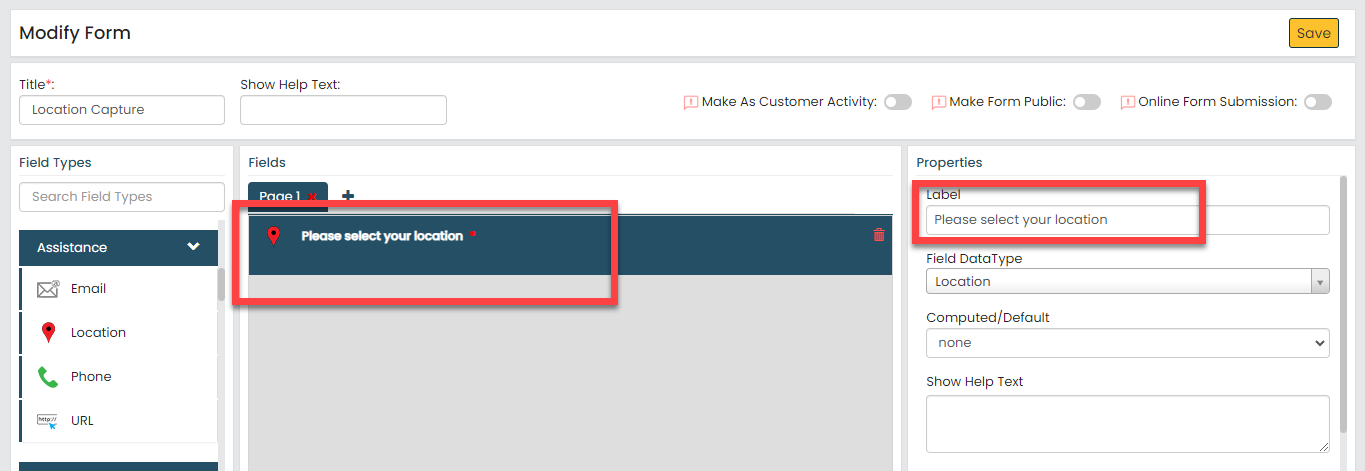
Drag and drop the Location data type onto the field canvas
and label it as Please select your location.
To know more about all the data types, refer to the following topics. -
Now click Publish and then click
OK to make it available to the
technicians.
Note: To know more about all the publishing options, refer to Publishing Options.
Creation and Configuration of RSA Workflow
The Roadside Assistance (RSA) workflow involves several key activities, including receiving breakdown requests, creating work items, assigning tasks to the nearest technicians, technicians visiting the breakdown location, and delivering the required services. In this section, we will establish the RSA work process activities, outline the sequence of execution, specify the necessary information for creating work items, automate task allocation to technicians, and configure customizations such as work invitation alarms, among other aspects. To know more about work processes, refer Work Processes.
Create Roadside Assistance Process
In this section, we will create the Roadside Assistance process.
- Go to .
-
On the Create Activity Process screen, do the
following:
-
In the Work Process Name field,
enter the title as Road Side Assistance.
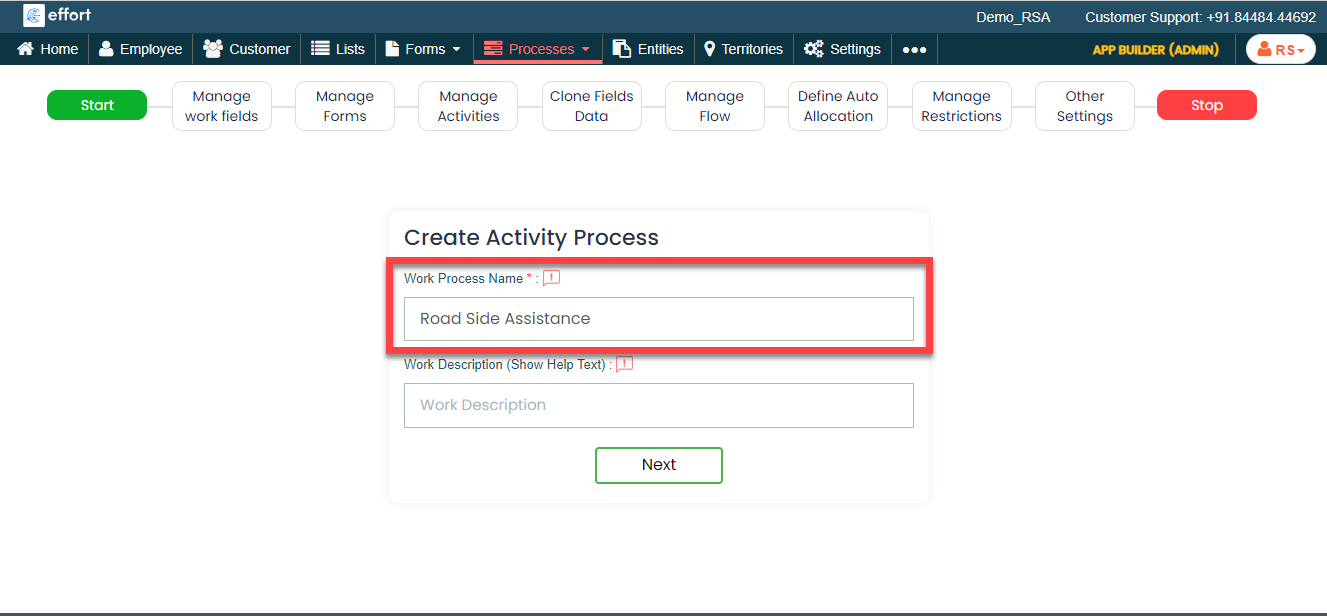
- Click Next.
-
In the Work Process Name field,
enter the title as Road Side Assistance.
-
After entering the process name and clicking Next, you will
proceed to the next tab, where you are required to configure the
work fields. On this tab, click Next and then click
OK. We will configure this section
later.

-
On the Manage Forms tab, click
Next.

-
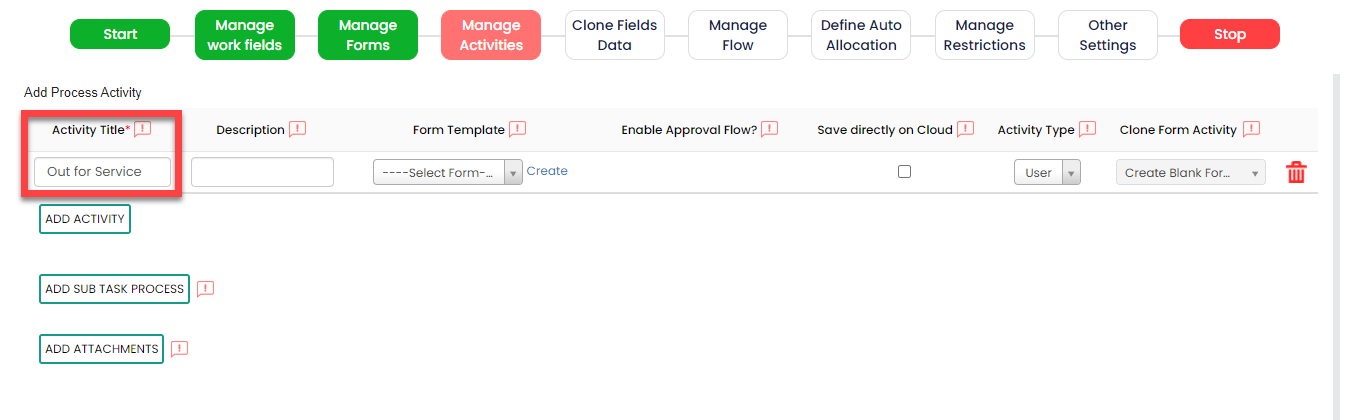
Manage Activities: On this tab, you will
define the activities that need to be executed to complete an RSA
task. To know more about activities, refer Activities. To
define the activities, follow these steps:
-
Click Add Activity.

-
Under the Activity Title column,
enter the title as Out for
service.
-
Similarly, click Add Activity button
again to create another activity as
Reached.

-
Now click the Add Activity button
again to create another activity as
Resolved.
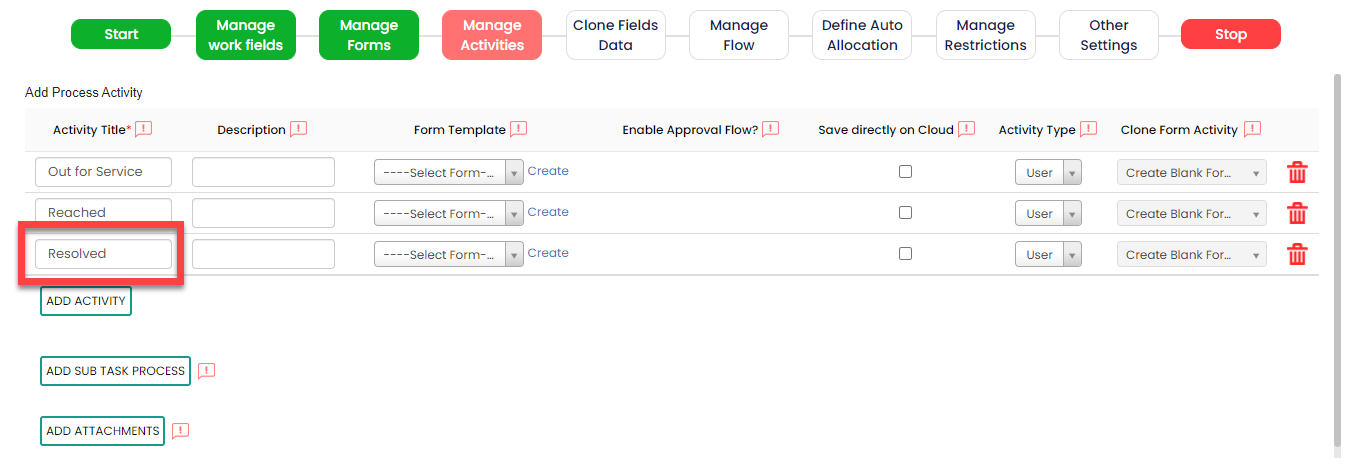
-
The above Resolved activity will be performed when a
technicians completes an RSA task. When completing this
activity, the technician must capture the details of the
resolution. To capture these details, we have created a
Resolution form earlier. Here, we will configure this
Resolution form to this activity. To configure this, click
the Select Form dropdown under the
Form Template column against the
Resolved Activity, and selct the
Resolution form.

-
Similarly, define the activities and configure the forms as
shown below:
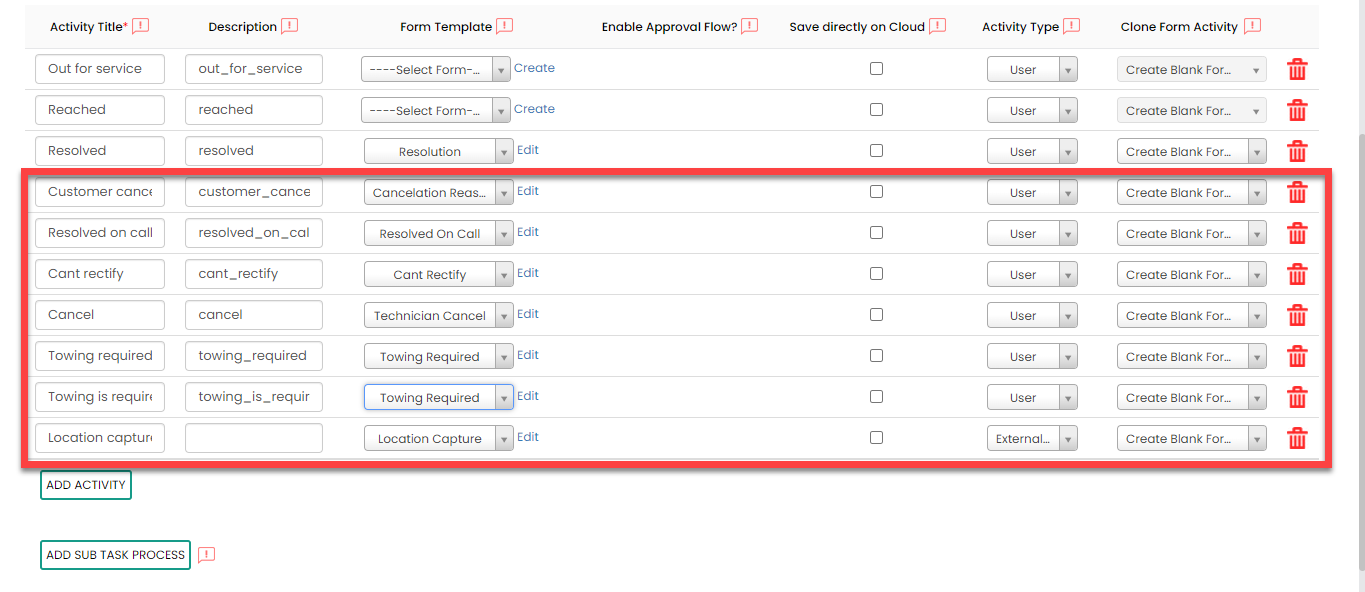
-
As you can see the last activity named Location
capture, the Activity
Type is configured as External
Activity.
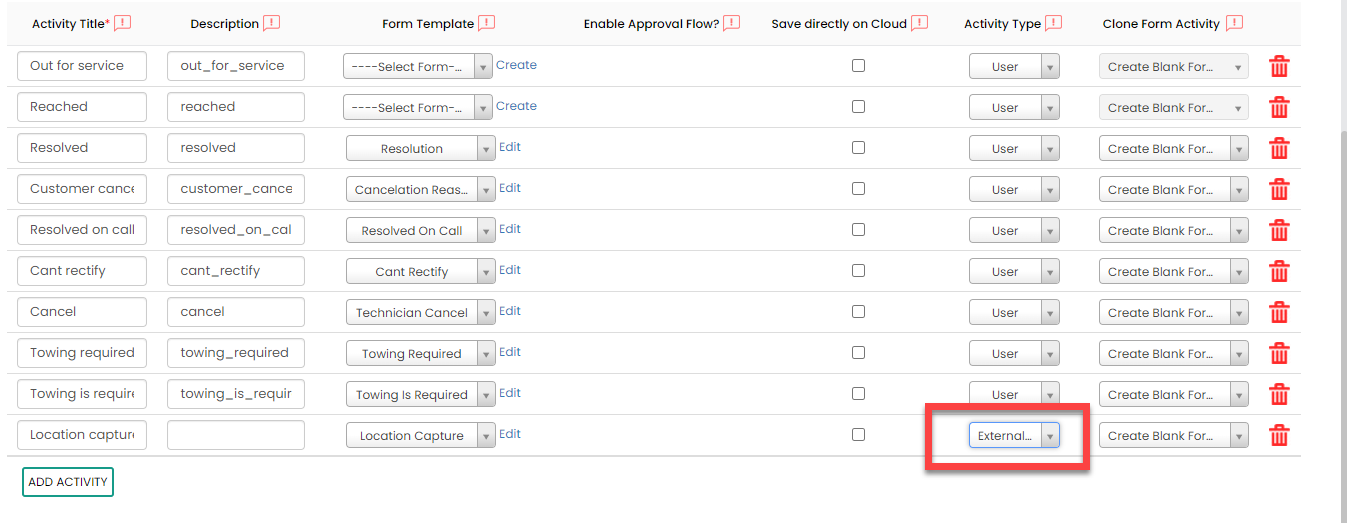
This activity will be executed by the customers. When this activity is initiated, a link will be sent to the configured mobile number and/or email. Customers are required to click on the link and complete the form. For further information on External Activity, refer to the External Activity documentation.
-
Click Add Activity.
-
On the Clone Fields Data tab, click
Next.

-
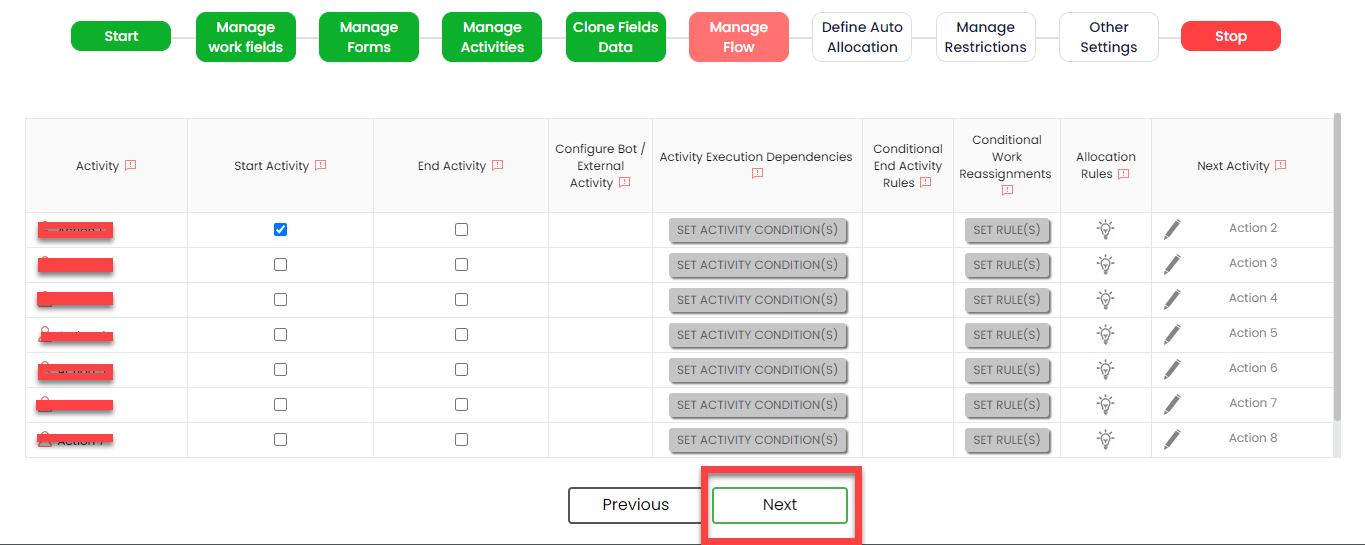
On the Manage Flow tab, you can see the default flow created
automatically. Click Next to move to the next
screen. We will configure this later.
-
On the Define Auto Allocation tab, click
Skip. We will configure this later.

-
On the Manage Restrictions tab, click
Next. We will configure this later.
-
On the Other Settings tab, click
Complete. We will configure this
later.

- As you can see, we've ignored some configurations as those are complex and time consuming. Refer to the next sections for detailed steps to configure the flow, fields, work settings, auto allocation, and so on.
Configure Work Fields
In this section, we will configure the work fields which are required for capturing the information necessary to create an RSA work. You will find some default fields that are pre-configured. However, these defaults are insufficient for capturing the necessary information. To address this, we must add and configure custom fields. To know more about work fields, refer Work Fields.
Follow the steps below to create work fields.
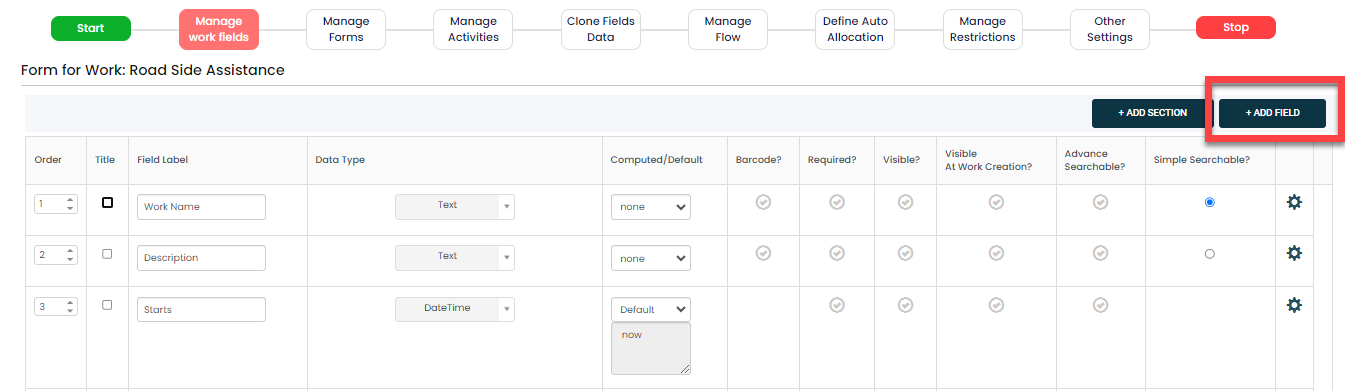
- On the process page, click Manage Fields. Alternatively, go to .
-
To begin, deactivate all default fields by clicking on the green
checkboxes, as demonstrated below.


-
After disabling all the default fields, click the Add
Field button.
-
In Field Label, enter Vehicle
Registration. Then, select the data type as
Pick List and select Vehicle
Registration Master list frsom the second
dropdown.
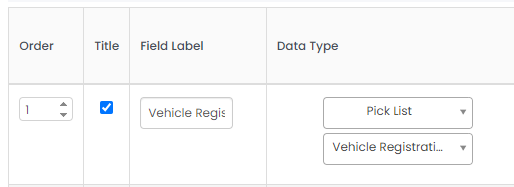
-
As shown below, define the Order as 1 and make the
field as Title, Required, Visible, Visible at Work
Creation, Advance Searchable, and Simple
Searchable.

-
Similarly, click the Add Field button again
and configure the following fields as described in the following
table.
Field Configuration Customer Name Make this field as Default. Click on the grey box and configure as shown below: 
The field configuration is shown below:
Customer Mobile No Make this field as Default. Click on the grey box and configure as shown below: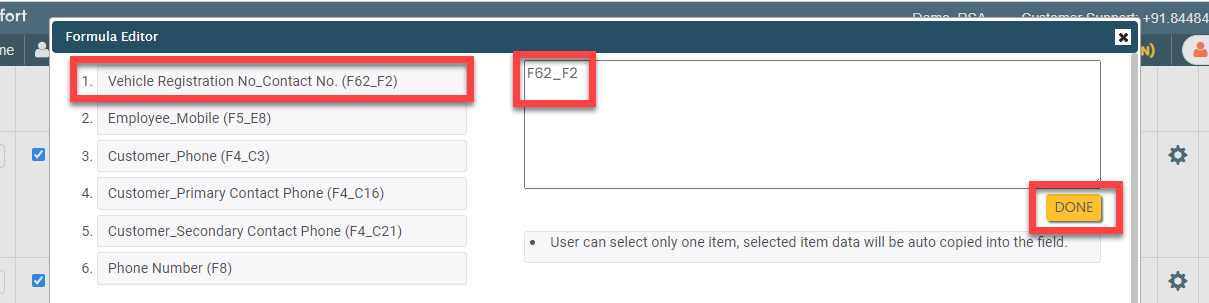
The field configuration is shown below:
Permanent Mobile No Make this field as Default. Click on the grey box and configure as shown below:
The field configuration is shown below:
City Key Configure the field as shown below: 
Breakdown City Make this field as Computed. Click on the grey box and configure as shown below: 
The field configuration is shown below:
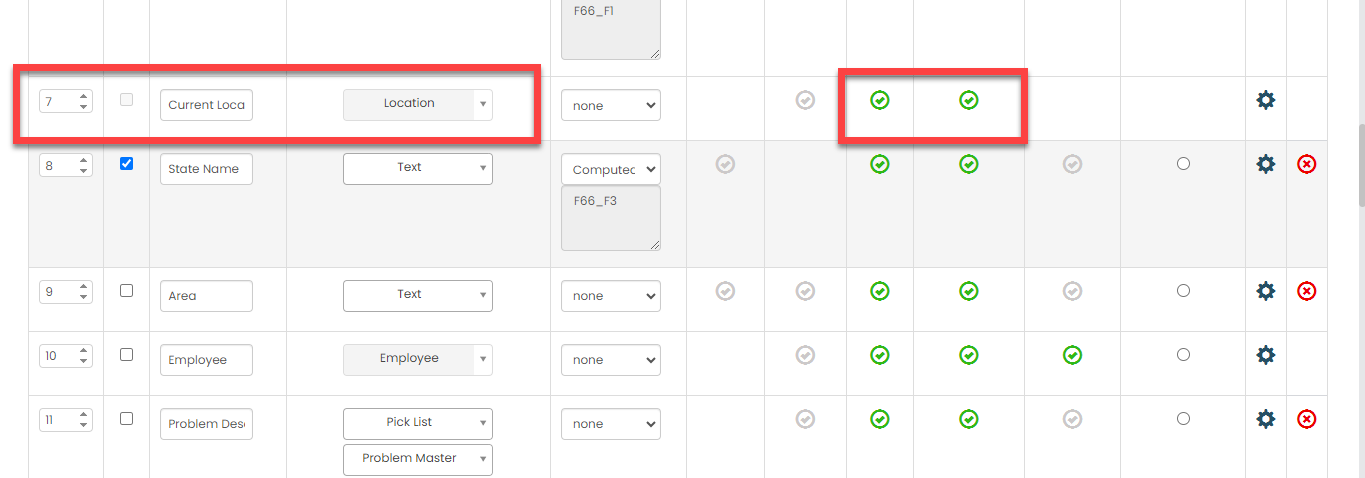
Current Location Configure the field as shown below:- Configure the field as shown below:
- Click the gear icon.

- On the Advanced Setting pop-up, enable
the Send location capture link checkbox and
select Customer Mobile No from the
Select the default phone number
dropdown.

Note: This configuration help us to send a link to customer while creating the work. The customer can click on the link and select his current location. The customer's location (lat-long values) will be populated automatically on the field.State Name Make this field as Computed. Click on the grey box and configure as shown below: 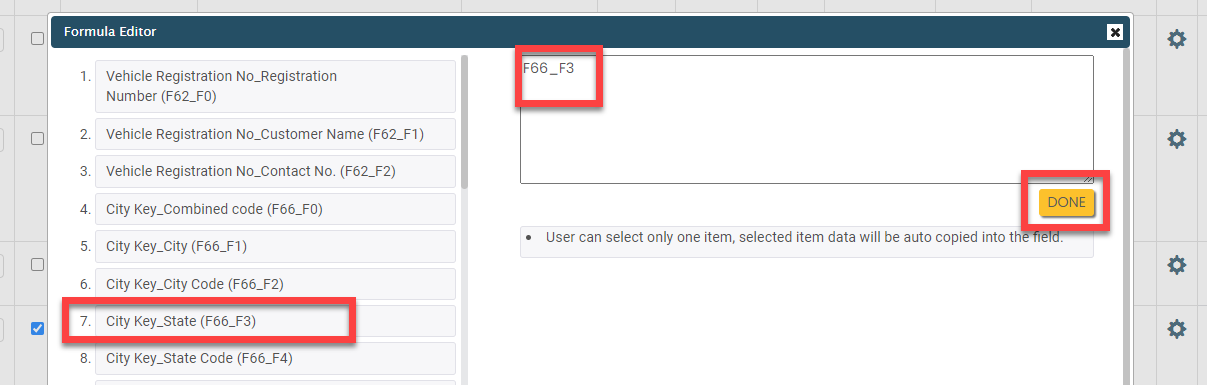
The field configuration is shown below:
Area Configure the field as shown below: 
Employee Configure the field as shown below: 
Problem Description Configure the field as shown below: 
Problem Category Make this field as Computed. Click on the grey box and configure as shown below: 
The field configuration is shown below:
Problem Key Make this field as Computed. Click on the grey box and configure as shown below: 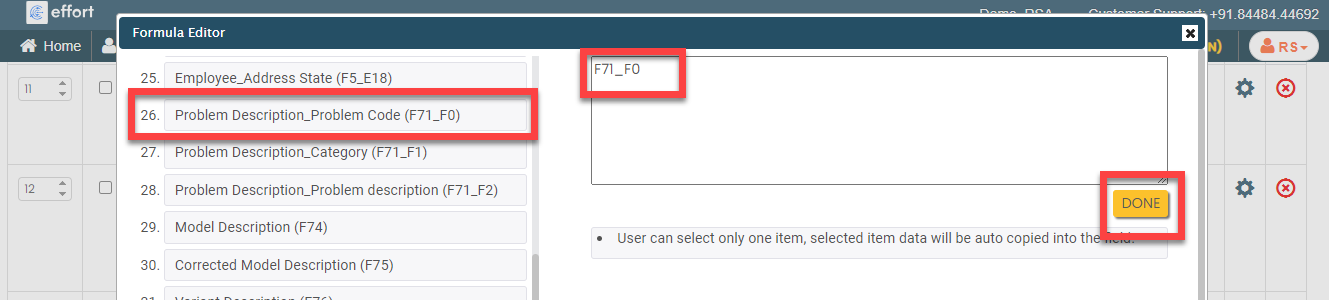
The field configuration is shown below:
Model Description Configure the field as shown below: 
Corrected Model Description Configure the field as shown below: 
Variant Description Configure the field as shown below: 
Corrected Variant Description Configure the field as shown below: 
Color Description Configure the field as shown below: 
Corrected Color Description Configure the field as shown below: 
Sale Date Configure the field as shown below: 
Corrected Sale Date Configure the field as shown below: 
Warranty Expiry Date Configure the field as shown below: 
Corrected Warranty Expiry Date Configure the field as shown below: 
Warranty Status Configure the field as shown below: 
Family Involvement Configure the field as shown below: 
Request Generated From Configure the field as shown below: 
Region Make this field as Computed. Click on the grey box and configure as shown below: 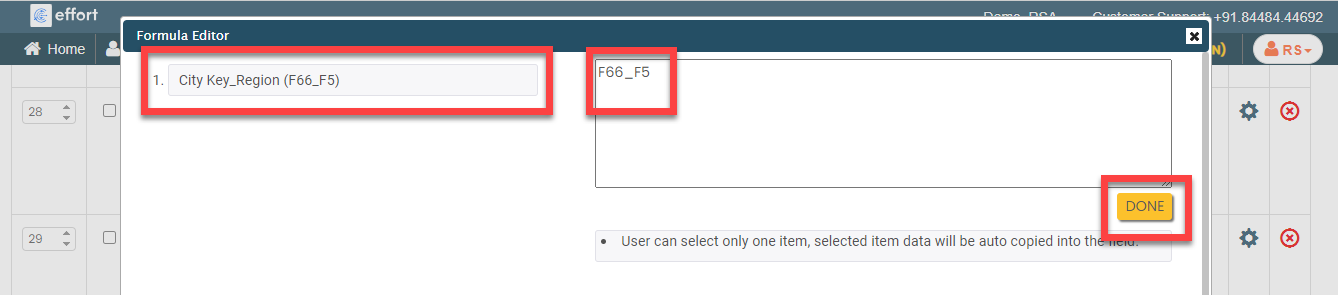
The field configuration is shown below:
Advice Message Configure the field as shown below: 
FailSafe Configure the field as shown below: 
Zone Make this field as Computed. Click on the grey box and configure as shown below: 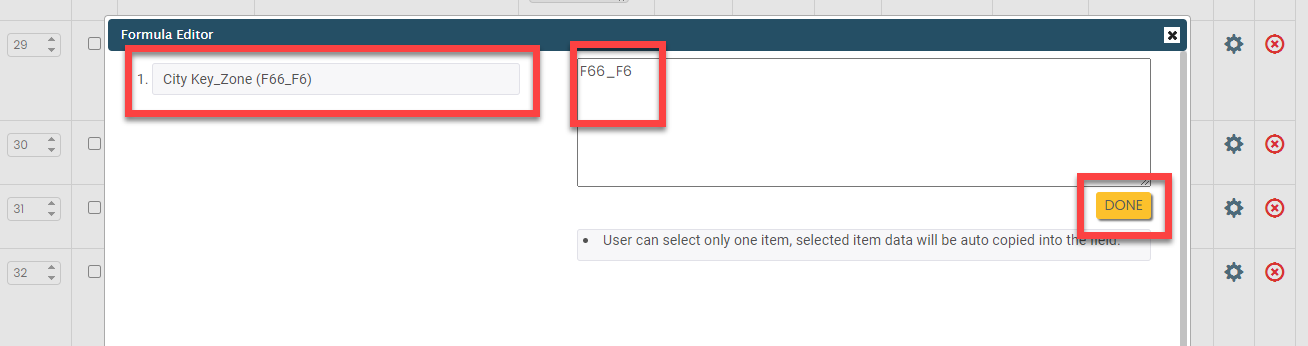
The field configuration is shown below:
City Make this field as Computed. Click on the grey box and configure as shown below: 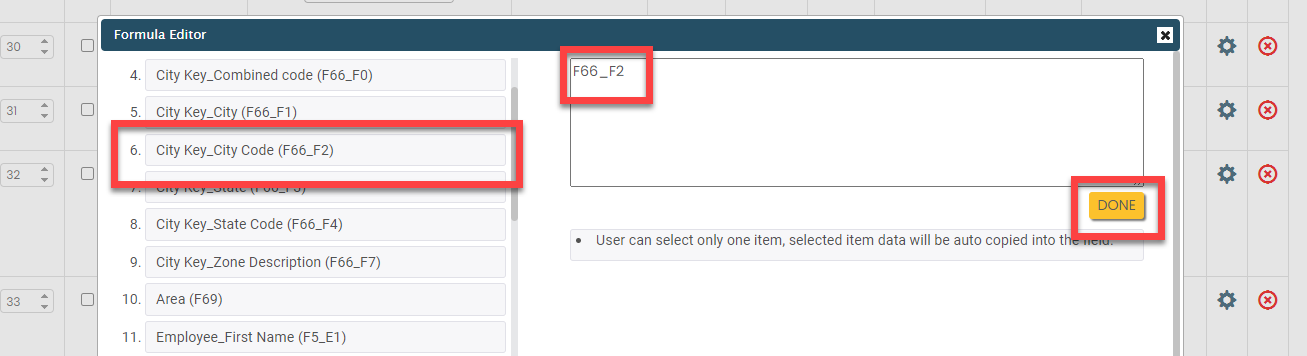
The field configuration is shown below:
Starts Make this field as Default. Click on the grey box and configure as shown below: 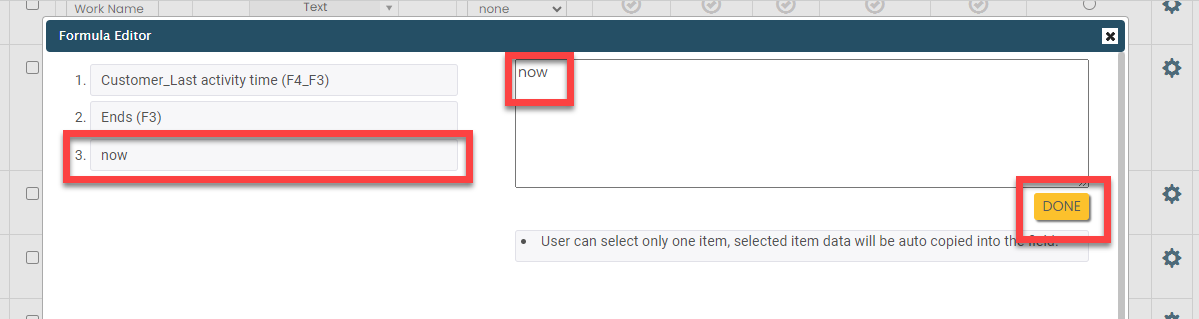
The field configuration is shown below:
Location Captured Configure the field as shown below: 
Job Type Configure the field as shown below: 
Ends Configure the field as shown below: 
Connect to call center Make this field as Computed. Click on the grey box and enter the service center number. 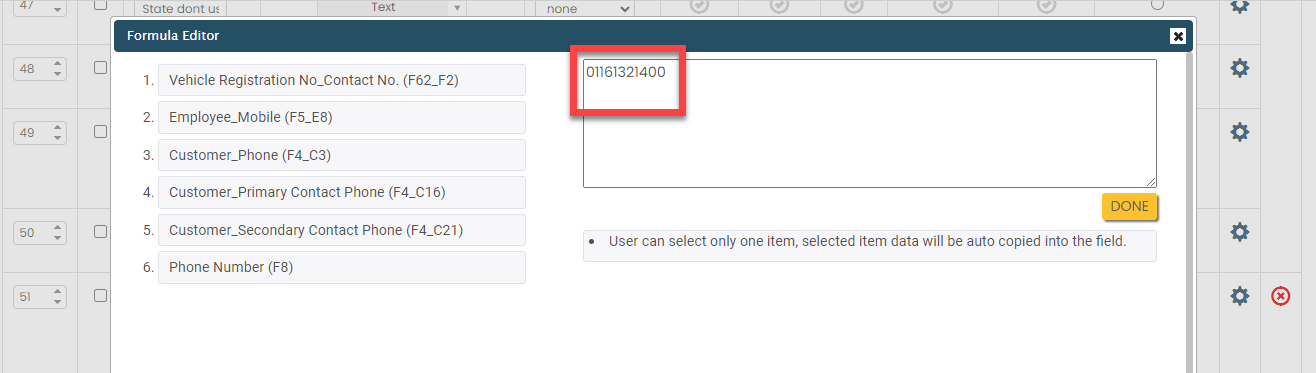
The field configuration is shown below:
Sequence No Configure the field as shown below: 
- Configure the field as shown below:
- Once you configure all the fields, click Save.
Configure Work Flow
In this section, we will define the workflow, which outlines the sequence of activities defined earlier. This process includes specifying the start activity, end activity, subsequent activities, and more. To know more about the Flow, refer to the Manage Flow documentation.
Follow the instructions below to configure flow:
- On the process page, click Manage Flow. Alternatively, go to .
-
For the Out for Service activity, do the
following:
-
Make the Out for service activity as
Start Activity as shown
below.

When you make an activity as the start activity, it means that technicians have to do this activity first.
-
Under the Next Activity column,
click the pencil icon.

-
Select the next activities that need to be executed after
this activity as shown below and click the right arrow icon
to move them to the selected section.
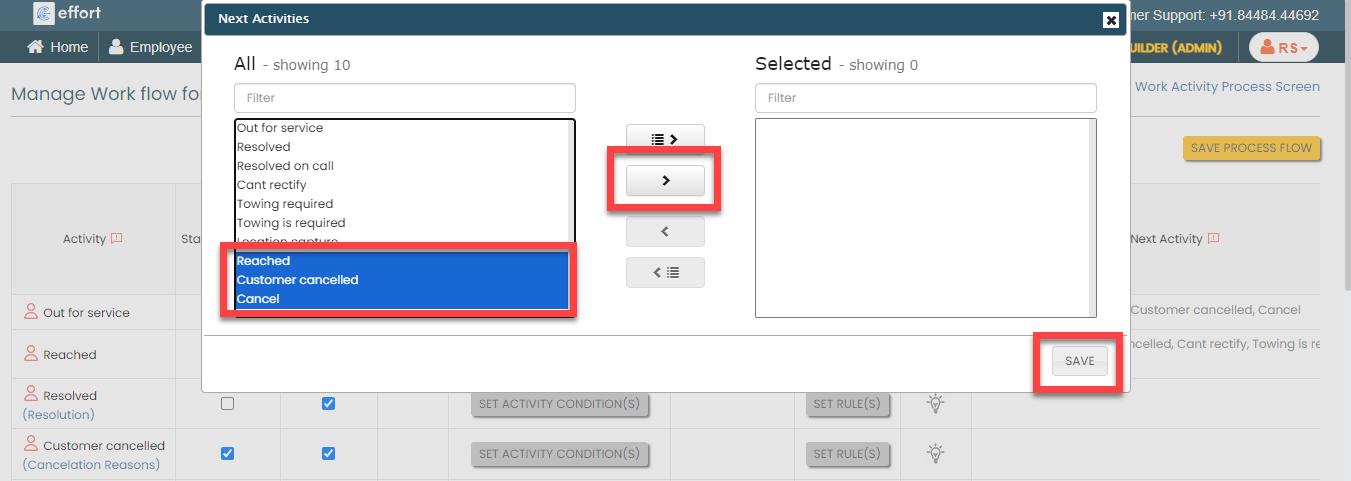
According to this configuration, the technician will have the flexibility to choose and execute any of the selected activities after the start action based on the specific scenario.
-
Make the Out for service activity as
Start Activity as shown
below.
-
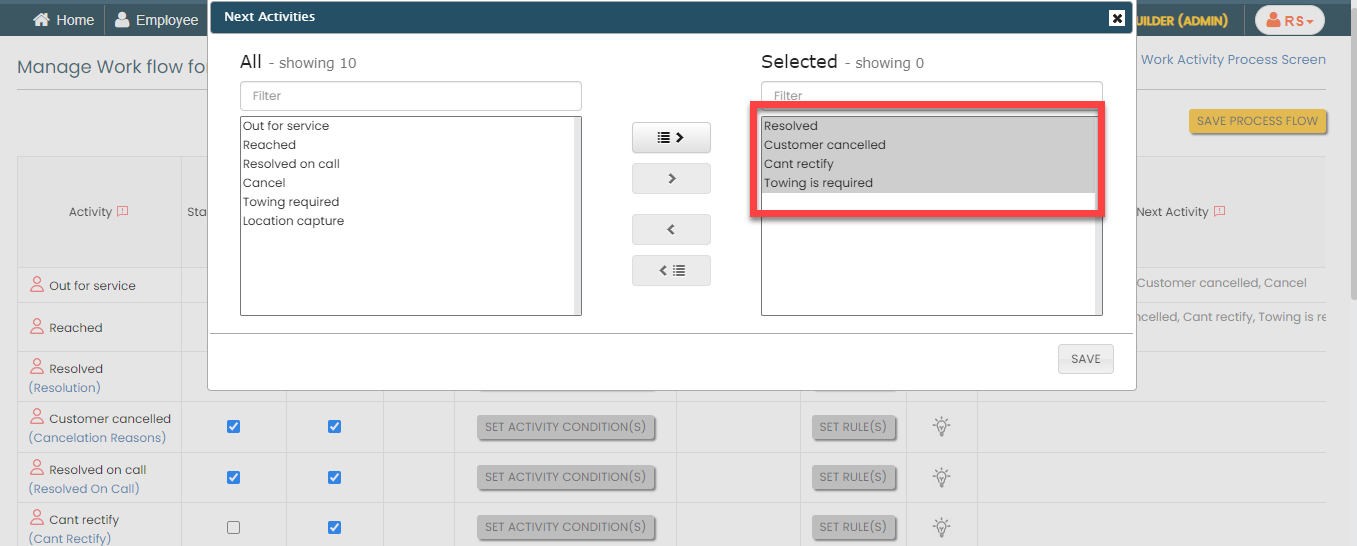
For the Reached activity, configure the
Next Activities as shown below:
-
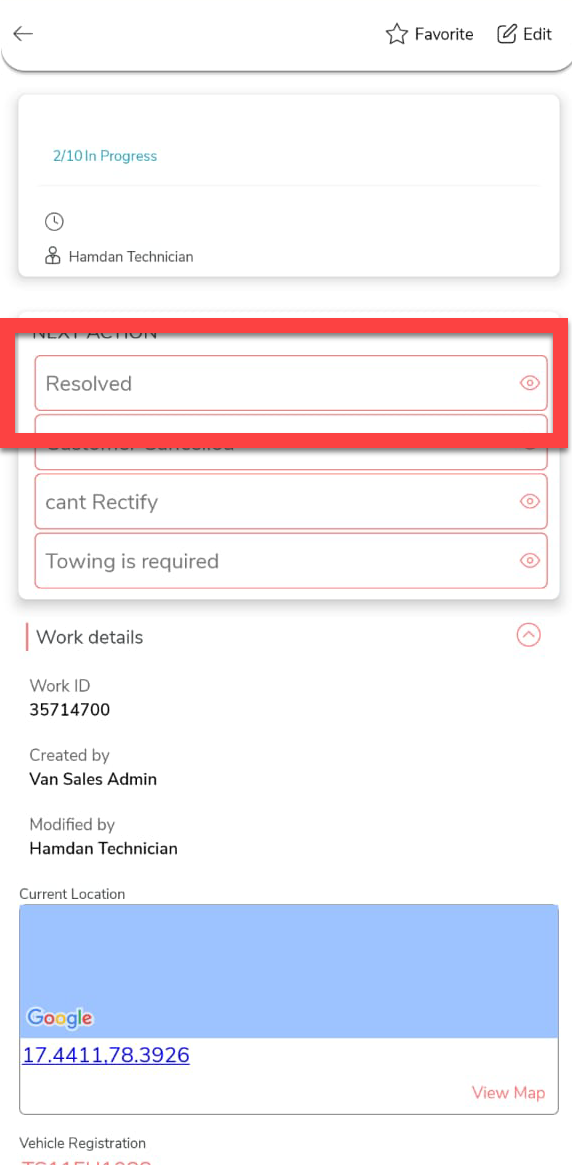
Make the Resolved activity as End
Activity as shown below.
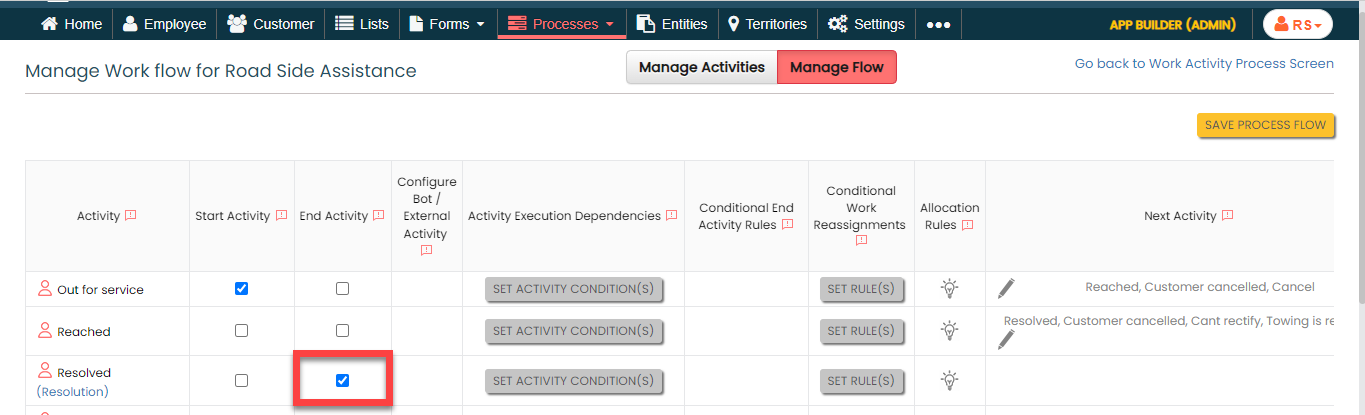
When you make an activity as the end activity, the RSA will be marked as completed once the technicians exectute this activity.
-
Make the Customer cancelled as start and end
activity.

In certain situations, customers may cancel the work they requested. As per this configuration, when a customer cancels the RSA task, the technician executes it as a start action. If technicians initiate this as a start activity, they don't have to go through the entire process. That's why we've marked it as both a start and an end activity.
-
Make the Resolved on call as start and end
activity.
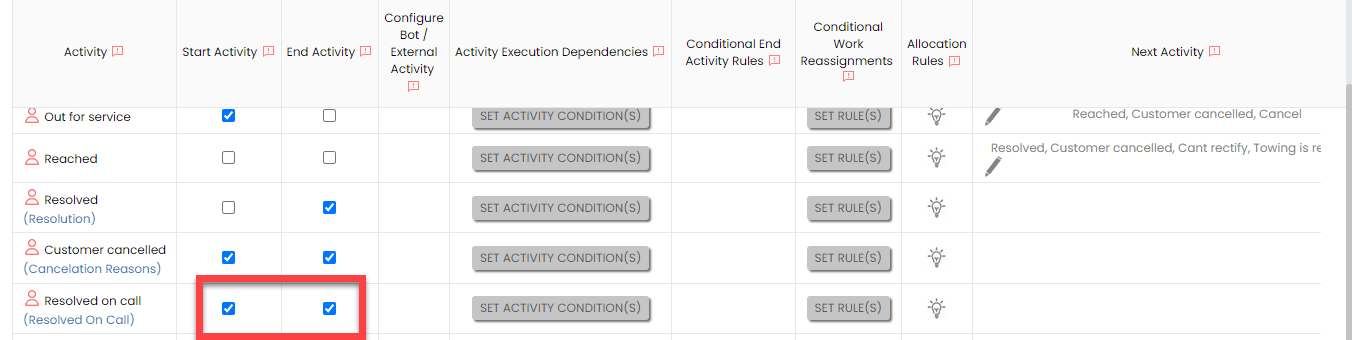
In some cases, problems can be solved if customers follow the instructions provided by technicians over the phone. As per this configuration, when an issue is resolved through a phone call, technicians treat it as a starting action. If technicians initiate this as a start activity, they don't have to go through the entire process. That's why we've marked it as both a start and an end activity.
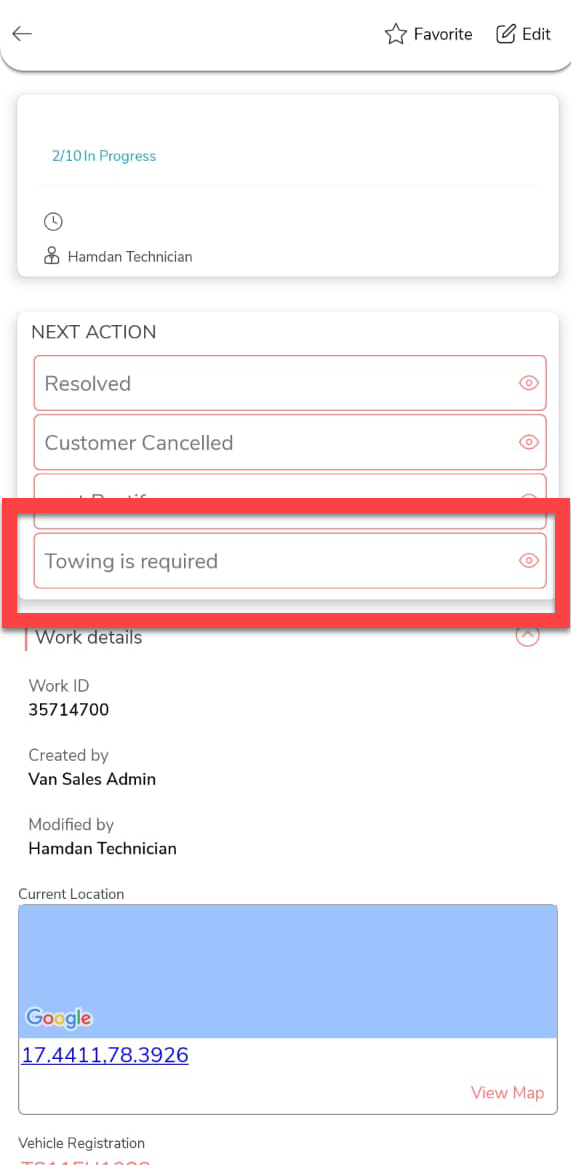
-
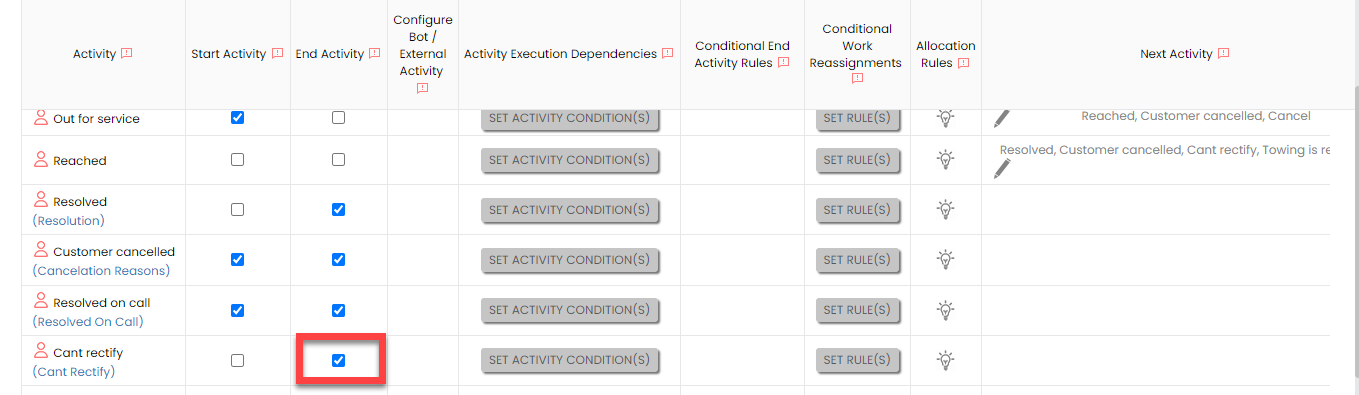
Make the Cant rectify activity as
End Activity as shown below.
-
For the Cancel activity, do the
following:
-
Make the Cancel activity as
Start Activity.
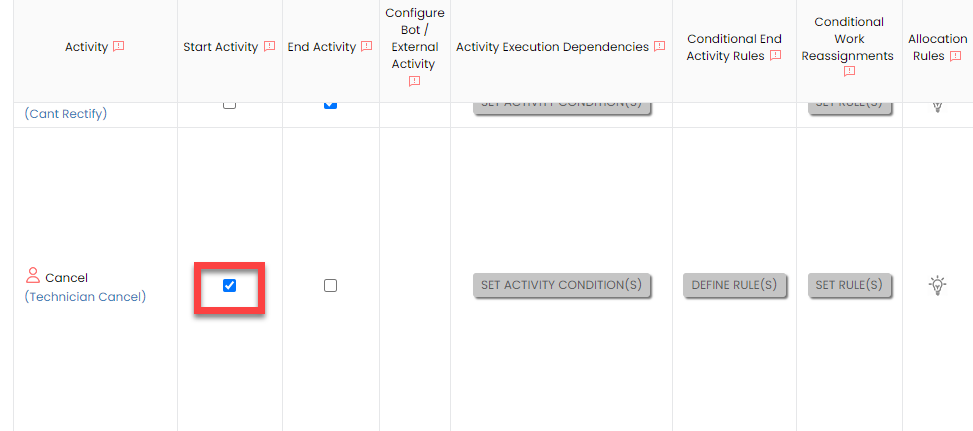
When you make an activity as the start activity, it means that technicians have to do this activity first.
-
Configure the next activities as shown below:

-
Make the Cancel activity as
Start Activity.
-
Make the Towing required as start and end
activity.
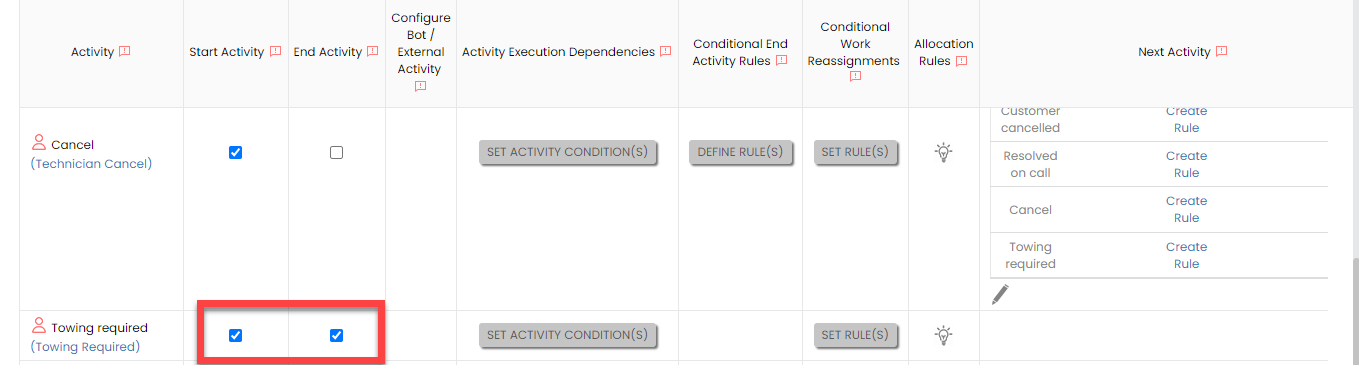
At times, technicians determine that the vehicle needs to be towed by reaching out to the customer over the phone. In this configuration, when towing is needed, technicians treat it as the start activity. By initiating it as a start activity, they can skip the rest of the process because the vehicle will be taken directly to the garage. That's why we've marked it as both a start and an end activity.
-
Make the Towing is required as end
activity.
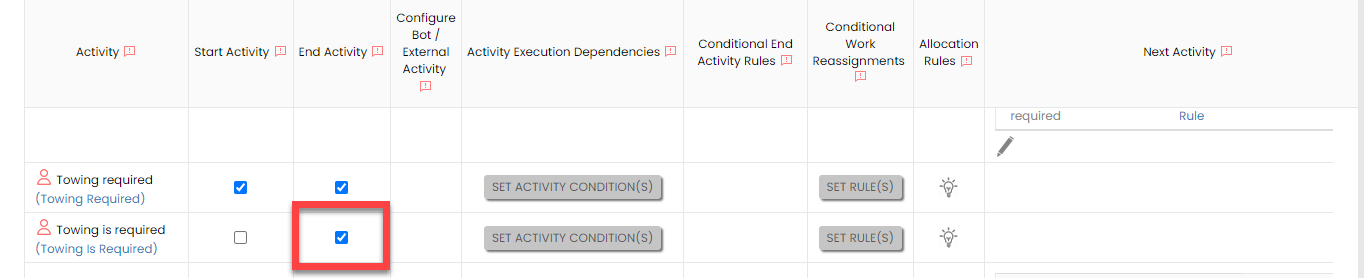
Some times, technicians determine that the vehicle needs to be towed by reaching out to the customer's location. In this configuration, when towing is needed, technicians treat it as the end activity. By initiating it as a end activity, they can skip the rest of the process because the vehicle will be taken directly to the garage.
-
For the Location capture activity, do the
following:
-
Make the Location capture activity
as Start Activity.
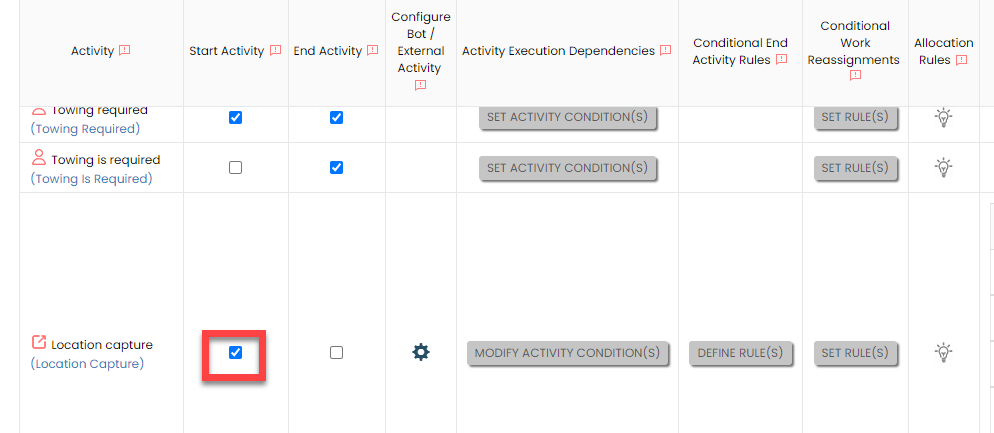
If there is no customer location, the technician initiates this as the start activity.
-
Under the Activity Execution
Dependencies column, click Set
Activity Condition(s) and define the
configuration as shown below, and then click
Save.
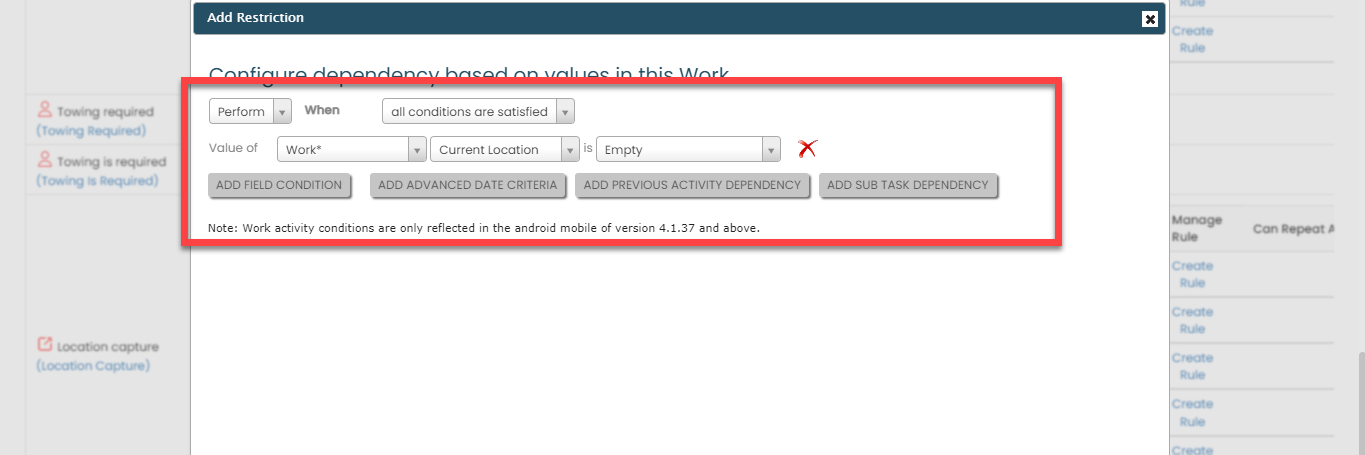
If the customer's location is already known, there's no need to perform this step. Therefore, we've defined the condition above to execute this activity only when the customer's location is unavailable.
-
Configure the next activities as shown below:

-
Make the Location capture activity
as Start Activity.
Configure Auto Allocation
Assigning RSA works manually is a complex task, involving details like breakdown location and technician availability. Work auto-allocation is crucial for emergencies like RSA. It ensures that whenever an RSA work is created, it's automatically assigned to the nearest technician, simplifying the process significantly. In this section, we'll configure the auto allocation for the RSA process. With this configuration, the nearby technicians will receive notifications automatically whenever an RSA task is created. To know more about auto allocation and scheduling, refer to the Auto Allocate and Scheduling documentation.
Follow the steps below to define this configuration:
- On the process page, click Manage Auto Allocate And Scheduling. Alternatively, go to .
-
Select the Work Invitations option.
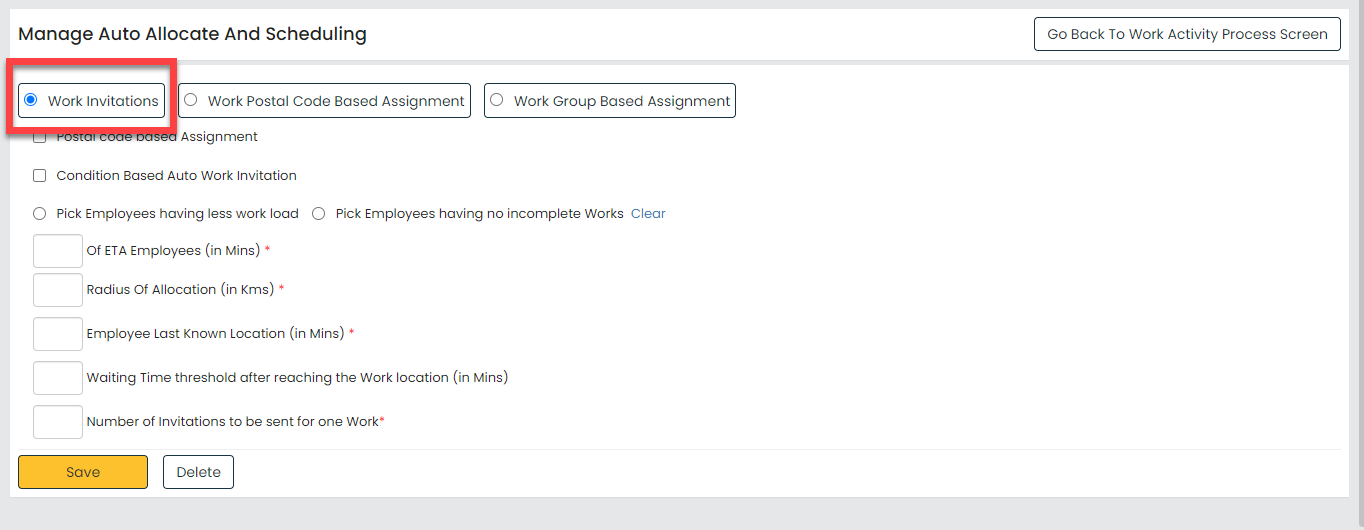
This feature enables us to notify technicians by sending work invitations directly to their mobile app.
-
Select the Pick Employees having no incomplete
Works option.

This option allows us to send work invitations exclusively to technicians who currently have no pending tasks.
-
Configure the highlighted parameters as shown below:
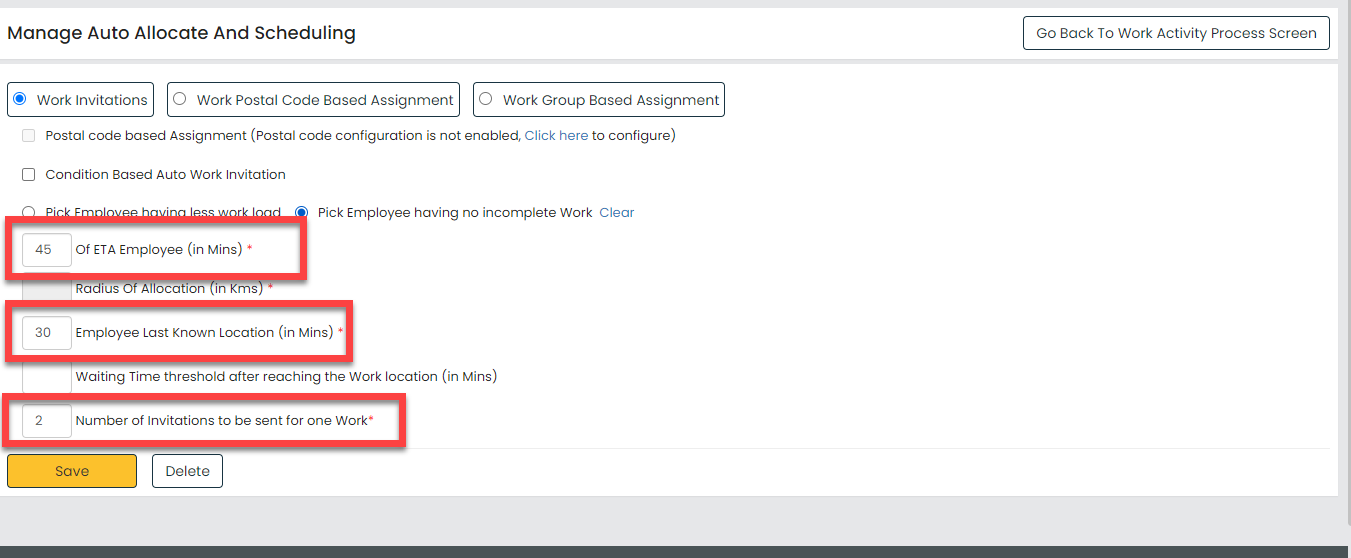
As per this configuration, a maximum of two work invitations will be sent to technicians whose last location was recorded within the last 30 minutes and who can reach the breakdown location within 45 minutes.
- Click Save.
Configure Work Invitation Alarm and Other Settings
In this section, we will configure the work invitation alarm and other settings to enhance the efficiency and effectiveness of the RSA workflow. To know more about the work fields, refet to the Work Settings: Fields and Description documentation.
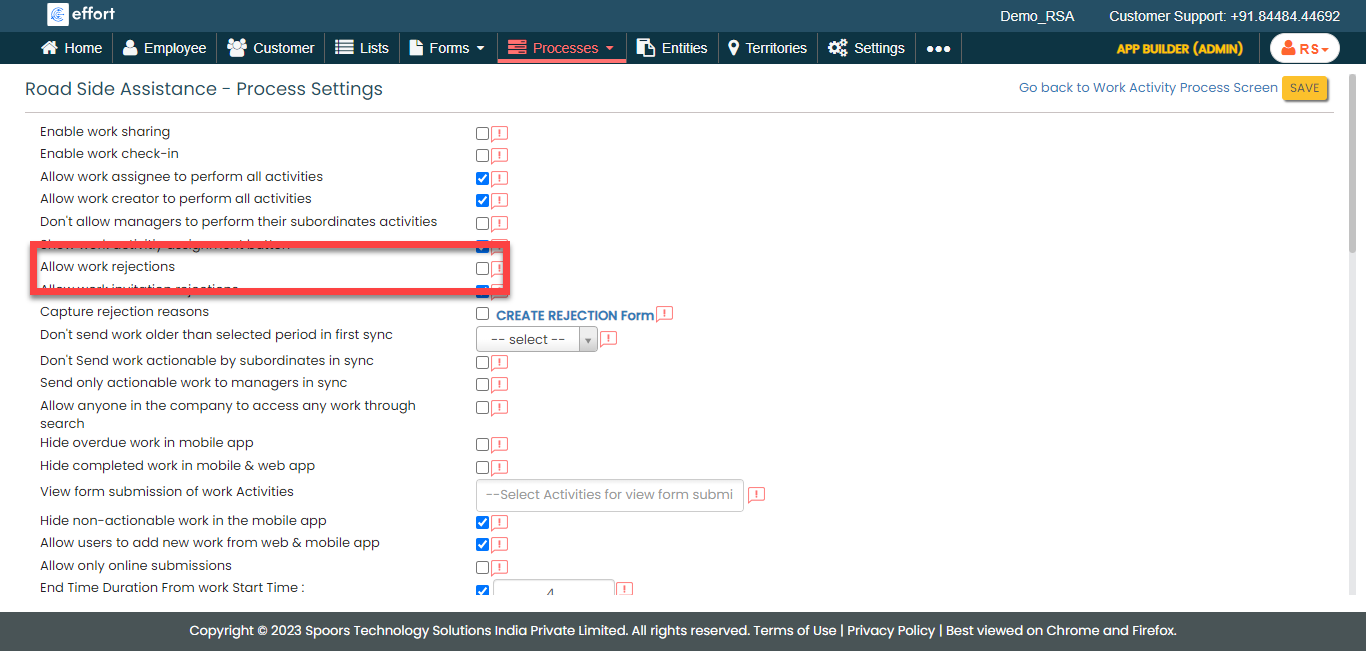
- On the process page, click Work Settings. Alternatively, go to .
-
Disable the Allow work rejections setting to
avoid work rejections by technicians.
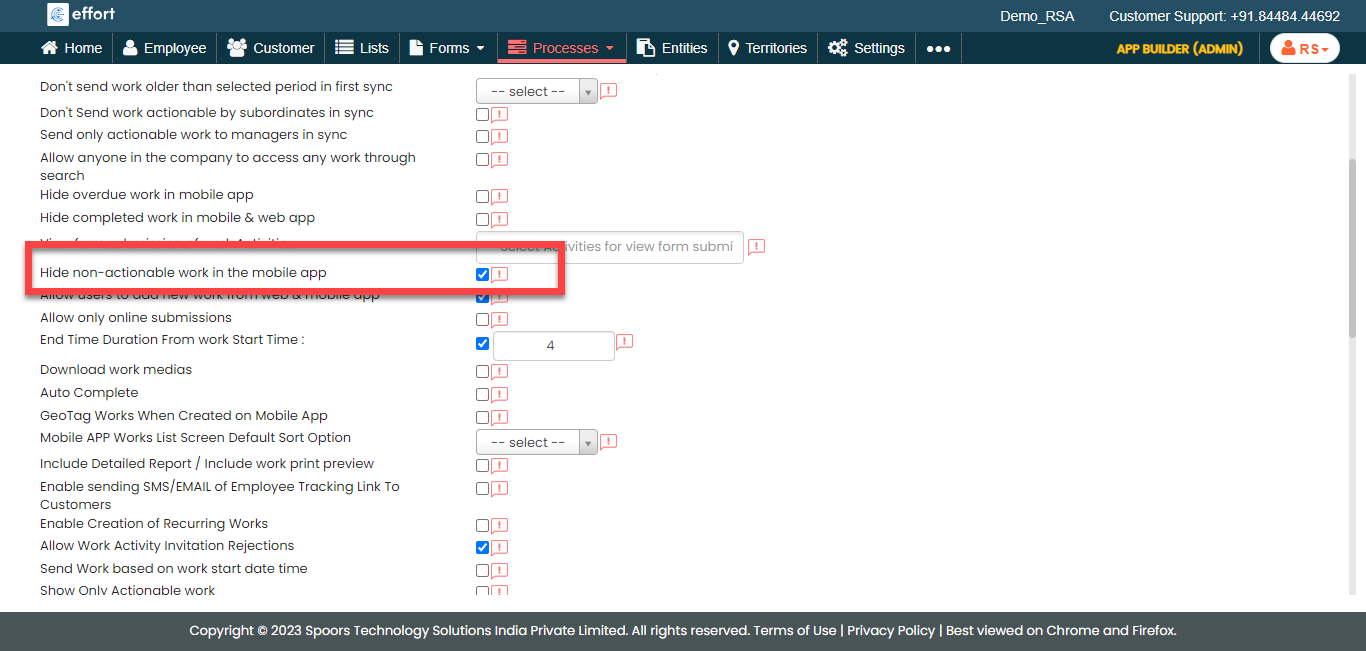
-
Enable the Hide Non-Actionable Work setting in the mobile
app to filter out works that can't be acted upon. This ensures
technicians only see works they can take action on.
-
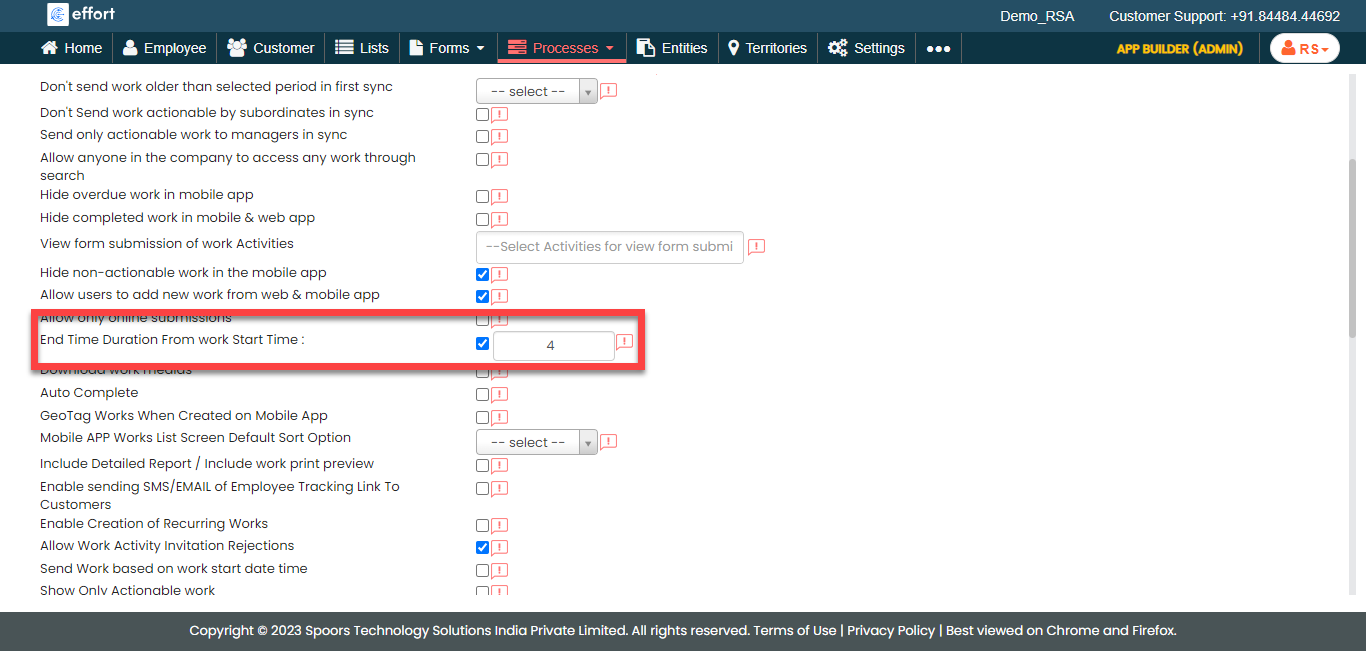
Enable the End Time Duration From work Start
Time setting and define the duration as 4. This
setting enable auto calculation of the end time on the work card
based on the duration given.
-
Disable the Enable sending SMS/EMAIL of Employee Tracking Link
To Customers and Enable Creation of Recurring
Works settings.

-
Enable the Work invitation alarm time
(seconds) and set the duration to 300 seconds.
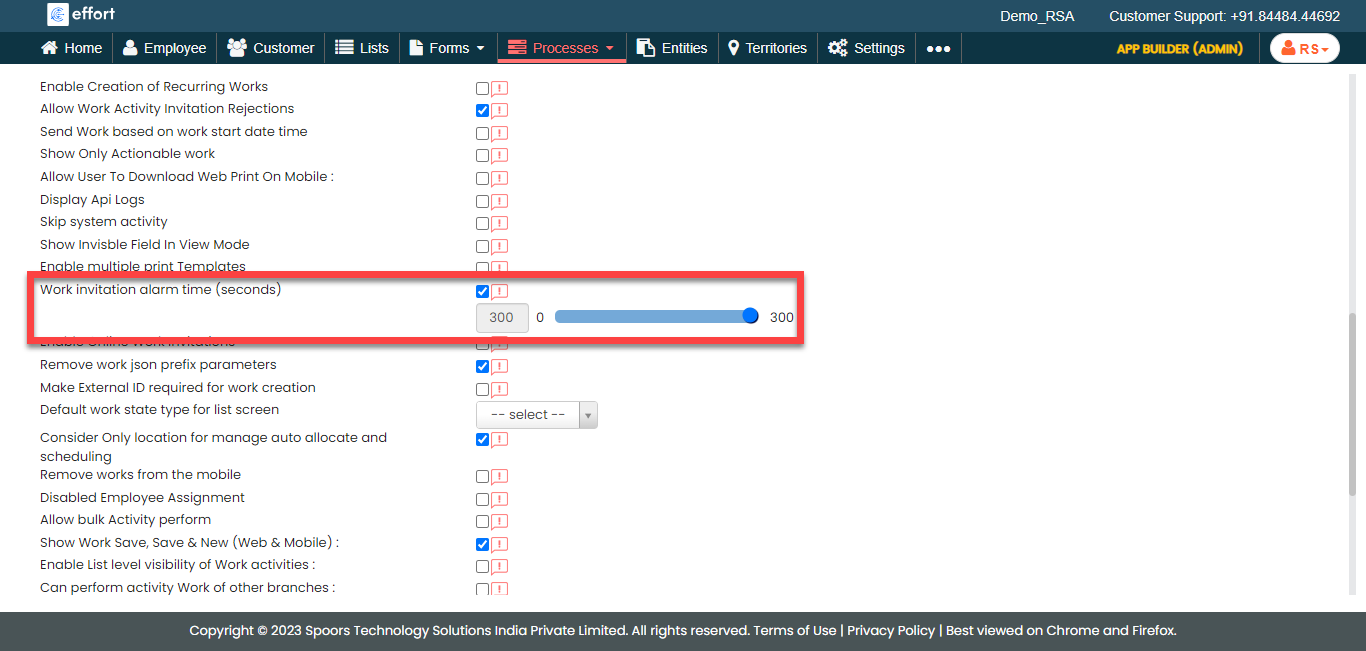
According to this setup, the work invitation alarm will play for 300 seconds.
-
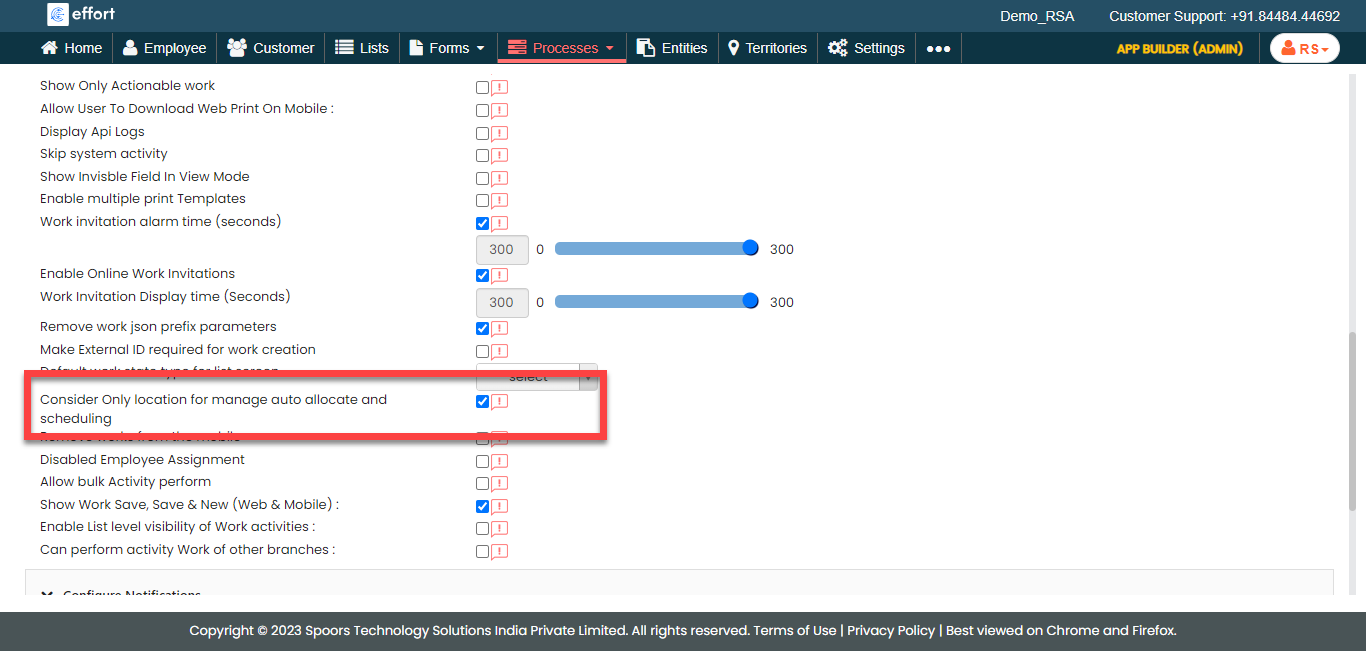
Enable the Enable Online Work Invitations
and define the time for Work Invitation Display time
(Seconds) as 300
seconds.

According to this setup, the work invitation alarm will display for 300 seconds.
-
Enable the Consider Only location for manage auto
allocate and scheduling setting.
- Click Save
Customize Web App Modules
In this section, we will customize the visibility of the Web App modules for easy operation. Follow the steps below:
- Go to .
-
Under the Visibility column, make the following
modules visible.
- Forms
- Customer
- Employee
- My Approvals
- Road Side Assistance
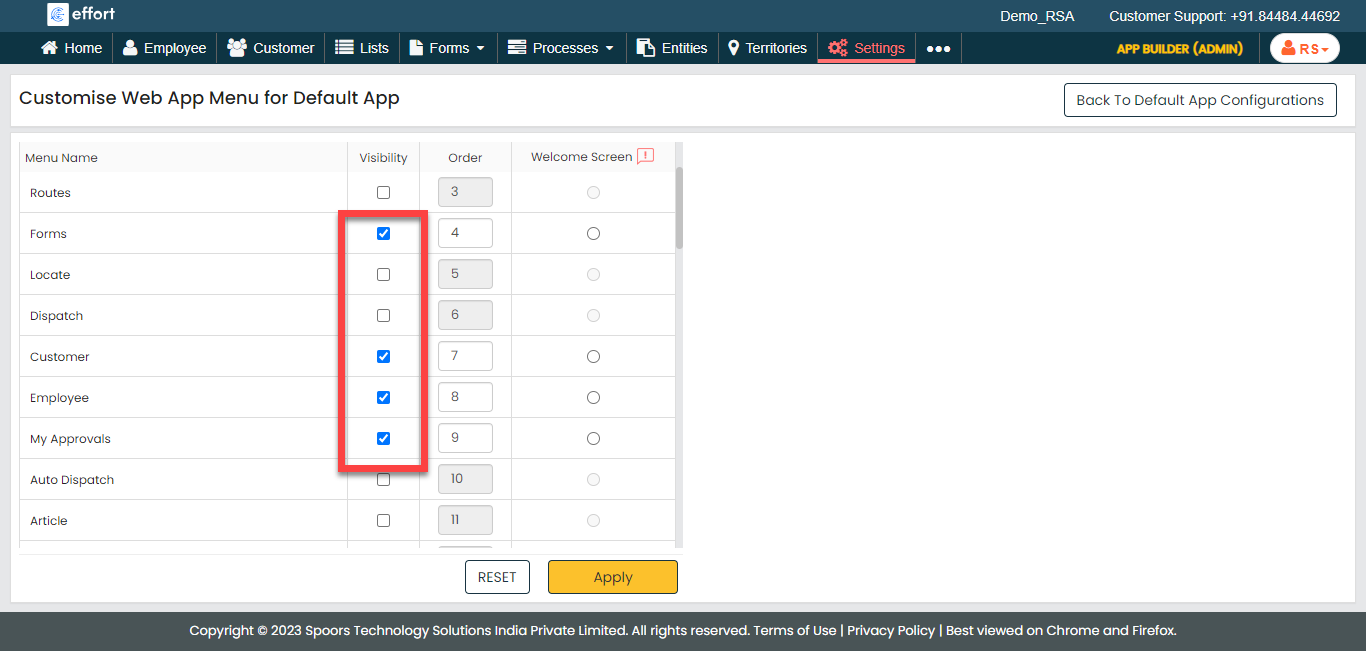
-
Make the Home as Welcome
screen.
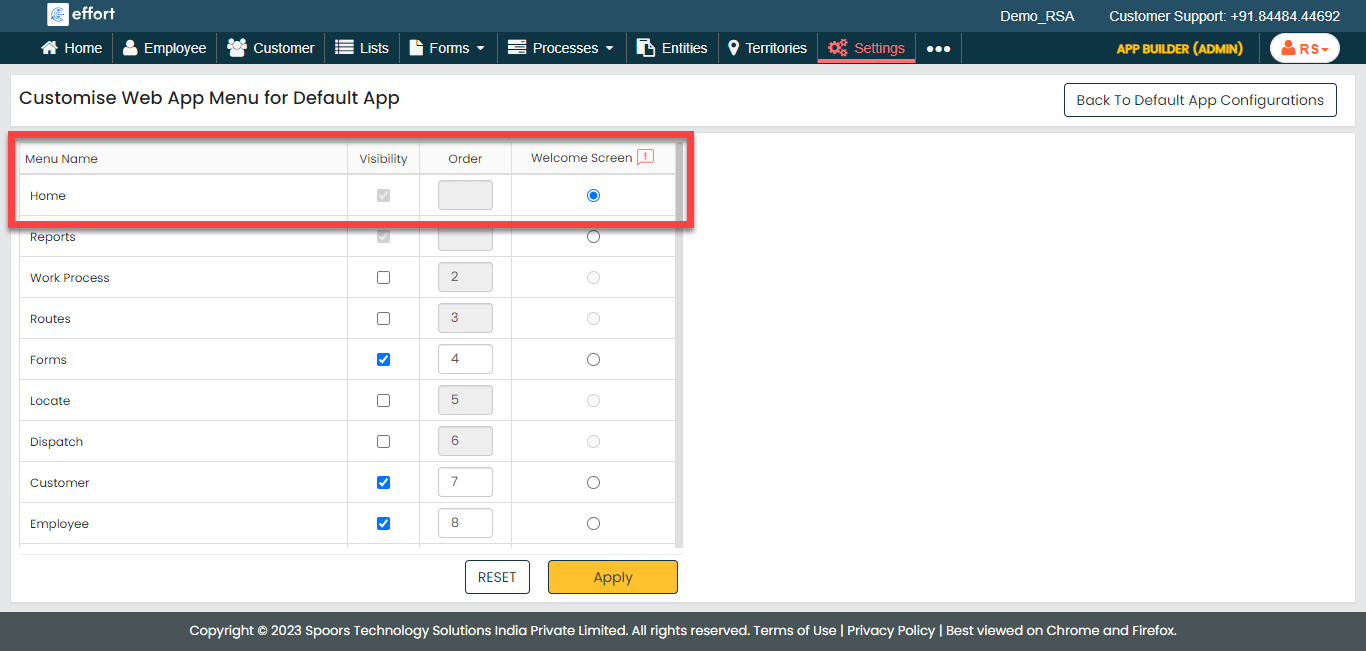
- Click Apply.
Execute RSA
In this section, we will show you how to execute the RSA task in the Effort Platform. It provides the activities performed by the admins and technicians, such as creating RSA works, logging into the effort, accepting work invitation alarm, executing RSA in mobile app, and so on. Let's get started.
Create an RSA Work
When a customer encounters a vehicle problem, they contact customer support for assistance. An RSA work is created when the customer calls the service center and provides their details. Follow the steps below to create an RSA work in the effort platform .
-
Go to .

-
Fill in the mandatory fields.
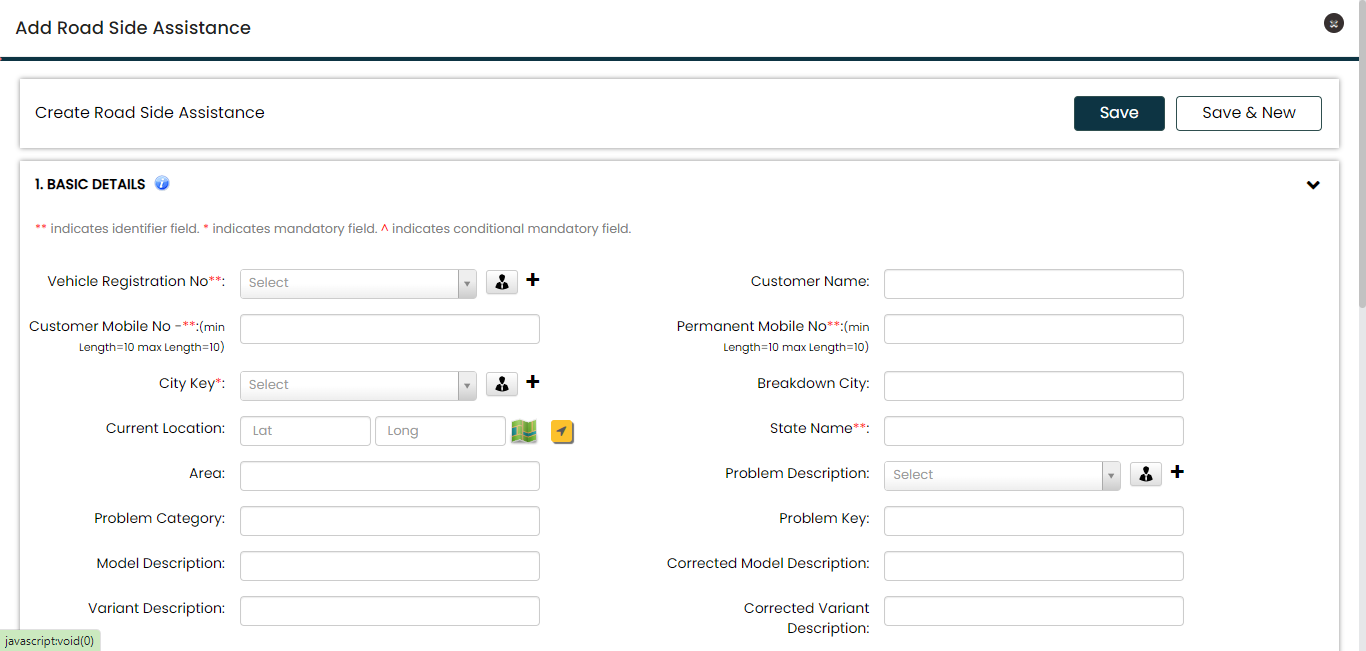
-
To get the customer's current location, click the arrow icon beside
Current Location field.

-
Enter the customer's mobile number and email ID and then click
Send Request.
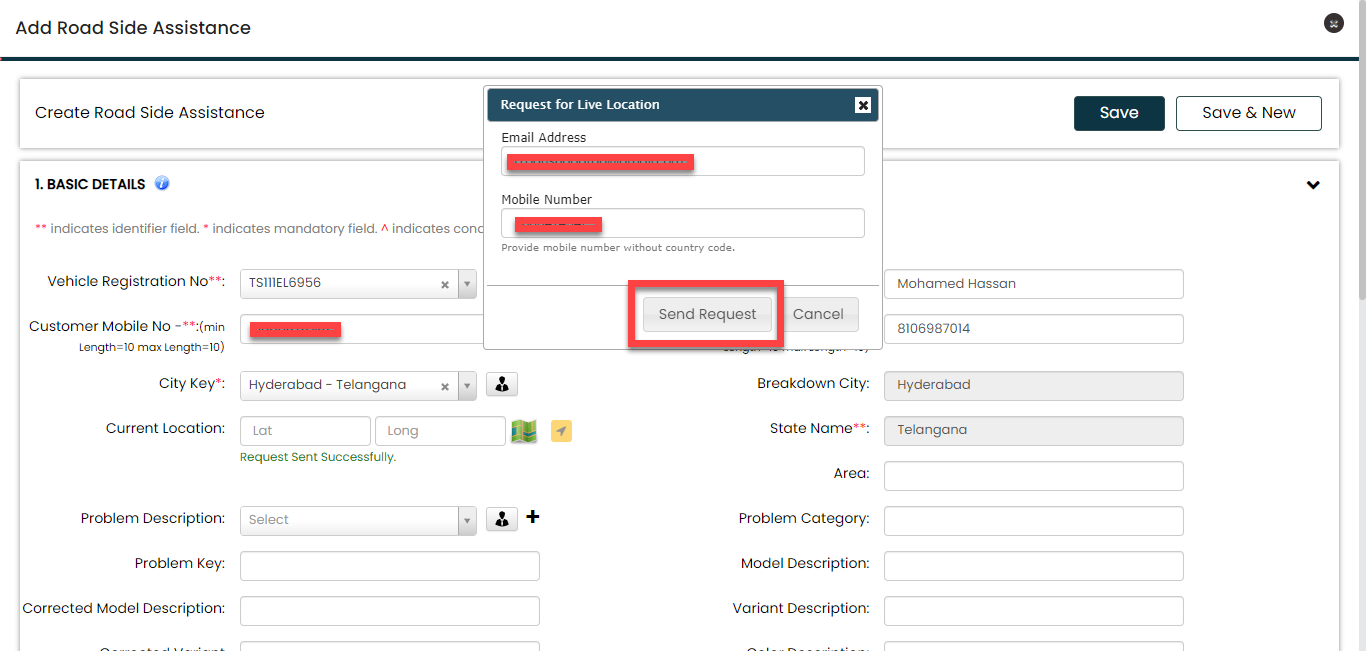
The customer will receive an SMS and email with a link as shown below.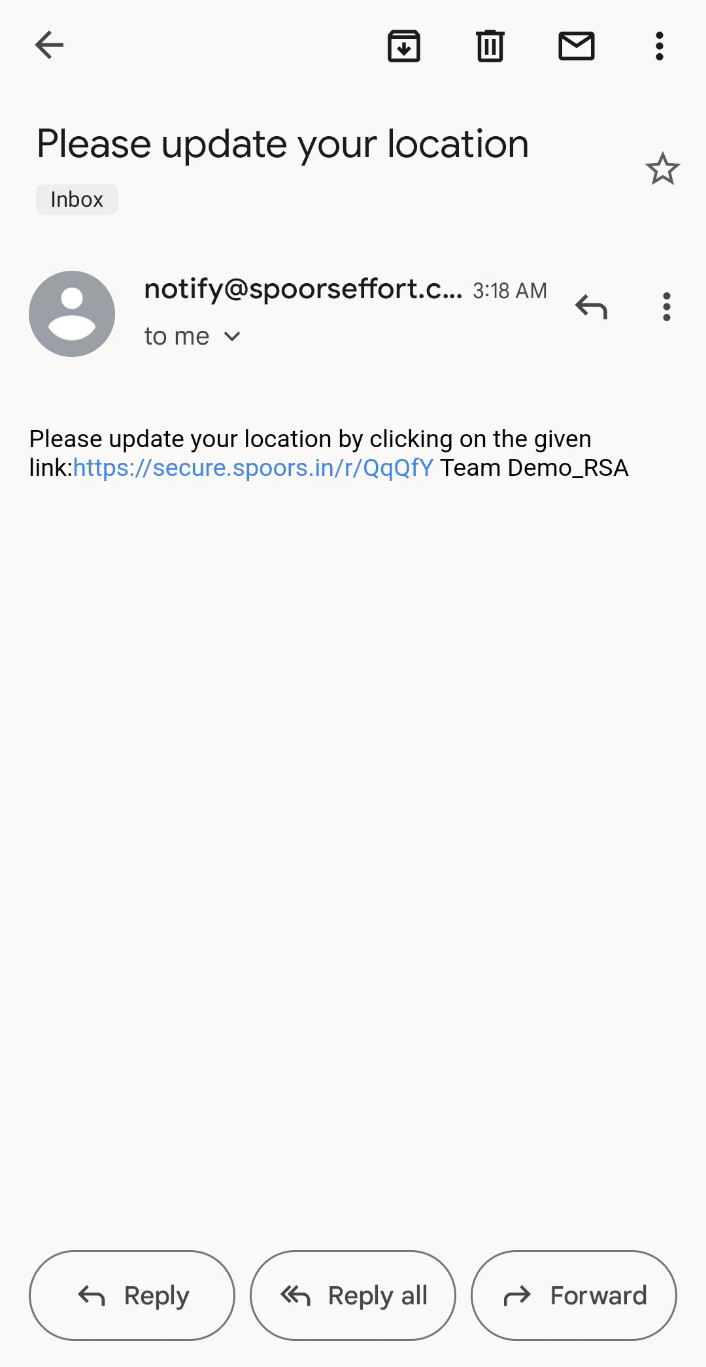 The customer will see the map with his current location marked when click on the link. The customer has to click on the Send Your Location button.
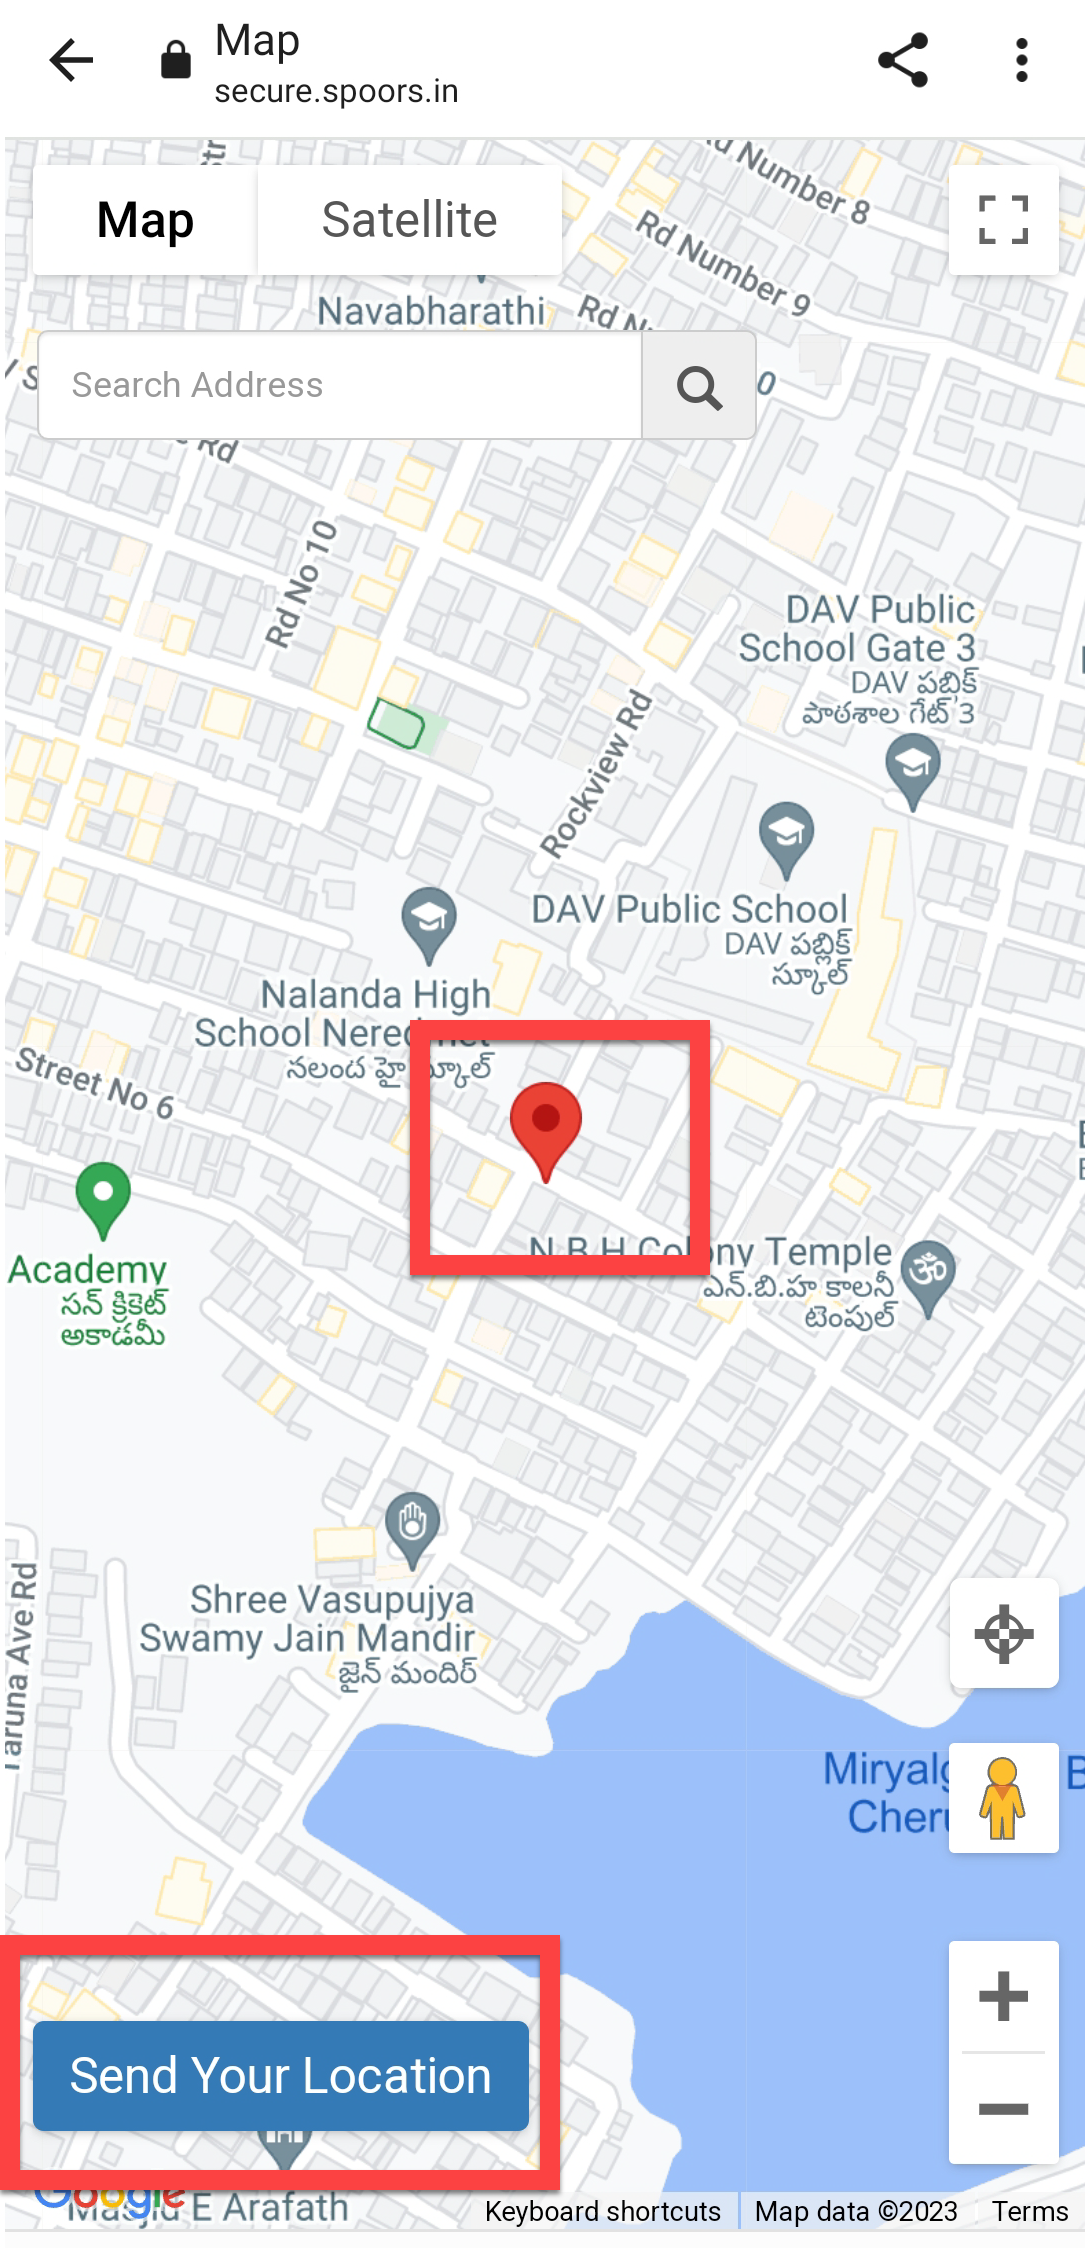 Once click on the link, you will see a confirmation page.
 Once customer finish this activity, the customer's location will be populated automatically on the field.
 Note: Do not refresh the page after the customer provides their current location. The location will be automatically filled in the designated field, as shown in the screenshot above.
 - Fill in the remaining fields and click Save.
Login to Effort NXT Mobile App
To begin with RSA, we require an application through which we can log in, check the work inviations, and perform RSA tasks. This section provides instructions to get started with the Effort NXT mobile app.
-
On your mobile phone, open either the Play Store or App Store and
install the Effort NXT app.
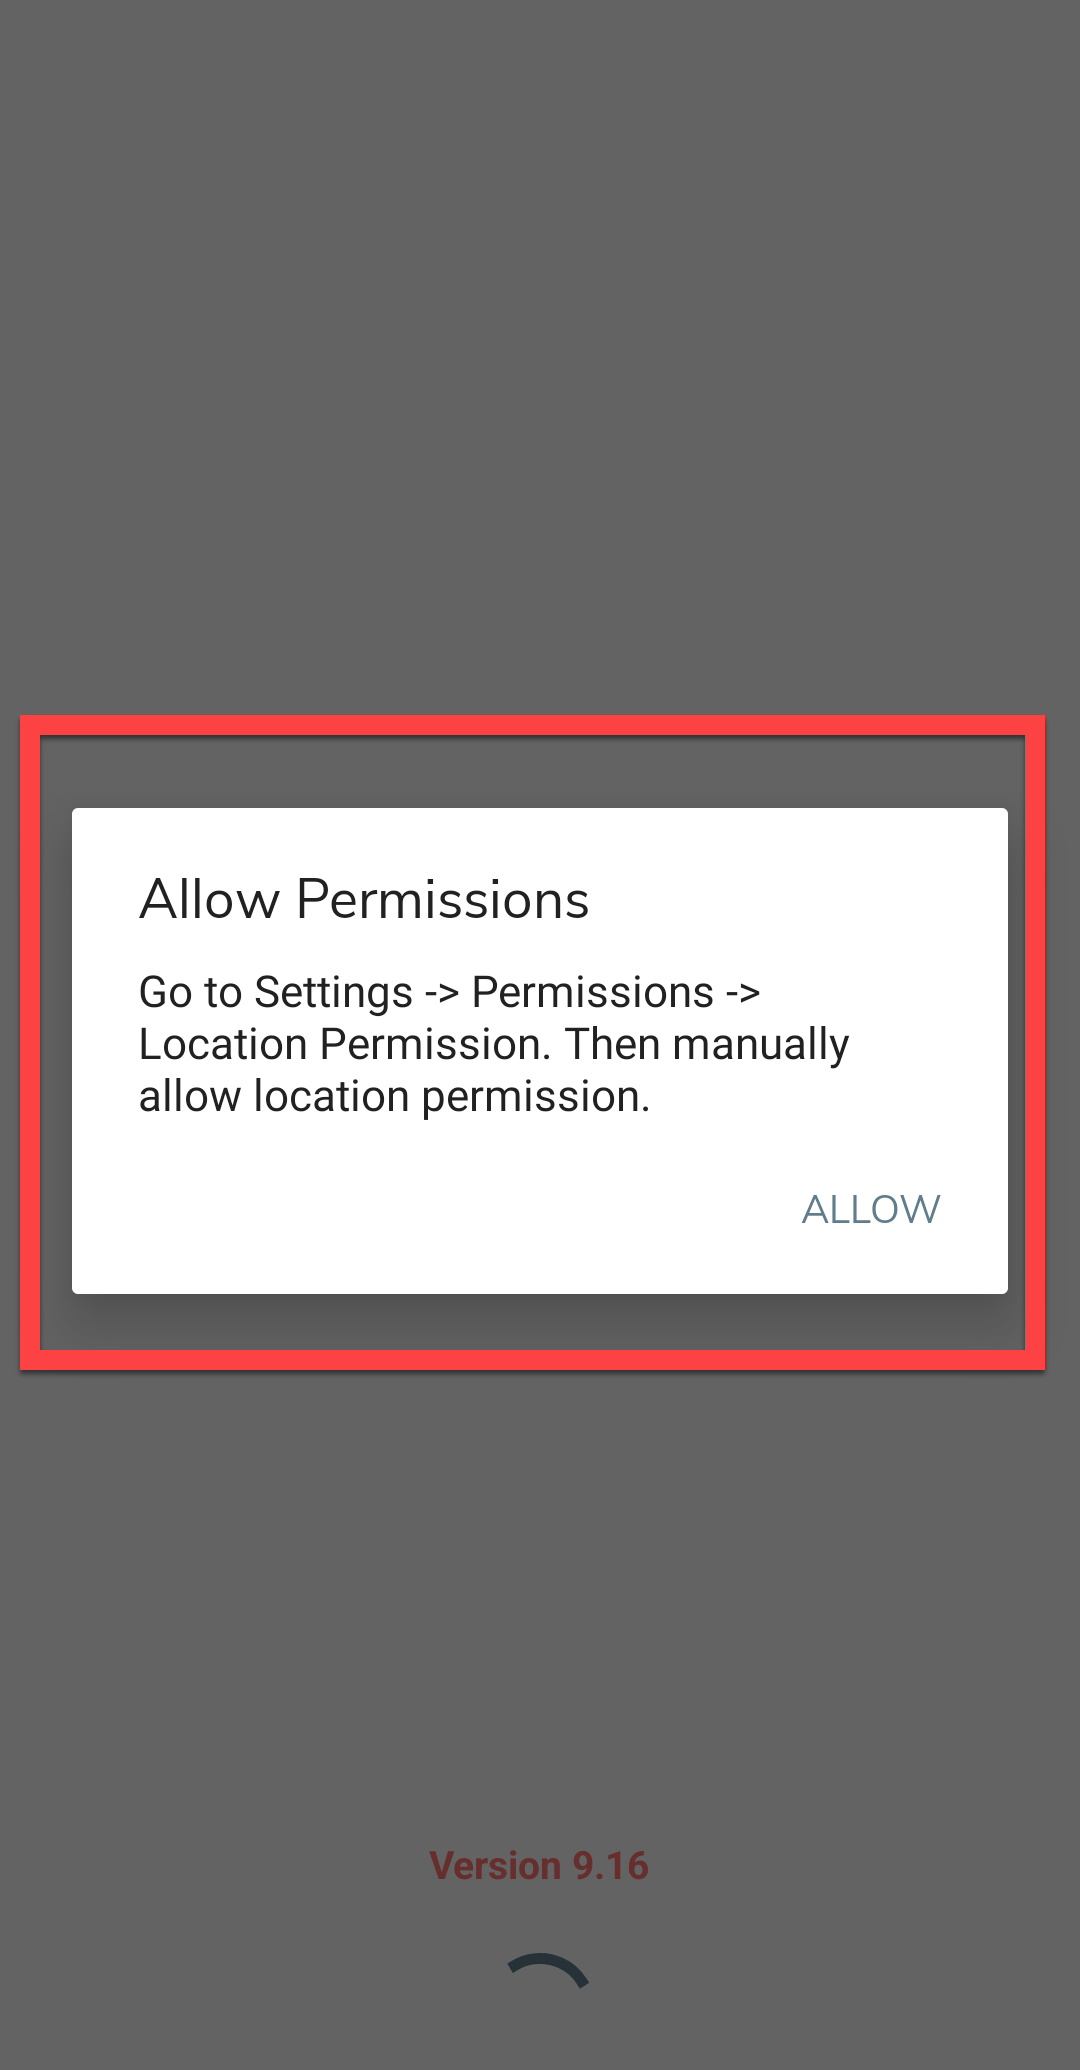
Note: To know more about how to install the app, refer to Install EFFORT NXT App. -
Once the download is completed, open the app and grant all the required
permissions.
-
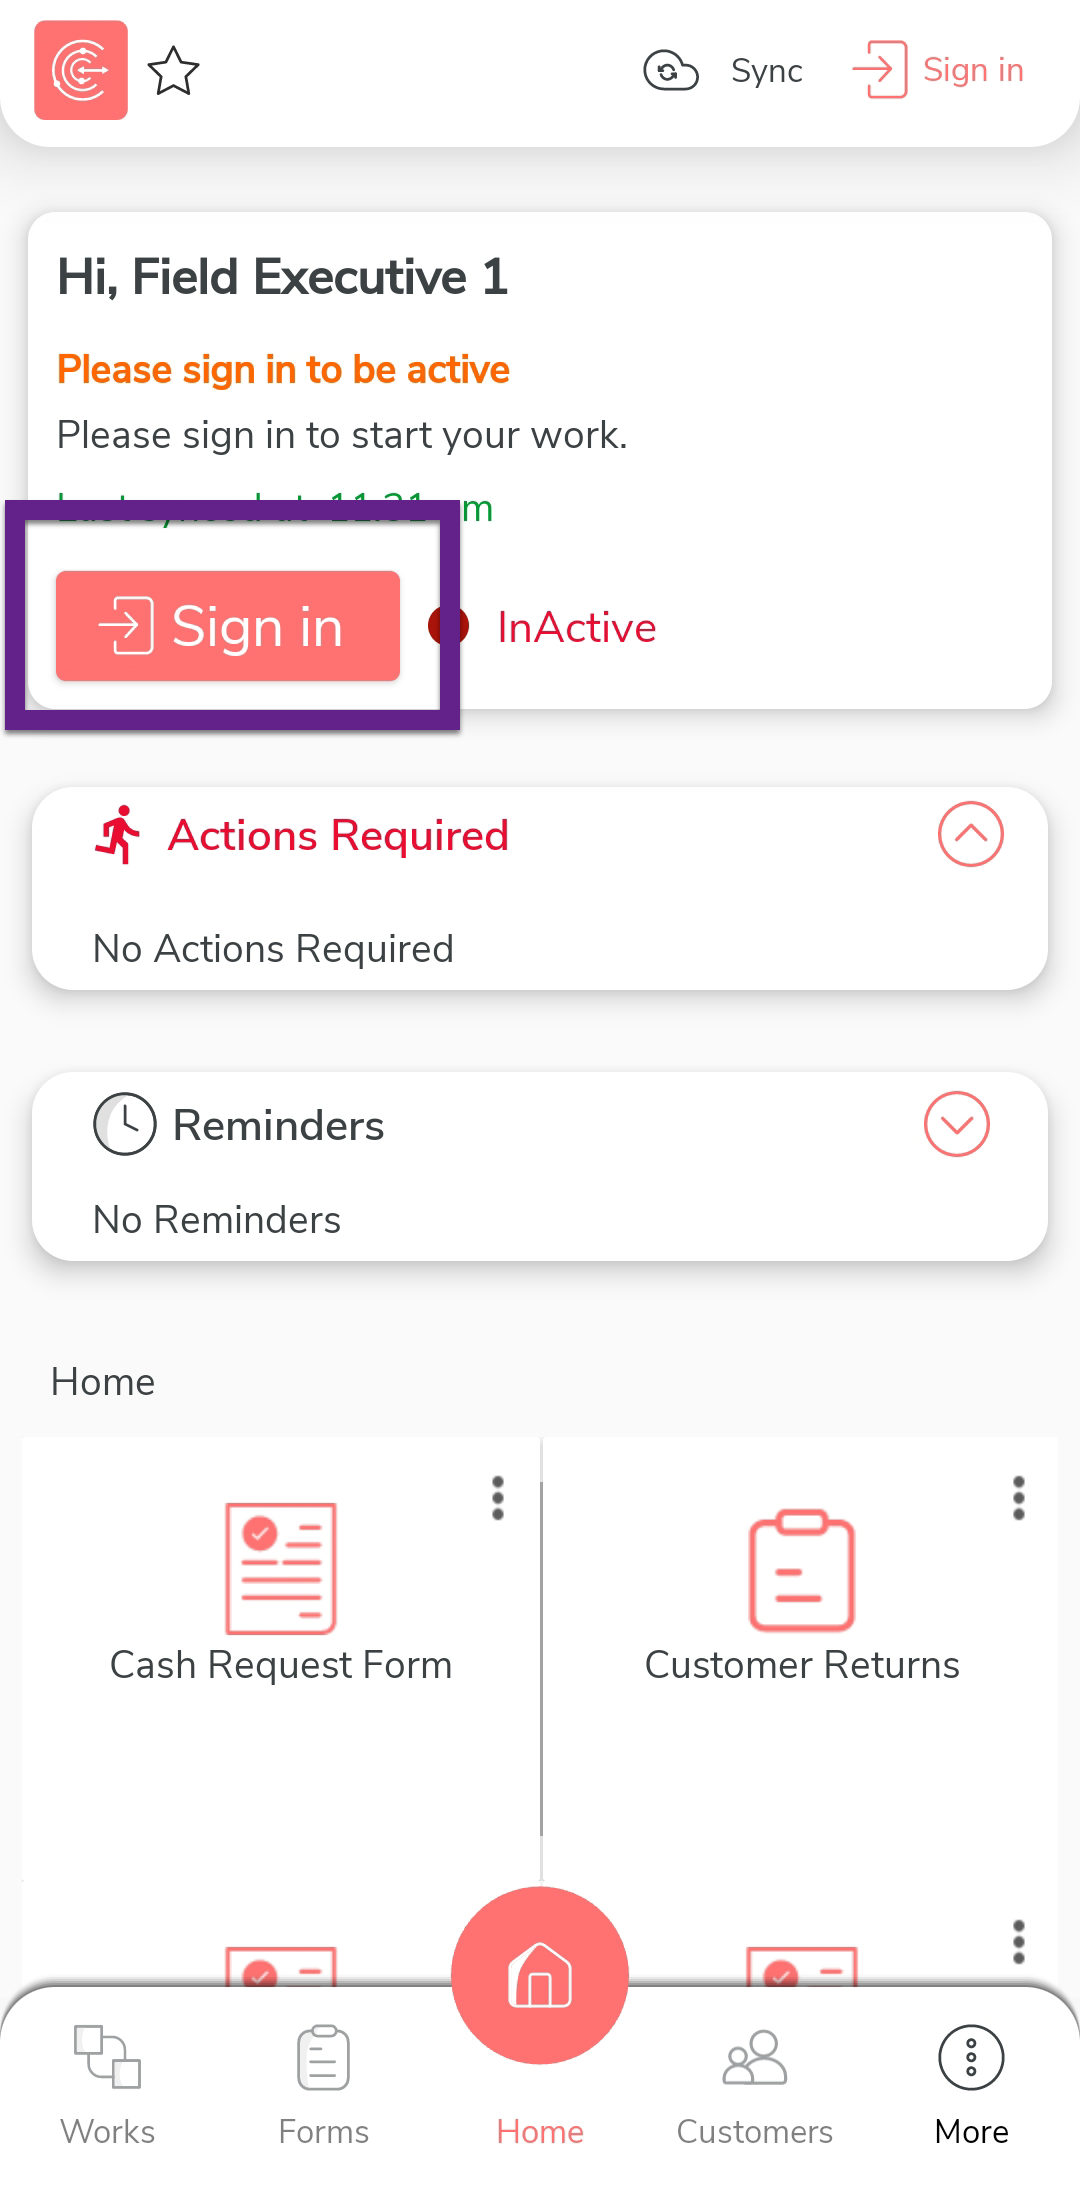
Login to the Effort app using your registered mobile number.

Note: To register using your registered mobile number, refer to Log in to Mobile App Using Phone.Note: To register using your email and password, refer to Log in to Mobile App Using Email -
After you log in to the mobile app, tap Sign in
to mark that you have started working.
-
The mobile captures your face and your current location. On this
screen, ensure your face and location are captured correctly, and then
tap Sign In.

-
Once you complete Sign In, tap
Sync to sync the data with the server.

Note: Make sure to Sync the mobile app every time you perform an activity to ensure that your data is updated on the server. If you fail to sync, your changes or work will not be captured in the server.
Accept Work Invitation Alarm
When an RSA work is created in the Web App, nearby technicians receive a work invitation on their mobile app, accompanied by an alarm that plays for a specific duration. In this section, we will explore how this process works within the Effort mobile app.
-
On the effort mobile app home page, the technicians will receive a work
invitation as shown below:
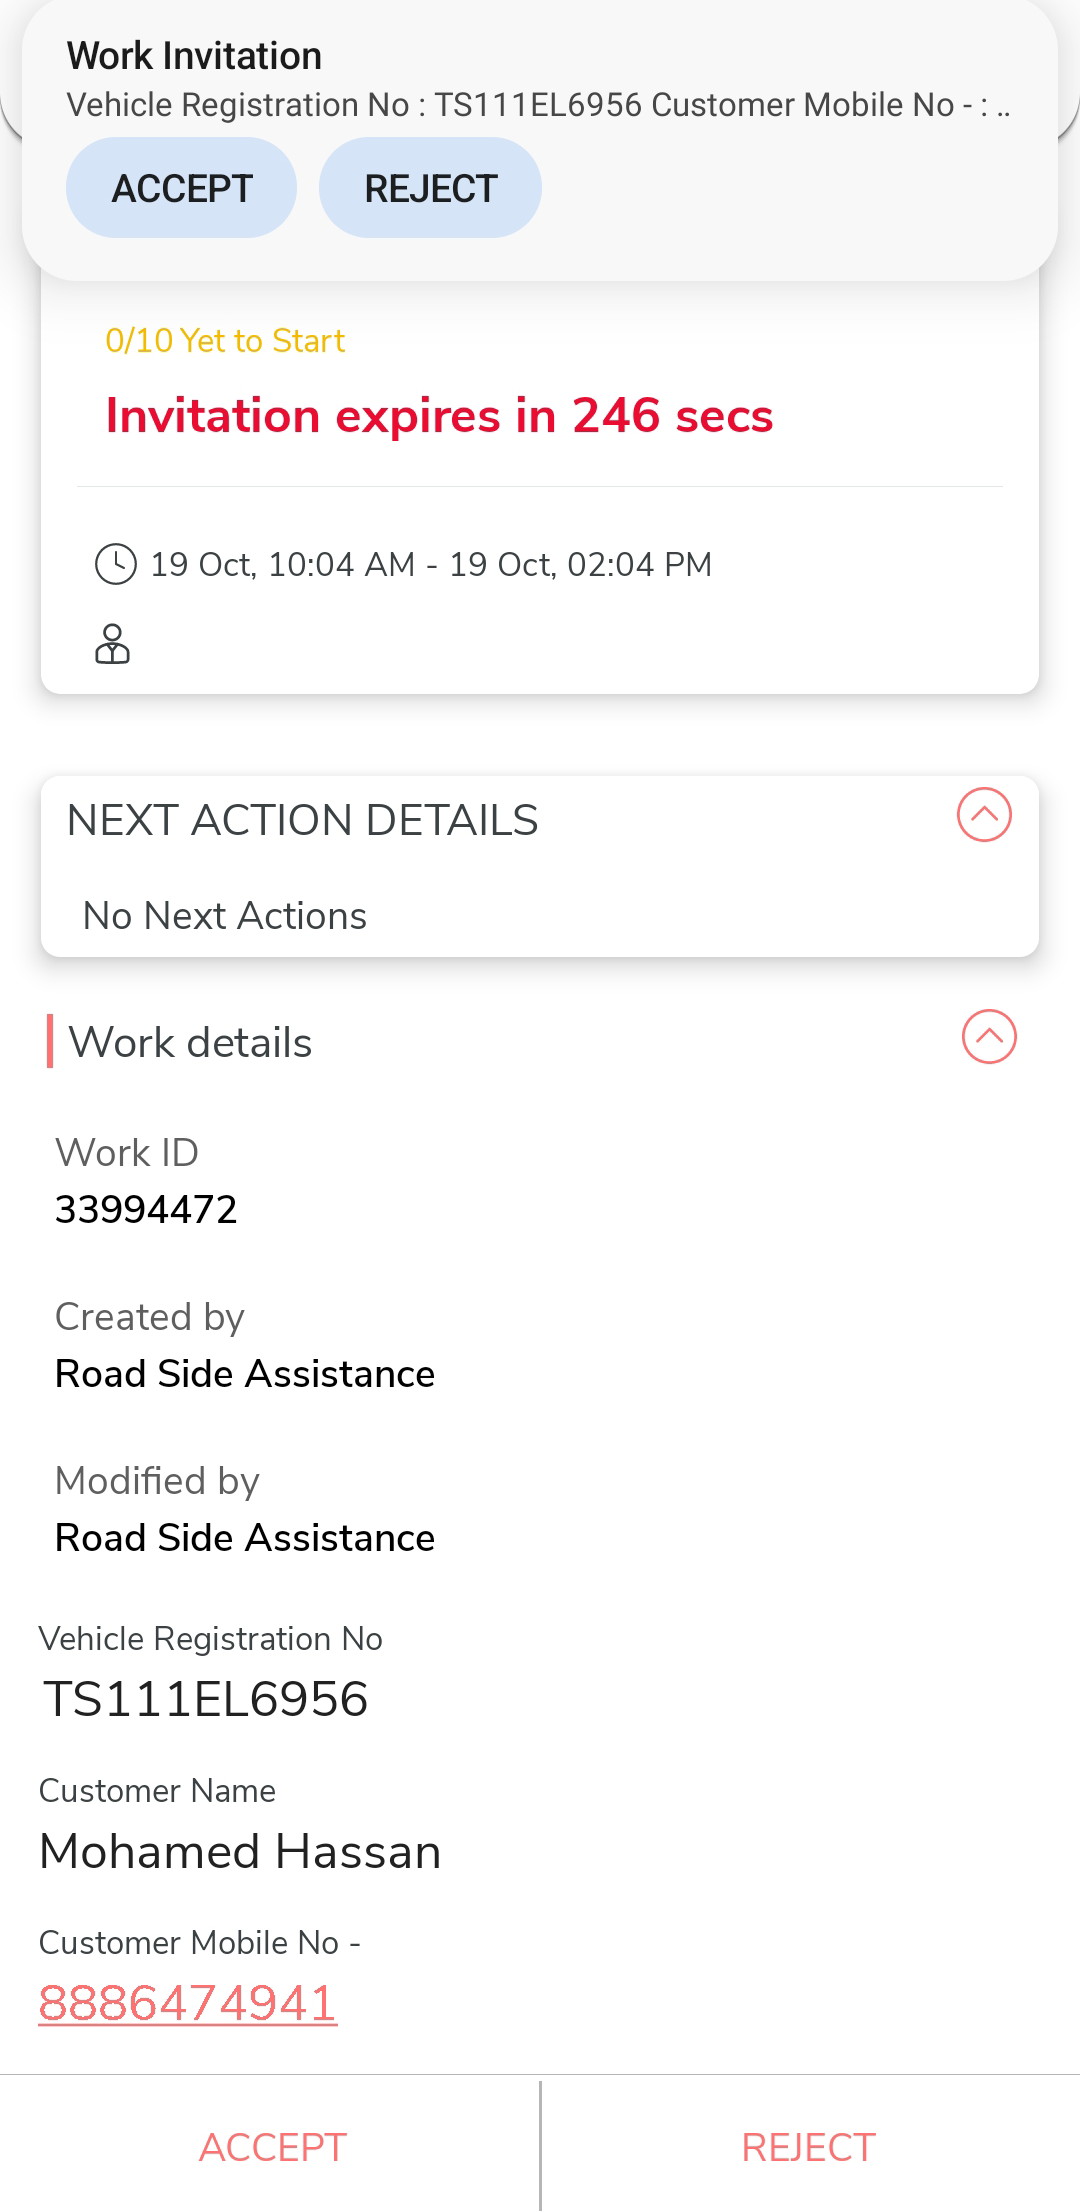
-
Tap Accept to accept the work invitation.
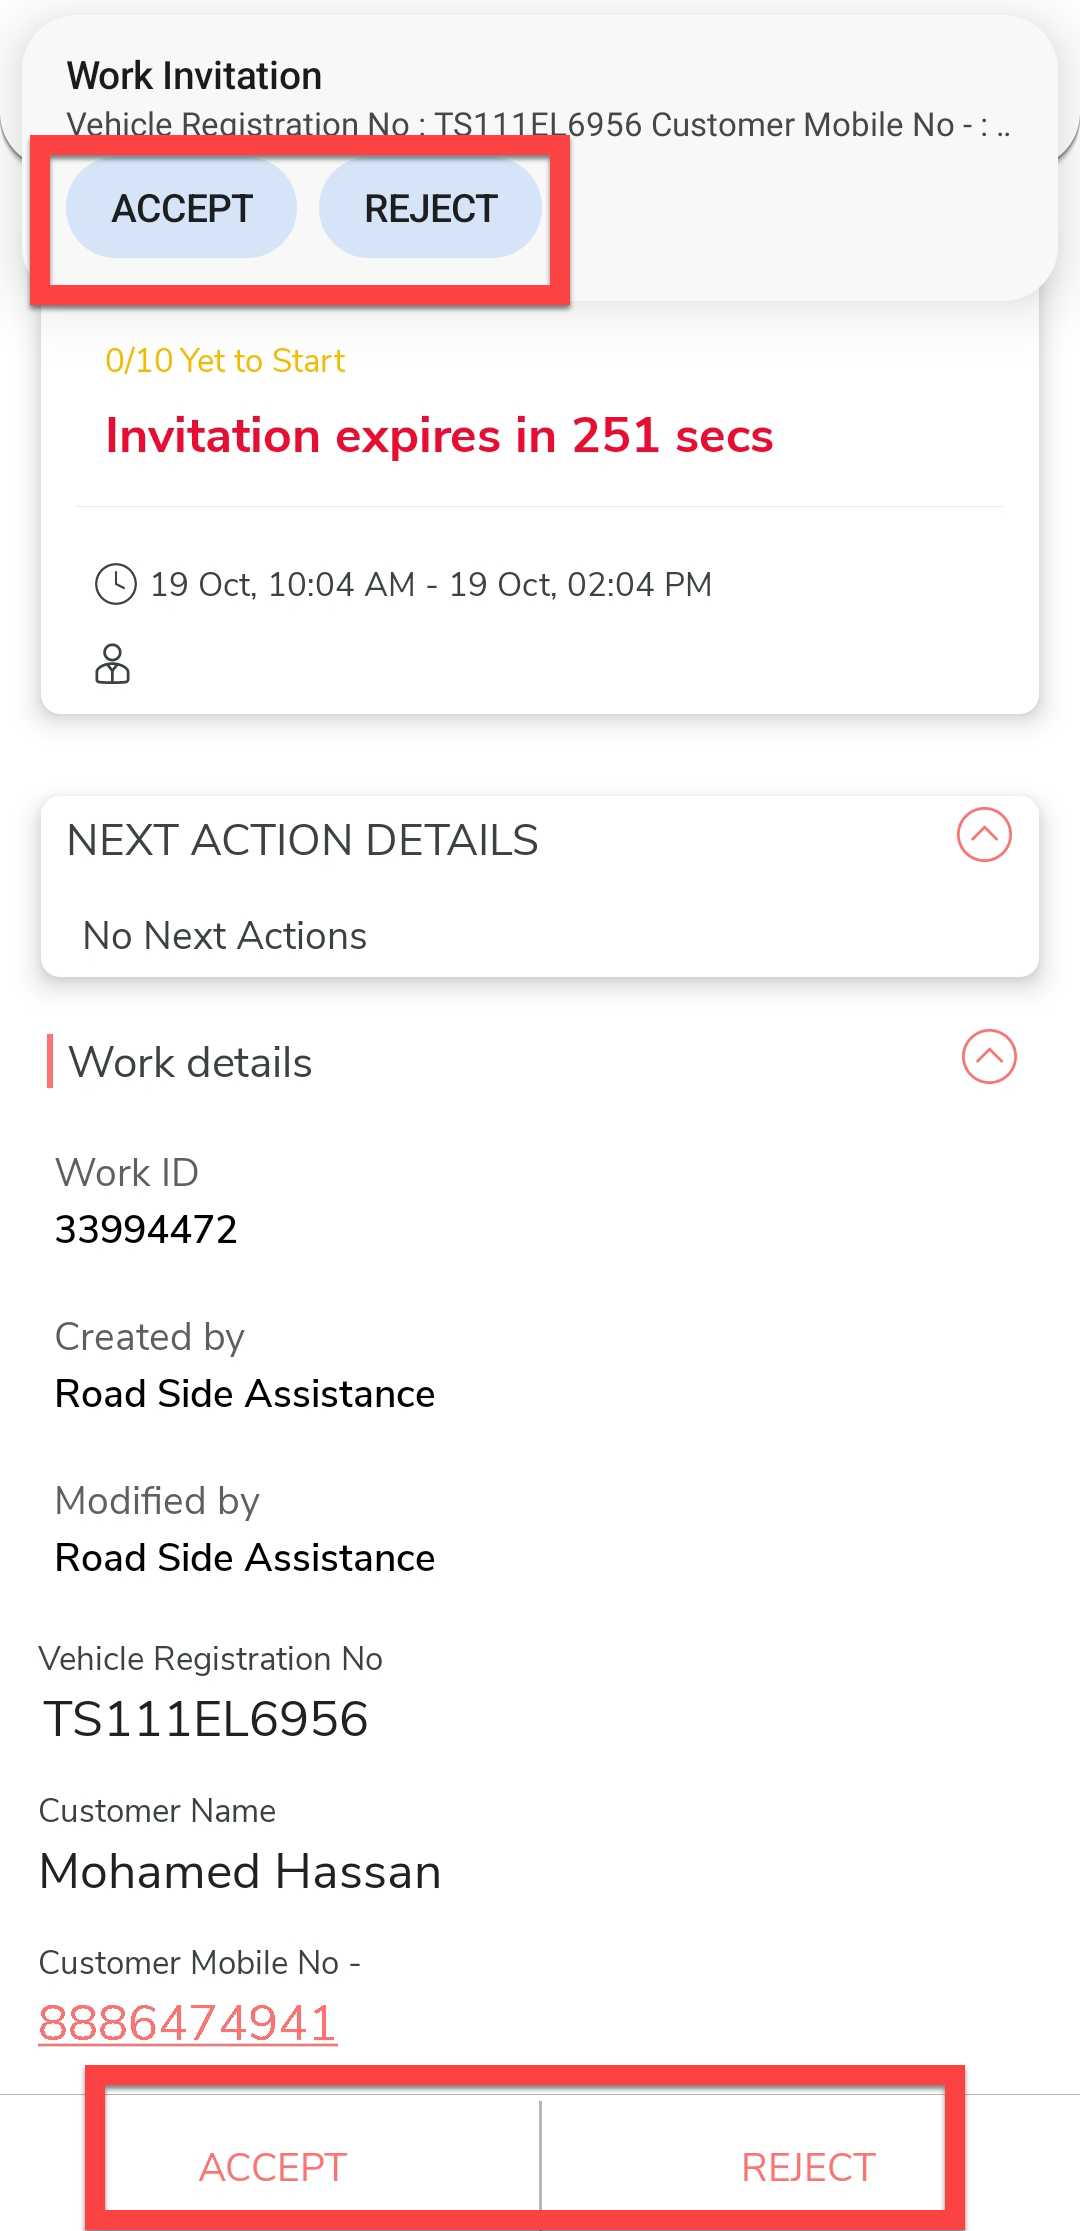
-
Tap OK in the confirmation pop-up.

-
The work will be assigned to the technician.

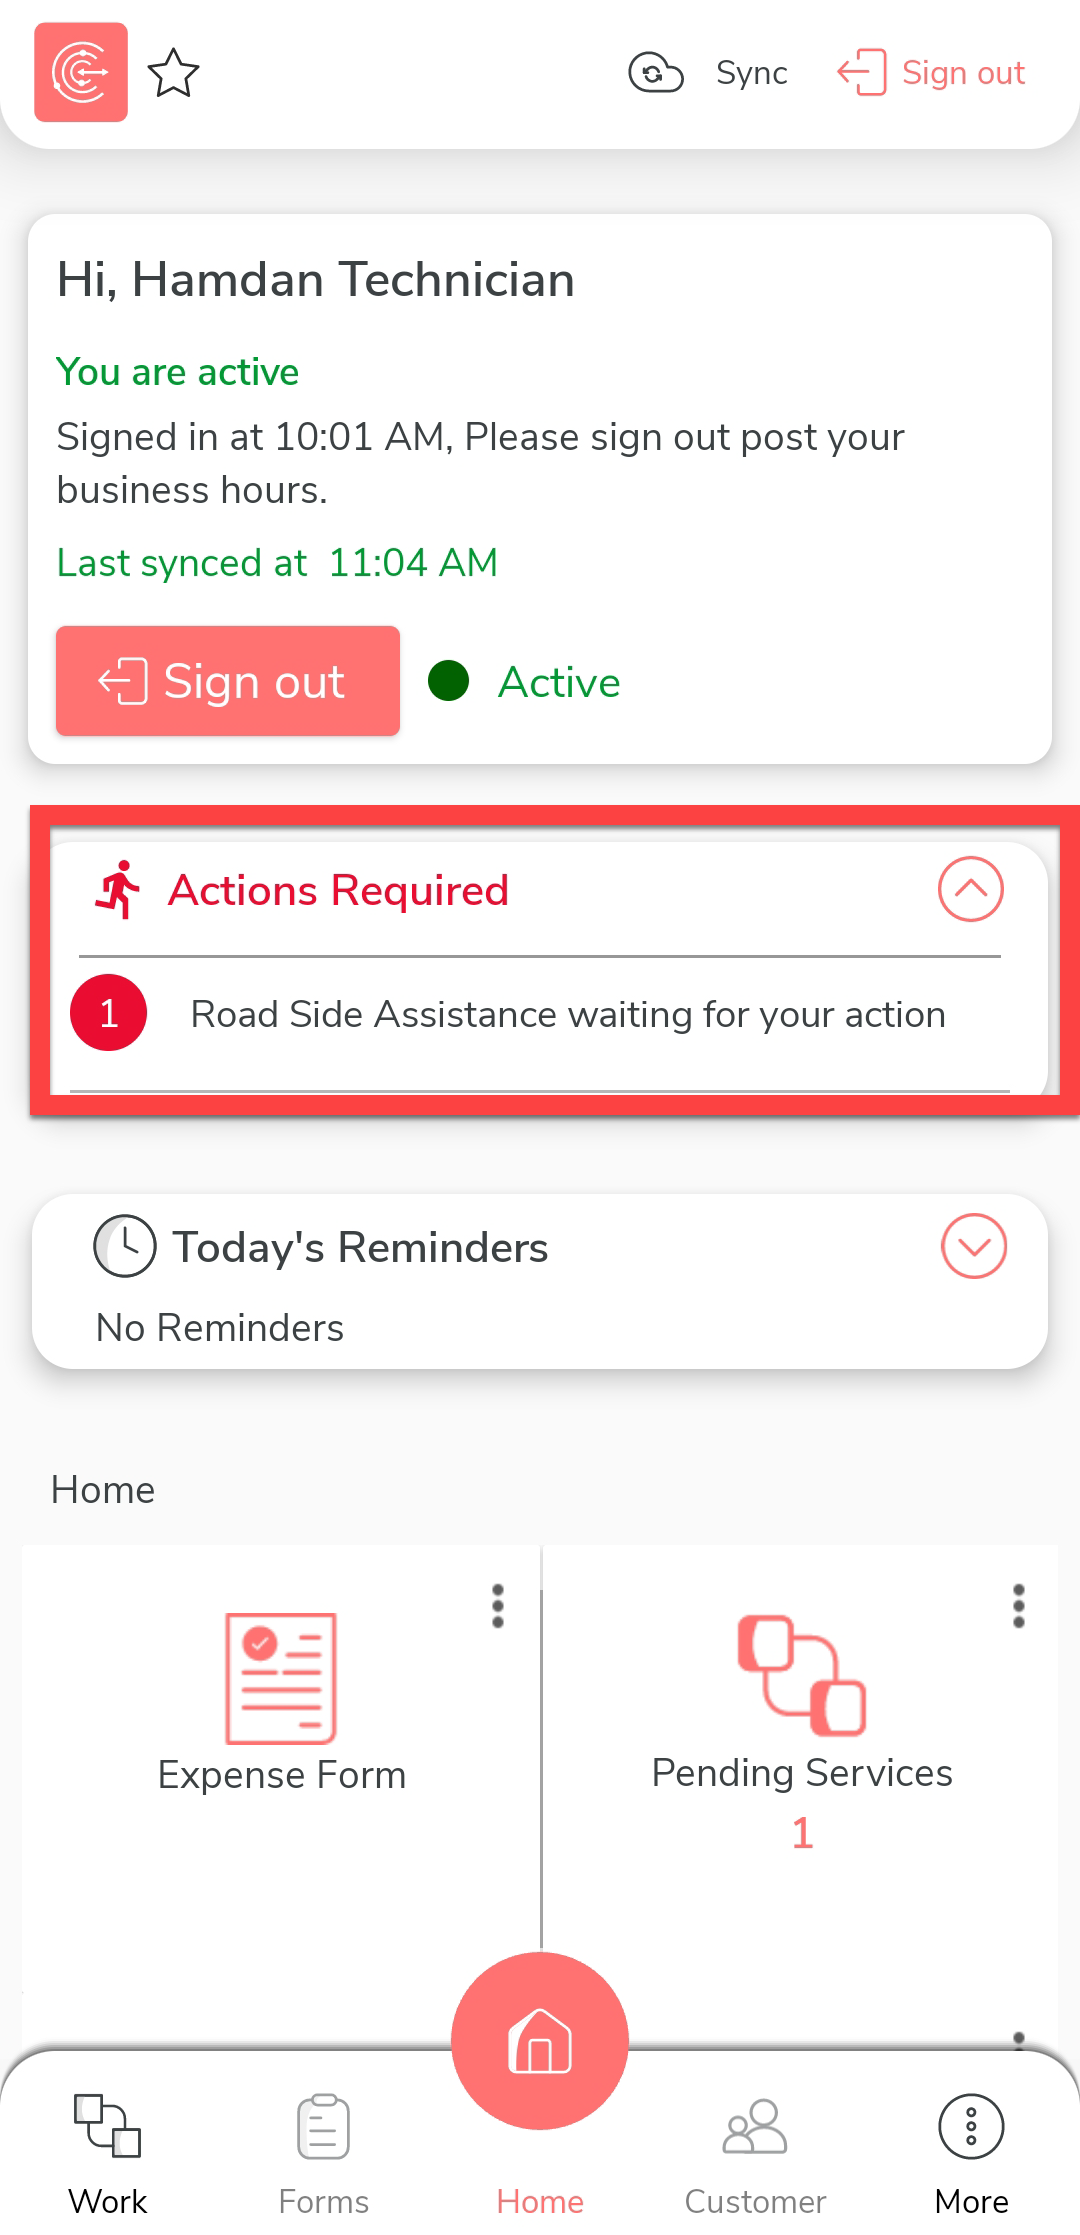
Complete RSA Work in Mobile App
In this section, we will explore how a technicians completes an RSA work using the Effort mobile app after accepting the work invitation.
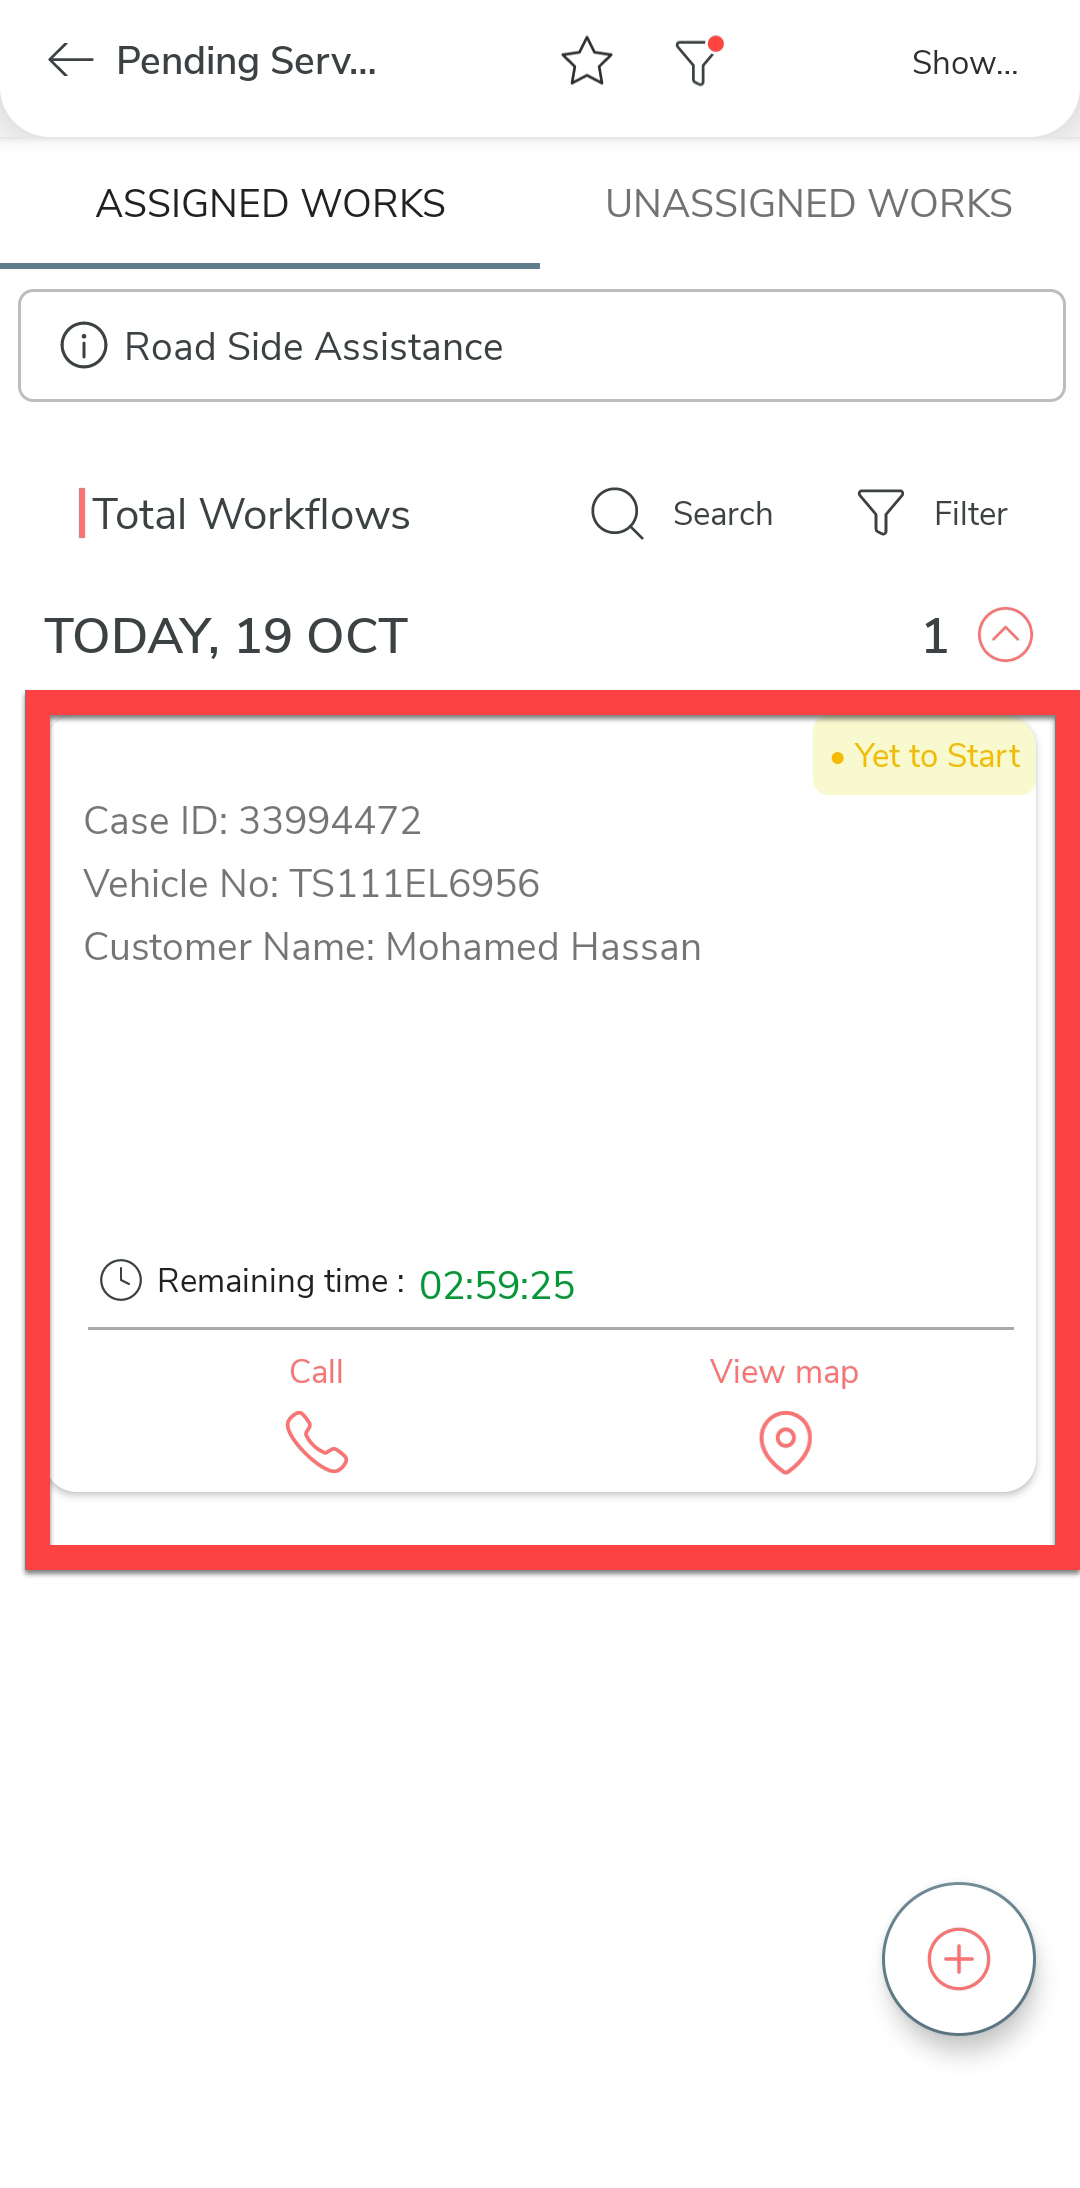
-
On the effort mobile app home screen, tap on the action item under the
Actions Required section. Alternatively, you
can tap the Roadside Assistance card.
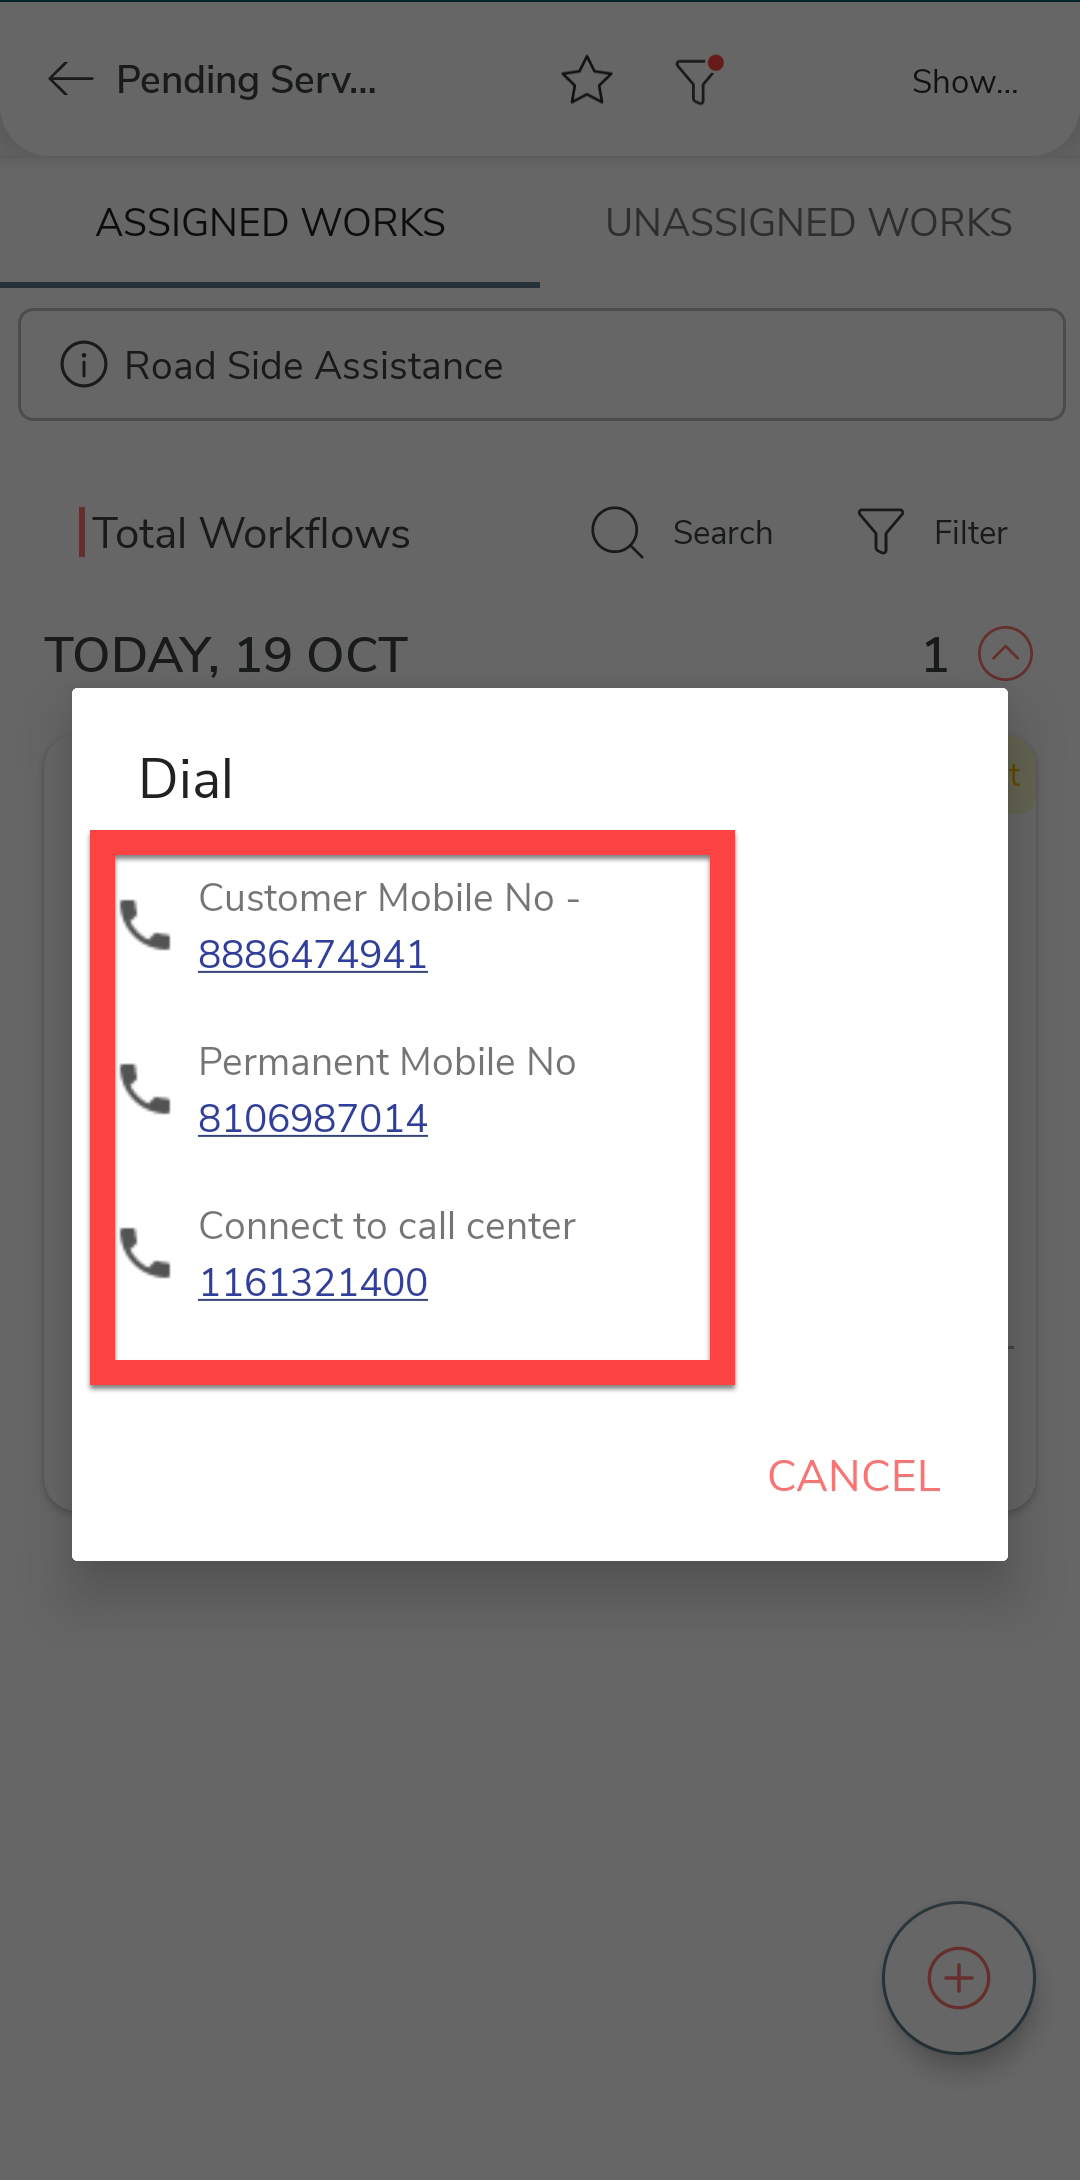
-
Tap on the call icon to view the contact numbers.
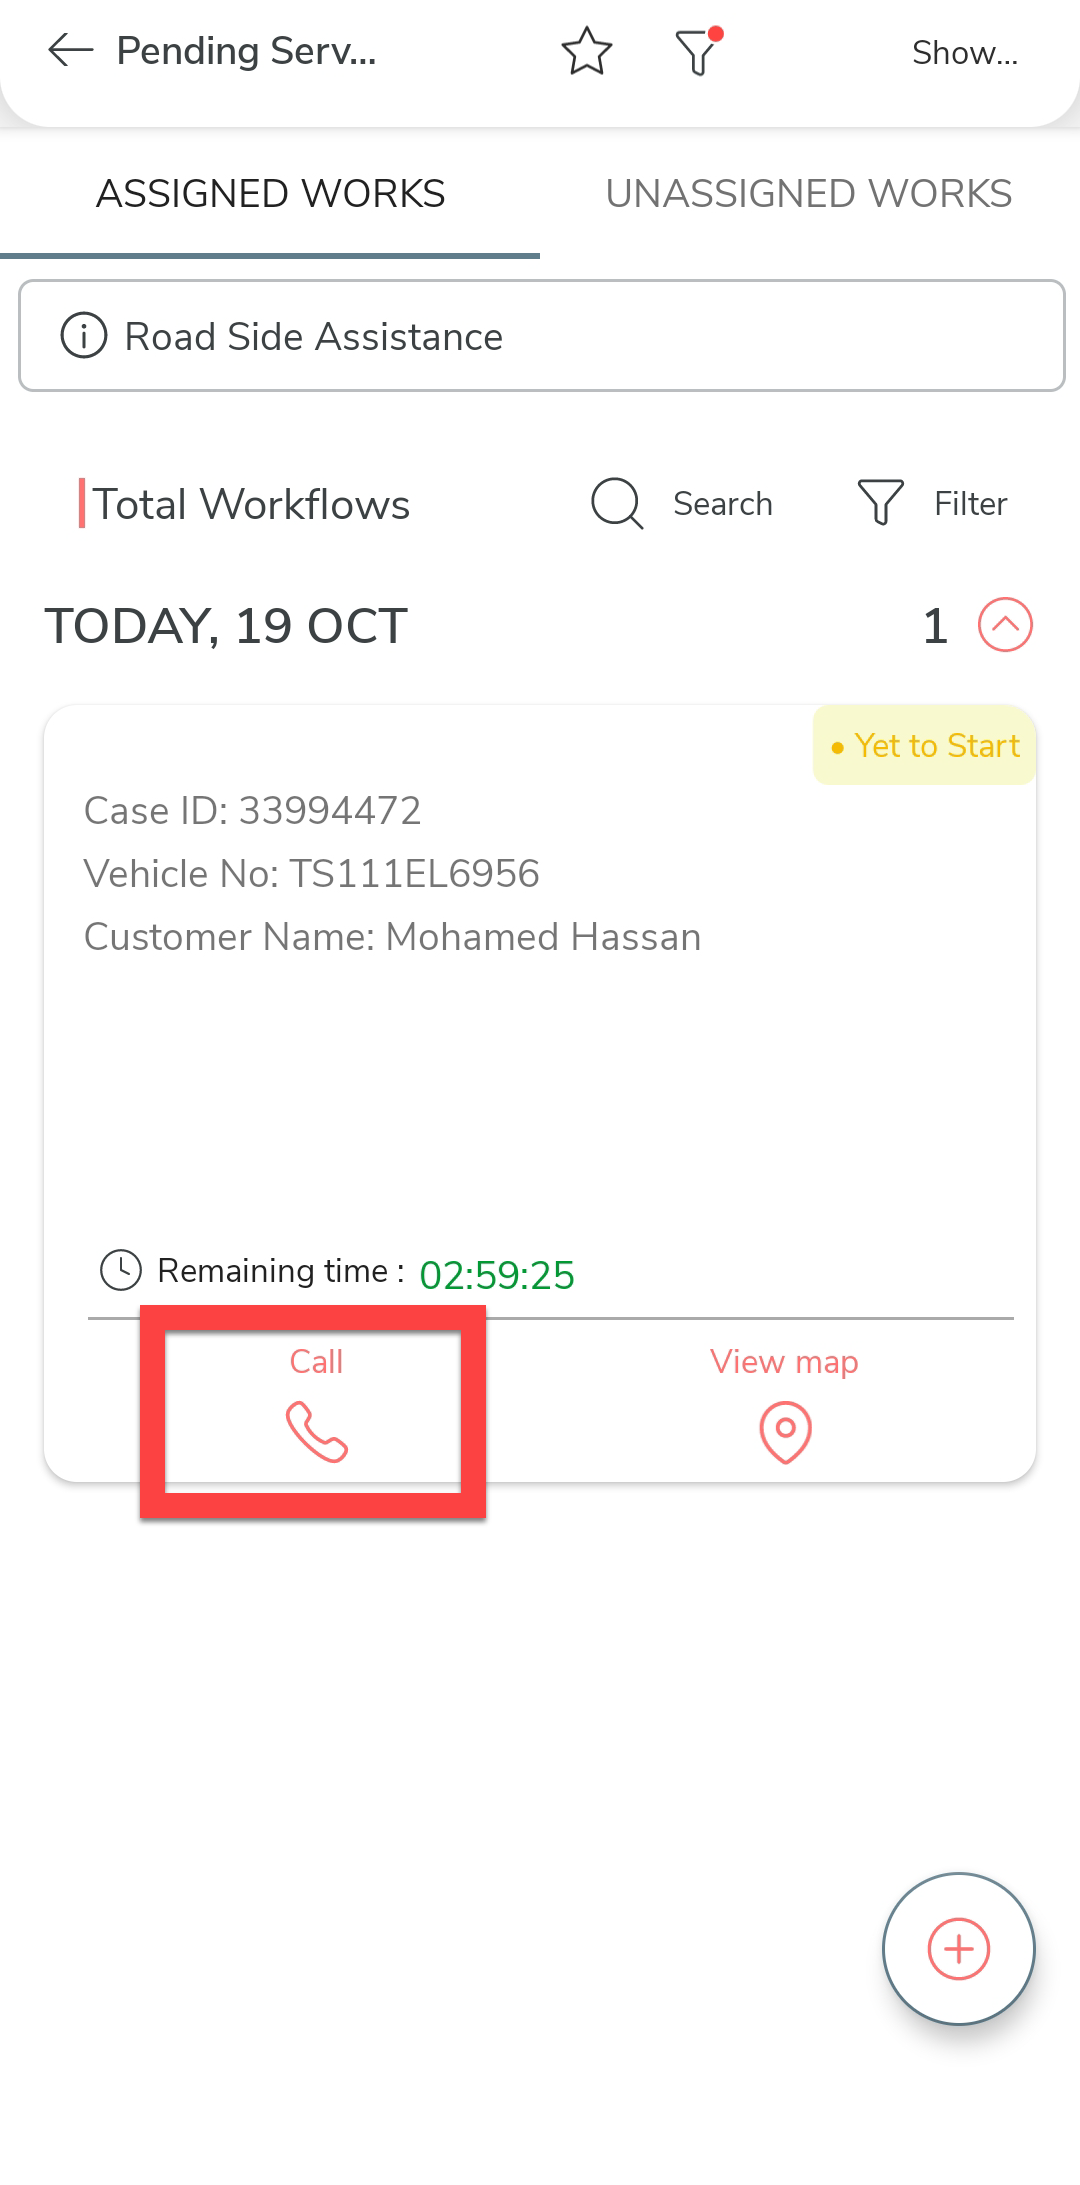
-
Tap on the required number to make a call to customer. If there is no
response from customer, you will have the option to call call center
also.
-
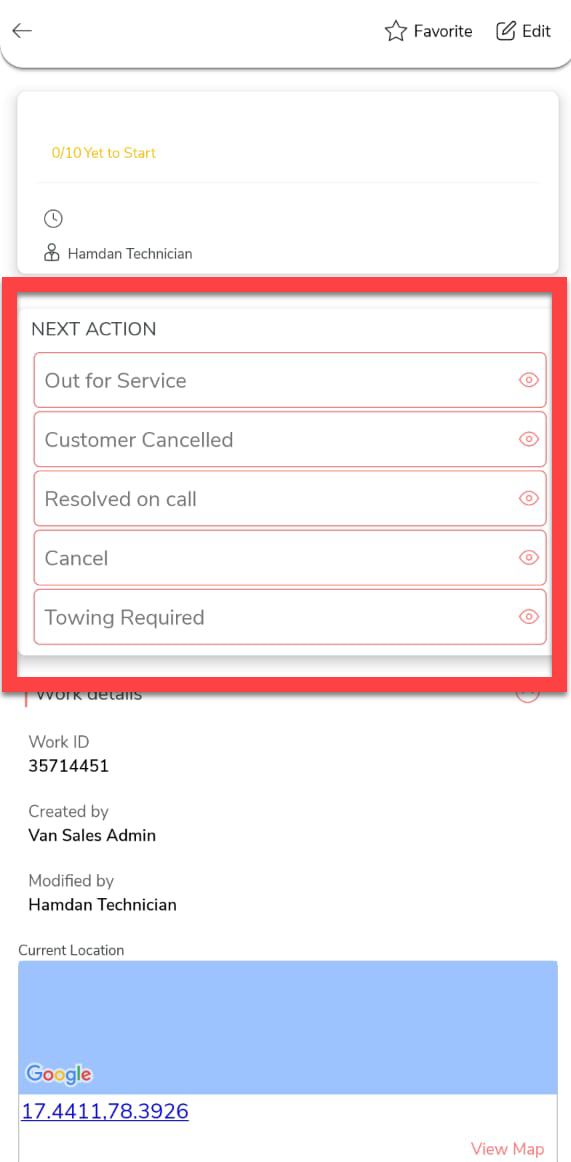
After connecting with customer, tap on the process card.
-
On the process screen, you can see the next activities to be
performed.
-
If customer asks you to cancel the work when you make a call to
customer, you can execute the Customer Cancelled
activity. As per the configured flow, the RSA process will be completed
after executing the following steps. To complete this activity, do the
following.
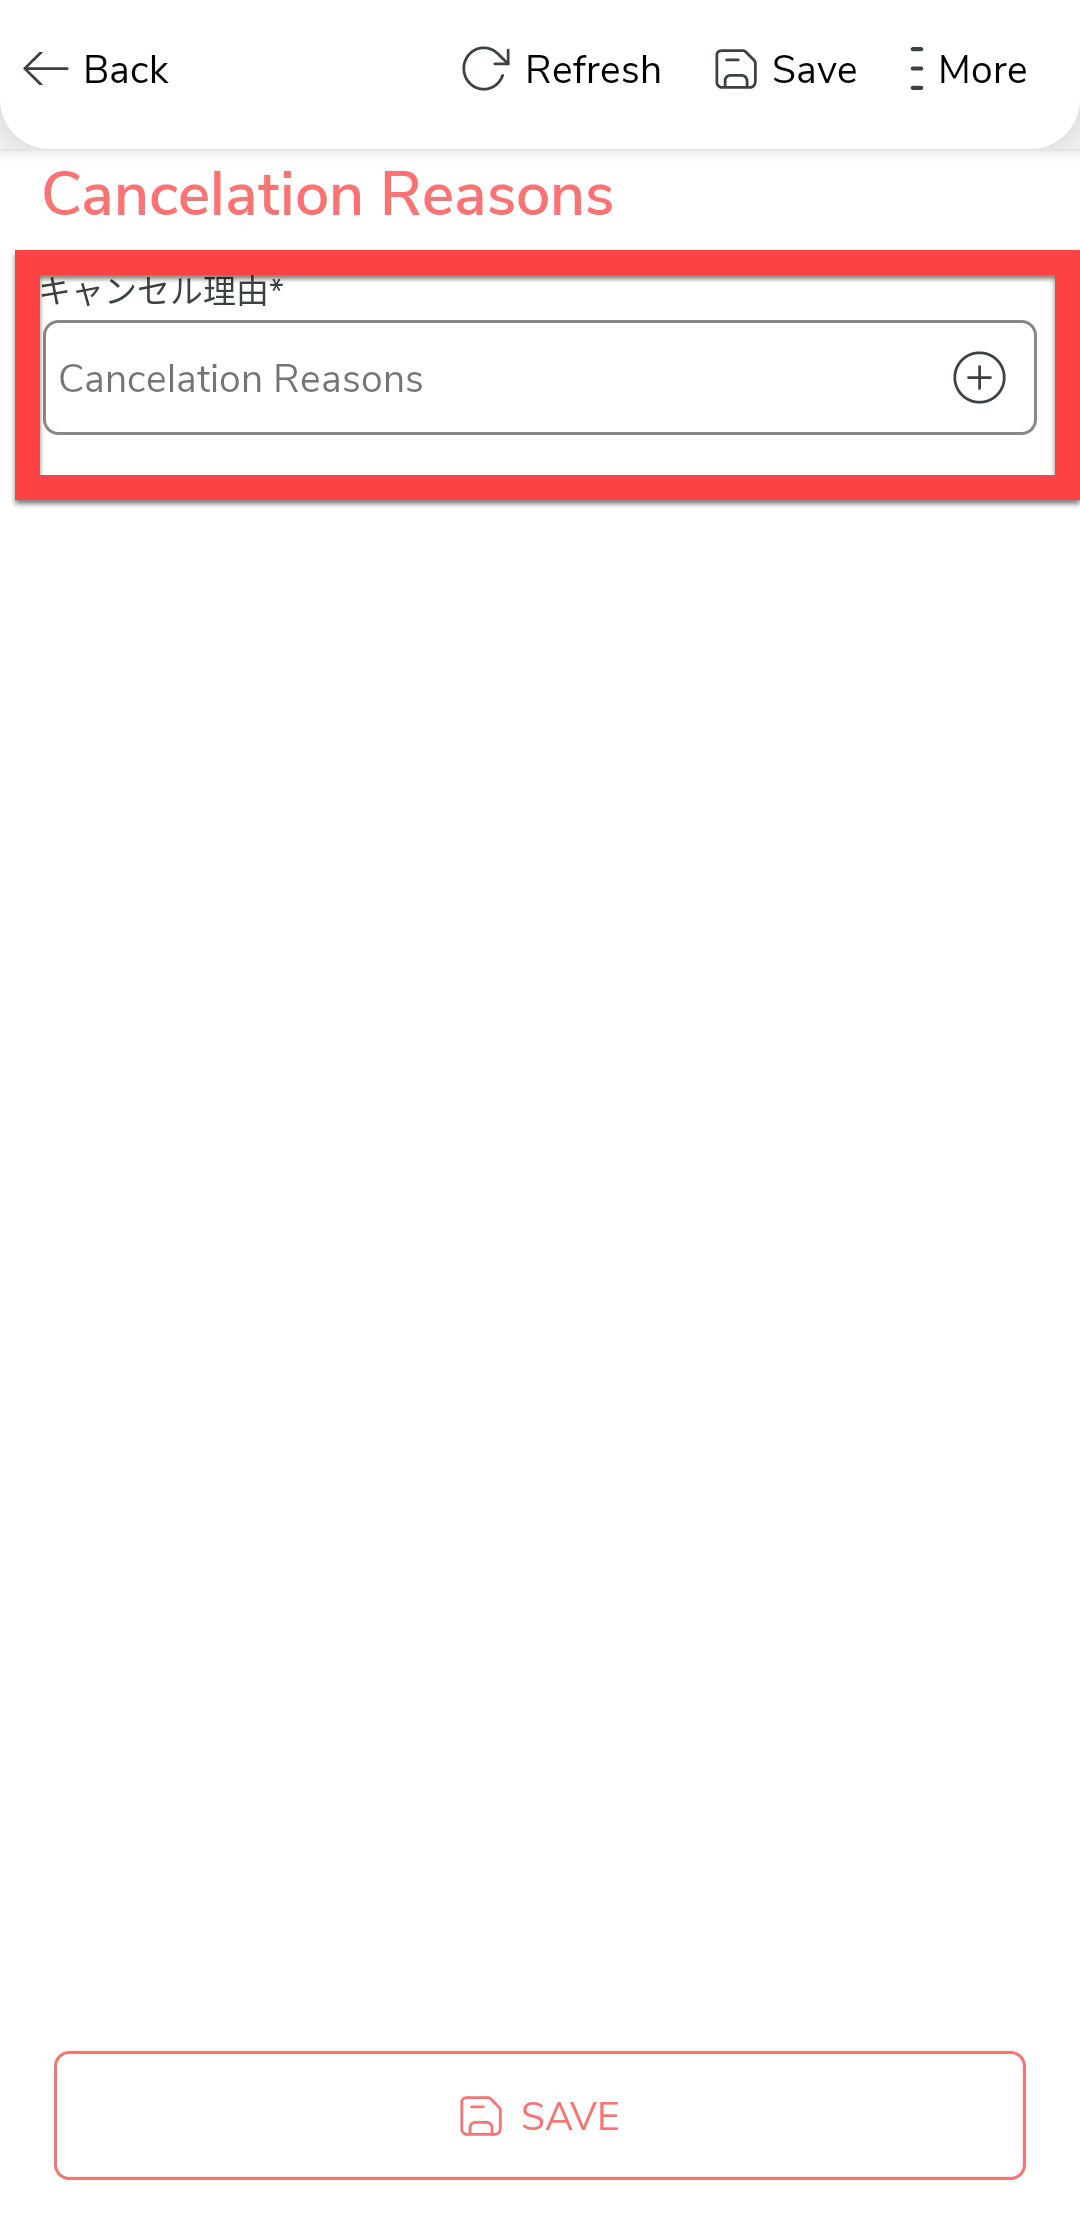
-
Tap on the Customer Cancelled
activity.

-
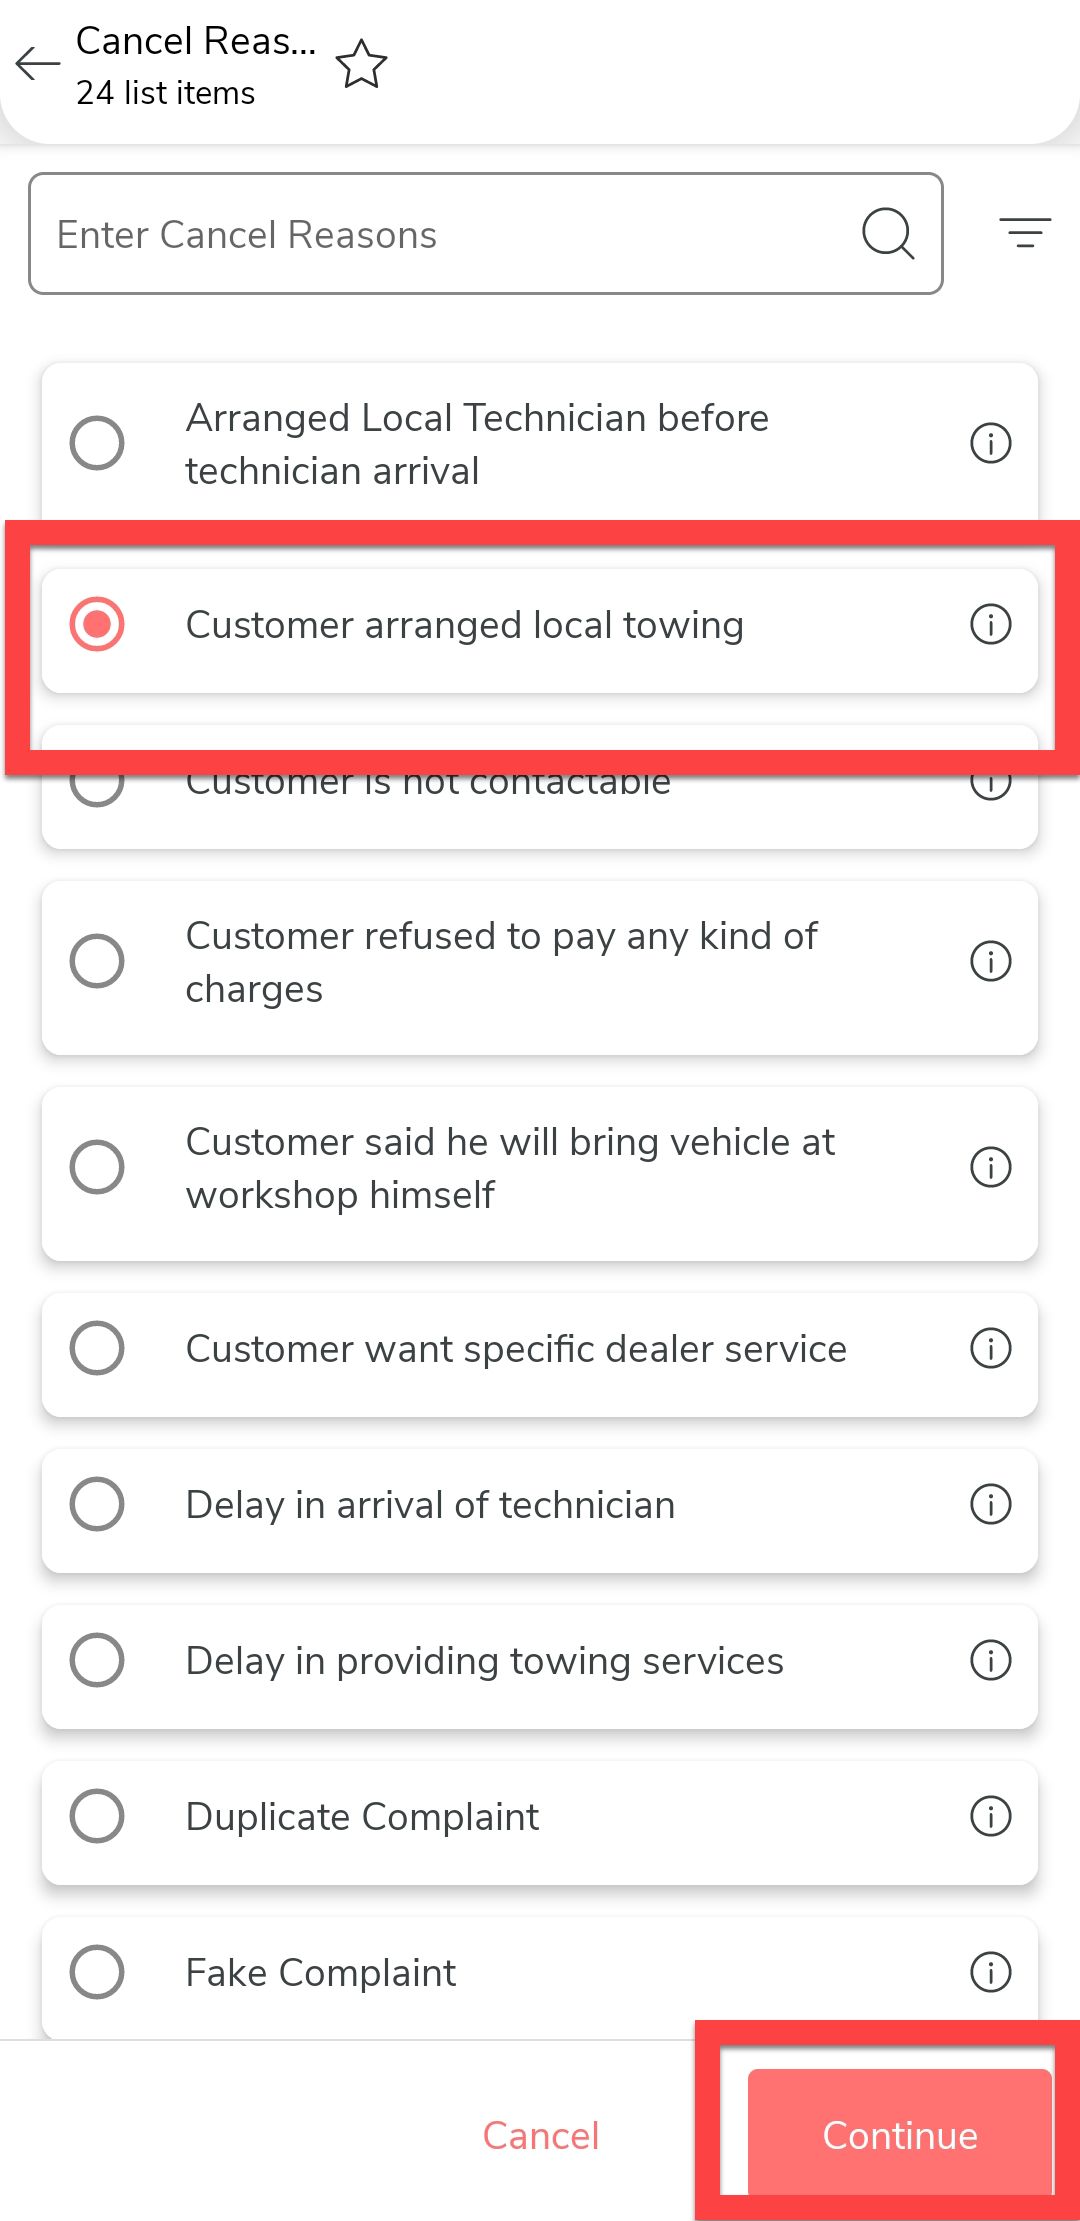
Tap the Cancelation Reasons to select a
reason for cancellation.
-
Select a reason and tap Continue.
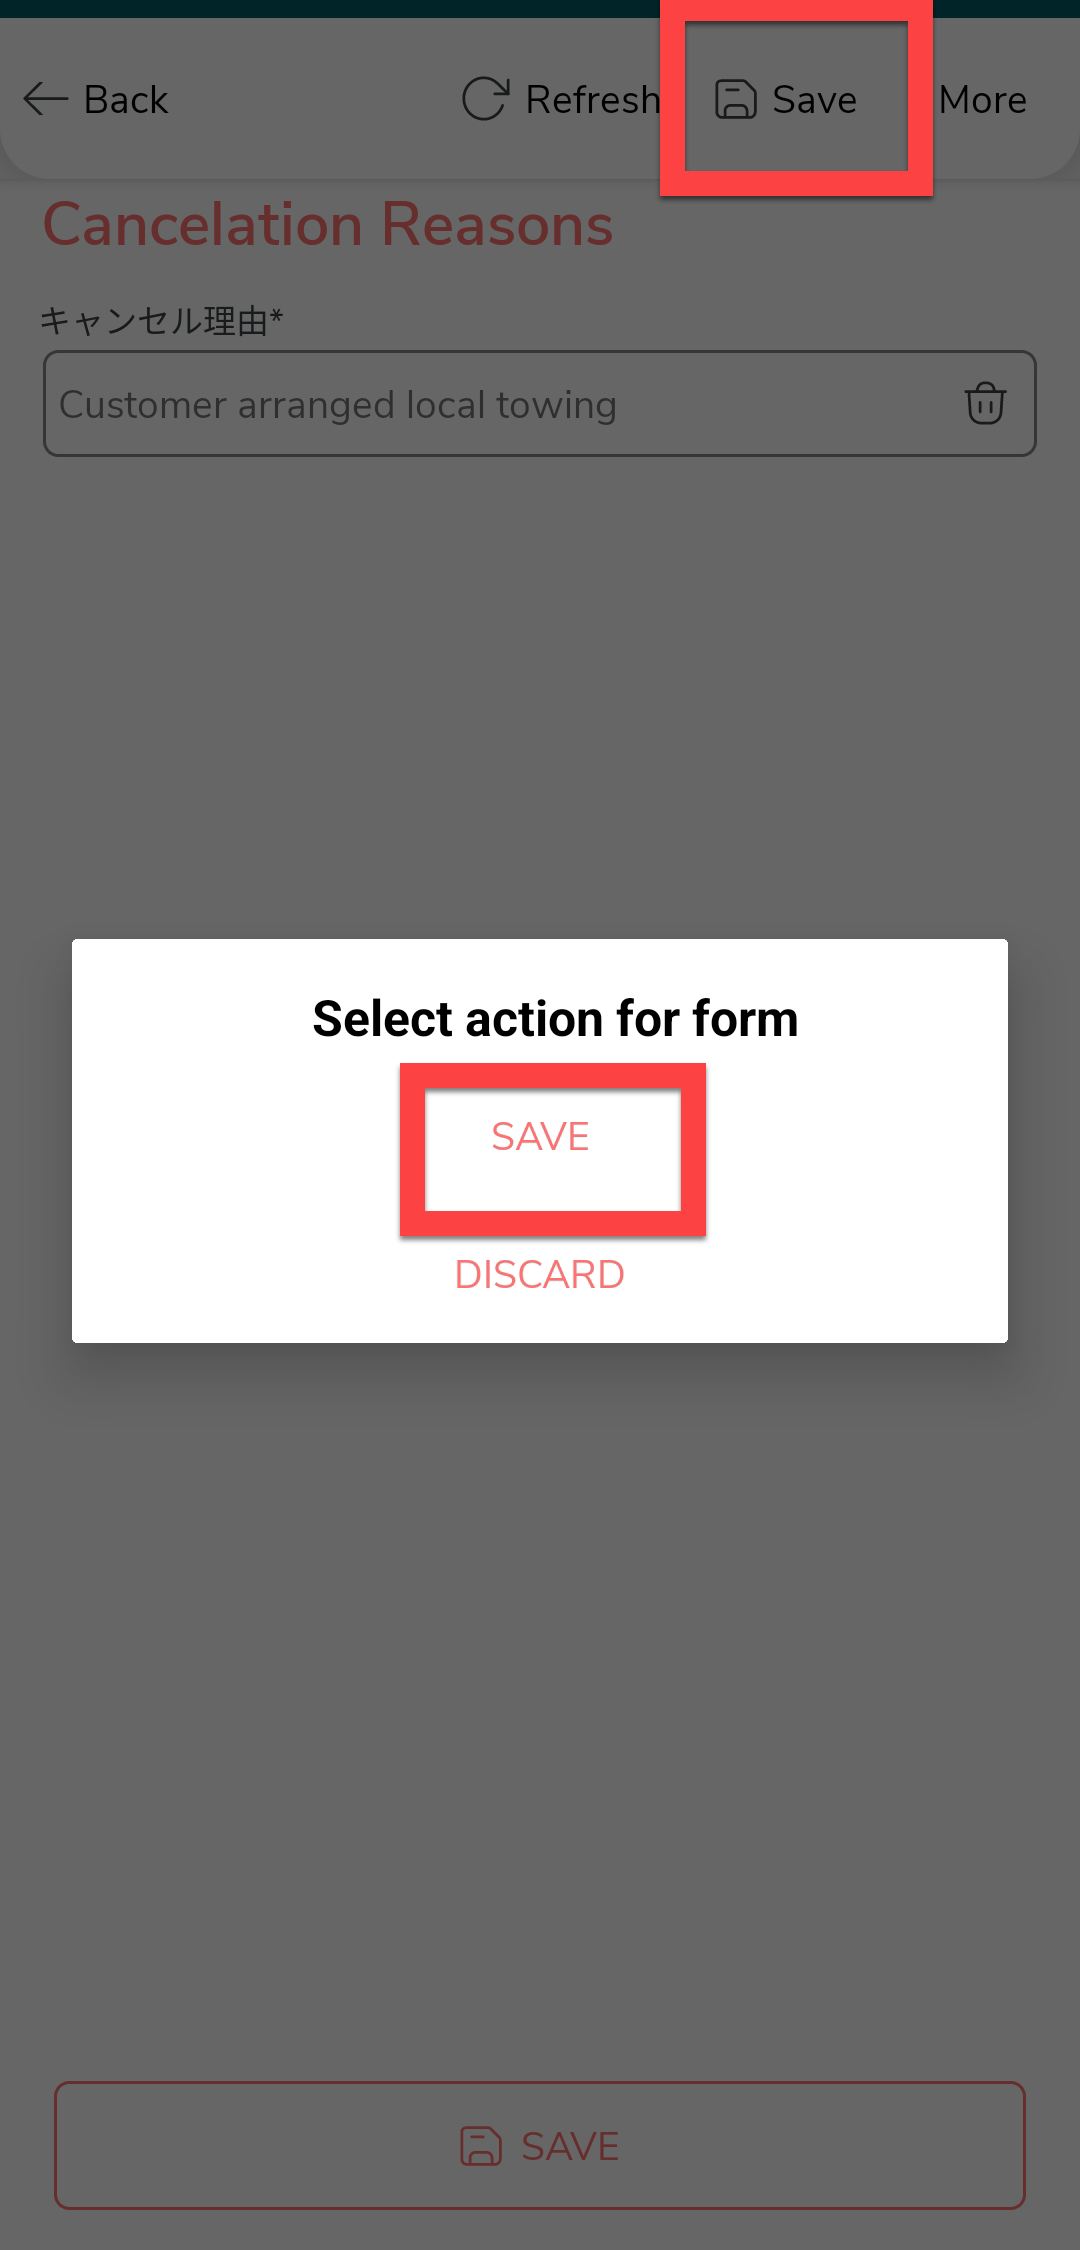
-
Tap Save and then tap
Save in the confirmation
pop-up.
-
Tap on the Customer Cancelled
activity.
-
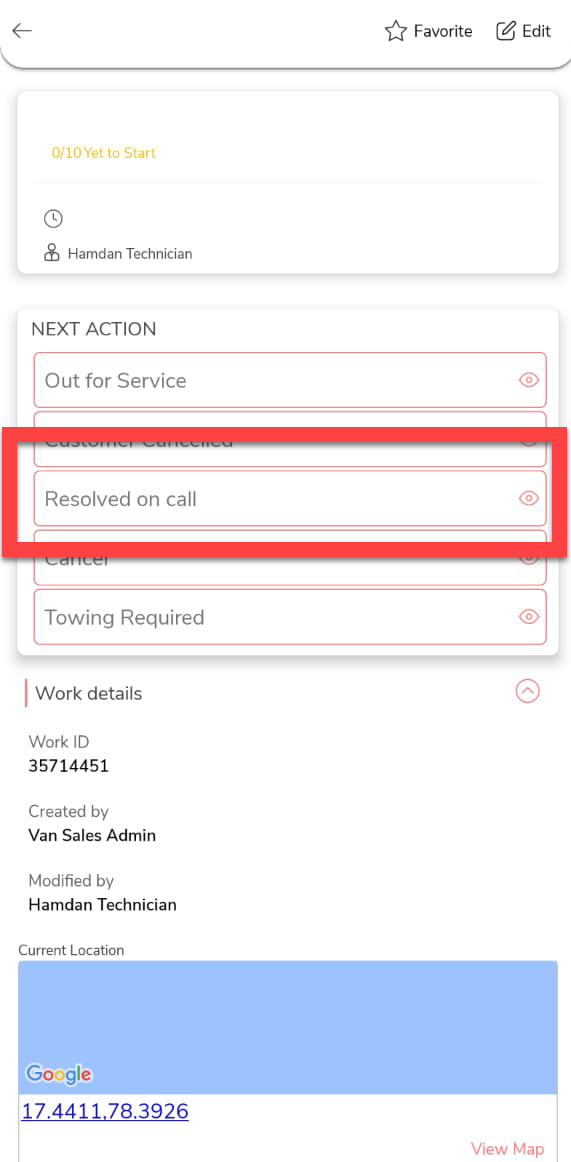
If the issue is resolved by following instructions you provided over
the call, you can tap on the Resolved on Call
activity. As per the configured flow, the RSA process will be completed
after executing the following steps. To complete this activity, do the
following.
-
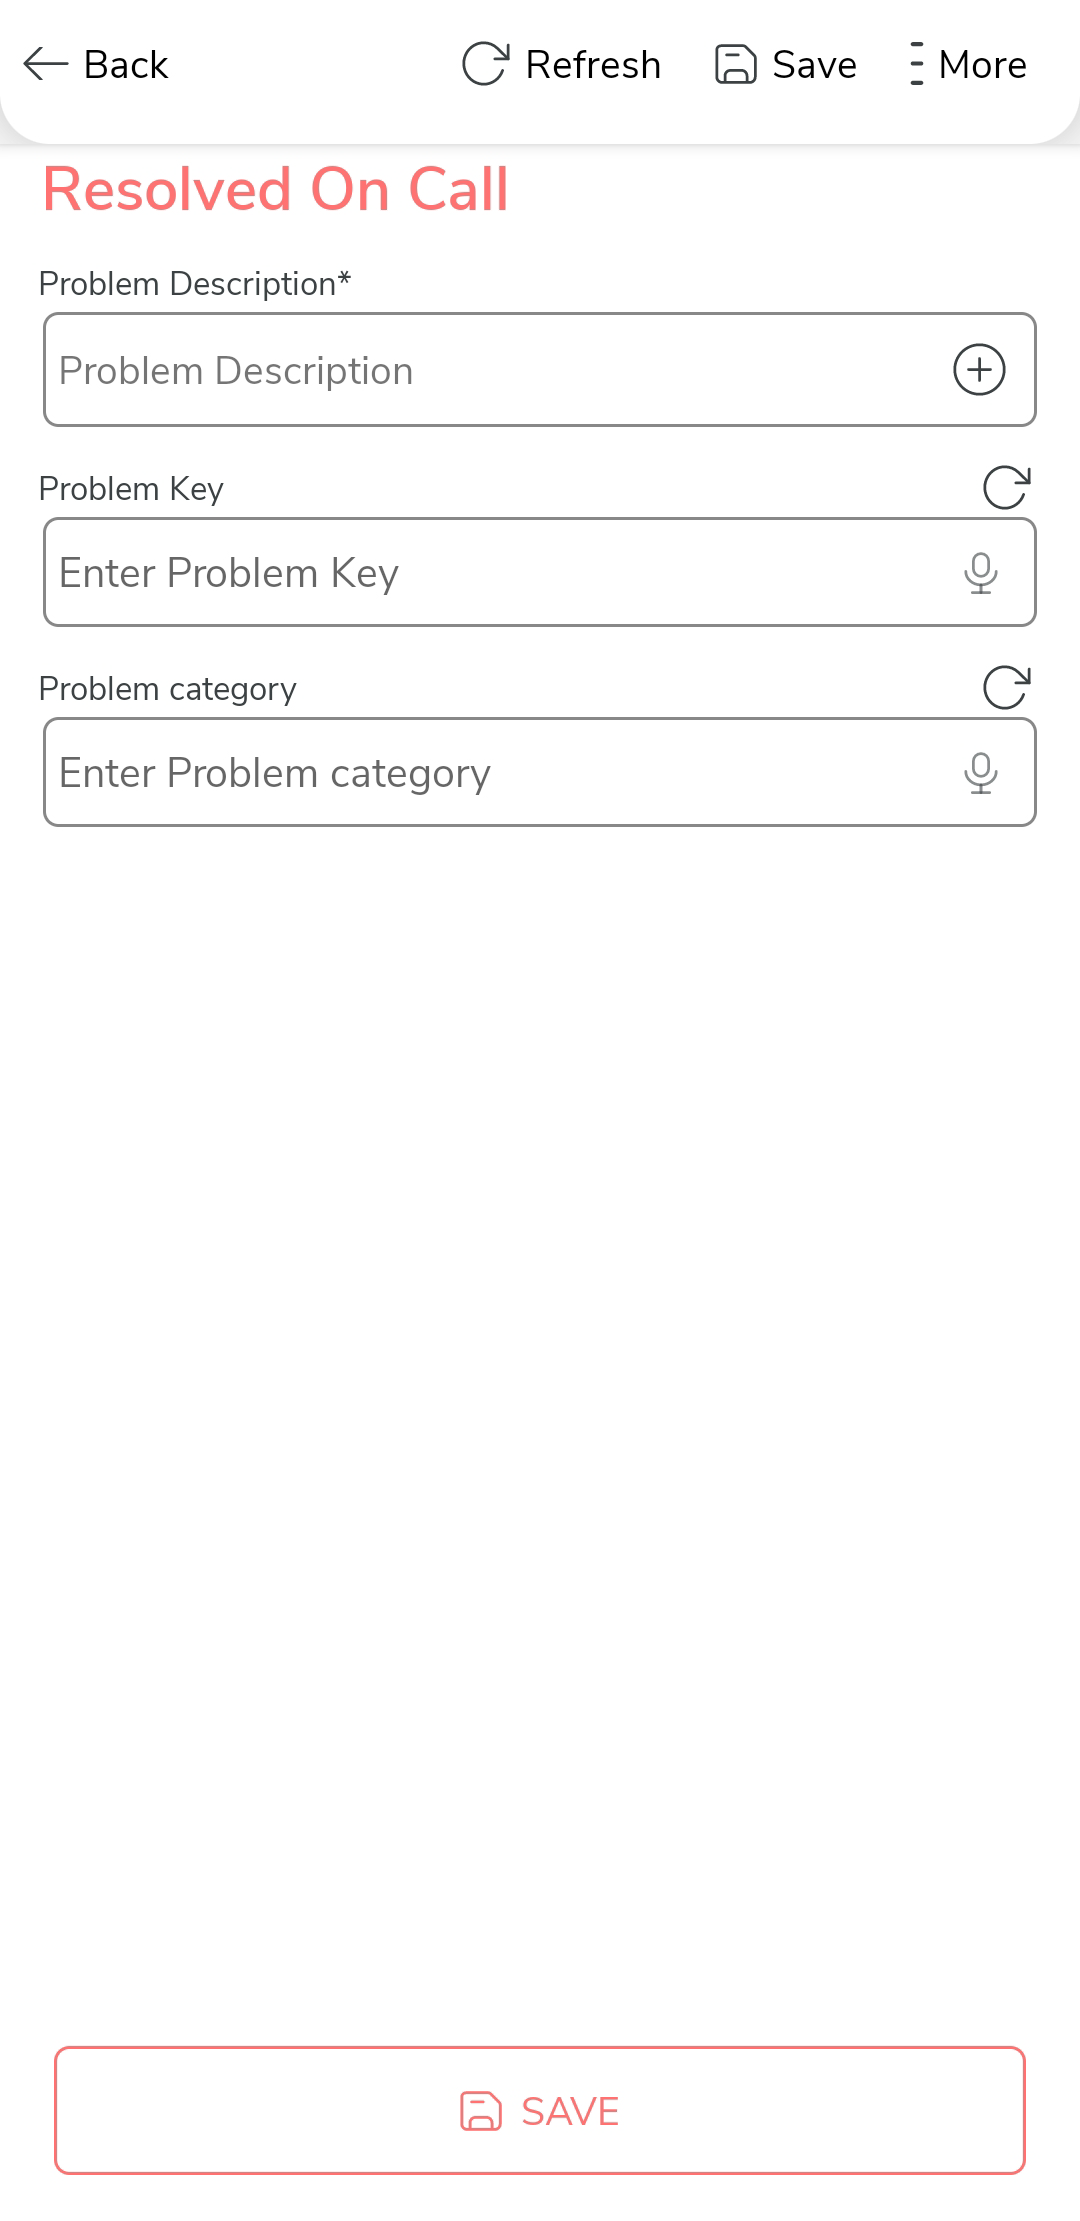
Tap on the Resolved On Call
activity.
-
Fill in the form and save it.
-
Tap on the Resolved On Call
activity.
-
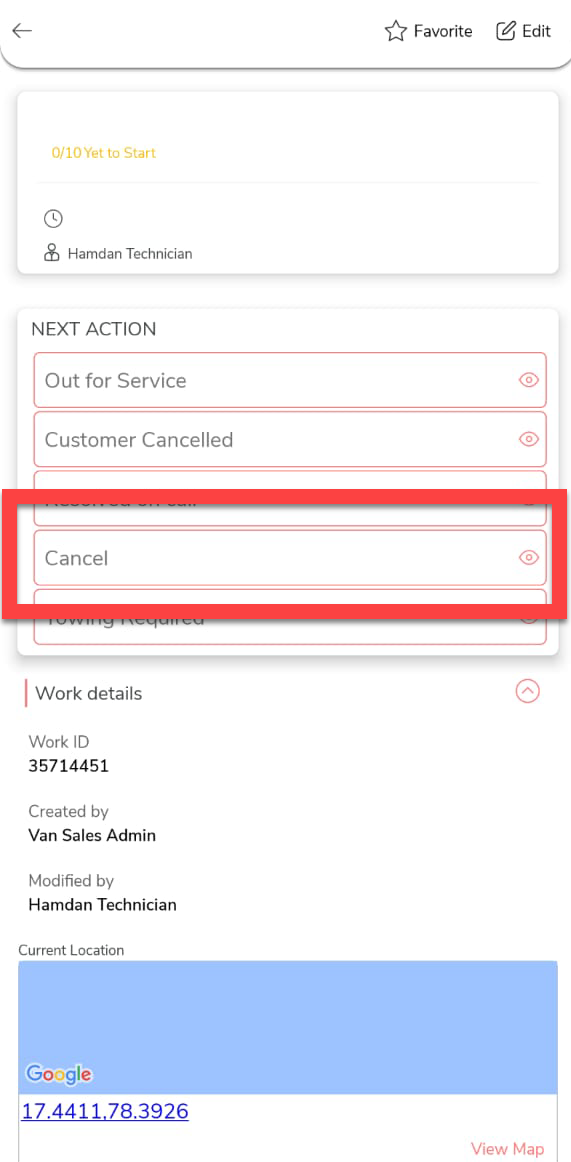
If you want to cancel the RSA work, you can tap on the
Cancel activity. As per the configured flow,
the RSA process will be completed after executing the following steps.
To complete this activity, do the following.
-
Tap on the Cancel activity.
-
Fill in the form and save it.
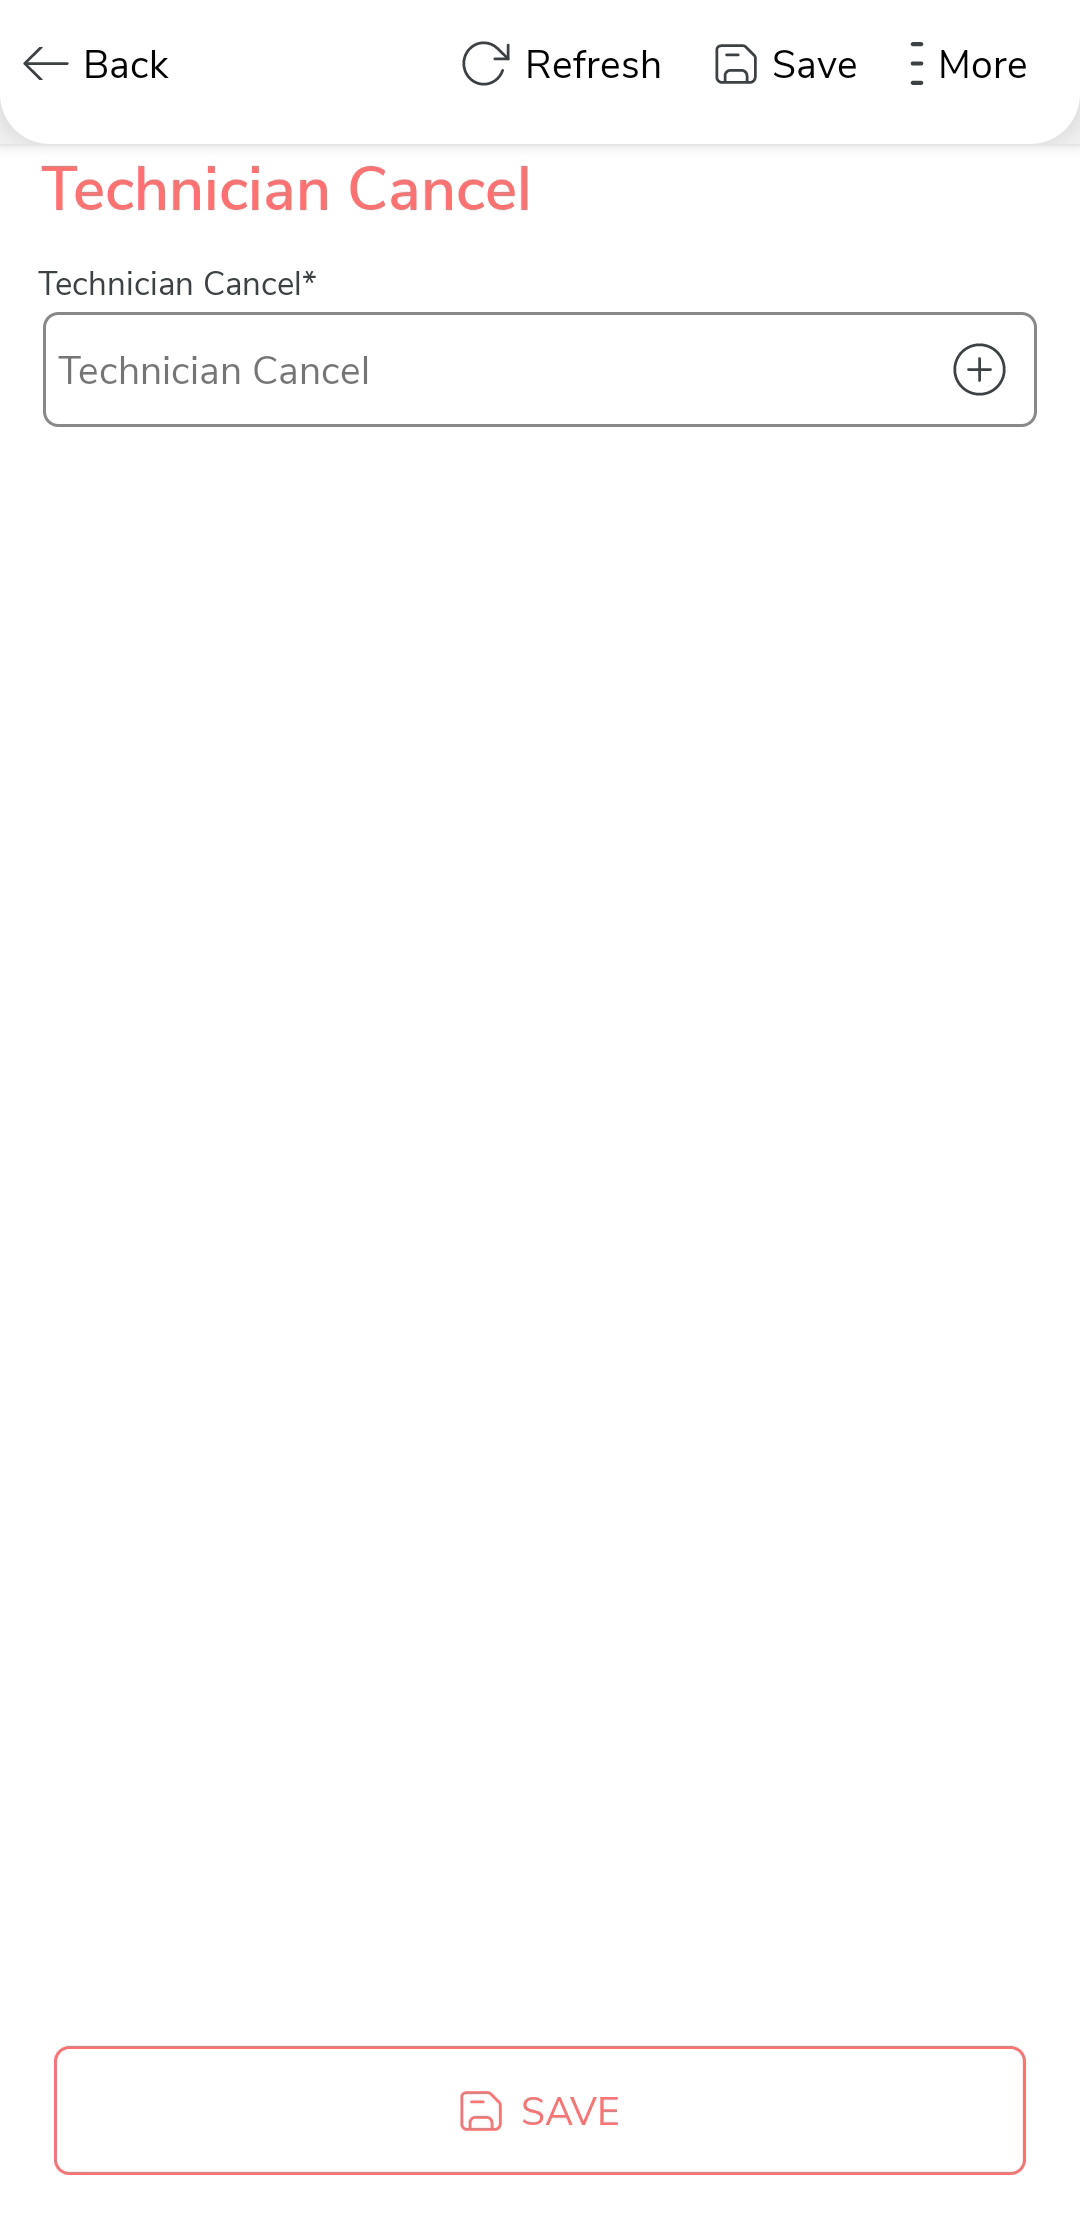
-
Tap on the Cancel activity.
-
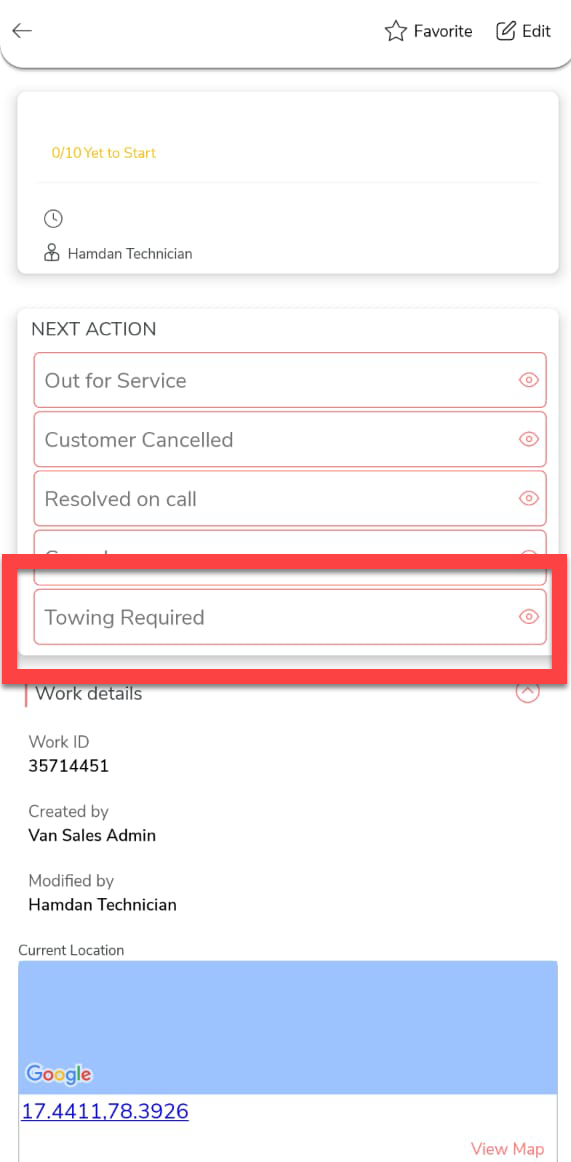
If the vehicle requires towing, you can tap on the Towing
Required activity. As per the configured flow, the RSA
process will be completed after executing the following steps. To
complete this activity, do the following.
-
Tap on the Towing Required
activity.
-
Fill in the form and save it.
-
Tap on the Towing Required
activity.
-
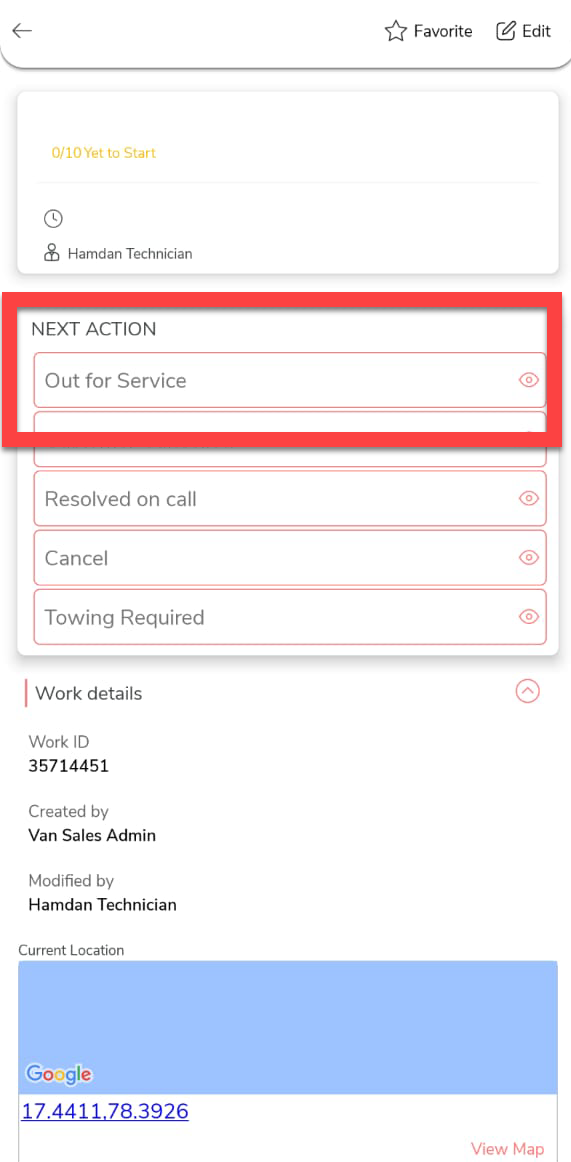
If you want to go the customer location to fix the issue, tap the
Out for Service activity.
-
If customer asks you to cancel the work after you reach the customer's
location, you can execute the Customer Cancelled
activity. As per the configured flow, the RSA process will be completed
after executing the following steps. To complete this activity, do the
following.
-
Tap on the Customer Cancelled
activity.

-
Fill in the form and save it.
-
Tap on the Customer Cancelled
activity.
-
If you want to cancel the RSA work after you reach the customer's
location, you can tap on the Cancel activity. As
per the configured flow, the RSA process will be completed after
executing the following steps. To complete this activity, do the
following.
-
Tap on the Cancel activity.
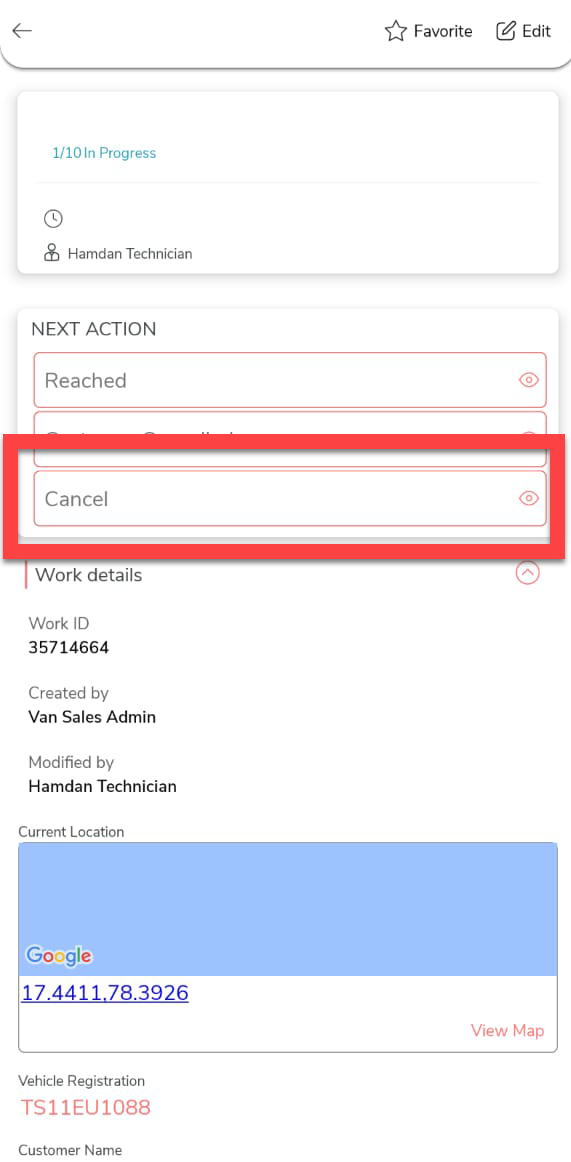
-
Fill in the form and save it.
-
Tap on the Cancel activity.
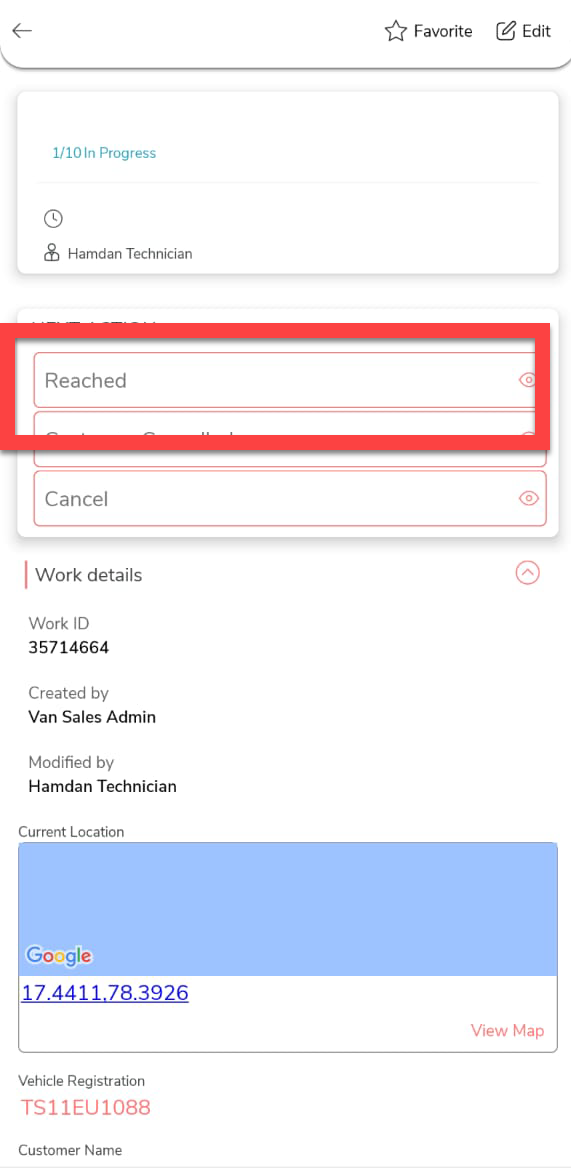
-
After you reach the customer and want to complete the service, tap on
the Reached activity.
-
If customer asks you to cancel the work after you reach the customer's
location, you can execute the Customer Cancelled
activity. As per the configured flow, the RSA process will be completed
after executing the following steps. To complete this activity, do the
following.
-
Tap on the Customer Cancelled
activity.

-
Fill in the form and save it.
-
Tap on the Customer Cancelled
activity.
-
After doing the service, if you find that the issue can't be resolved,
then you can execute the Cant Rectify activity.
As per the configured flow, the RSA process will be completed after
executing the following steps. To complete this activity, do the
following. the
-
Tap on the Cant Rectify activity.
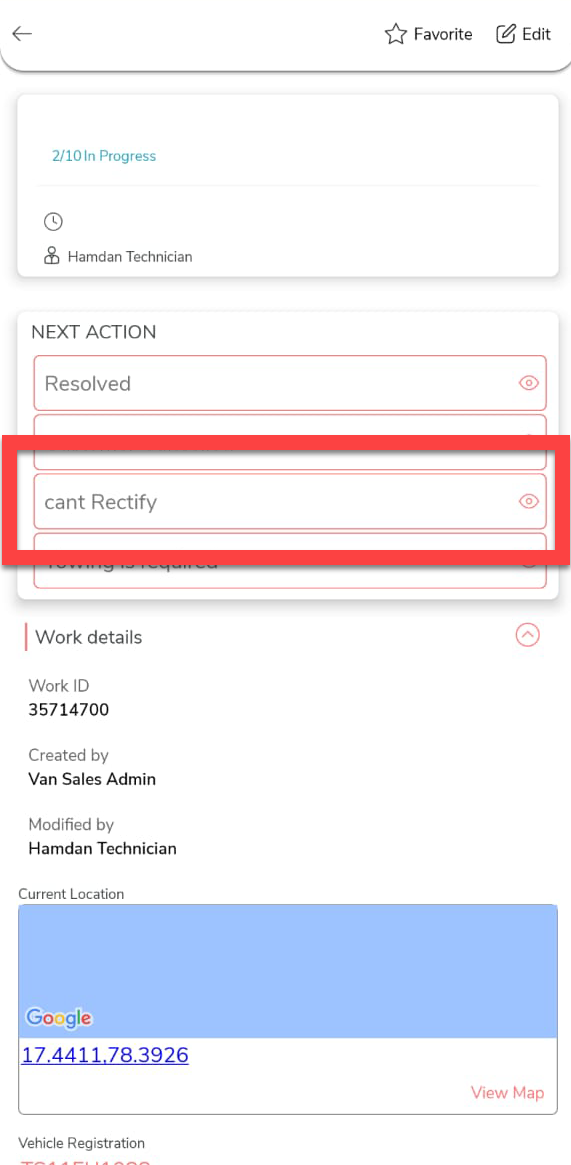
-
Fill in the form and save it.
-
Tap on the Cant Rectify activity.
-
After doing the service, if you find that the vehicle requires towing,
then you can execute the Towing Required
activity. As per the configured flow, the RSA process will be completed
after executing the following steps. To complete this activity, do the
following. the
-
Tap on the Towing Required
activity.
-
Fill in the form and save it.
-
Tap on the Towing Required
activity.
-
After doing the service, if the issue is resolved, then you can execute
the Resolved activity. As per the configured
flow, the RSA process will be completed after executing the following
steps. To complete this activity, do the following. the
-
Tap on the Resolved activity.
-
Fill in the form and save it.
-
Tap on the Resolved activity.
-
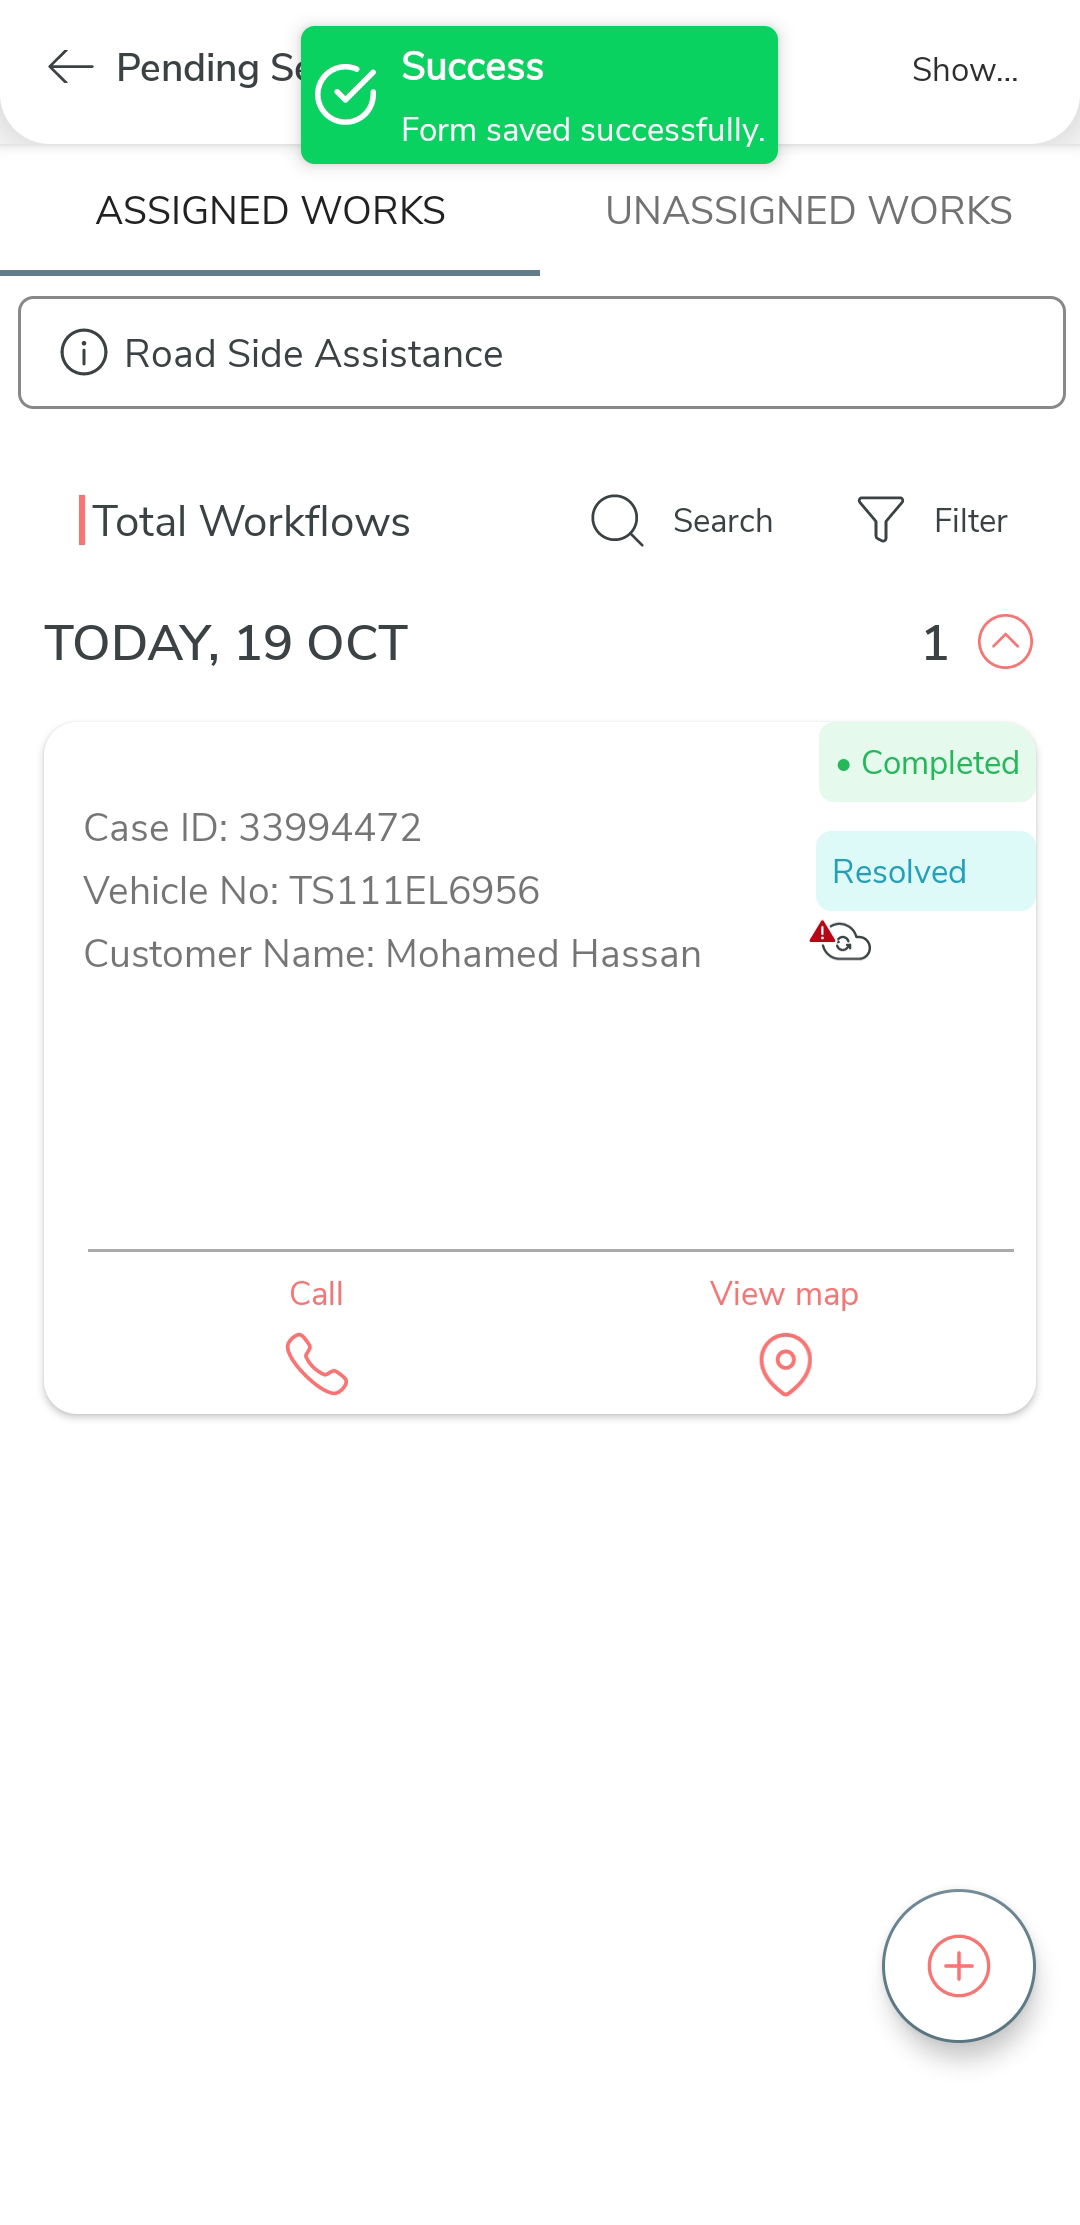
After you execute the Resolved activity, the
process will be completed and marked as resolved. We've successfully
executed the RSA work in the effort mobile app.
Note: After completing the RSA work, make sure to sync the mobile app to mark it as completed on the server.