Configure Service Ticket Management (E-Zone) Process
Introduction
It's essential for any business to quickly address service/installation requests by assigning them to the nearest branch coordinators. This ensures swift service delivery and customer satisfaction. However, performing this task manually consumes considerable time, involving the manual identification of branch coordinators, availability checks, ticket assignments, and other related activities.
Effort, a No Code Platform, offers a comprehensive solution to sidestep all these challenges by fully digitizing installation activities. Upon receiving a customer request, Effort quickly identifies the respective branch coordinator and automatically assigns the ticket to them. The branch coordinator subsequently assigns the ticket to technicians who are available. In this tutorial, we are calling this workflow as EZone.
This tutorial walks you through the process of configuring and operating the EZone process from scratch using the Effort platform. By following the step-by-step instructions below, you will be able to set up a successful EZone operation with the Effort platform.
You can find all the activities that need to be performed by different roles involved in the Installation Service operation using the Effort platform. The roles include Admin, Central Coordinator, Branch Coordinator, and Technicians. Here's the list of activities we will be configuring and executing in the Effort as part of the EZone Service.
- Admin Activities (Configuration of E-Zone)
- Create Employee
- Create Branch List
- Create Customer Status List
- Create Priority List
- Create Customer Type List
- Customize Employee Fields
- Map Branch to Existing Employees
- Customer Configuration
- Creation of List Masters
- Create Action Type List
- Create Contact Details List
- Create Ticket Condition List
- Create Ticket Condition Details List
- Create Update Ticket Status List
- Create Mode of Transport List
- Create Ticket Source List
- Create Ticket Category List
- Create Solution List
- Create Solution Service List
- Create Solution Details List
- Creation and Configuration of Forms
- Creation and Configuration of E-Zone Process
- Execute EZone Process
Admin Activities (Configuration of E-Zone)
In this section, we will walk you through the admin-level activities involved in the configuration of the E-Zone process. To perform the Admin activities, the users must have access to the App Builder module. Only the users that have App Builder access can define all the configurations. Login to Effort as App Builder. Refer to the Sign-in To Effort topic for login.
Create Employee
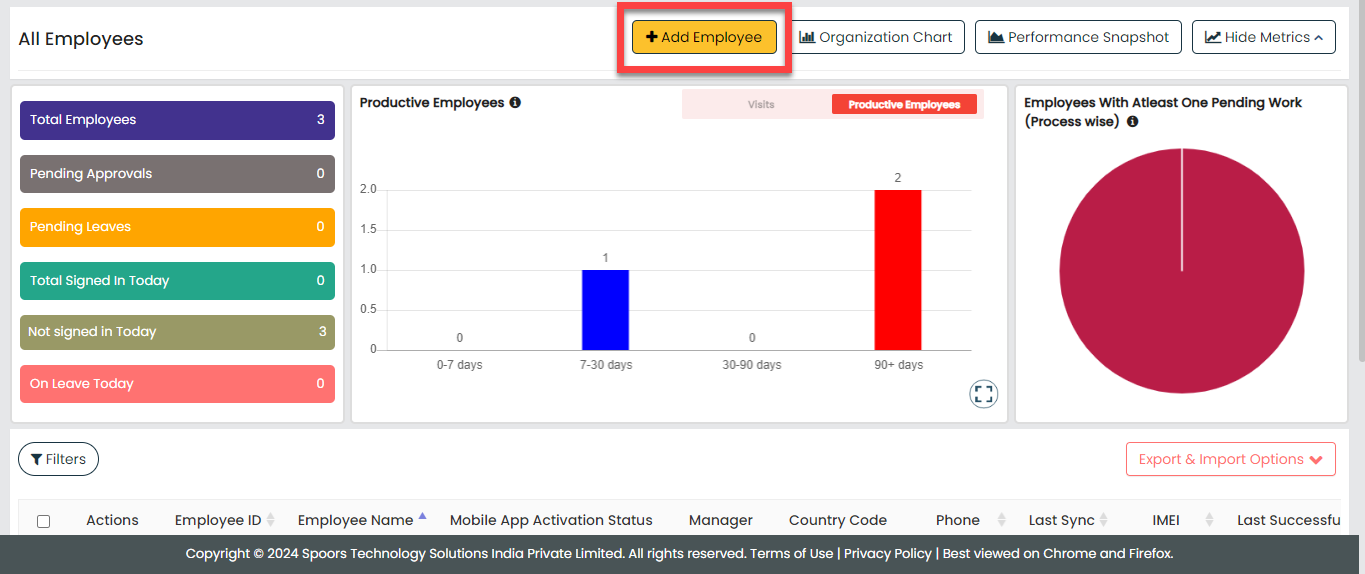
In this section, you will find the steps to create employees (technicians) in the Web App. Here, you need to create only the branch coordinators responsible for handling the branch activities. To create an employee, follow the steps below:
-
Go to .
-
Enter the employee details such as First Name, Last Name, Employee ID,
Email, Mobile Number, and so on.
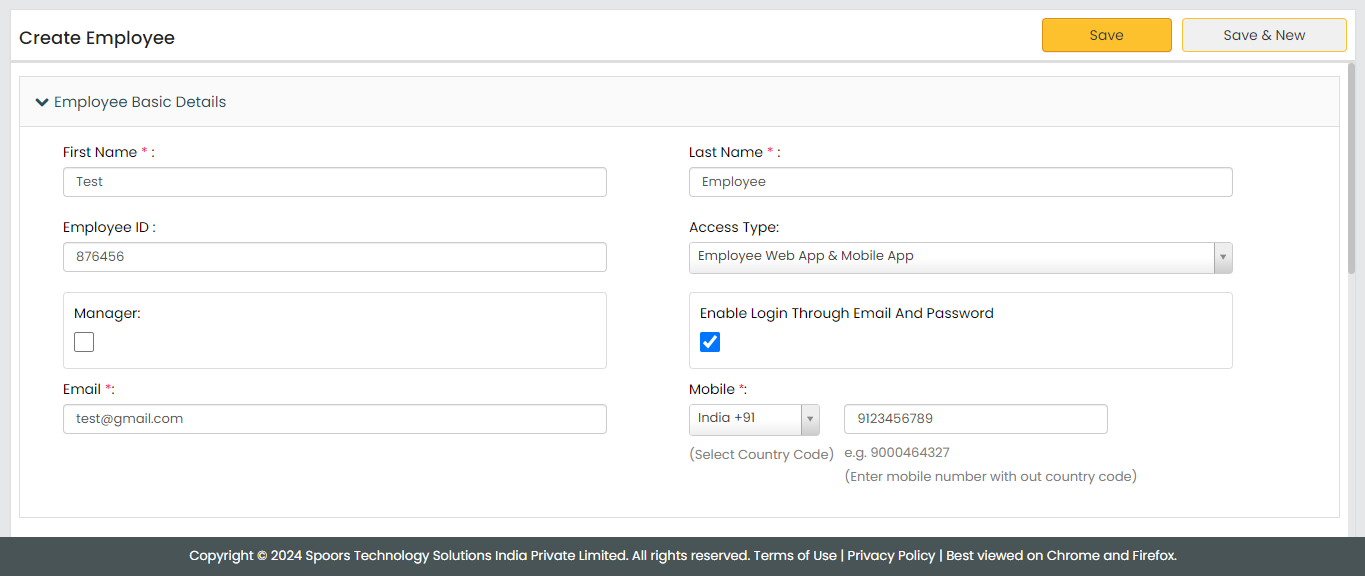
- Select the Access Type based on the employee you want to create.
-
Click Save.
Note: If you want to create more employees, you can choose the Import feature to create in a single go. To import employees, refer to Import Employees.
Create Branch List
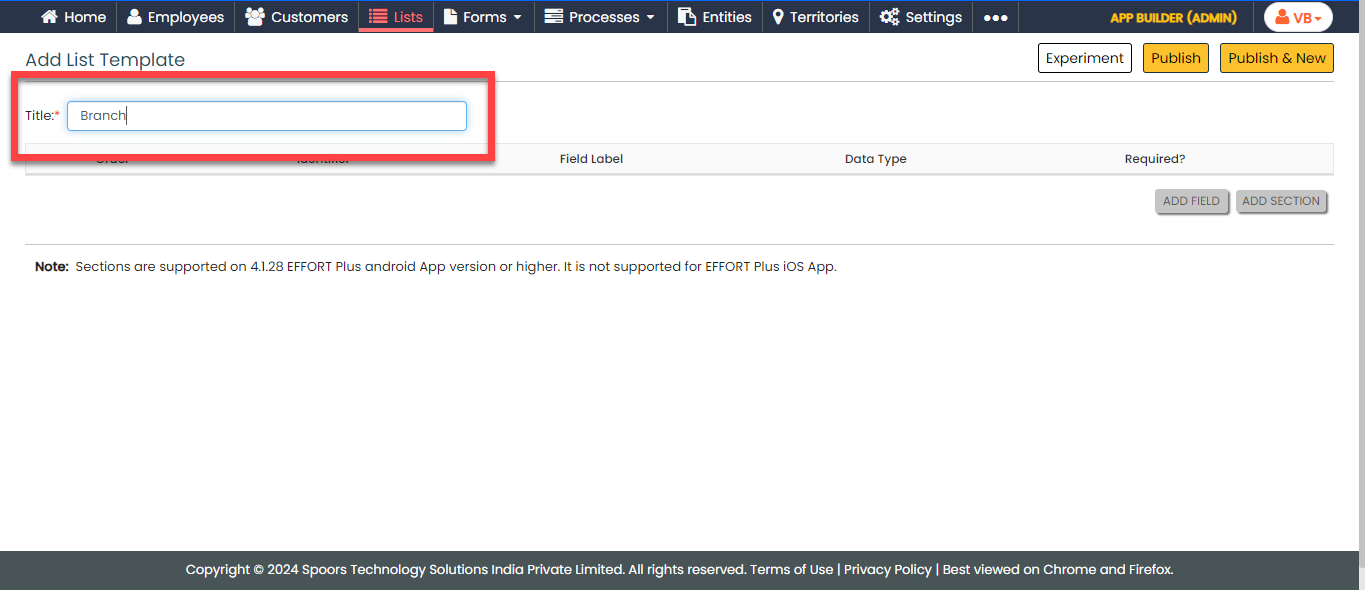
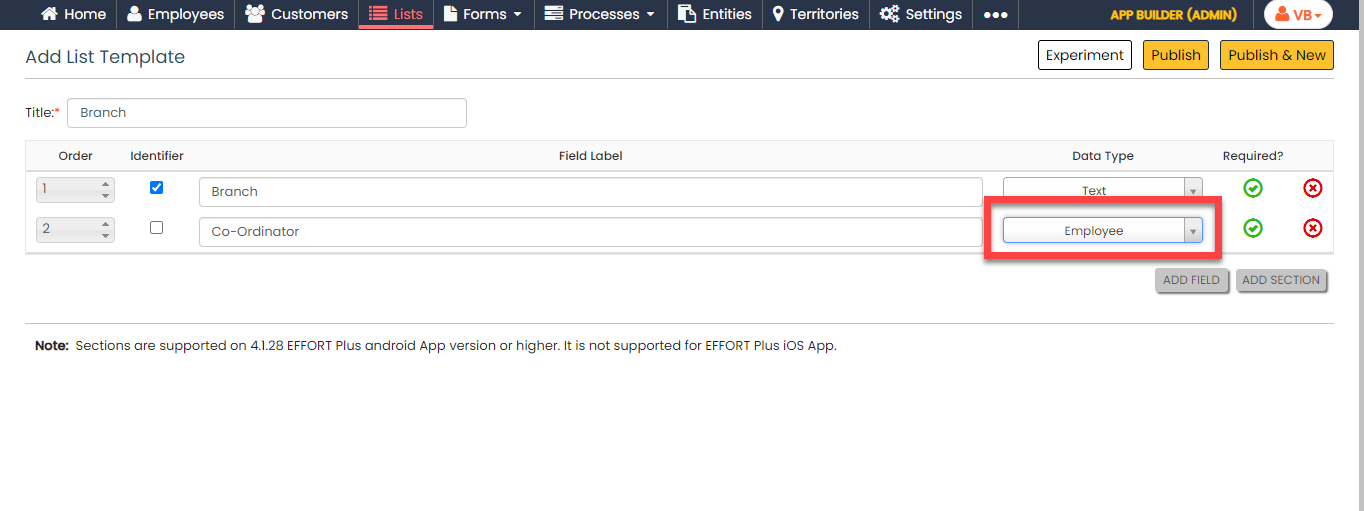
In this section, we will create a list called Branch that contains the details of branch names and their coordinators. This list will be used to map technicians and customers to their nearest branch and assign tickets to the employees of the respective branches. To create this list, follow the steps below:
-
Go to .
-
In the Title field, enter the title as
Branch.
-
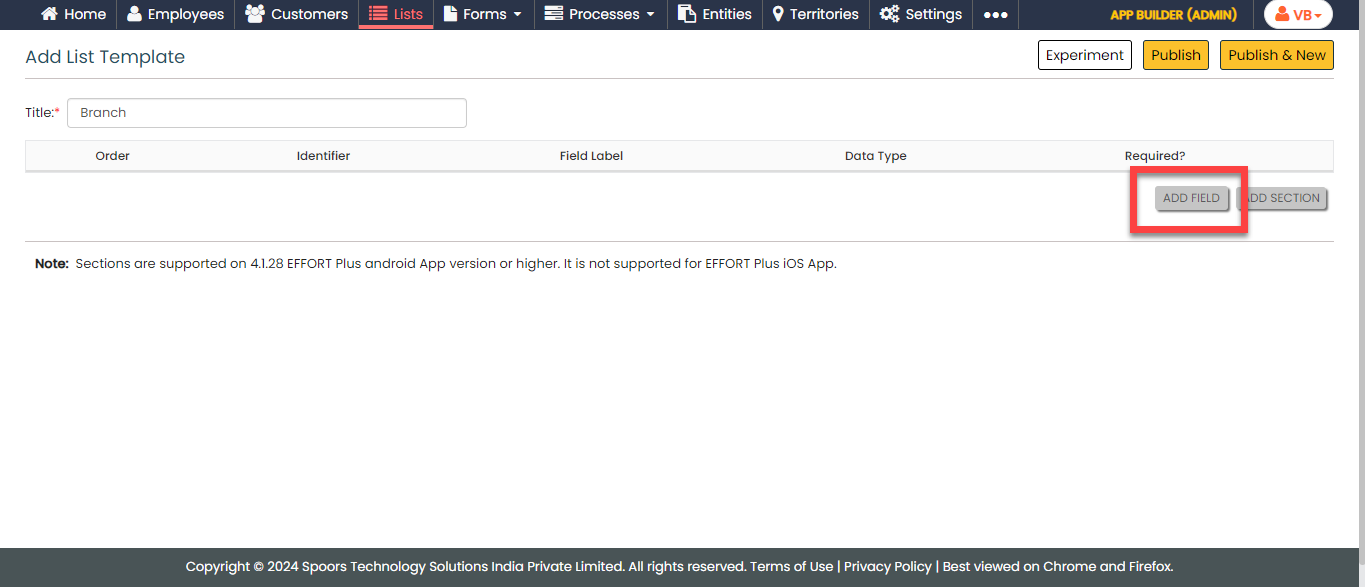
Click the Add Field button.
-
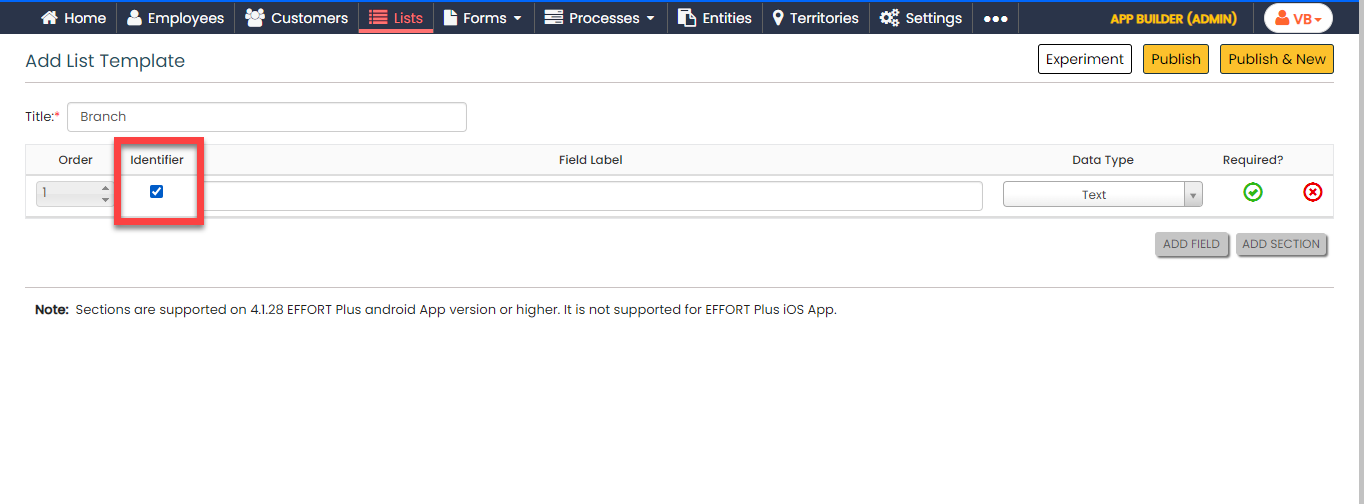
Under the Identifier column, enable the
checkbox.
-
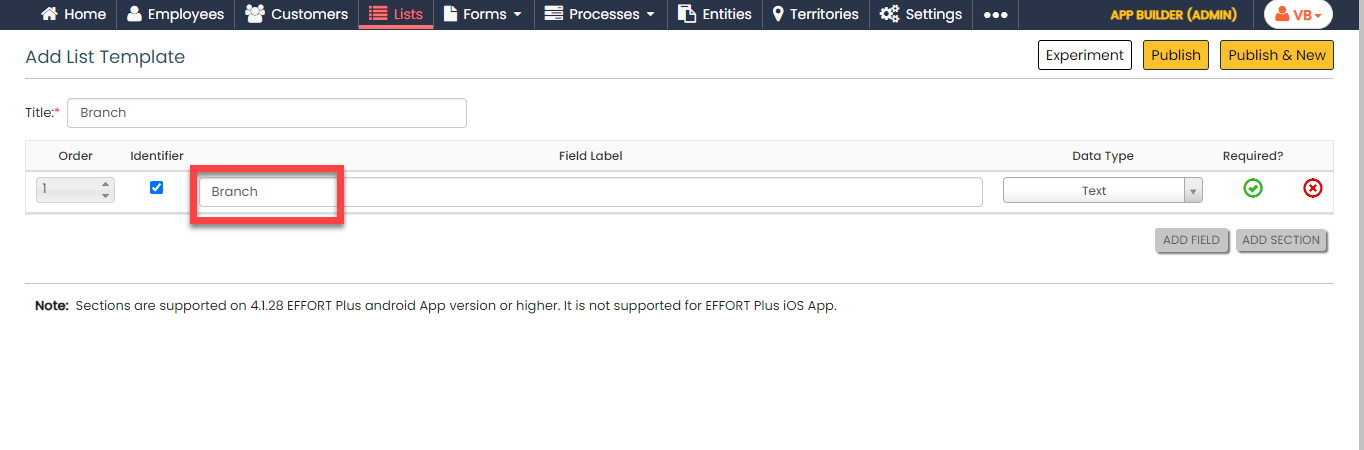
Under the Field Label column, enter the label as
Branch.
-
Click the Add Field button again to add more
fields.

-
Under the Field Label column, enter the label as
Co-Ordinator.

-
Under the Data Type column, click the dropdown
and change the data type to Employee.
-
Click Publish and then click
OK in the confirmation pop-up.

-
In the List Scope in Sync pop-up window, select
the Sync all option and click
OK to make all the list items available to
the technicians.

-
In the Warning pop-up window, click the
Accept button.

Your Branch list is ready.
-
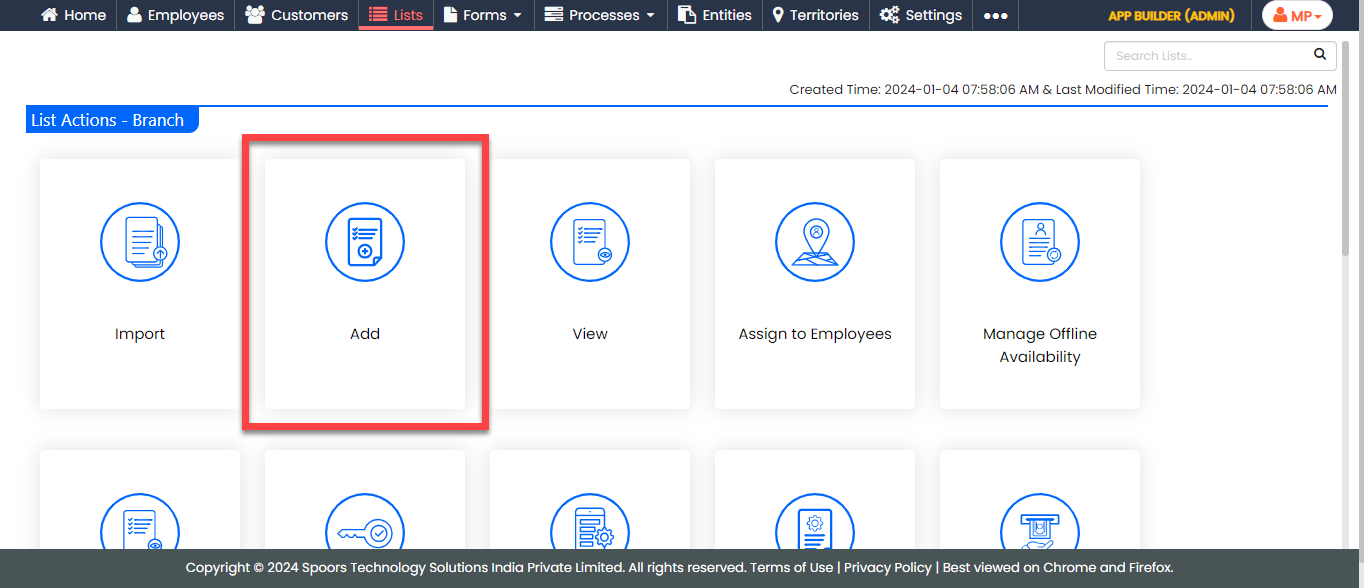
On the List Actions page, click
Add to add branch details.
-
Enter data in the list fields and click Save or
Save & New to save the existing item and
add one more new item.

Note: To view the list items that you added, refer to View List Items.Note: To edit the list items that you added, refer to Edit List Item.Note: To add two or more list items in one go, refer to Import List Items.
Create Customer Status List
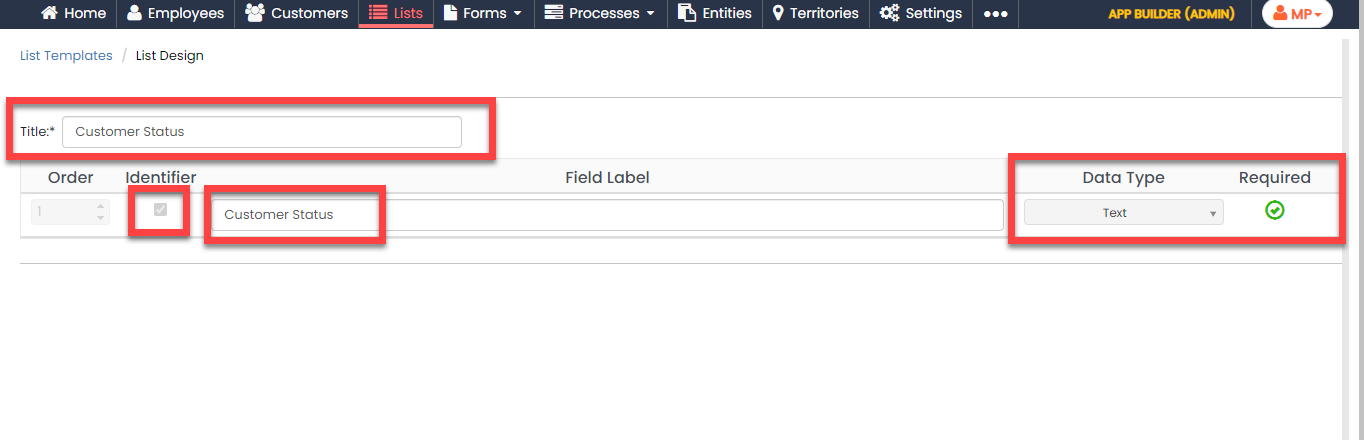
In this section, we will create a list master that contains the customer status options. To create the Customer Status list, follow the steps below:
-
Create the Customer Status list master as shown
in the following screenshot.
-
Now add the items to the list. You can either use the
Import option or follow the manual process to
add the items at your convenience.

Note: To add the list items, refer to Add an Item to List.Note: To import the list items, refer to Import List Items.Note: To edit the list items that you added, refer to Edit List Item.
Create Plan Type List
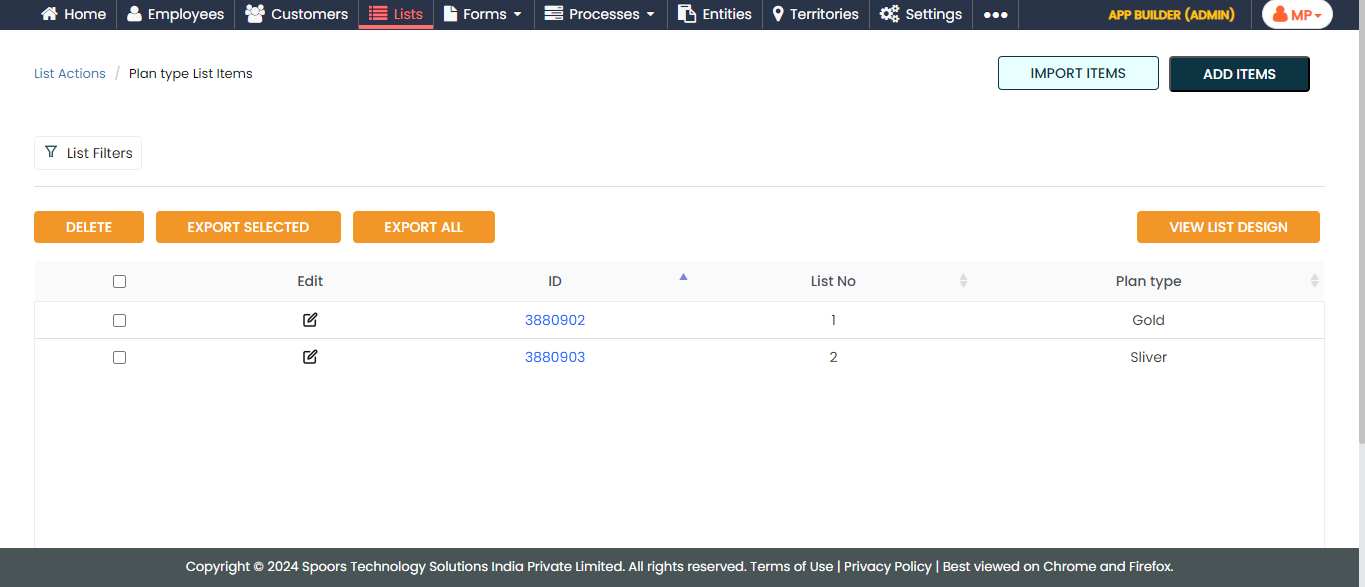
Now, we will create a master list that contains the different plan types which the customer can choose. To create this list, follow the steps below:
-
Create the Plan Type list master as shown in the
following screenshot.

-
Now add the items to the list. You can either use the
Import option or follow the manual process to
add the items at your convenience.
Note: To add the list items, refer to Add an Item to List.Note: To import the list items, refer to Import List Items.Note: To edit the list items that you added, refer to Edit List Item.
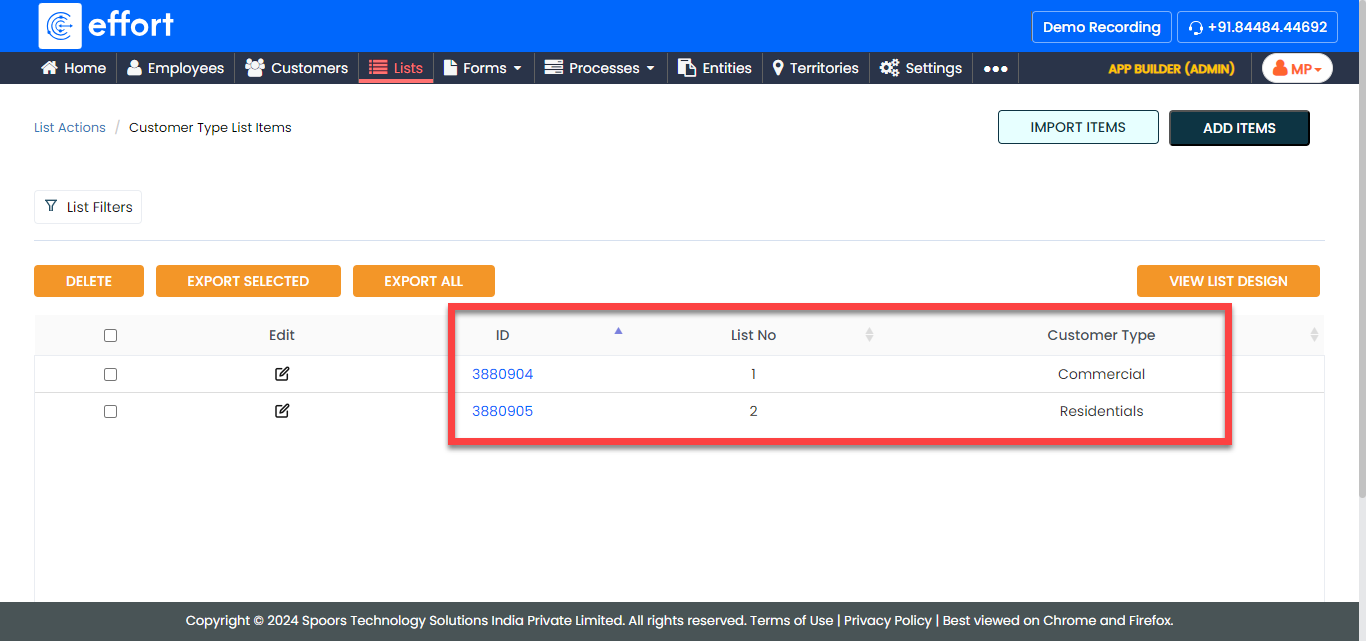
Create Customer Type List
Now, we will create a list that contains the different types to categorize the customers. To create this list, follow the steps below:
-
Create the Customer Type list master as shown in
the following screenshot.

-
Now add the items to the list. You can either use the
Import option or follow the manual process to
add the items at your convenience.
Note: To add the list items, refer to Add an Item to List.Note: To import the list items, refer to Import List Items.Note: To edit the list items that you added, refer to Edit List Item.
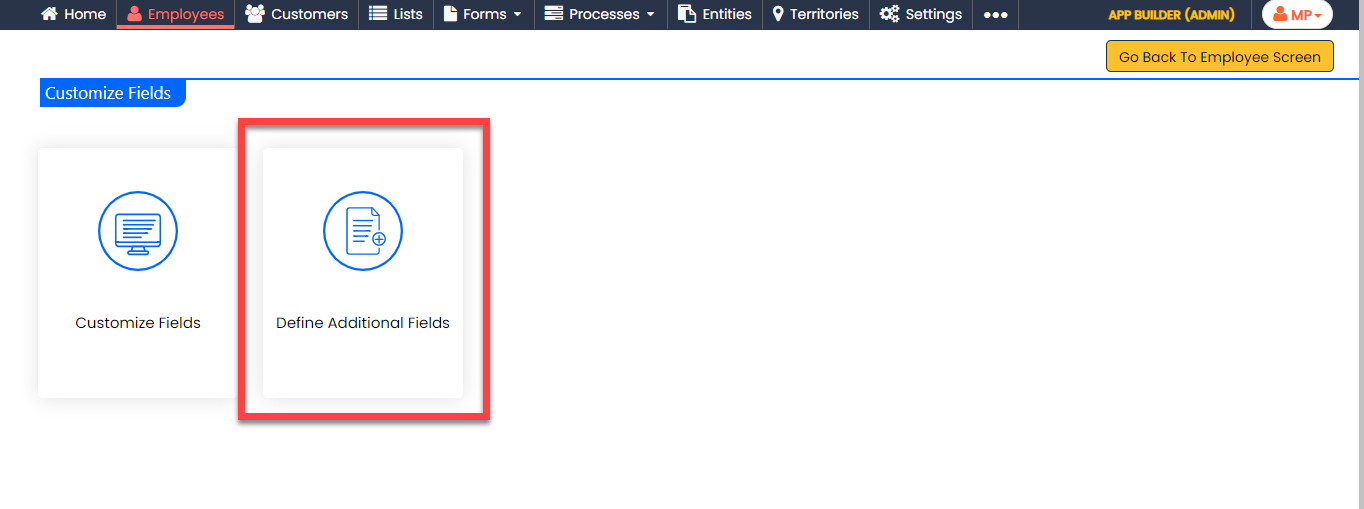
Customize Employee Fields
The employee fields are used to capture employee details when creating an employee in the Web App. To map an employee with a branch, we require a custom field to record branch information. In this section, you will find the steps to create custom fields for capturing additional employee details.
-
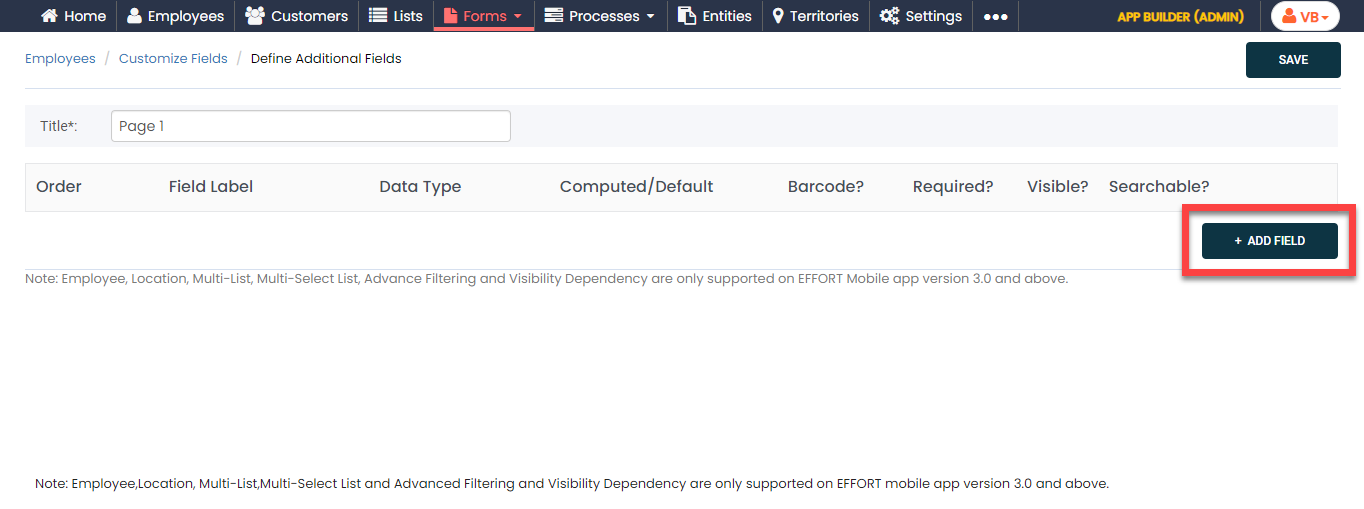
Go to .
-
On the Define Additional Fields page, click the Add
Field button.
-
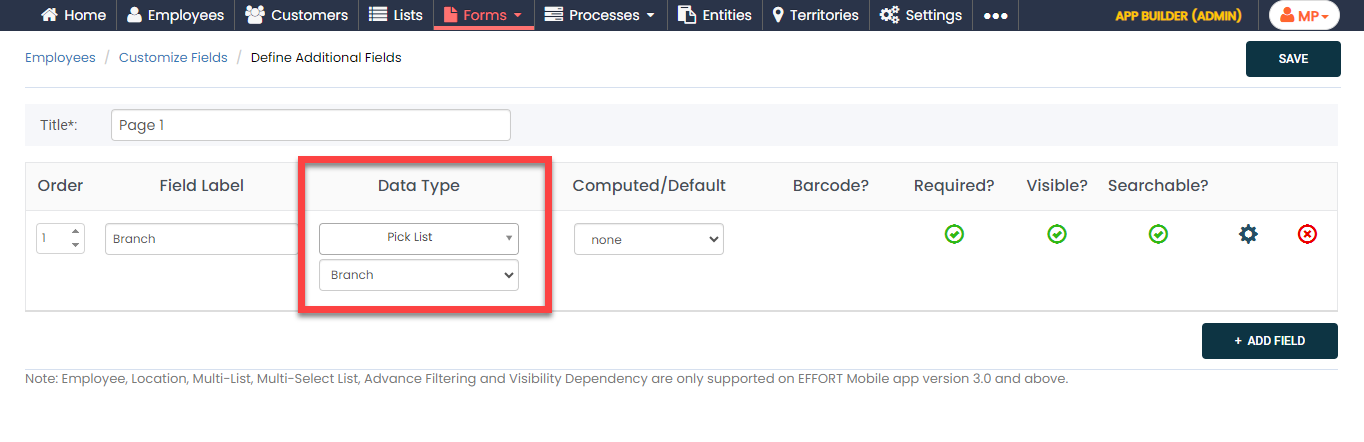
Under the Field Label column, enter the label as
Branch.

-
Under the Data Type column, click the dropdown,
change the data type to Pick List, and then
select Branch from the second dropdown.
-
Enable the checkbox under the Searchable column.
This helps you to search the employees using the branch name.
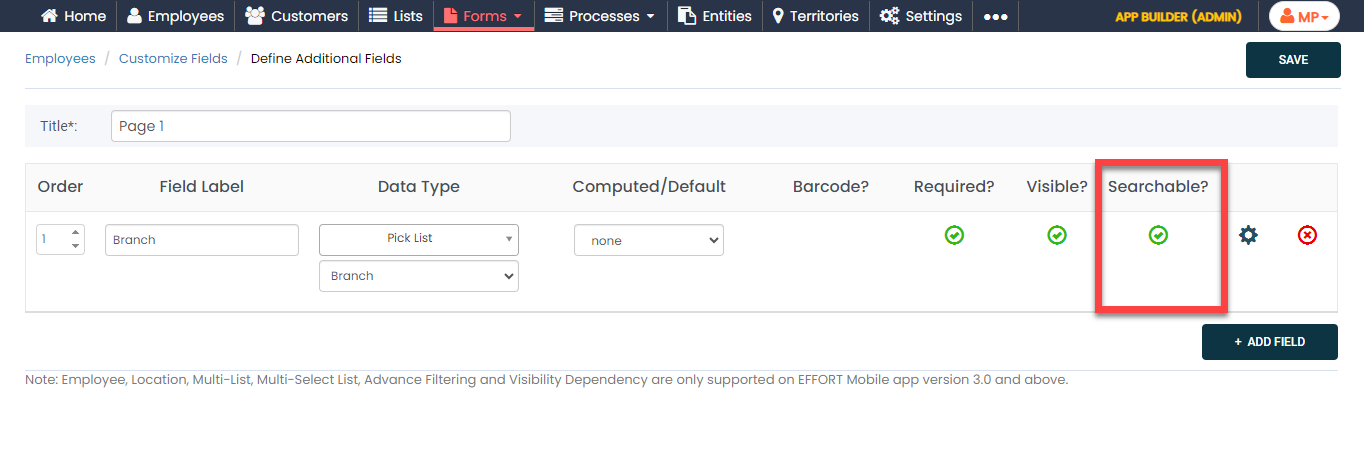
- Click Save to save the configuration.
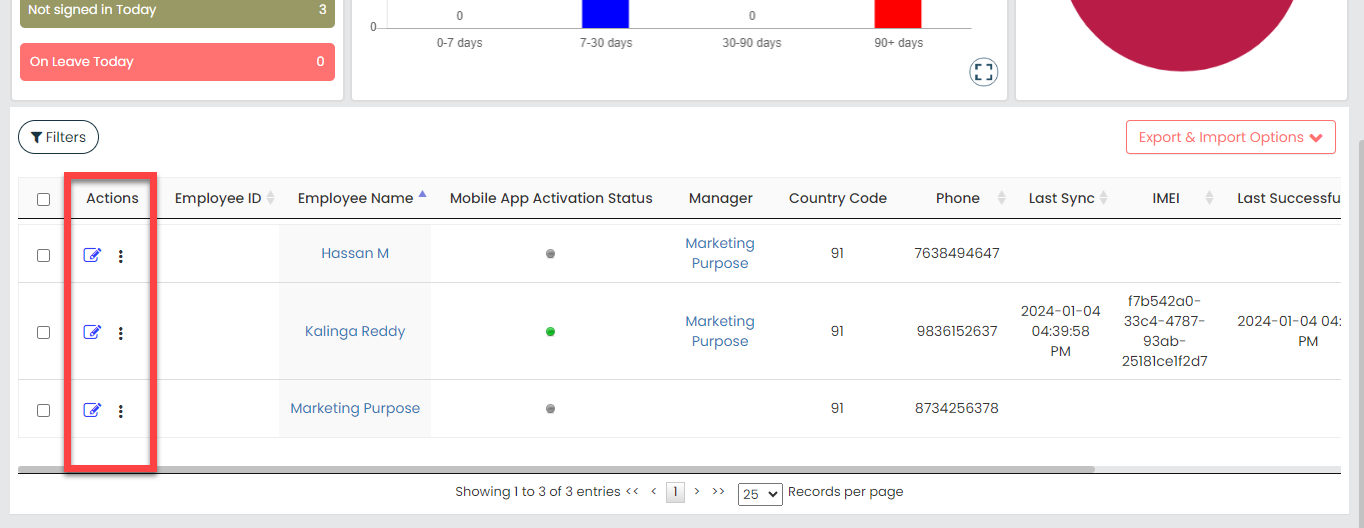
Map Branch to Existing Employees
In the above section, we have created a new custom field to capture branch information. After creating this, we must map a branch to all the existing and new employees in your organization. To map the created branches to the already created employees, follow the steps below.
- Go to .
-
Under the Actions column, click the edit icon
against the employee you want to map the branch.
-
Under the User Defined Fields section, select
Branch.

Note: Make sure to map the branches to all the newly created employees. To map a branch when creating a new employee, scroll down to the User Defined Fields section and map the branch. - Click Save.
Customer Configuration
Add Custom Fields
The customer fields are used to capture customer details when creating a customer in the Web App. To associate a customer with a branch, we require a custom field to record branch information. In this section, you will find the steps to create custom fields for capturing additional customer details.
-
Go to .

-
Drag and drop the following data types onto the field canvas and
label them as shown below.
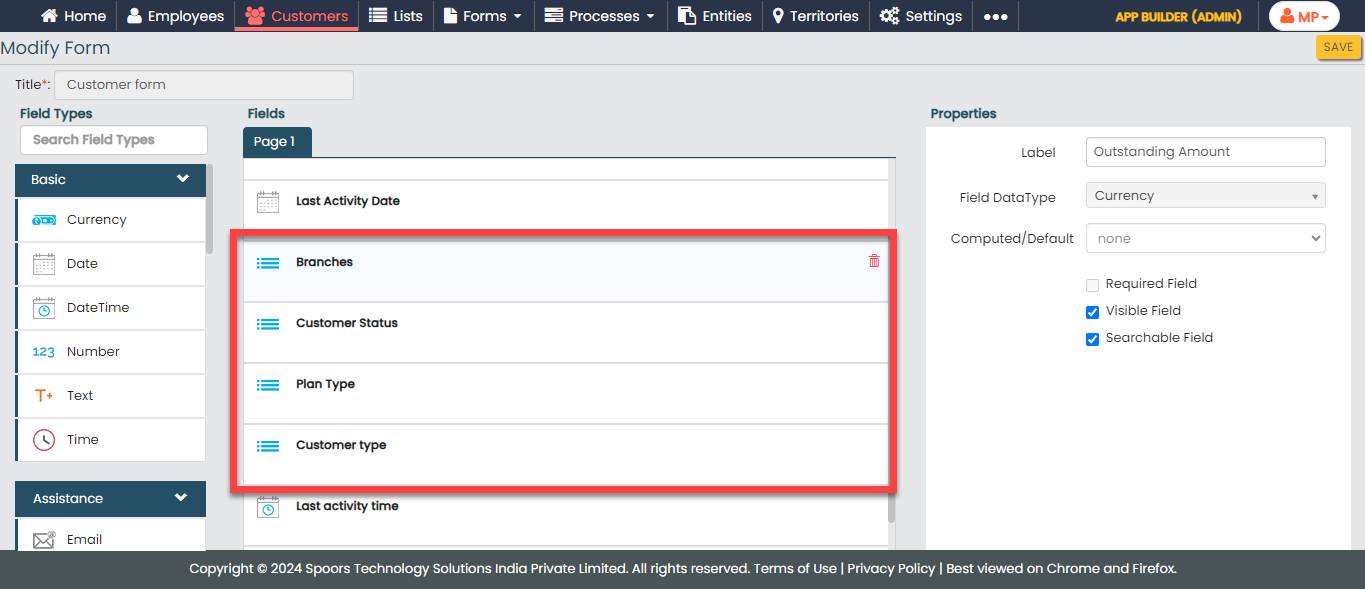
Data Type Label Pick List Branches Pick List Customer Status Pick List Plan Type Pick List Customer type -
Click the Branches field and select the
Branch list from the dropdown.

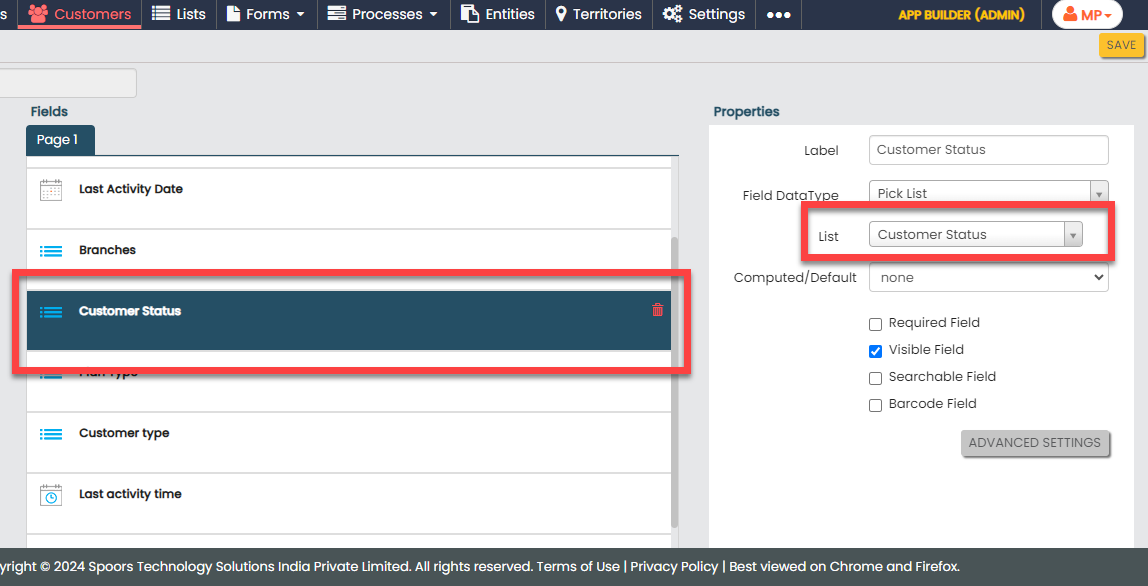
-
Similarly, click the Customer Status field
and select the Customer Status list from the
dropdown.
-
Now, click the Plan Type field and select
the Plan Type list from the dropdown.

-
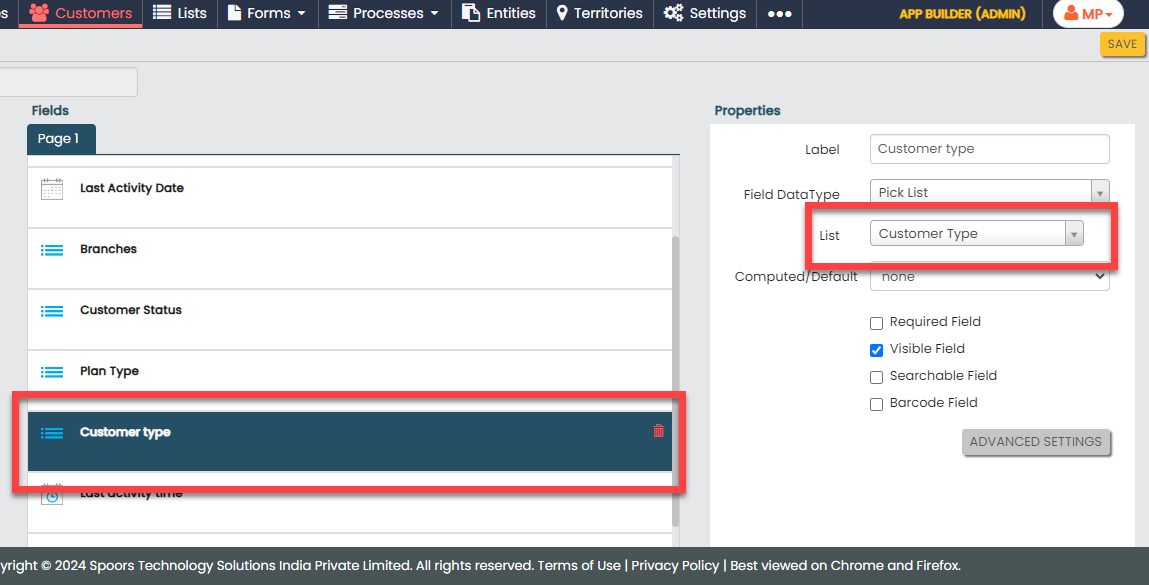
In the same way, click the Customer type
field and select the Customer Type list from
the dropdown.
- Click Save.
Create Customers
In this section, you will find the steps to create customers in the Web App.
-
Go to .

-
Enter the customer details.
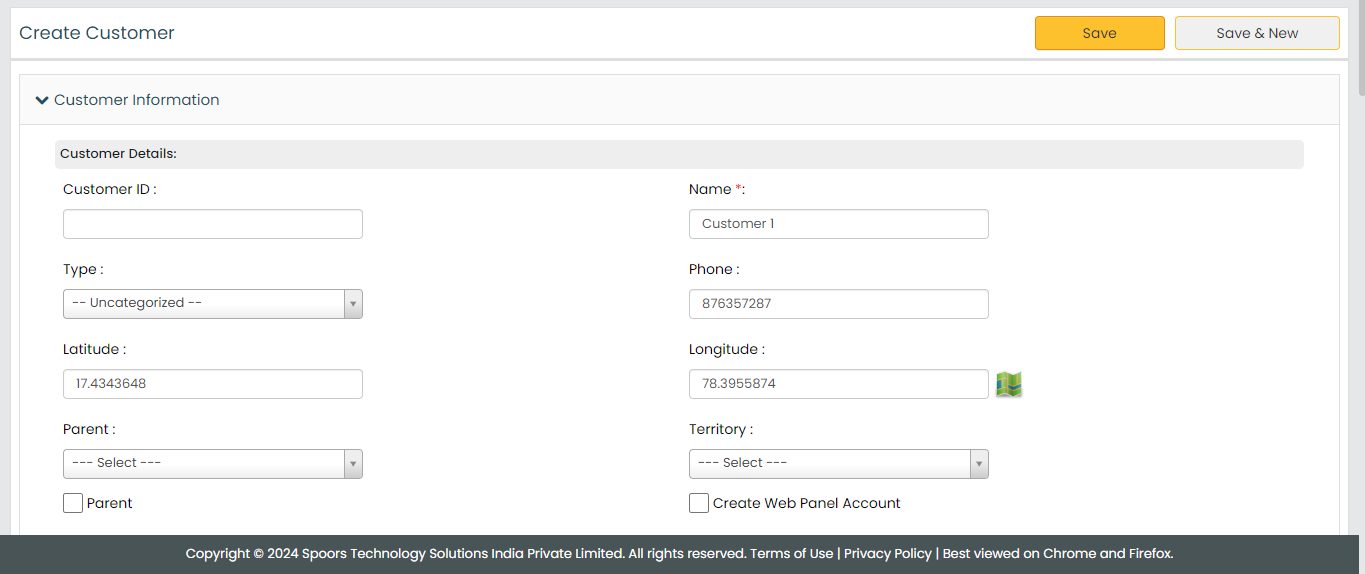
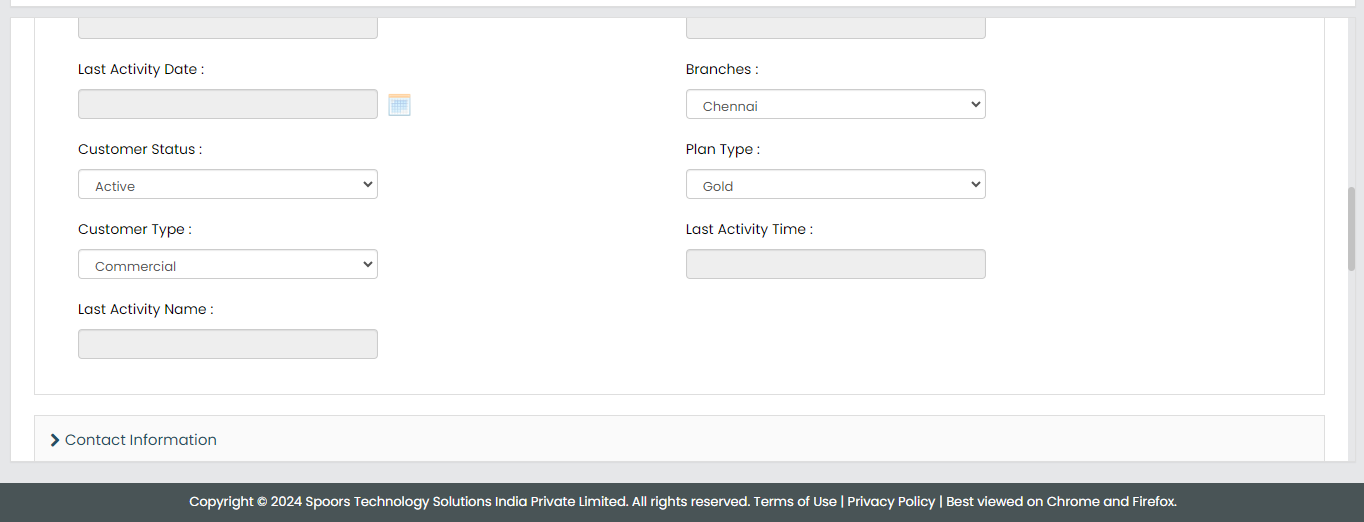
- Click Save.
- You can also use the Import option to create more customers in a single go. For the instructions to import the customers, refer to the Import Customers topic.
- Once you import the customers, you can check the import status at the bottom of the page. Alternatively, you can check the Customers module in the Web App.
Creation of List Masters
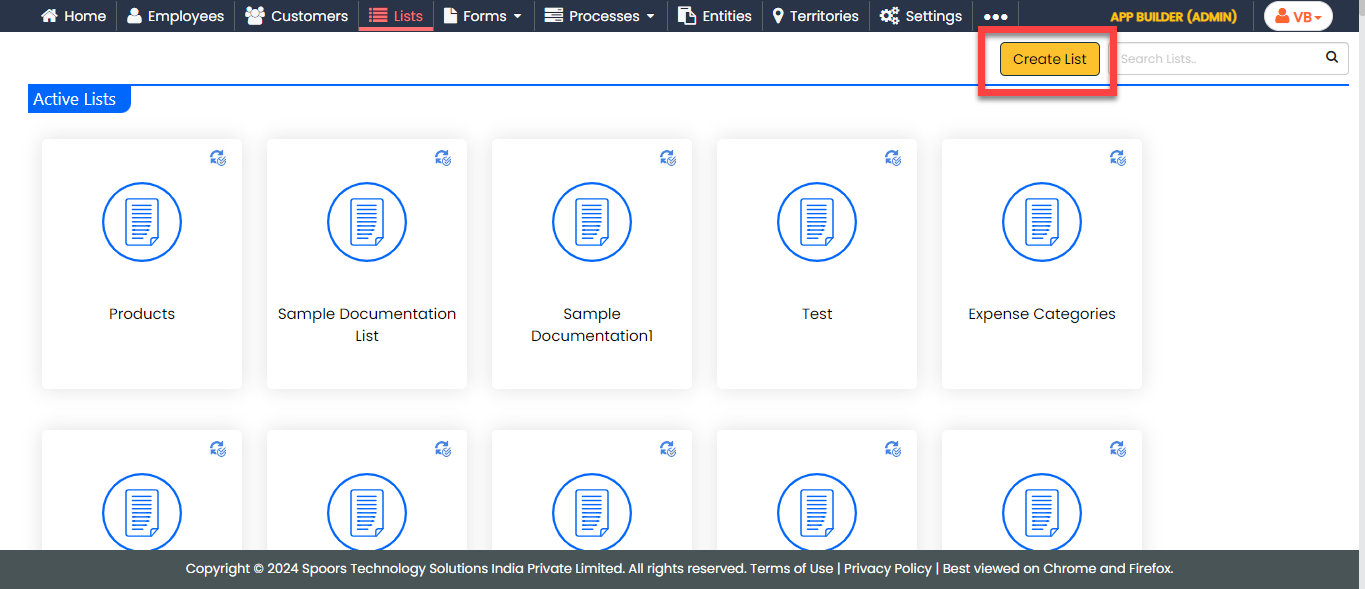
In this part, we'll be creating the list masters. A list master is a comprehensive collection of data. It includes information about products, finished goods, and dispatch data. We'll use these list masters in forms and processes to manage the data. To know more about Lists, refer to Lists.
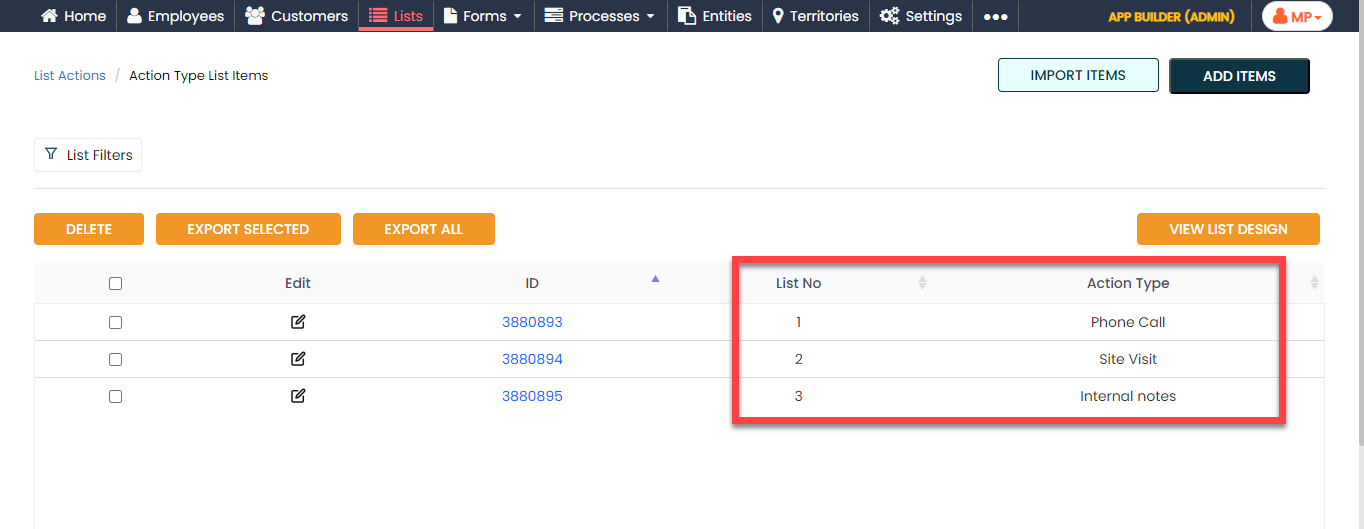
Create Action Type List
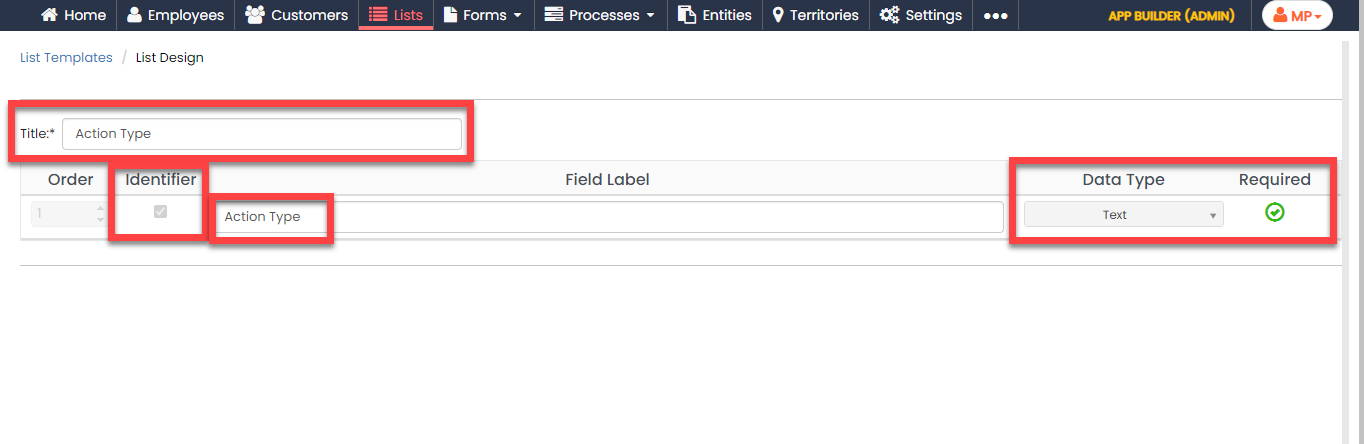
In this section, we will create a list master for action types.
-
Create the Action Type list as shown in the
following screenshot.
- Click Publish to save the List master and then select all in the List Scope in Sync pop-up window.
-
The list master creation is completed. Now you need to add items to
this list. It will take more time if we add items manually. Instead,
you can add multiple items to the list in one go using the
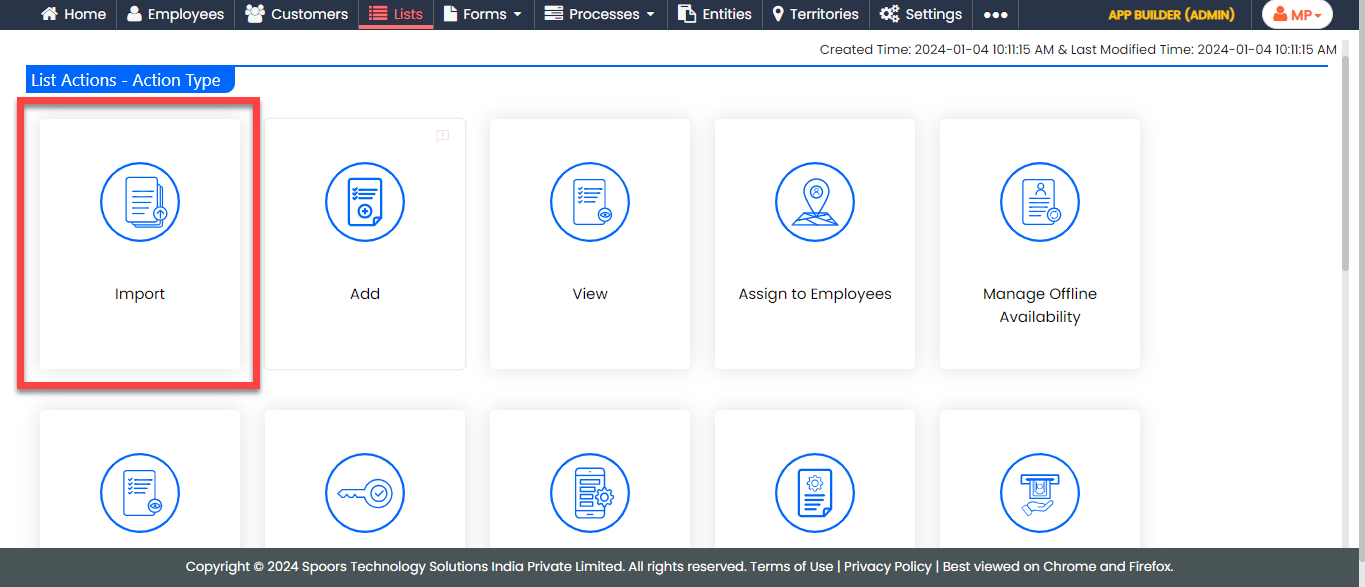
Import option. On the List
Actions page, click
Import.
-
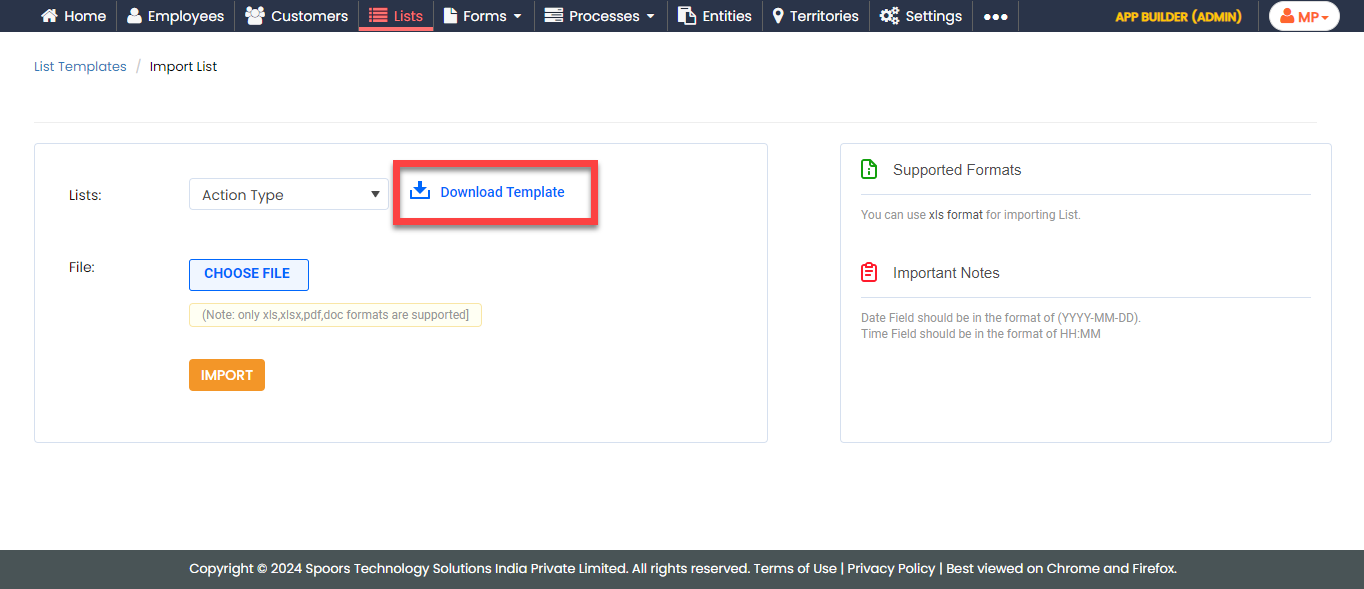
Click Download Template. An Excel file is
downloaded.
-
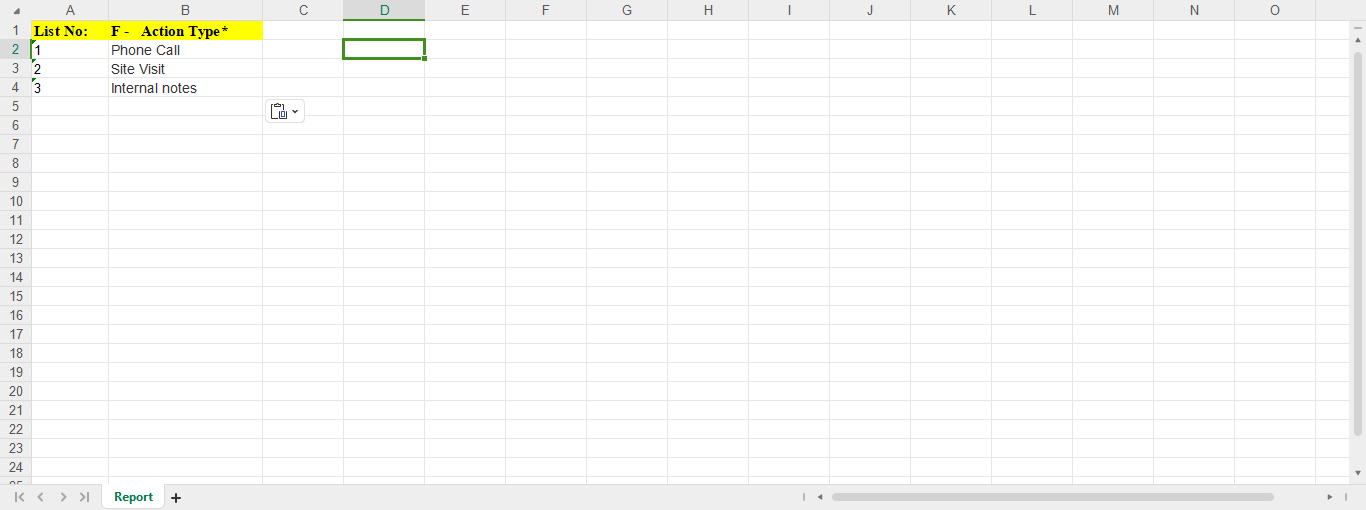
Open the downloaded Excel sheet and fill in the data in the fields.
Once you fill in the data, save the Excel sheet.
-
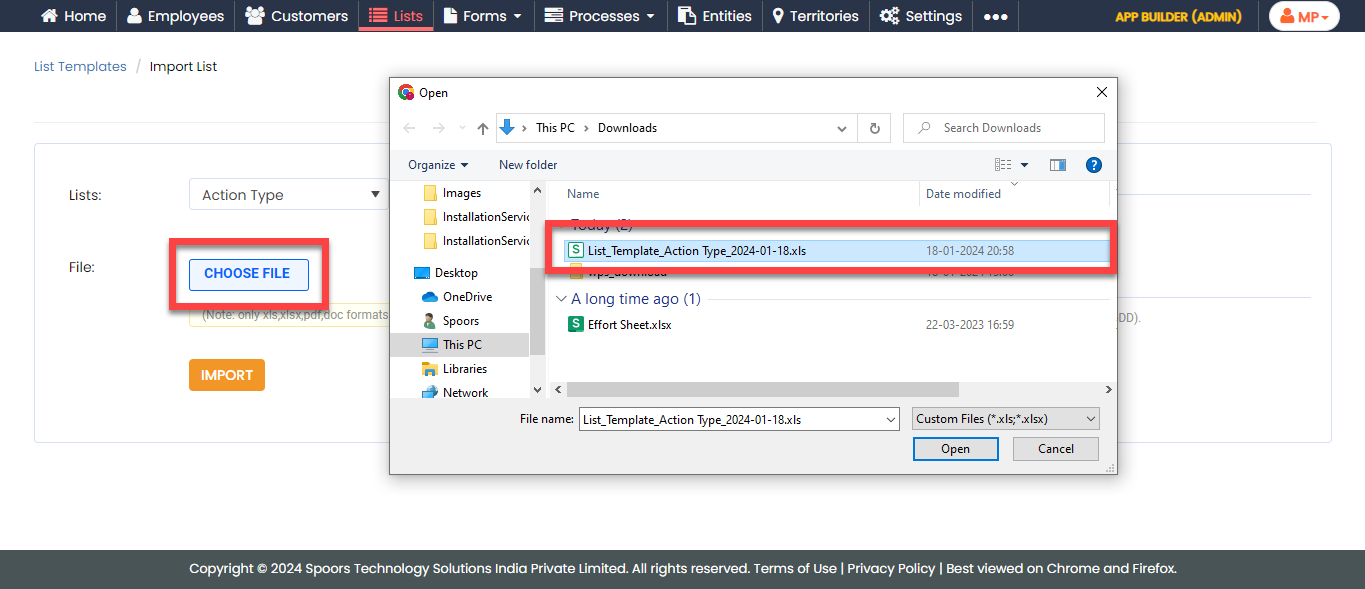
Go back to the Import List page, click
Choose File, and select the filled Excel
sheet.
- Click the Import button. Once the import is completed, refresh the page after a few seconds. You can check the import status at the bottom of the page.
-
To view the imported list items, go to .
Note: To view the list items that you added, refer to View List Items.Note: To edit the list items that you added, refer to Edit List Item.
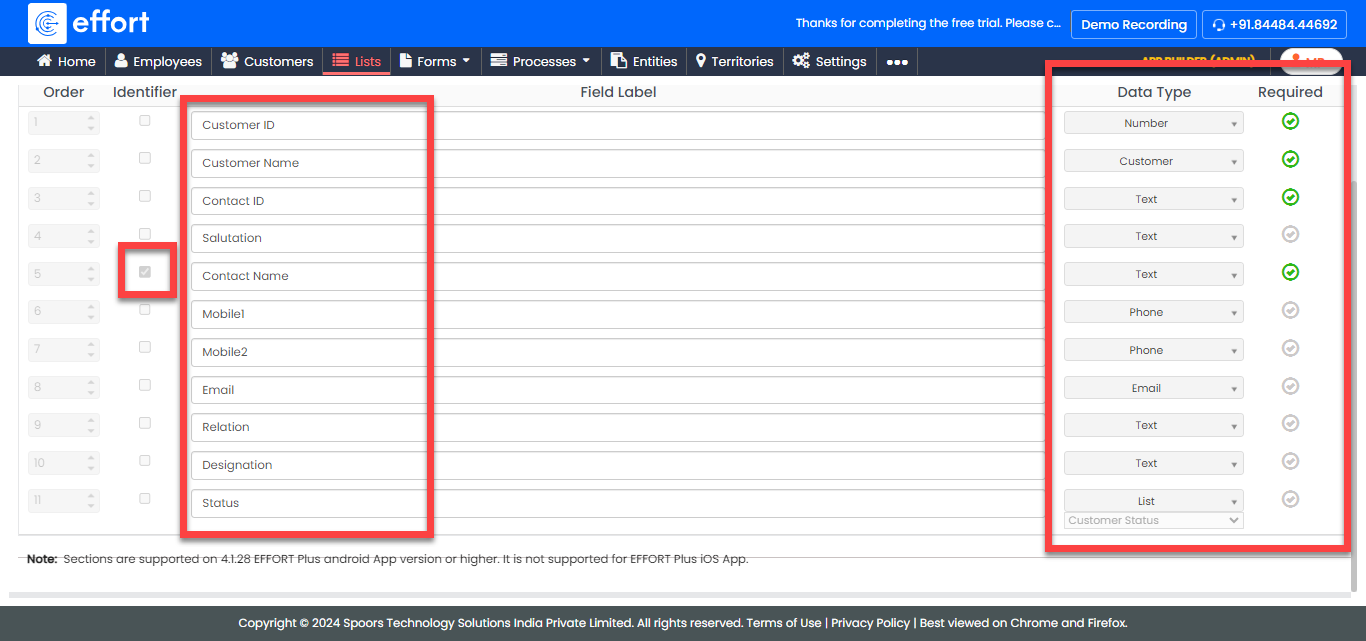
Create Contact Details List
Now, we will create a list master that contains the details of the customer such as Customer ID, Customer Name, Contact ID, Salutation, Contact Name, and so on. To create the Contact Details list, follow the steps below:
-
Create the Contact Details list master as
shown in the following screenshot.

-
Now add the items to the list. You can either use the
Import option or follow the manual
process to add the items at your convenience.

Note: To add the list items, refer to Add an Item to List.Note: To import the list items, refer to Import List Items.Note: To edit the list items that you added, refer to Edit List Item.
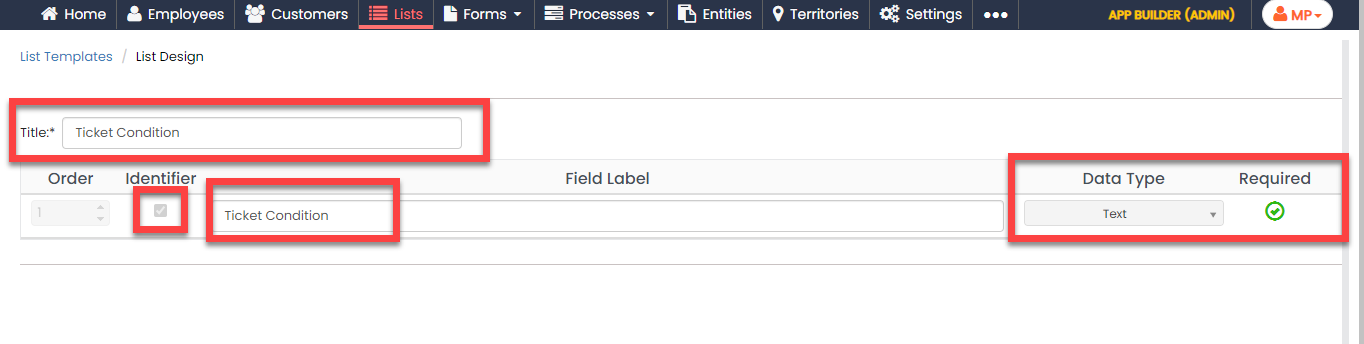
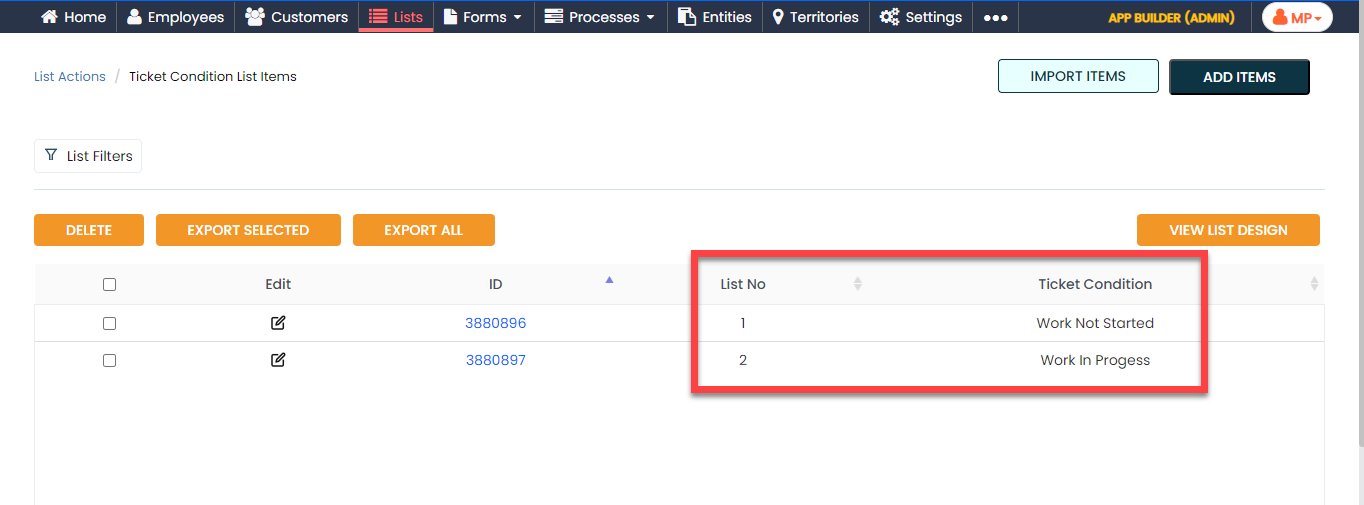
Create Ticket Condition List
Now, we will create a list master that contains the ticket conditions options. To create the Ticket Condition list, follow the steps below:
-
Create the Ticket Condition list master as
shown in the following screenshot.
-
Now add the items to the list. You can either use the
Import option or follow the manual
process to add the items at your convenience.
Note: To add the list items, refer to Add an Item to List.Note: To import the list items, refer to Import List Items.Note: To edit the list items that you added, refer to Edit List Item.
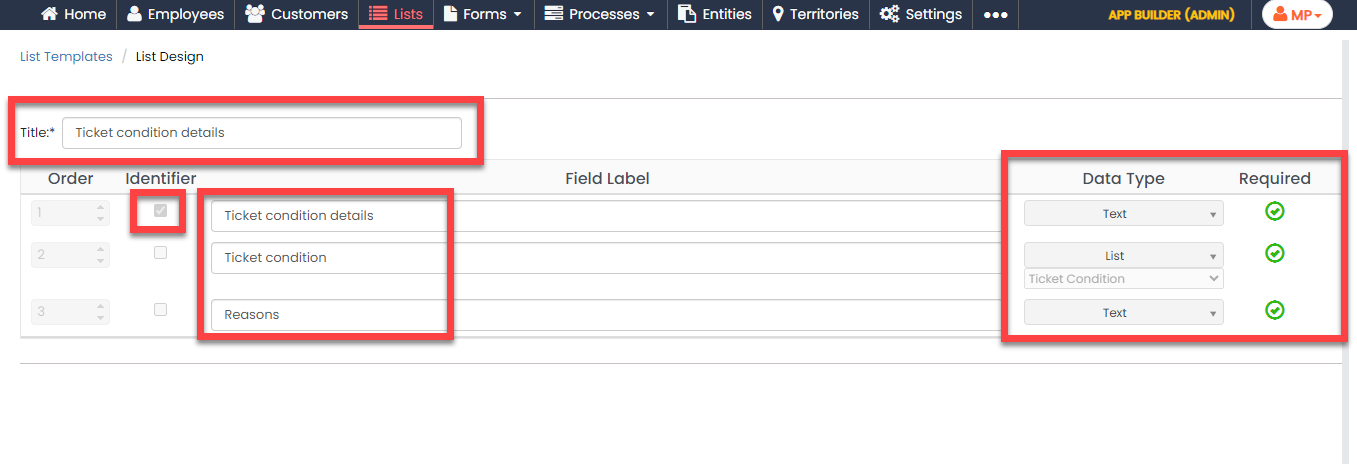
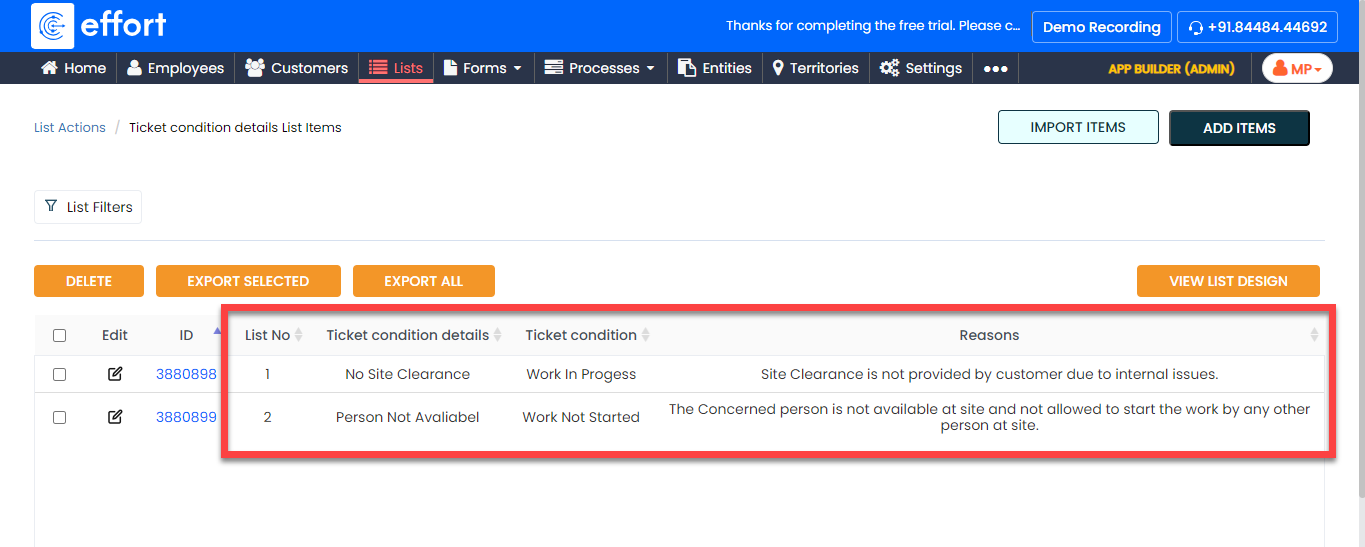
Create Ticket Condition Details List
Now, we will create a list master that contains the ticket condition details. To create the Ticket Condition Details list, follow the steps below:
-
Create the Ticket Condition Details list
master as shown in the following screenshot.
-
Now add the items to the list. You can either use the
Import option or follow the manual
process to add the items at your convenience.
Note: To add the list items, refer to Add an Item to List.Note: To import the list items, refer to Import List Items.Note: To edit the list items that you added, refer to Edit List Item.
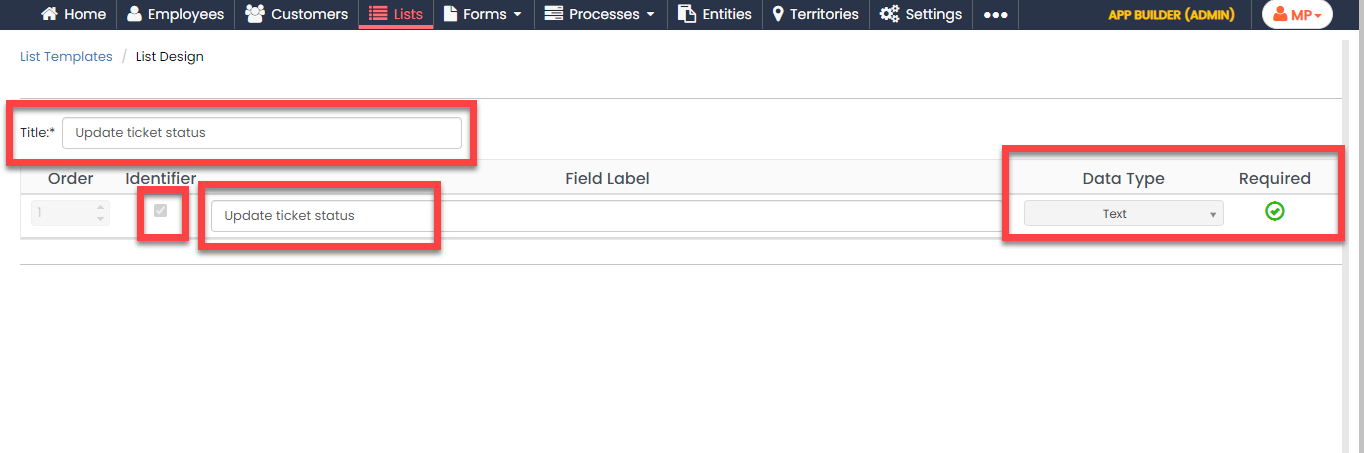
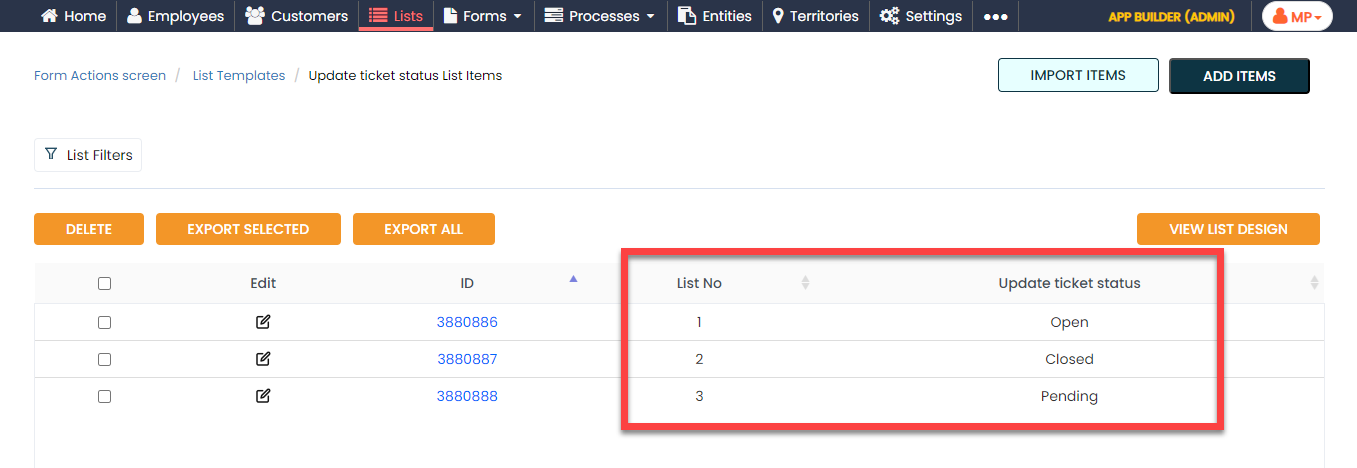
Create Update Ticket Status List
Now, we will create a list master that contains the ticket status options. To create the Update Ticket Status list, follow the steps below:
-
Create the Update Ticket Status list master
as shown in the following screenshot.
-
Now add the items to the list. You can either use the
Import option or follow the manual
process to add the items at your convenience.
Note: To add the list items, refer to Add an Item to List.Note: To import the list items, refer to Import List Items.Note: To edit the list items that you added, refer to Edit List Item.
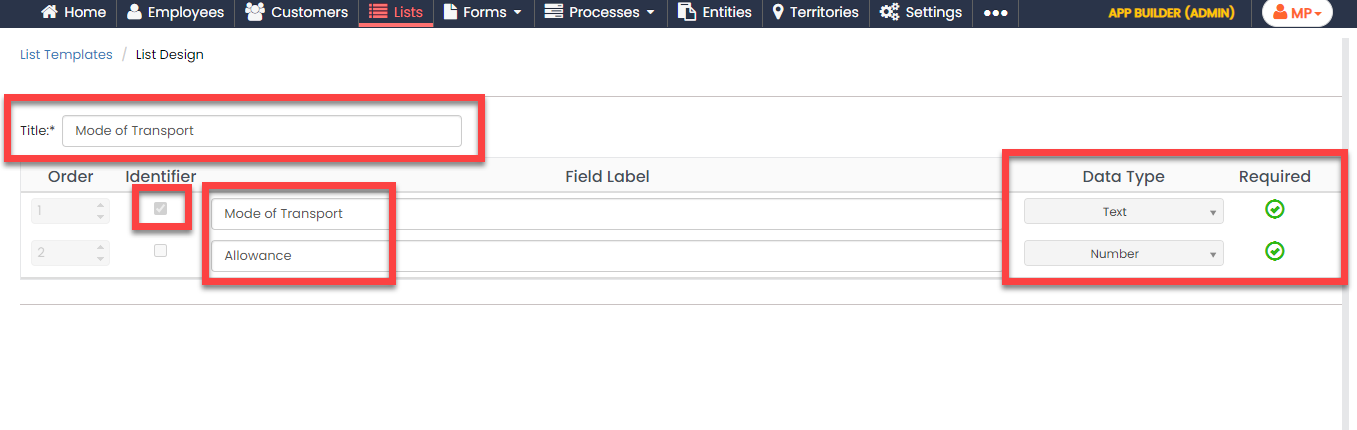
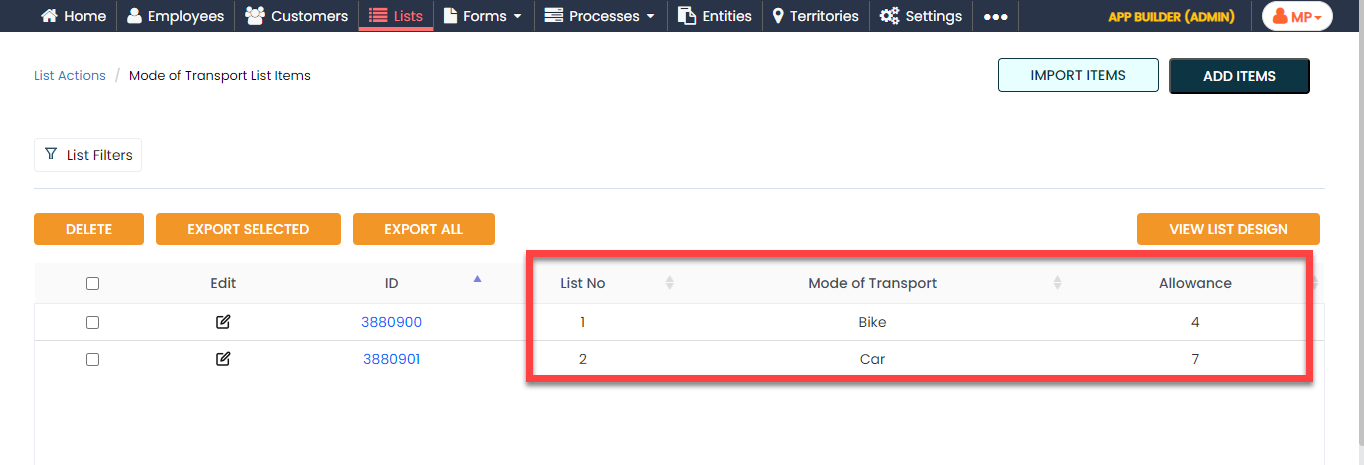
Create Mode of Transport List
Now, we will create a list master that contains the transport options. To create the Mode of Transport list, follow the steps below:
-
Create the Mode of Transport list master as
shown in the following screenshot.
-
Now add the items to the list. You can either use the
Import option or follow the manual
process to add the items at your convenience.
Note: To add the list items, refer to Add an Item to List.Note: To import the list items, refer to Import List Items.Note: To edit the list items that you added, refer to Edit List Item.
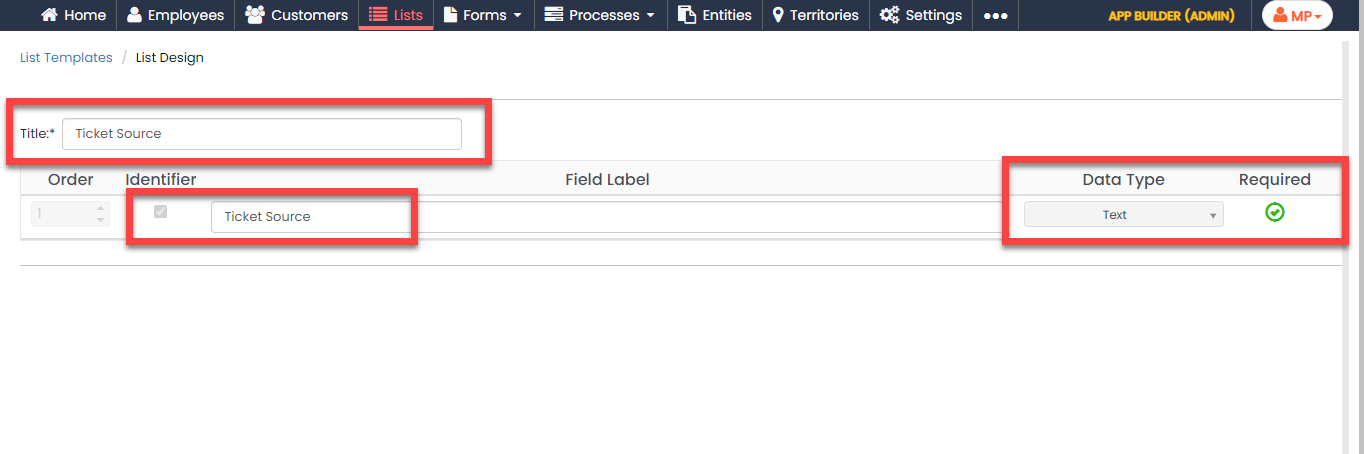
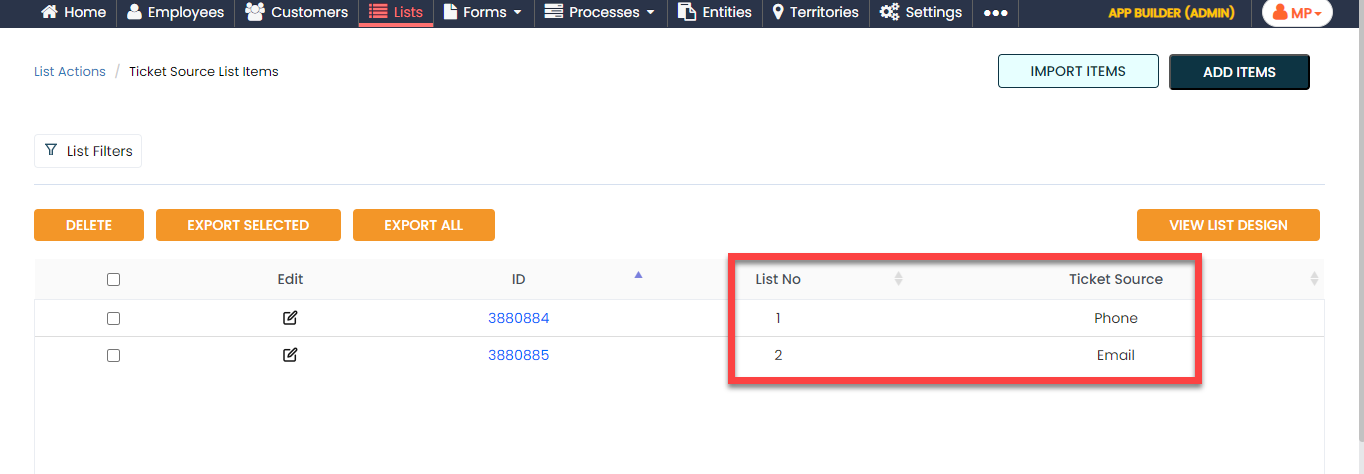
Create Ticket Source List
Now, we will create a list master that contains the source of ticket options. To create the Ticket Source list, follow the steps below:
-
Create the Ticket Source list master as
shown in the following screenshot.
-
Now add the items to the list. You can either use the
Import option or follow the manual
process to add the items at your convenience.
Note: To add the list items, refer to Add an Item to List.Note: To import the list items, refer to Import List Items.Note: To edit the list items that you added, refer to Edit List Item.
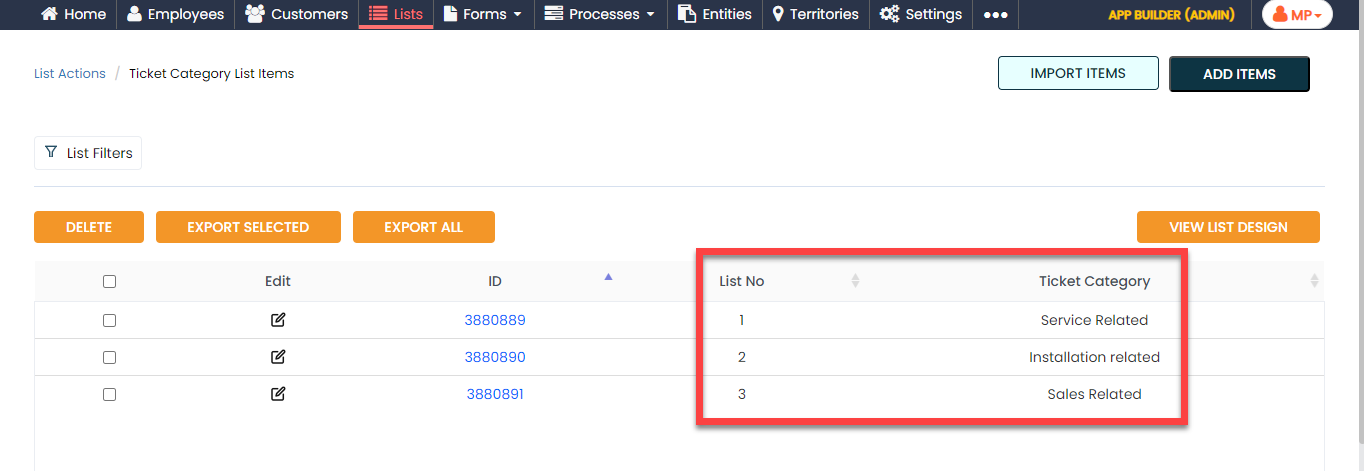
Create Ticket Category List
Now, we will create a list master that contains the ticket category options. To create the Ticket Category list, follow the steps below:
-
Create the Ticket Category list master as
shown in the following screenshot.

-
Now add the items to the list. You can either use the
Import option or follow the manual
process to add the items at your convenience.
Note: To add the list items, refer to Add an Item to List.Note: To import the list items, refer to Import List Items.Note: To edit the list items that you added, refer to Edit List Item.
Create Solution List
Now, we will create a list master that contains the solutions available. To create the Solution list, follow the steps below:
-
Create the Solution list master as shown in
the following screenshot.

-
Now add the items to the list. You can either use the
Import option or follow the manual
process to add the items at your convenience.

Note: To add the list items, refer to Add an Item to List.Note: To import the list items, refer to Import List Items.Note: To edit the list items that you added, refer to Edit List Item.
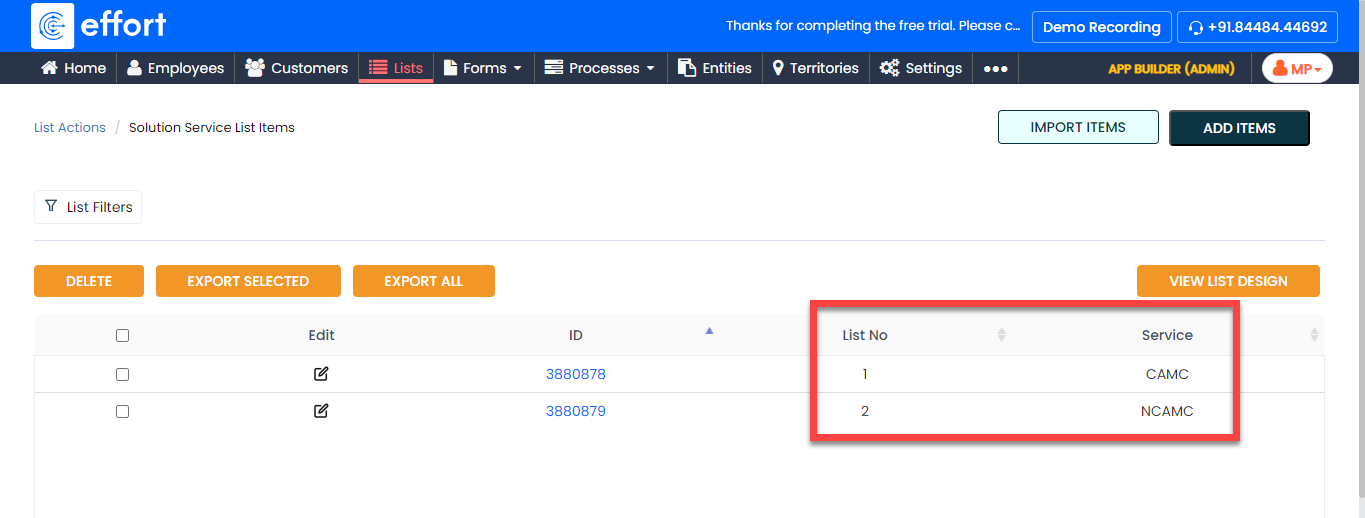
Create Solution Service List
Now, we will create a list master that contains the details about the solution services. To create the Solution Service list, follow the steps below:
-
Create the Solution Service list master as
shown in the following screenshot.

-
Now add the items to the list. You can either use the
Import option or follow the manual
process to add the items at your convenience.
Note: To add the list items, refer to Add an Item to List.Note: To import the list items, refer to Import List Items.Note: To edit the list items that you added, refer to Edit List Item.
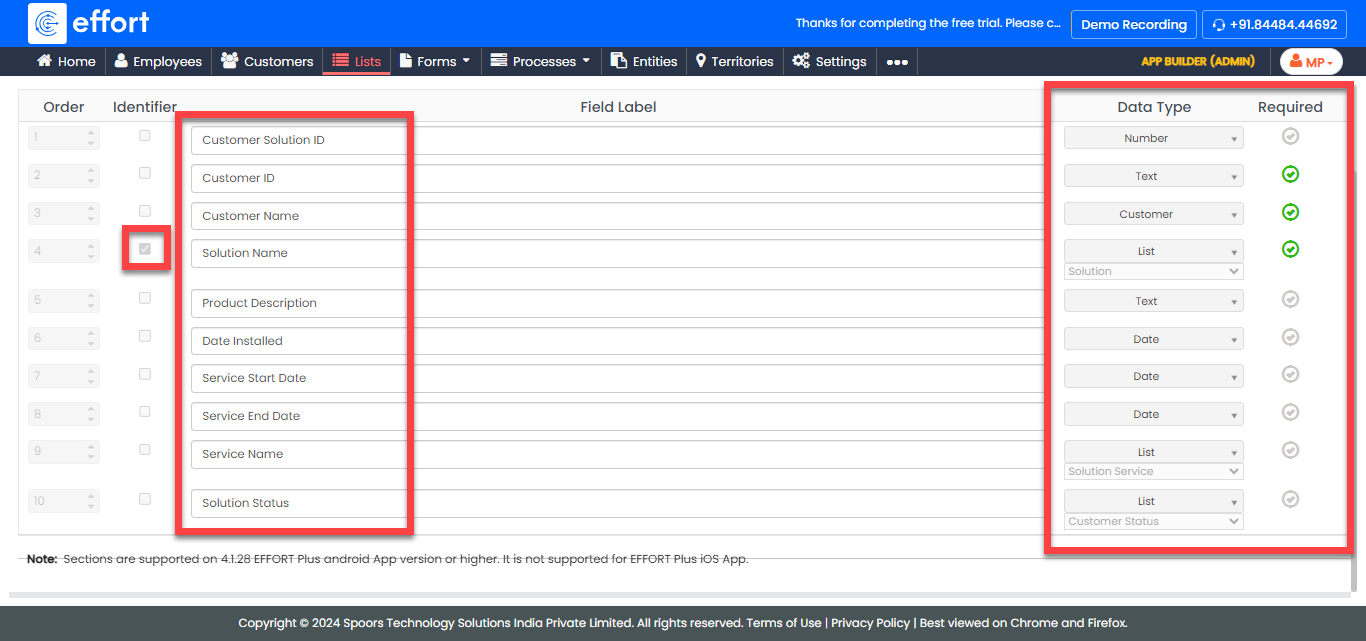
Create Solution Details List
Now, we will create a list master that contains the details about the solutions available. To create the Solution Details list, follow the steps below:
-
Create the Solution Details list master as
shown in the following screenshot.

-
Now add the items to the list. You can either use the
Import option or follow the manual
process to add the items at your convenience.

Note: To add the list items, refer to Add an Item to List.Note: To import the list items, refer to Import List Items.Note: To edit the list items that you added, refer to Edit List Item.
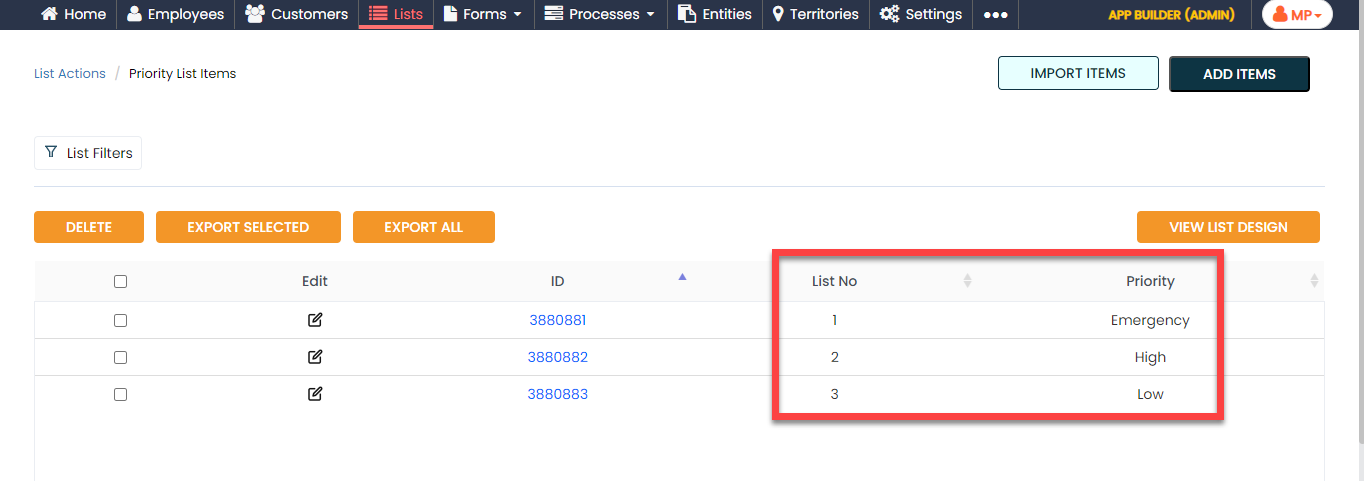
Create Priority List
Now, we will create a list master that contains the details about the priority. To create the Priority list, follow the steps below:
-
Create the Priority list master as shown in
the following screenshot.

-
Now add the items to the list. You can either use the
Import option or follow the manual
process to add the items at your convenience.
Note: To add the list items, refer to Add an Item to List.Note: To import the list items, refer to Import List Items.Note: To edit the list items that you added, refer to Edit List Item.
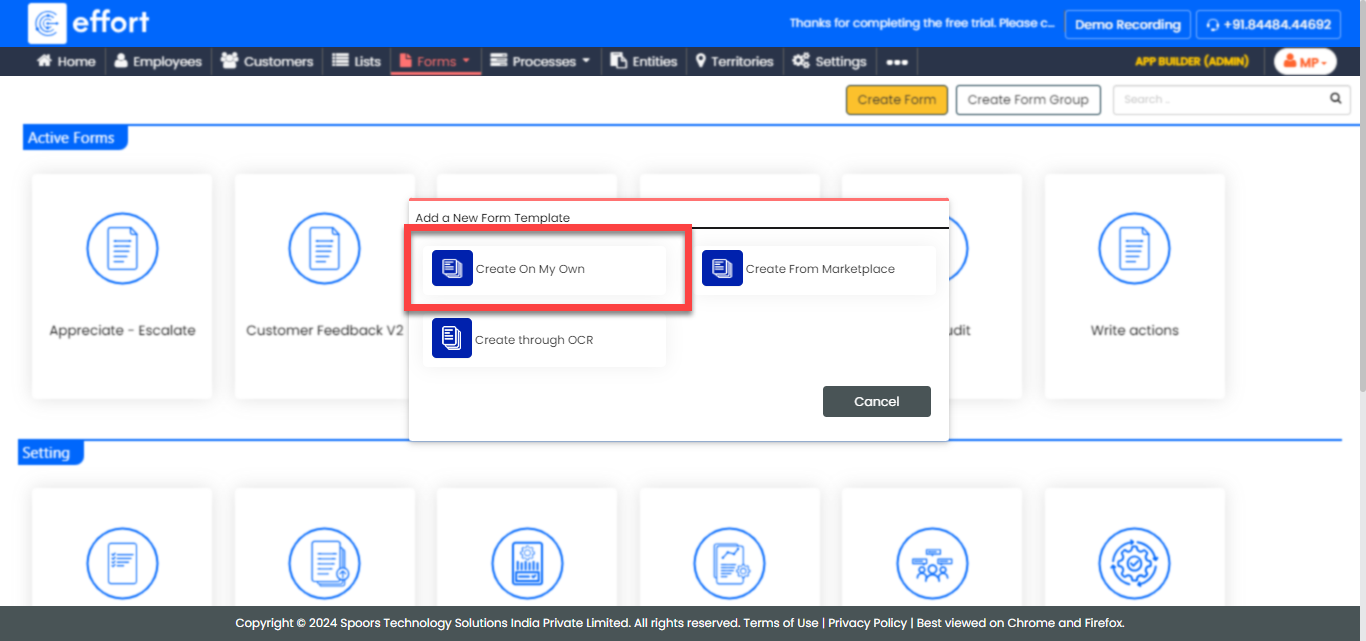
Creation and Configuration of Forms
In this section, we will create the forms required to manage the E-Zone process. These forms need to be filled out by employees to capture all the details related to the process. We will discuss them in detail as we set them up separately. Here, we will guide you through the steps of creating the forms, necessary fields, field-level configurations, and form-level configurations for all the forms. To know more about the forms, refer to Forms.
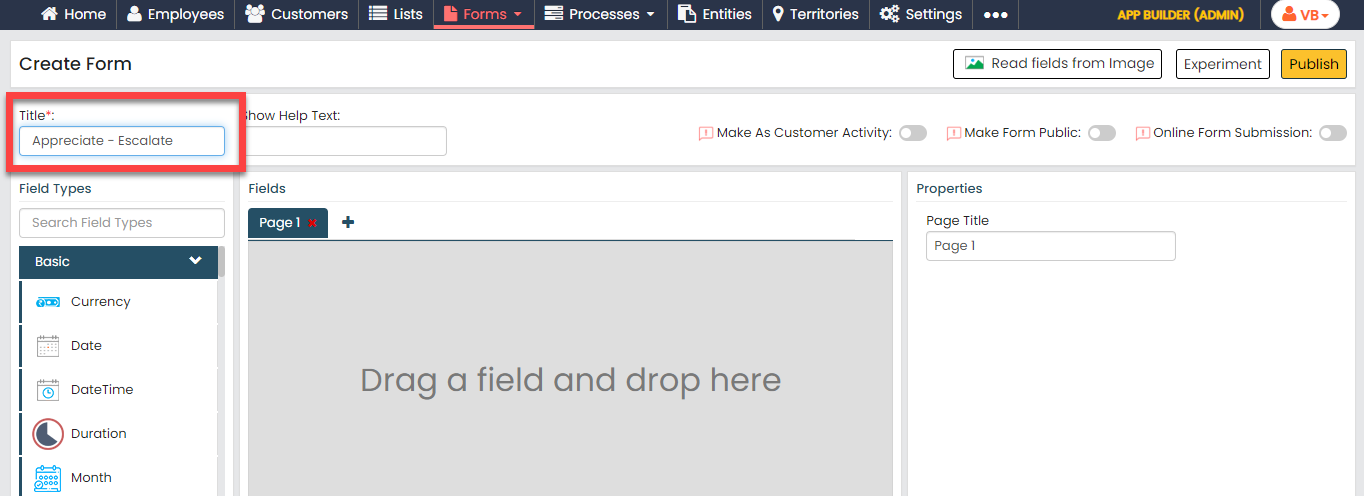
Appreciate - Escalate
In this section, we will create a form called Appreciate - Escalate. Technicians will fill out this form as part of the Ezone process to escalate an issue when it remains unresolved. The form includes details about the issue and the employee's name to whom they wish to escalate it.
To create this form, follow the steps below:
-
Go to .
-
In the Title field, enter the title as
Appreciate - Escalate.
-
Drag and drop the following data types onto the field canvas and
label them as shown below.
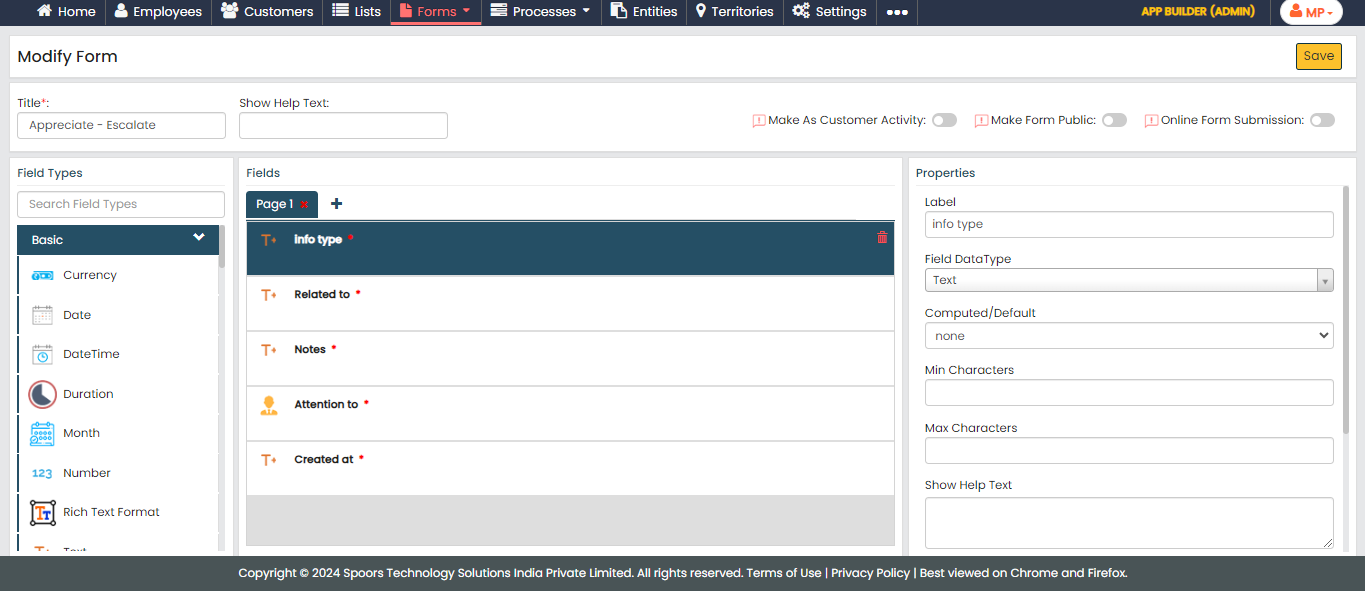
Data Type Label Text Info type Text Related to Text Notes Employee Attention to Text Created at To know more about all the data types, refer to the following topics. -
Now click Publish and then click
OK to make it available to the
technicians. You are done with your first form creation.
Note: To know more about all the publishing options, refer to Publishing Options.
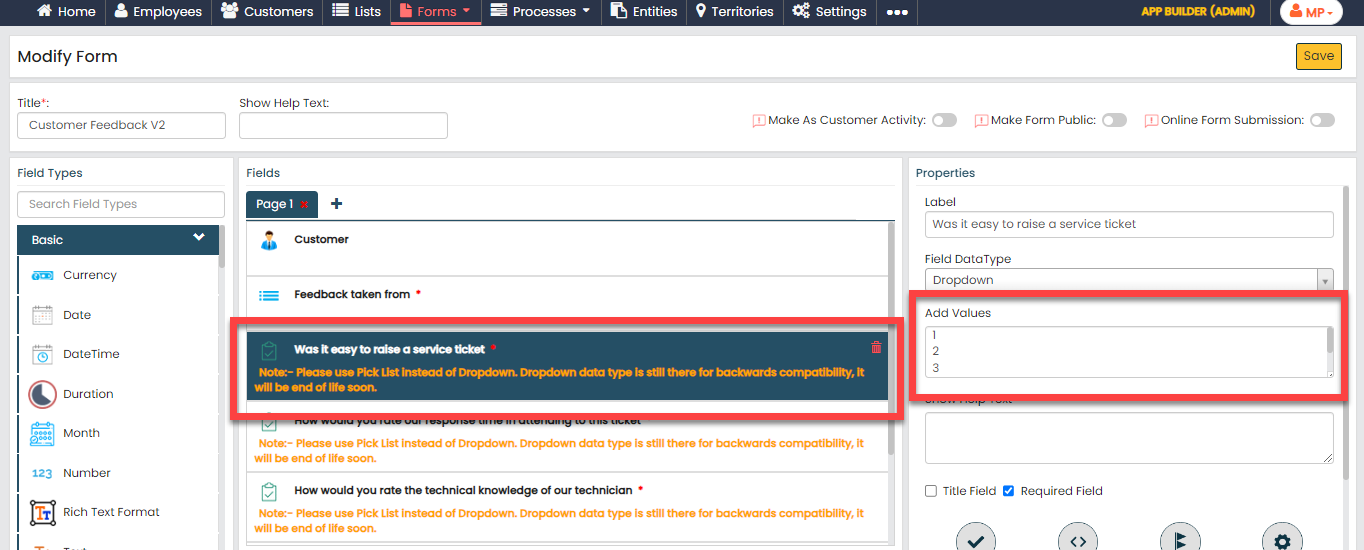
Customer Feedback
In this section, we will create the customer feedback form to gather feedback from the customer after the ticket/issue is resolved.
To create this form, follow the steps below:
-
Go to .
-
In the Title field, enter the title as
Customer Feedback.

-
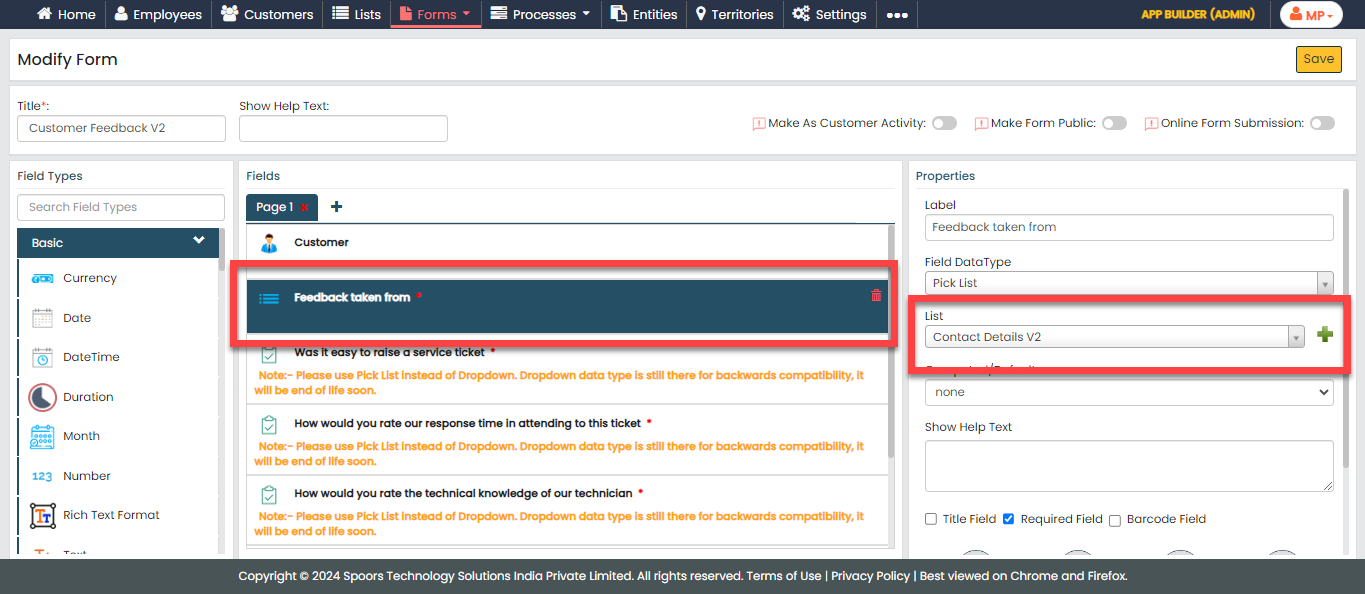
Drag and drop the following data types onto the field canvas and
label them as shown below. You can also add the fields and customize
labels as per your requirement.
Data Type Label Customer Customer Pick List Feedback taken from Dropdown Was it easy to raise a service ticket Dropdown How would you rate our response time in attending to this ticket Dropdown How would you rate the technical knowledge of our technician Dropdown How would you rate the overall service experience with Ezone Text General Notes To know more about all the data types, refer to the following topics. -
Click the Feedback taken from field and
select Contact Details from the
List dropdown under the
Properties section.
-
For all the dropdown fields, and add values 1 to 5 in the
Add Values field.
-
Now click Publish and then click
OK to make it available to the
employees.
Note: To know more about all the publishing options, refer to Publishing Options.
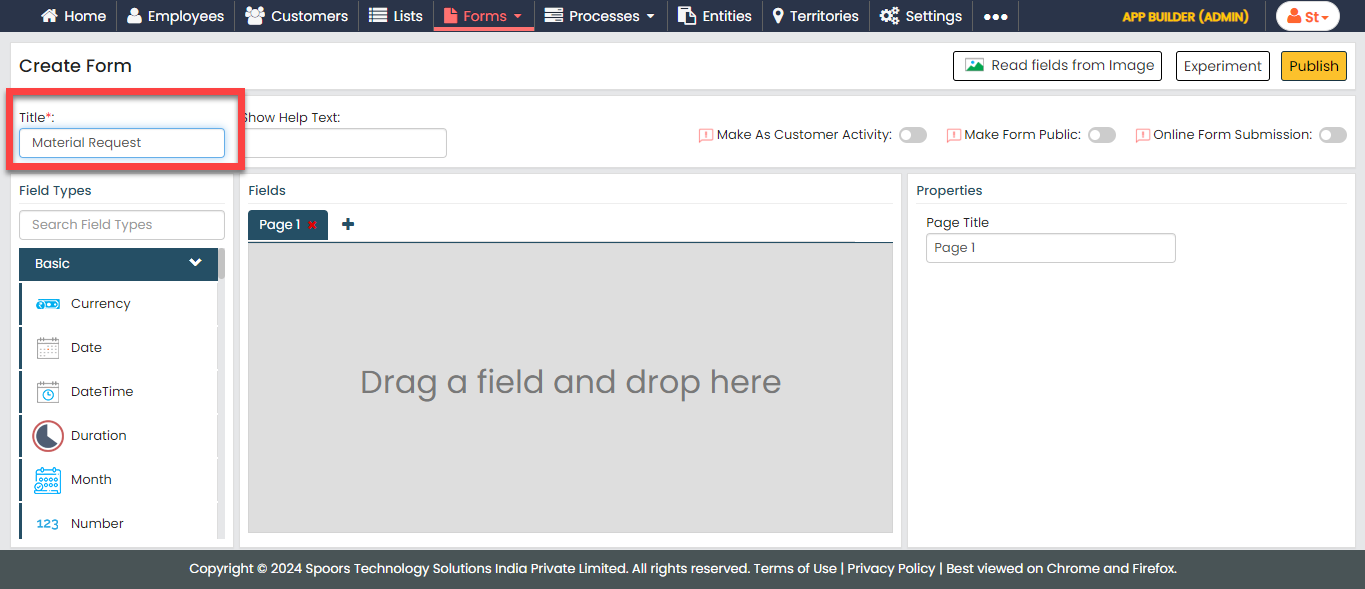
Material Request
In this section, we will create a form called Material Request. Technicians will fill out this form as part of the Ezone process to raise a request for materials when needed. The form includes details about the products and their quantities.
To create this form, follow the steps below:
-
Go to .
-
In the Title field, enter the title as
Material Request.
-
Drag and drop the following data types onto the field canvas and
label them as shown below.
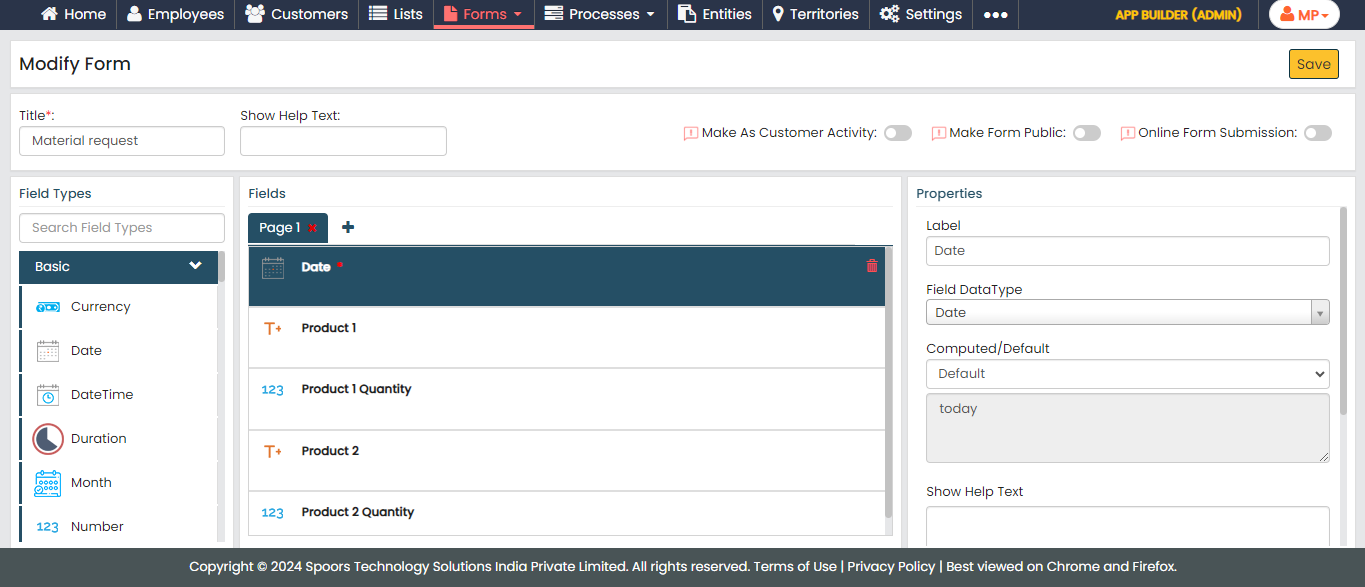
Data Type Label Date Date Text Product 1 Number Product 1 Quantity Text Product 2 Number Product 2 Quantity To know more about all the data types, refer to the following topics. -
For the following fields, uncheck the Required
Field checkbox to make them optional when submitting
the form.
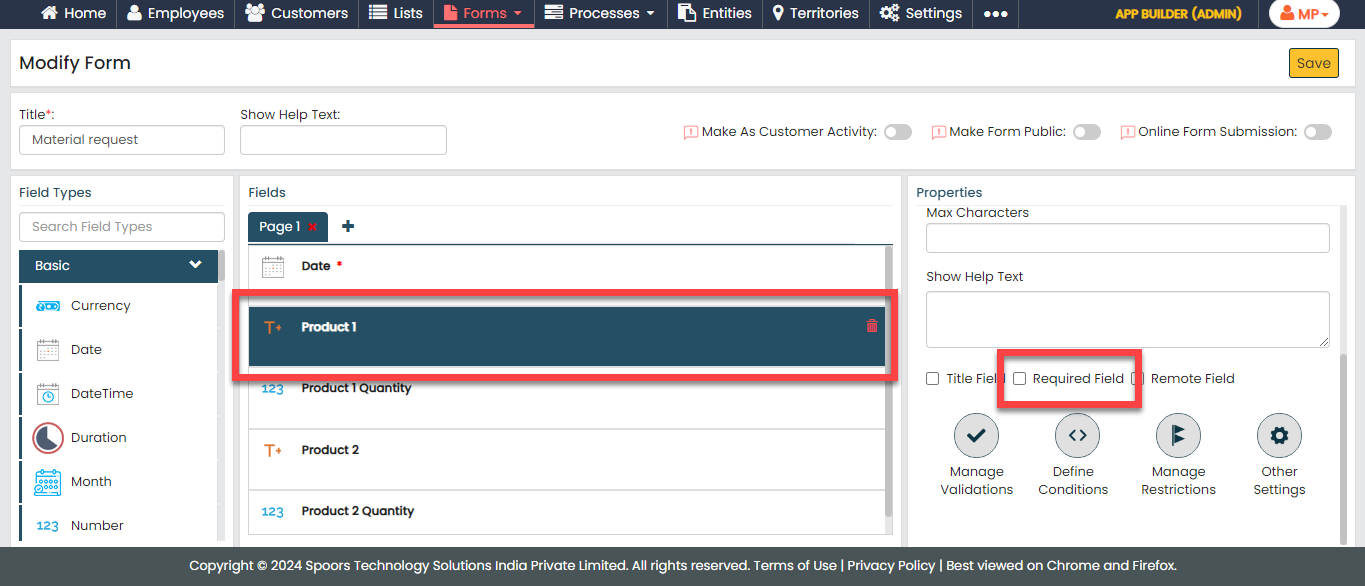
- Product 1
- Product 1 Quantity
- Product 2
- Product 2 Quantity
-
Click the Date field, and do the
following:
-
Under the Properties section, make
the field as Default.
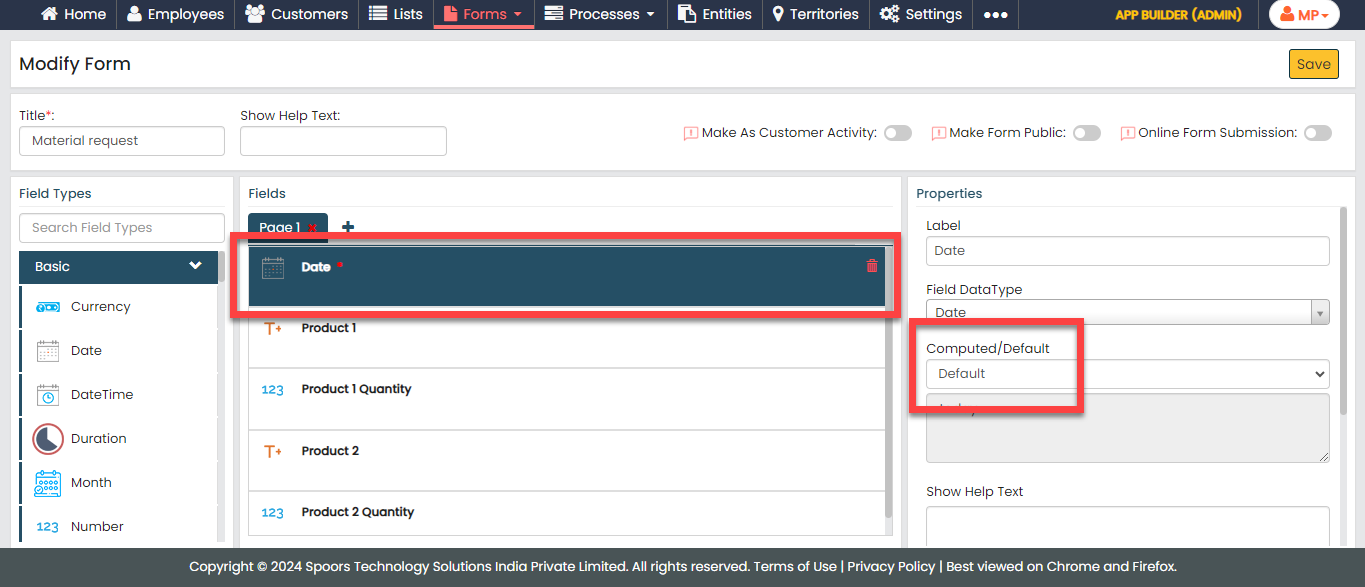
-
Click the grey box below the
Computed/Default field and
configure as shown below.
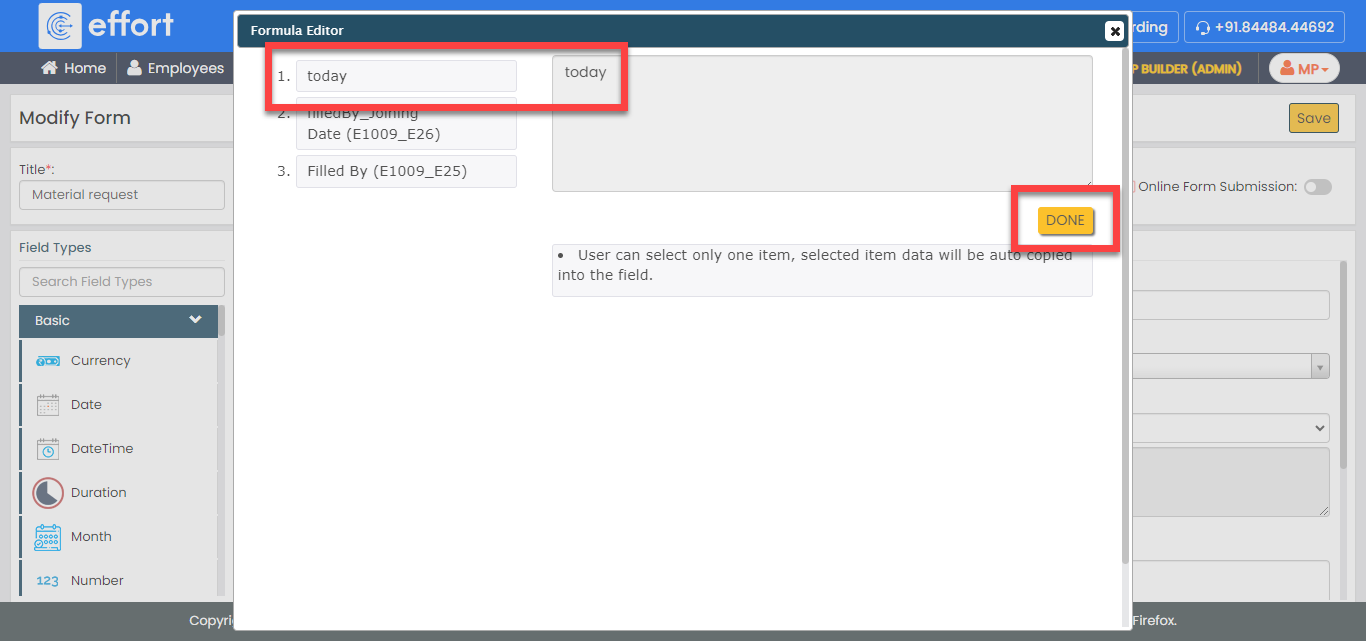
- Click Done.
-
Under the Properties section, make
the field as Default.
-
Now click Publish and then click
OK to make it available to the
technicians. You are done with your first form creation.
Note: To know more about all the publishing options, refer to Publishing Options.
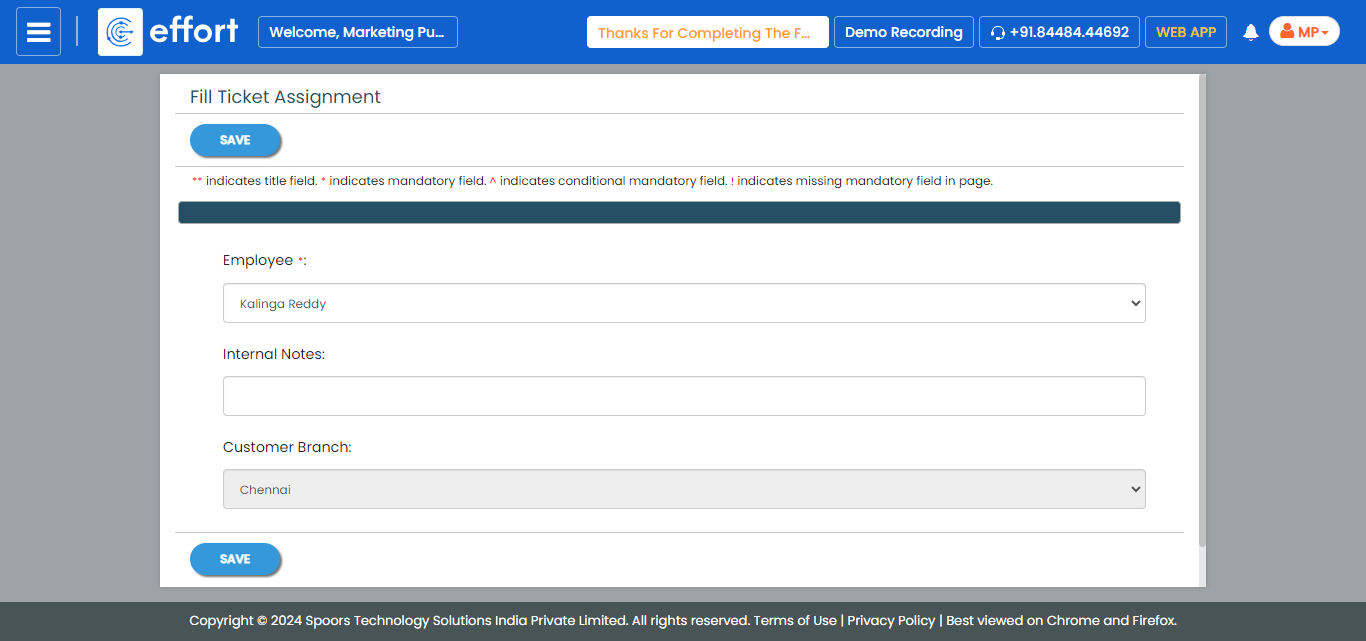
Ticket Assignment
In this section, we will create a form called Ticket Assignment. This is the initial task that must be carried out by the back-office employees. It involves gathering information about the branch coordinator and the branch to assign the ticket to them.
To create this form, follow the steps below:
-
Go to .
-
In the Title field, enter the title as
Ticket Assignment.

-
Drag and drop the following data types onto the field canvas and
label them as shown below. You can also add the fields and customize
labels as per your requirement.
Data Type Label Employee Employee Text Internal Notes Pick List Customer Branch To know more about all the data types, refer to the following topics. -
For the following fields, uncheck the Required
Field checkbox to make them optional when submitting
the form.
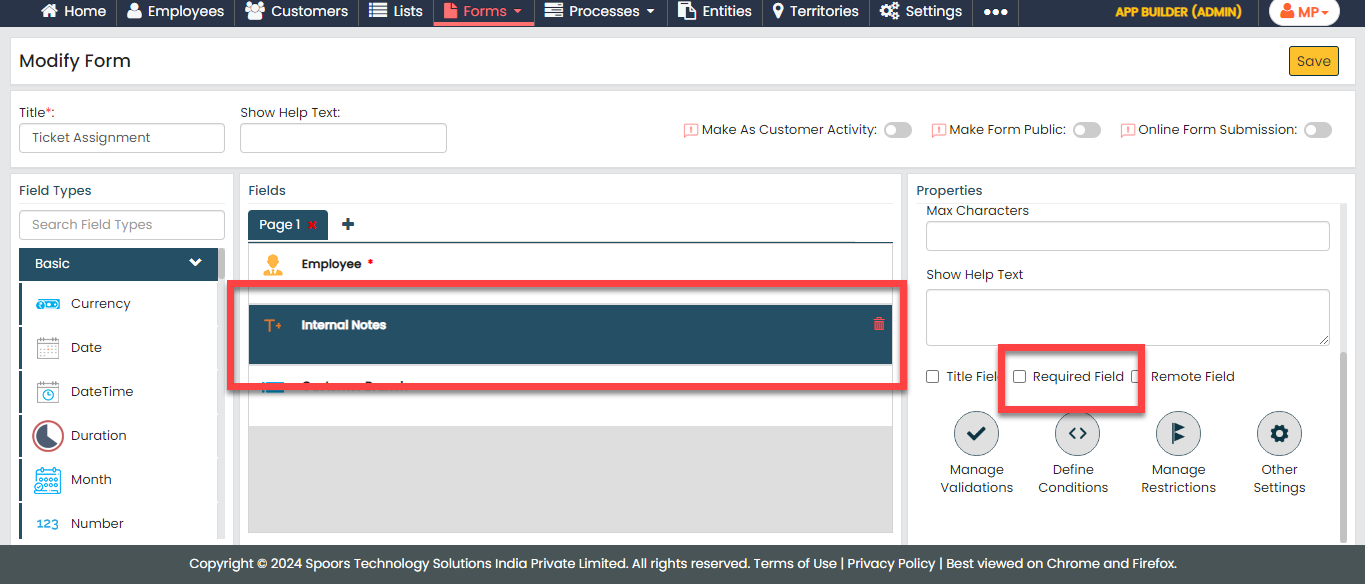
- Product 1Internal Notes
- Customer Branch
-
Click the Customer Branch field and select
Branch from the
List dropdown under the
Properties section.

-
Now click Publish and then click
OK to make it available to the
employees.
Note: To know more about all the publishing options, refer to Publishing Options.
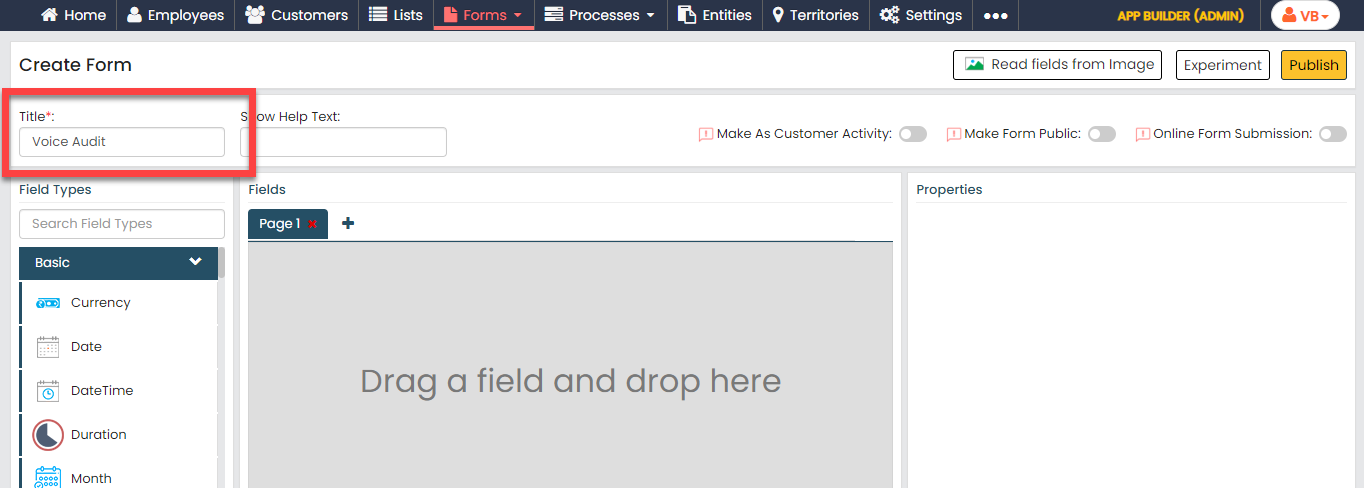
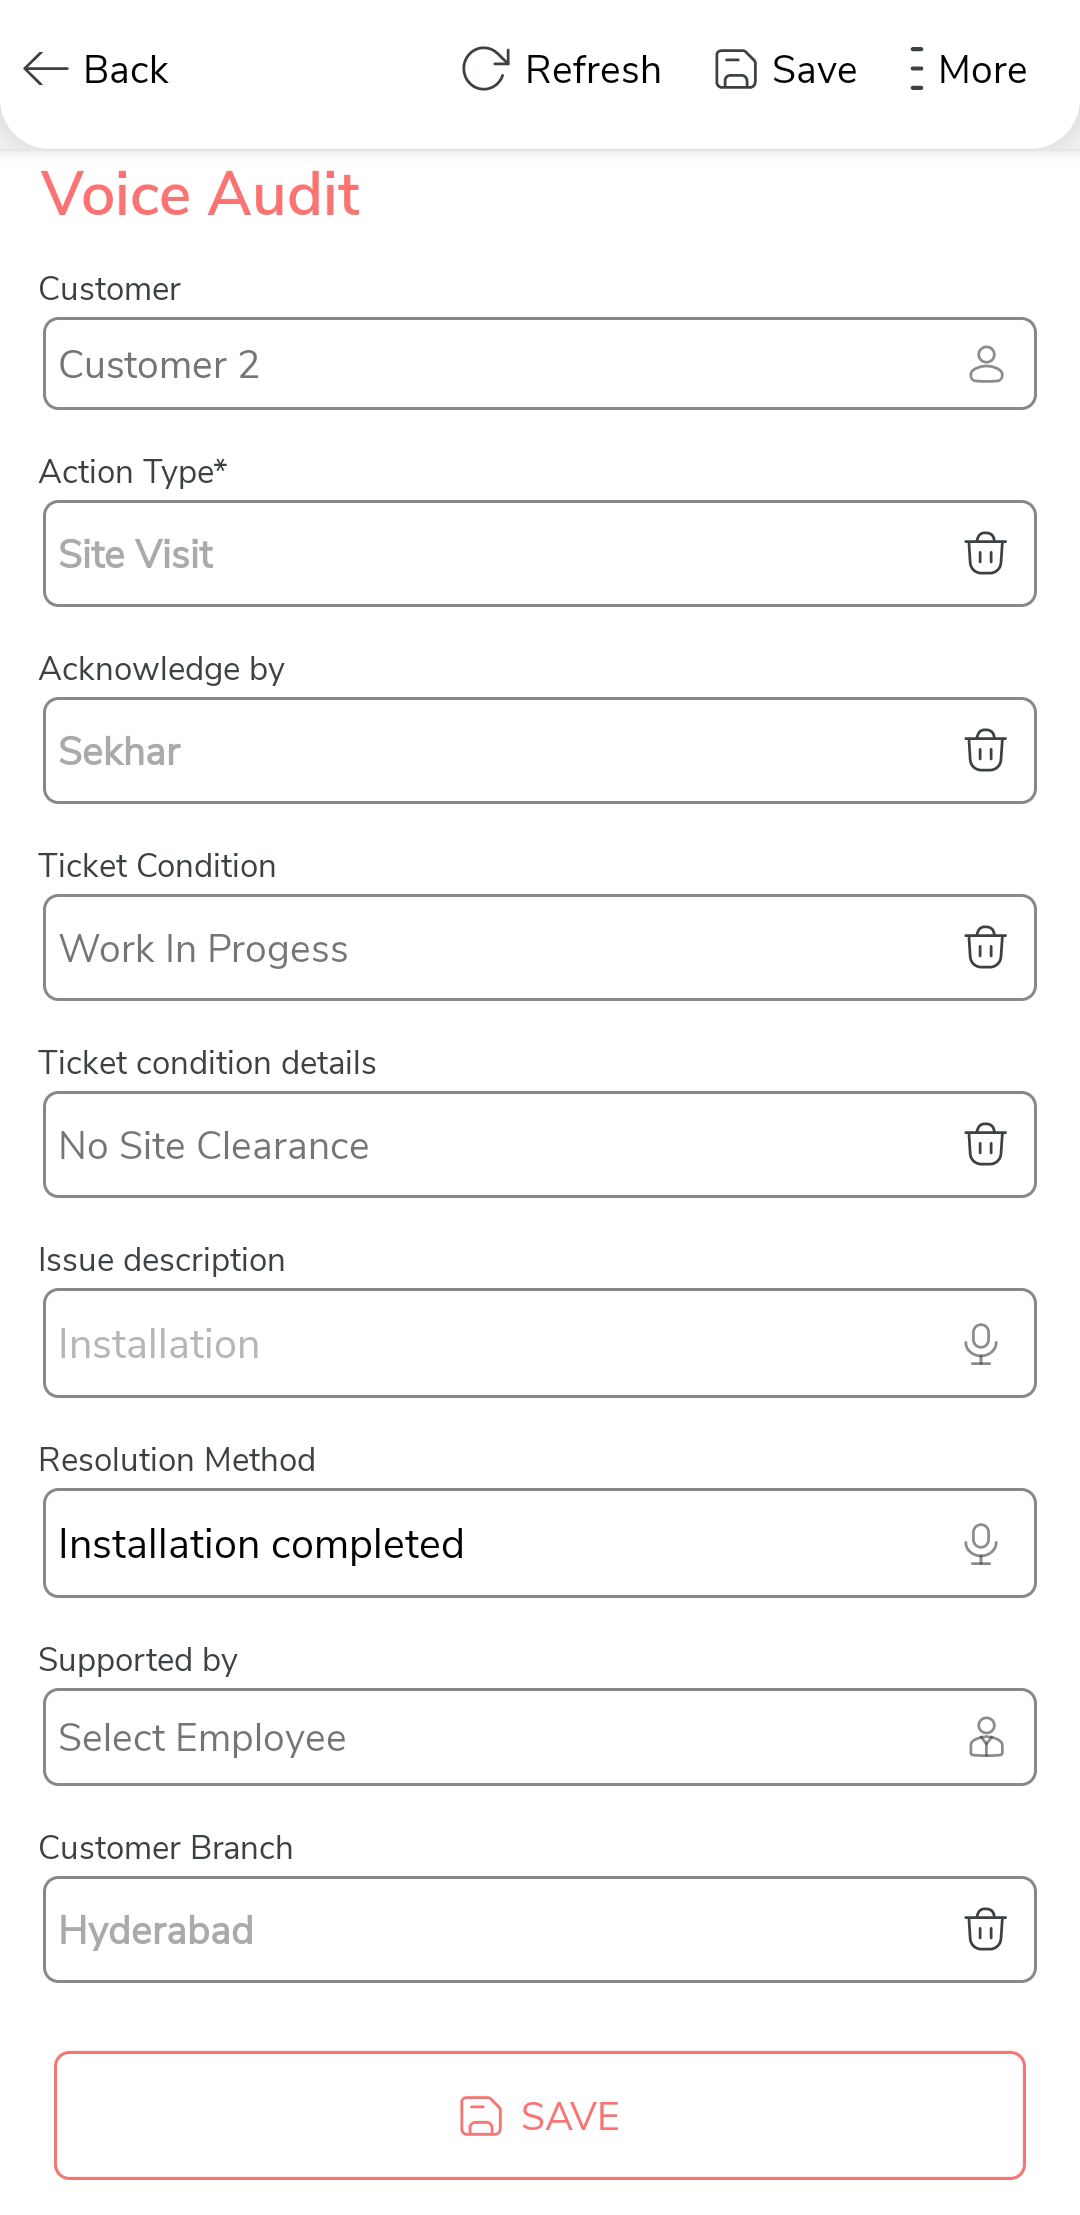
Voice Audit
In this section, we will create a form called Voice Audit that the coordinator will fill out as part of the Ezone process. The coordinator reaches out to the customer and captures the details of the issues, indicating whether they have been resolved or not.
To create this form, follow the steps below:
-
Go to .
-
In the Title field, enter the title as
Voice Audit.
-
Drag and drop the following data types onto the field canvas and
label them as shown below. You can also add the fields and customize
labels as per your requirement.
Data Type Label Customer Customer Pick List Action Type Pick List Acknowledge by Pick List Ticket Condition Pick List Ticket condition details Text Issue description Text Resolution Method Employee Supported by Pick List Customer Branch Text Charges collected Pick List Update ticket status Yes/No Feedback required To know more about all the data types, refer to the following topics. -
For the following fields, uncheck the Required
Field checkbox to make them optional when submitting
the form.
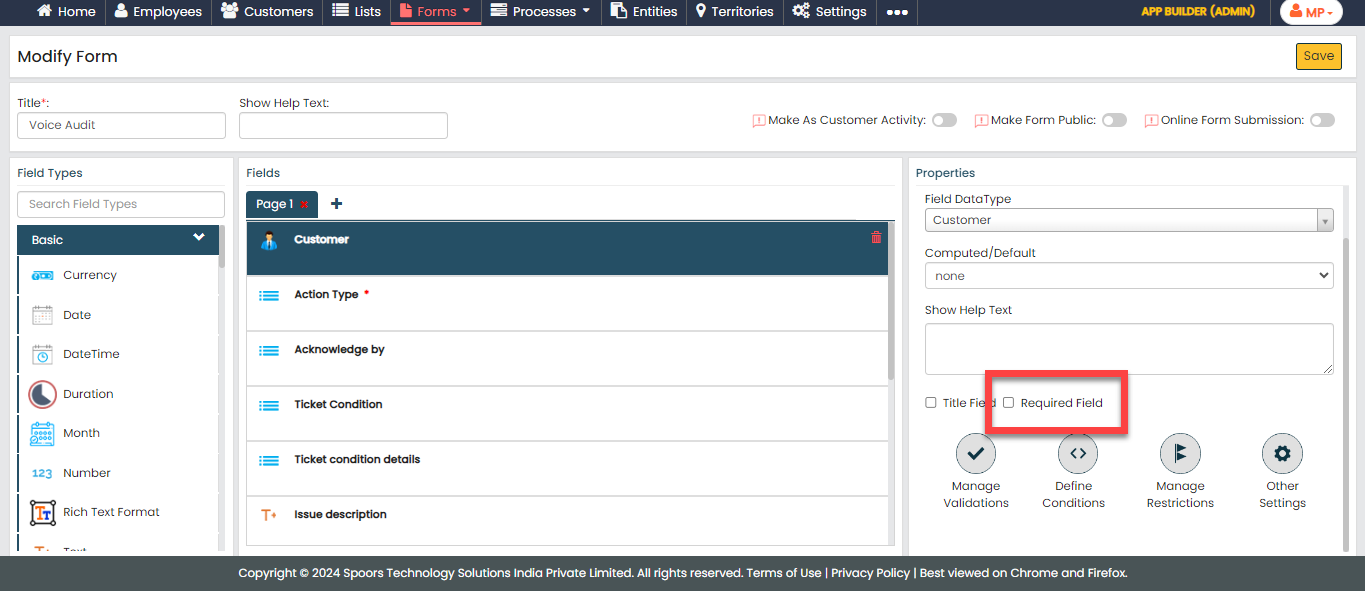
- Customer
- Acknowledge by
- Ticket Condition
- Ticket condition details
- Issue description
- Resolution Method
- Supported by
- Customer Branch
- Charges collected
-
Click the Action Type field and select
Action Type from the
List dropdown under the
Properties section.

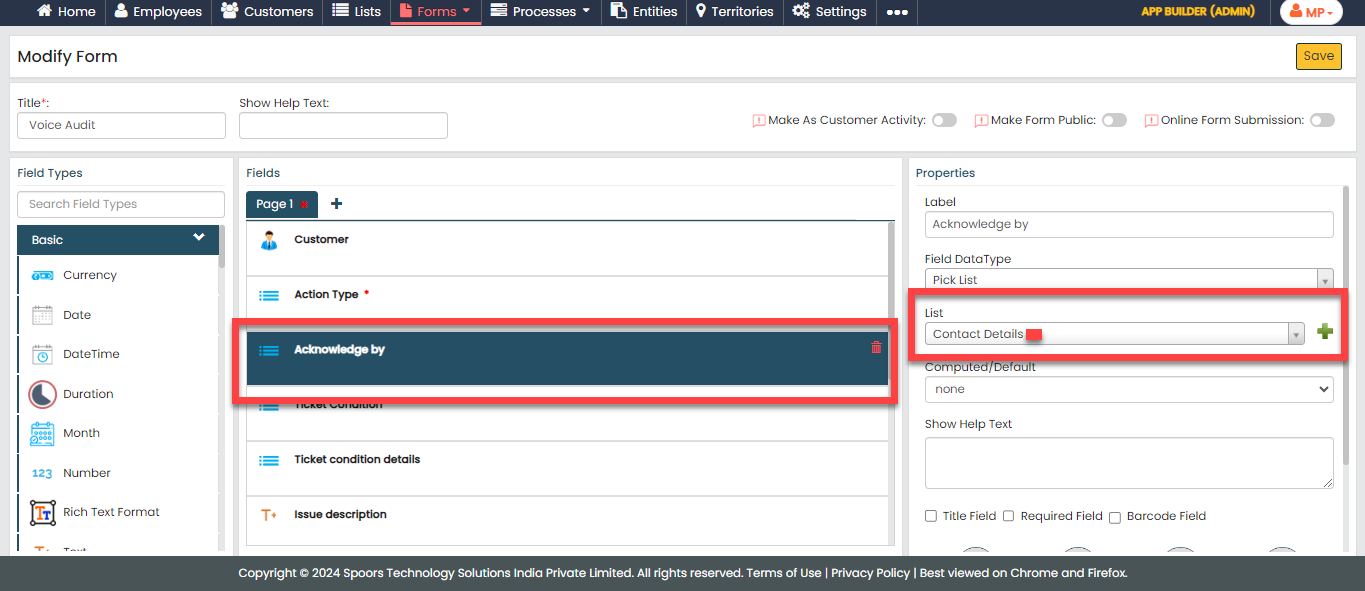
-
Click the Acknowledge by field and select
Contact Details from the
List dropdown under the
Properties section.
-
Click the Ticket Condition field and select
Ticket Condition from the
List dropdown under the
Properties section.

-
Click the Ticket condition details field and
select Ticket condition details from the
List dropdown under the
Properties section.

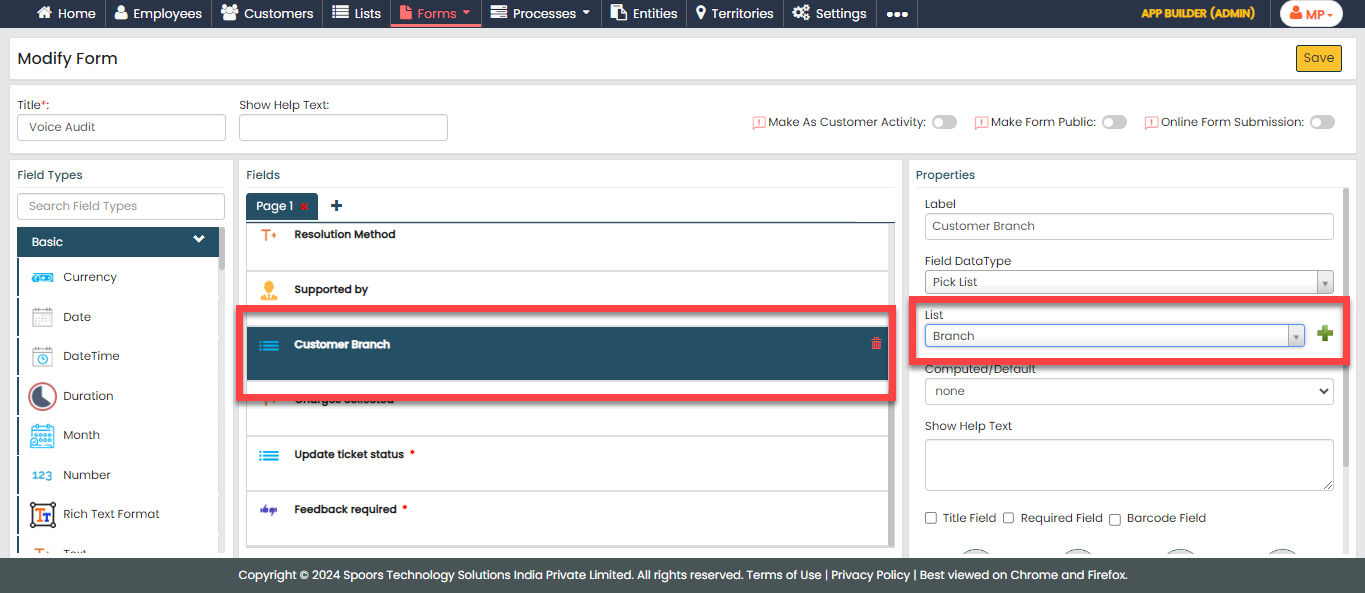
-
Click the Customer Branch field and select
Branch from the
List dropdown under the
Properties section.
-
Click the Update ticket status field and
select Update ticket status from the
List dropdown under the
Properties section.

-
Now click Publish and then click
OK to make it available to the
employees.
Note: To know more about all the publishing options, refer to Publishing Options.
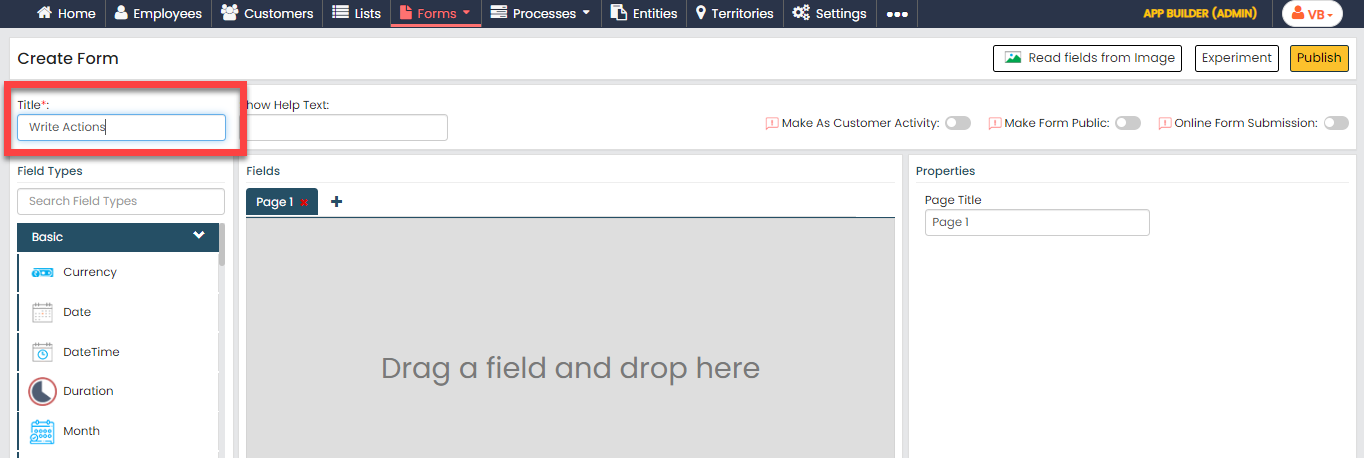
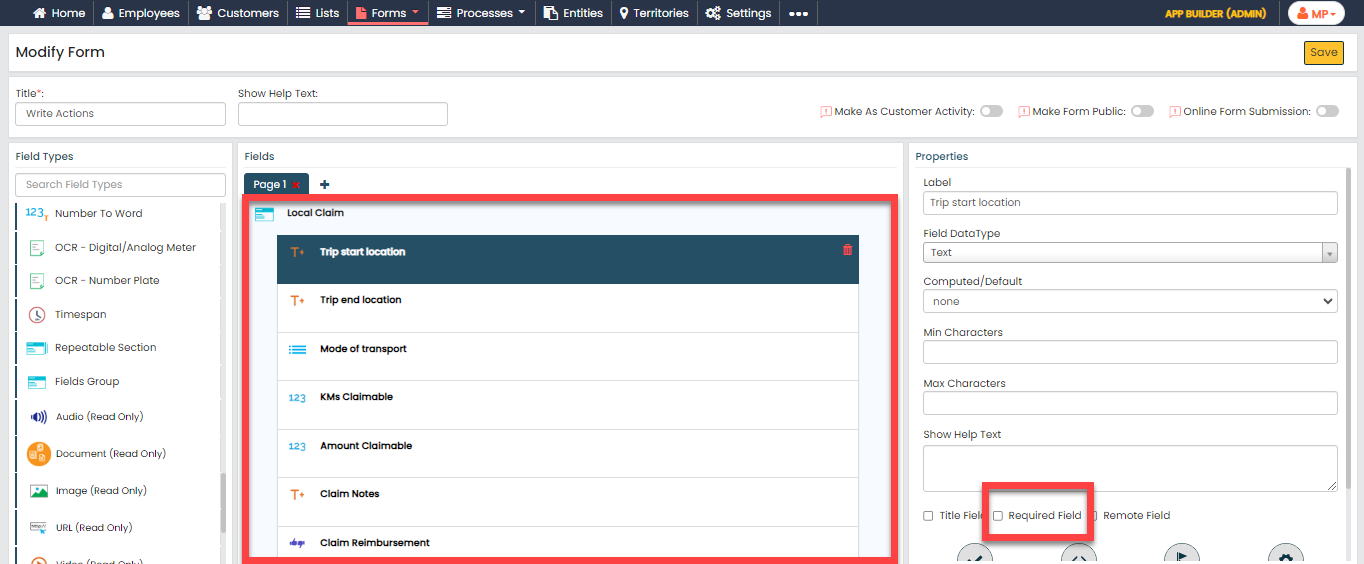
Write Actions
In this section, we will create a form called Write Actions that the technician will fill out as part of the Ezone process. This form is designed to capture work details such as activity type, ticket status, and so on.
To create this form, follow the steps below:
-
Go to .
-
In the Title field, enter the title as
Write Actions.
-
Drag and drop the following data types onto the field canvas and
label them as shown below. You can also add the fields and customize
labels as per your requirement.
Data Type Label Customer Customer Pick List Action Type Pick List Acknowledge by Pick List Ticket Condition Pick List Ticket condition details Text Issue description Text Resolution Method Employee Supported by Pick List Customer Branch Text Charges collected Pick List Update ticket status Fields Group Local Claim Number Claim Amount Upload Image Upload Image To know more about all the data types, refer to the following topics. -
For the following fields, uncheck the Required
Field checkbox to make them optional when submitting
the form.
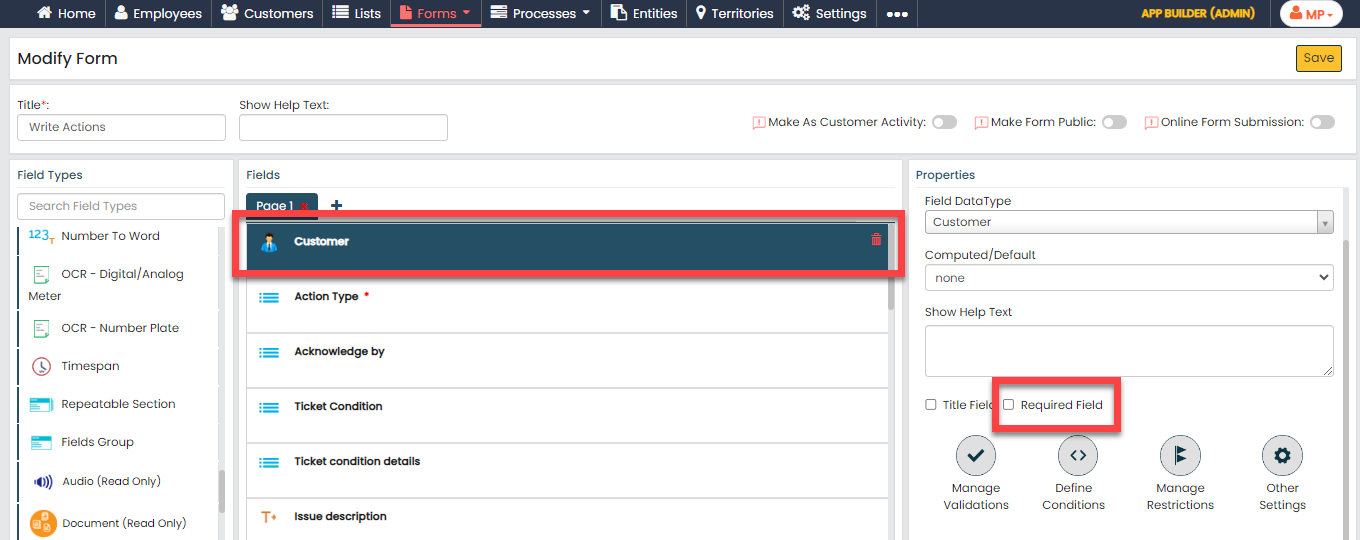
- Customer
- Acknowledge by
- Ticket Condition
- Ticket condition details
- Issue description
- Resolution Method
- Supported by
- Customer Branch
- Charges collected
- Claim Amount
- Upload Image
-
Click the Action Type field and select
Action Type from the
List dropdown under the
Properties section.

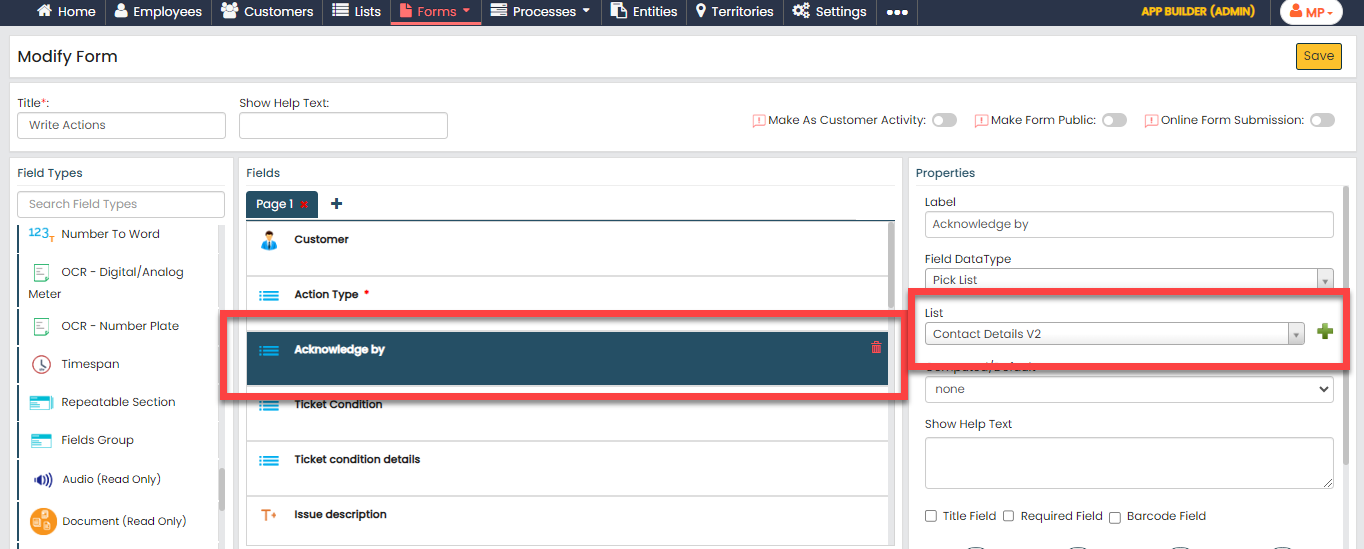
-
Click the Acknowledge by field and select
Contact Details from the
List dropdown under the
Properties section.
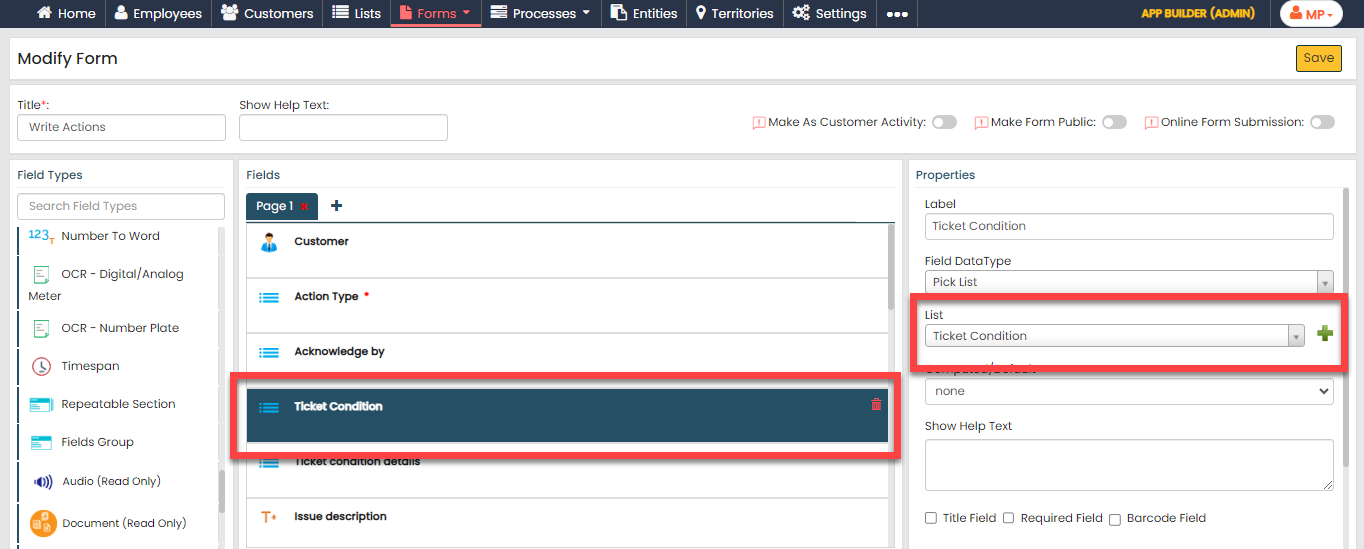
-
Click the Ticket Condition field and select
Ticket Condition from the
List dropdown under the
Properties section.
-
Click the Ticket condition details field and
select Ticket condition details from the
List dropdown under the
Properties section.

-
Click the Customer Branch field and select
Branch from the
List dropdown under the
Properties section.

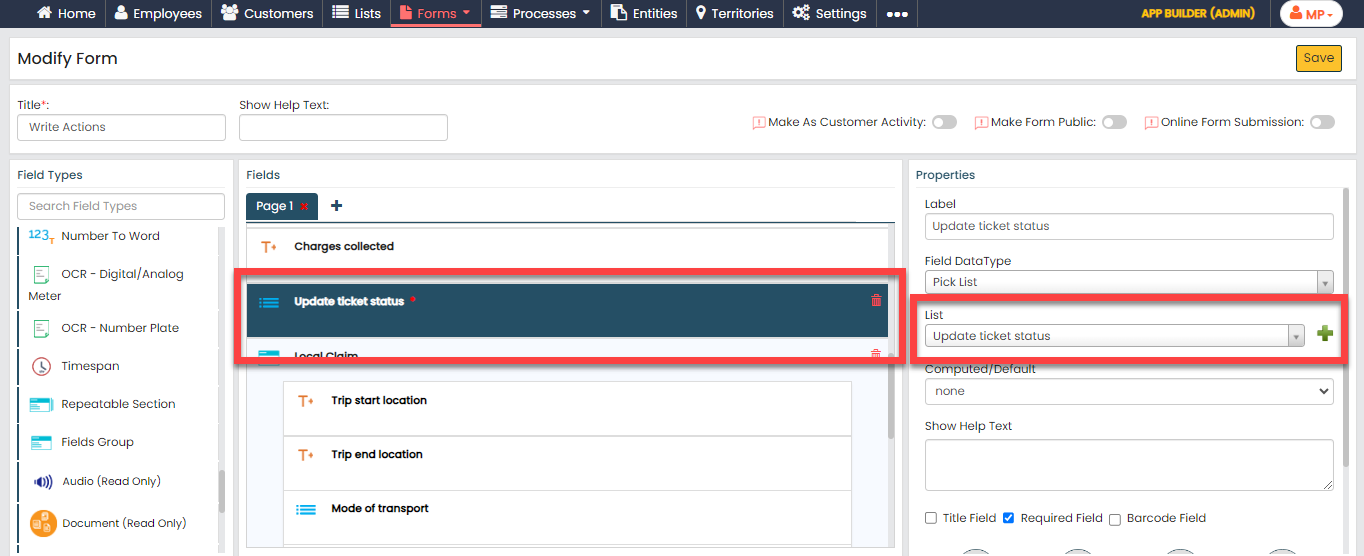
-
Click the Update ticket status field and
select Update ticket status from the
List dropdown under the
Properties section.
-
Drag and drop the following data types onto the
Group field and label them as shown
below.
Data Type Label Text Trip start location Text Trip end location Pick List Mode of transport Number KMs Claimable Number Amount Claimable Text Claim Notes Yes/No Claim Reimbursement -
Uncheck the Required Field checkbox for all
the fields in the Group to make them optional when submitting the
form.
-
Click the Claim Amount field and do the
following.
-
Under the Properties section, make
the field as Computed.

-
Click the grey box below the
Computed field and define the
formula as shown below.
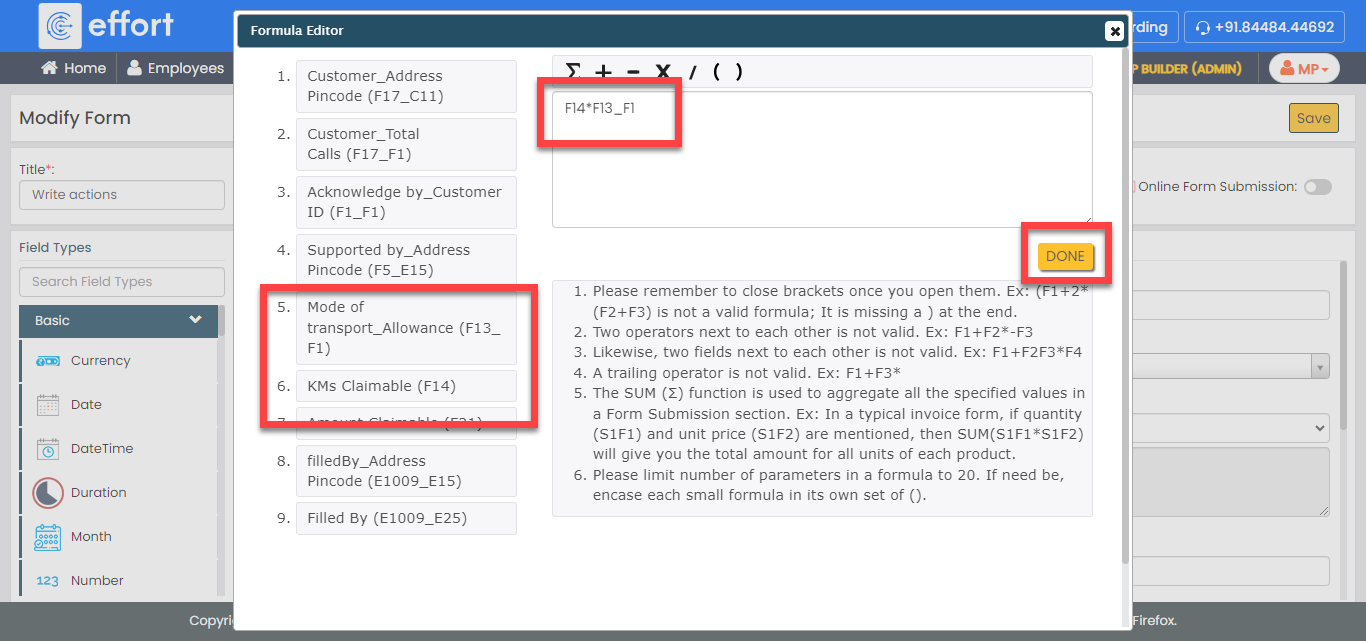
In the above screenshot, we have defined the formula to multiply the allowance with KMs to get the total claim amount.
-
Under the Properties section, make
the field as Computed.
-
Now click Publish and then click
OK to make it available to the
employees.
Note: To know more about all the publishing options, refer to Publishing Options.
Creation and Configuration of E-Zone Process
The E-Zone is a workflow that requires configuration to effectively manage the activities associated with the process. These activities include the creation of an installation/service request, ticket assignment to the respective branch coordinator, raising material requests, and more.
In this section, we will configure the process activities, outline the sequence of execution, specify the necessary information for creating work items, and among other aspects. To know more about work processes, refer Work Processes.
Create EZone Process
In this section, we will create the process.
-
Go to .
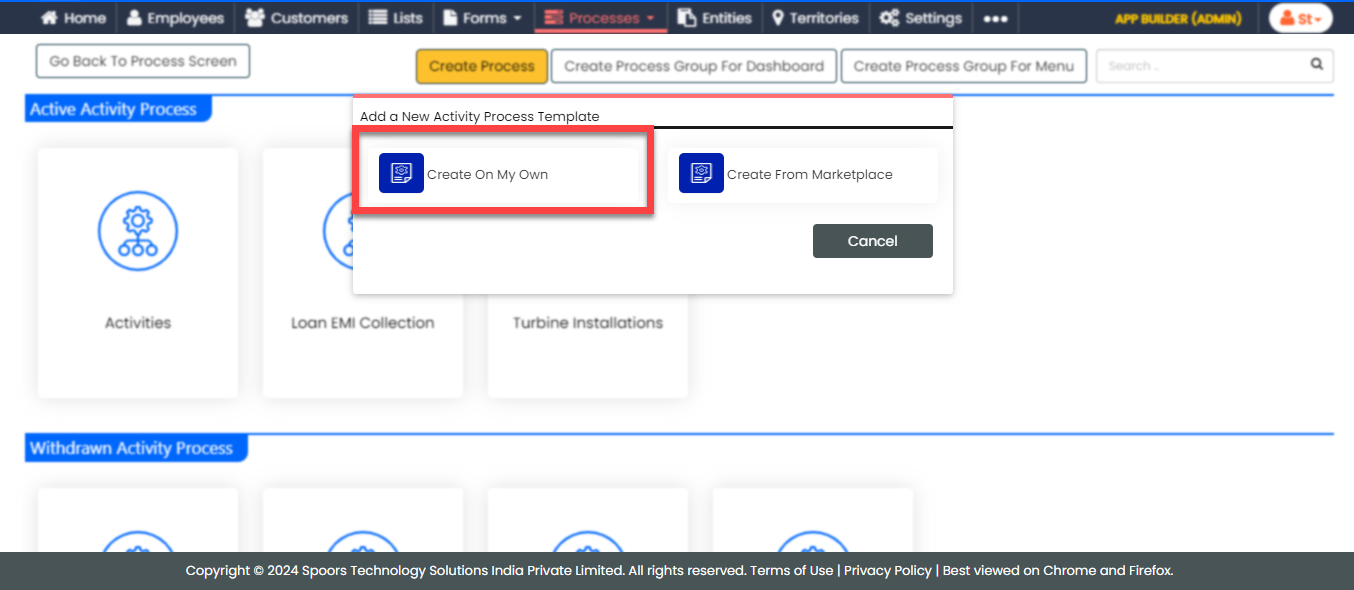
-
On the Create Activity Process screen, do the
following:
-
In the Work Process Name field,
enter the title as EZONE.

- Click Next.
-
In the Work Process Name field,
enter the title as EZONE.
-
After entering the process name and clicking Next, you will
proceed to the next tab, where you are required to configure the
work fields. On this tab, click Next and then click
OK. We will configure this section
later.
-
On the Manage Forms tab, click
Next.

-
Manage Activities: On this tab, we will
define the activities that need to be executed for a request. To
know more about activities, refer Activities. To
define the activities, follow these steps:
-
Check the Enable check-in checkbox
to activate the work check-in feature for this process.
Based on the configuration, the system will not allow the
technicians to execute the process without doing the
check-in.
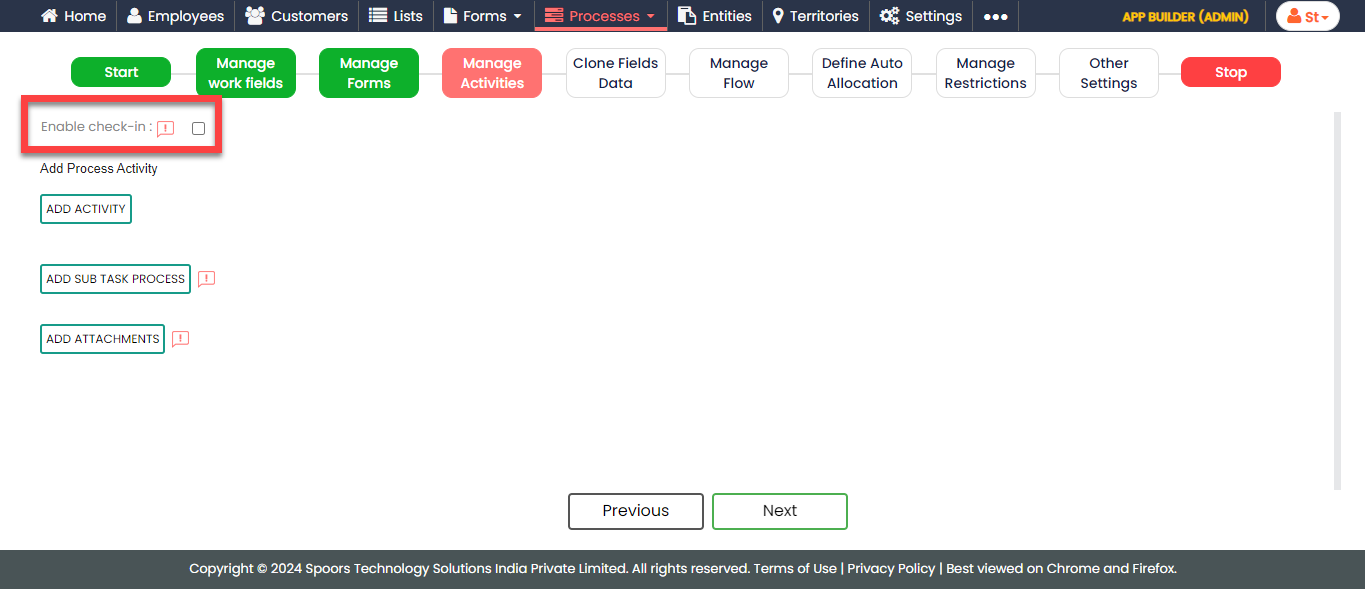
-
Click Add Activity.

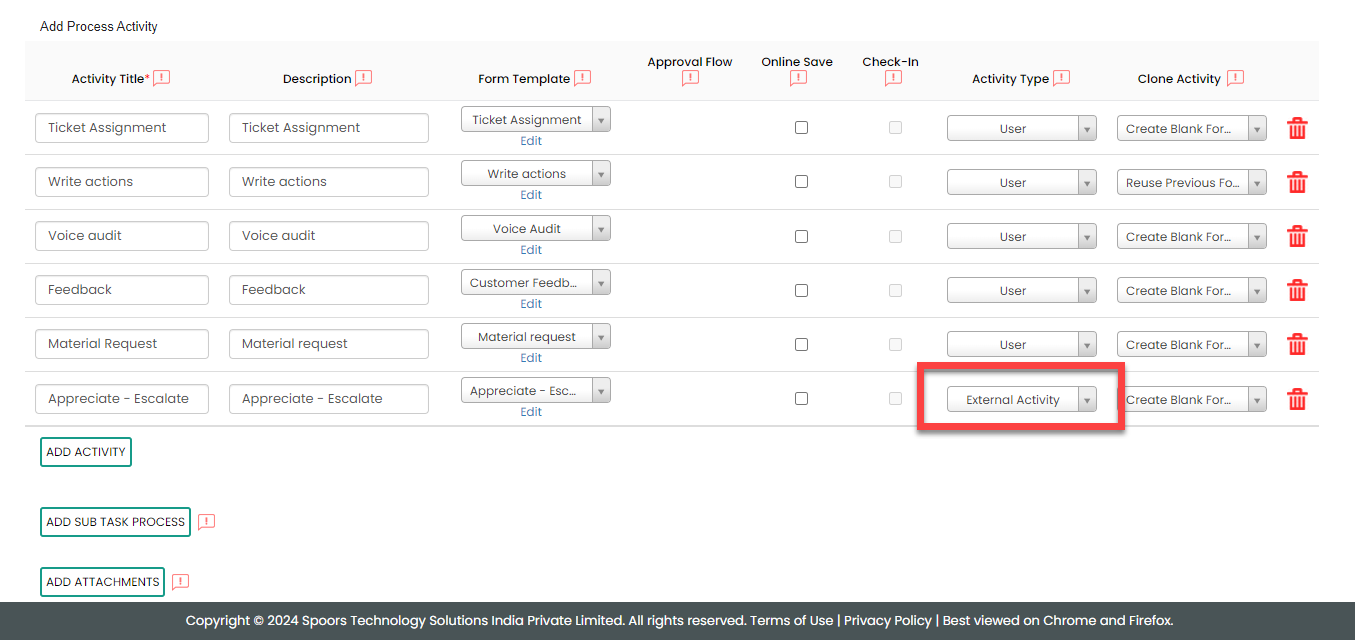
-
Under the Activity Title column,
enter the title as Ticket
Assignment.

-
For the Ticket Assignment activity,
configure the Ticket Assignment form
under the Form Template column.

-
Similarly, click the Add Activity
button again and create the following activities, and then
configure the forms given against the activities.

Activity Name Form Template Write actions Write actions Voice audit Voice Audit Feedback Customer Feedback Material Request Material Request Appreciate - Escalate Appreciate - Escalate -
Make the Appreciate - Escalate
activity as an external activity. Under the
Action Type column, select the
External Activity option from the
dropdown.
To know more about the External Activity feature, refer to the External Action topic.
-
Check the Enable check-in checkbox
to activate the work check-in feature for this process.
Based on the configuration, the system will not allow the
technicians to execute the process without doing the
check-in.
-
On the Clone Fields Data tab, click
Next.

-
On the Manage Flow tab, you can see the default flow created
automatically. Click Next to move to the next
screen. We will configure this later.
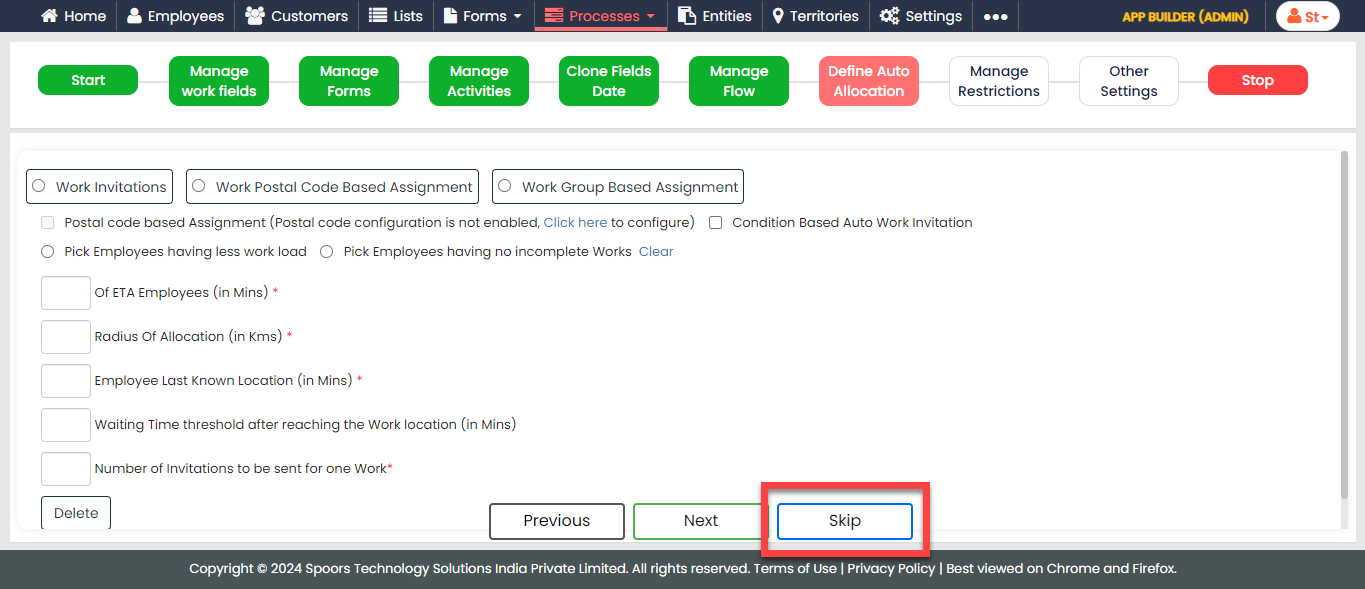
-
On the Define Auto Allocation tab, click
Skip. We will configure this later.
-
On the Manage Restrictions tab, click
Next.

-
On the Other Settings tab, click
Complete. We will configure this
later.

- As you can see, we've ignored some configurations as those are complex and time consuming. Refer to the next sections for detailed steps to configure the flow, fields, work settings, and so on.
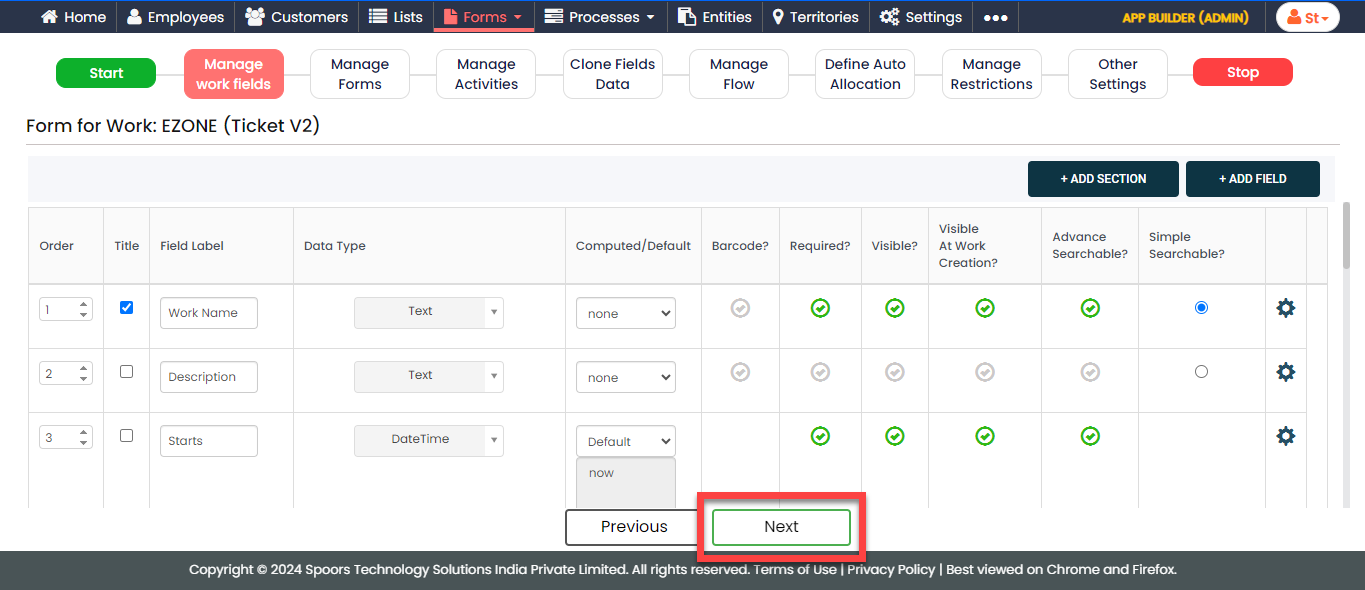
Configure Work Fields
In this section, we will configure the work fields that are required for capturing the information necessary to execute the process. You will find some default fields that are pre-configured. However, these defaults are insufficient for capturing the necessary information. To address this, we must add and configure custom fields. To know more about work fields, refer to Work Fields.
Follow the steps below to create work fields.
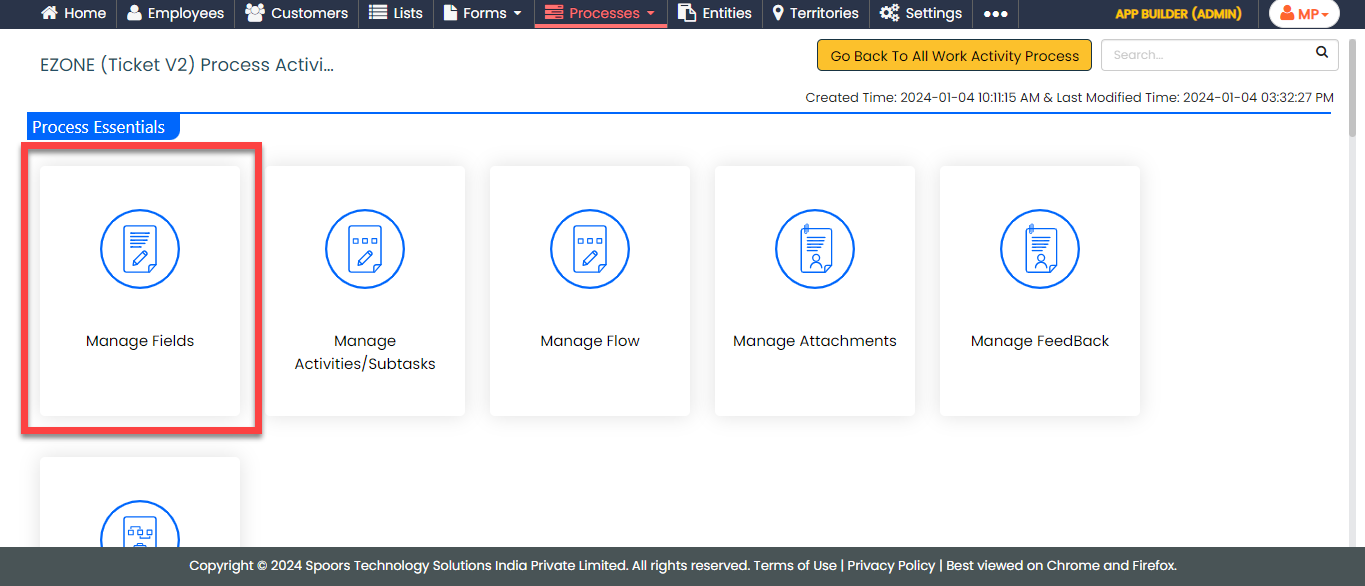
-
On the process page, click Manage Fields.
Alternatively, go to .
-
To begin, deactivate all default fields by clicking on the green
checkboxes, as demonstrated below.


-
Change the Work Name label to
Customer ID, and make it as a
Default field.
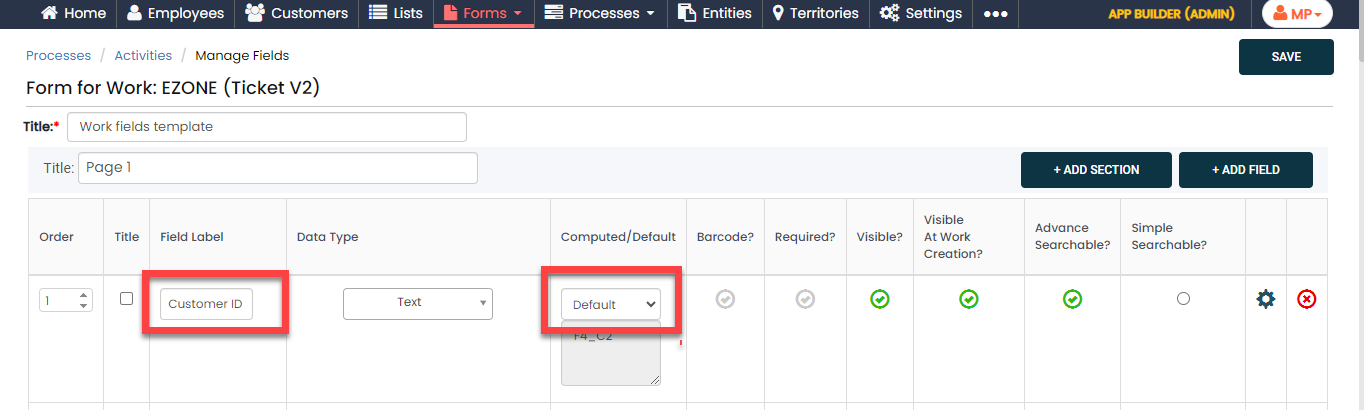
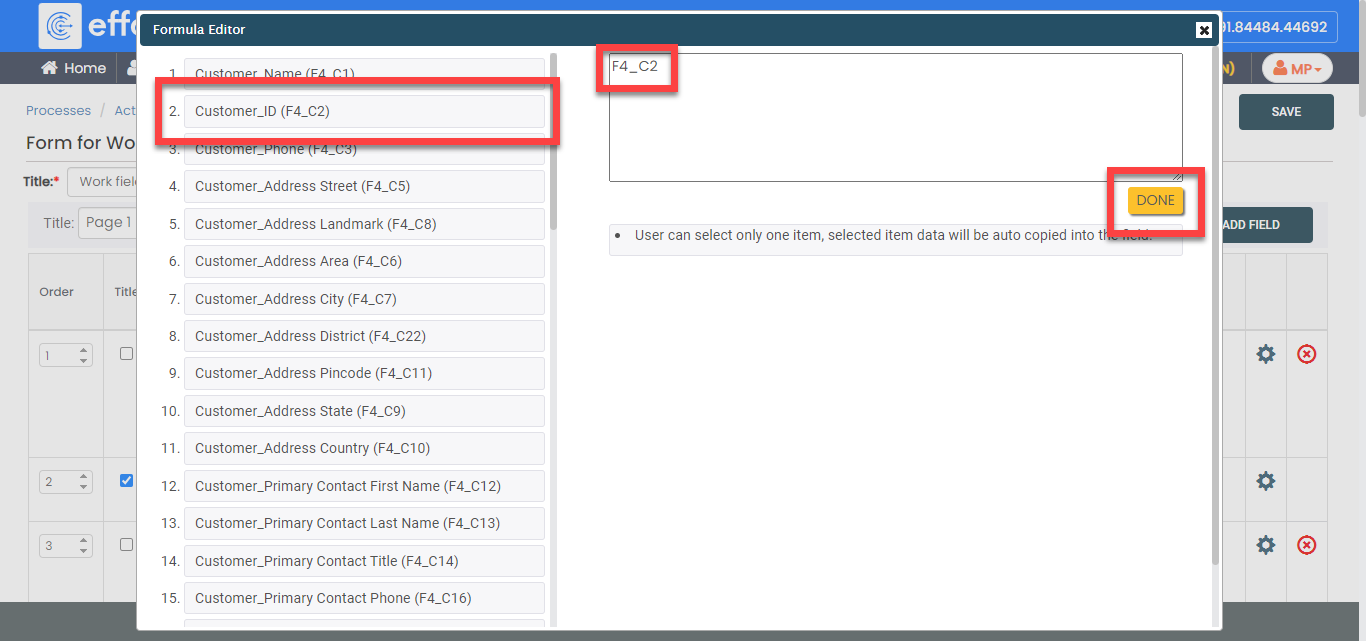
-
Click the grey box under the Default field
to see the Formula Editor pop-up. On the
Formula Editor pop-up, click the
Customer ID field to populate it on the
editor, and then click Save.
-
Similarly, click the Add Field button and
configure the fields as described in the following table.
Field Configuration Customer Enable the customer field, set the order, and configure it as shown below: 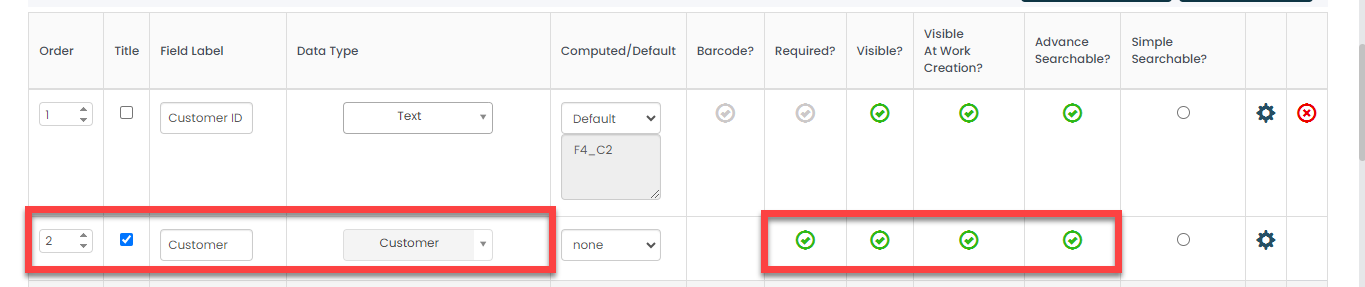
Initiated by Enable the employee field, set the order, and configure it as shown below: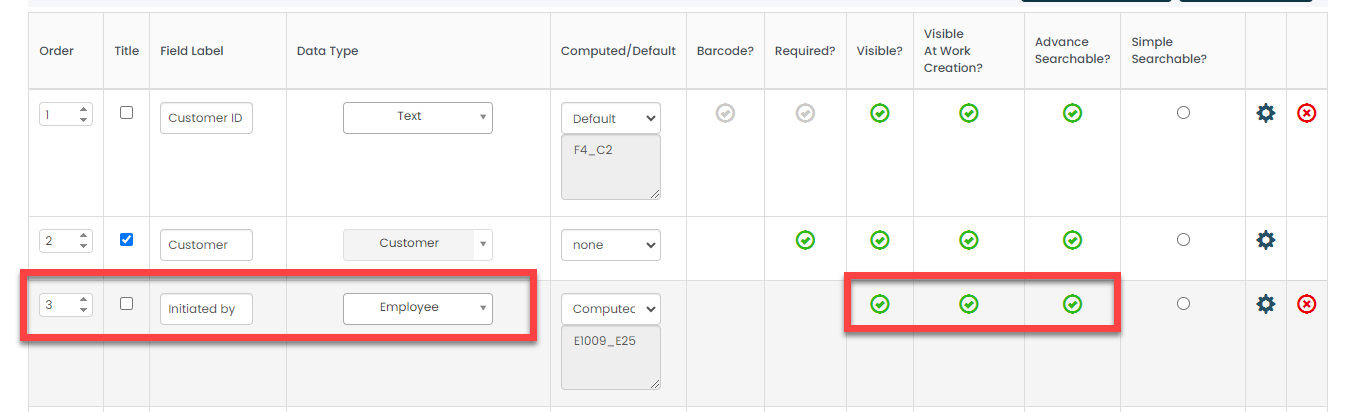 Make this field as Computed. The field configuration is shown below:
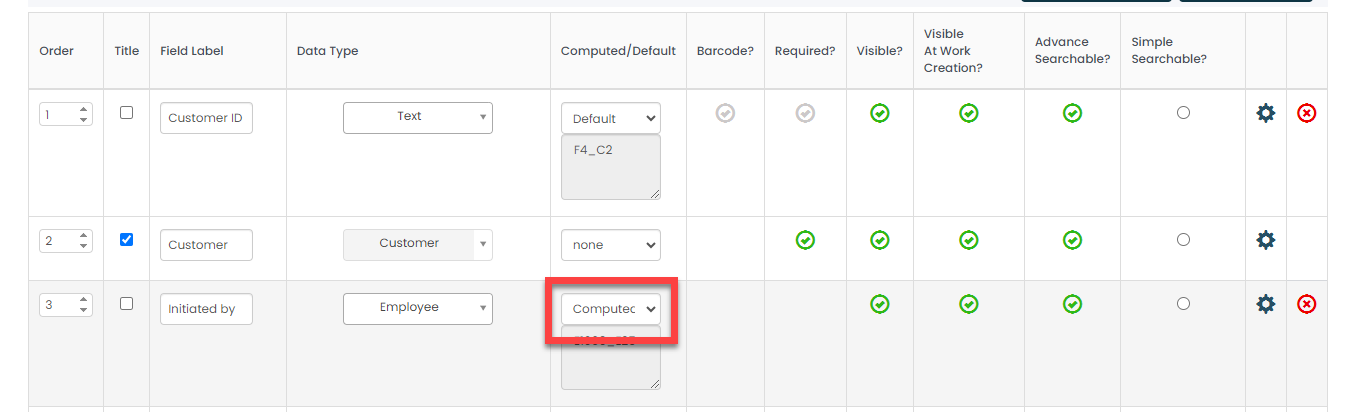 Click on the grey box and configure as shown below to fetch the employee name who created the process:
Reported by Configure the field as shown below: 
Internal Notes Configure the field as shown below: 
Customer Status Configure the field as shown below: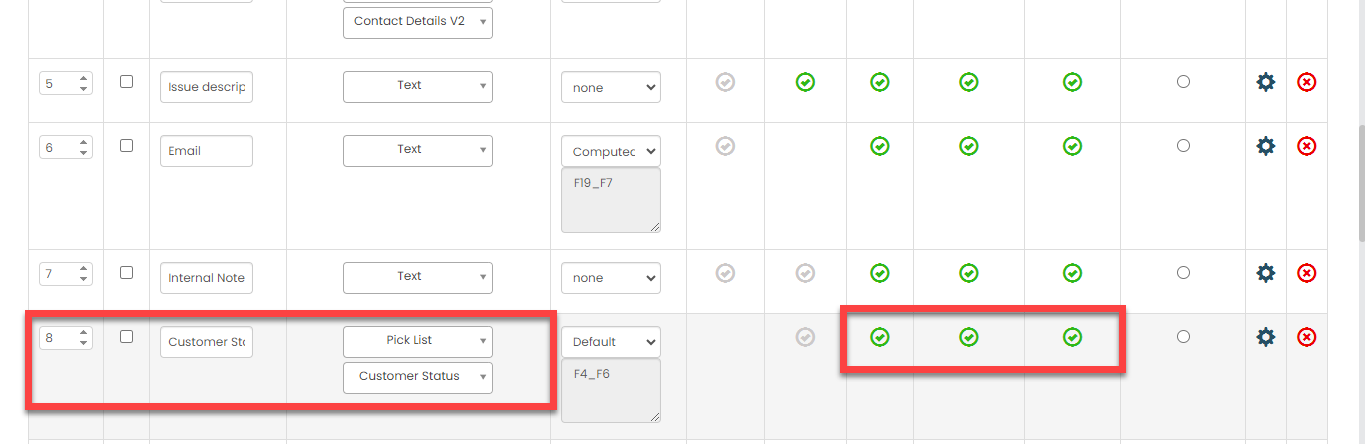 Make this field as Default. The field configuration is shown below:
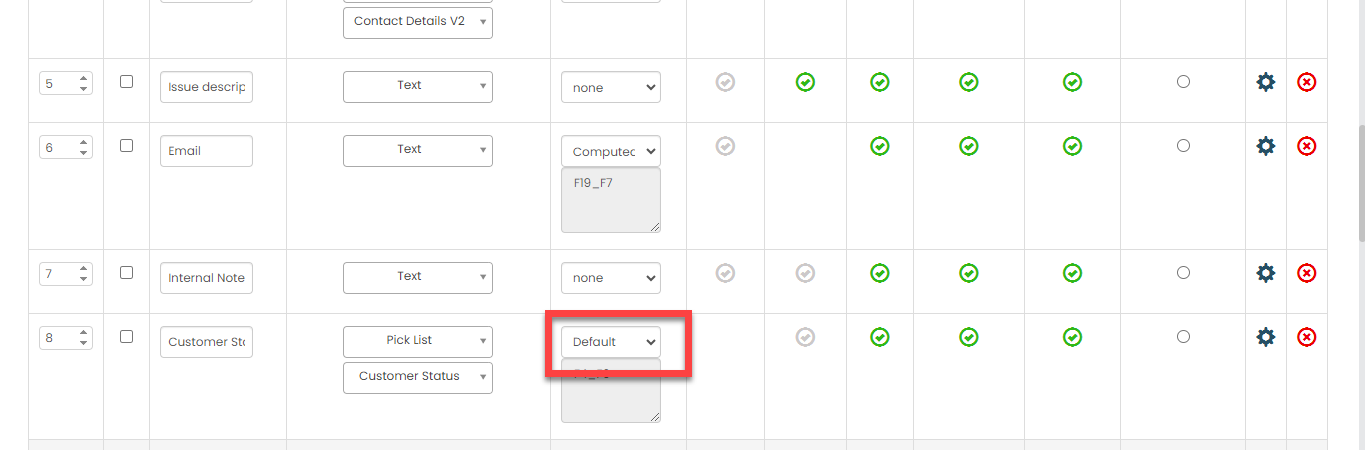 Click on the grey box and configure as shown below to fetch the customer status automatically from the Customer Status list:
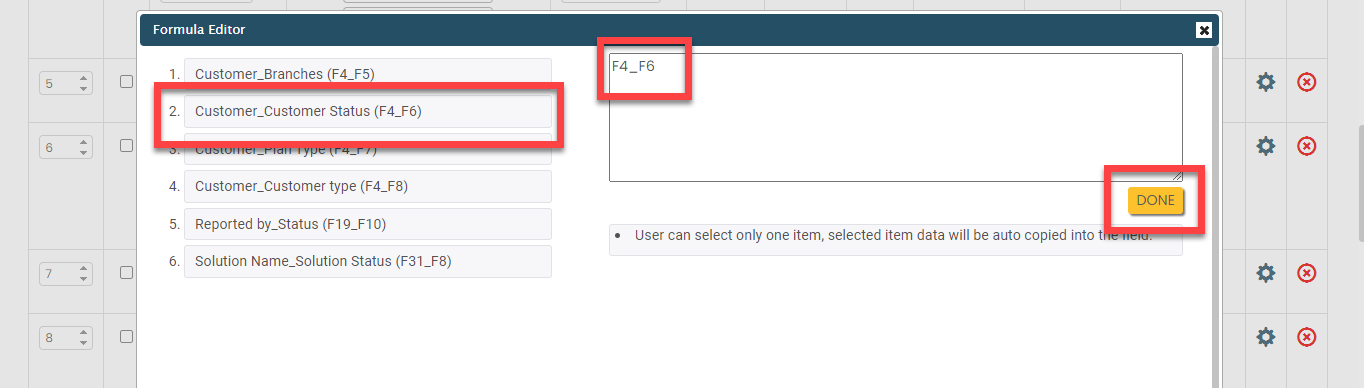
Branch Configure the field as shown below: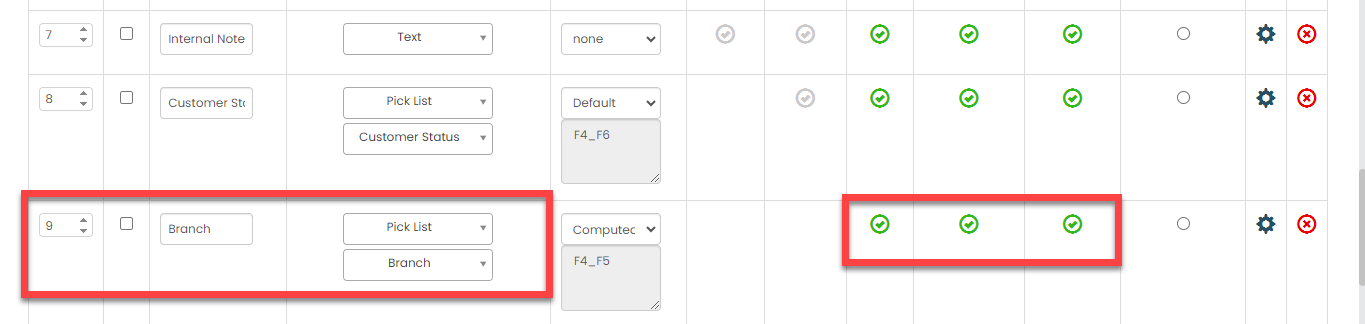 Make this field as Computed. The field configuration is shown below:
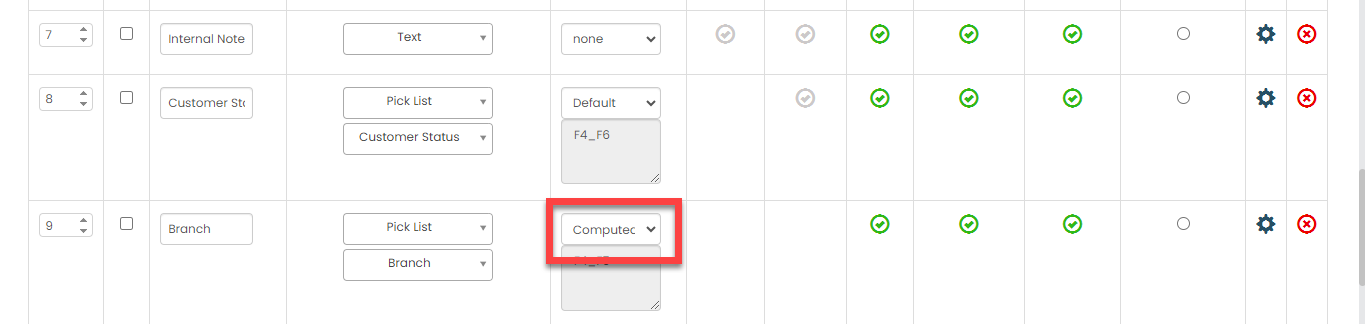 Click on the grey box and configure as shown below to fetch the branch automatically from the Branch list:
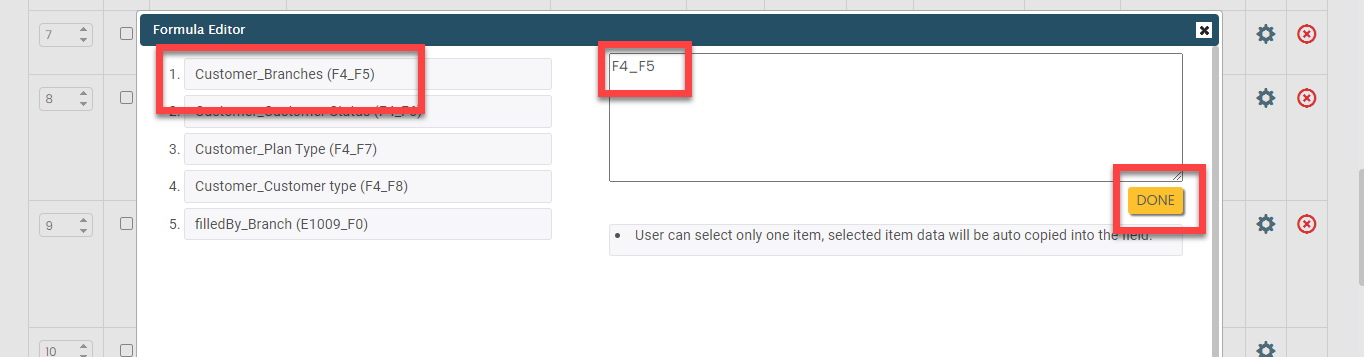
Starts Configure the field as shown below: Make this field as Computed. The field configuration is shown below:
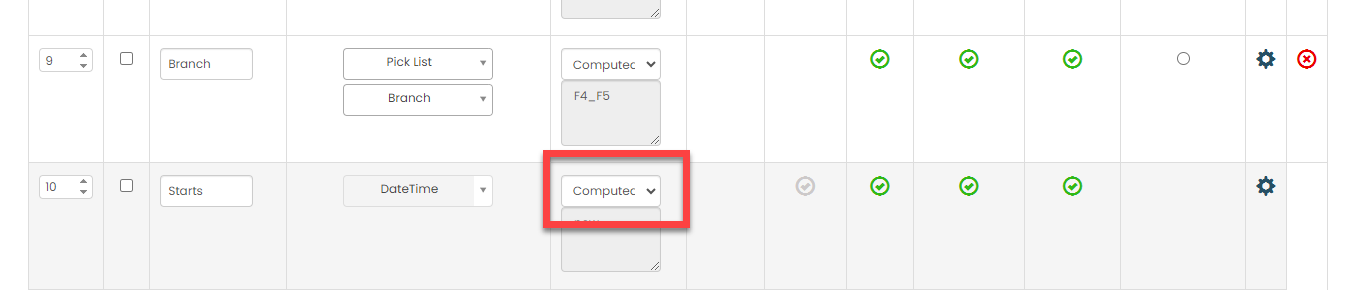 Click on the grey box and configure as shown below to fetch the branch automatically from the Branch list:
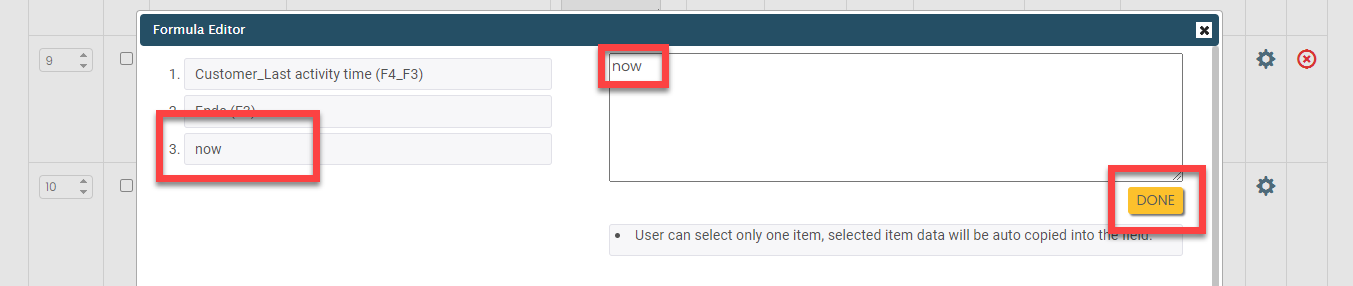
Priority Configure the field as shown below:
Ends Configure the field as shown below: 
Employee Configure the field as shown below: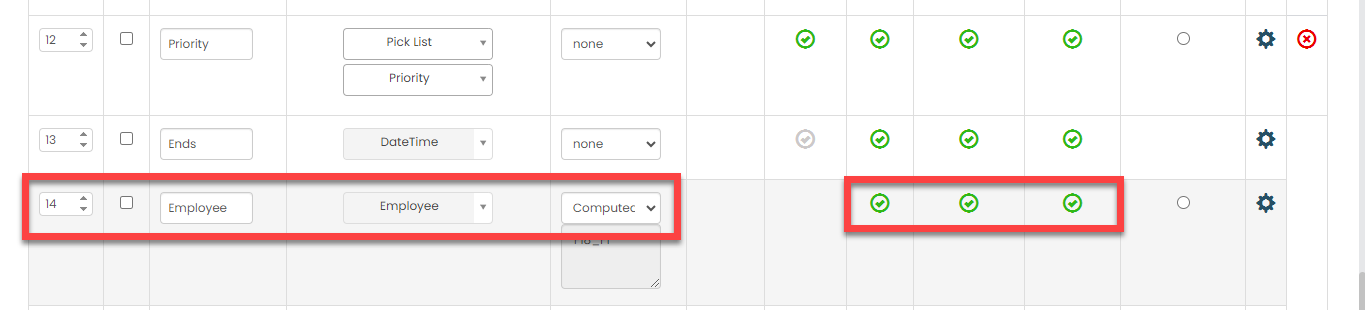 Make this field as Computed. The field configuration is shown below:
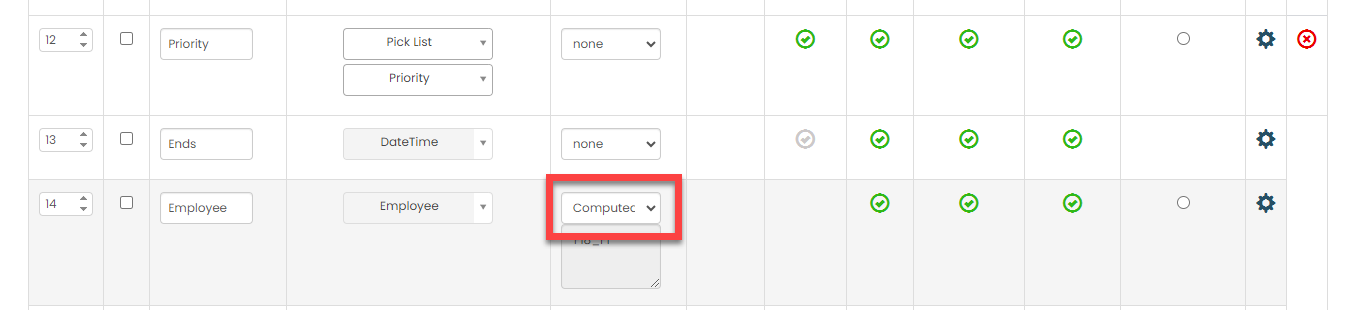 Click on the grey box and configure as shown below to fetch the branch co-ordinator automatically from the Branch list:
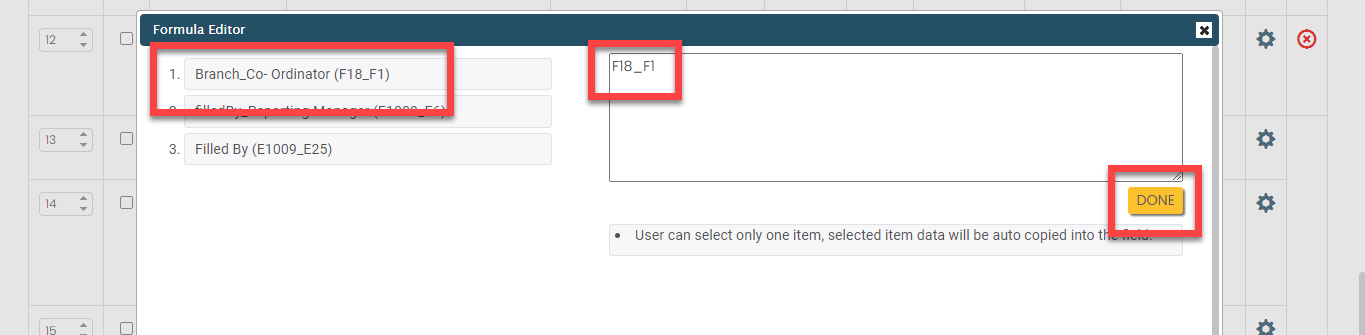
Ticket Source Configure the field as shown below: 
Ticket Status Configure the field as shown below: 
Ticket Category Configure the field as shown below: 
External Ticket ID Configure the field as shown below: 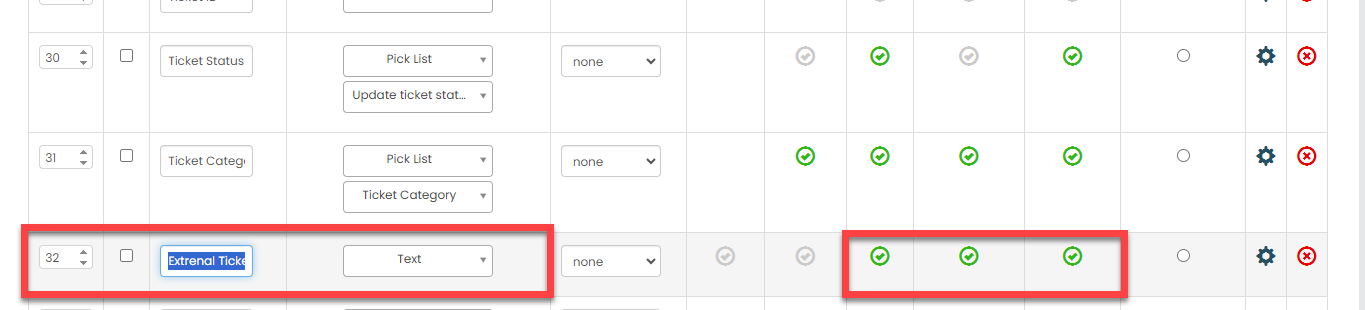
Solution Name Configure the field as shown below: 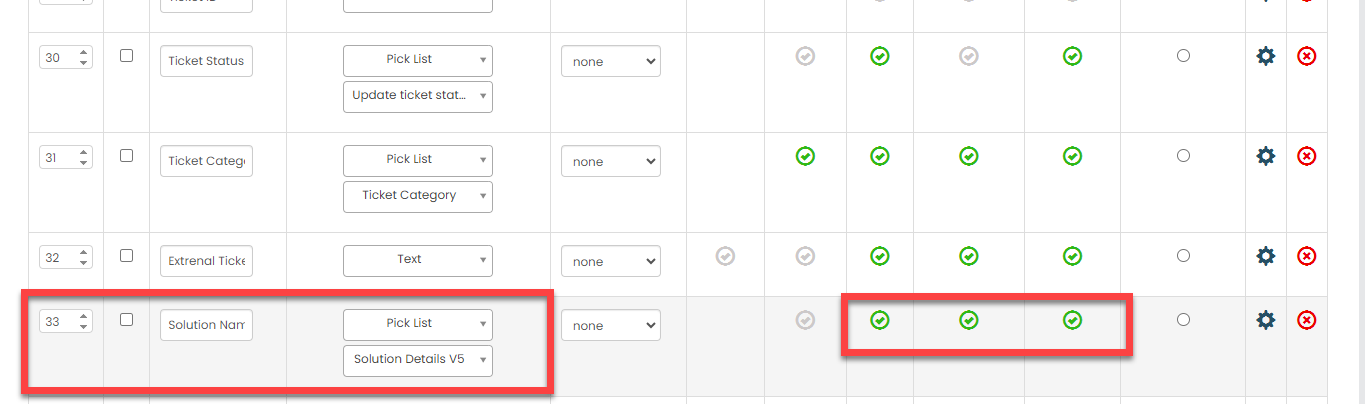
Service Configure the field as shown below: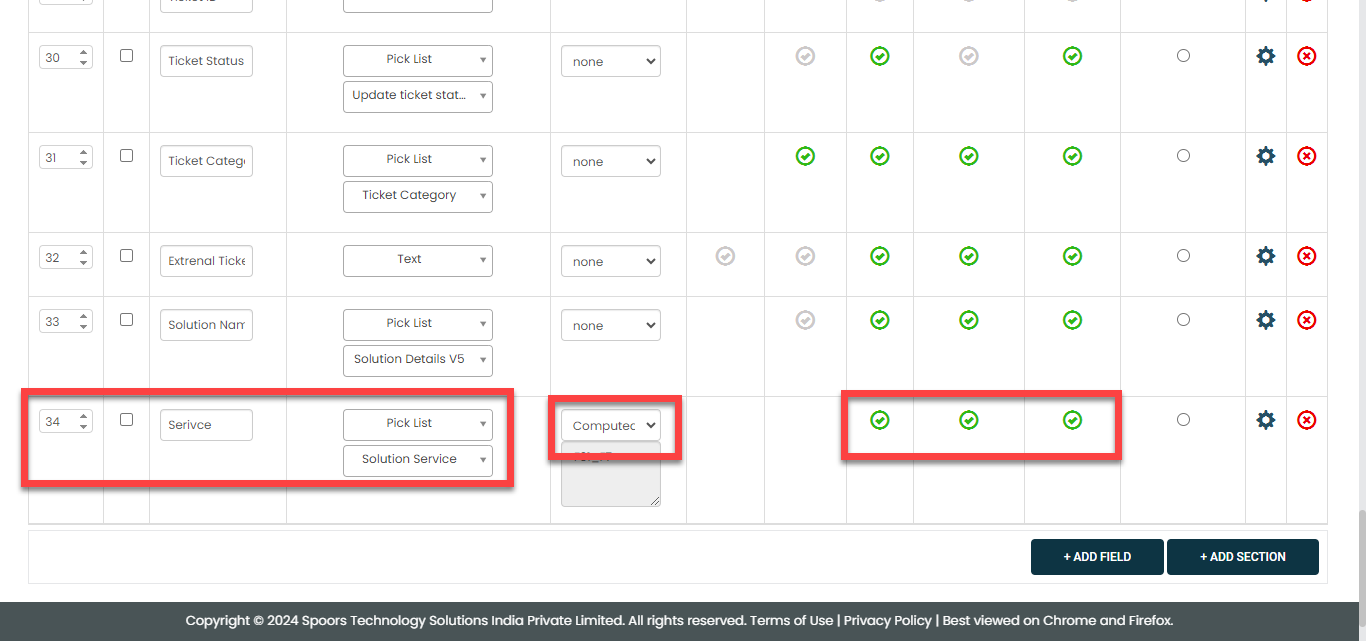 Make this field as Computed. The field configuration is shown below:
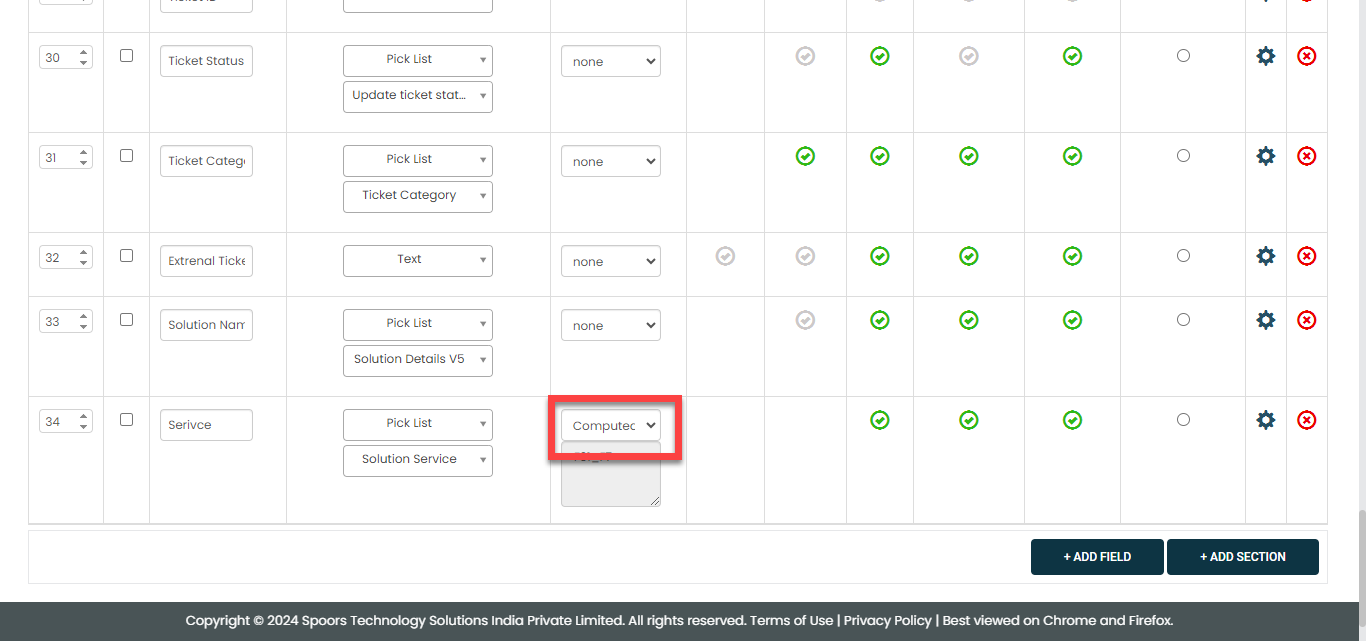 Click on the grey box and configure as shown below to fetch the service name automatically from the Solution Name list:
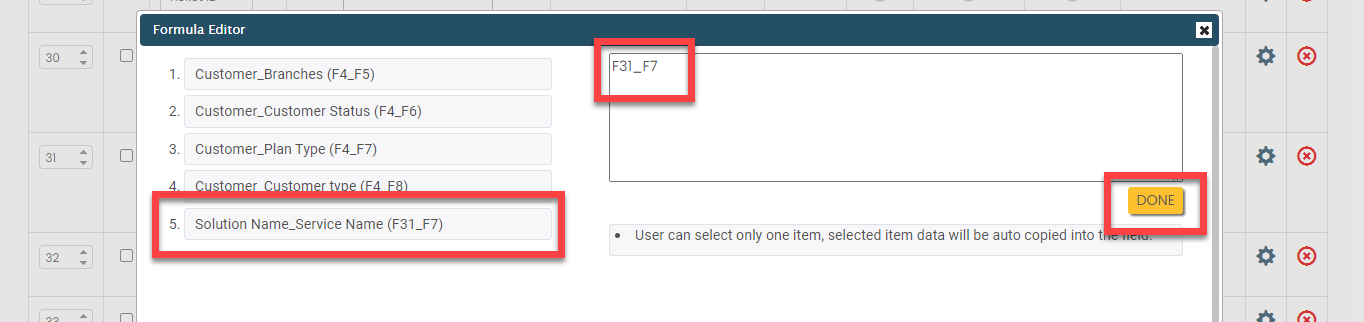
- Once you configure all the fields, click Save.
Configure Work Flow
In this section, we will define the workflow, which outlines the sequence of activities defined earlier. This process includes specifying the start activity, end activity, subsequent activities, and more. To know more about the Flow, refer to the Manage Flow documentation.
Follow the instructions below to configure the flow:
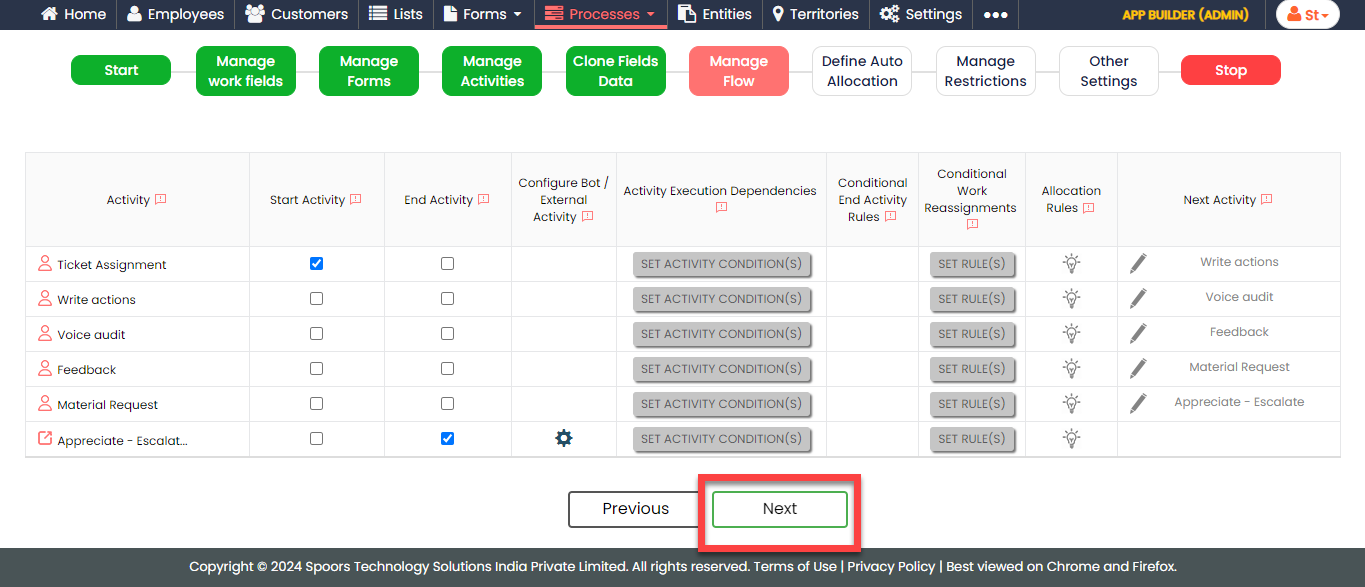
- On the process page, click Manage Flow. Alternatively, go to .
-
For the Ticket Assignment activity, do the
following:
-
Make sure that the Ticket Assignment
activity as Start Activity as shown
below.
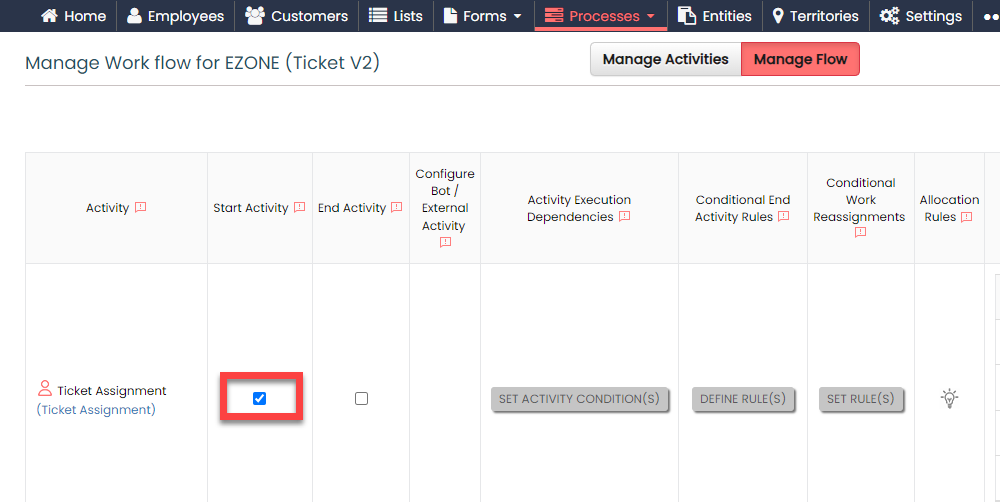
When you make an activity as the start activity, it means that technicians have to do this activity first.
-
Select the following activities and click the right arrow
icon to move them to the Selected
section.
- Ticket Assignment
- Write Actions
- Material Request
- Appreciate - Escalate
The technicians can perform the selected activities once the ticket assignment is completed.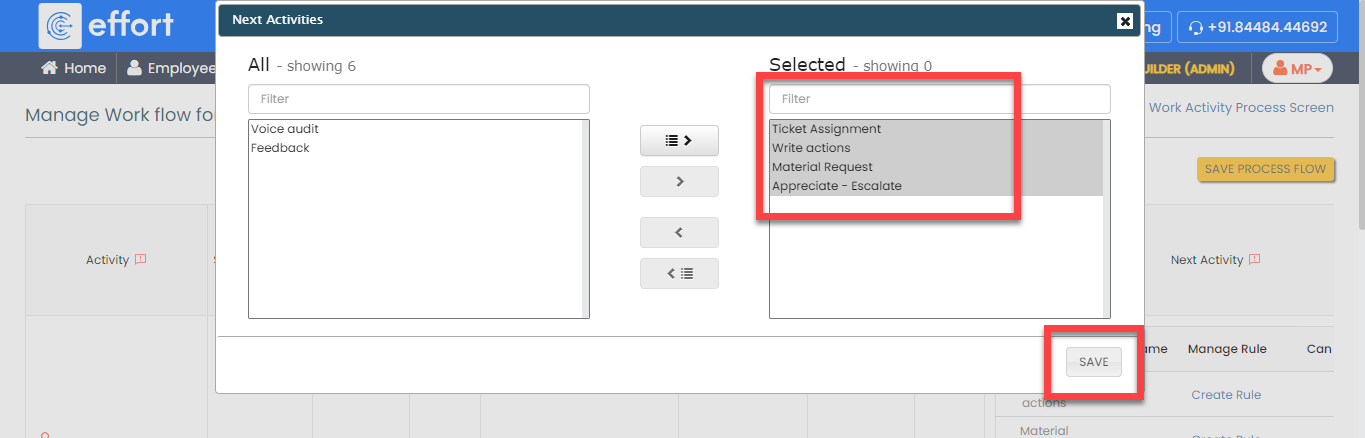
-
Make sure that the Ticket Assignment
activity as Start Activity as shown
below.
-
For the Write actions activity, do the
following:
-
Select the following activities and click the right arrow
icon to move them to the Selected
section.
- Ticket Assignment
- Write Actions
- Voice Audit
- Material Request
- Appreciate - Escalate
The technicians can perform the selected activities once the Write actions is completed.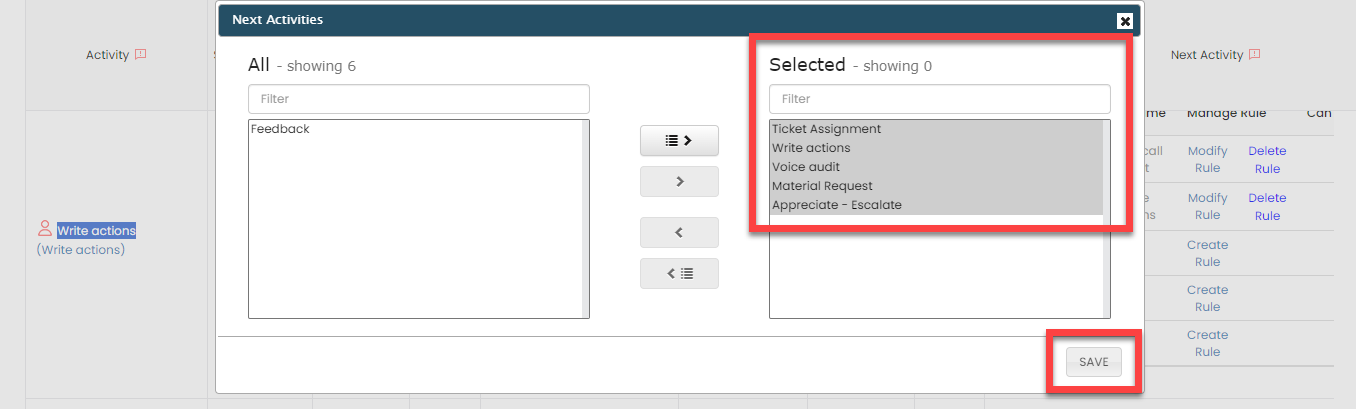
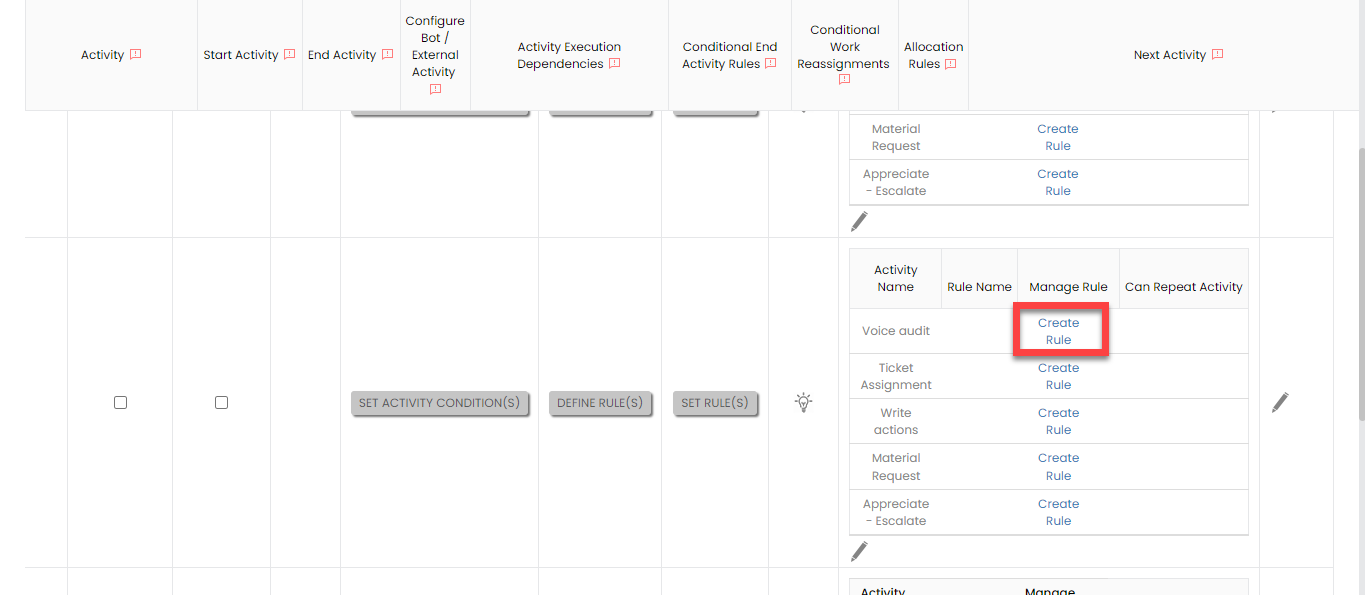
-
Click Create Rule against the
Voice Audit activity to define
the conditions to execute this activity after completing the
Write Actions.
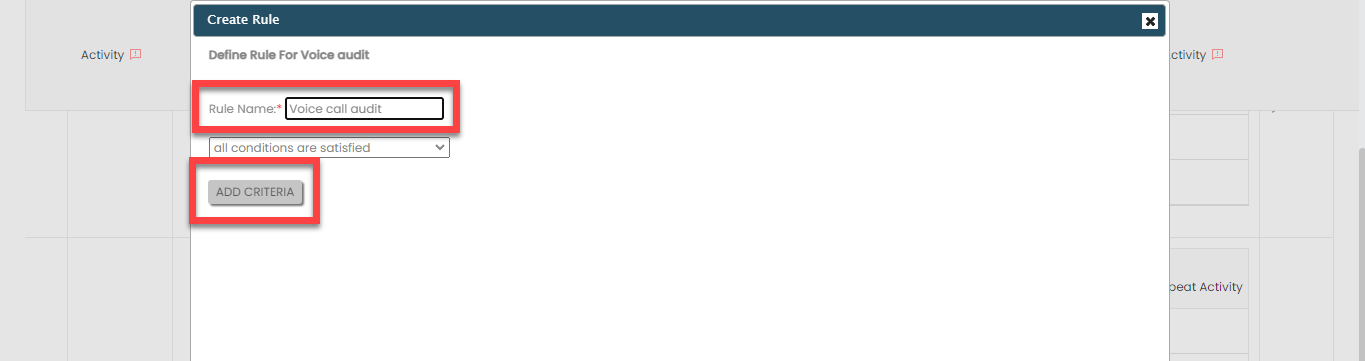
-
Enter the Rule Name as
Voice call audit, and then click
Add Criteria.
-
Define the configuration as shown below, and then click
Save.
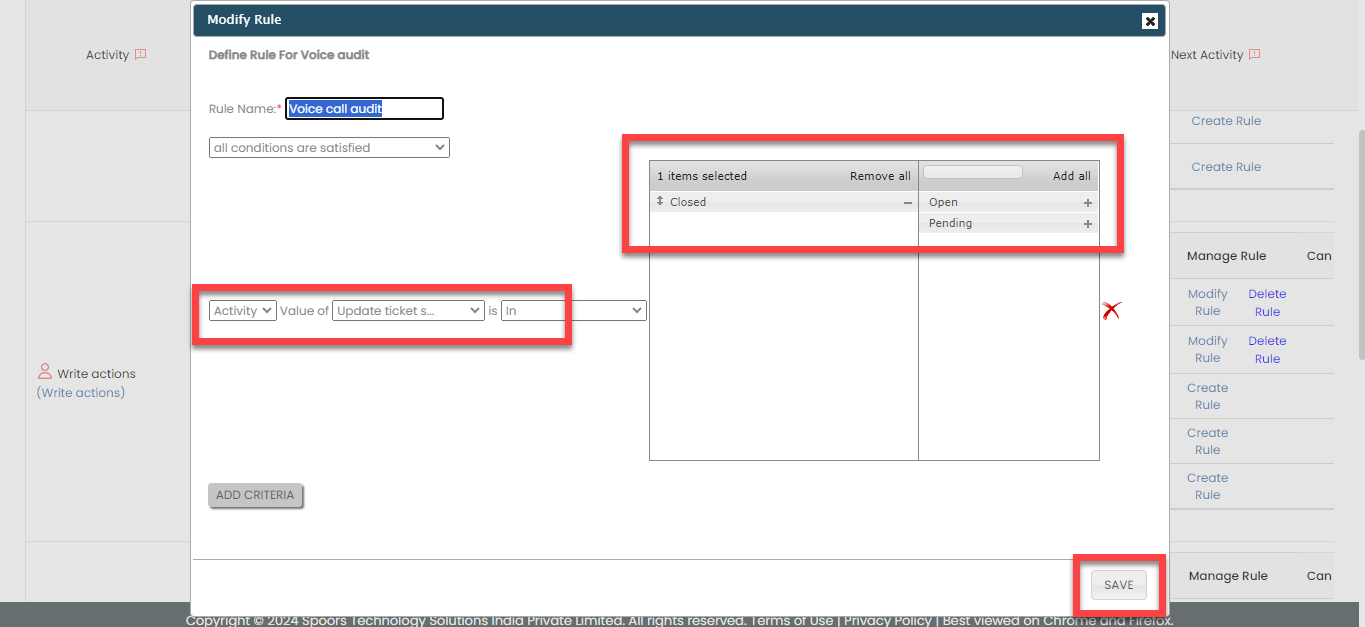
In accordance with this configuration, the Voice Call activity will be initiated upon completion of the Write Actions activity. If the Write Actions activity is not completed, technicians have the option to choose and perform any of the other activities we configured.
-
Select the following activities and click the right arrow
icon to move them to the Selected
section.
-
For the Voice Audit activity, do the
following:
-
Select the following activities and click the right arrow
icon to move them to the Selected
section.
- Ticket Assignment
- Write Actions
- Voice Audit
- Feedback
The technicians can perform the selected activities once the Voice Audit is completed.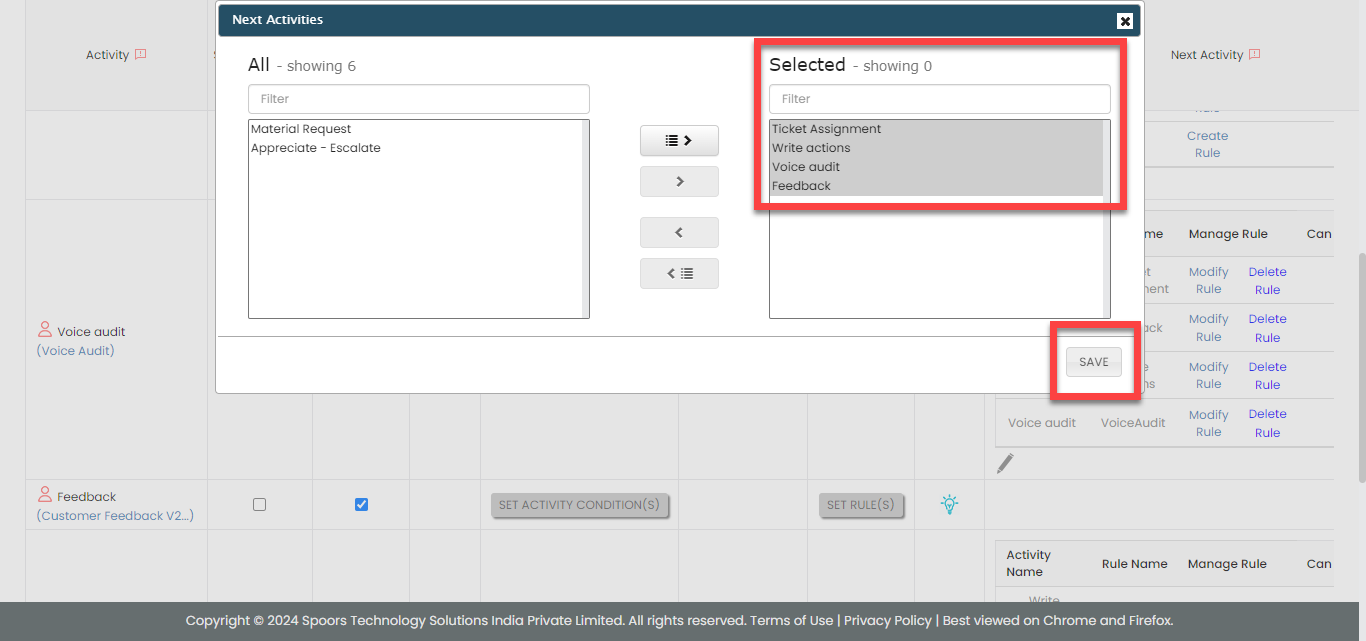
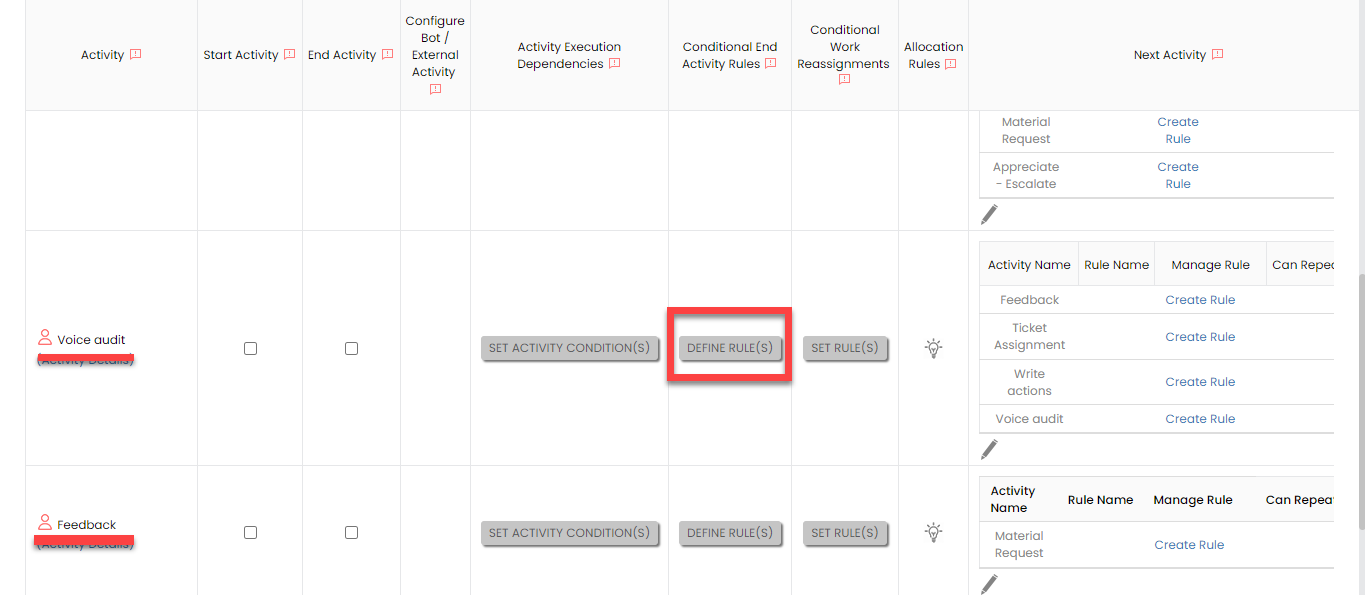
-
Under the Conditional End Activity
Rules column, click Define
Rule(s).
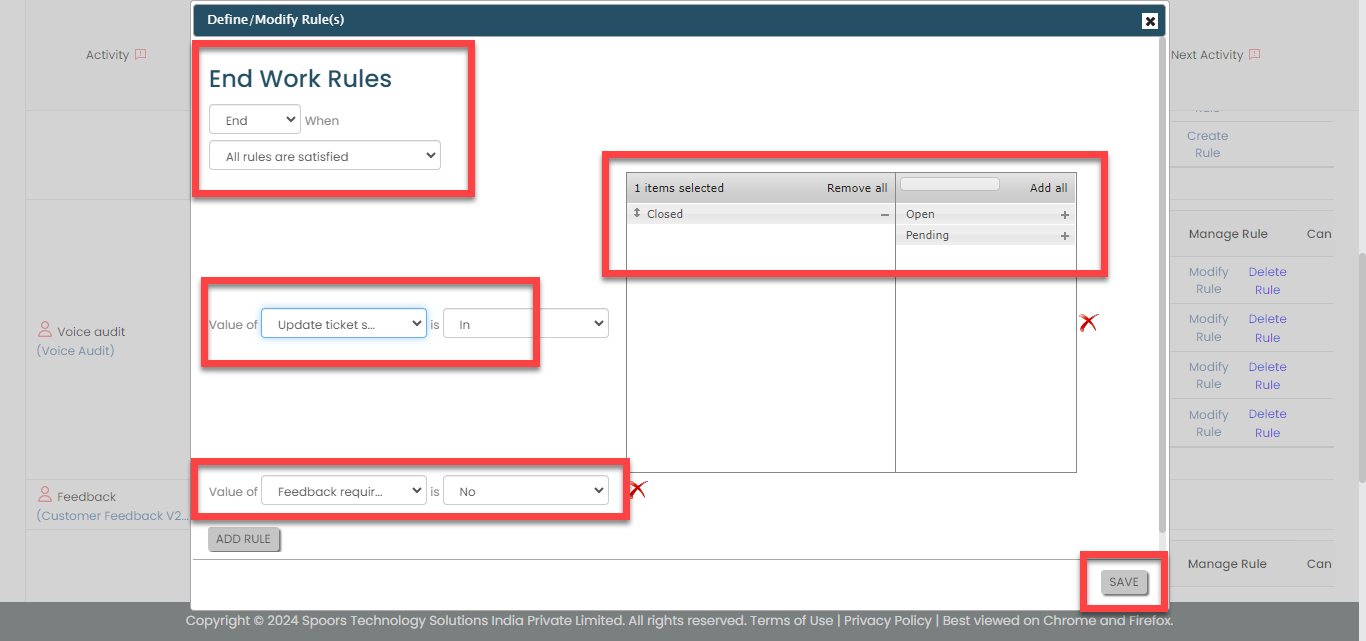
-
Define the configuration as shown below, and then click
Save.
-
Select the following activities and click the right arrow
icon to move them to the Selected
section.
-
For the Feedback activity, do the
following:
-
Under the End Activity column,
enable the checkbox.
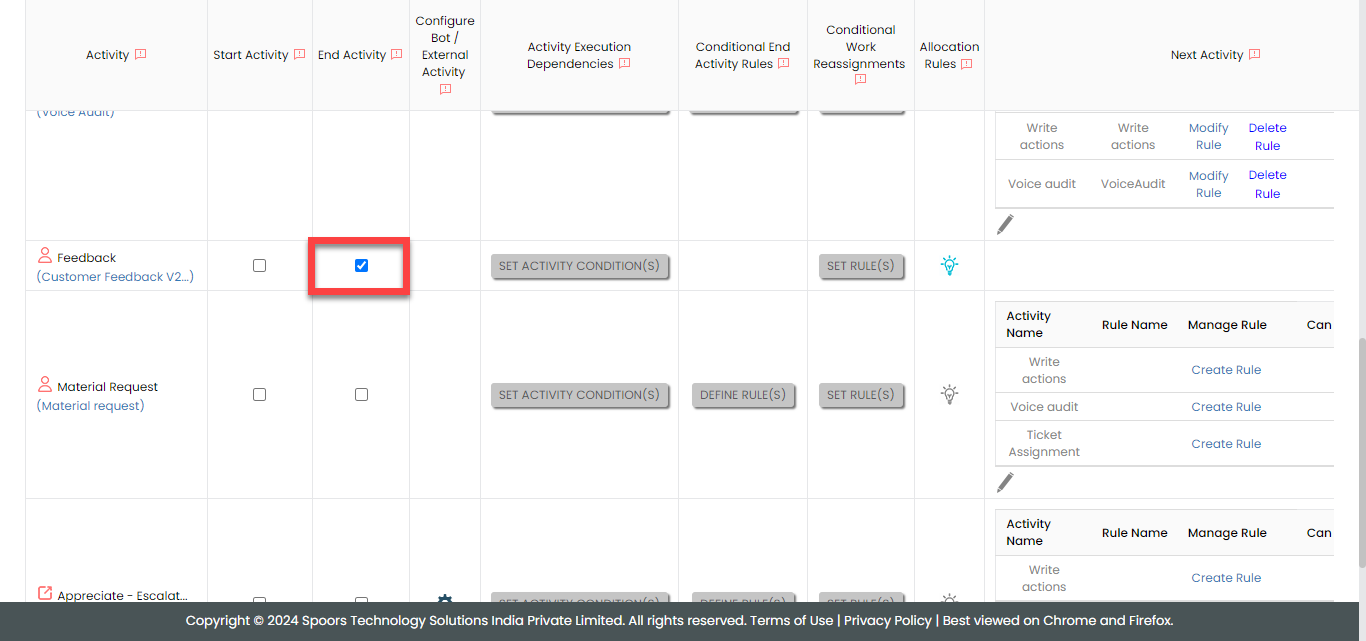
According to this configuration, the process will be marked as completed after technicians have performed this activity.
-
Under the Allocation Rules column,
click the bulb icon.

-
Define the configuration as shown below, and then click
Save.
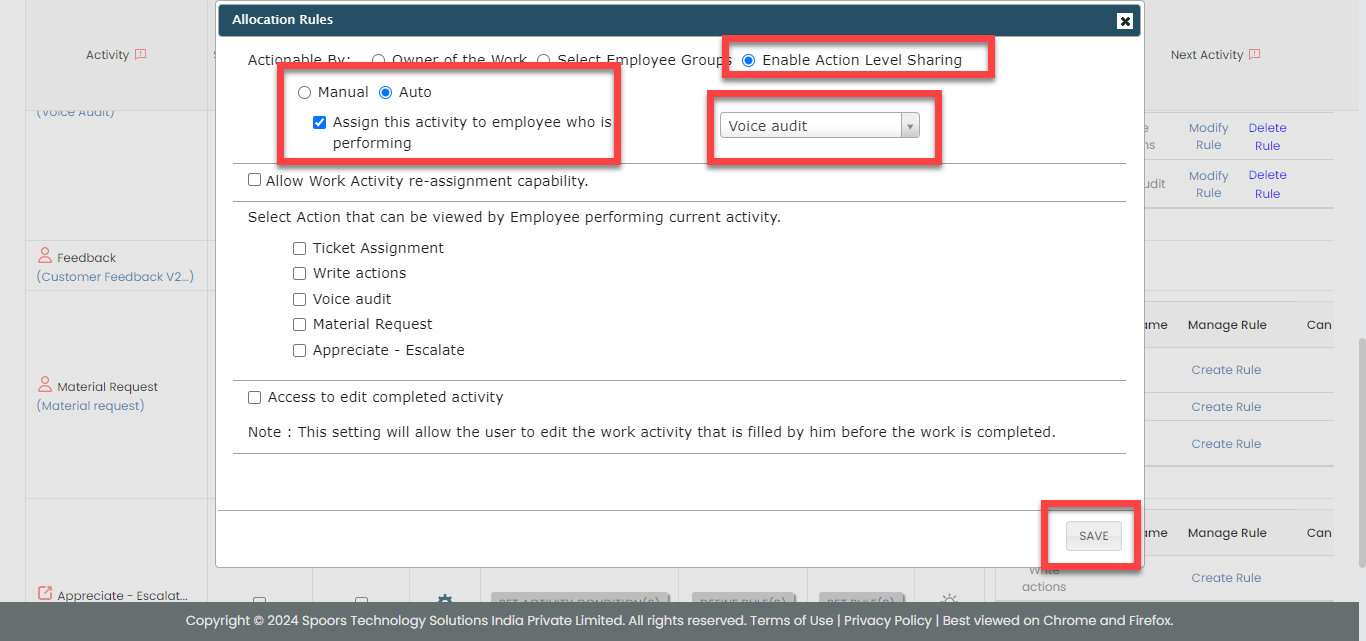
According to this configuration, this activity will be assigned to the technicians who perform the Voice Audit activity.
-
Under the End Activity column,
enable the checkbox.
-
For the Material Request activity, do the
following:
-
Select the following activities and click the right arrow
icon to move them to the Selected
section.
- Ticket Assignment
- Write Actions
- Voice Audit
The technicians can perform the selected activities once the Material Request is completed.
-
Select the following activities and click the right arrow
icon to move them to the Selected
section.
-
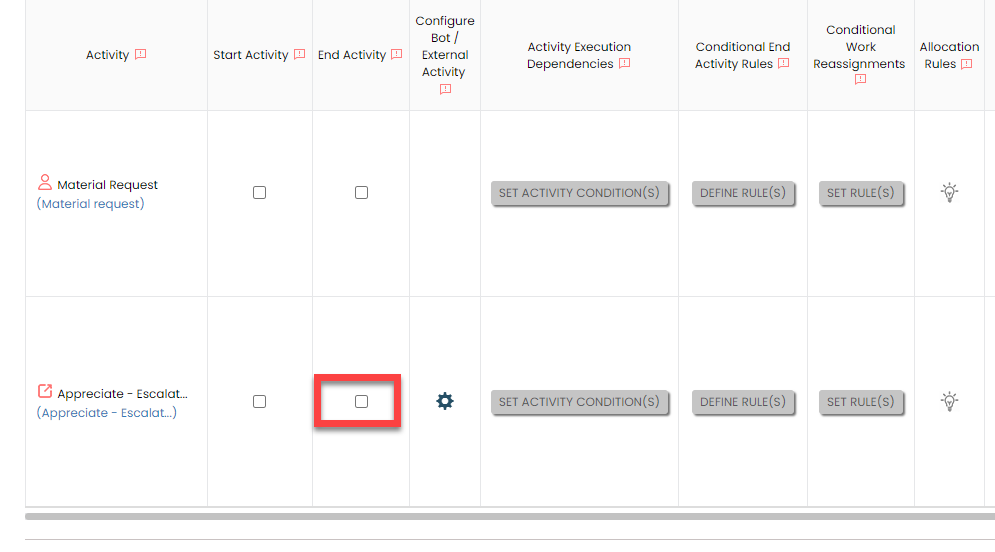
For the Appreciate - Escalate activity, do
the following:
-
Under the End Activity column,
disable the checkbox.
-
Select the following activities and click the right arrow
icon to move them to the Selected
section.
- Ticket Assignment
- Write Actions
- Voice Audit
The technicians can perform the selected activities once the Appreciate - Escalate is completed.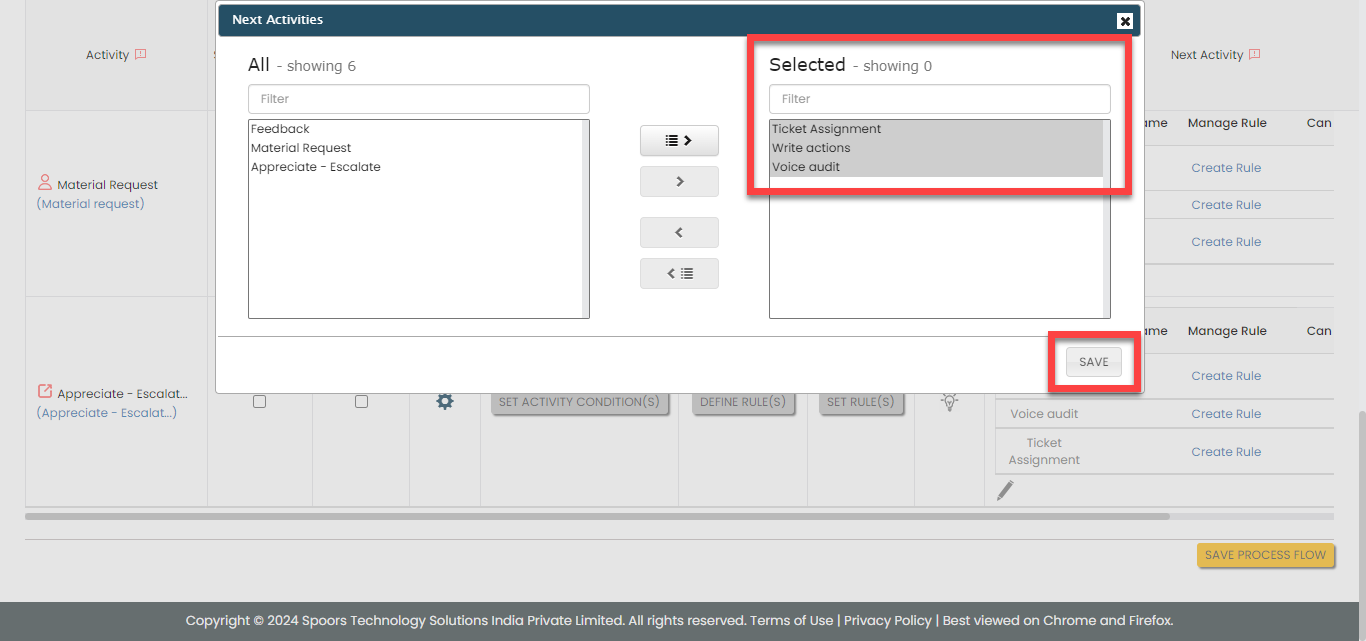
-
Under the End Activity column,
disable the checkbox.
- Click Save Process Flow.
Configure Work Settings
In this section, we will enable a key workflow setting that helps us assign the ticket to the respective branch coordinator. When this feature is enabled, any newly created work will be automatically assigned to the corresponding branch coordinator. To learn more about all the workflow settings, refer to the Work Settings documentation.
Follow the instructions below to configure flow:
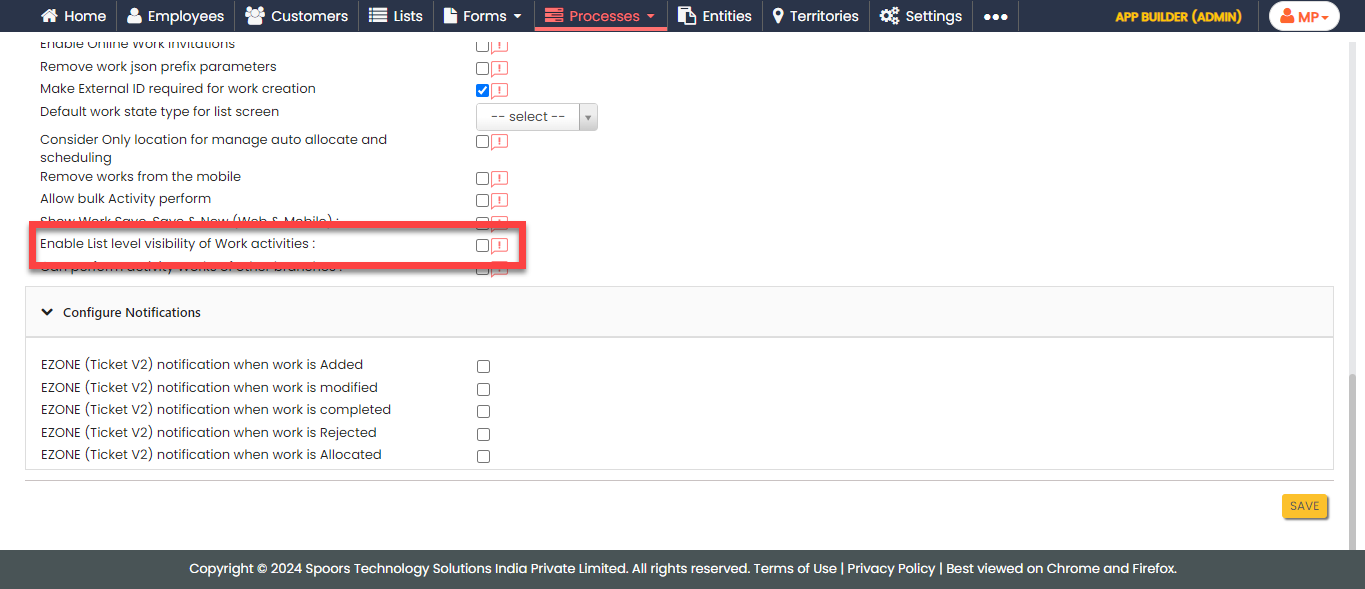
- On the process page, click Settings. Alternatively, go to .
-
Scroll down to the bottom of the page and enable the
Enable List level visibility of Work
activities box.
-
Select the branch list for both the dropdowns.

- Click Save.
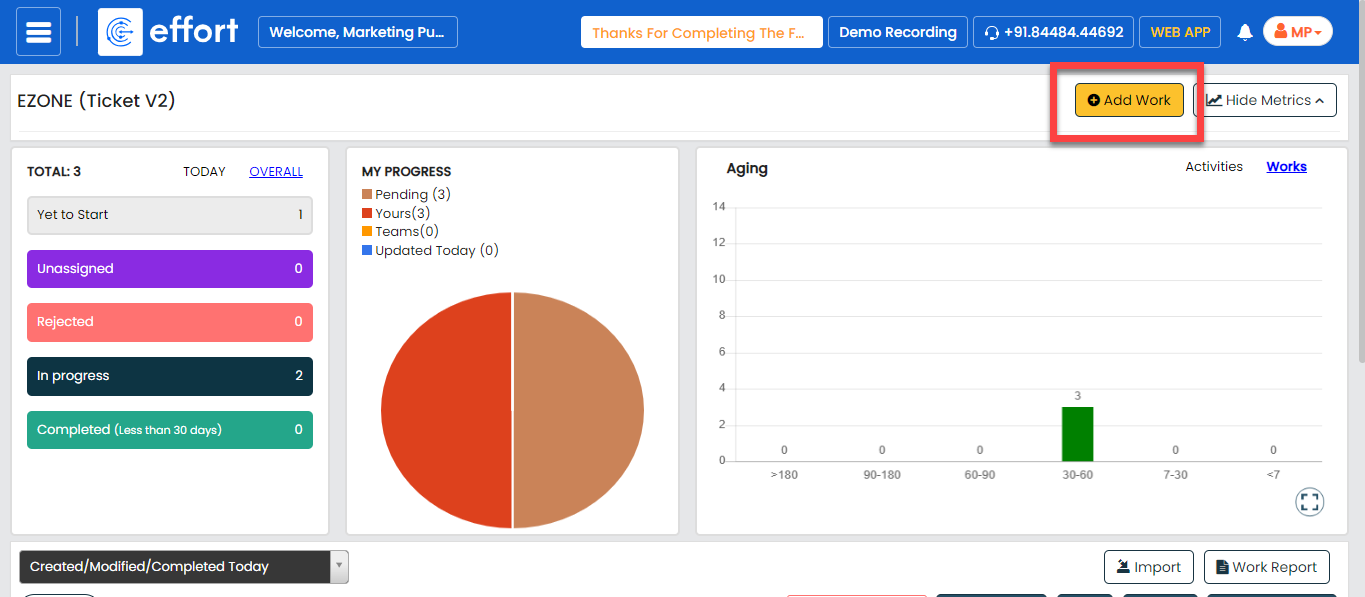
Execute EZone Process
In this section, we will show you how to execute the EZone Process in the Effort Platform. It provides the activities performed by the admins and technicians, such as creating works, logging into the effort, executing activities in the mobile app, and so on. Let's get started.
Create EZone Process
Central Coordinators create EZone tickets in the Effort platform. Follow the steps outlined below to create a work.
-
Go to .
-
Under the Basic Details section, fill in the
required fields.

-
Under the Assign A Work section, you can see the
ticket has already been assigned to the respective branch
coordinator.
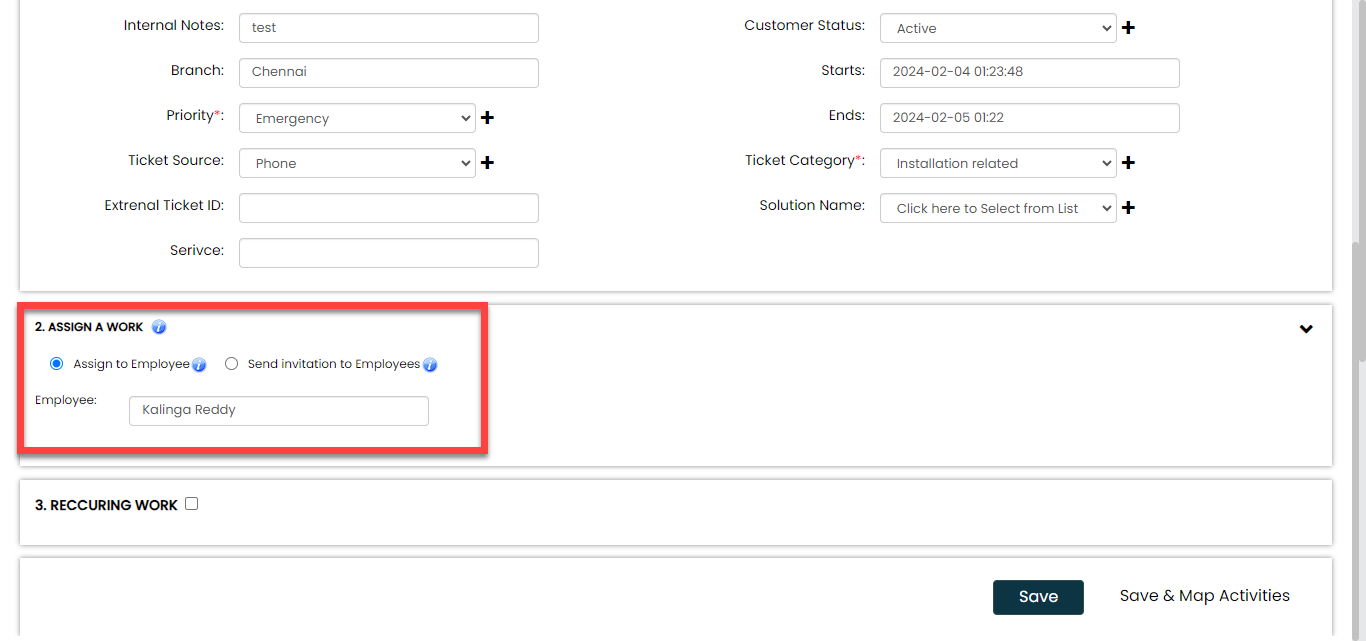
- Click Save.
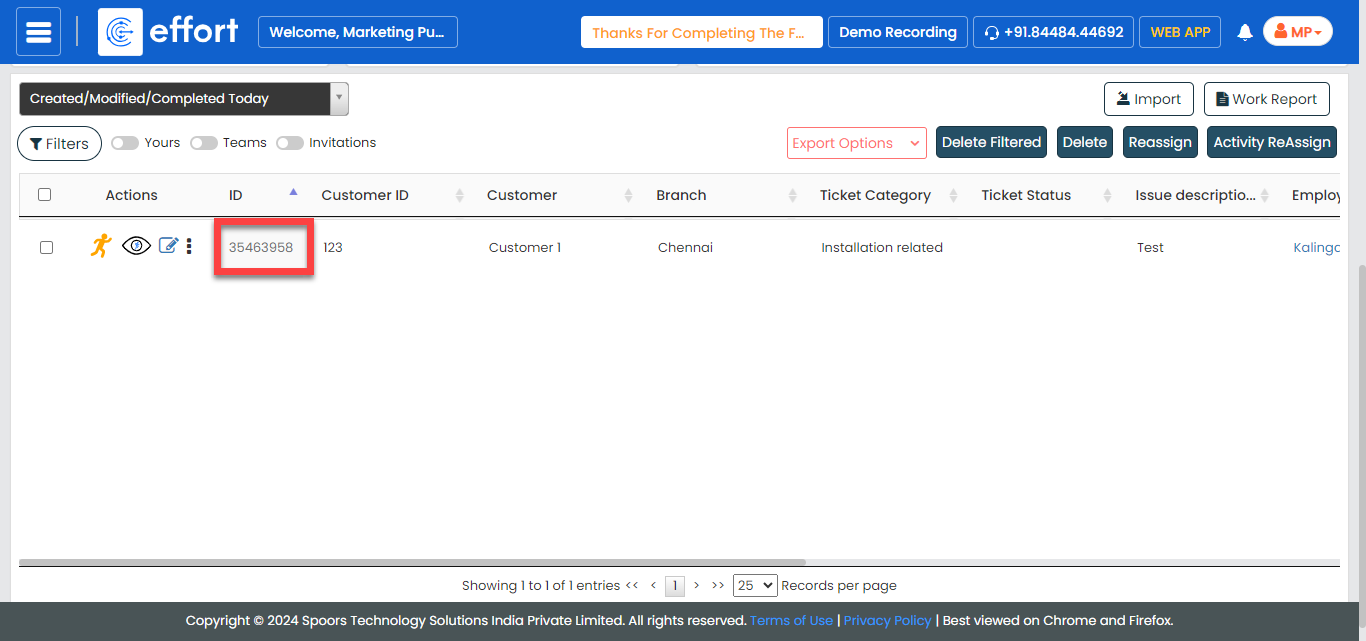
Assign Tickets to Technicians
Once the ticket is created, it will be assigned to the respective branch coordinator. The branch coordinator will review the details and then assign it to a technician. To complete the ticket assignment, follow the steps below.
- Go to .
-
Scroll down a bit to the works section, click the work ID against the
ticket you want to assign.
-
On the ticket details page, click Perform Ticket
Assignment.
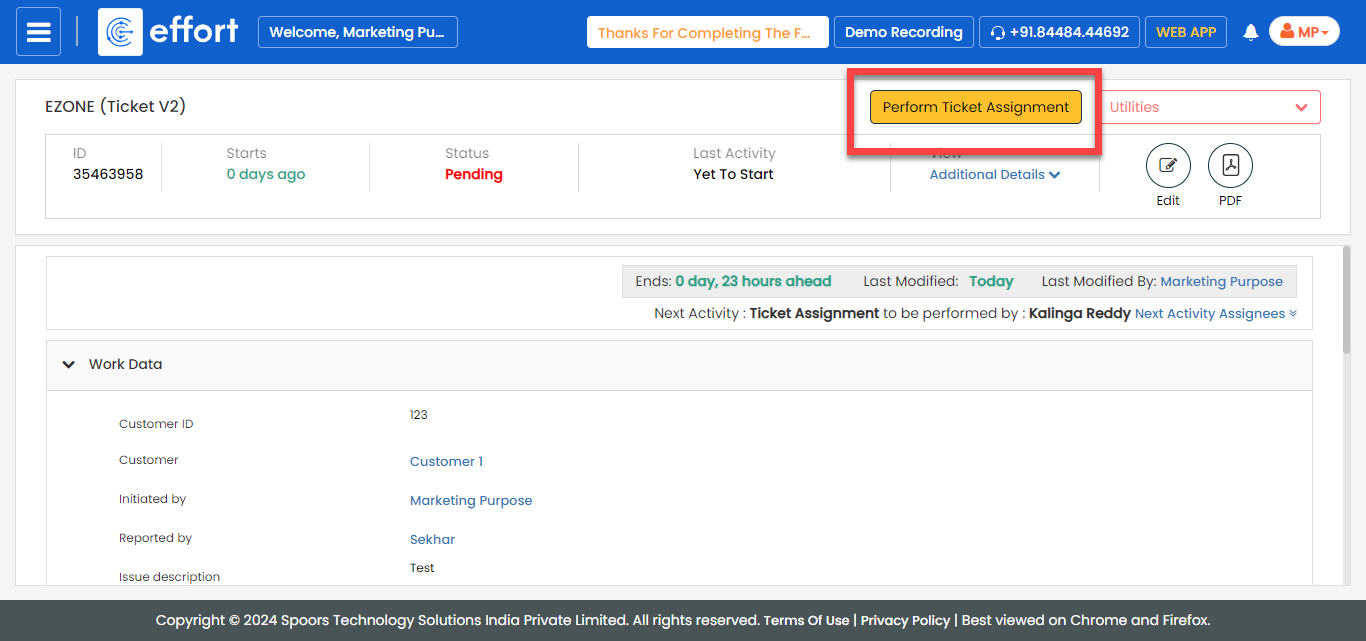
-
Fill in the Ticket Assignment form.
- Click Save.
Login to Effort NXT Mobile App
To begin with the EZone Process, we require an application through which we can log in, check the works assigned, and perform tasks. This section provides instructions to get started with the Effort NXT mobile app.
-
On your mobile phone, open either the Play Store or App Store and
install the Effort NXT app.
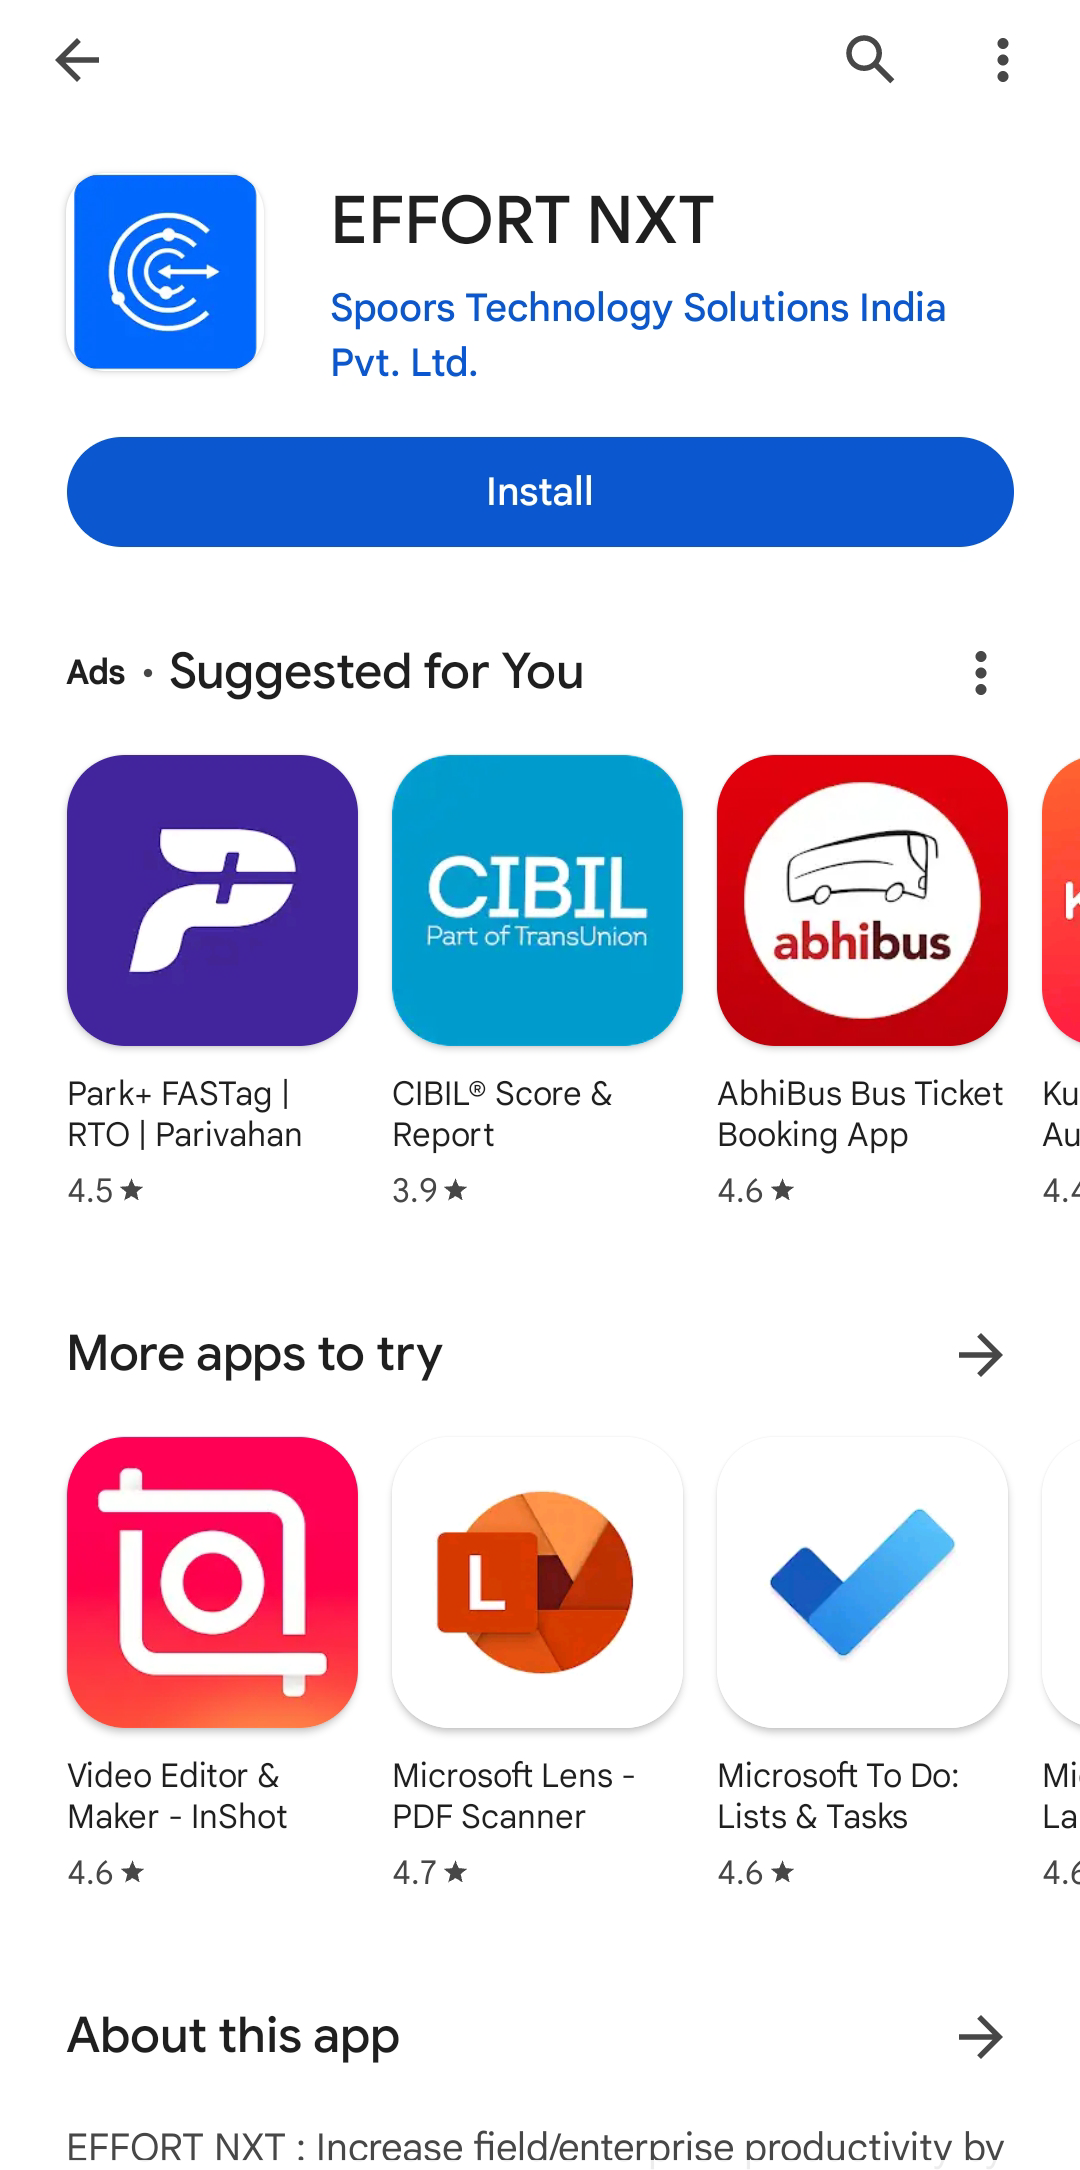
Note: To know more about how to install the app, refer to Install EFFORT NXT App. -
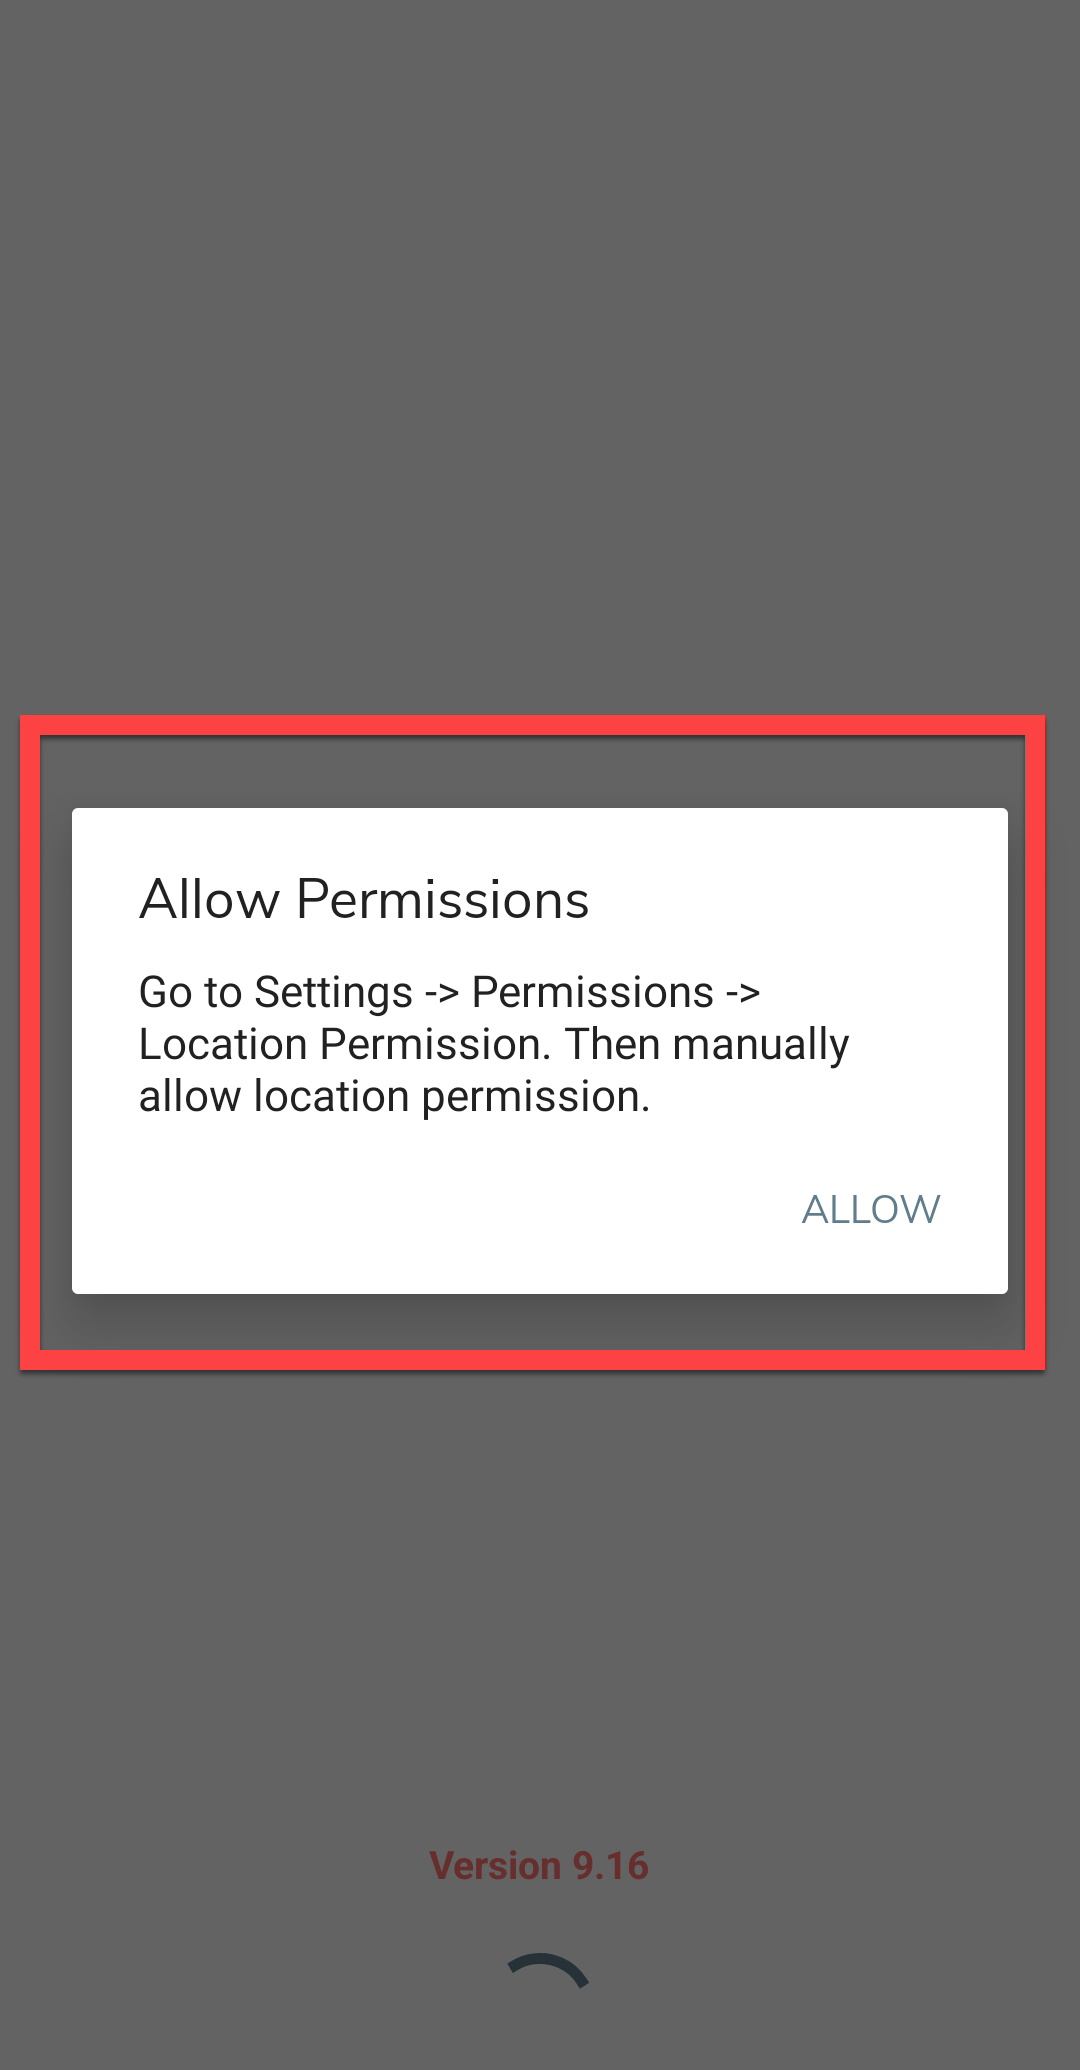
Once the download is completed, open the app and grant all the required
permissions.
-
Login to the Effort app using your registered mobile number.

Note: To register using your registered mobile number, refer to Log in to Mobile App Using Phone.Note: To register using your email and password, refer to Log in to Mobile App Using Email -
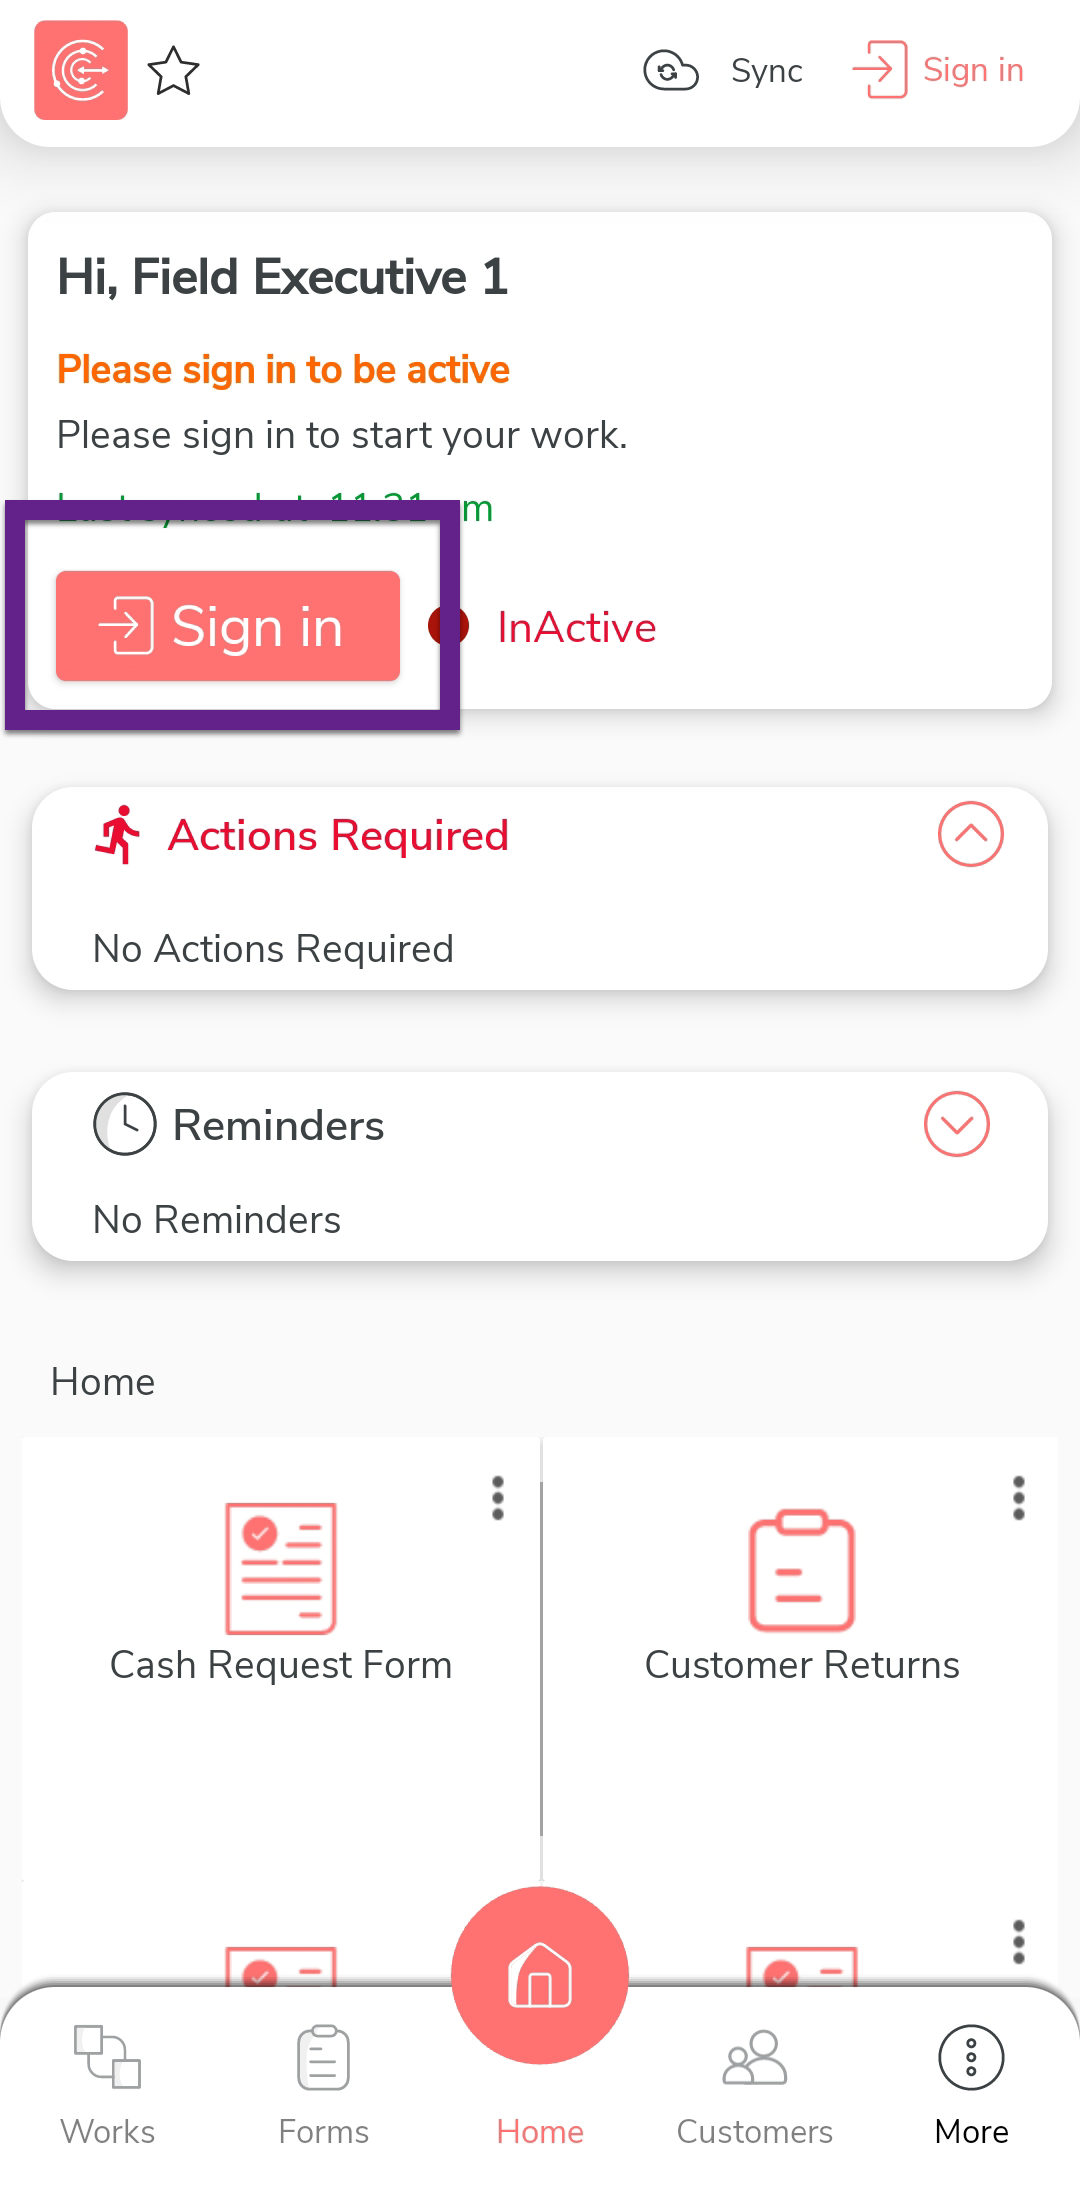
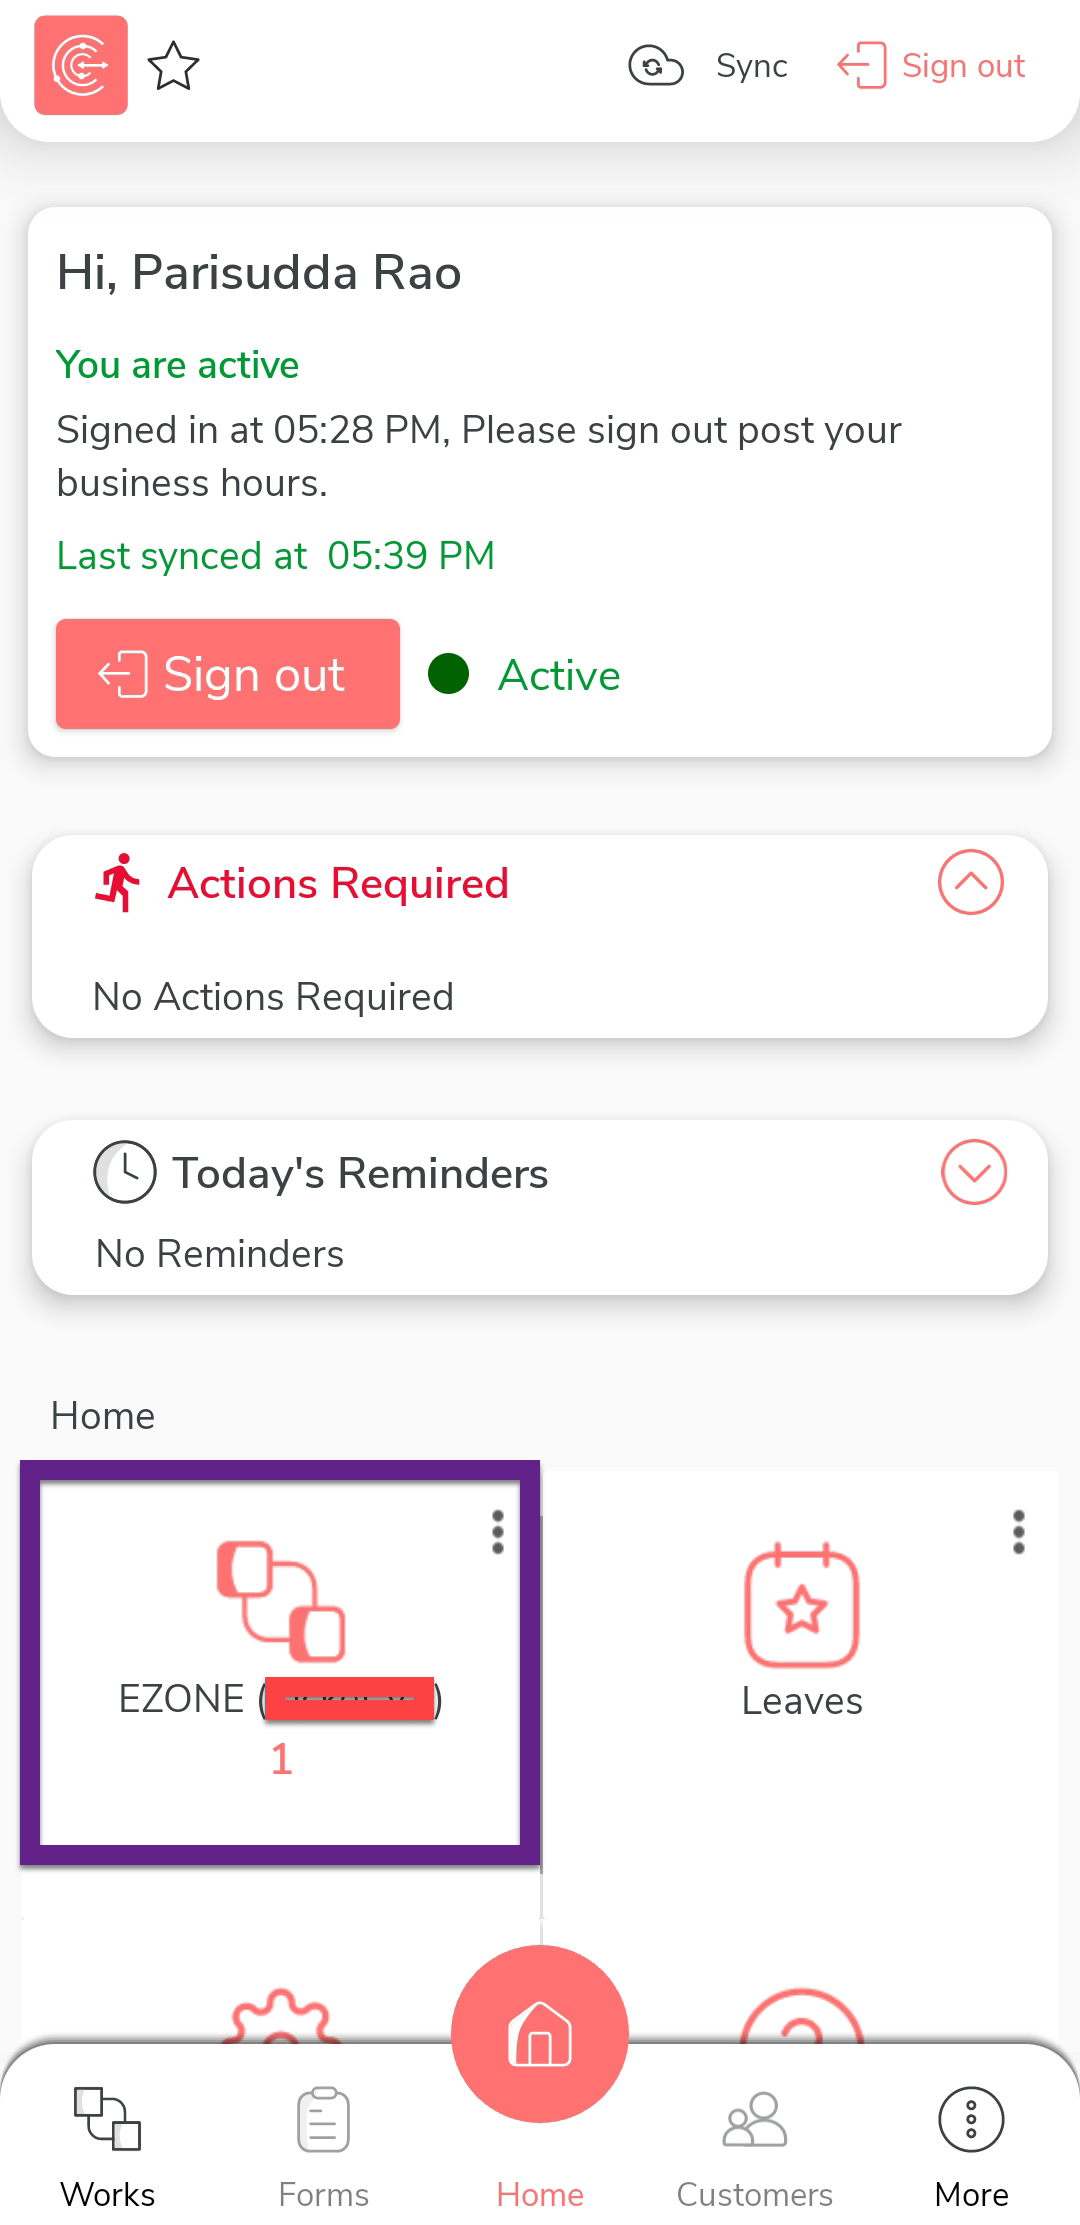
After you log in to the mobile app, tap Sign in
to mark that you have started working.
-
The mobile captures your face and your current location. On this
screen, ensure your face and location are captured correctly, and then
tap Sign In.

-
Once you complete Sign In, tap
Sync to sync the data with the server.

Note: Make sure to Sync the mobile app every time you perform an activity to ensure that your data is updated on the server. If you fail to sync, your changes or work will not be captured in the server.
Complete EZone Work in the Mobile App
In this section, we will explore how a technician completes an EZone task using the Effort mobile app.
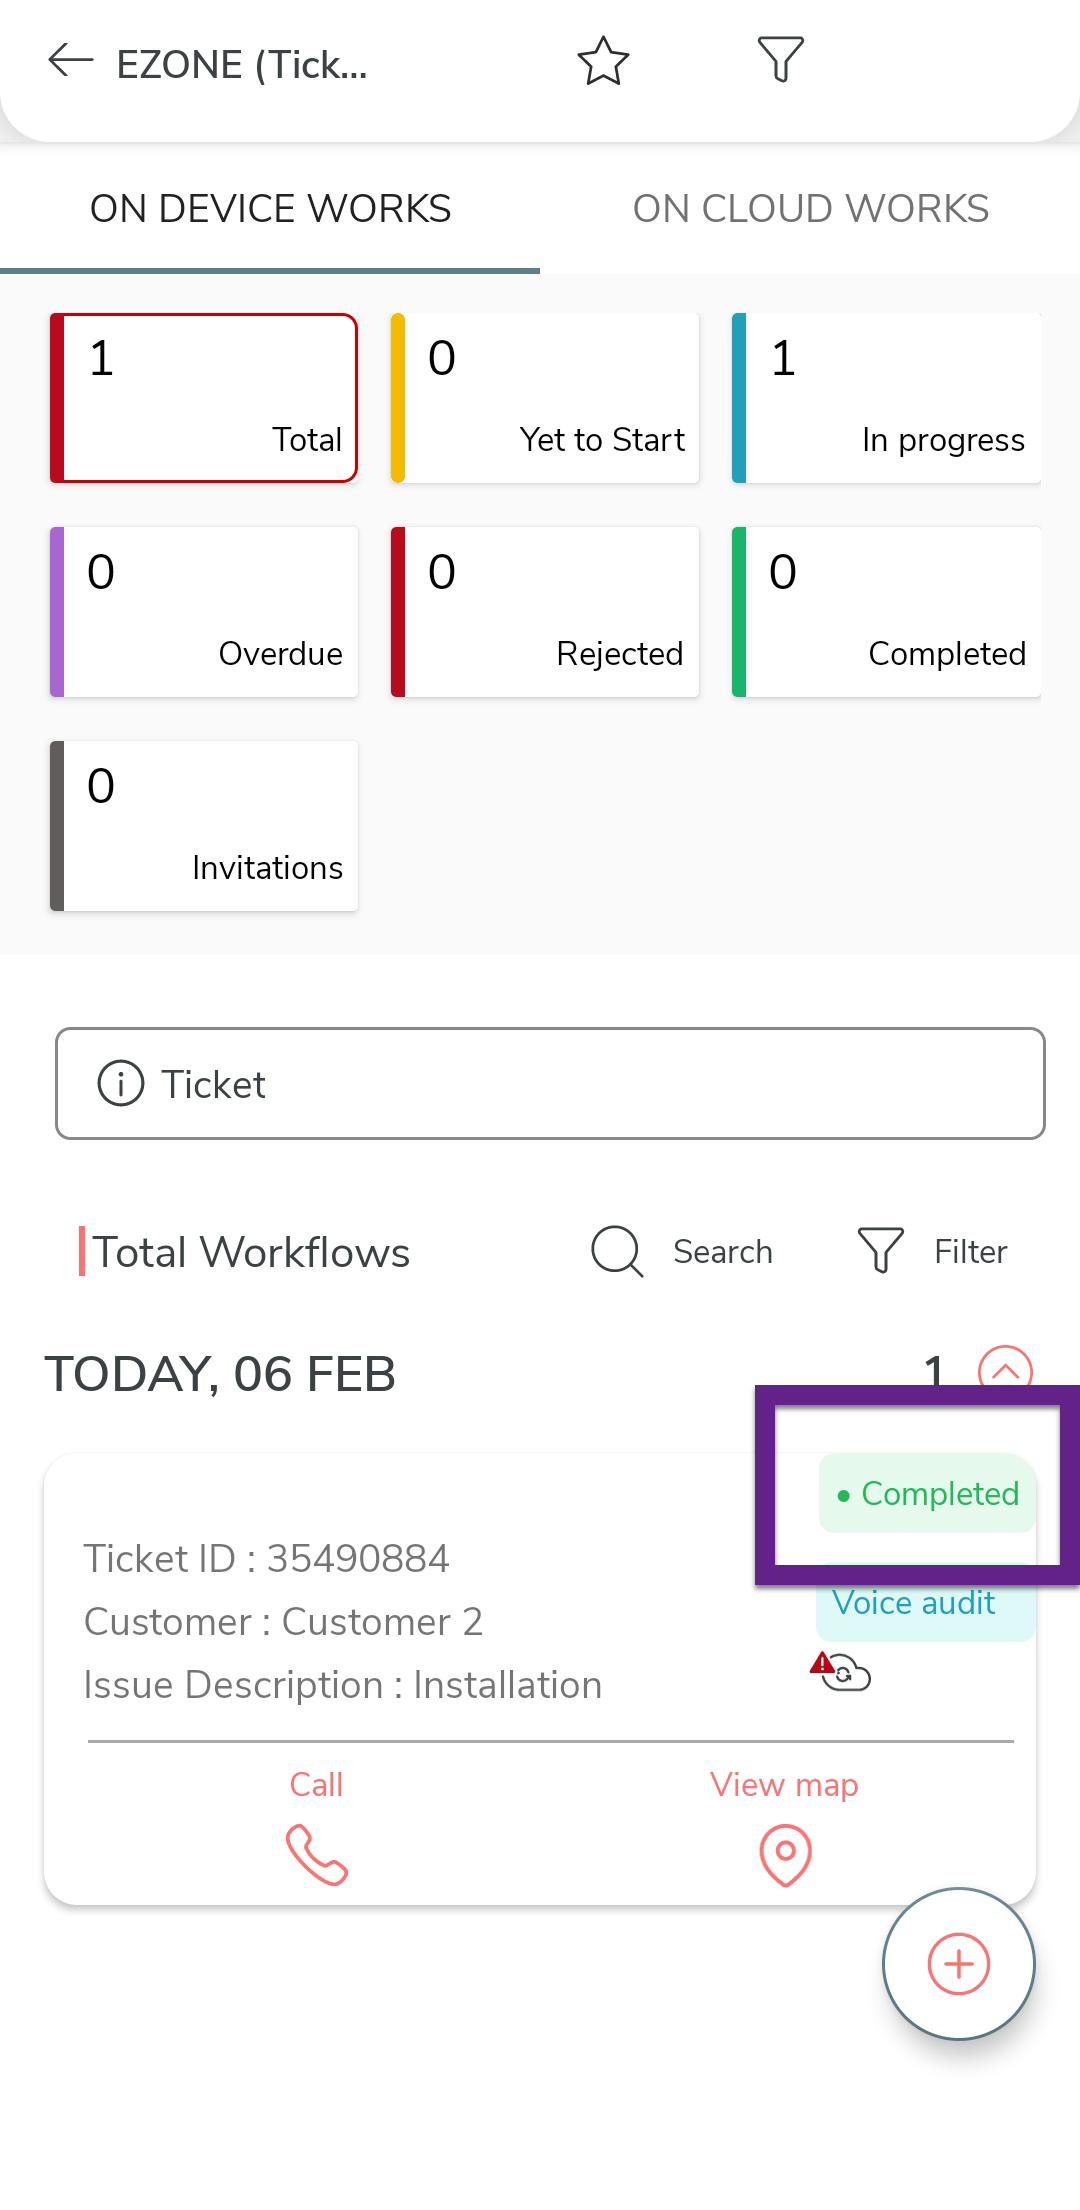
-
On the effort mobile app home screen, tap the
EZone card.
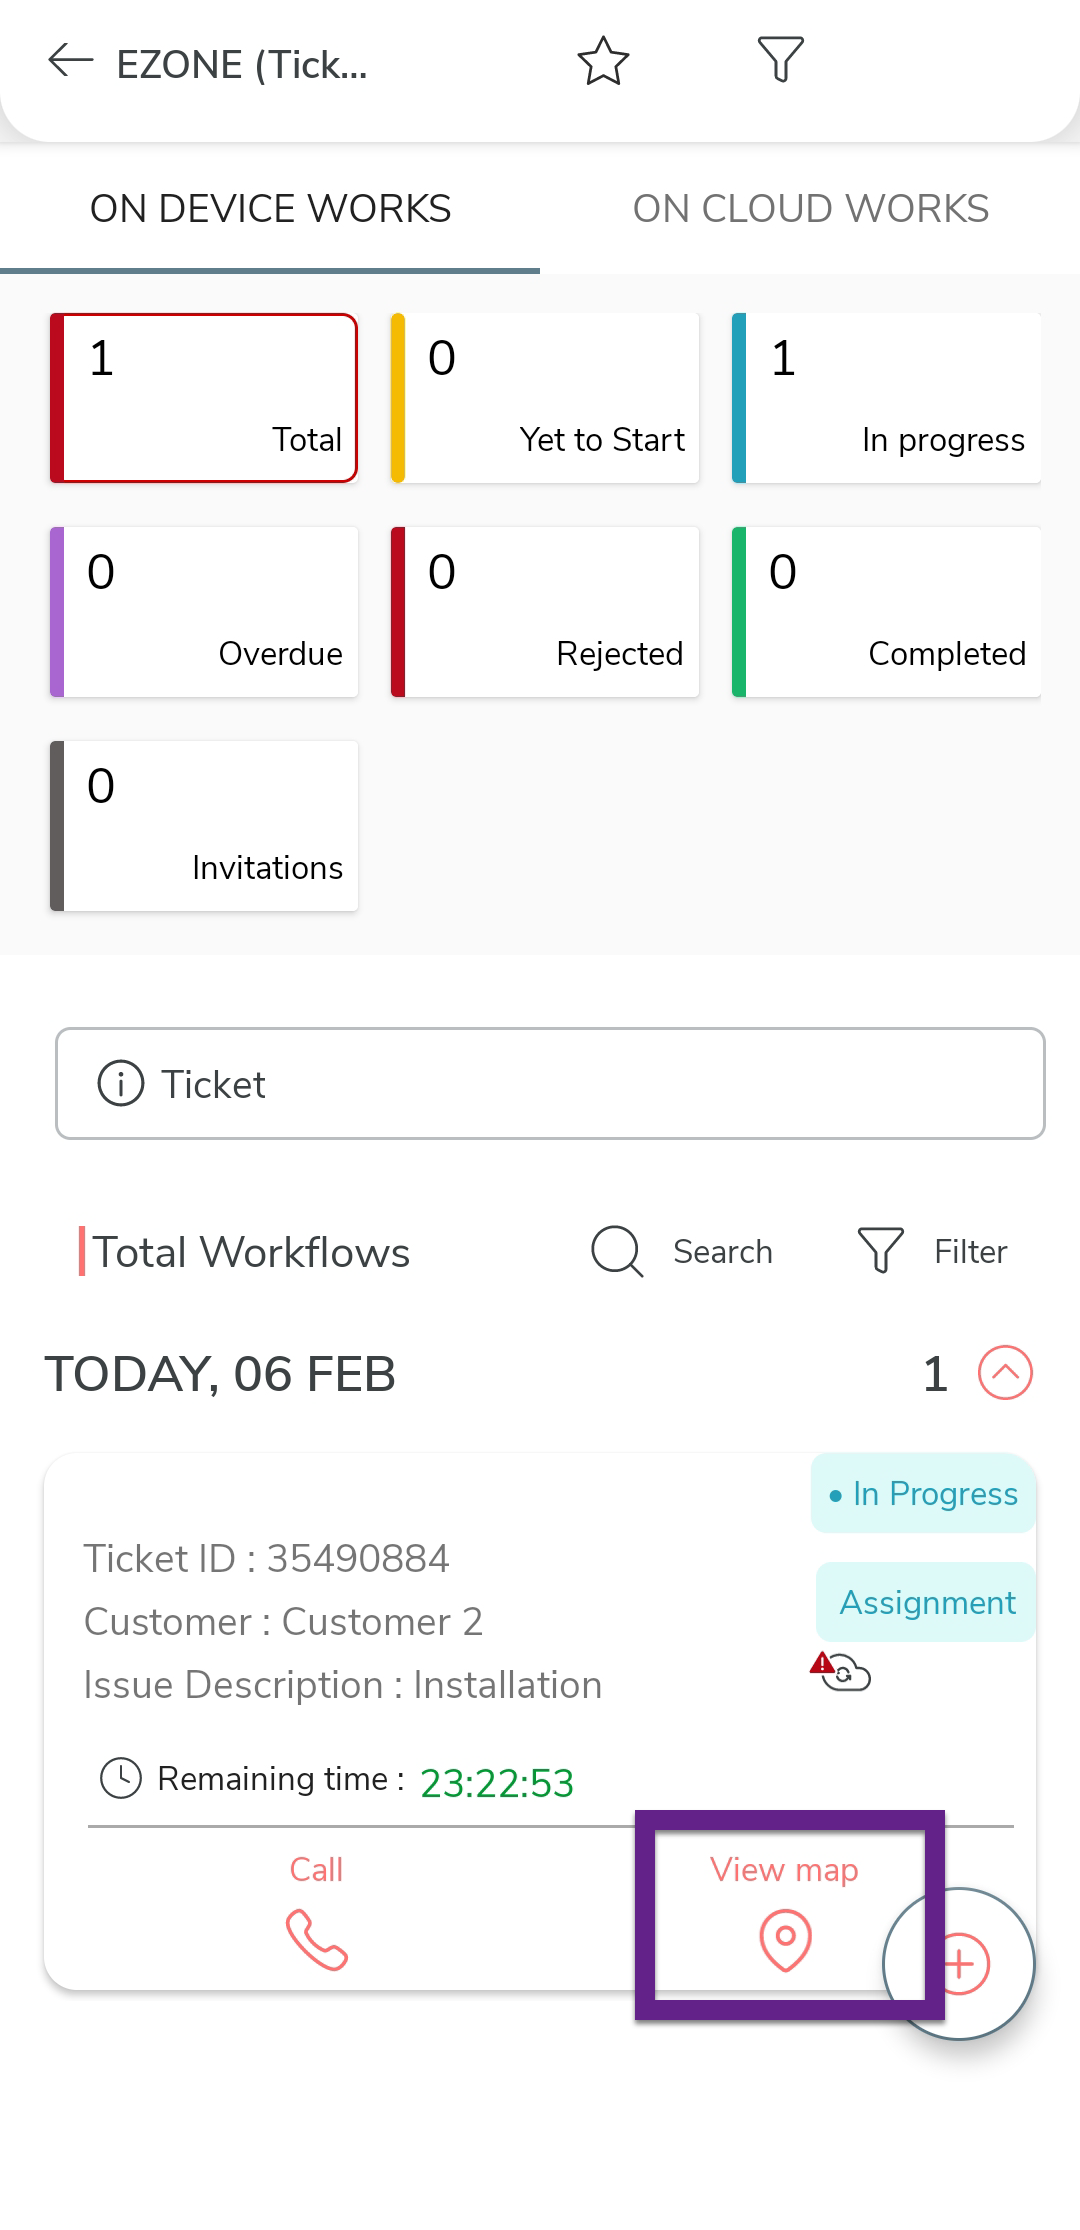
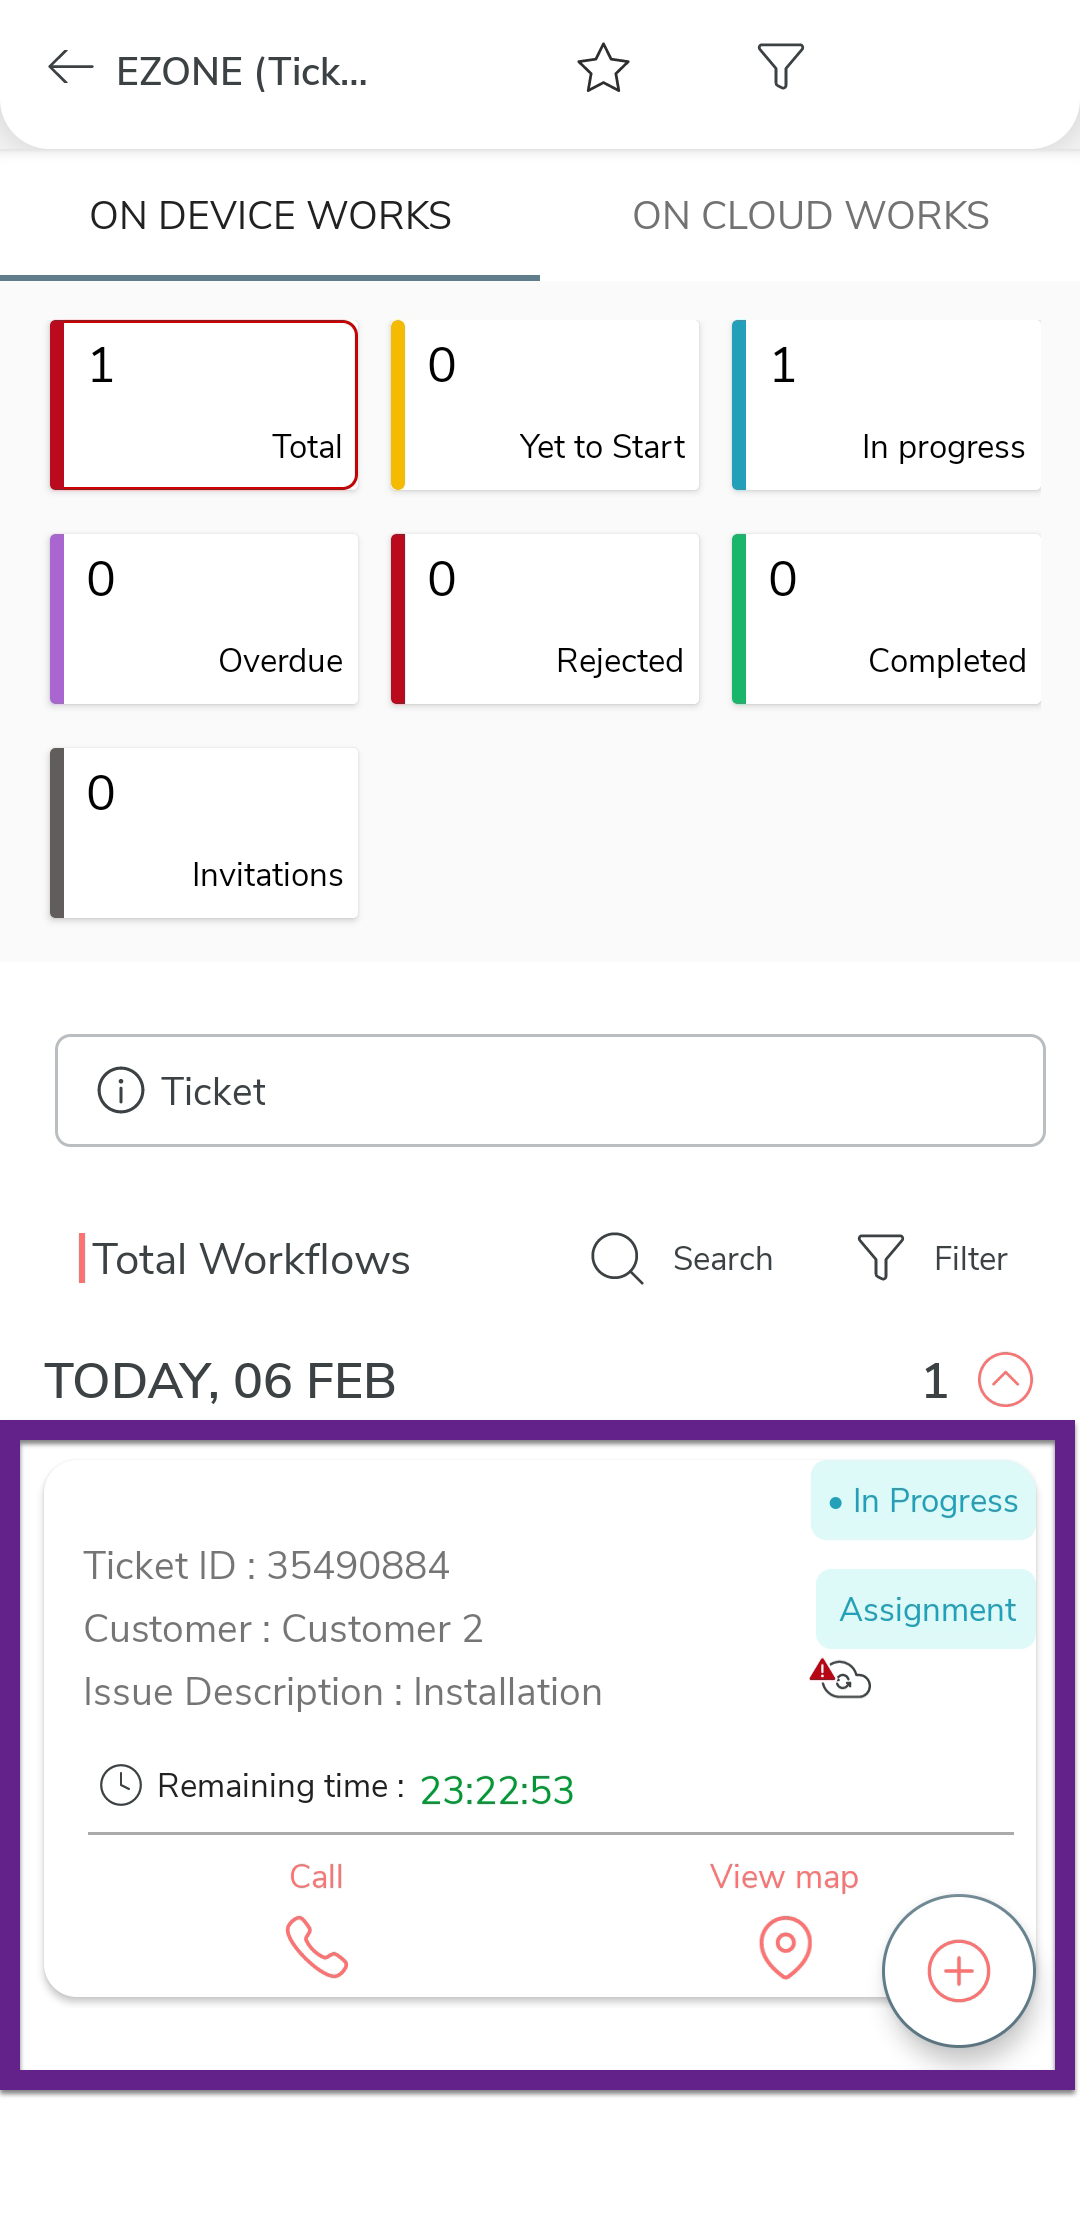
-
Tap on the view map icon to view the customer's location.
-
Use the navigation buttons to reach the customer.

-
Once you reach the customer location, tap on the work you want to
start.
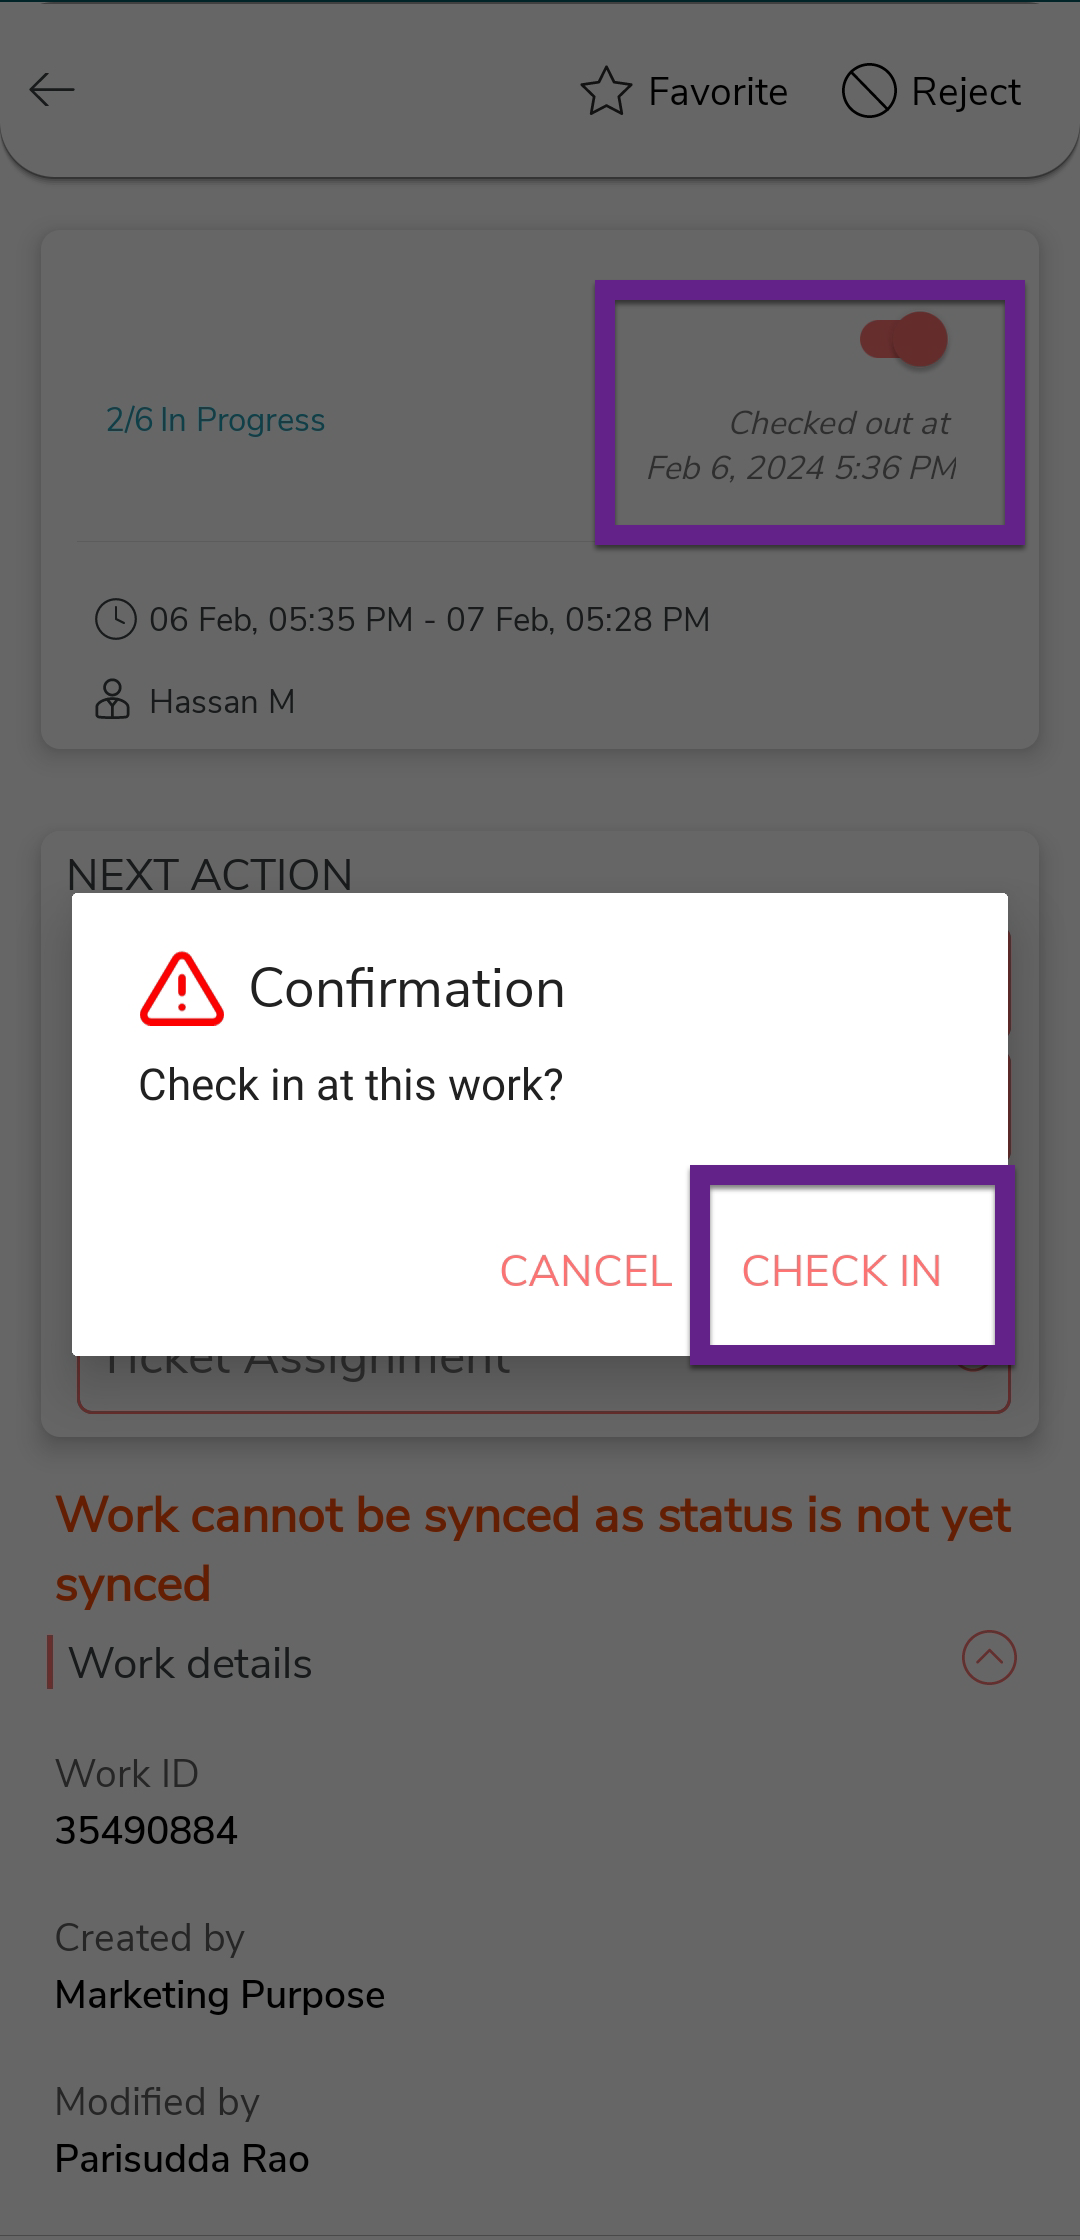
-
Tap Check in, and then tap Check
In on the confirmation pop-up.
-
Under the Next Action section, tap on the
required activity.
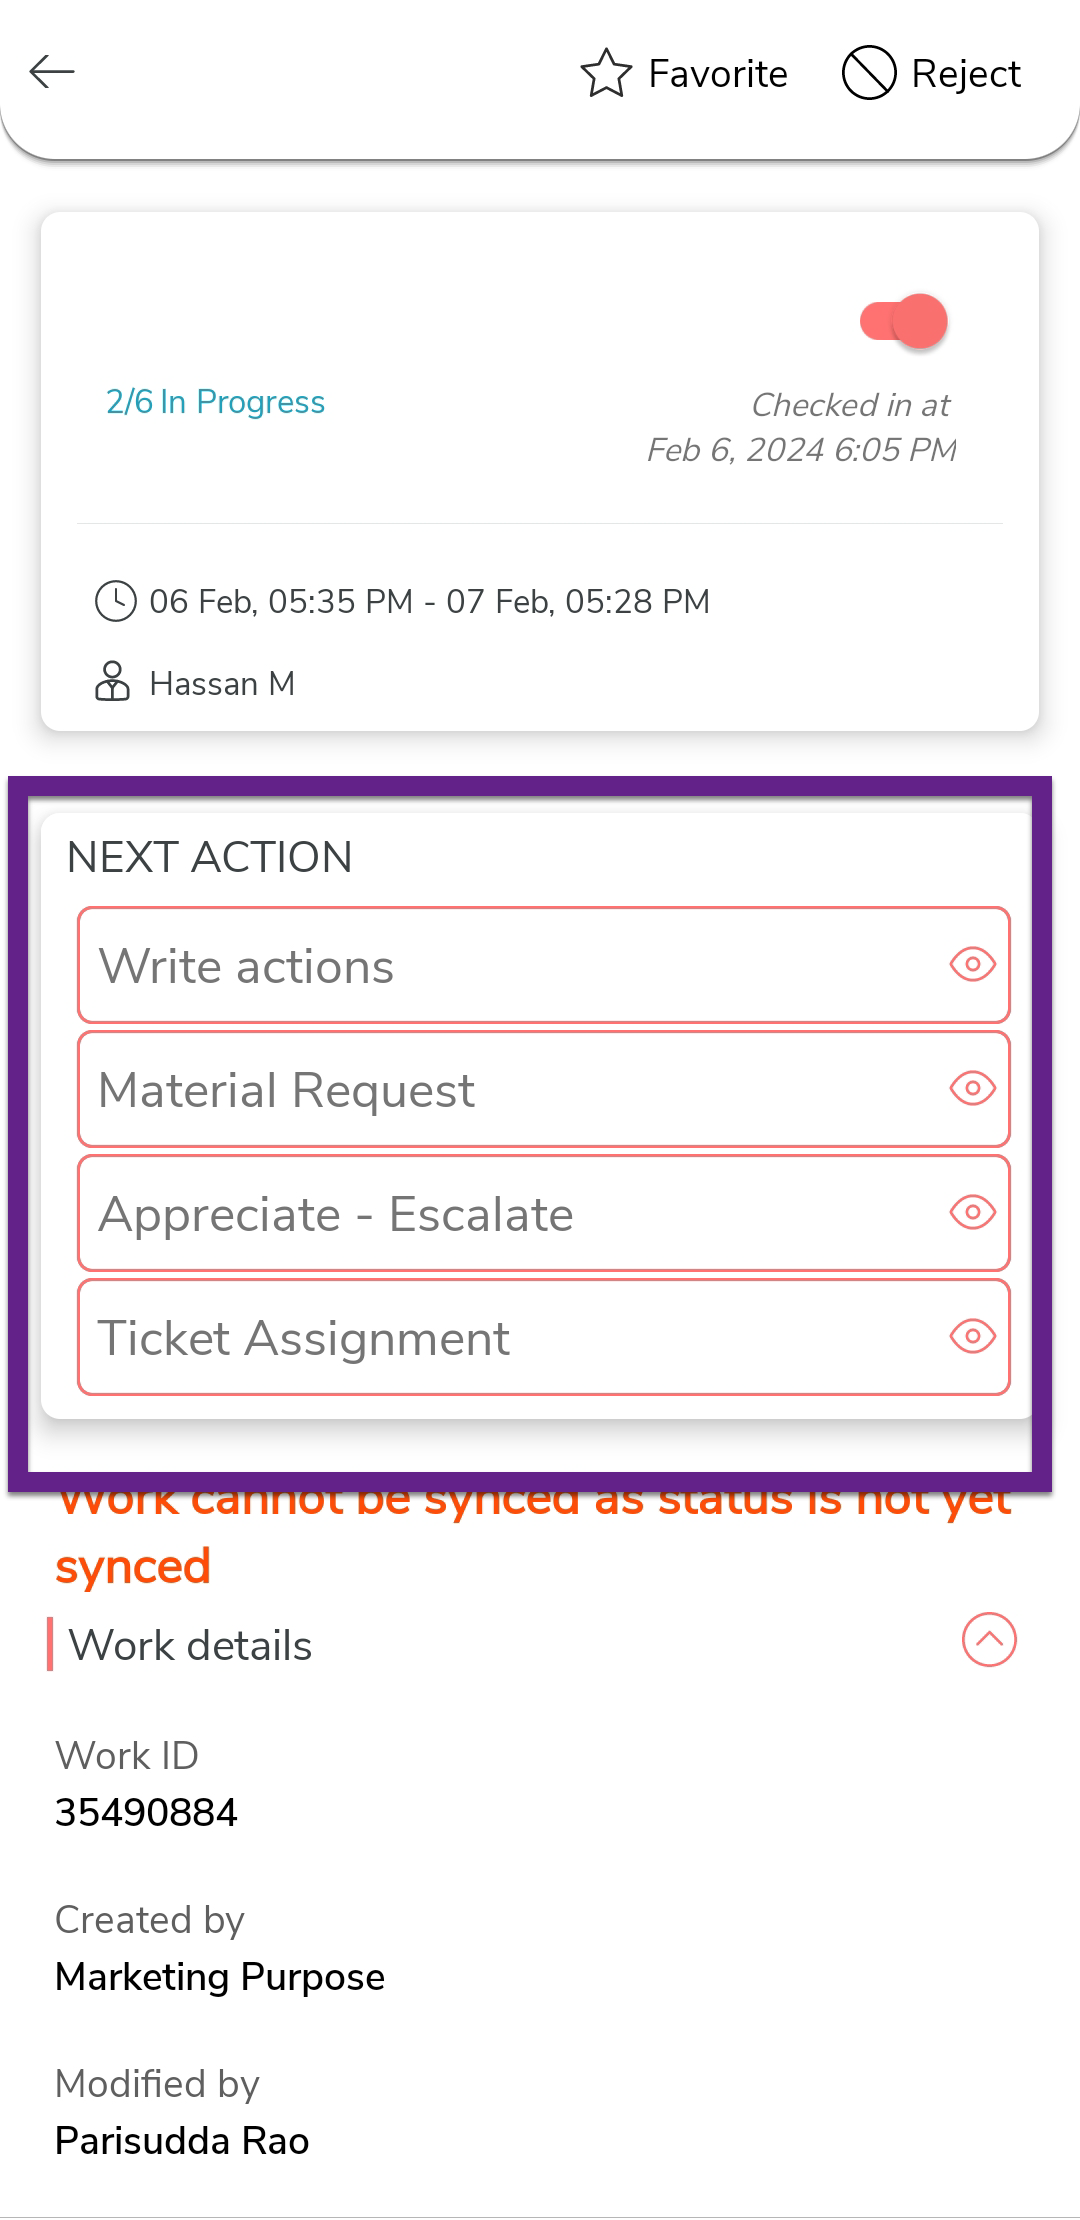
- Write Action: You can tap on this activity to provide
updates such as the type of action and the status of the ticket
before submitting them.Note: The ticket will progress to the next action, i.e., voice audit, only if you select the status as "technically completed" or "closed with recommendation." Until then, the write action will remain in a loop.
- Material Request: You can tap on this activity to request more materials if necessary.
- Appreciate - Escalate: You can tap on this activity to escalate the issue to the higher management.
- Ticket Assignment: You can tap on this activity to reallocate a ticket.
- Write Action: You can tap on this activity to provide
updates such as the type of action and the status of the ticket
before submitting them.
-
Here, we are filling out the Write Actions form.
Fill in the details and tap Save.

-
Once you fill in the Write Actions form, you
will again see the activities. Tap on the required activity.

-
Here, we are completing the Voice Audit
activity. Fill in the form and tap Save.
Note: As per the configured flow, if you select Feedback Required as Yes, then the next activity will be Customer Feedback.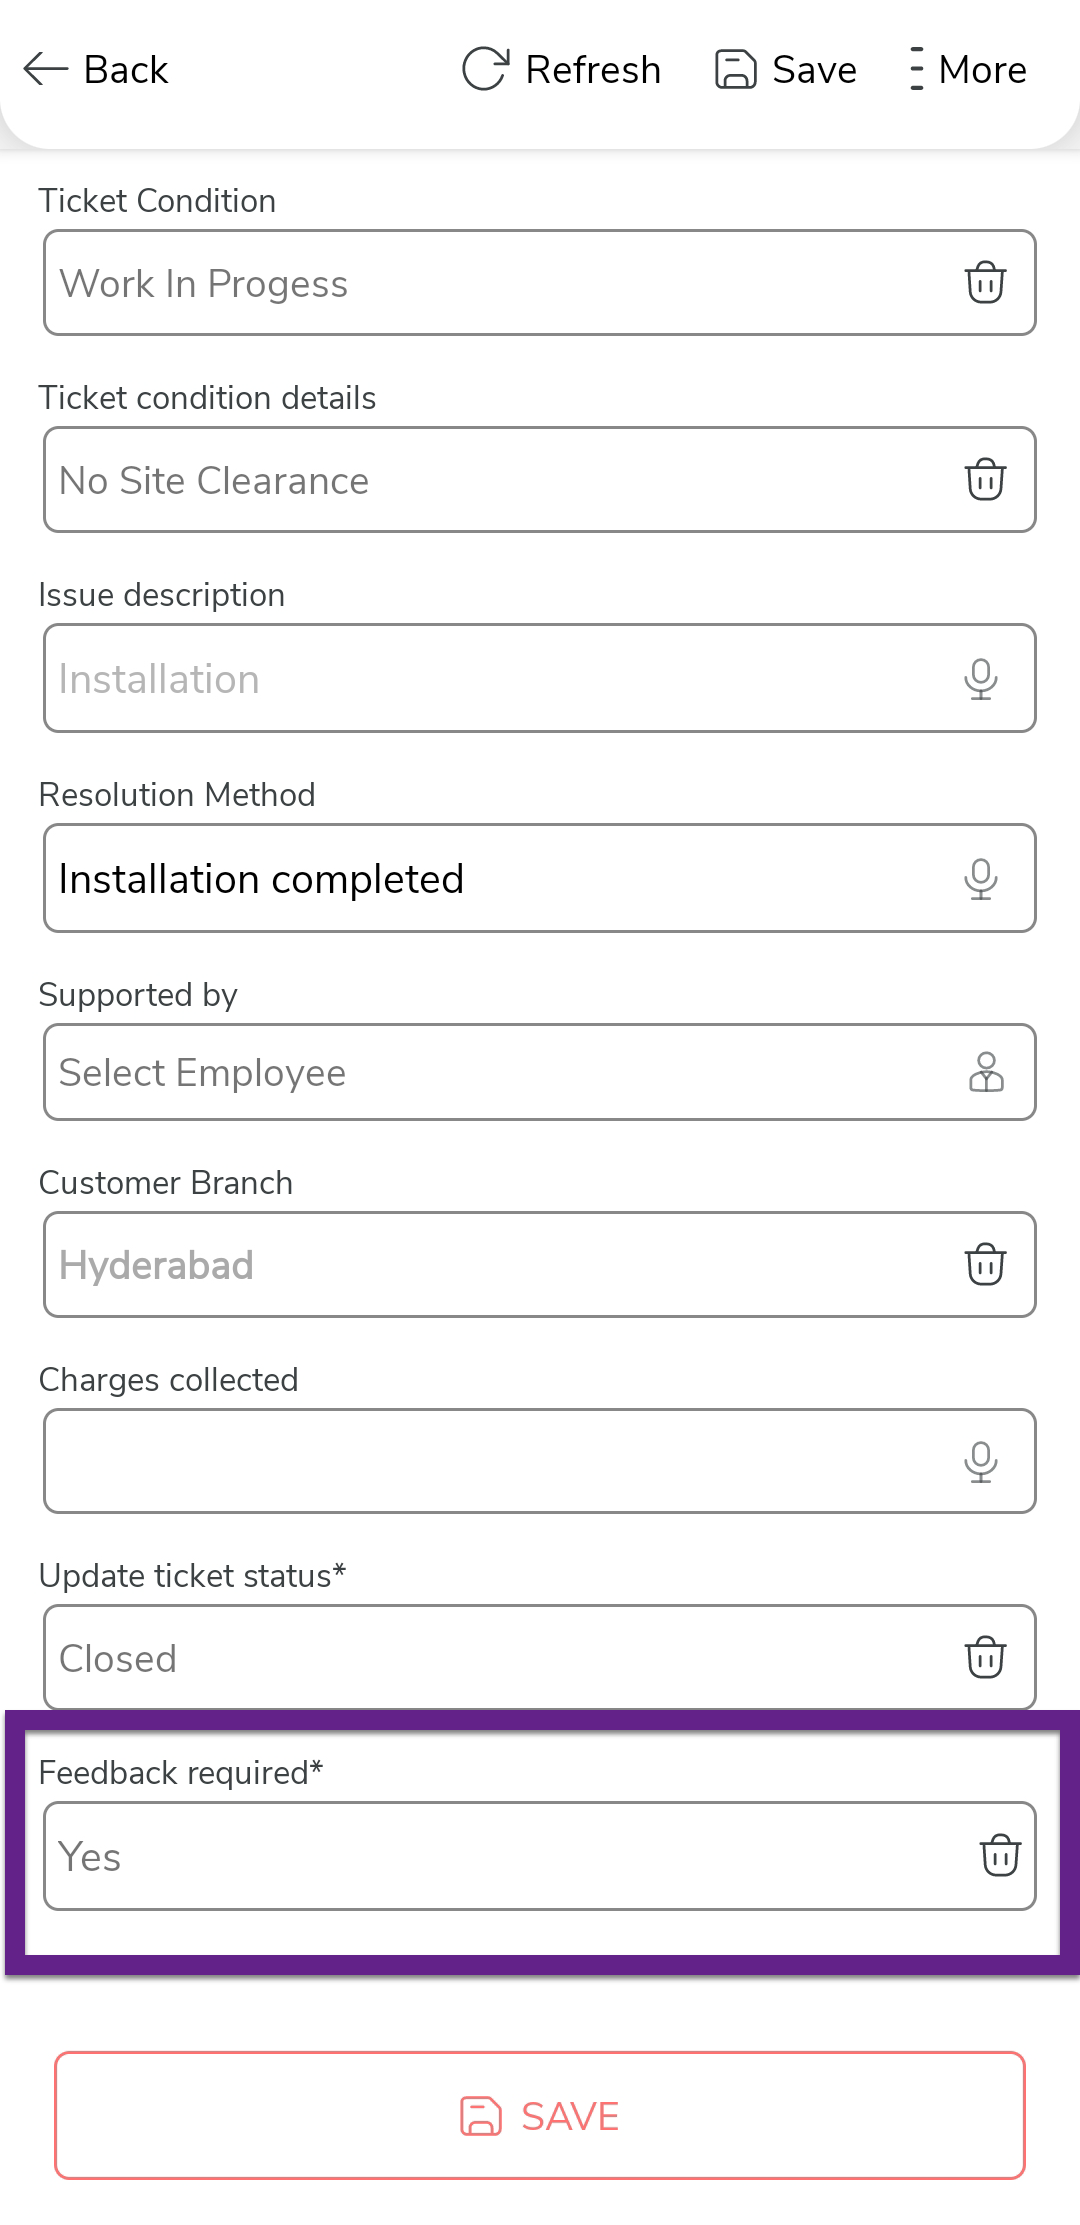
-
The process will be marked as completed when you select Feedback
Required as No and the ticket status as
closed.