
Configure Van Sales with Effort
Introduction
Van sales, also known as direct store delivery (DSD), is a distribution method used by companies to sell and distribute their products directly to retail stores or customers' locations using vans or other vehicles. This approach is commonly employed in the distribution of perishable goods, fast-moving consumer goods (FMCG), beverages, snacks, and other products that require frequent restocking.
In this tutorial, we will walk you through the process of configuring and operating Van Sales from scratch using the Effort platform. By following the step-by-step instructions below, you will be able to set up a successful Van Sales operation with the Effort platform.
This tutorial provides all the activities that need to be performed by different roles involved in the Van Sales operation using the Effort platform. The roles include Admin, Manager, and Employee (Van Sales Representative). Here's the list of activities we will be configuring and executing in the Effort as part of Van sales.
Admin Activities (Configuration of Van Sales)
In this section, we will walk you through the admin-level activities involved in the configuration of the Van Sales. To perform the Admin activities, the users must have access to the App Builder module. Only the users that have App Builder access can create the list masters. Login to Effort as App Builder. Refer to the Sign-in To Effort topic for login.
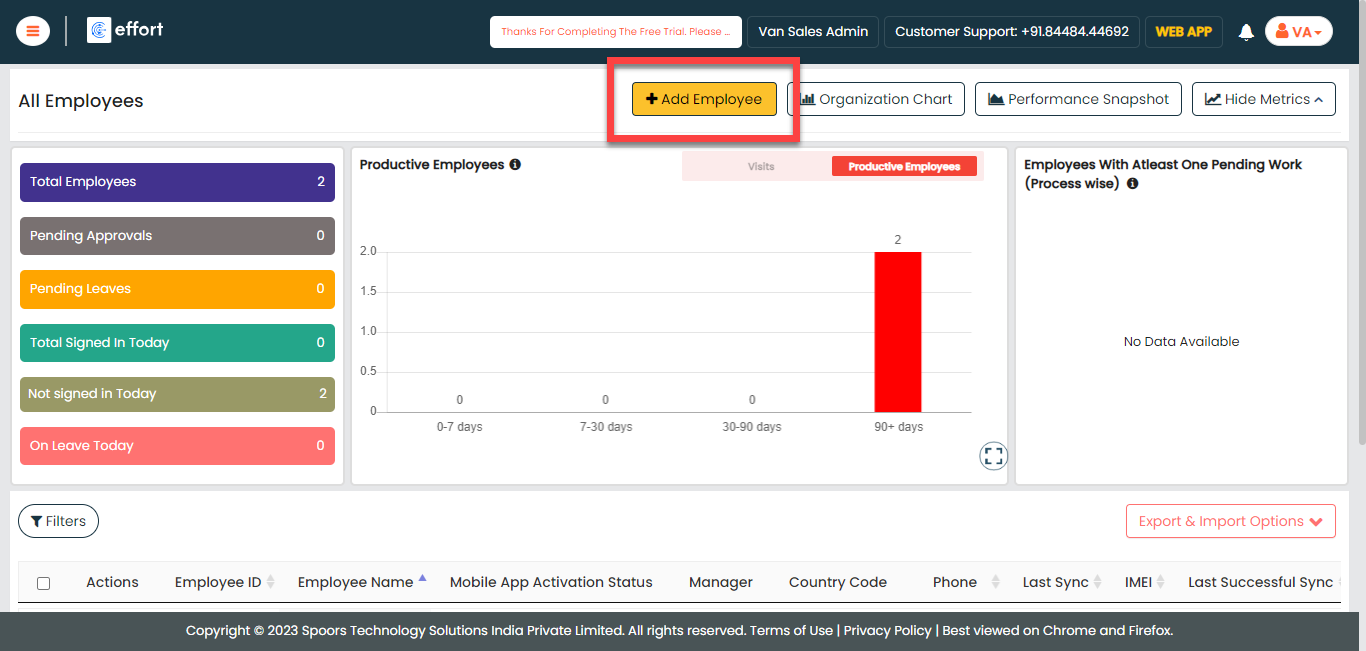
Create Employees
- Field Employees (Van Sales Executives)
- Managers (Dispatch Managers)
To know more about the employees module, refer to Employees.
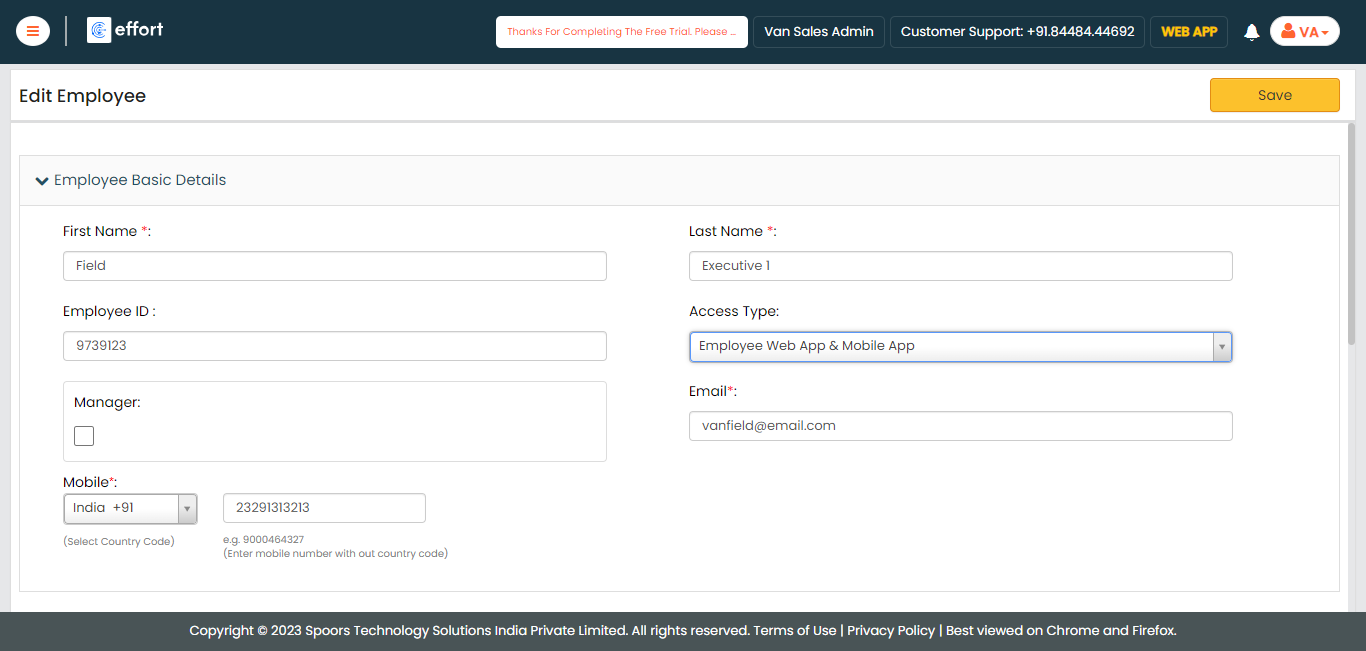
In this section, we will create employees who will be involved in the Van Sales activities. To create employees, follow the steps below:
-
Go to .
-
Enter the employee details such as First Name, Last Name, Employee ID,
Email, Mobile Number, and so on.
-
Select the Access Type based on the employee you
want to create.
If you are creating a Field Employee or Field Manager, you can select the Access Types as Mobile App or Employee Web App & Mobile App. For the Admin or Manager employees, you can select the Employee Web App, Configurator & Mobile App option.
-
Click Save.
Note: If you want to create more employees, you can choose the Import feature to create in a single go. To import employees, refer to Import Employees.
Create Employee Groups
- Sales Executives Group
- Managers Group
To know more about employee groups, refer to Employee Groups.
In this section, we will create employee groups involved in the Van Sales activities. To create employee groups, follow the steps below:
- Go to .
-
Create a group for the Sales Executives as shown below:

To create employee groups, refer to the Add Employee Group topic. -
Create one more employee group for Dispatch Managers as shown
below.
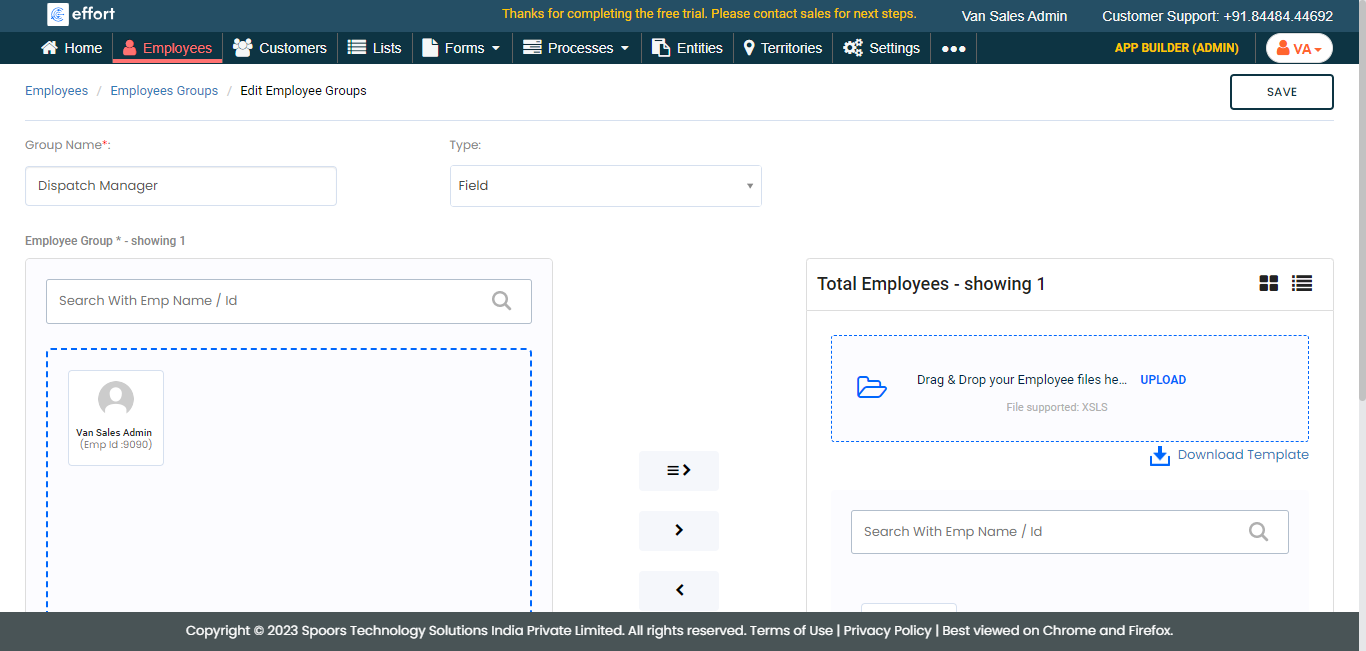
To create employee groups, refer to the Add Employee Group topic.
Create Approval Processes
In the van sales operation, we require an approval mechanism to handle requests from field executives regarding cash in hand, stock load in, stock load out, and other activities. This section will guide you through creating the following approval processes to manage the requests made by the field executives.
- Cash In Hand Approval
- Dispatch Approval
To learn more about approval processes, refer to Approval Process.
To create approval processes, follow the steps below:
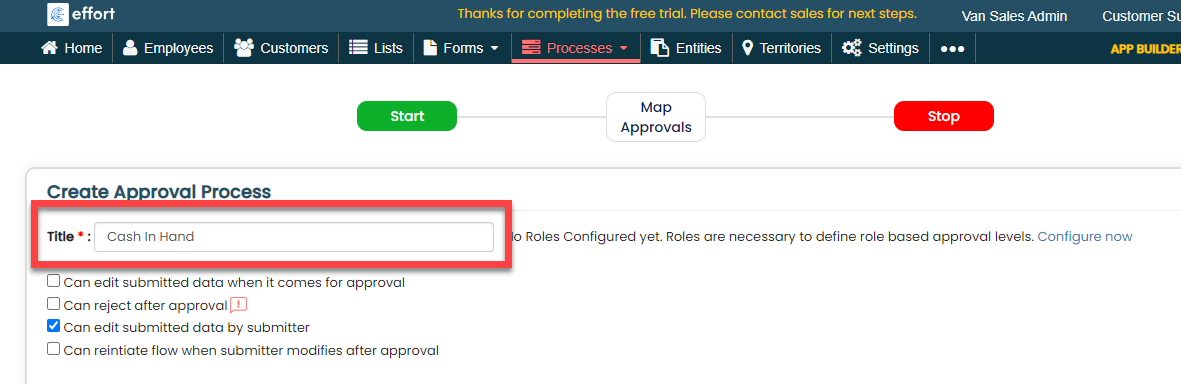
-
Create Cash In Hand Approval: We are creating
this approval mechanism to handle the cash in hand requests of the field
executives. To create this approval flow, follow the steps below:
-
Go to .

-
In the Title field, enter the title as
Cash In Hand.
-
Click the Add Approval Level button and
configure as shown below.

- Approval Level Name: Enter the name as Cash Approval.
- Type: Select Hierarchy based.
-
Click Next and then click
Complete.

-
Go to .
-
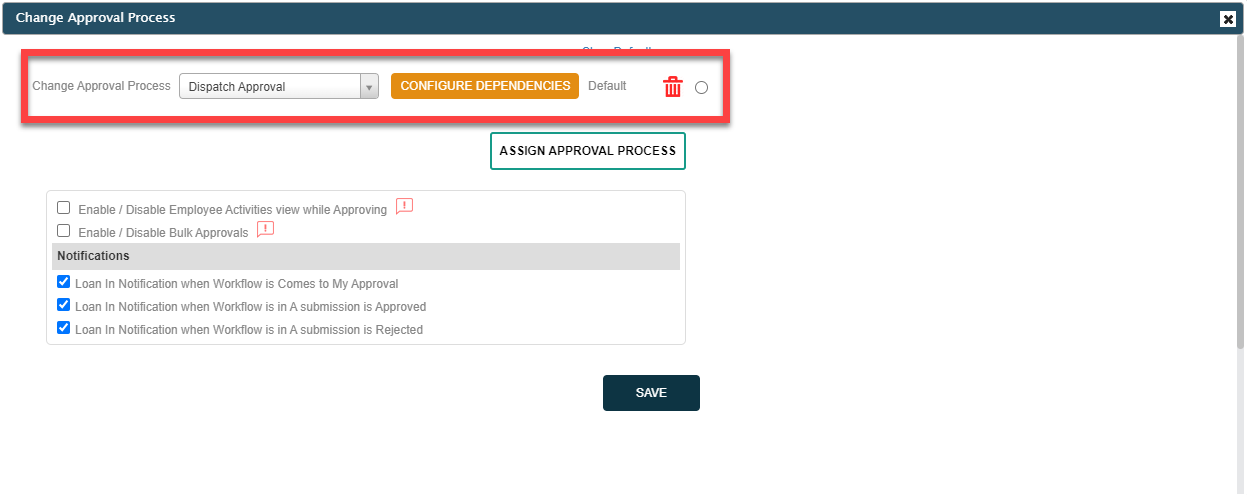
Dispatch Approval: This is an employee
group-based approval flow. We are creating this approval mechanism to
handle the stock load-in and load-out requests submitted by the field
executives. The employees in the configured group can approve the forms
submitted by the field executives. To create this approval flow, follow
the steps below:
-
Go to .
-
In the Title field, enter the title as
Dispatch Approval.

-
Click the Add Approval Level button and
configure as shown below.

- Approval Level Name: Enter the name as Dispatch Approval.
- Type: Select Employee Group based.
- Select the Dispatch Manager employee group that we created in the previous section and click the right arrow icon.
-
Click Next and then click
Complete.
-
Go to .
Create List Masters
In this section, we will create the list masters. A list master is a collection of data that contains the data, such as factory inventory, cash in hand for sales executives, van inventory, customer outstanding amount, and reasons for customer returns. To know more about Lists, refer to Lists.
Create Product Category List
In this section, we will create a Product Category list. Product Category refers to the grouping of similar products based on their intended use, such as Tea, Coffee, Biscuits, Diary, and more. To create this list, follow the steps below:
- Go to .
-
In the Title field, enter the title as
Product Category Master.

-
Click the Add Field button.

-
Under the Identifier column, enable the
checkbox.

-
Under the Field Label column, enter the
label as Product Name.

-
Click Publish and then click
OK in the confirmation pop-up.

-
In the List Scope in Sync pop-up window,
select the Sync all option and click
OK to make all the list items available
to the mobile app users.

-
In the Warning pop-up window, click the
Accept button.

Your Product Category List is ready. Now you need to add items to it. -
To add product categories to the list master, click
Add.

-
In the List No and Product
Name fields, enter product names as per your
requirement, such as Coffee, Tea, etc.

Note: To view the list items that you added, refer to View List Items.Note: To edit the list items that you added, refer to Edit List Item. - Click Save to save your item. Otherwise, click Save & New to save the existing item and add one more new item.
Create Product Sub Category List
In this section, we will create a Product Sub Category list. Product Subcategories are specific groupings within a broader product category, such as Tea, Coffee, and more.
-
Follow the same instructions in the previous section and create the
Product Sub Category as shown below.

-
As you can see, we have 4 fields in the above list. To add more
fields, you need to click the Add Fields
button again.

-
For the second field labeled as Product Cat,
you need to change the data type to List. To
change the data type, select the List option
from the dropdown under the Data Type
column.
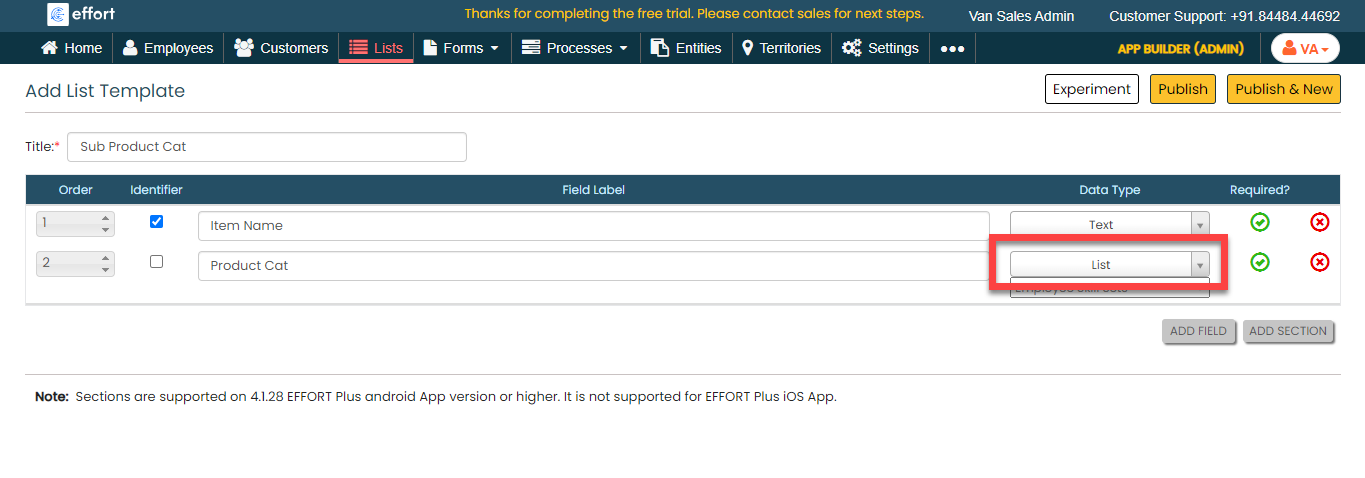
-
You will see the second dropdown when you set the data type to
List. Click the second dropdown and
select the Product Category Master list that
you created in the previous section. Here, we are mapping the
sub-item to the main category.

-
For the Price and Warehouse
Quantity fields, change the data type to
Number as we capture numerical values
against these fields.

- Click Publish to save the List master and then select all in the List Scope in Sync pop-up window.
-
The list master creation is completed. Now you need to add items to
this list. As we have 4 fields in this list, it will take more time
if we add items manually. Instead, you can add multiple items to the
list in one go using the Import option. On
the List Actions page, click
Import.

-
Click Download Template. An Excel file is
downloaded.

-
Open the downloaded Excel sheet and fill in the data in the fields.
Once you fill in the data, save the Excel sheet.
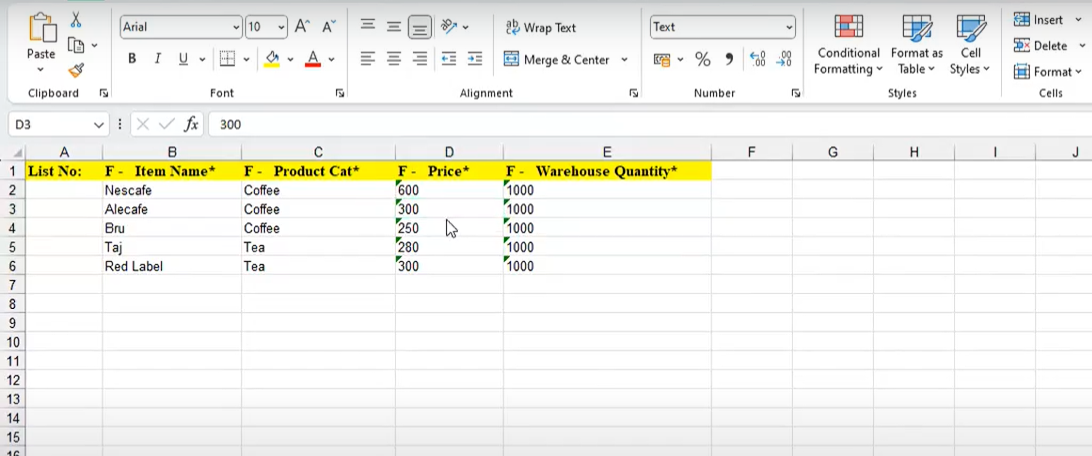
For the Product Cat field, we have configured the Product Category Master list. Under the Product Cat column, enter the List No to which product category you want to map the item. You can copy the list numbers from the View Items tab in the Product Category Master list.
-
Go back to the Import List page, click
Choose File, and select the filled Excel
sheet.

-
Click the Import button. Once the import is
completed, refresh the page after a few seconds. You can check the
import status at the bottom of the page.

-
To view the imported list items, go to .

Note: To view the list items that you added, refer to View List Items.Note: To edit the list items that you added, refer to Edit List Item.
Create Cash in Hand List
Till now, we have created Product Category and Product Sub Category list masters and added items to them. Now you are familiar with creating lists and adding items using import and manually.
In this section, we will create a list master that contains the details of each executive's cash in hand. The "cash in hand" of a van sales executive refers to the amount of physical currency ( or cash) that the salesperson has on their person at any given time while conducting sales activities. To create the Cash In Hand list, follow the steps below:
-
Create the Cash In Hand list master as shown in the following
screenshot.

-
Note: Make sure to create employees (Van sales executives) before adding items to this list master as we are adding cash in hand for them. To create employees, refer to the Create Employee topic.Now add the items to the list. You can either use the Import option or follow the manual process to add the items at your convenience.

Note: To add the list items, refer to Add an Item to List.Note: To import the list items, refer to Import List Items.Note: To edit the list items that you added, refer to Edit List Item.
Create Van Inventory List
Now, we will create a list master that contains the details of the van inventory such as item, category, price, available quantity, and so on. We need this list to effectively manage the inventory in the Van. With this list, we can know what items we have, what types they are, and how many of them we've got. To create the Van Inventory list, follow the steps below:
-
Create the Van Inventory list master as shown in the following
screenshot.

-
Now add the items to the list. Since we are creating the list for
the first time, make the available quantity of each item 0. The van
inventory will be added when requested through the Load In form that
we create later. You can either use the
Import option or follow the manual
process to add the items at your convenience.

Note: To add the list items, refer to Add an Item to List.Note: To import the list items, refer to Import List Items.Note: To edit the list items that you added, refer to Edit List Item.
Create Customer Outstanding Amount List
The customer outstanding amount refers to the unpaid balances from customers. Now, we will create a list master that contains the details of the customer's outstanding amount. To create the Customer Outstanding Amount list, follow the steps below:

Create Customer Return Reason List
Customer returns, also known as product returns, refer to the process where a customer returns a purchased product to the seller or retailer for various reasons. In our van sales process, there might be some situations where customers return the products. When the customers return the products, this list enables them to select a reason for the return. In this section, we will create a list master that contains the reasons for product returns. To create the Cash In Hand list, follow the steps below:
-
Create the Customer Return Reason list master as shown in the
following screenshot.

-
Now add the items to the list. You can either use the
Import option or follow the manual
process to add the items at your convenience.

Note: To add the list items, refer to Add an Item to List.Note: To import the list items, refer to Import List Items.Note: To edit the list items that you added, refer to Edit List Item.
Creation and Configuration of Forms
In this section, we will create the forms that are required for the operation of van sales. The forms include a cash request form, stock load in, stock load out, sales form, and customer returns. Here, we will walk you through the form creation steps, required fields, field-level configurations, and form-level configurations for all the forms. To know more about the forms, refer to Forms.
Cash Request Form
The Cash Request form is used by field employees to request a specific amount of cash for miscellaneous expenses. This form is part of the internal financial team and is used to track and manage cash disbursements. To create this form, follow the steps below:
- Go to .
-
In the Title field, enter the title field as
Cash Request Form.

-
Drag and drop the following data types onto the field canvas and
label them as shown below.

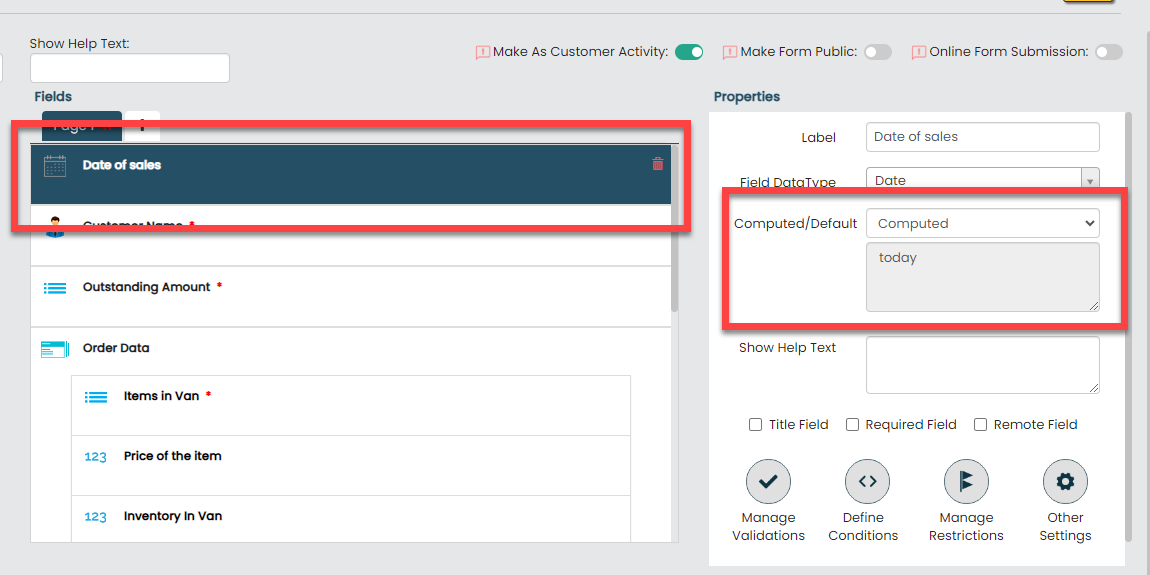
Data Type Label Date Date of Request Employee Executive Name Pick List Current Cash In Hand Number Requested Amount To know more about all the data types, refer to the following topics. -
Click the Date of Request date field, and do
the following:
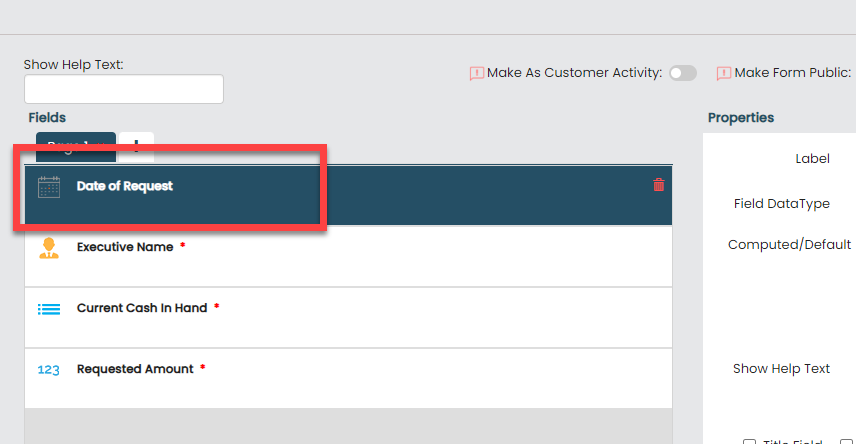
-
Under the Properties section, select
the Computed option from the
Computed/Default dropdown.

To know more about Computed and Default options, refer to Field Properties.
-
Click the grey box under the
Computed/Default dropdown, and
select today, and click
Done.

-
Under the Properties section, select
the Computed option from the
Computed/Default dropdown.
-
Click the Current Cash In Hand picklist
field, and do the following:

-
Under the Properties section, select
the Cash In Hand list that we created
earlier from the List dropdown. We
are mapping the Cash In Hand list
master to the Cash Request form. We
can manage the Cash In Hand of the field executive using
this form.

-
When a field executive tries to submit this form, this
field must show the cash in hand of that field executive who
is submitting this form. To configure this, click
Define Conditions.

-
On the Define Conditions pop-up
window, click the Add Criteria button
and define the configuration as shown below.

In the picture shown above, the "Executive" field is the field of the "Cash In Hand" list, which we created earlier, and the "Executive Name" field is the field of the form we are creating now. We are defining a rule that compares both these fields. Only when these two fields match, the "Current Cash In Hand" field will show the amount of cash the executive currently has.
-
Under the Properties section, select
the Cash In Hand list that we created
earlier from the List dropdown. We
are mapping the Cash In Hand list
master to the Cash Request form. We
can manage the Cash In Hand of the field executive using
this form.
-
Now click Publish and then click
OK to make it available to the field
employees. You are done with your first form creation.
Note: To know more about all the publishing options, refer to Publishing Options.
-
Whenever the field executives submit the Cash
Request form, the form has to go through the finance
team for approval. To configure an approval flow for this form,
click Assign Approval Flow.
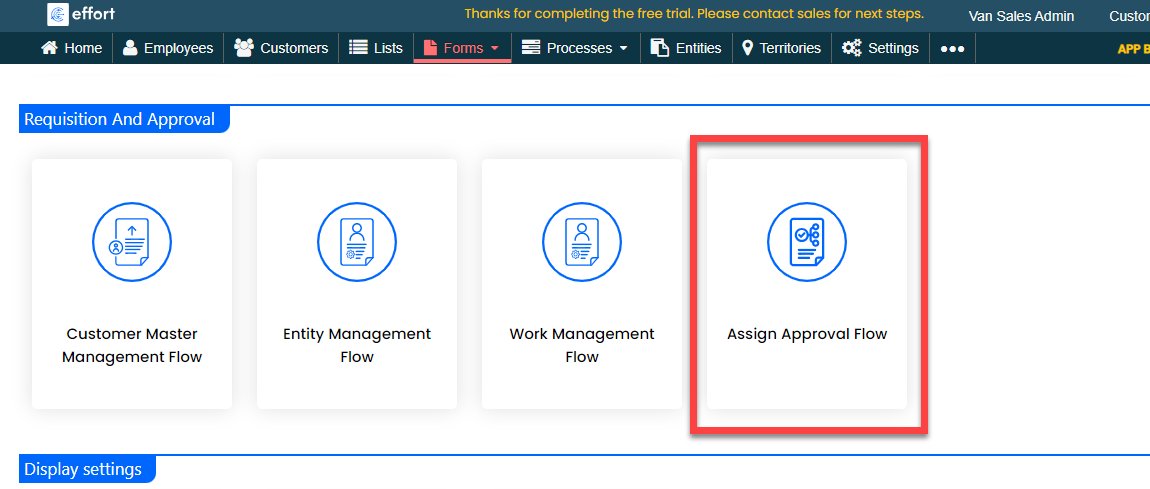
-
Click Assign Approval Process.

-
From the Select Approval Process dropdown,
select the Cash In Hand approval process that
we created earlier, and click Save, and then
click OK.

-
We created a Cash Request form and configured an approval flow to
it. Whenever the cash in hand request gets approved, that approved
amount must be added to the field executive in the Cash
In Hand list master that we created earlier to store
the executive's cash in hand. To update the approved cash in hand
amount in the Cash In Hand list master,
follow the steps below:
-
On the Cash Request Form Actions
page, scroll down to the Utilities
section and click Manage List Item
Updates.

-
Check Enable Passing of Data on
Approval. When this checkbox is enabled, the
data will be updated only after the form gets
approved.

-
Click the Add Item button and define
the configuration as shown below:

The requested amount will be added to the Cash In Hand list field. For example, let us assume the current cash in hand of the field executive is 10,000 rupees. Now the field executive requested an amount of another 10,000 rupees. If the cash request is approved, The amount in the Cash In Hand list field will be updated to 20,000 rupees.
-
On the Cash Request Form Actions
page, scroll down to the Utilities
section and click Manage List Item
Updates.
Load In Form
The Load In form is used by field employees to request the required inventory for sales. We are creating this form to capture essential information, such as the products and quantity of products needed. To create this form, follow the steps below:
- Go to .
-
In the Title field, enter the title field as
Cash Request Form.

-
Drag and drop the following data types onto the field canvas and
label them as shown below.
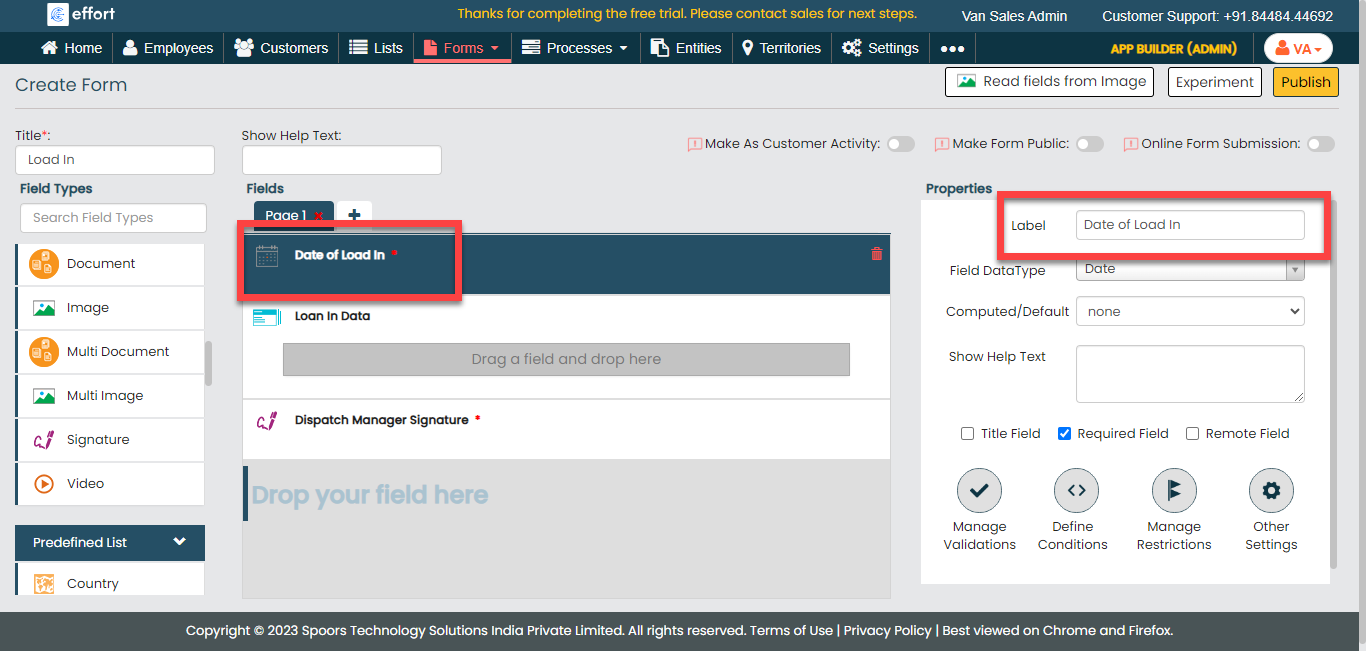
Data Type Label Date Date of Load In Repeatable Section Date of Load In Signature Dispatch Manager Signature To know more about all the data types, refer to the following topics. -
Now drag and drop the following data types onto the repeatable
section field and label them as shown below.

Data Type Label Pick List Van Inventory Number Quantity Pick List Warehouse Inventory Using the Repeatable Section data type, you can create multiple instances. For instance, if you require 100 products, this section enables you to produce 100 separate instances. In each of these instances, you can replicate the fields and input the necessary data. To know more, refer to Data Types - Others.
-
Click the Date of Load In field, and do the
following:

-
Under the Properties section, select
the Computed option from the
Computed/Default dropdown and
select Today from the grey box.
To know more, refer to Field Properties.
-
Under the Properties section, select
the Computed option from the
Computed/Default dropdown and
select Today from the grey box.
-
Click the Load In Data field, then go to the
Properties section and set the
Minimum Entries to 1 and the
Maximum Entries to 200, as shown below:

This configuration allows you to make a request for a minimum of 1 item and a maximum of 200 items. To know more, refer to Field Properties.
-
Now click the Van Inventory field in the
Load In Data field and select the
Van Inventory list template from the
List dropdown.

-
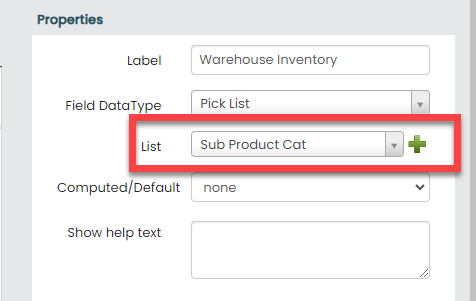
Click the Warehouse Inventory field and do
the following:

-
Under the Properties section, select
the Sub Product Cat list template
from the List dropdown.
-
Click the Define Conditions icon
under the Properties section.

-
Under the Filter Based on Values in Other
Fields section, click the Add
Criteria button and define the following
condition.
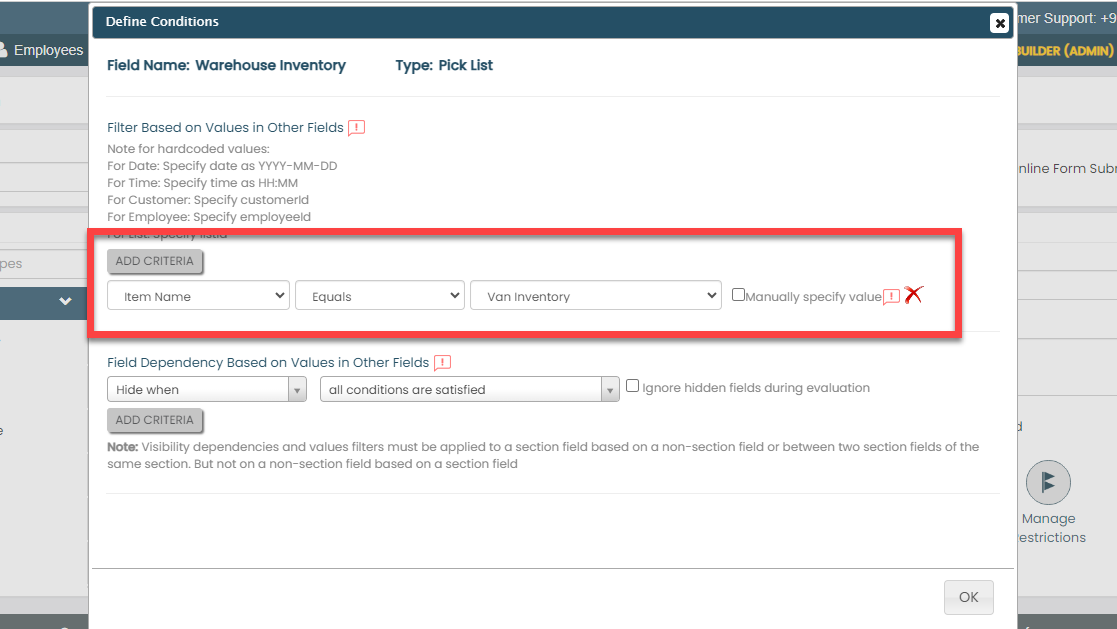
We added this field to manage inventory in both the Van and Warehouse. When inventory is added to the Van, it should automatically reduce the corresponding inventory in the Warehouse. The above condition serves as a filter for items listed in the Sub Product Category. Whenever you choose an item in the Van Inventory field, the corresponding item in the Sub Product Category list becomes visible. To learn more about filters, refer to Define Conditions.
-
Under the Properties section, select
the Sub Product Cat list template
from the List dropdown.
-
Click the Dispatch Manager Signature field
and select the unselect the Required Field
under the Properties section.

We are making this field as optional, as we want to capture the signature of the dispatch manager during the approval.
-
Now click Publish and then click
OK to make it available to the field
employees.
Note: To know more about all the publishing options, refer to Publishing Options.
-
Whenever the field executives submit the Load
In form, the form has to go through the dispatch
manager for approval. To configure an approval flow for this form,
click Assign Approval Flow.
To learn more about approval processes, refer to Approval Process.
-
Assign the Dispatch Approval process to this
form.
-
Upon form approval, there will be an increase in Van inventory and
a corresponding decrease in Warehouse inventory. To configure this,
follow the steps below:
-
On the Load In page, scroll down to
the Utilities section and click
Manage List Item Updates.
-
Define the configuration as shown below and click
Save.

In the above conditions, we have defined that the Warehouse Quantity in the Warehouse Inventory list will decrease by the Load in Quantity, while the Available Quantity in the Van Inventory list will increase by the same Load in Quantity.
-
On the Load In page, scroll down to
the Utilities section and click
Manage List Item Updates.
Sales Form
The Sales Form is used by field employees for the sales activity when they visit the customer. This form is created to capture the necessary details including customer information, orders, invoices, outstanding amounts, and more. To create this form, follow the steps below:
- Go to .
-
In the Title field, enter the title field as
Sales Form.

-
Drag and drop the following data types onto the field canvas and
label them as shown below.


Data Type Label Date Date of sales Customer Customer Name Pick List Outstanding Amount Repeatable Section Order Data Number Total Invoice Image Image of Receipt Dropdown Mode of Payment Number Amount Collected Number Amount Remaining Pick List Drivers Cash In hand -
Now drag and drop the following data types onto the repeatable
section field and label them as shown below.

Data Type Label Pick List Items in Van Number Price of the item Number Inventory In Van Number Order Quantity Number Sub Total Using the Repeatable Section data type, you can create multiple instances. For instance, if you want to sell 100 products, this section enables you to produce 100 separate instances. In each of these instances, you can replicate the fields and input the necessary data. To know more, refer to Data Types - Others.
-
Click the Date of Sales field, and do the
following:

-
Under the Properties section, select
the Computed option from the
Computed/Default dropdown and
select today from the grey box.
To know more, refer to Field Properties.
-
Under the Properties section, select
the Computed option from the
Computed/Default dropdown and
select today from the grey box.
-
Now click the Outstanding Amount field and
select the Customer Outstanding Amount list
template from the List dropdown.

-
Click the Order Data field, then go to the
Properties section and set the
Minimum Entries to 1 and the
Maximum Entries to 100, as shown below:

This configuration allows you to sell a minimum of 1 item and a maximum of 100 items. To know more about field properties, refer to Field Properties.
-
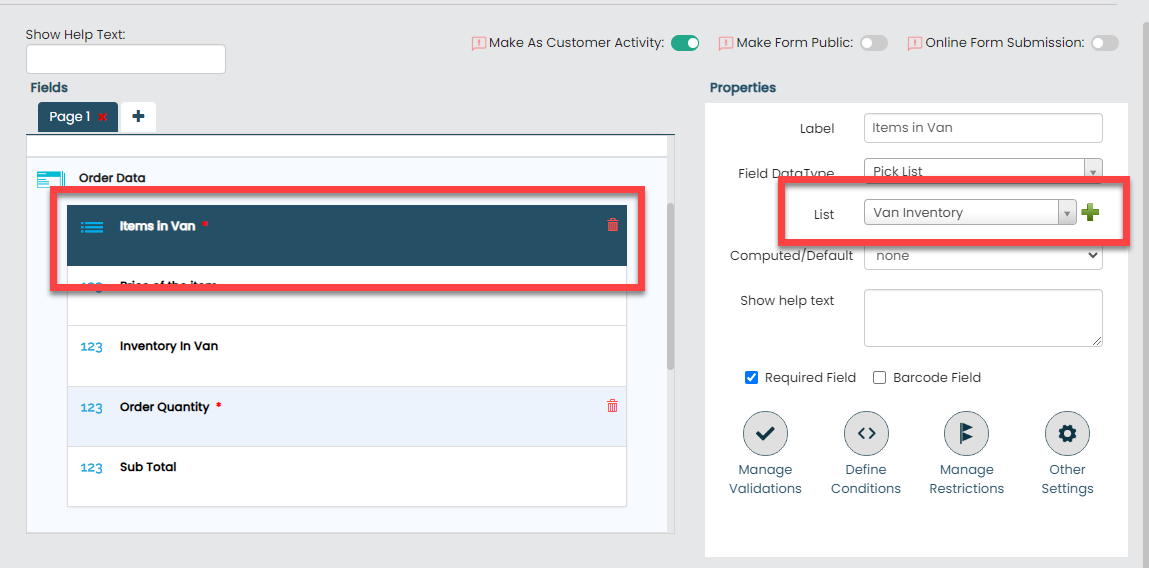
Now click the Items in Van field in the
Order Data field and select the
Van Inventory list template from the
List dropdown.
-
Click the Price of the Item field and do the
following:

-
When an item is selected in the Items in Van field,
the price of the selected item must populate automatically.
To configure this, select the
Computed option from the
Computed/Default dropdown.

-
Click the grey box below the
Computed/Default dropdown.

-
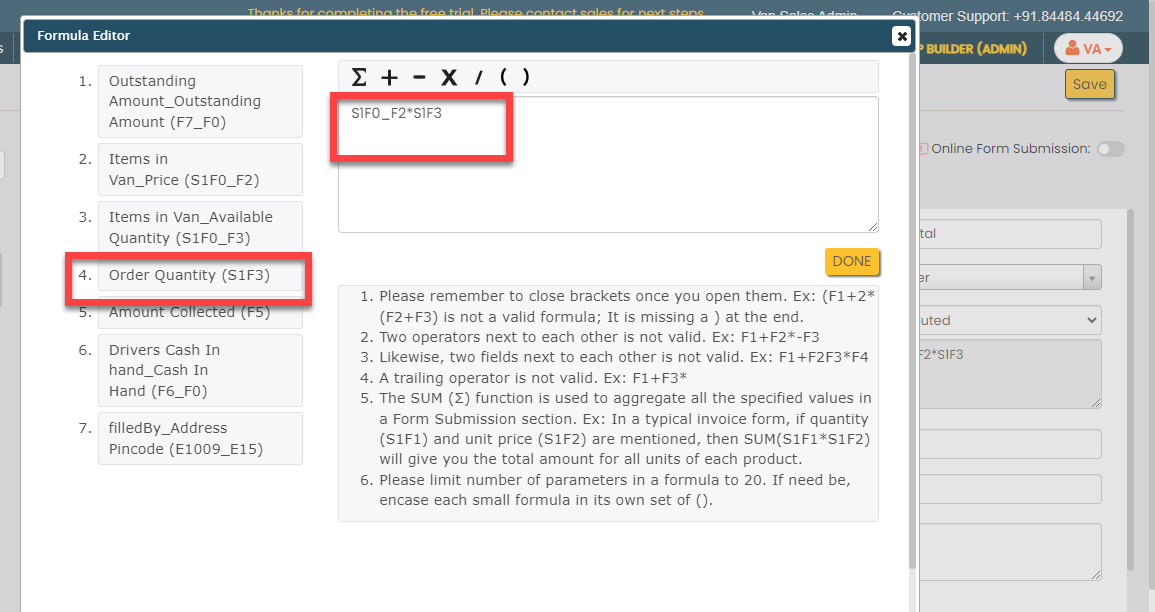
The Formula Editor pop-up window
appears. You can see the fields that have the
Number/Currency data type on the left side. You
can see the formula field where you can populate the fields
and define formulas using the arithmetic operators. Click
the 2nd field (Items in Van_Price) to populate it on the
formula box and then click Done.

The above field belongs to the Van Inventory list master that we to the Items In Van picklist field. With this configuration, the price of the item will be automatically populated when the item is selected. To know more about the Computed/Default options, refer to Field Properties.
-
When an item is selected in the Items in Van field,
the price of the selected item must populate automatically.
To configure this, select the
Computed option from the
Computed/Default dropdown.
-
When you select the item, you need to know how much quantity you
have in your van to sell the items to the customer. To know this,
click the Inventory in Van field and make it
Computed.

-
Now click the grey box and select the Available Quantity
from the Items in Van list as shown below.

-
We have another field as Sub Total in the
Order Data section. We added this field
to calculate the total amount when we select the item and quantity.
To configure this, do the following:
-
Click the Sub Total field and make
it Computed.

-
Click the grey box and add the price field to the formula
field.

-
Now click the multiply operator (X) and then click the
Order Quantity field to populate
it on the formula field.
-
Click the Sub Total field and make
it Computed.
-
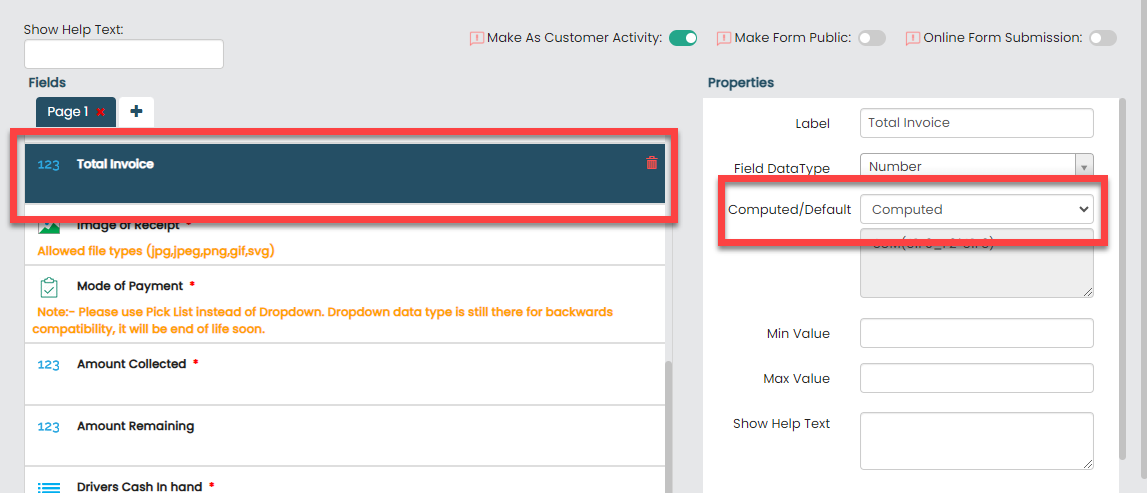
We added a field as Total Invoice to
calculate all the sub-total amounts of all the items. This
Total Invoice is the total amount of all
the items that we are selling to the customer. To calculate the
total invoice, do the following:
-
Click the Total Invoice field and
make it Computed.
-
Click the grey box and define the formula as shown below.
The below formula is the sum of all the sub-totals.

- Click Done.
-
Click the Total Invoice field and
make it Computed.
-
Click the Mode of Payment dropdown field and
add the following dropdown values in the Add
Values field under the
Properties section.

- Cash
- Online
-
We added a field as Amount Collected into
our form to enter the amount we received from the customer. In cases
where the customer opts for online payment, the field executive
won't need to utilize this field. To hide the Amount
Collected field when the customer chooses the online payment
option, click Amount Collected field and do
the following:
-
Under the Properties section, click
the Define Conditions icon.

-
Click the Add Criteria button and
define the condition as shown below.

-
Under the Properties section, click
the Define Conditions icon.
-
We've added an additional field labeled Amount Remaining to
capture any outstanding balance yet to be collected from the
customer. When a customer makes a payment of half the total amount,
this field will automatically display the remaining half amount. To
configure this, do the following:
-
Click the Amount Remaining field and
make it Computed.

-
Click the grey box and define the formula as shown
below.

This formula deducts the total collected amount from the overall invoice and shows the remaining balance.
-
Click the Amount Remaining field and
make it Computed.
-
To display the field executive's existing cash in hand while
performing sales activity, now click the Drivers Cash In
Hand field and do the following.
-
Under the List section, configure
the Cash In Hand list master.
-
Click the Define Conditions
icon.

-
Click the Add Criteria button and
define the condition as shown below.

The items in the Cash in Hand list master get filtered based on the employee who is filling the form and the cash in hand of that employee will be displayed in this field.
-
Under the List section, configure
the Cash In Hand list master.
-
Now click Publish and then click
OK to make it available to the field
employees.
Note: To know more about all the publishing options, refer to Publishing Options.
-
After field executives conduct a sales activity with a customer
using this sales form, the following actions should occur
automatically and without any manual intervention:
- The Van inventory must decrease by the quantity sold.
- The cash in hand for the drivers must increase by the collected amount.
- The outstanding amount from the customer must increase by the remaining balance that the customer is required to pay.
To configure this, follow the steps below:
-
On the Sales Form page, scroll down
to the Utilities section and click
Manage List Item Updates.
-
Define the configuration as shown below and click
Save.

Load Out Form
The Load Out form is used by the field employees to return the remaining inventory at the warehouse after performing all the sales activities. To create this form, follow the steps below:
- Go to .
-
In the Title field, enter the title field as
Load Out.

-
Drag and drop the following data types onto the field canvas and
label them as shown below.
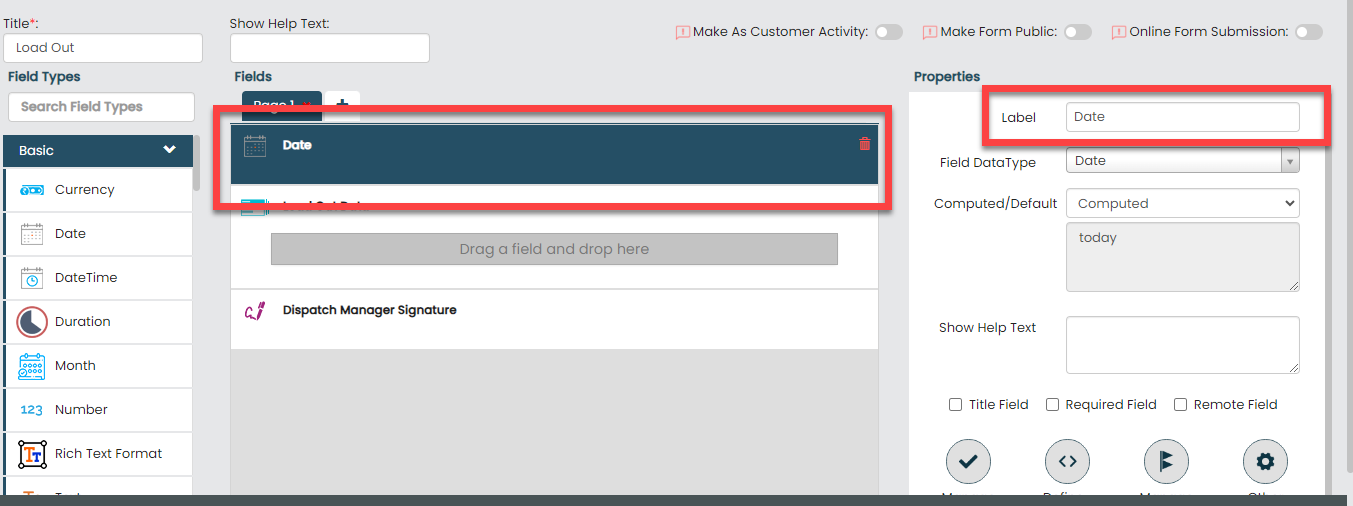
Data Type Label Date Date Repeatable Section Load Out Data Signature Dispatch Manager Signature -
Now drag and drop the following data types onto the repeatable
section field and label them as shown below.

Data Type Label Pick List Van Inventory Number Inventory Available for the products Pick List Warehouse Inventory Number Deviation Using the Repeatable Section data type, you can create multiple instances. For example, if you want to return 100 products, this section enables you to produce 100 separate instances. In each of these instances, you can replicate the fields and input the necessary data. To know more, refer to Data Types - Others.
-
Click the Date field, select the
Computed option from the
Computed/Default dropdown, and select
today from the grey box.
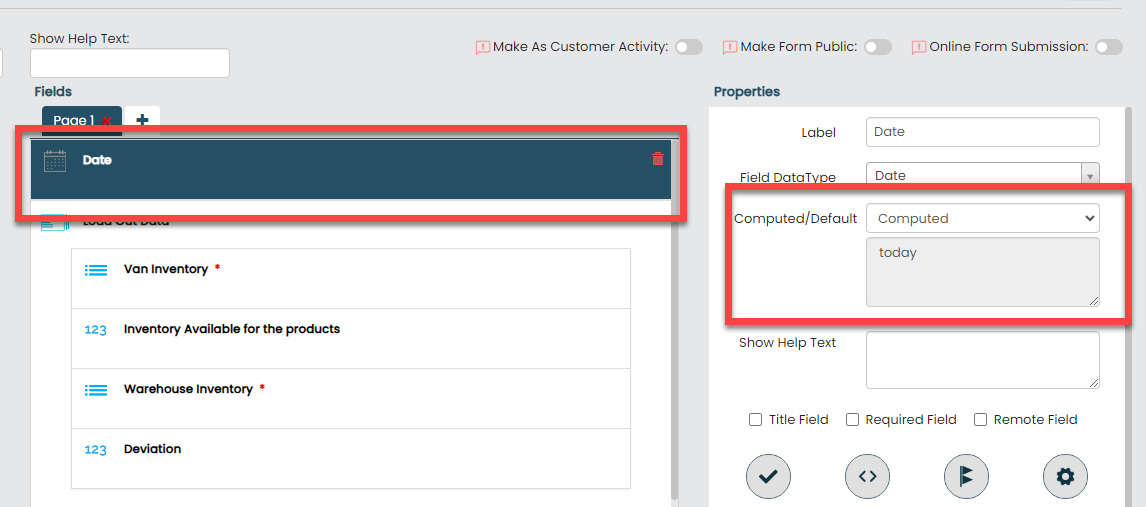
To know more about Computed and Default options, refer to Field Properties.
-
Click the Load Out Data field, then go to
the Properties section and set the
Minimum Entries to 1 and the
Maximum Entries to 100, as shown below:

This configuration allows you to return a minimum of 1 item and a maximum of 100 items. To know more, refer to Field Properties.
-
Now click the Van Inventory field in the
Load In Data section and select the
Van Inventory list template from the
List dropdown.

-
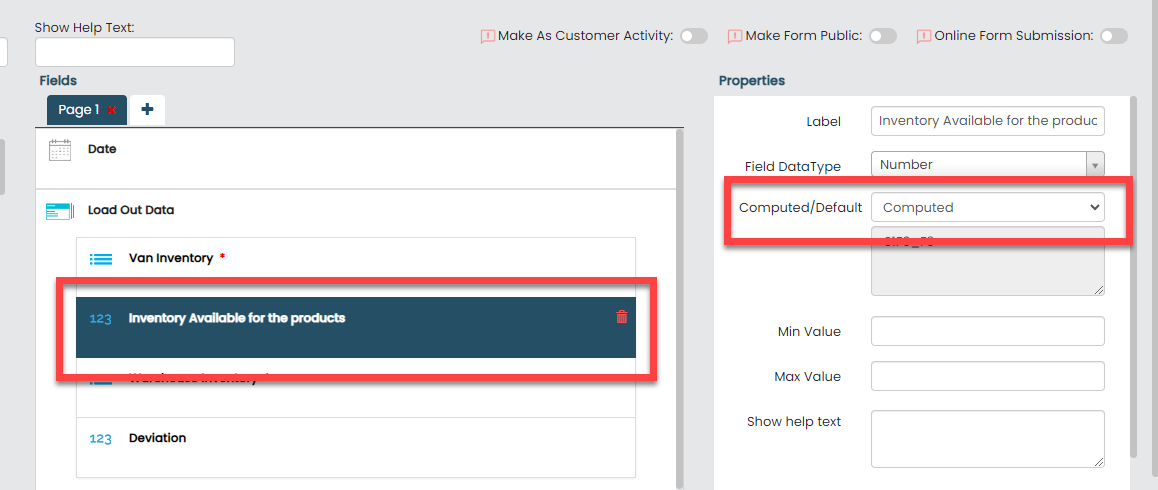
Click the Inventory Available for the
products field and do the following:
-
Under the Properties section, make
the field Computed and then click the
grey box.
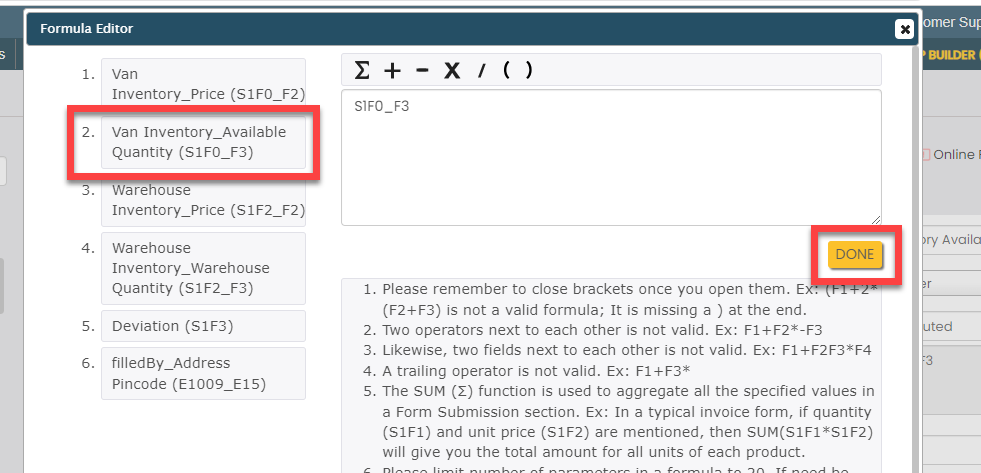
-
Click the 2nd field (Van Inventory_Available Quantity
(S1F0_F3)) option and click
Done.
-
Under the Properties section, make
the field Computed and then click the
grey box.
-
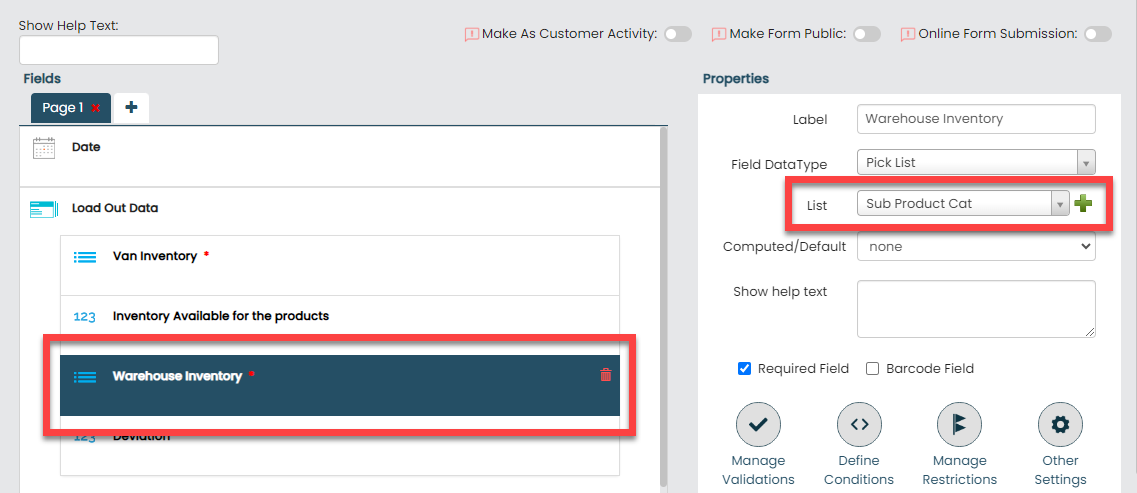
Click the Warehouse Inventory field and do
the following:
-
Under the Properties section, select
the Sub Prod Cat list that we created
earlier from the List dropdown.
-
Click the Define Conditions
button.

-
Click the Add Criteria button and
define the condition as shown below.

-
Under the Properties section, select
the Sub Prod Cat list that we created
earlier from the List dropdown.
-
Click the Dispatch Manager Signature field
and select the unselect the Required Field
under the Properties section.

We are making this field as optional, as we want to capture the signature of the dispatch manager during the approval.
-
Now click Publish and then click
OK to make it available to the field
employees.
Note: To know more about all the publishing options, refer to Publishing Options.
-
Whenever the field executives submit the Load
Out form, the form has to go through the dispatch
manager for approval. To configure an approval flow for this form,
click Assign Approval Flow.
To learn more about approval processes, refer to Approval Process.
-
Assign the Dispatch Approval process to this
form.
-
Upon form approval, there will be an increase in Warehouse
inventory and a corresponding decrease in Van inventory. To
configure this, follow the steps below:
-
On the Load Out page, scroll down to
the Utilities section and click
Manage List Item Updates.
-
Define the configuration as shown below and click
Save:

In the above conditions, we have defined that the Available Quantity in the Van Inventory list will decrease by the Load Out Quantity, while the Warehouse Quantity in the Warehouse Inventory list will increase by the same Load Out Quantity.
-
On the Load Out page, scroll down to
the Utilities section and click
Manage List Item Updates.
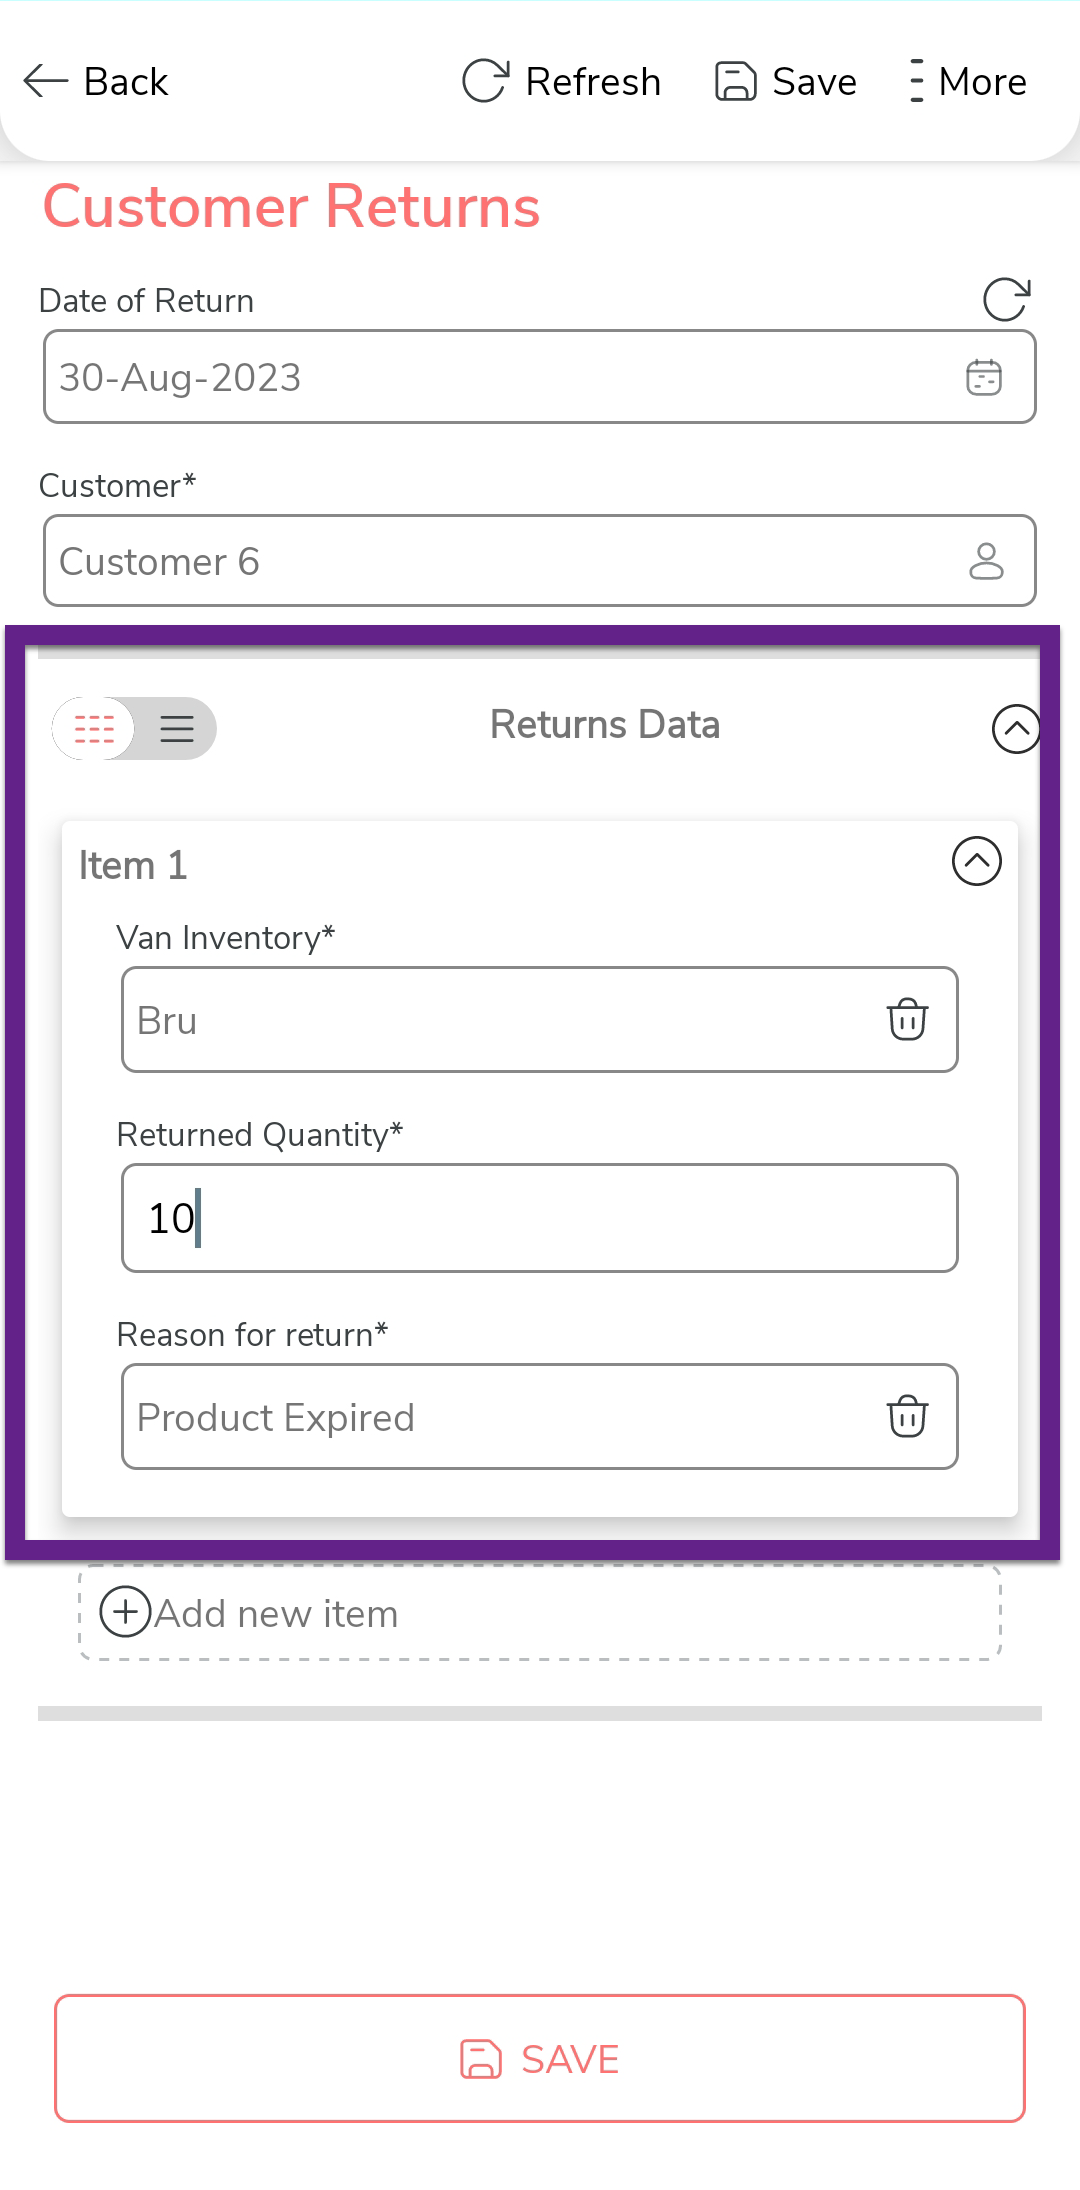
Customer Returns Form
The Customer Returns Form is used by field employees to capture the product details when customers initiate returns due to various reasons. This form is created to capture the necessary details including customers and products. To create this form, follow the steps below:
- Go to .
-
In the Title field, enter the title field as
Customer Returns.

-
Drag and drop the following data types onto the field canvas and
label them as shown below.

Data Type Label Date Date of Return Customer Customer Repeatable Section Returns Data -
Now drag and drop the following data types onto the repeatable
section field and label them as shown below.

Data Type Label Pick List Van Inventory Number Returned Quantity Pick List Reason for Return Using the Repeatable Section data type, you can create multiple instances. For instance, if a customer is returning 100 products, this section enables you to produce 100 separate instances. In each of these instances, you can replicate the fields and input the necessary data. To know more, refer to Data Types - Others.
-
Click the Date of Return field, and do the
following:

-
Under the Properties section, select
the Computed option from the
Computed/Default dropdown and
select today from the grey box.

To know more, refer to Field Properties.
-
Under the Properties section, select
the Computed option from the
Computed/Default dropdown and
select today from the grey box.
-
Click the Return Data field, then go to the
Properties section and set the
Minimum Entries to 1 and the
Maximum Entries to 1000, as shown below:

This configuration allows you to sell a minimum of 1 item and a maximum of 1000 items. To know more about field properties, refer to Field Properties.
-
Now click the Items in Van field in the
Return Data section and select the
Van Inventory list template from the
List dropdown.

-
Now click the Reason for Return field in the
Return Data section and select the
Customer Return Reason list template from
the List dropdown.

-
Now click Publish and then click
OK to make it available to the field
employees.
Note: To know more about all the publishing options, refer to Publishing Options.
-
When a customer returns the products, the Van inventory must
increase automatically without any manual intervention by the
quantity returned. To configure this, follow the steps below:
-
On the Customer Returns Form page,
scroll down to the Utilities section
and click Manage List Item
Updates.
-
Click the Add Item button and define the
configuration as shown below.

- Click Save.
-
On the Customer Returns Form page,
scroll down to the Utilities section
and click Manage List Item
Updates.
Configuration and Creation of Customers
The customers are essential for the Van sales business. In this section, we will define the customer configurations, which includes customizing fields to create customer, customer creation, and configuring outstanding amounts for customers.
Customize Customer Fields
In this section, we will customize the customer fields that we use to capture customer details such as Name, Contact Details, Address, and more. To know more about customer fields, refer to Customer Fields
To customize customer fields, follow the steps below.
- Go to .
-
Disable all the fields except the following as shown in the
screenshot and click Save.

- In addition to the built-in fields, if there's a need for additional customer information, custom fields can be used for this purpose. To define custom fields, go to .
-
On this page, you can see some predefined fields on the field
canvas and different data types which you can drag and drop on the
left side. Here, we need only the customer outstanding amount field
from the existing fields to capture the outstanding amount against a
customer. Click on all the other fields except for customer
outstanding and disable the visibility and searchable field under
the Properties section.

- Once completed, click Save.
Create Customers
In this section, we will create customers from the web app. To create customers, follow the steps below.
- Go to .
-
Enter the customer details and click
Save.

-
You can also use the Import option to create
more customers in a single go. For the instructions to import the
customers, refer to the Import Customers
topic.
Note: In the Map to Employee column, enter the employee ID instead of the employee name.

-
Once you import the customers, you can check the import status at
the bottom of the page. Alternatively, you can check the
Customers module in the Web
App.
Add Items to Customer OutStanding Amount List
In this section, we will add items to the customer outstanding amount list that we created earlier. To add items, follow the steps below.
- Go to .
- In the Outstanding Amount field, enter 0 as the customers are newly created.
-
From the Customer Name dropdown, select a
customer.
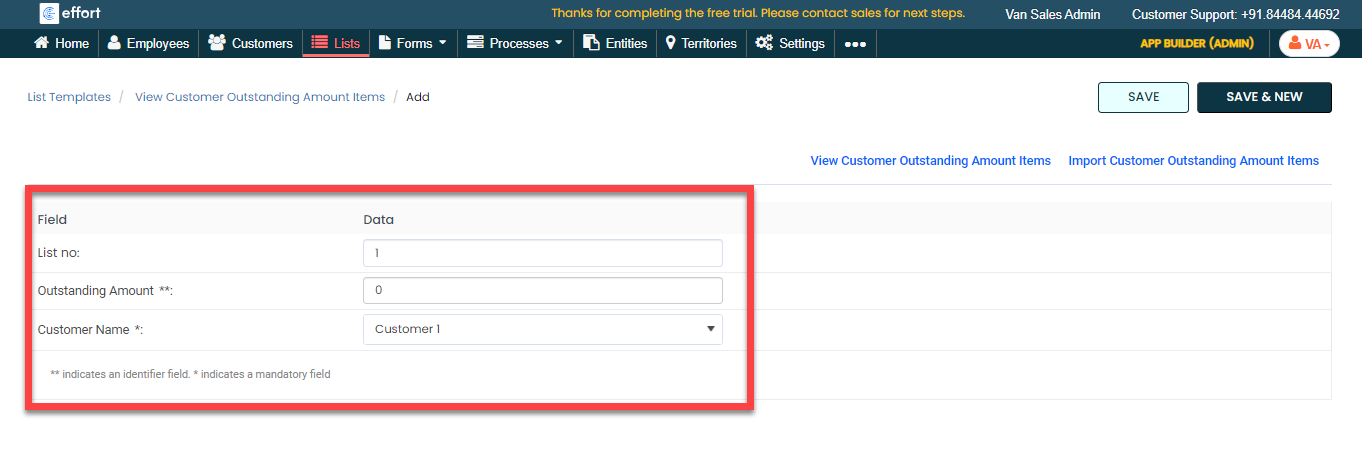
- Click Save or Save & New to add another item.
Manage Customer Outstanding Amount
The customer outstanding amount refers to the balance that a customer has yet to pay. Within the context of Van sales, some customers make complete payments, while others make partial payments. Due to this, effectively managing the customer's outstanding amount is crucial in the Van sales. In this section, we will define the customer's outstanding amount configuration. To define this configuration, follow the steps below.
-
Go to .

-
On the Manage Referenced Masters pop-up
window, click Manage List Reference.

-
Under the Visible column, enable the
checkbox.
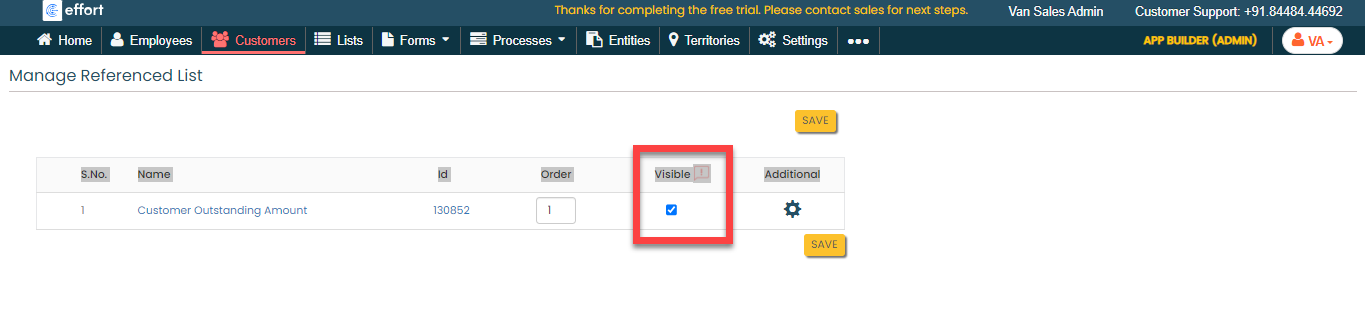
- Click Save.
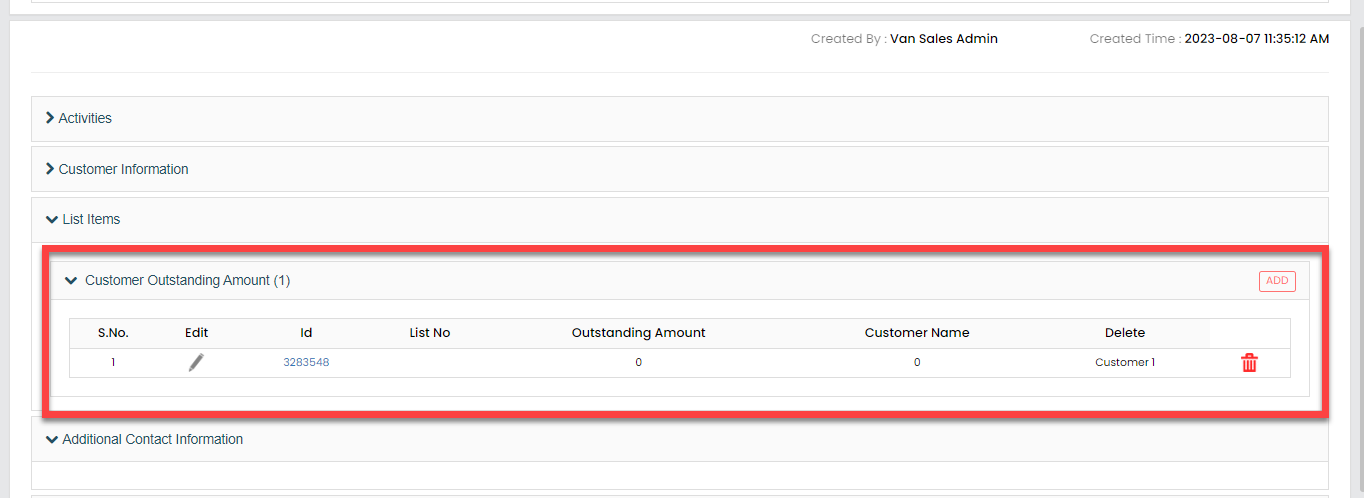
-
When you enable this configuration, you can see the outstanding
amount on the customer details page. You can add the outstanding
amount from this page also.
Route Planning
Executing a Van sales requires visiting multiple customers in a particular area. Using Route Plans, you can effectively manage customer visits. It allows you to select multiple customers and find out the optimized routes to complete the customer visits quickly. You can create recurring routes like daily, weekly, and monthly. In this section, we will create a route plan and assign it to a field executive. To know more about routes, refer to Route Plans.
To create and assign a route plan, follow the steps below:
-
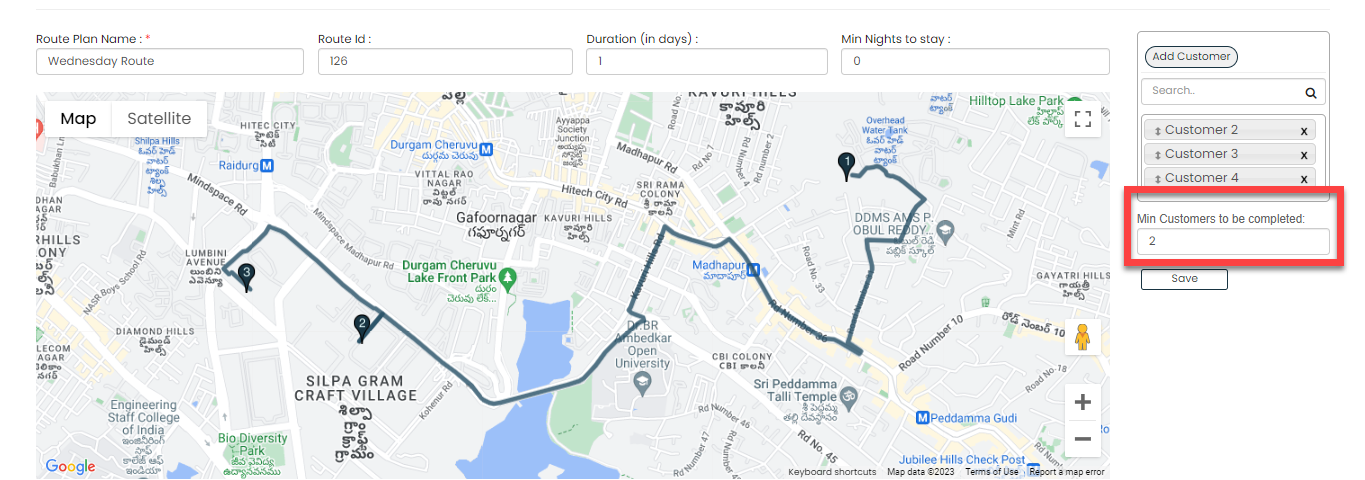
Go to .

-
Enter a name for the route plan, a unique ID for referring to it in
subsequent operations, duration, and a minimum number of customers to
visit.
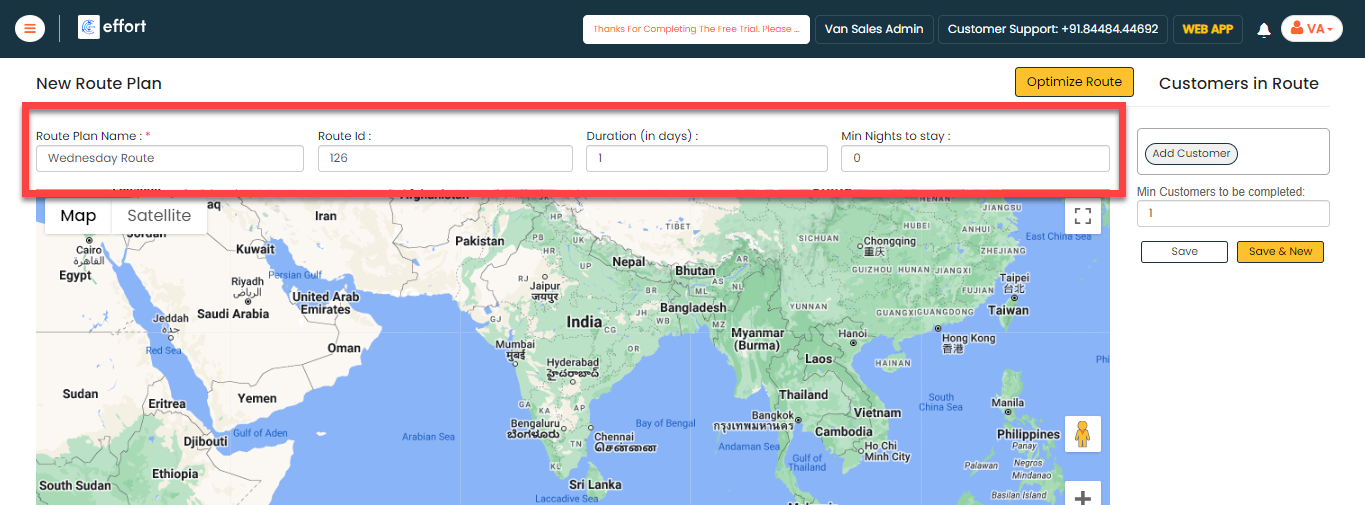
-
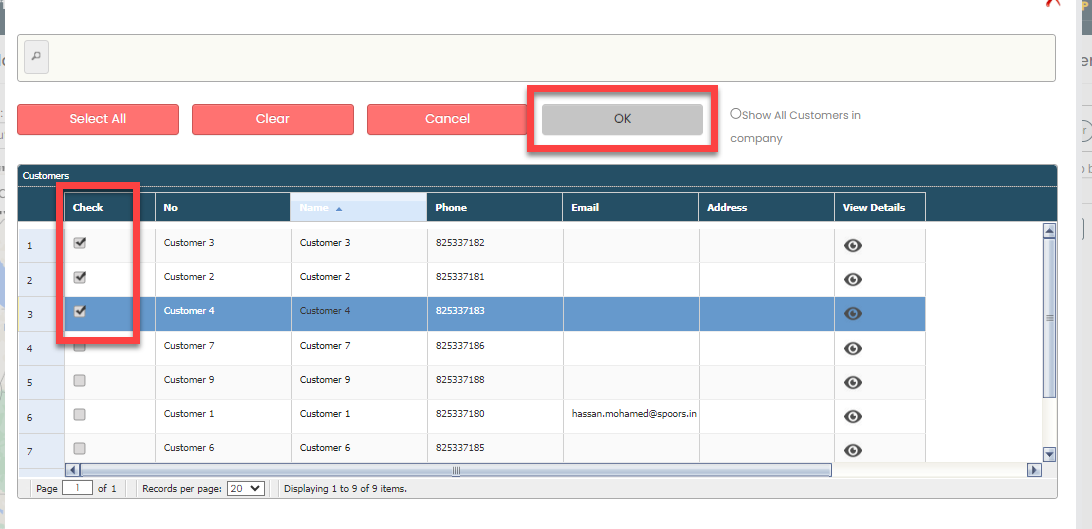
Click the Add Customer button to add customers
that you want to visit in this route.

-
Select customers and click OK.
-
Click the OPTIMIZE ROUTE button to find out the
shortest route that helps you to complete the route quickly.

-
Select the customer you want to visit first and click
OK.

-
In the Min Customers to be completed, enter the
minimum number of customers that must be visited by the field executive
in this route and click Save.
-
Under the Actions column, click the
Assign icon.

-
From the Employee dropdown, select the employee
to which you want to assign the route.

-
Select the route start date from the date field.
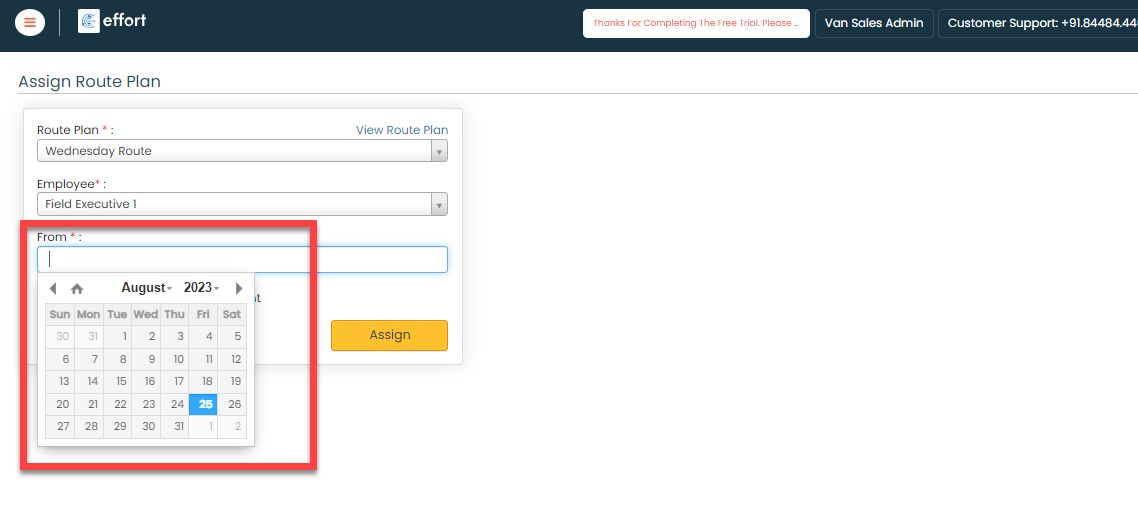
-
Click the This is a recurring route assignment
checkbox to make this route a recurring route.

-
Set the recurring configuration as per your requirement and click
Assign.

We have successfully configured the Van Sales activity in the Effort platform. Now we will execute the Van sales and see how it works.
Execute Van Sales
In this section, we will show you how to execute the Van sales activity in the Effort Platform. It provides the activities performed by the field executives and the dispatch managers, such as logging into the effort, requesting cash in hand, submitting load in/out requests, approving load in/out requests, performing sales at the customer, and so on. Let's get started.
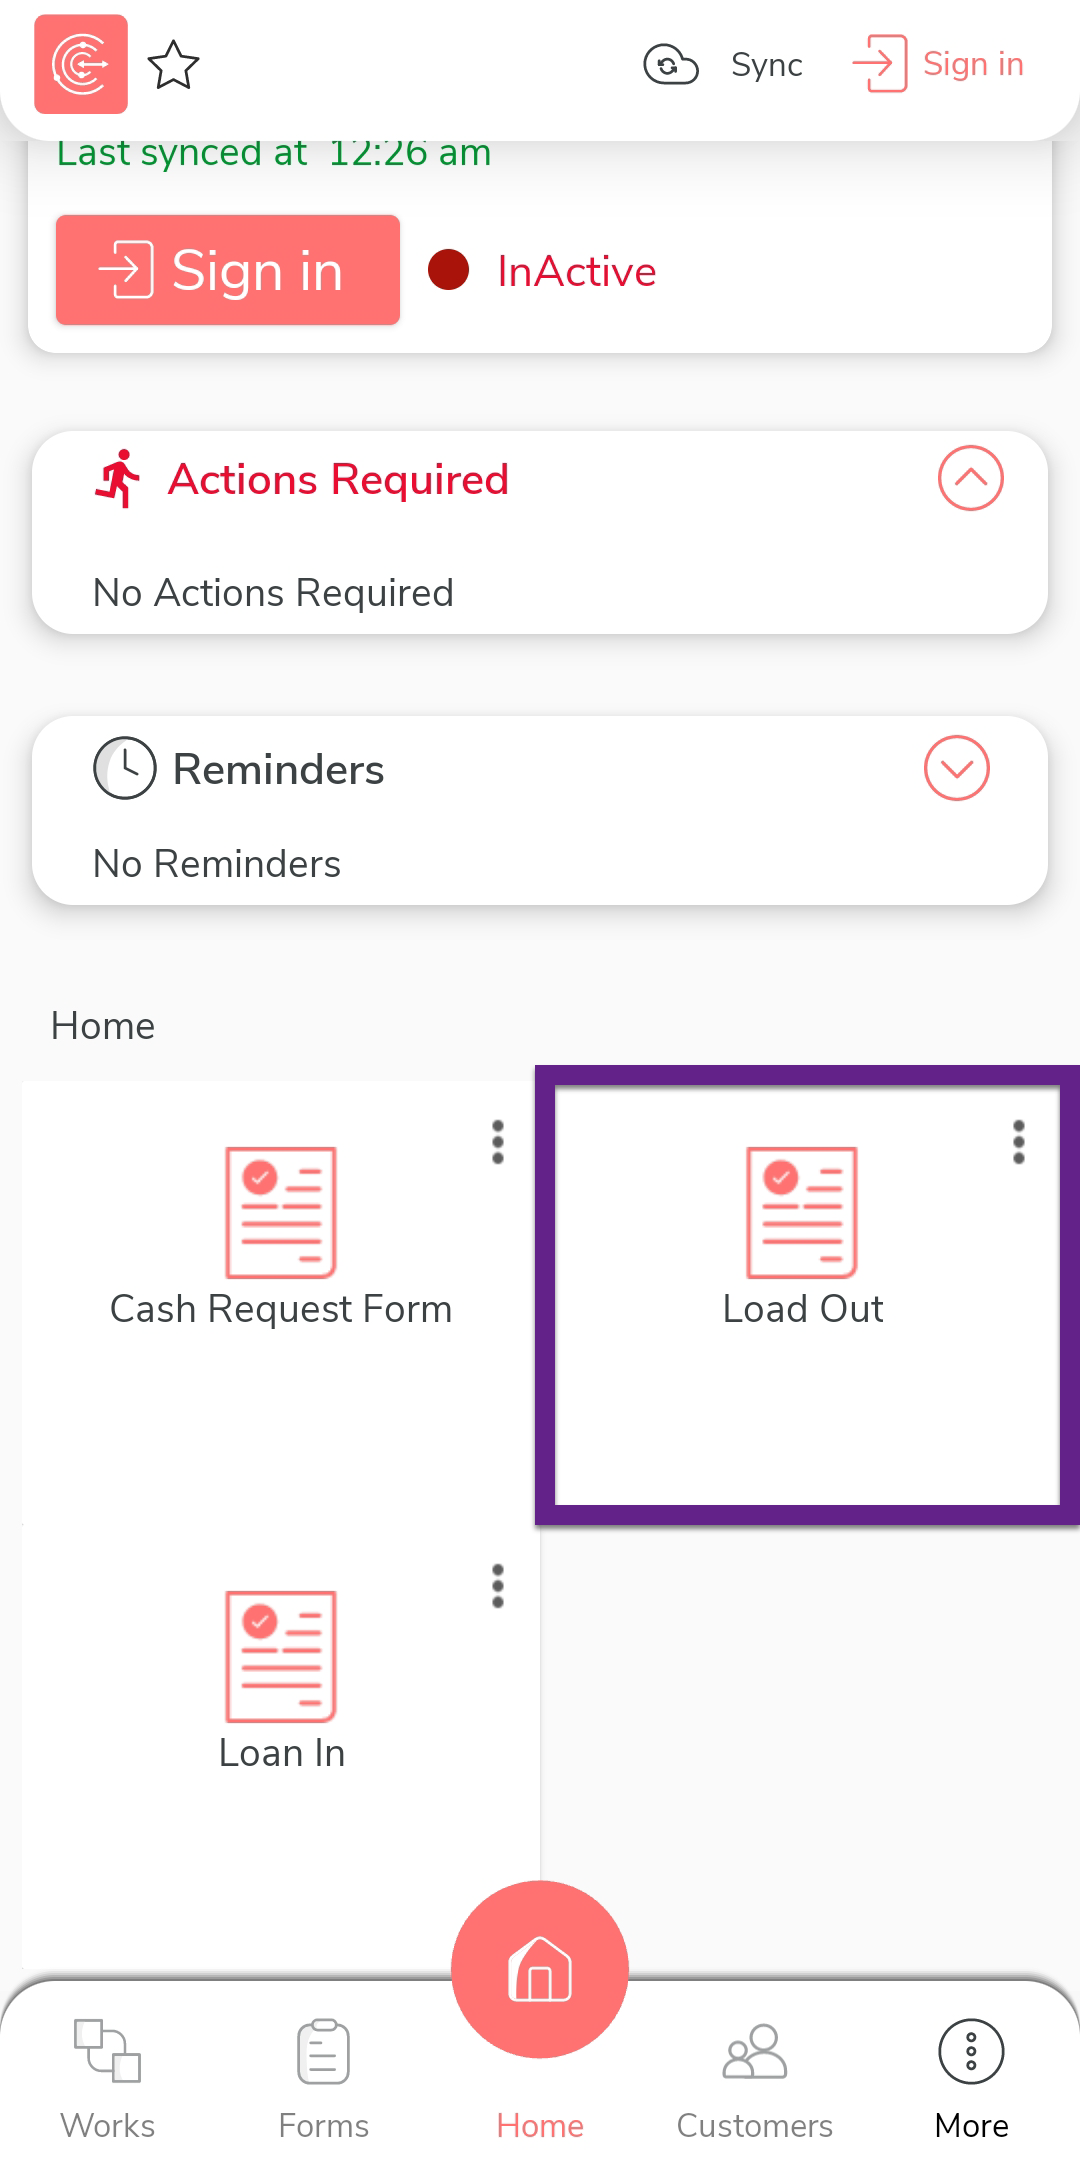
Login to Effort NXT Mobile App
To begin with Van sales, we require an application through which we can log in, check available cash, generate load requests, and perform related tasks. This section provides instructions to get started with the Effort NXT mobile app.
-
On your mobile phone, open either the Play Store or App Store and
install the Effort NXT app.
Note: To know more about how to install the app, refer to Install EFFORT NXT App -
Once the download is completed, grant all the required
permissions.
-
Login to the Effort app using your registered mobile number.

Note: To register using your registered mobile number, refer to Log in to Mobile App Using Phone.Note: To register using your email and password, refer to Log in to Mobile App Using Email -
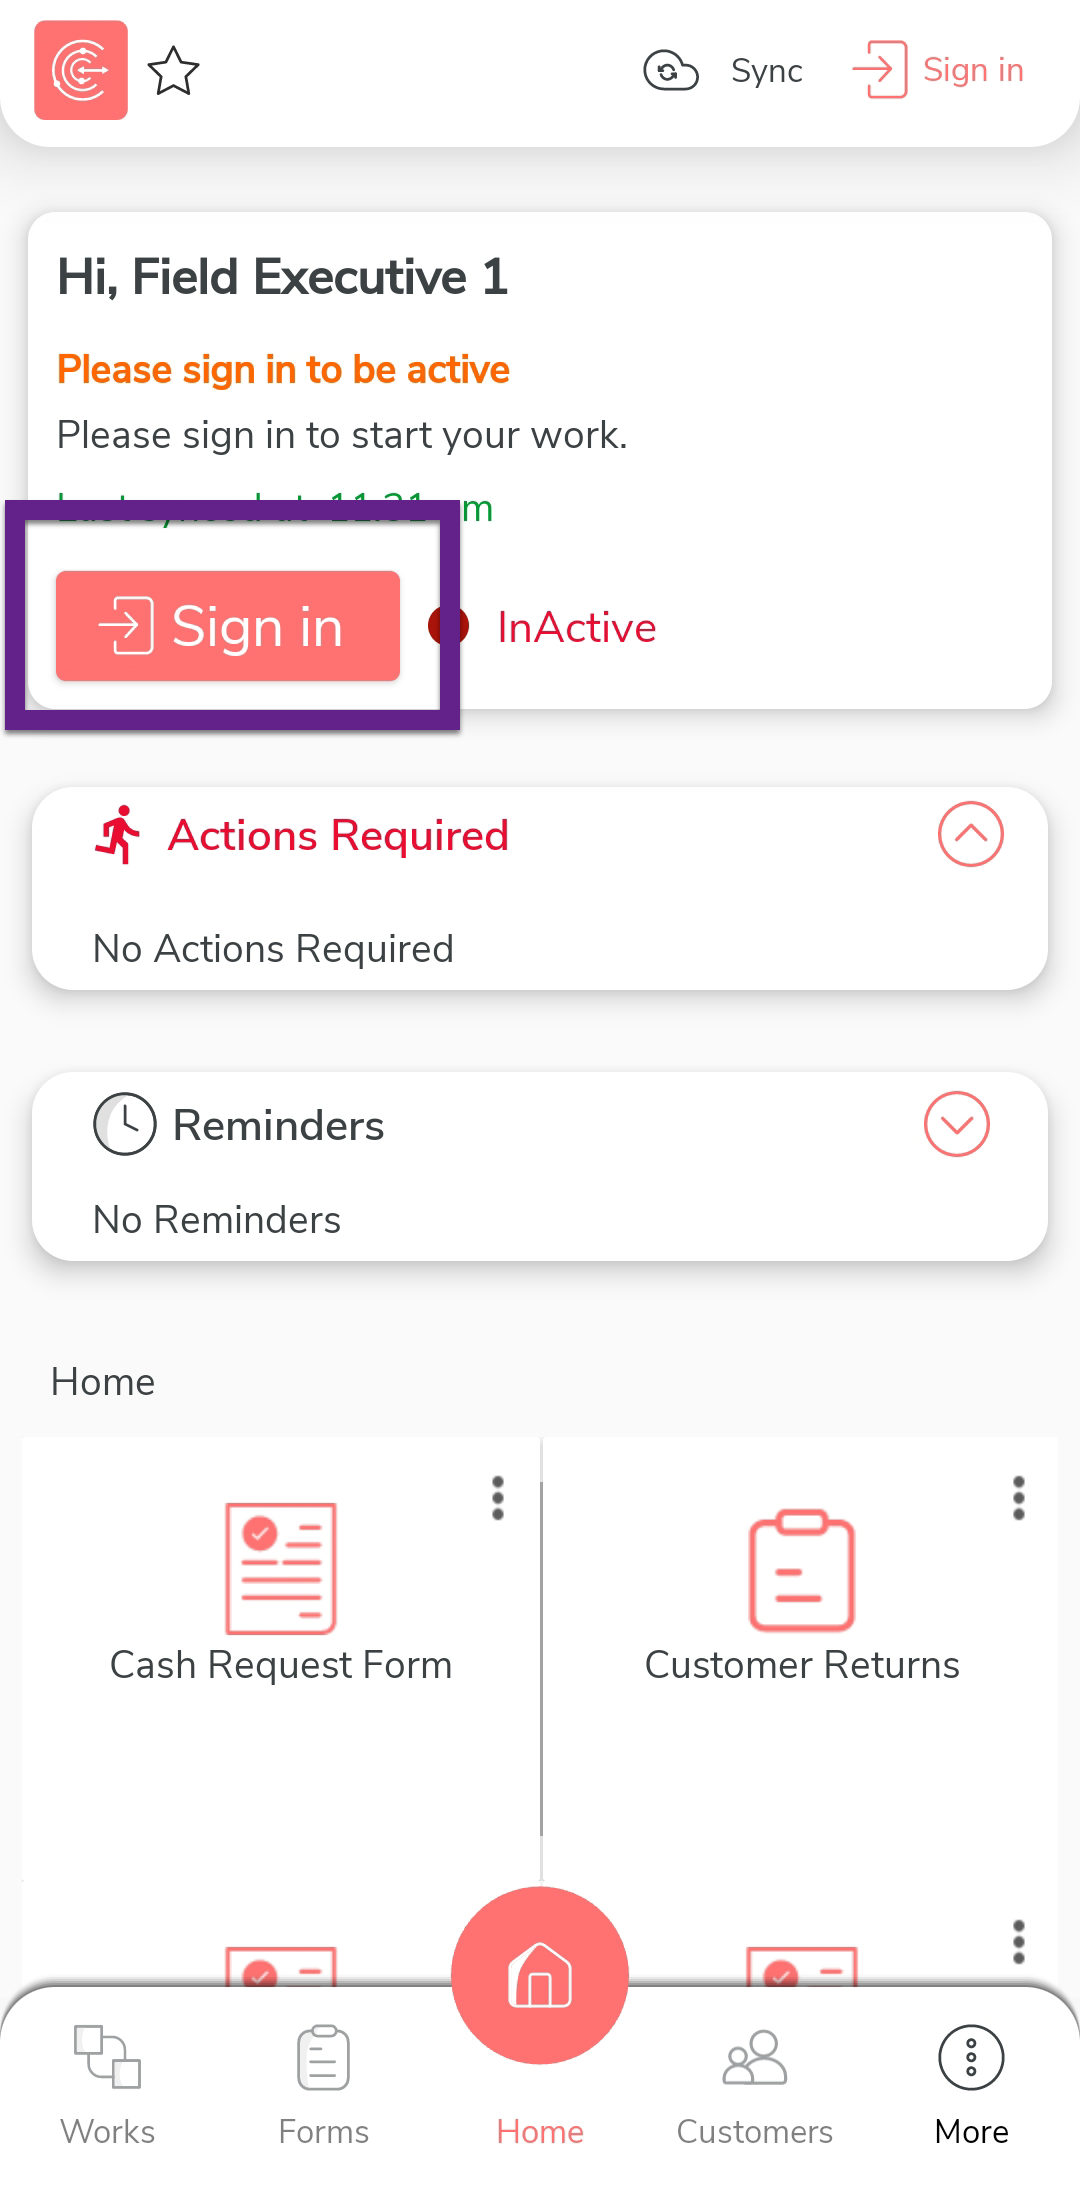
After you log in to the mobile app, tap Sign in
to mark that you have started working.
-
The mobile captures your face and your current location. On this
screen, ensure your face and location are captured correctly, and then
tap Sign In.

-
Once you complete Sign In, tap
Sync to sync the data with the server.

Note: Make sure to Sync the mobile app every time you perform an activity to ensure that your data is updated on the server. If you fail to sync, your changes or work will not be captured in the server.
Request Cash In Hand
Once the sign-in activity is finished, the next task for the field executive involves requesting a cash allowance for daily miscellaneous expenses. To submit a cash in hand request through the mobile app, follow the steps below:
- Login to the Effort NXT app as a Field Executive.
-
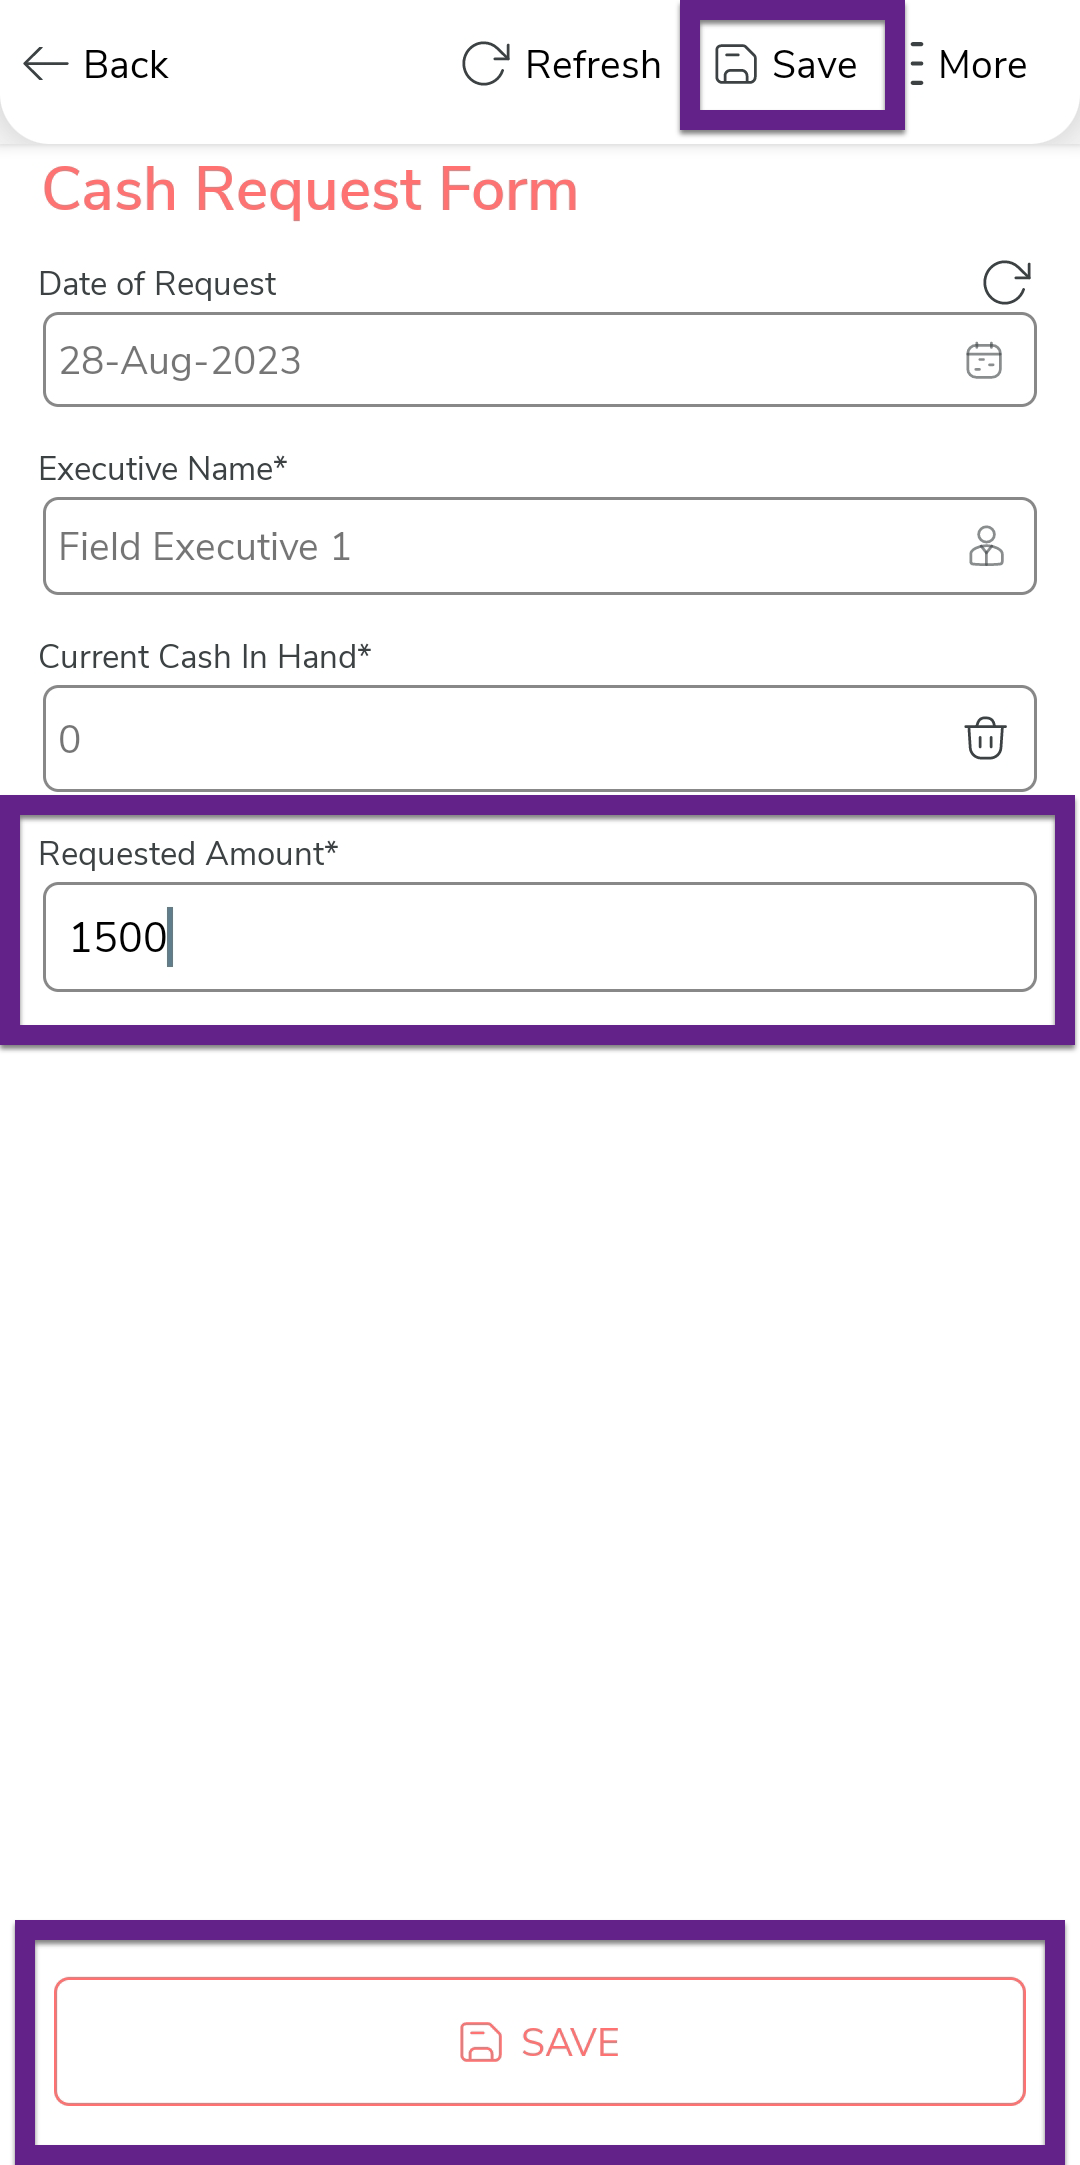
On the home screen, tap Cash Request Form.

-
Tap the add form icon.

-
You can see the form submission screen. As per the configuration, it
displays today's date, the requester's name, and the current cash in
hand. In the Requested Amount field, enter the
amount of cash in hand you need for your expenses and then tap
Save.
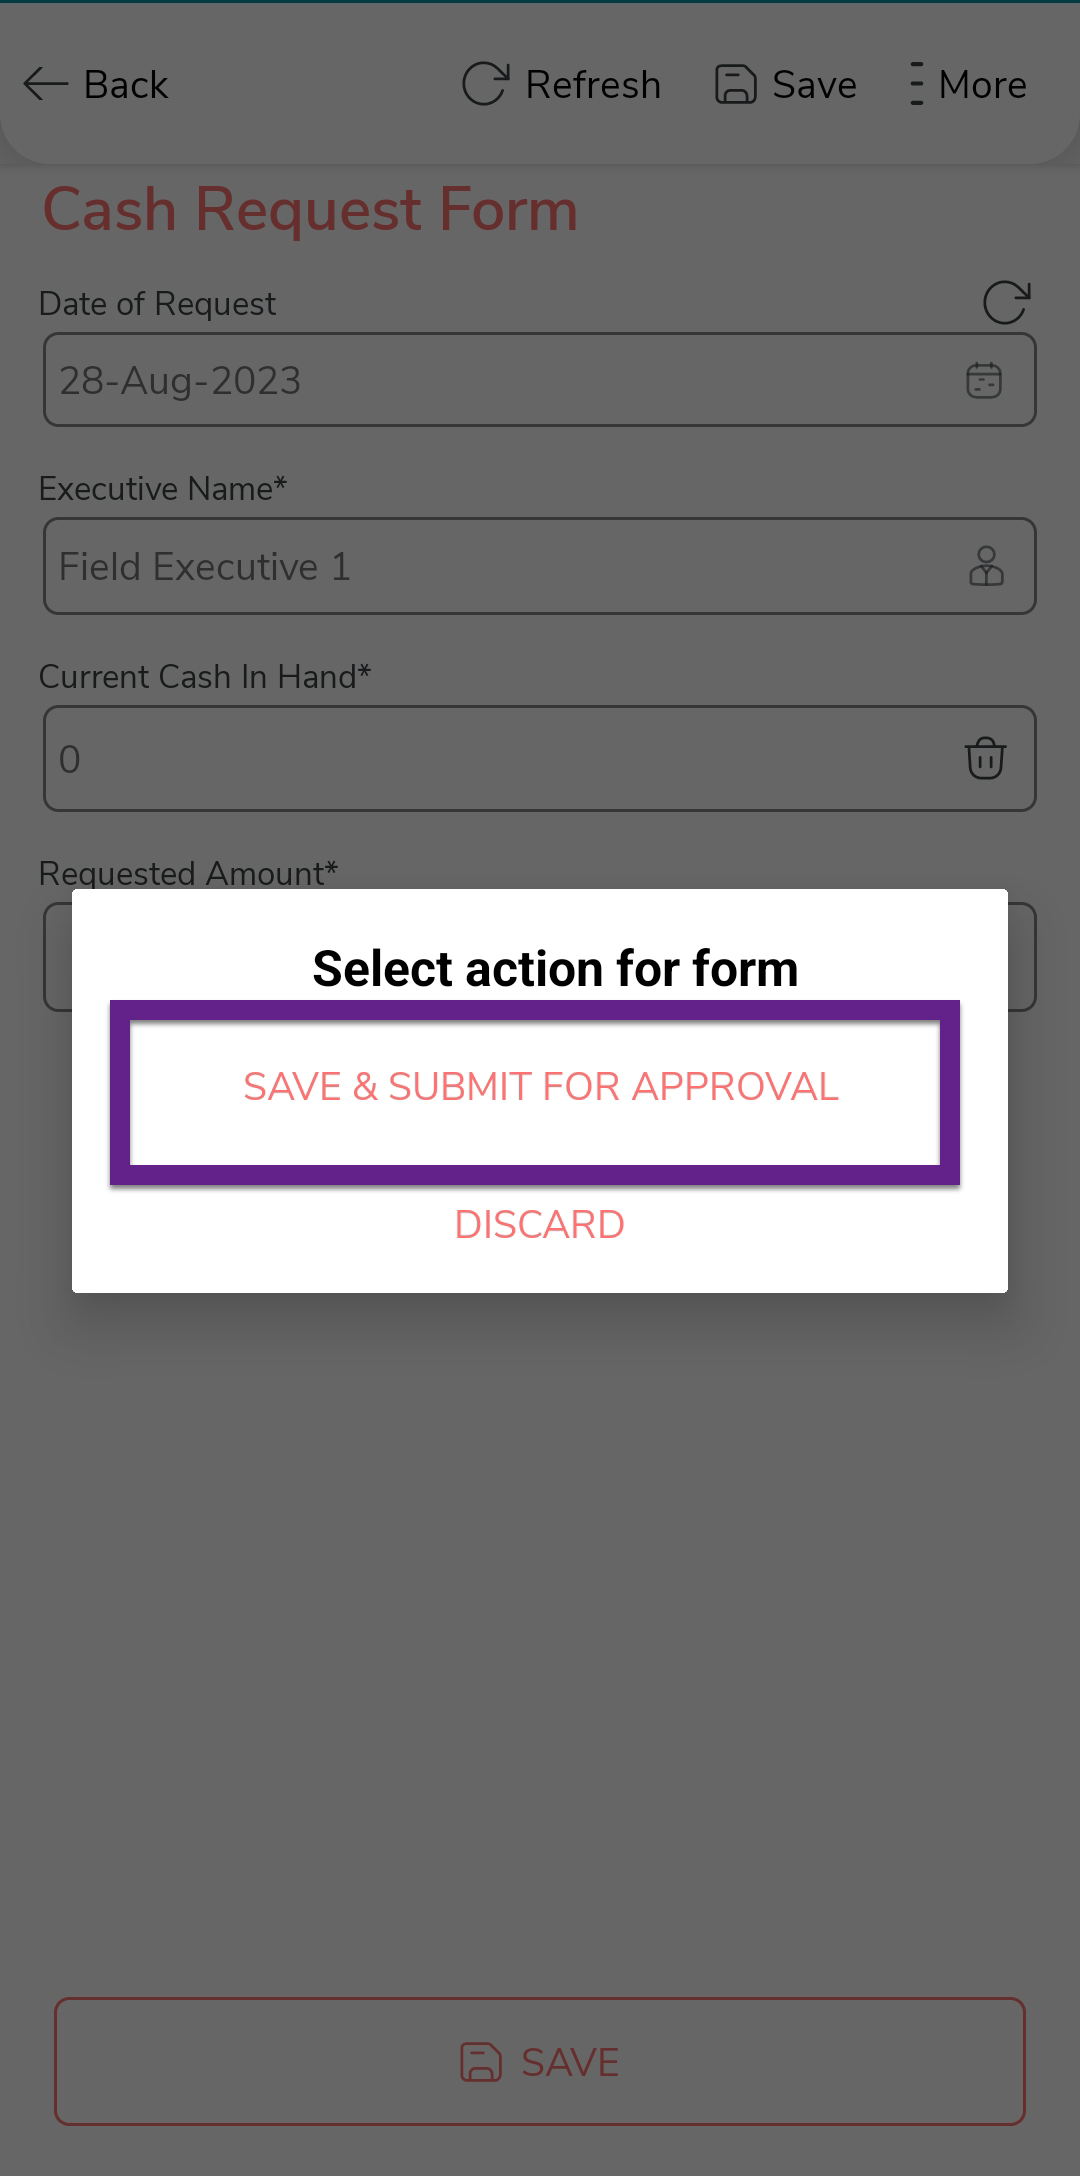
-
On the confirmation pop-up, tap Save & Submit for
Approval.
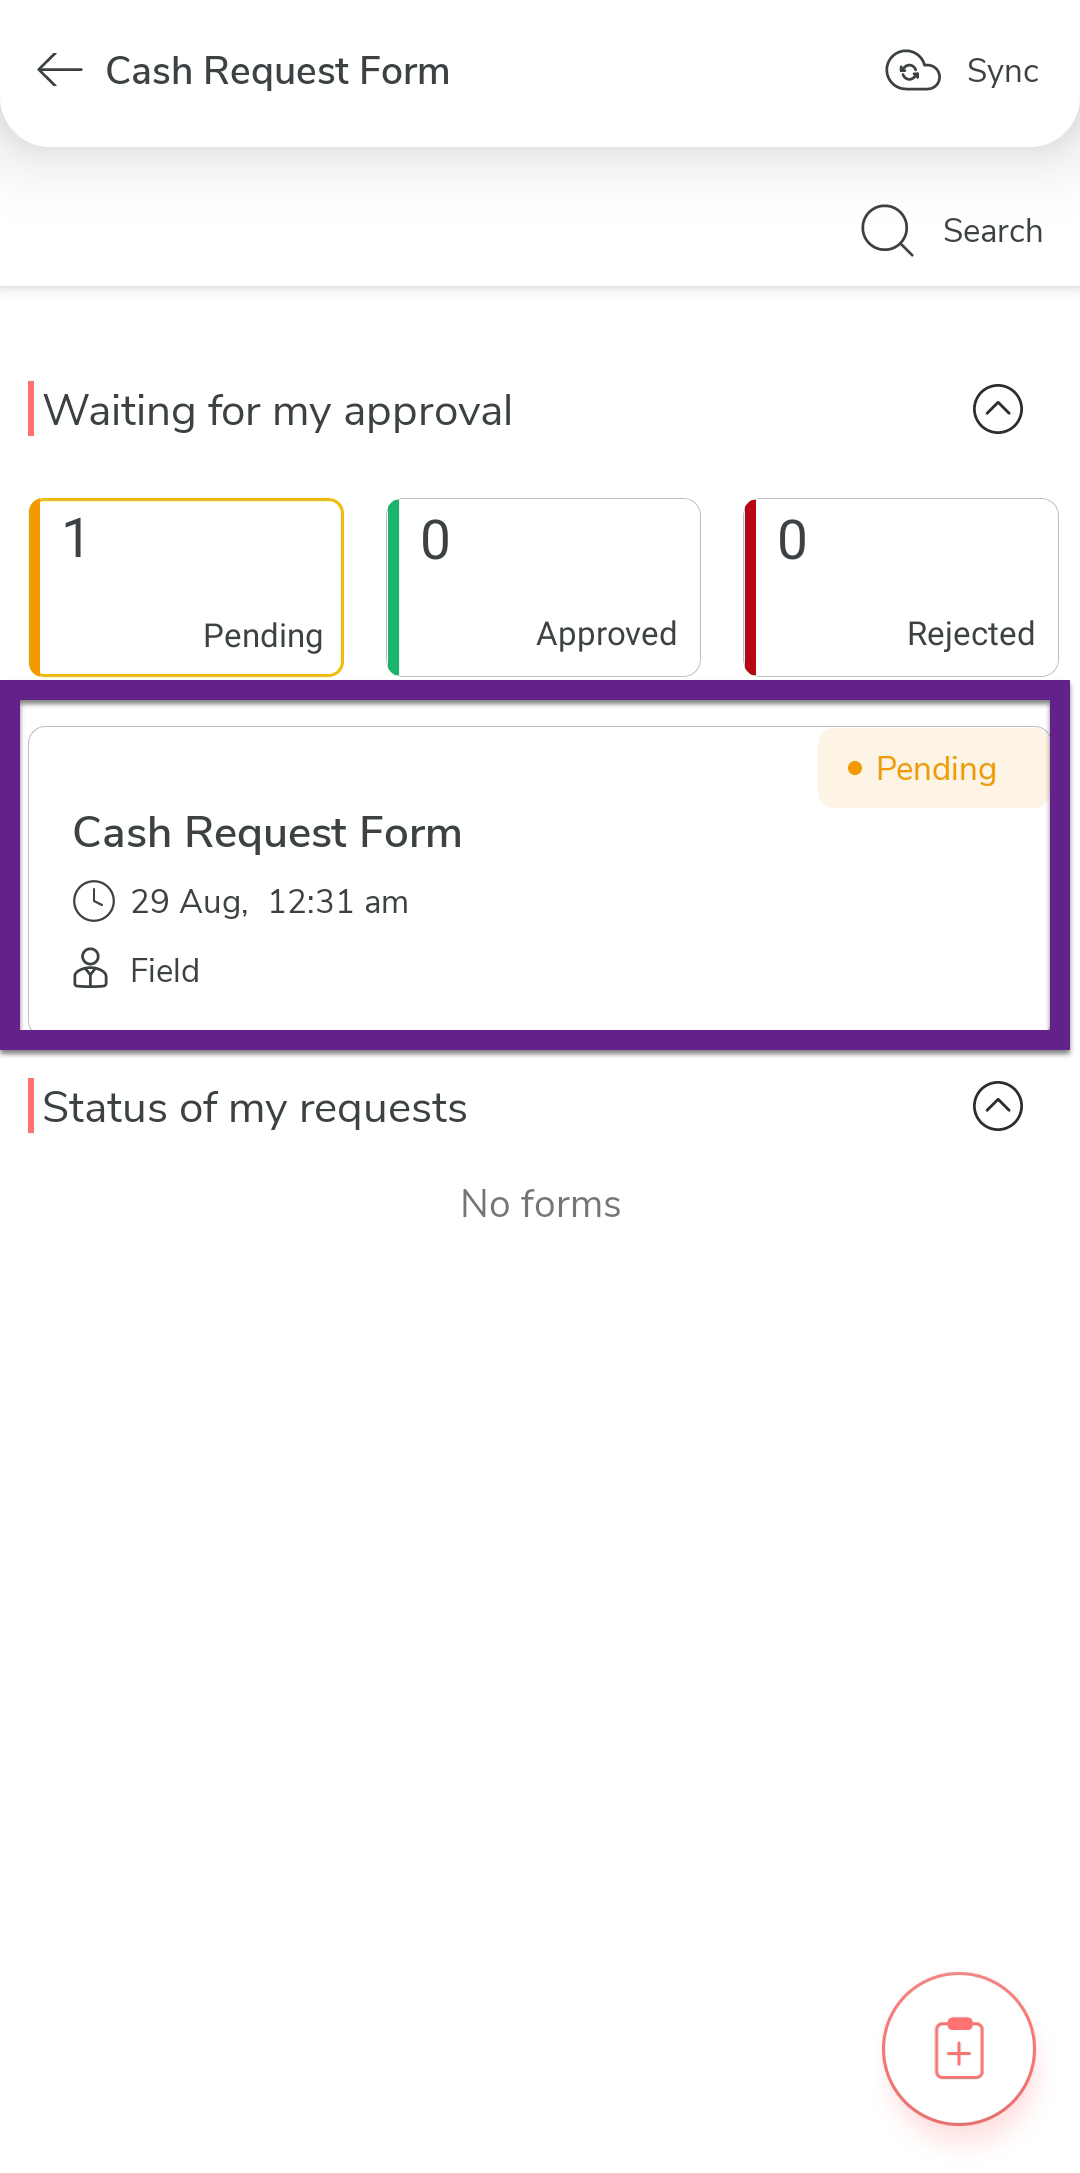
Once the form is submitted, you will see the form submissions list screen. You can find the submitted form here. You can tap to view the submission details and edit if you want to make any changes to the submitted form.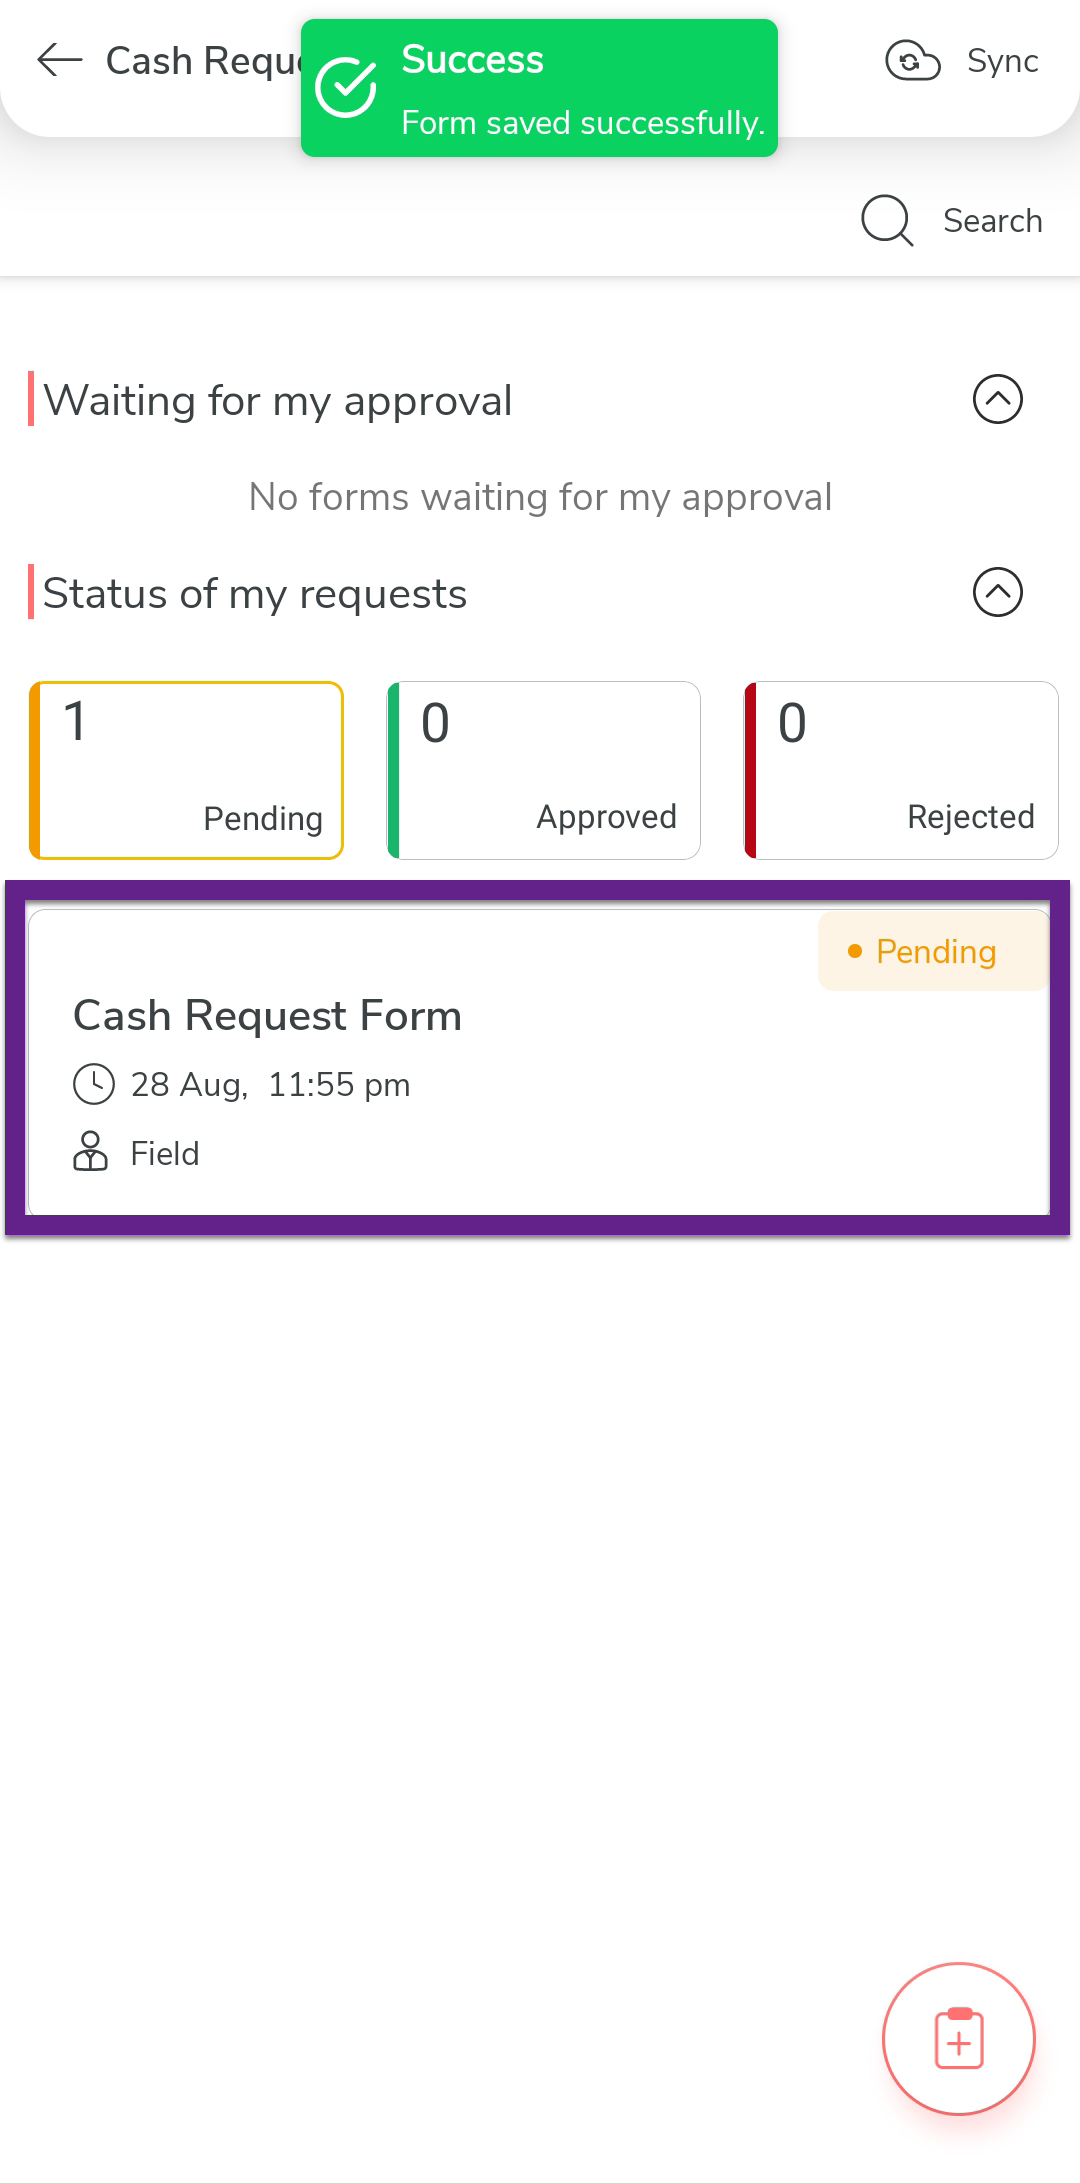
-
Go to the home screen and tap Sync.

Upon successful completion of the Sync process, the submitted form will be sent for the manager's approval. To check the approval status, refer to Check Form Approval Status.
Approve Cash In Hand Request from Mobile App
This section applies to the reporting manager of the field executive, In this section, we will show you how a manager approves a submitted cash in hand request from the mobile app.
- Login to the Effort NXT app as a Manager.
-
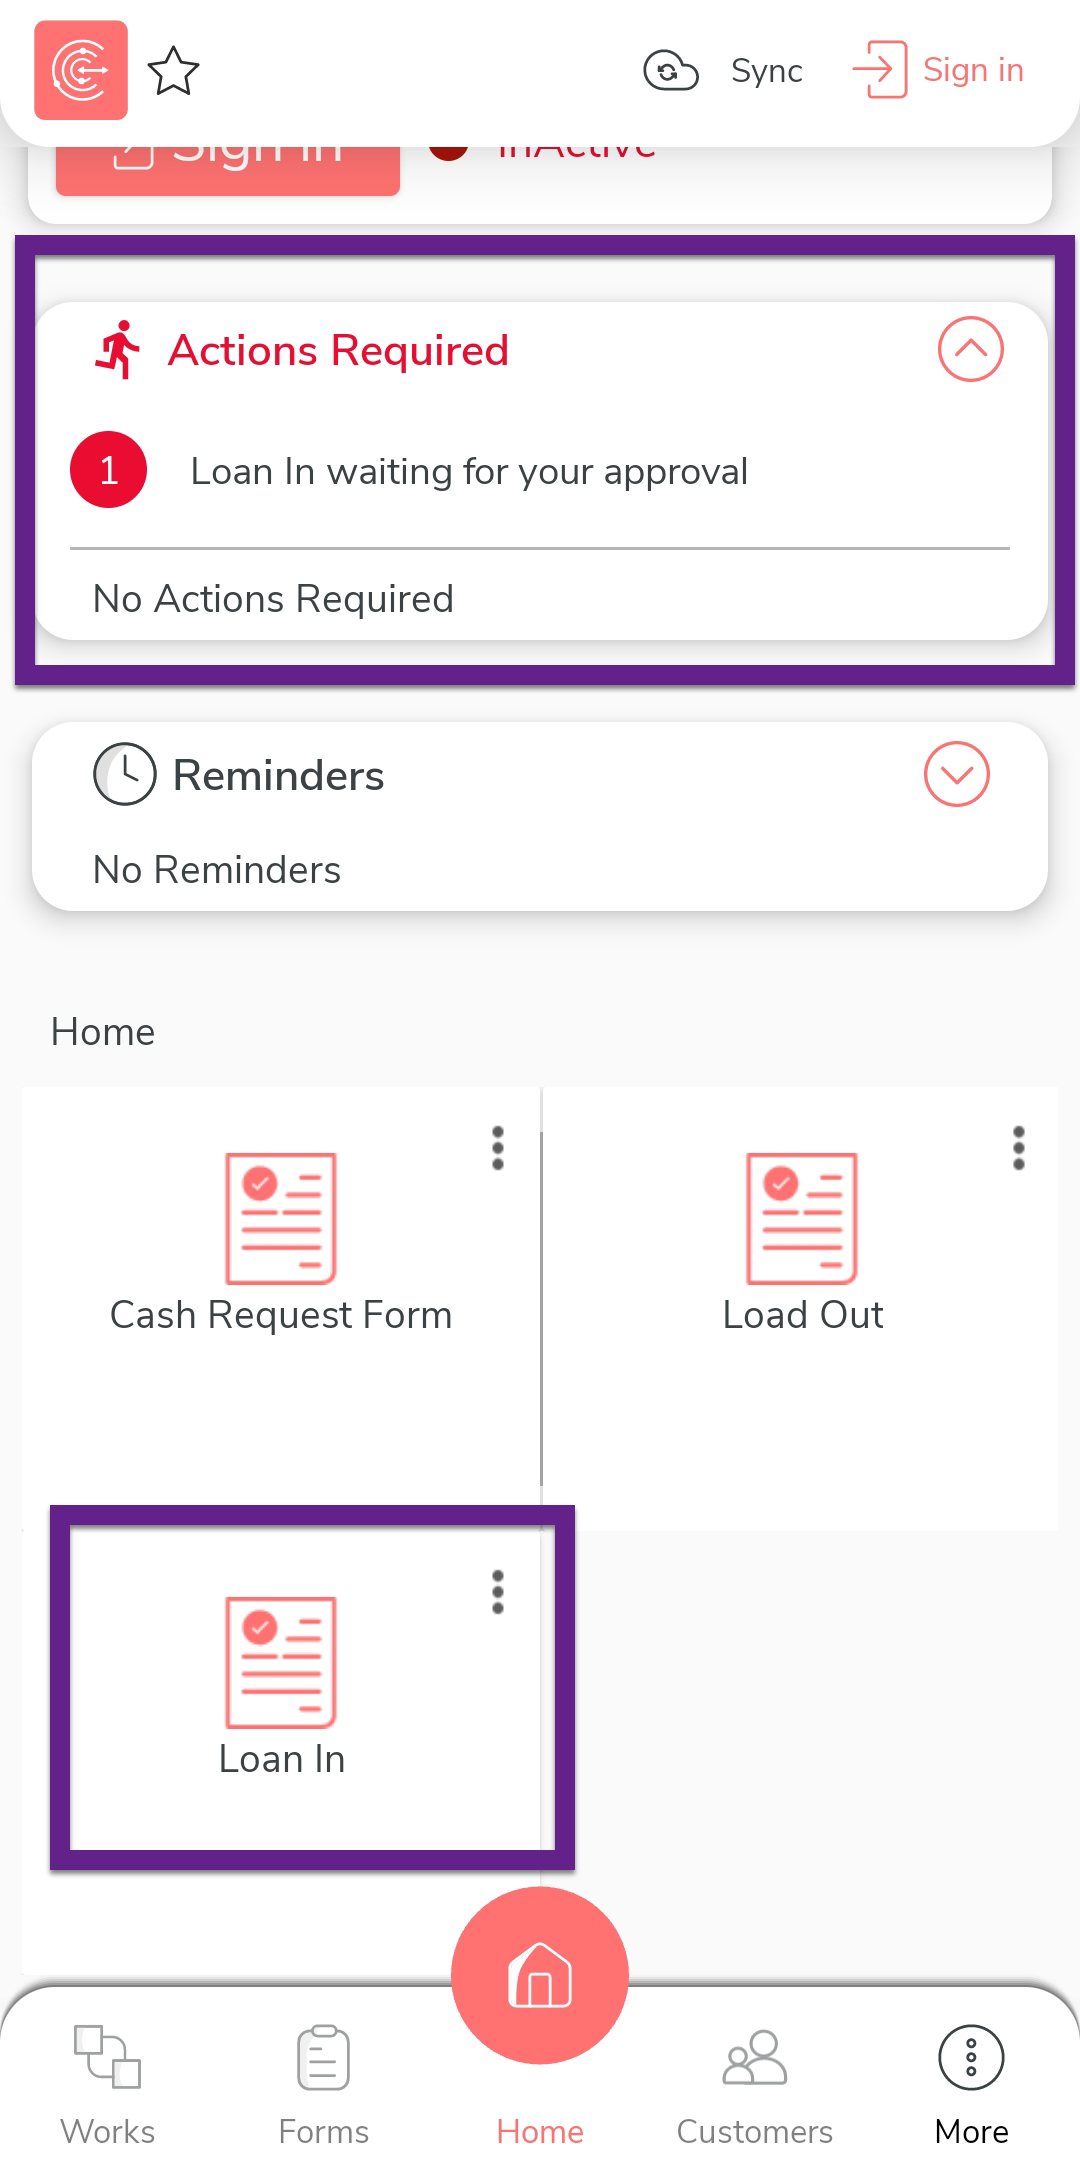
On the home screen, tap on either Actions
Required or Cash In Hand
Form.

Note: If you don't find any submitted forms, make sure to sync the mobile app. -
Tap on the form submission you want to approve.
-
Tap View Form to view form submission
details.

-
Verify the form submission details. Provide your comment in the
Remarks field and tap
Approve to approve the form submission.
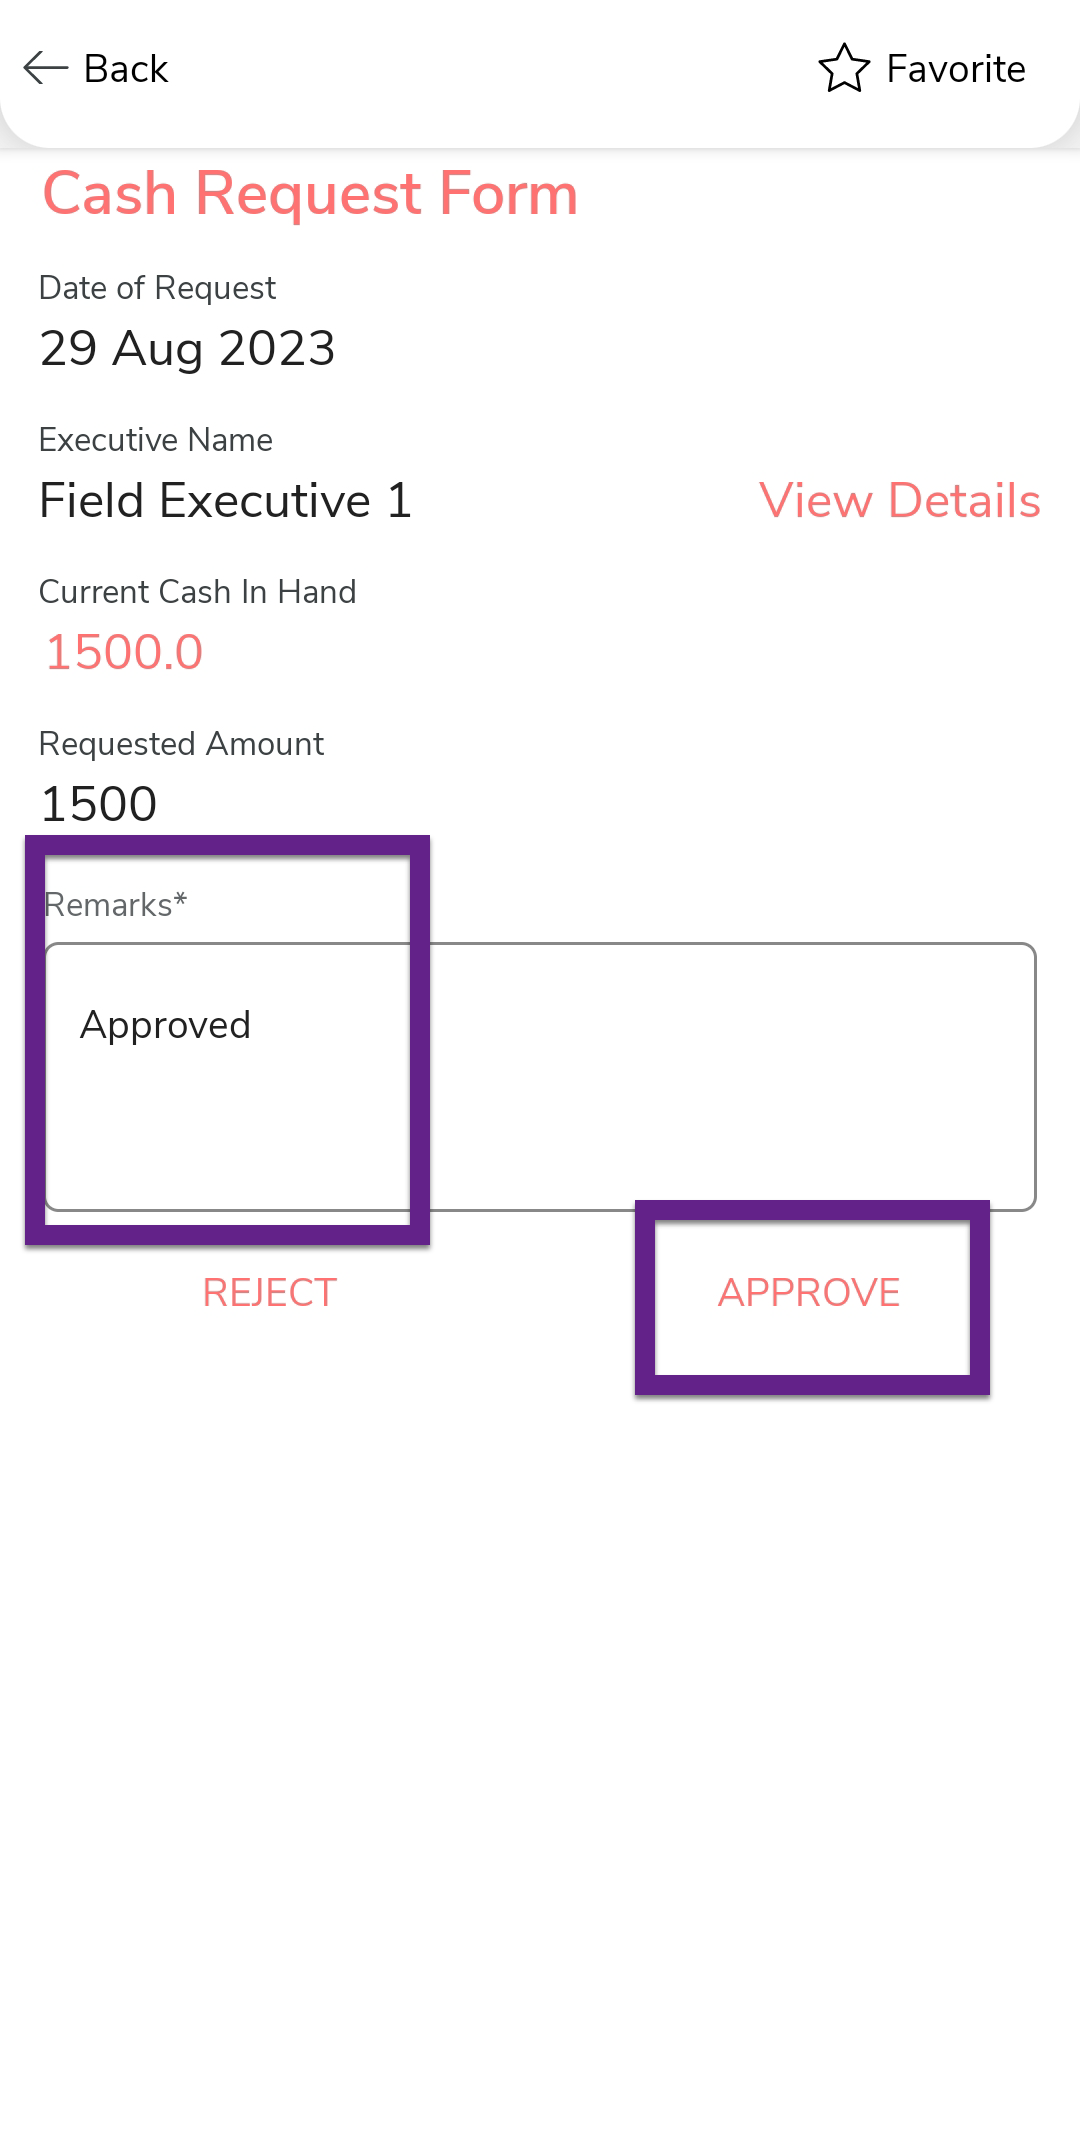
Note: After approving the form, make sure to sync the mobile app. Once the Cash In Hand is approved, it will be updated in the mobile app. The field executive can use that employee for his expenses.
Approve Cash In Hand Request from Web App
This section applies to the reporting manager of the field executive, In this section, we will show you how a manager approves a submitted cash in hand request from the web app.
- Go to .
- Scroll down to the bottom of the page. You will see the form submissions waiting for your approval.
-
Click on the form submission you want to approve.

-
Verify the form submission details. To approve the form submission,
click Approve.

-
On the pop-up window, provide your comment in the
Remarks field and click
Approve to approve the form submission.

Assign Route Plan
After the cash in hand is approved, the manager will proceed to assign a route plan to the field executive. The route plan shows the list of customers that the field executive needs to visit for the day. We've already covered how to create and assign the route plan in the Route Planning topic.
Requesting Load
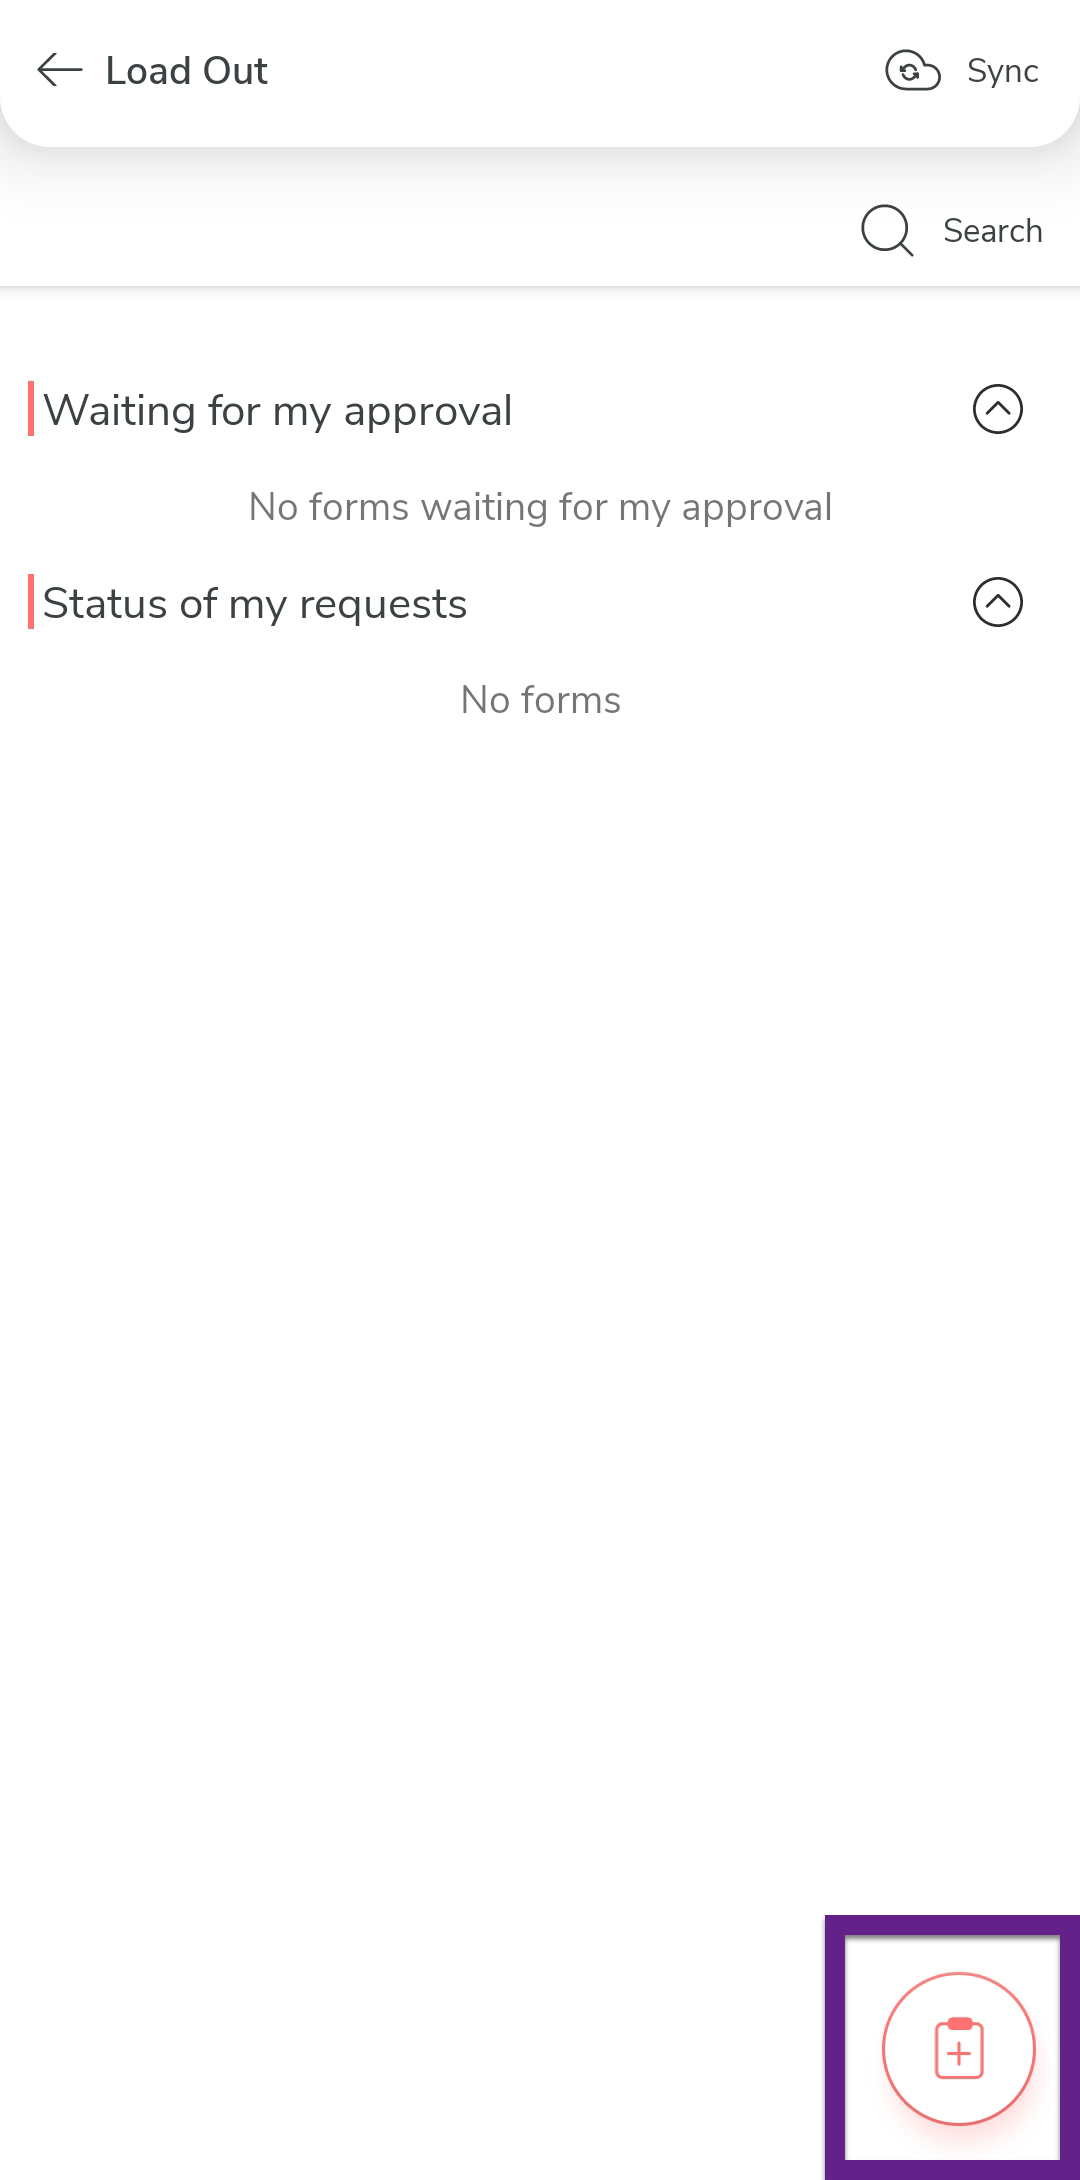
Once the route plan is assigned, the field executive will go to the warehouse loading bay and load in the SKUs into the Van. Once the stock is loaded, the executive will submit the Load In form. This form goes to the dispatch manager to get approved. After the approval, the Van Inventory list will be incremented for the same SKUs.
To submit the load-in request in the mobile app, follow the steps below:
- Login to the Effort NXT app as a Field Executive.
-
On the home screen, tap Load In.

-
Click the add form icon.

-
As per the configuration, you can see the Date field shows the
today's date by default.

-
On the Load In Data section, tap the toggle icon
if you want to switch to a horizontal view.

-
Tap the Van Inventory field, and select a
product, and then enter the quantity received in the
Quantity field.
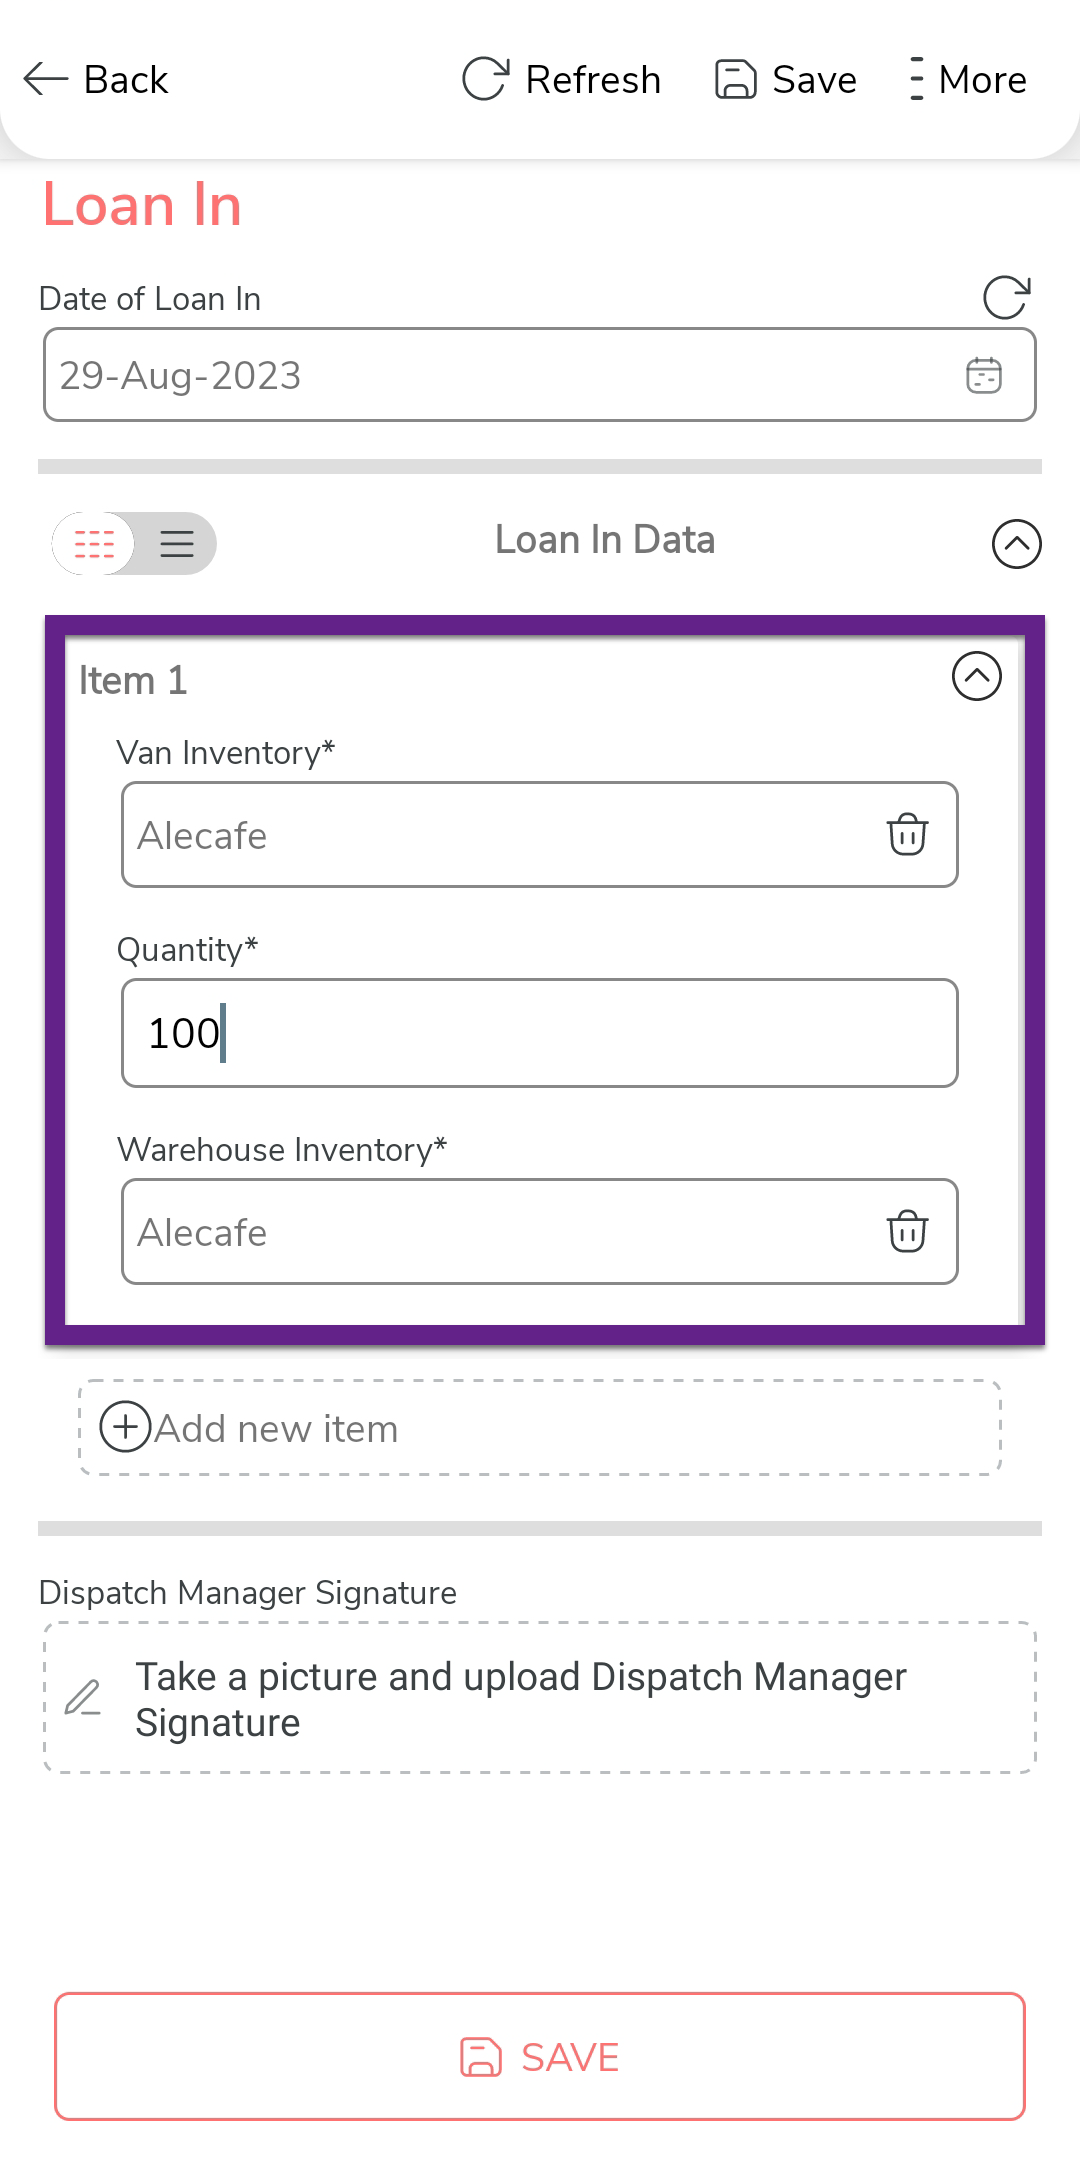
-
Tap Add new item to create more instances to
capture the items received.

-
Once captured all the items, tap the Dispatch Manager
Signature field and take the dispatch manager's
approval.

-
Once everything is completed, tap Save and then
select Save & Submit For Approval.

Note: After submitting the form, make sure to sync the mobile app.As configured, the form submission is now submitted for the dispatch manager's approval.
Approve Load In Request
As per the configuration, the empoyees in the dispatch manager's group will receive the request. In this section, we will approve the Load In Request that was submitted by the field executive in the previous section.
- Login to Effort NXT app as Dispatch Manager.
-
On the home screen, tap Action Required or
Load In.
Note: If you don't find any submitted forms, make sure to sync the mobile app. -
Tap the form submission that you want to approve.

-
Tap View Form.

-
Review form submission details. If everything is fine, then enter your
comments in the Remarks field and tap
Approve.

Note: After approving the form, make sure to sync the mobile app.
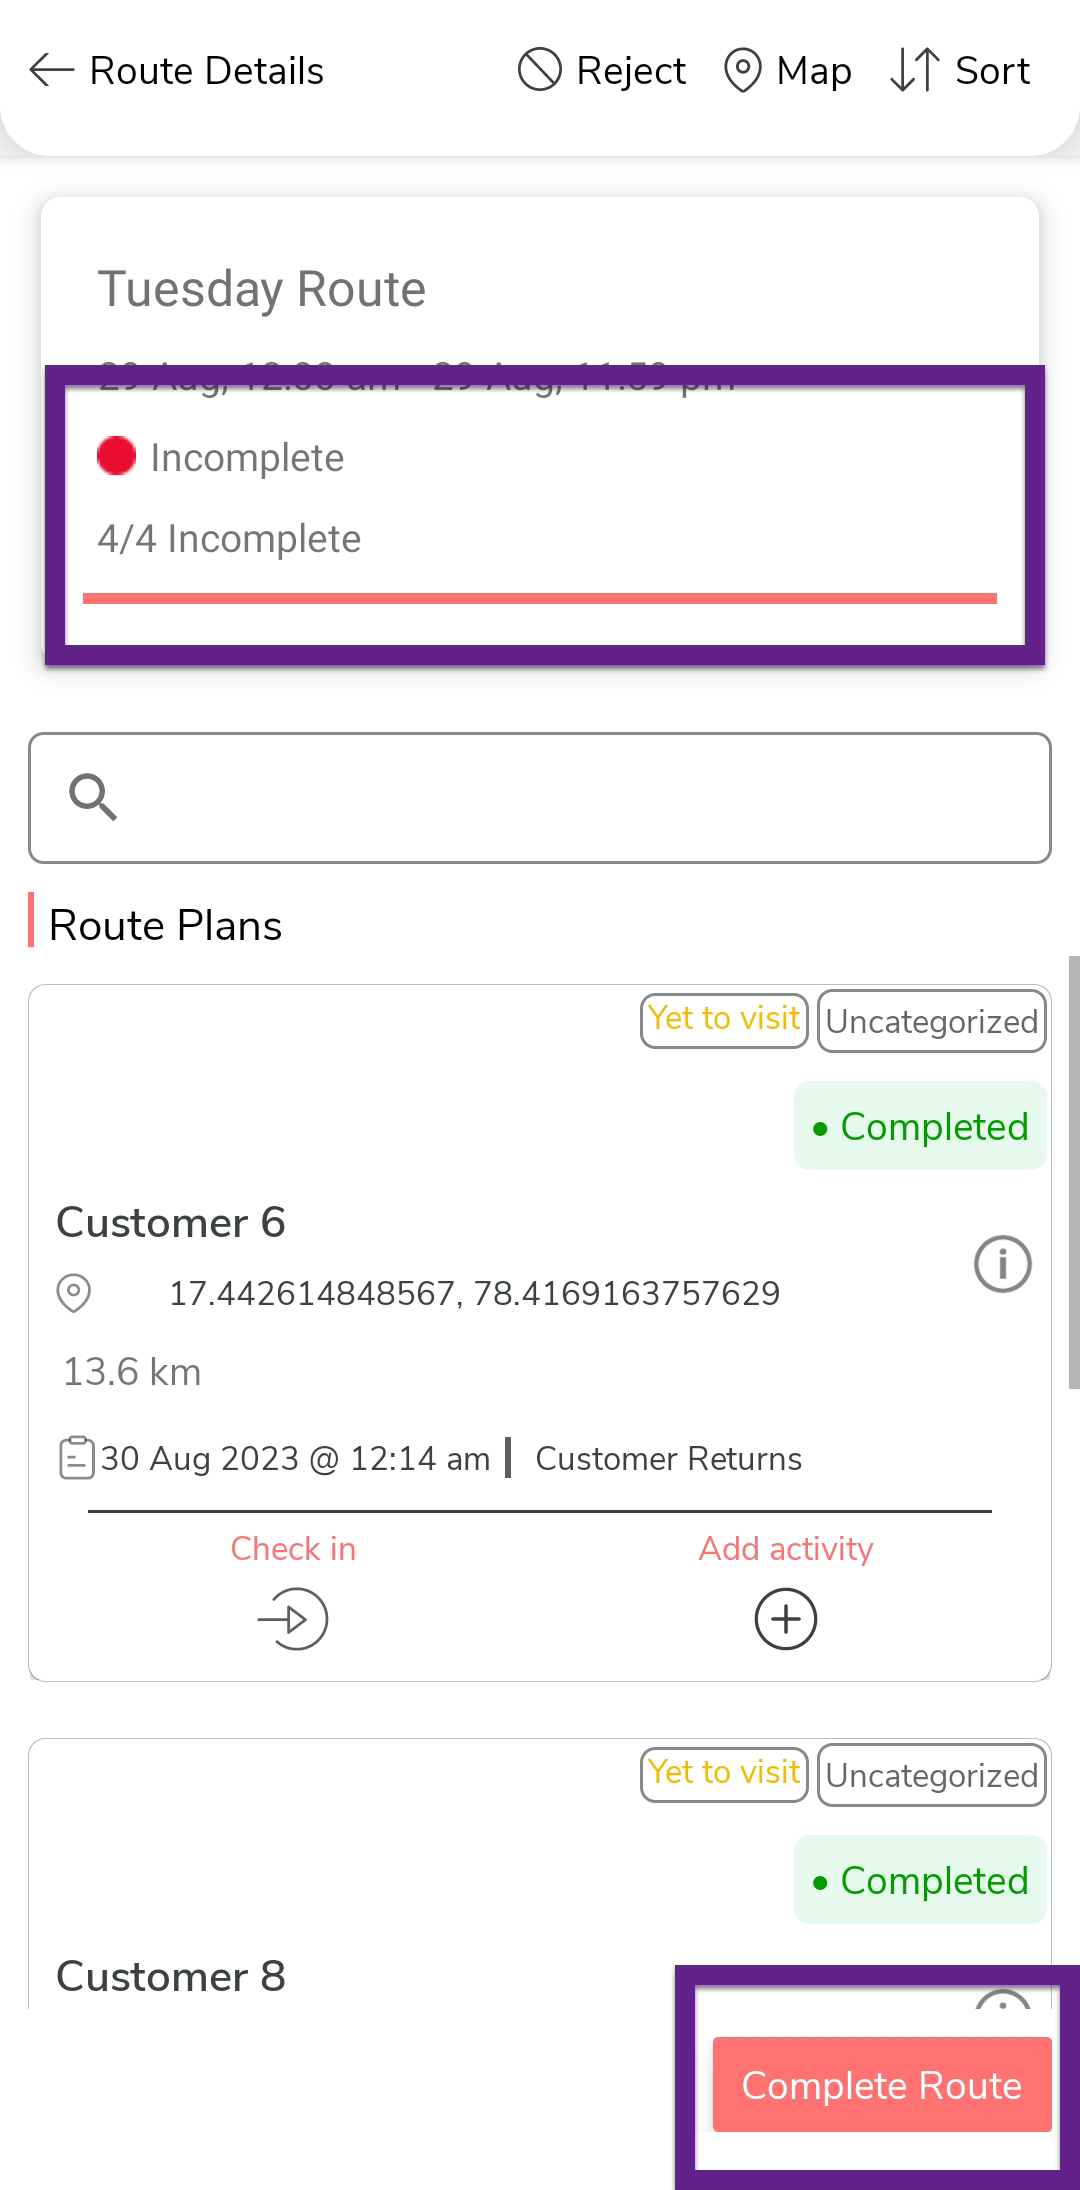
Execute Route Plan
After the Load In request is approved, the field executive starts visiting customers using the Routes module. In this section, we will show you how a field executive executes the route plan and completes all the customer visits.
- Login to the Effort NXT app as a Field Executive.
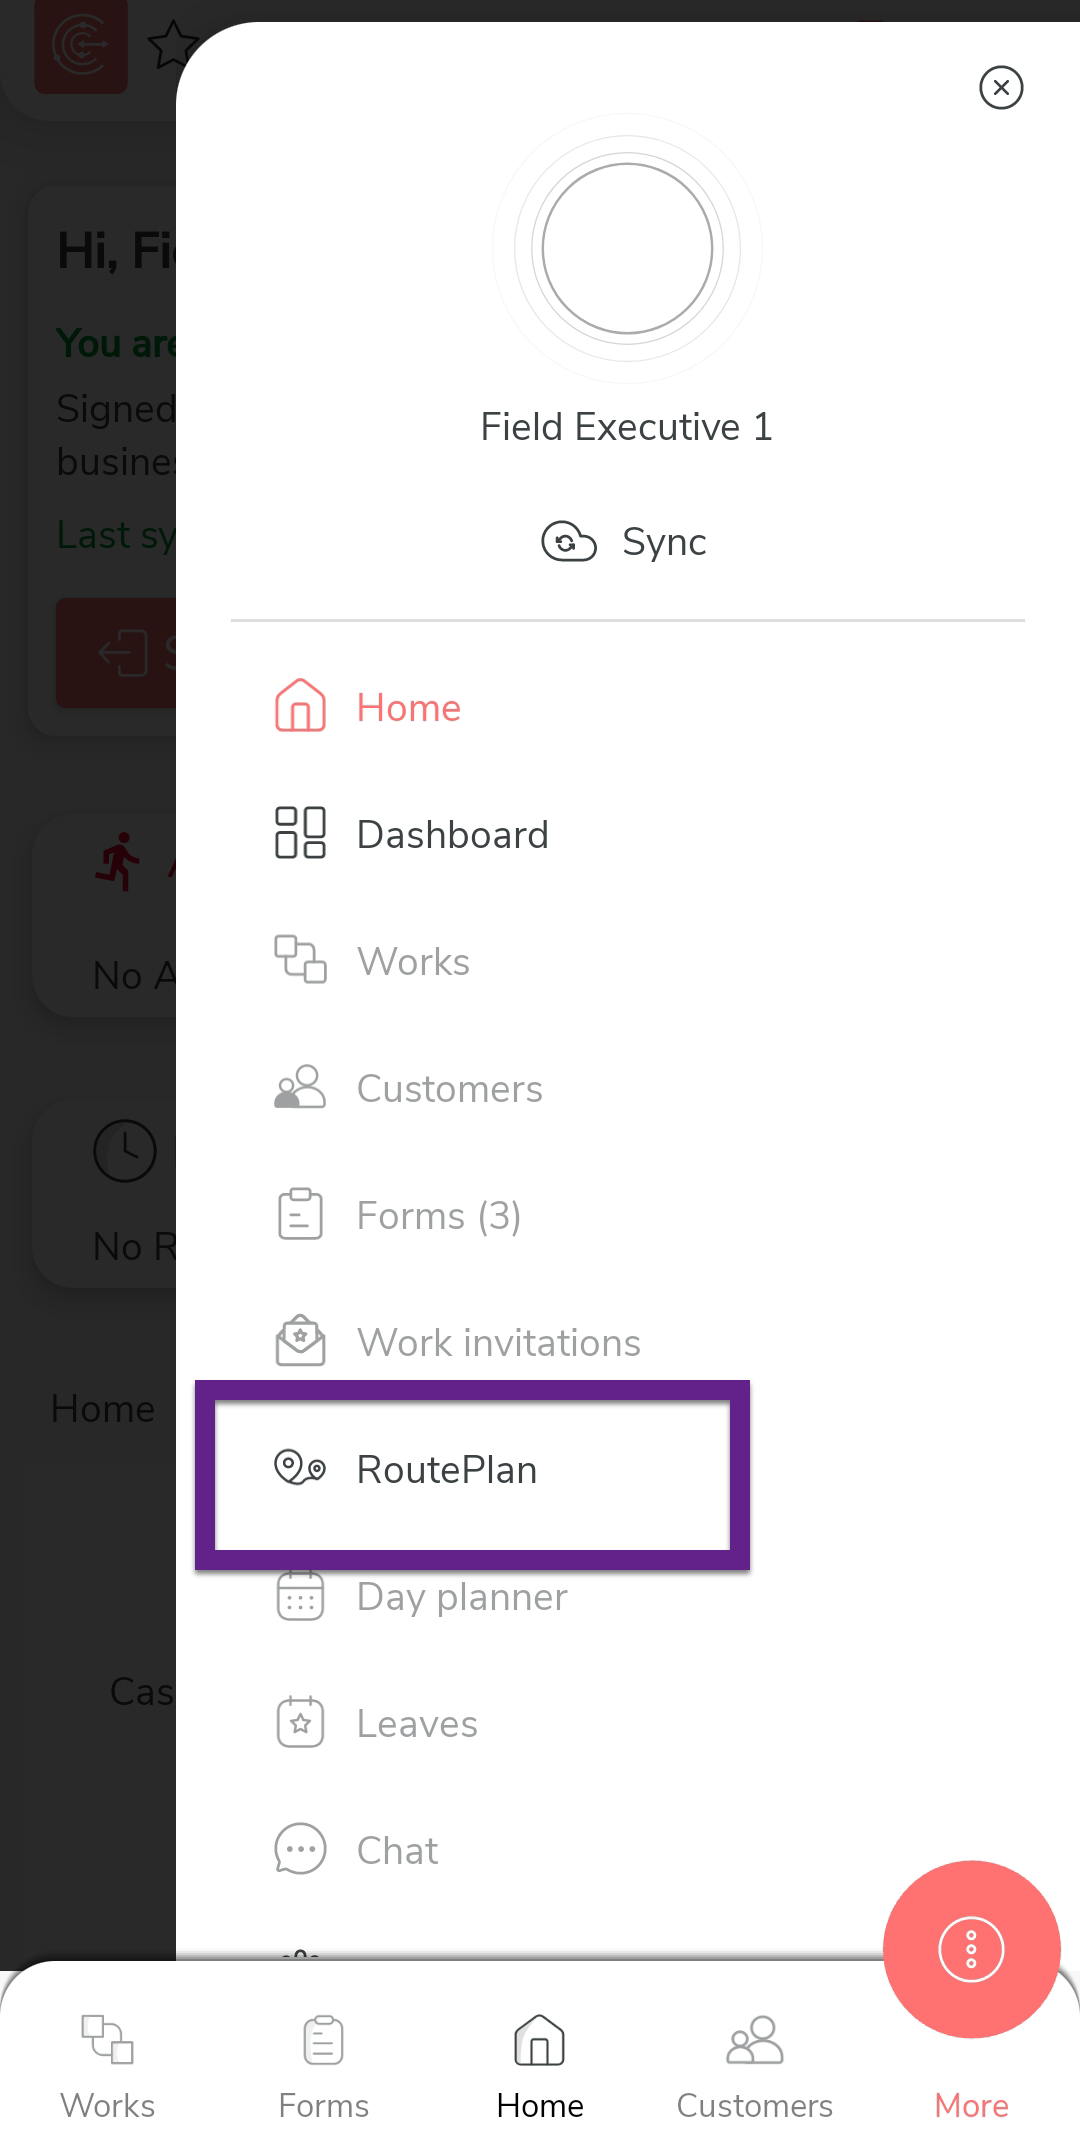
-
On the home screen, tap More and then tap
RoutePlan.
-
Go to the Today tab and then tap the route you
want to complete.

-
You will see the list of customers you need to visit today. You can
also sort the customers by nearness. Tap Sort and
then select By nearness. It shows the customer
who is near to your current location.

-
Tap on the customer name you want to visit first.

-
You will see the customer details. Tap View Map
to see customer location on Google Maps.

-
Tap the Get Driving Directions To option at the
bottom to get directions to reach the customer location from your
current location.

When you tap on this option, you will be redirected to the Google Maps application and you can see the route to reach the customer from your location.
-
When you reach the customer location, go back to the Effort NXT app and
tap Check in.

-
Now tap Add Activity.
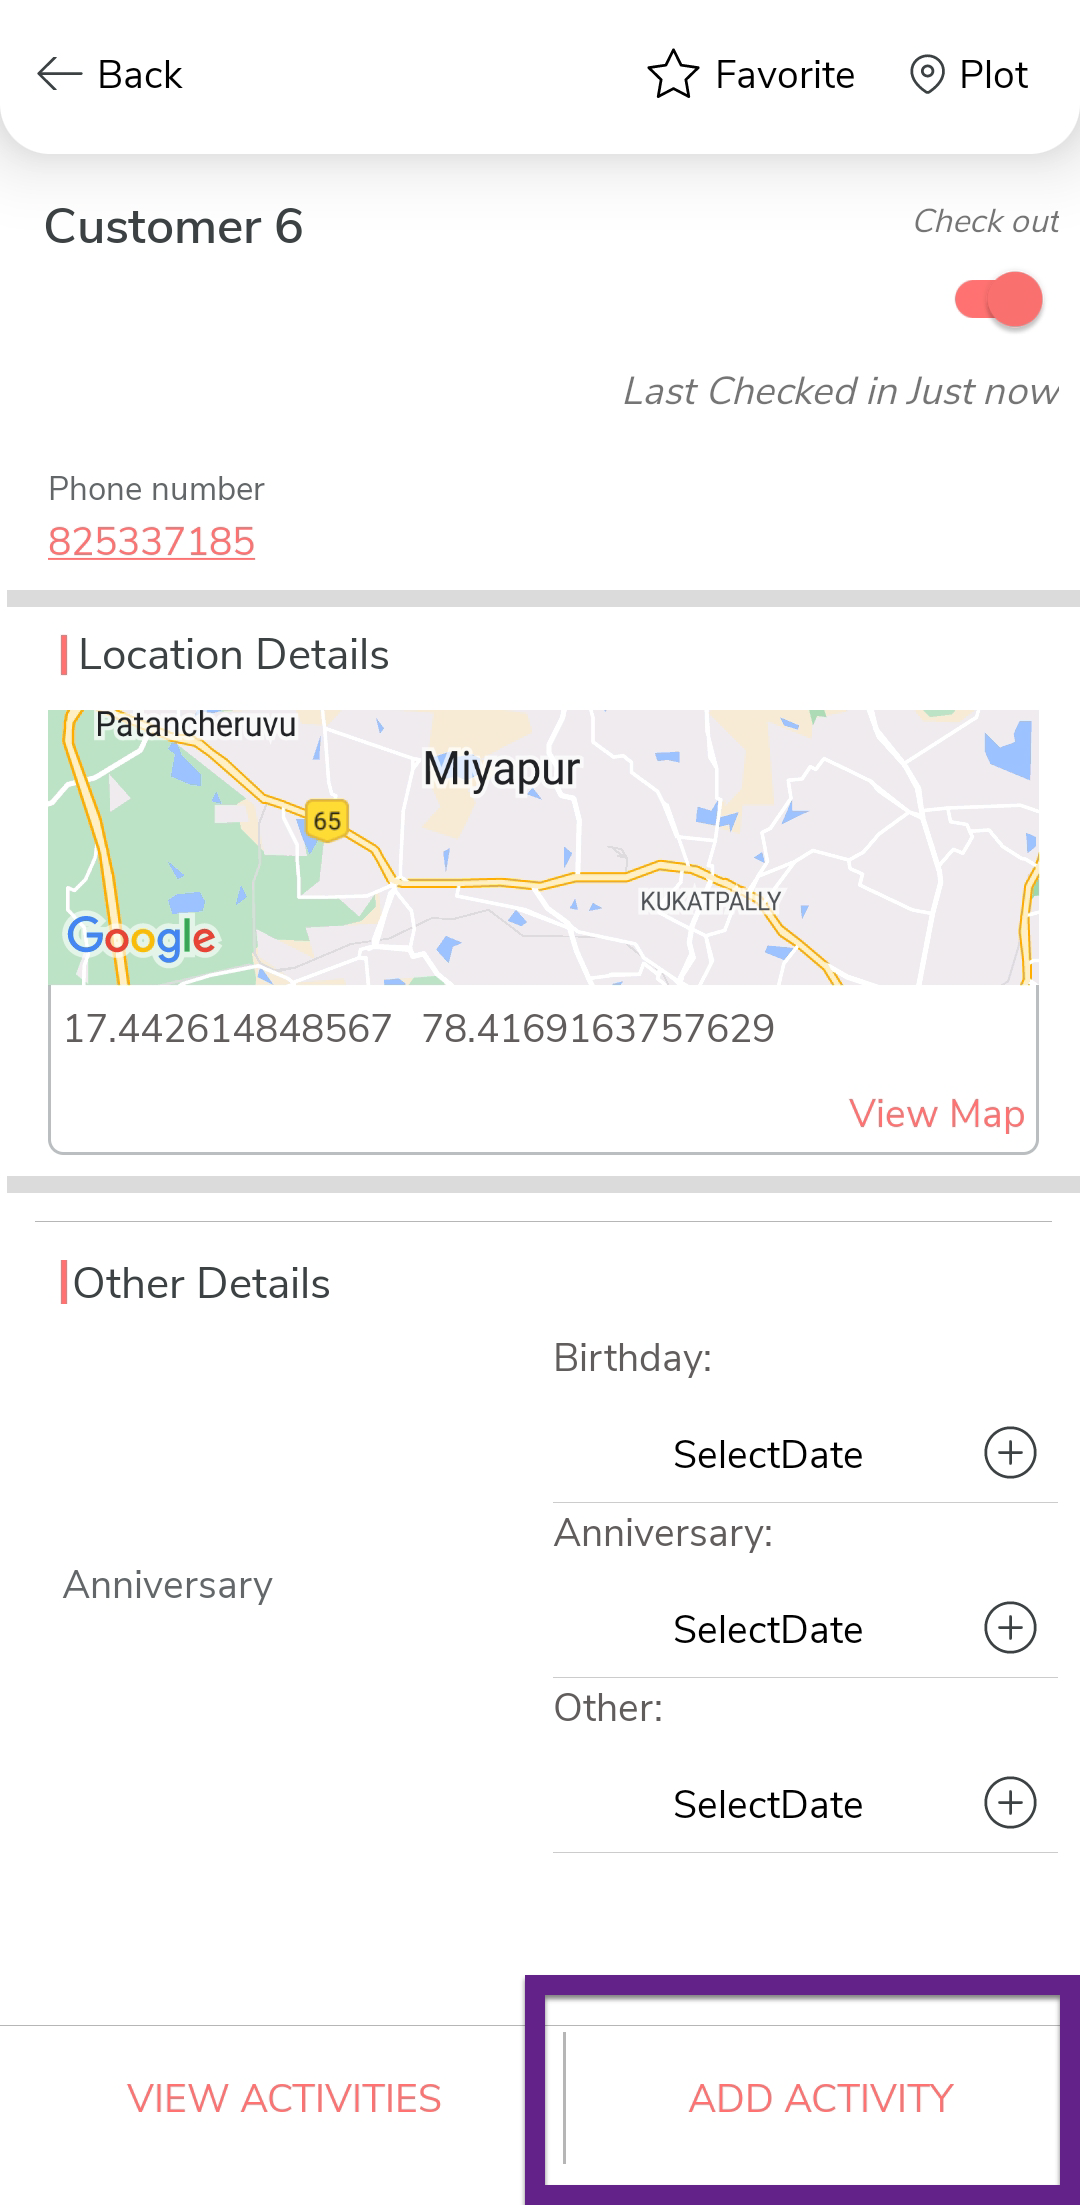
-
You can see the Sales form and
Customer Returns form.

-
Note: Ignore this step and refer to step 12 if you want to perform Customer Returns.To perform sales at the customer, tap Sales Form and follow the steps below.
-
As per the configuration, you can see today's date, customer
name, and outstanding amount populated automatically.

-
On the Order Data section, select the
item from the Items in Van field and
enter the quantity in the Order Quantity
field. Tap the refresh icon beside the Sub
Total field to see the total amount for the
selected amount.

-
Tap Add new item to create more
instances.

-
After filling in the order data, tap the refresh icon located
beside the Total invoice to see the total
amount.
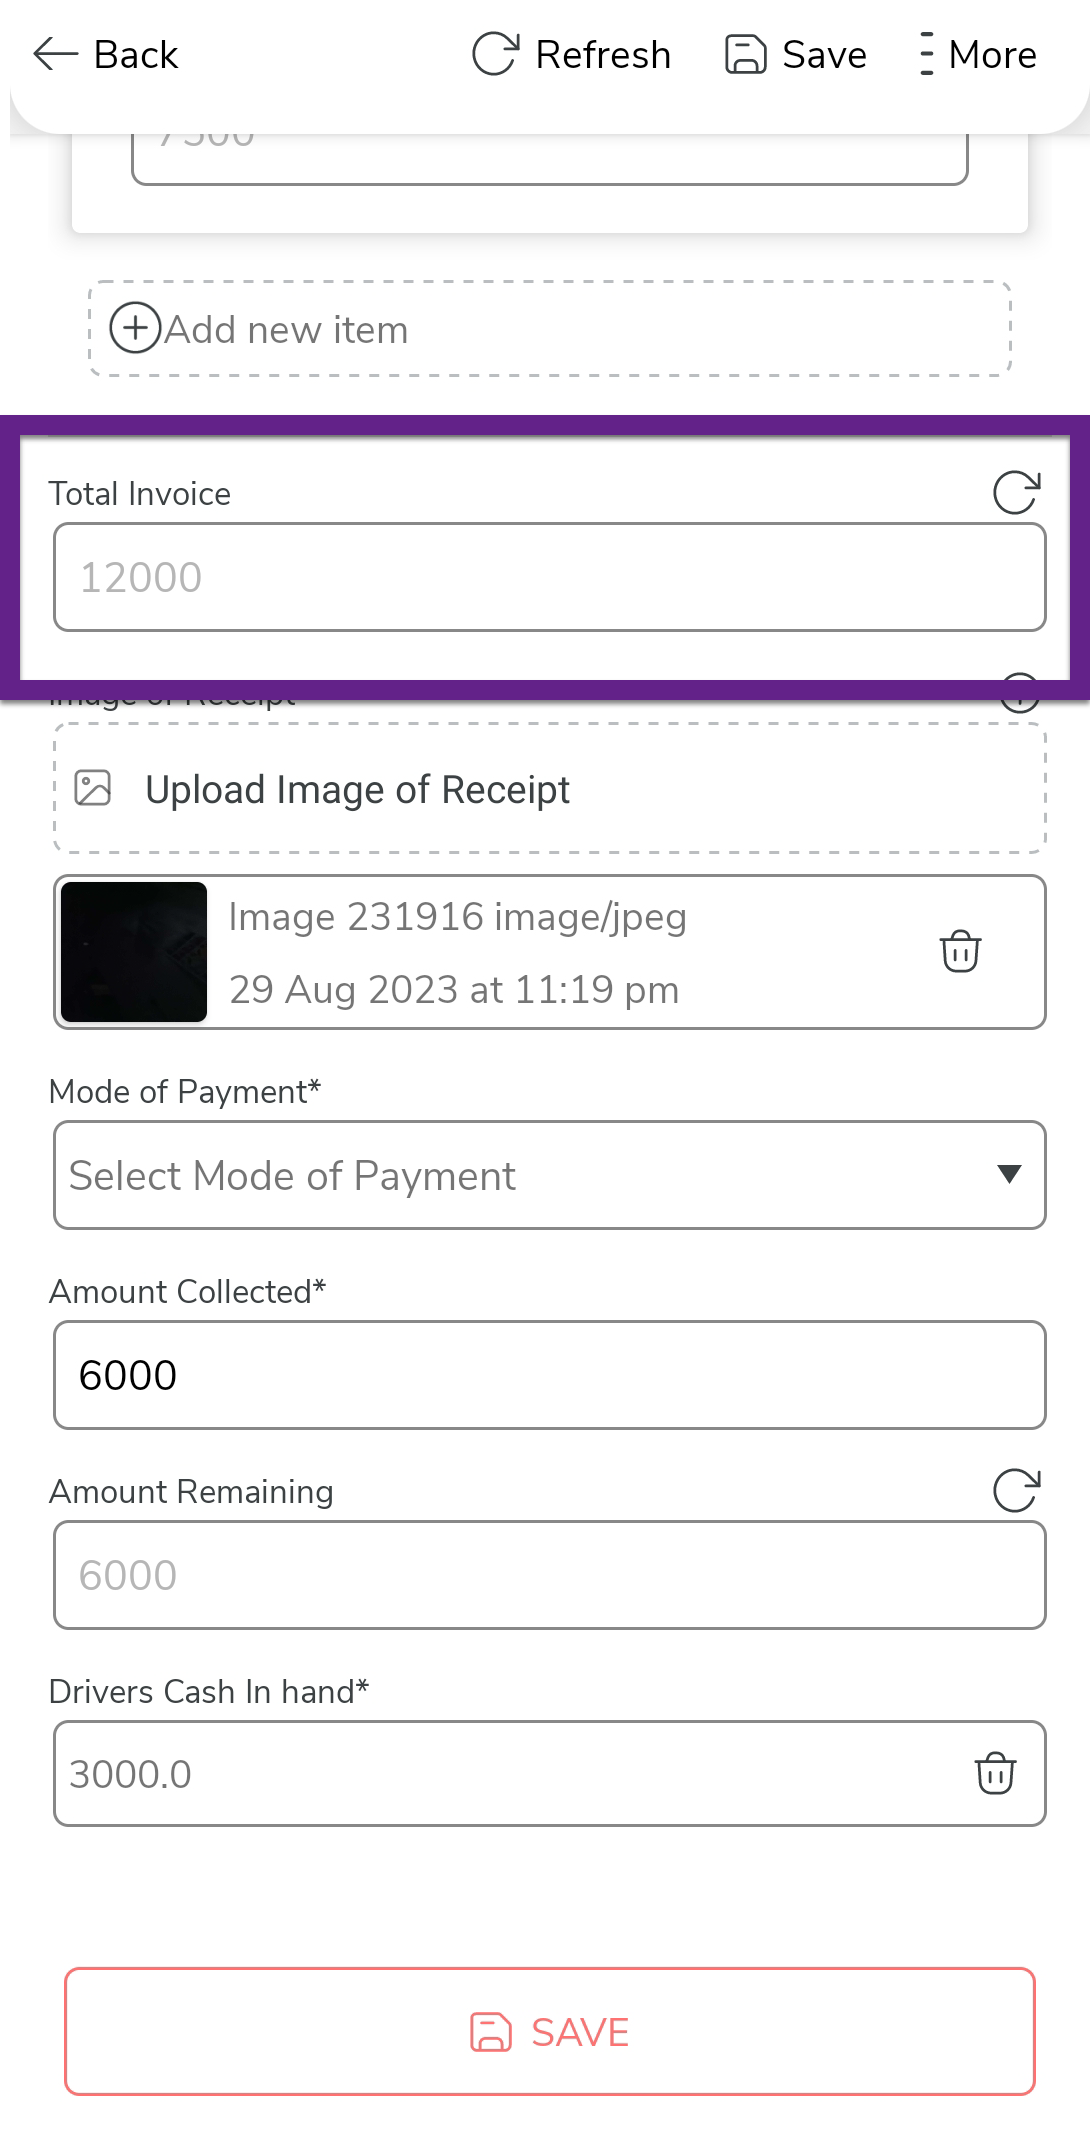
-
Tap the Image of the Receipt field and
upload the image of the receipt.

-
Select the Mode of the Payment and then
Enter the Amount Collected.

-
Tap the refresh icon located beside the Amount
Remaining to see the pending amount that the
customer has yet to pay.

-
After filling in all the details, tap
Save and then select
Save.

-
As per the configuration, you can see today's date, customer
name, and outstanding amount populated automatically.
-
Note: Ignore this step and refer to step 11 if you want to perform Sales at the customer location.In some cases, the customers might return the products which they previously purchased due to some reasons. To perform customer returns at the customer, tap Customer Returns and follow the steps below.
-
As per the configuration, you can see today's date and customer
name populated automatically.

-
On the Returns Data section, select the
item, enter the quantity, and reason for return.
-
Tap Add new item to add more
items.

-
Once finished, tap Save, and then select
Save.

-
As per the configuration, you can see today's date and customer
name populated automatically.
-
After completing the activity with the customer, tap Mark As
Completed and then tap OK to mark
the customer visit as completed.

-
Now tap Check Out and then tap
Yes to complete the visit.

-
You can see the customer visit status on the customer card as
Completed.

-
Similarly, complete the remaining customer visits. Once all the
customer visits are completed, then tap Complete
Route to finish the day.
After completing the route, sync the mobile app. After syncing the mobile app, the route status will be changed to Completed.
Submit Load Out Request
After completing the route plan, the executive will go to the warehouse and return the leftover stock. In this section, we will see how a field executive returns the leftover stock in the warehouse.
- Login to the Effort NXT app as a Field Executive.
-
On the home screen, tap Load Out.
-
Tap the add form icon.
-
As configured, the date and leftover stock is displayed
automatically.

-
If any deviation is found while returning the items, enter the missed
quantity in the Deviation field.

-
Tap Save and then select Save &
Submit for Approval.

Note: After submitting the form, make sure to sync the mobile app.
Approve Load Out Request
The Load Out request will go to the dispatch manager for approval. In this section, we will approve the Load Out Request that was submitted by the field executive in the previous section.
- Login to Effort NXT app as Dispatch Manager.
-
On the home screen, tap Action Required or
Load Out.

Note: If you don't find any submitted forms, make sure to sync the mobile app. -
Tap the form submission that you want to approve.

-
Tap View Form.

-
Review the form submission details. If everything is fine, then enter
your comments in the Remarks field and tap
Approve.

Note: After approving the form, make sure to sync the mobile app.